Chapter 7: Faking Camera Effects for Better Renders
Now that we've created the basic building blocks for a nature scene, we can start to get a little deeper into making a good nature scene. What we have so far has all the elements we might want to have in a landscape: grass, rocks, water, sky. But it doesn't really look all that interesting or exciting. If we showed this to a director right now, they'd laugh and tell us to do better. So, let's take our scene up a notch. As a developing artist, it can be difficult to really hone in on this hard-to-pinpoint idea of what will make the scene better. With time and experience, you'll have more of an idea of what exactly you want to do to make a scene better. But for now, let's look back at the original premise of our idea. We wanted to make a realistic environment. So, let's spend this chapter and the next one looking at adding the smaller details that will make this environment look realistic. In this chapter, we'll talk about using EEVEE to fake camera effects so that our final product looks that much better. Faking camera effects is a by-product of using EEVEE. Since EEVEE only approximates our lighting using the rasterization technique, we usually need to modify our workflow for a real-time rendering engine to more explicitly specify the result we want in EEVEE. In this chapter, we'll look at Atmospheric Lighting, Ambient Occlusion, and Depth of Field in more detail and then cover the concept of baking indirect lighting for our scene. All of these elements can be very important to creating a more believable image. We'll start by adding some elements to the scene that will allow us to see these effects a little better and then move on to fine-tuning and talking about the reason each works.
In this chapter, we will cover the following:
- Atmospheric lighting
- Bloom
- Ambient occlusion
- Depth of field
Technical requirements
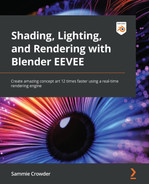
Download the Chapter7_Start.blend file from the Chapter 7 repository, or if you want to build off your own file from Chapter 6, Screen Space Reflections – Adding Reflection to the Water, download the supplementary file (supplements.blend) for this chapter and append the sun object inside of it to your Chapter 6 file. We will use the sun object to demonstrate the concept of atmospheric lighting and bloom, as well as to build our composition with depth of field. For reference, you can see how I've set up the scene to start us off in the following figure, in case you want to add the objects yourself.
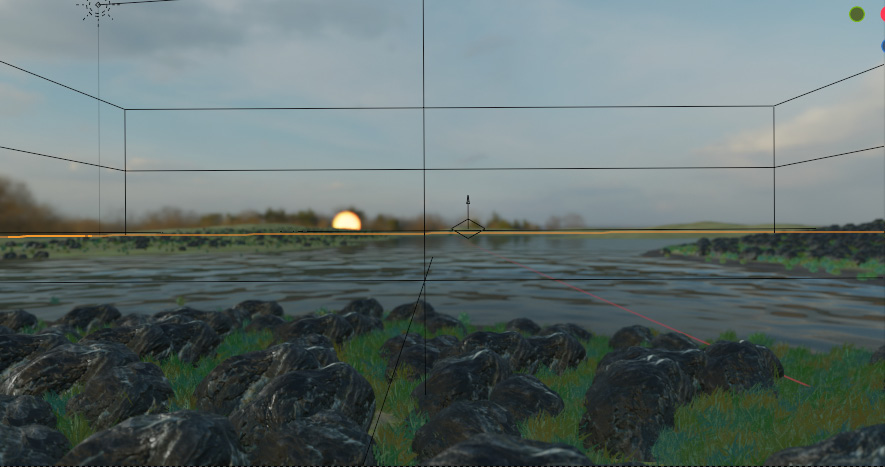
Figure 7.1: Starting the setup
Reference Chapter 5, Setting Up an Environment with Geometry Nodes, to go over how to add objects to our Asset Library from another .blend file if you feel lost, or simply start from my Chapter 7_Start.blend file and you will have all the pieces already put together for you.
These files can be found at https://github.com/PacktPublishing/Shading-Lighting-and-Rendering-with-Blenders-EEVEE/tree/main/Chapter07.
Side Note
If modeling and scene creation on a more granular level is something you'd like to learn more about, you'll probably be a little disappointed as I tend to gloss over it in this book. Modeling is outside the scope of this book, but I would recommend looking into YouTuber tutor4u, who has many simple modeling tutorials that could help bootstrap your understanding of how to model. Other paid resources I would recommend are Udemy or CG Boost. The latter has an amazingly comprehensive tutorial on sculpting that I would recommend to any budding character artist. Hopefully, the fact that I'm providing some of these models will highlight the concept that time is money, if you have to model something yourself, think of the time it will take you. We're creating concept art in EEVEE to be fast, and it can sometimes ruin the idea of "fast" if you have to model every single thing yourself. Don't be adverse to spending some money to save you some time, if you think it'll be worth it in the end.
Atmospheric lighting
Atmospheric lighting is using lighting from the atmosphere (the sky) and using it to light our scene. We did something like this with the first mini-project, as using an HDRI isn't viable in EEVEE for anything other than background. But if you think about it, we didn't really get any real atmosphere in our last project. Atmosphere means that the air in the scene is not 100% transluscent. It means we can see the light in the air, just as we can in real life. Elements of the air catch light differently, reflect elements, or provide haziness. That is what we are creating with atmospheric lighting. Unfortunately, EEVEE makes this a little more difficult to implement than Cycles, but to add real atmosphere to our piece, let's create an atmosphere to make something a little less sterile and a little more lifelike. In doing this, we'll also add some bounced lighting to the scene that will facilitate some of the faked lighting effects in the scene.
Let's start by adding a volume cube to serve as our:
- Add a cube using the usual Shift + A method:

Figure 7.2: The Add Cube menu
- Use the S Key to scale the cube so it covers the area of land that we can see in the camera viewport, until about the end of the reflection cube map. After we add the Principled Volume shader, we can tweak the size of this cube, because we want it to be big enough to cover the area the camera sees, but not so big that it will increase our rendering time.
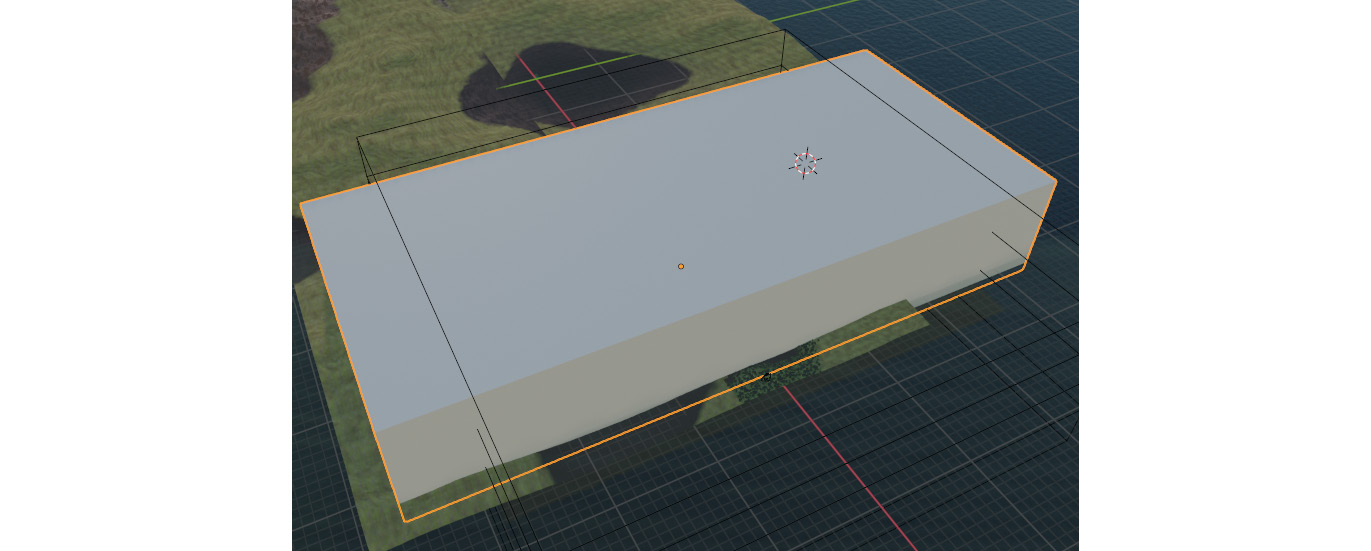
Figure 7.3: Area of the cube from above
- Add a shader to the cube, delete the Principled shader, and add a Principled Volume shader.
- Connect the Principled Volume shader to the Volume input of the Material Output.

Figure 7.4: Principled Volume Shader
- You'll notice this is the same general workflow as when we made our clouds. But, instead of using the clouds in our composition, we'll add this volumetric shader to refract light through the air, exactly like our atmosphere does. Notice that the color of our sunlight is the color of the mist in our viewport now.
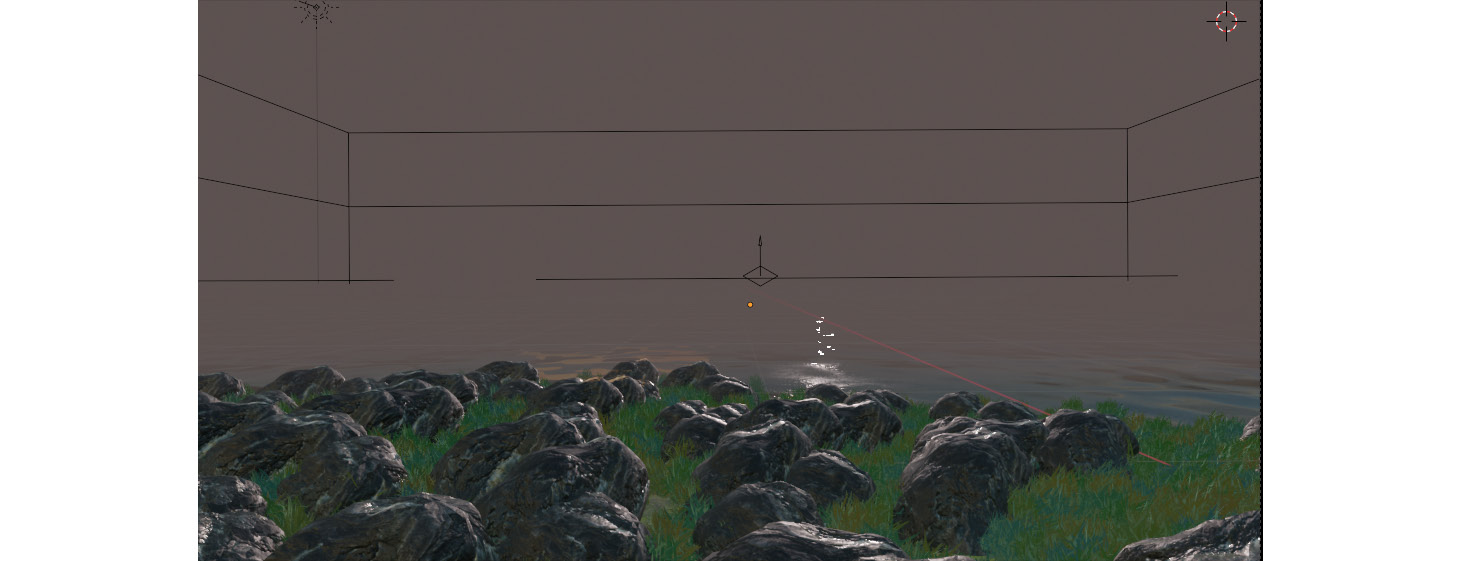
Figure 7.5: The Volume Shader with 1.0 density
- Obviously, the mist is too thick at the moment. We can't see any of the elements further away from the camera! Let's add a Density mask for the Principled Volume shader. Add a Noise Texture node and a Color Ramp. Connect the Noise Texture node Fac output to the ColorRamp node input. Then connect the ColorRamp node output to the Density input on the Principled Volume shader. We won't change any other values but Color and Density at this point, but it can be useful to experiment and see how each value can affect the scene.
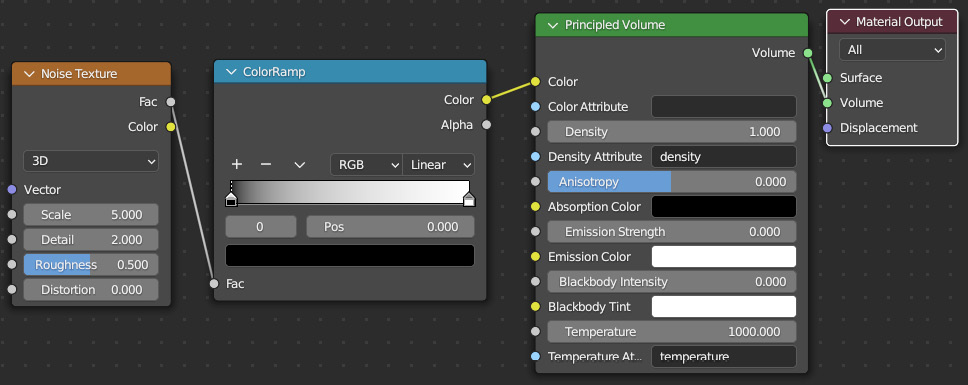
Figure 7.6: Adding the noise and ColorRamp
- Use the ColorRamp sliders to change the contrast of Noise Texture. I usually change the white end of the ramp to gray (I used hex 424242 here), which lessens the overall density of the Principled Volume shader, but try a different combination of the slider positions and colors.
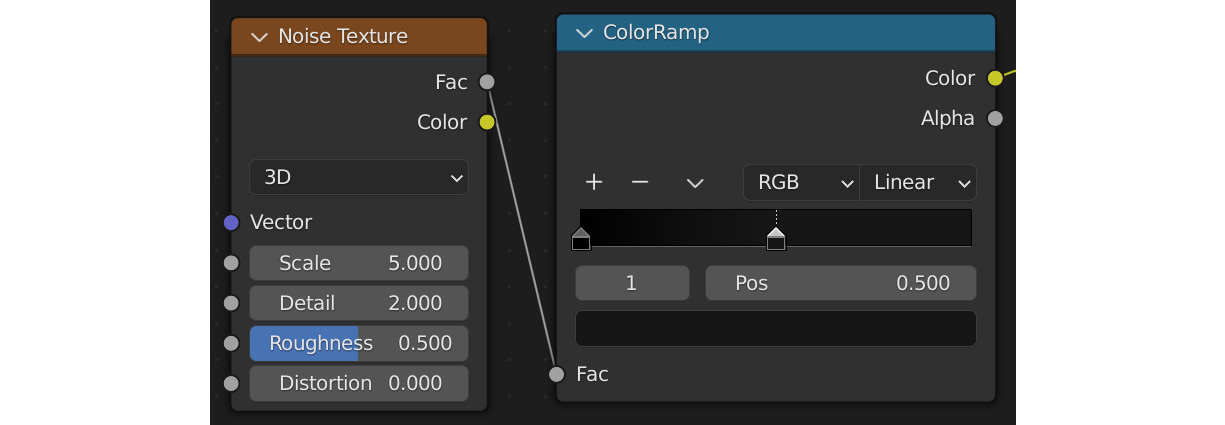
Figure 7.7: Noise Texture and ColorRamp edits
- As you can see in Figure 7.7, I also increased the Scale for the Noise Texture node so that we get more variation in the mist.
- You should see now that we have something that adds to the overall feel of the scene. It's subtle but you can see that the air is tangible and also allows us to be a little less focused on the objects that are far away from the camera, now you can't see them as clearly.

Figure 7.8: The mist in the scene
Let's take this up a notch. Since the sun is so low in the sky, it should reflect off the water, due to the angle of the light. We'll edit the sunlight we have in the scene so that when we turn on the Bloom option, the sun will look more natural:
- Select Sun Light (the light, not the object we added to the scene at the start of this chapter!) and then rotate it until it's almost entirely horizontal and points towards the camera.

Figure 7.9: Changing the angle of the sun
- You should be able to rotate (using the R shortcut) and line it up as necessary, but in case you have trouble, here are the values I used for my sun:

Figure 7.10: The sun values in the Item panel
- While Sun Light is still selected, let's go to the Light Data Panel (the tab that looks like a little light bulb). Change the light to a color that is closer to the sun we added. You can use the color picker to select the color from the scene or choose your own from the color wheel by clicking on the wheel to select the color you want. Alternatively, you could type in the hex code I show in Figure 7.11 to get the exact same color I did.
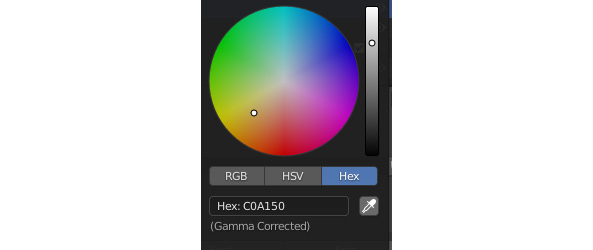
Figure 7.11: The light color picker and wheel
- Let's also turn Strength up for the light. I changed mine to 5, to really get the highlights from the water.

Figure 7.12: The Light Data Panel
After changing our light and tweaking the Volume Shader, the viewport should look a little more dramatic, with the light of the sun glancing off the water.
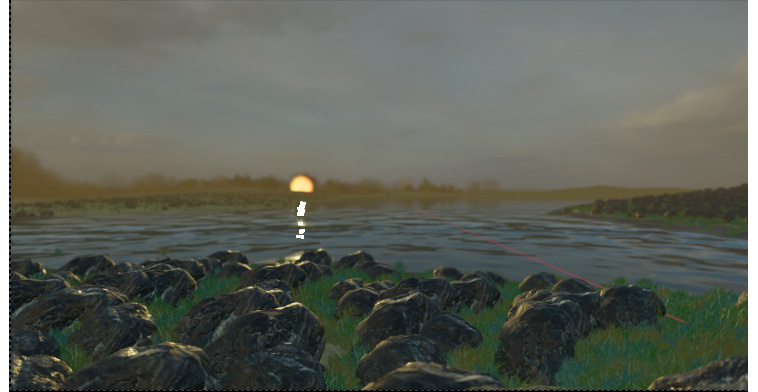
Figure 7.13: The scene so far
In this section, we've effectively used a volume cube to create a fake atmosphere for our fake sun to reflect light through, diffusing the areas far away in the scene and mimicking the real-world effects of the atmosphere. In computer graphics, you have to fake it 'til you make it, and I think we're off to a great start.
In the next section, let's transition to adding Bloom to the scene to give our sun a realistic glow that will really make it pop.
Bloom
There's definitely still something missing. If you remember in our last mini-project, we used Bloom just to change the general light coloring. Now we have actual rays of light visible in our scene, we can start to use Bloom more effectively. Let's check the Bloom option in the Render panel and see how it changes the light we've cultivated in the scene.
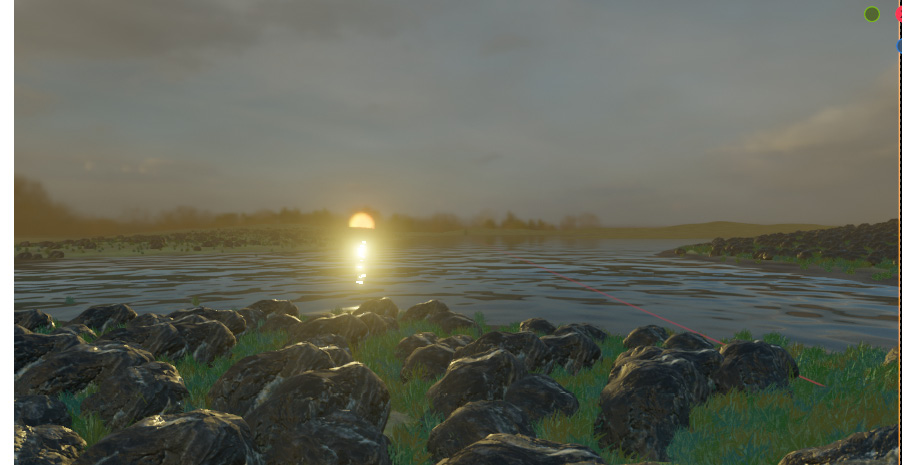
Figure 7.14: Adding Bloom
Bloom effectively mimics how a real camera lens works and fakes light refraction off the lens of our fake camera. It is a post-processing effect though (which means it is applied after the light is rasterized/calculated). Two major components of the Bloom settings are the following:
- Threshold: Setting this at a specific number tells EEVEE that any pixels above the threshold brightness should have a Bloom effect, and any below will not have the Bloom effect applied to them. So higher numbers mean less bloom, lower means more bloom.
- Intensity: This is exactly what it sounds like, how intense should the effect applied be. Higher numbers mean more bloom and lower numbers mean less here.

Figure 7.15: The Bloom properties
Try changing some of the values in the Bloom section to see how it affects the Bloom. In this short section, we covered some of the more technical aspects of Bloom and what values are the most important to pay attention to. In the next section, we'll add ambient occlusion to the scene.
Ambient occlusion
In this section, we'll investigate ambient occlusion further, even though we already talked about it briefly in Chapter 4, Non-Physical Rendering. We'll activate ambient occlusion (often initialized as AO) and then talk about some important values to change. Let's get started:
- Go to the Render Properties and check the box next to Ambient Occlusion.

Figure 7.16: Ambient Occlusion preferences
- You should see immediately that the rocks close to the camera become darker where they occlude with other rocks. Ambient occlusion is basically shadowing that we take for granted in real work but can be very computationally heavy in a rendering engine. In EEVEE, we approximate it so that we can see it in real time.
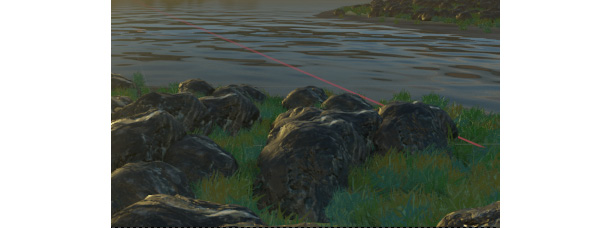
Figure 7.17: Ambient occlusion taking effect on the rocks
Refer to Figure 7.16 to see the properties available to tweak for Ambient Occlusion in the Render Properties panel. The most important values in the Ambient Occlusion section are the following:
- Distance: This value is how far the effect should take effect. Higher values mean larger areas of ambient occlusion. I would caution you not to go overboard with this effect, as it can get very surreal very quickly. If in doubt, look for reference pictures of the type of scene you are creating and try to dial into what proves out in reality.
- Factor: How strongly the ambient occlusion should be shown onscreen. A higher number here would make darker ambient occlusion.
- Bent Normals: This can sometimes be used to increase the realism of the occlusion, as it calculates what direction should be less occluded. It can increase render times, but only marginally.
In this section, we briefly covered ambient occlusion and its necessity in creating a more realistic scene. Next, we'll talk about one of my favorites, depth of field!
Depth of field
Depth of field is something you might already understand implicitly, even if you don't recognize the term. It's available to use in Cycles, so you might have already used it in Blender before. Depth of field is a photography term that describes how close the sharpest object in the frame will appear. So some part of the frame will be in focus (sharp) and the rest of the frame will be out of focus (blurry). We can use this effect to highlight the parts of the frame that we want viewers to be looking at. It's also an effect that happens with taking a picture in real life, so if we use it in 3D well, it can add to the overall realism of the shot. The more we can mimic what happens with a real camera with our 3D camera, the more real the shot should look. Let's add some depth of field to the shot, keeping the rocks in the foreground in focus and the rest of the frame out of focus:
- Head to Render Properties (I know, again) and scroll down to the Depth of Field section. If you twirl down the section, you'll see that Depth of Field doesn't have a box to check to tell EEVEE if you want it active in the scene. We need to do that in the Camera options.
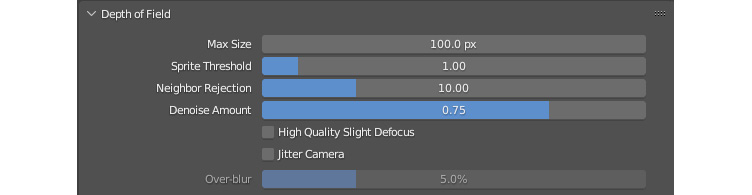
Figure 7.18: The Depth of Field options
- Select the Camera object and then navigate to Camera Properties (the icon looks like an old-time camera).
- Ah! There's the box we can check to activate Depth of Field. Check it and see what happens.
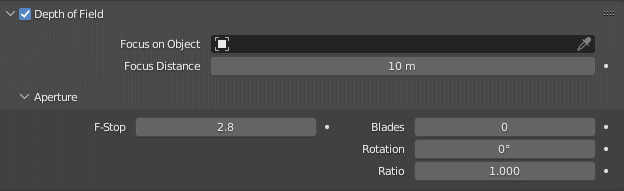
Figure 7.19: The Depth of Field camera options
- If nothing happened...then yes, you did it right. We now need to specify the distance of the focus. You can do this through Focus Distance with a number, but it's a lot easier to visualize focus distance when we use the Focus on Object option.
- Create a new Empty object in your scene using Shift + A | Empty | Plain Axes. An empty object is one that will not show up in the final render but can be used to hold coordinates, scale, or rotational values. Let's put our Empty object right up close to the camera using the G shortcut to move the object.

Figure 7.20: The Empty object menu
- Now click back into the Camera object. Select the eyedropper next to Focus on Object and select the Empty object we just created.

Figure 7.21: The eyedropper tool next to Focus on Object
Once we've added the Empty object, it should appear in the Focus on Object field.

Figure 7.22: Adding Empty as our focus object
- The Empty object now controls the distance of our focus object.
- The next thing we need to change is the F-Stop value, which you should see in the Depth of Field options. A smaller value will increase the severity of the blur in the background. In real cameras, the lowest F-stop you'd reasonably use is 1.4, so try not to go any lower than that, for the sake of keeping our camera as real as possible.

Figure 7.23: After applying depth of field
Now that we've set up our camera with the right Depth of Field settings, let's go back to Render Properties to look at the settings there.
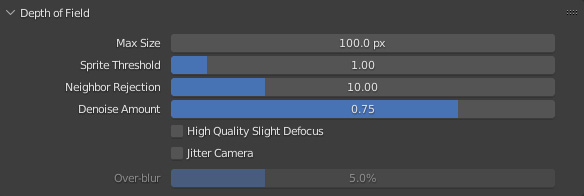
Figure 7.24: Depth of Field Render settings
Depth of Field is an interesting aspect of Render Properties, as it mostly controls the second pass of the Depth of Field filter. The first pass is the blur aspect, where the background or foreground (depending on the depth of field) is blurred. The second pass is what is controlled with this Depth of Field panel here in the Render Properties panel. This pass simply improves the highlights of the scene. Sprite Threshold and Neighbor Rejection are two aspects that can control how much of the highlight is affected. If you set Max Size to 0, you can disable the second pass, and only see the effect of the first pass of the Depth of Field filter.
There are several important aspects of the Depth of Field settings. It is helpful to know about them, even if you never plan on changing them, so that you understand the inner workings of the Depth of Field mechanism and can plan your renders accordingly:
- Max Size: Maximum size of the pixel to process in the second pass.
- Sprite Threshold: Similar to the Threshold setting for Bloom, where it controls the cutoff for the pixel brightness to be processed.
- Neighbor Rejection: Controls how much of the scene is processed in that second pass.
- High Quality Slight Defocus: This is a really interesting effect to add. It makes areas that are slightly defocused higher quality (as the name might suggest).
- Jitter Camera: Be very careful using this. It jitters the camera to different positions in order for the sample pattern of the Depth of Field pass to be more irregular. This changes how many samples are being rendered in each frame. I would recommend not turning this on unless you're very certain you need it.
My settings for this scene:

Figure 7.25: Depth of Field settings for the scene
Don't feel like you need to copy mine, and you probably won't notice much difference in your render after changing these specific values. You can use the trick of changing Max Size to 0 to toggle the effect of these options on and off. In this section, we went over a really cool effect, depth of field. It's a nice thing to use to direct the viewers to a specific part of the scene or mimic the way that things become out of focus as they fade into the background. Hopefully, you'll enjoy using this effect in EEVEE just as much as in Cycles.
Summary
Here's what we have so far!
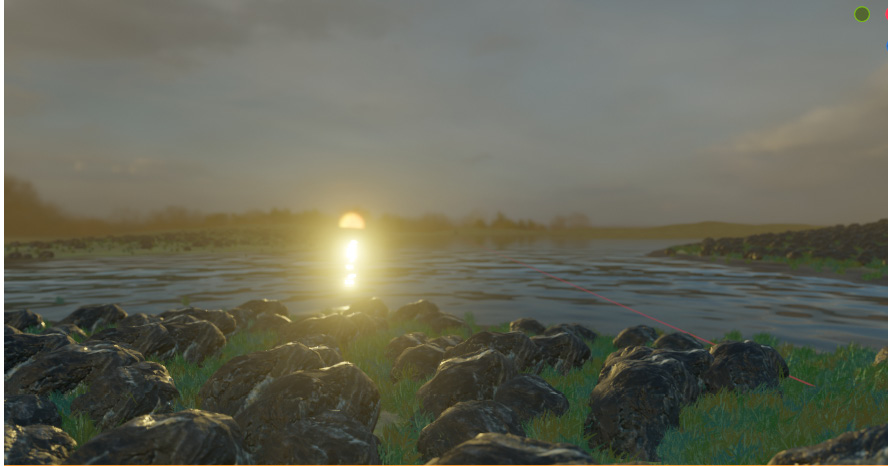
Figure 7.26: The scene so far!
I think it looks a million times better than what we had at the beginning. In the four sections of this chapter, we got to use a whole suite of effects to make our computer generated camera more like a real camera. We made it so that the background of our scene fades away, the light in the scene reflects appropriately off the lake, and the ambient occlusion and the depth of field matches what we would see in real life. The more we can mimic real life, the more we start to make images that look so real they can fool the average person. I hope you are as amazed as I am that this free software can make something so good with such little work. But, we still have more to do to make this scene really pop!
In the next chapter, we'll add small details such as birds, fake mist, and other little things that can really add to a scene's realism.