3 Database access with Spring Data
- Introducing Spring Data, its needs, and various Spring Data modules
- Configuring a relational database, NoSQL database (MongoDB), and access data in a Spring Boot application
- Enabling Spring Data JPA to manage business domain objects with relational databases
- Various techniques to access data from a relational database using
@NamedQuery,@Query, Criteria API, andQuerydsl
You’ve already explored a variety of topics on Spring Boot in the last two chapters. With a solid overview of Spring Boot, you’ve learned a few common tasks that you may use in your Spring Boot applications quite frequently. So what’s next? In today’s world, most applications are incomplete without a database that stores the application data. Spring Boot applications are no exception. In this chapter, you’ll boot your journey by interacting with the database from your Spring Boot application. You’ll explore how seamless it is to perform database configuration, complete initialization, access data, and manage business objects in the database with Spring Boot!
3.1 Introducing Spring Data
Spring Data (https://spring.io/projects/spring-data) lets you access data from a variety of data sources (e.g., relational and nonrelational databases, MapReduce databases, and cloud-based data services). It attempts to provide a uniform, easy-to-use, and familiar programming model through the Spring Framework.
It is an umbrella project under the Spring Framework that contains several subprojects, each of which targeting a specific database. For instance, the Spring Data JPA module is specific to relational databases (e.g., H2, MySQL, PostgreSQL). Similarly, Spring Data MongoDB aims to provide support for the MongoDB database.
3.1.1 Why Spring Data?
One of the core themes of Spring Data is to provide a consistent programming model to access various data sources. Thus, it provides a convenient API that lets you specify the metadata to the domain objects that need to be persisted and ensures that business domain objects are eligible to be persisted in the specific datastore. For instance, you can use a relational database and Spring Data JPA to manage business objects. You can provide the JPA annotations in business objects, and Spring Data JPA ensures the domain object is persisted in the database table. Later in this chapter, you’ll see many of these annotations and their use in business objects.
Spring Data modules also expose APIs in the form of templates similar to popular JdbcTemplate and JmsTemplate template design patterns. For instance, if you use MongoDB, you can use MongoTemplate to perform various operations in the MongoDB database. These template classes provide several helper methods that manage store-specific resource management and exception translations.
Spring Data provides a repository abstraction layer across the supported databases as a common programming model. The abstraction is contained in the Spring Data Commons module, and it provides several useful interfaces that let you perform the standard create, read, update, and delete (CRUD) operations as well as executing queries. This abstraction layer is the topmost layer and acts as the foundation for other Spring Data modules.
3.1.2 Spring Data modules
In the previous section, you’ve seen the role of Spring Data. In this section, you’ll learn more about Spring Data modules. You can refer to the Spring Data Modules sidebar for the list of major subprojects available under Spring Data.
Of all Spring Data modules, the Spring Data Commons module is one of the most important. It consists of foundational and data source agnostic components of Spring Data that are used in other Spring Data modules. For instance, the Spring Data JPA module relies on the interfaces defined in the Spring Data Commons module. Spring Data JPA’s JpaRepository interface is a subinterface of the Spring Data Commons module’s PagingAndSortingRepository interface and inherits CRUD, pagination, and sorting support from the Spring Data Commons module.

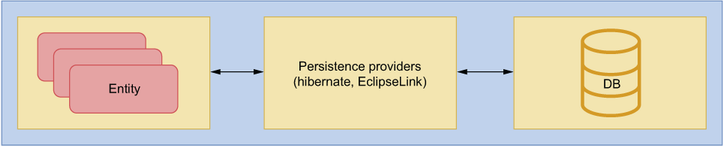
Figure 3.2 Spring Data modules. The Spring Data Commons module provides a foundation upon which other submodules are based. Each submodule targets a specific type of database. The Repository, CrudRepository, and PagingAndSortingRepository are interfaces of the Spring Data Commons module.
As shown in figure 3.2, the Spring Data Commons module provides three core repository interfaces: Repository, CrudRepository, and PagingAndSortingRepository. As the name suggests, the CrudRepository interface allows you to use the CRUD operations. Similarly, the PagingAndSortingRepository interface, which is a sub-interface of CrudRepository, allows you to perform CRUD operations as well as the pagination and sorting of data returned from the database. You’ll explore some of these interfaces in detail in section 3.3.
The Spring Data submodules contain database technology-specific Spring Data implementations that provide supports for specific database families (e.g., Spring Data JDBC or Spring Data JPA focus on relational databases) or vendor-specific databases (e.g., Spring Data MongoDB focuses on MongoDB database). These submodules leverage the core framework features offered in the Spring Data Commons module.
3.2 Configuring a database in a Spring Boot application
Configuring and accessing a database is one of the fundamental operations in any application, and Spring Boot applications are no exception to it. Spring Boot provides various techniques to configure and access a database from your Spring Boot application. Let’s understand how to configure and access a relational database in a Spring Boot application.
3.2.1 Technique: Configuring a relational database in a Spring Boot application
In this technique, we’ll demonstrate how to configure a relational database in a Spring Boot application.
Most applications need to interact with a database to store and retrieve application data. However, before communicating with the database, you need to configure the database in the application. You need to configure and access a relational database in your Spring Boot application.
To configure a relational database with Spring Boot, you can add spring-boot-starter-data-jpa and the relational database driver dependency in the pom.xml of your application. Additionally, you need to supply the database details, such as database username, password, driver class, and connection URL.
To configure a relational database, you need to add two additional dependencies in the existing pom.xml file, as shown in the following listing. You can copy and paste these dependencies anywhere inside the dependencies tag in the pom.xml file.
Listing 3.1 Spring Data JPA starter and H2 dependency
<dependency>                 ①
    <groupId>org.springframework.boot</groupId>
    <artifactId>spring-boot-starter-data-jpa</artifactId>
</dependency>
<dependency>                 ②
    <groupId>com.h2database</groupId>
    <artifactId>h2</artifactId>
    <scope>runtime</scope>
</dependency>
① Spring Boot Data JPA dependency for JPA support
② H2 database driver dependency. This dependency is configured with runtime scope to ensure it is available at the application runtime and not needed at the time of compilation.
In listing 3.1, the first dependency incorporates Spring Data JPA, and the other one includes the H2 database driver in the Spring Boot project. If you are using a database other than H2, you need to use the associated database driver dependency in the pom.xml file. For instance, if you are using MySQL or PostgreSQL database, you can find the corresponding Maven dependency in the Maven central repository.
Among the dependencies, Spring Data JPA lets you manage your business domain objects through ORM techniques without defining SQL queries explicitly. The H2 in-memory dependency allows you to use an embedded H2 database in the Spring Boot application. As this is an in-memory database, the data inside this database is lost each time you restart the application.
Let’s now proceed with the H2 database details in the Spring Boot application. If you recall, every Spring Boot application contains an application.properties file that lets you configure various application properties to control its behavior. Let’s add the H2 database configurations to the application.properties file. The following listing shows the configuration needed to do this.
Listing 3.2 Application properties with H2 database configuration
spring.datasource.url=jdbc:h2:mem:sbipdb            ①
spring.datasource.driverClassName=org.h2.Driver     ②
spring.datasource.username=sa                       ③
spring.datasource.password=password                 ④
spring.h2.console.enabled=true                      ⑤
① Database URL. We are using a schema called sbipdb in this demonstration.
⑤ Enable H2 console. This property is specific to H2 database only.
In listing 3.2, you’ve provided the H2 database connection URL, driver class, username, and password and enabled the H2 console. The H2 console provides you with a UI that lets you execute SQL queries in the in-memory H2 database. The provided details are sufficient for Spring Boot to configure the data source in the application.
To validate the created data source, you’ll define a test case that asserts the data source type and the underlying database, as shown in listing 3.3. If you are not familiar with the test, you can refer to the book’s companion GitHub wiki page at http://mng.bz/jyez.
Note If you are interested in unit testing, Manning has a few excellent texts with detailed coverage of the subject. You can refer to Unit Testing Principles, Practices, and Patterns by Vladimir Khorikov, available at https://www.manning.com/books/unit-testing.
Listing 3.3 Unit test to validate the data source details
package com.manning.sbip.ch03;

// Import Statements are excluded as a matter of readability
@SpringBootTest
class CourseTrackerSpringBootApplicationTests {

    @Autowired
    private DataSource dataSource;

    @Test
    public void givenDatasourceAvailableWhenAccessDetailsThenExpectDetails() throws SQLException {
        assertThat(dataSource.getClass().getName()).isEqualTo("com.zaxxer.hikari.HikariDataSource");
        assertThat(dataSource.getConnection().getMetaData().getDatabaseProductName()).isEqualTo("H2");
    }
}
In this test case, you’ve autowired the DataSource instance and asserted that the data source class name is com.zaxxer.hikari.HikariDataSource and the database product name is H2. You’ll learn more about the role of HikariCP in the discussion section of this technique. If you execute this test case, you can see both assertions are true, as shown in figure 3.3.

With this technique, you’ve learned how you can configure a relational database in your Spring Boot application with a few configurations. For instance, the presence of database configuration details in the application.properties file, and the Spring Data JPA and H2 driver jars in the classpath enable Spring Boot to configure an H2 data source in the application. You can use this data source for database communication.
As part of the database configuration, Spring Boot automatically configures the HikariCP (https://github.com/brettwooldridge/HikariCP) database connection pool. A database connection pool contains one or more database connections that are generally created at the time of application startup and available for use by the application. The benefit of a database connection pool is that a set of database connections are created at the application startup and available for use by the application. Thus, you don’t create a new connection each time you need a database connection and close it once done. The application can take a connection from the pool, use it, and return to the pool. Spring Boot uses HikariCP as the default database connection pool library.
If you are curious to know where the HikariCP dependency is located, you can inspect the spring-boot-starter-data-jpa dependency by looking at its associated pom.xml file. Browse to the pom.xml file of the sample application in your IDE, and click on the spring-boot-starter-data-jpa dependency. You can observe that spring-boot-starter-data-jpa has a dependency on spring-boot-starter-jdbc, and that, in turn, has a dependency on the HikariCP library. Figure 3.4 shows this dependency hierarchy.

If you need to use a database connection pooling library other than HikariCP, you can achieve this by excluding the HikariCP dependency from the spring-boot-starter-data-jpa dependency and including your preferred database connection pooling library (e.g., Oracle UCP, Tomcat JDBC, DBCP2, etc.). Listing 3.4 shows the configuration to exclude HikariCP and use the tomcat-jdbc connection pooling library.
Listing 3.4 POM XML changes to exclude HikariCP and include Tomcat connection pool
...
<dependency>
    <groupId>org.springframework.boot</groupId>
    <artifactId>spring-boot-starter-data-jpa</artifactId>
    <exclusions>
        <exclusion>                         ①
            <groupId>com.zaxxer</groupId>
            <artifactId>HikariCP</artifactId>
        </exclusion>
    </exclusions>
</dependency>
<dependency>                                ②
    <groupId>org.apache.tomcat</groupId>
    <artifactId>tomcat-jdbc</artifactId>
</dependency>
...
① Default connection pool HikariCP is excluded from Spring Data JPA dependency
② Tomcat JDBC connection pool is added explicitly as the connection pool of choice
Spring Boot uses the following strategies to detect the database connection pool library based on the configuration defined in listing 3.4:
-
If HikariCP is not available, then Spring Boot attempts to use Apache Tomcat database connection pooling if it is available in the classpath.
-
If both HikariCP and Apache Tomcat connection pool dependencies are not available, then Spring Boot attempts to use Apache Commons DBCP2 library (https://commons.apache.org/proper/commons-dbcp).
-
If DBCP2 is also not available, Spring Boot configures the JDK’s default data source (
javax.sql.DataSource).
In this technique, you’ve configured the H2 database in your Spring Boot application by configuring a few parameters in the application.properties file. In this demonstration, you’ve used only a handful of parameters to enable the database configuration. Spring Boot provides several additional configuration parameters to fine-tune the database configuration.
For instance, if you are using the default HikariCP configuration, you might want to customize the HikariCP connection pool configuration. You can configure a custom maximum number of connections per pool—namely, the maximum connection pool size by configuring the spring.datasource.hikari.maximum-pool-size property in the application.properties. If you are using a connection pool library other than HikariCP, you need to configure the property specific to the library.
If you are curious to explore the available database configuration parameters, you can browse Spring Boot application.properties documentation at http://mng.bz/g4OV.
3.2.2 Technique: Configuring MongoDB database in a Spring Boot application
In this technique, we’ll demonstrate how to configure MongoDB database in a Spring Boot application.
You’ve already explored configuring a relational database in a Spring Boot application. Along with relational databases, NoSQL databases are also gaining popularity. You need to configure the popular NoSQL database MongoDB in a Spring Boot application.
MongoDB is a popular NoSQL database that stores the data as documents in JSON-like format. Spring Boot provides an easy approach to integrate with the MongoDB database through spring-boot-starter-data-mongodb dependency. In this technique, you’ll learn how to connect to a MongoDB database from your Spring Boot application.
To configure MongoDB in a Spring Boot application, you’ve included the following dependencies in your Spring Boot application, as shown in the following listing.
Listing 3.5 MongoDB Maven dependencies
<dependency>
    <groupId>org.springframework.boot</groupId>
    <artifactId>spring-boot-starter-data-mongodb</artifactId>
</dependency>
<dependency>
    <groupId>de.flapdoodle.embed</groupId>
    <artifactId>de.flapdoodle.embed.mongo</artifactId>
</dependency>
The first dependency provides Spring Data MongoDB support in the Spring Boot application. The second dependency adds the Flapdoodle-embedded MongoDB database to our application. You can find more details on this database at http://mng.bz/GGKO. If you are using a real MongoDB instance, then you don’t need the embedded MongoDB database dependency. Let’s define a test case to validate how to use MongoDB, as shown in the following listing.
Listing 3.6 Unit test to validate the use of MongoDB in Spring Data
package com.manning.sbip.ch03;

// Import statements are excluded as a matter of readability
import static org.assertj.core.api.Assertions.assertThat;

@DataMongoTest
@ExtendWith(SpringExtension.class)
class CourseTrackerSpringBootApplicationTests {

    @Autowired
    private MongoTemplate mongoTemplate;

    @Test
    public void givenObjectAvailableWhenSaveToCollectionThenExpectValue() {
        // given
        DBObject object = BasicDBObjectBuilder.start().add("Manning", "Spring Boot In Practice").get();
        // when
        mongoTemplate.save(object, "collection");
        // then
        assertThat(mongoTemplate.findAll(DBObject.class, "collection"))
                .extracting("Manning")
                .containsOnly("Spring Boot In Practice");

    }
}
Let’s explore the activities performed in this test case:
-
You’ve autowired the
MongoTemplatein the test class. An instance ofMongoTemplateis created by Spring Boot.MongoTemplateis a helper class that lets you perform various MongoDB operations. -
You then create a document as the key–value pair with the key as Manning and the value as Spring Boot in Practice. MongoDB stores the documents as part of collections. Thus, you add the document to a collection named Collection.
-
Finally, you find the document to extract the key and assert the returned value.
A relational database stores data in a tabular format in terms of rows and columns. However, not all data is suitable to be stored in a tabular format. There are several use cases in which data is unstructured and treated as a document. The NoSQL databases store the data in terms of a document and are popularly known as document databases. MongoDB is one of the most popular and leading document databases.
With this technique, you’ve used an in-memory instance of MongoDB. An in-memory instance lets you quickly bootstrap the application and does not require a local or remote database installation.
If you have a local or remote instance (e.g., in a remote server or cloud provider), you can remove the embedded configuration and provide your actual database configuration. The following listing shows the MongoDB database configurations you can provide in the application.properties file to customize the database details.
Listing 3.7 MongoDB properties
spring.data.mongodb.authentication-database=<Authentication database name>  ①
spring.data.mongodb.database=<Database name>                                ②
spring.data.mongodb.field-naming-strategy=<Field Naming Strategy>           ③
spring.data.mongodb.gridfs.database=<Gridfs database>                       ④
spring.data.mongodb.host=<Database Hostname>                                ⑤
spring.data.mongodb.password=<Database password>                            ⑥
spring.data.mongodb.port=<Database Port>                                    ⑦
spring.data.mongodb.uri=<Database URI>                                      ⑧
spring.data.mongodb.username=<Database Username>                            ⑨
spring.mongodb.embedded.version=2.6.10                                      ⑩
① Authentication database name
③ Fully qualified name of the FieldNamingStrategy to use
⑥ Login password of the Mongo server
⑦ Mongo server port (27017 is the default MongoDB port)
⑧ Mongo database URI. When set, host and port are ignored.
⑨ Login password of the Mongo server
Note You can refer to Spring Boot reference documentation available at http://mng.bz/zQAQ for all supported properties.
If you are new to MongoDB, you can refer to the book’s companion GitHub wiki page for a beginner’s guide on MongoDB available at http://mng.bz/0wA6.
3.2.3 Technique: Initializing a relational database schema with a Spring Boot application
In this technique, we’ll discuss how to initialize a relational database schema in a Spring Boot application.
In the configuring a relational database in a spring boot application technique, you saw how to configure a relational database in your Spring Boot application. However, before you start accessing the database, you need to ensure the database schema is initialized properly. For instance, all the required tables and indexes are created, and associated insert scripts are executed. You need to initialize the database schema at the application startup.
Spring Boot allows you to initialize a database schema with built-in solutions as well as third-party libraries (ORM solutions). In this technique, you’ll learn how to initialize the database using Spring Data’s built-in schema.sql and data.sql scripts.
Spring Boot can load the SQL scripts from the classpath (e.g., the src/main/ resources folder) or a preconfigured location. By default, you define the schema.sql file to provide all DDL scripts and define the data.sql file to include the DML scripts and place it inside the srcmain
esources folder for Spring Boot to detect and execute these files. Further, you can also use the spring.datasource.schema and spring.datasource.data properties to customize the default behavior. You’ll examine this in this technique.
To begin with, if you are using a database other than an embedded (in-memory) database, you need to set spring.sql.init.mode to always be in the application .properties file, as shown in listing 3.8. This property instructs Spring Boot to always initialize the database schema. It supports three values—embedded, always, and never. By default, this property is set to the value embedded. This means Spring Boot automatically initializes the database schema for embedded database types (e.g., H2 in-memory database available at https://www.h2database.com/html/main.html). To initialize MySQL or other actual databases, you need to explicitly configure the value to always. Since you are using the H2 database in this technique, you may ignore this property.
In this schema initialization-based approach, Spring Boot re-creates the schema each time you restart the application. There is no database schema versioning done by Spring Boot. For example, in the above example, Spring Boot drops and re-creates the COURSES table in each application restart and executes the DML statements provided in the data.sql script. The following listing shows the updated application .properties file.
Listing 3.8 Updated application.properties file
spring.sql.init.mode=always      ①

// Other data source properties such as username, password, driver name, and connection URL
① Instructs Spring Boot to initialize the database schema. Supported values are embedded, always, and never. By default, it is set to embedded, which means if you use an embedded database, then automatically the database is initialized. For other database types, it always needs to be configured to configure the database.
Let’s now define the schema.sql and the data.sql files. However, before that let’s recap the business model we are working on within this application. In this example, you are managing Course details in the sample application. Thus, the Course is the business domain object in the application. The schema.sql creates the COURSES table, and the data.sql inserts a few sample courses into the COURSES table. The following listing shows the database schema configuration located at src/main/ resources/schema.sql.
Listing 3.9 Database schema.sql configuration
CREATE TABLE COURSES
(
    id int(15) NOT NULL,
    name varchar(100) NOT NULL,
    category varchar(20) NOT NULL,
    rating int(1) NOT NULL,
    description varchar(1000) NOT NULL,
    PRIMARY KEY (id)
);
Listing 3.10 shows the database initialization SQL script provided in the data.sql configuration file located at src/main/resources/data.sql. This is a DML script that contains the INSERT statements to populate the COURSES table.
Listing 3.10 Database initialization scripts
INSERT INTO COURSES(ID, NAME, CATEGORY, RATING, DESCRIPTION)
VALUES(1, 'Rapid Spring Boot Application Development',
'Spring', 4, 'Spring Boot gives all the power of the
 Spring Framework without all of the complexities');
INSERT INTO COURSES(ID, NAME, CATEGORY, RATING, DESCRIPTION)
VALUES(2, 'Getting Started with Spring Security DSL',
'Spring', 3,  'Learn Spring Security DSL in easy steps');
INSERT INTO COURSES(ID, NAME, CATEGORY, RATING, DESCRIPTION)
VALUES(3, 'Scalable, Cloud Native Data Applications',
'Spring', 4,  'Manage Cloud based applications with Spring Boot');
INSERT INTO COURSES(ID, NAME, CATEGORY, RATING, DESCRIPTION)
VALUES(4, 'Fully Reactive: Spring, Kotlin, and JavaFX Playing Together',
'Spring', 3,'Unleash the power of Reactive Spring
with Kotlin and Spring Boot');
INSERT INTO COURSES(ID, NAME, CATEGORY, RATING, DESCRIPTION)
VALUES(5, 'Getting Started with Spring Cloud Kubernetes',
'Spring', 5, 'Master Spring Boot application deployment
 with Kubernetes');
To validate whether Spring Boot initializes the database schema, let us write a test case. This simple test case counts the number of courses available in the COURSES table in the database, as shown in the following listing.
Listing 3.11 Unit test to validate database schema initialization
package com.manning.sbip.ch03;

// Import Statements are excluded as a matter of readability

@SpringBootTest
class CourseTrackerSpringBootApplicationTests {

    @Autowired
    private DataSource dataSource;

    @Test
    public void whenCountAllCoursesThenExpectFiveCourses()
➥ throws SQLException {
        ResultSet rs = null;
        int noOfCourses = 0;
        try(PreparedStatement ps =
➥ dataSource.getConnection().prepareStatement("SELECT COUNT(1) FROM
➥ COURSES")) {
            rs = ps.executeQuery();
            while(rs.next()) {
                noOfCourses = rs.getInt(1);

            }
            assertThat(noOfCourses).isEqualTo(5L);
        }
        finally {
            if(rs != null) {
                rs.close();
            }
        }
    }
}
In listing 3.11, you’ve autowired the DataSource and used basic JDBC code to count the courses from the COURSES table. Don’t be scared by all this boilerplate code, as in the next section, you’ll learn how to perform SQL queries with JPA repositories. In this example, you’ve created five courses using the INSERT queries defined in the data.sql file. Thus, in the test case you are asserting for five courses.
You can also specify a different schema and data file name with a different location. For instance, listing 3.12 shows the configuration for sbip-schema.sql and sbip-data.sql files available at the srcmain esourcessqlschema and srcmain esources sqldata folders, respectively.
Listing 3.12 Custom schema and data file location
spring.sql.init.schema-locations=classpath:sql/schema/sbip-schema.sql   ①
spring.sql.init.data-locations=classpath:sql/data/sbip-data.sql         ②
① Specifying a different schema file location
② Specifying a different data file location
Other than classpath, you can also provide a file system location (with file://<absolute path>) if your schema and data files are in the file system. Further, you can specify more than one schema or data file separated by the comma. For instance, spring.sql .init.data-locations=classpath:sql/data/sbip-data.sql,file://c:/sql/data/reference-data.sql loads both files.
In this technique, you’ve learned how to use Spring Boot’s built-in techniques to initialize a database by defining a few SQL files. To recap, you can define the schema.sql file to provide all your DDL scripts that define the database schema. Furthermore, you can use the data.sql file to provide DML scripts that populate the database. You’ve also learned to maintain database platform-specific SQLs in the same application. This is useful if your application supports multiple databases.
So far, you’ve used the basic Spring Boot techniques to configure and communicate to the database. In the next section, you’ll learn to use Spring Data JPA to manage your database communication in a much more concise and effective manner. Let’s proceed to discussing Spring Data’s CrudRepository interface, which provides support for standard CRUD operations as well as upon which most of the Spring Data submodules are based.
3.3 Understanding the CrudRepository interface
Before starting with the CrudRepository interface, you need to know about the Repository interface. Spring Data repository uses this generic interface as the primary abstraction for a data source. It takes a business domain class that needs to be managed and an identifier type of the class as the type attribute. A business domain class is a Java class that represents a business entity and needs to be persisted. For instance, in the CourseTracker application, you are managing the course details that are represented in the Course class and have an identifier of the long data type.
The Repository is a marker interface and is primarily used to capture the domain class and its ID type information. A marker interface has no methods or constants and provides runtime type information about objects. The following listing shows the Repository interface from the spring-data-commons module.
Listing 3.13 Spring Data repository interface
The CrudRepository is a subinterface of the Repository interface and provides CRUD operations. Listing 3.14 shows the CrudRepository interface from the spring-data-commons module. You can find the source code of this interface at http://mng.bz/jyzP.
Listing 3.14 Spring Data CrudRepository methods
public interface CrudRepository<T, ID> extends Repository<T, ID> {     ①
 <S extends T> S save(S entity);                                       ②
 Optional<T> findById(ID id);                                          ③
 Iterable<T> findAll();                                                ④
 long count();                                                         ⑤
 void deleteById(ID id);                                               ⑥
 // Additional Methods excluded for brevity
}
① The interface definition. The generic type T represents the domain class, and the ID type represents the identifier of the domain class.
③ Finds an entity by the given ID
⑤ Returns the number of entities available
⑥ Deletes the entity with the given ID
In addition to the CrudRepository, Spring Data also provides a PagingAndSortingRepository, which extends the CrudRepository and provides additional support for pagination and sorting of the entities. Figure 3.5 shows the relationship between the core interfaces of the Spring Data Commons module.

To manage a business domain class persistence, you typically create an interface that extends either CrudRepository or the PagingAndSortingRepository interface and provides the entity class and its identifier type information. The custom repository interface (e.g., CourseRepository) extends all the methods available in the extended interface (e.g., CrudRepository). Let’s explore the use of the CrudRepository interface in the next technique.
3.3.1 Technique: Managing domain objects in a relational database with Spring Data JPA
In this section, we’ll explore how to manage business domain objects in a relational database with Spring Data JPA.
You need to use Spring Data JPA to manage domain objects in a relational database in your Spring Boot application.
In the previous section, you’ve learned the Spring Data repository interfaces Repository, CrudRepository, and PagingAndSortingRepository that lets you manage domain objects in a Spring Boot application. In this technique, you’ll learn how to use the CrudRepository interface to perform the create, read, update, and delete operations in an application.
Let’s start by modifying the Course domain class by providing a few JPA annotations so that Spring Data JPA can manage this class. This is shown in the following listing.
Listing 3.15 The Course entity with @Id, @Column, and @GeneratedValue annotations
import javax.persistence.*;

@Entity
@Table(name = "COURSES")
public class Course {

    @Id
    @Column(name = "ID")
    @GeneratedValue(strategy = GenerationType.IDENTITY)
    private Long id;

    @Column(name = "NAME")
    private String name;

       @Column(name = "CATEGORY")
    private String category;

       @Column(name = "RATING")
    private int rating;

    @Column(name = "DESCRIPTION")
    private String description;

       public Course(String name, String category,
➥ int rating, String description) {
            this.name = name;
           this.category = category;
            this.rating = rating;
            this.description = description;
       }
    // Getter/setters, and toString is omitted
Let’s discuss the changes you’ve made:
-
You have annotated the class with the
@Entityand the@Tableannotations. The first annotation marks the Java class as a JPA entity, and the other annotation provides the database table details in which the entity needs to be managed. -
You have annotated the Java fields with the
@Columnannotation. This provides mapping information between the Java fields and the associated column name in the table. -
You have annotated the
idfield with the@Idannotation to indicate that this field is the primary key of the table. You’ve also provided details to indicate that the values for this field should be generated using the provided strategy. Refer to the discussion section for more information about the available strategies. -
The course constructor does not have the
idfield. The ID is managed by JPA and is auto-generated.
You’ll now define a custom Spring Data repository by extending the CrudRepository interface that lets you manage the Course details. Recall that the CrudRepository interface provides support for the standard CRUD operations. Thus, CourseRepository inherits the CRUD operation support from this extended interface. The following listing shows the CourseRepository interface.
Listing 3.16 The CourseRepository interface
package com.manning.sbip.ch03.repository;

import org.springframework.data.repository.CrudRepository;
import org.springframework.stereotype.Repository;

import com.manning.sbip.ch03.model.Course;

@Repository
public interface CourseRepository extends CrudRepository<Course, Long> {
    // The interface body is actually empty
}
You’ve annotated the CourseRepository interface with the @Repository annotation to indicate this is a Spring repository. Notice that, although it seems to be an empty interface, at runtime its concrete method implementation is provided by Spring Data JPA, which is then used to perform the CRUD operations.
The last change you need to perform is to update the application.properties file with the spring.jpa.hibernate.ddl-auto property with the create value. This property instructs the Hibernate (the default JPA provider in Spring Data JPA) to manage the database tables for the entities. Note that this property is specific to Hibernate and is not applicable if any other JPA provider is used. Let’s now write a test case to see the CRUD operations in practice, as shown in the following listing.
Listing 3.17 Unit test to validate CrudRepository methods
package com.manning.sbip.ch03;

// Import Statements are excluded as a matter of readability

@SpringBootTest
class CourseTrackerSpringBootApplicationTests {

    @Autowired
    private CourseRepository courseRepository;
    @Test
    public void givenCreateCourseWhenLoadTheCourseThenExpectSameCourse() {
        Course course =
➥ new Course("Rapid Spring Boot Application Development",
➥ "Spring", 4, "'Spring Boot gives all the power of the
➥ Spring Framework without all of the complexities");
        Course savedCourse = courseRepository.save(course);
        assertThat(courseRepository.findById(savedCourse.getId())
➥ .get()).isEqualTo(course);
    }

    @Test
    public void givenUpdateCourseWhenLoadTheCourseThenExpectUpdatedCourse() {
        Course course =
➥ new Course("Rapid Spring Boot Application Development",
➥ "Spring", 4, "'Spring Boot gives all the power of the
➥ Spring Framework without all of the complexities");
        courseRepository.save(course);
        course.setRating(5);
        Course savedCourse = courseRepository.save(course);
assertThat(courseRepository.findById(savedCourse.getId())
➥ .get().getRating()).isEqualTo(5);
    }

    @Test
    public void givenDeleteCourseWhenLoadTheCourseThenExpectNoCourse() {
        Course course =
➥ new Course("Rapid Spring Boot Application Development",
➥ "Spring", 4, "'Spring Boot gives all the power of the
➥ Spring Framework without all of the complexities");
        Course savedCourse  = courseRepository.save(course);
    assertThat(courseRepository.findById(savedCourse.getId())
➥ .get()).isEqualTo(course);
    courseRepository.delete(course);
    assertThat(courseRepository.findById(savedCourse.getId())
➥ .isPresent()).isFalse();
   }
}
In the unit test of listing 3.17, you’ve autowired the CourseRepository and defined three test cases:
-
The first test case creates a new course and saves it into the database. We then find the course by its ID and assert that it is the same course we’ve created.
-
The second test case creates and saves a course in the database. It then updates the course rating of the course and asserts whether the update is successful.
-
The last test case creates and deletes a course. It asserts whether the course deletion is successful.
In this technique, you’ve learned to manage business domain objects through Spring Data JPA. To start with, you’ve updated the business domain class with JPA annotations. Spring Data JPA uses these annotations to manage the domain objects. Let’s explore the JPA annotations in detail:
-
@Entity—You’ve annotated theCourseclass with the@Entityannotation to indicate that this class is a JPA entity. A JPA entity is a POJO class representing the business domain object that needs to be persisted in a database table. As a default configuration, Spring Data uses the class name as the entity name. However, you can specify a custom entity name with the name attribute of@Entityannotation (e.g.,@Entity(name = "COURSE")). -
@Table—By default, the entity class name also represents the name of the database table in which the entity data should be persisted. Thus, theCoursePOJO class name (i.e.,Course) ensures that course details should be persisted in a table namedCOURSEin the database. Spring Data uses this as the default strategy if there is no table information provided in the class. However, in this example, you’ve customized the table name asCOURSESwith the@Tableannotation. You can also specify several other tables-related information, such as the database schema name, unique constraints and indexes for the table, and a custom table name. -
@Id—An entity requires an identifier to identify each row in the underlying database table uniquely. The@Idannotation on a Java field in the business domain class specifies the property as the primary key of the table. Based on the application, a primary key can be a simple ID with a single field, or it can be a composite ID with multiple fields. To see the use of the composite key in Spring Data JPA, you can refer to http://mng.bz/ExzO. -
@Column—By default, Spring Data uses the class field names as the column names in the database table. For example, the field nameidrepresents the columnIDin the database table. Besides, if you have a property with more than one word in thecamelCaseformat in your Java class, then thecamelCaseproperty name in the class is represented as thecamel_casein the database table field. The words in the field are connected by an underscore(_).Thus, if you’ve defined a property namedcourseId, it is represented ascourse_idin the table column.
Although the default column naming strategy works well in most scenarios, you can’t use it all the time. For example, your organization might have a predefined column naming convention for the database table columns. Thus, you have a database column name different from the generated column name. You can address this name mismatch by specifying the corresponding database column name in the @Column annotation in the POJO field. For instance, @Column(name= "COURSE_ID") uses COURSE_ID as the column name in the COURSES table instead of the default generated name ID. Besides, you have also noticed that the id field is annotated with the @GeneratedValue annotation. This annotation indicates that the value of the annotated property is generated. The GeneratedValue annotation accepts a GenerationType strategy that defines how the property value should be generated. The supported values are Table, Identity, Sequence, and Auto. Let’s discuss these options briefly:
-
Table—This option indicates that the persistence provider should assign primary keys for an entity using a database table.
-
Identity—Identity indicates that the persistence provider should assign the primary keys for an entity using a database identity column.
-
Sequence—As the name suggests, this option allows the persistence provider to assign the primary keys using a database sequence.
-
Auto—This option allows the persistence provider to determine the ID-generation scheme.
You’ve annotated the CourseRepository interface with the @Repository annotation. This annotation serves two important purposes:
-
Auto detection—The
@Repositoryannotation is meta-annotated with the@Componentannotation. Thus, the Spring component scan can autodetect the repository interfaces through the classpath scanning, and you can autowire in other classes. -
Exception translation—One major benefit of using Spring Data JPA is that it provides flexibility to switch the underlying persistence provider. For instance, you can instruct Spring Boot to use
EclipseLinkas the JPA provider instead ofHibernate. However, this also brings the overhead of handlingEclipseLinkspecific exceptions.
The @Repository annotation assists you in managing this overhead through its support for exception translation. An exception translation in this context means converting a technology-specific exception type (e.g., SQLException, EclipseLink-Exception, or HibernateException) to a generic Spring exception type (e.g., DataAccessException). Spring Data provides DataAccessException and a set of its child exception classes, which are runtime exceptions. These exceptions wrap the original technology-specific checked exceptions and enables you to define a consistent exception handling strategy through the DataAccessException.
JPA provides you with the flexibility to automatically infer the DDLs from the @Entity classes and execute them in a database. The spring.jpa.hibernate.ddl-auto property decides how to manage the DDLs in your application. The possible values for this property are none, validate, update, create, and create-drop. The following list provides a brief discussion on these options:
-
none—Disables the automatic DDL management. It is the default value for nonembedded databases. -
validate—Validates the schema but does not make any changes to the database. Spring Boot throws an error if the database schema is not in expected structure. -
create—Creates the schema and destroys already-existing data -
create-drop—Creates the schema and destroys at the end of the session. It is the default value for embedded databases.
The property spring.jpa.hibernate.ddl-auto is specific to Hibernate, which is the default persistence provider in Spring Boot. If you are using another persistent provider, you can use the more generic property spring.jpa.generate-ddl, which accepts a boolean value.
In this technique, you’ve explored that you can use the CrudRepository interface to perform the CRUD operations in your application. However, at times you might need to control the exposure of the CRUD methods. For instance, you may not want to expose the delete(..) method that deletes business entities due to your application design. For instance, many organizations won’t delete the application data and instead choose to update the details as inactive in the database. In the next technique, you’ll learn to control the exposure of the CRUD methods by defining a custom Spring Data repository.
3.3.2 Technique: Creating a custom Spring Data repository with Spring Data JPA to manage domain objects in a relational database
In this technique, we will demonstrate how to create custom Spring Data repositories.
You want to use Spring Data repository interfaces to manage your application domain objects but don’t want to expose all CRUD methods.
Spring Data repository interfaces provide an excellent and easy way to manage the business domain objects. It also lets you define your custom repository interfaces if the framework provided does not meet your need. With this technique, you’ll define a custom Spring Data repository interface and use it in your Spring Boot application.
To create a custom repository, you need to define a base repository interface that extends the Spring Data’s Repository interface. You can then selectively specify the CrudRepository methods you want to expose. Let’s define an interface called BaseRepository that exposes only the save() and findAll() methods of the CrudRepository interface, as shown in the following listing.
Listing 3.18 Defining the BaseRepository interface
package com.manning.sbip.ch03.repository;

import org.springframework.data.repository.NoRepositoryBean;
import org.springframework.data.repository.Repository;

@NoRepositoryBean
public interface BaseRepository<T, ID> extends Repository<T, ID> {

    <S extends T> S save(S entity);

    Iterable<T> findAll();

}
You’ve annotated this interface with @NoRepositoryBean annotation. As this is a base interface, you don’t want Spring Data infrastructure to pick up this interface and create a concrete instance of it. The @NoRepositoryBean annotation ensures that the BaseRepository interface is excluded from the proxy object creation. You’ve also provided the CrudRepository method signatures that you want to expose in the BaseRepository interface. For these method invocations, Spring Data routes the runtime calls to the actual JPA implementation class, as they match the CrudRepository method signature.
Let’s define a custom interface that extends the BaseRepository interface, as shown in listing 3.19. This ensures that the custom repository has access to only the methods defined in the BaseRepository interface.
Listing 3.19 Defining CustomizedCourseRepository interface
package com.manning.sbip.ch03.repository;

import com.manning.sbip.ch03.model.Course;
import org.springframework.stereotype.Repository;

@Repository
public interface CustomizedCourseRepository
➥ extends BaseRepository<Course, Long> {
}
The CustomizedCourseRepository interface is similar to the CourseRepository interface with the exception that it extends the BaseRepository interface and lets you access only the save(..) and findAll() methods.
Let’s define a test case that uses the custom CustomizedCourseRepository interface, as shown in listing 3.20. Notice that you can only invoke the save(..) and findAll() methods. Trying to access other CrudRepository methods will result in a compile-time error, since that method signature is not available in the BaseRepository interface.
Listing 3.20 Unit test to validate the custom repository
package com.manning.sbip.ch03;

// Import Statements are excluded as a matter of readability

@DataJpaTest
class CourseTrackerSpringBootApplicationTests {

    @Autowired
    private CustomizedCourseRepository customizedCourseRepository;

    @Test
    public void givenCreateCourseWhenFindAllCoursesThenExpectOneCourse() {
        Course course =
➥ new Course("Rapid Spring Boot Application Development",
➥ “Spring”, 4, “’Spring Boot gives all the power of the
➥ Spring Framework without all of the complexities");
        customizedCourseRepository.save(course);
        assertThat(Arrays.asList(customizedCourseRepository.findAll())
➥ .size()).isEqualTo(1);
    }
}
In listing 3.20, you’ve autowired the CustomizedCourseRepository and used it to create a course. You then assert that one course has been created.
In this technique, you’ve learned how to define a custom repository interface in your application. Although the CrudRepository interface is suitable in most of the scenarios, sometimes it is useful to control the CRUD operations. With the @NoRepositoryBean annotation, Spring Data lets you achieve this.
3.4 Retrieve data from a database using Spring Data
In the previous sections, you’ve learned how to configure databases and manage business domain objects or entities. In this section, you’ll learn several techniques to efficiently access data from a database in a Spring Boot application.
3.4.1 Defining query methods
In previous techniques, you’ve seen how to use the CrudRepository interface to manage business domain objects. Although this interface provides standard CRUD operations, sometimes these generic methods are not sufficient. Instead, you may need more fine-grained control to manage domain objects. For instance, you might need to query entities based on entity properties instead of only relying on the entity ID (i.e., default findById(..)method).
You may also need to query entities after applying some conditions on the entity properties (e.g., Like, StartsWith, Containing, etc.). Further, you may also be interested in ordering (i.e., ascending or descending) the fetched entities based on one or more entity properties.
Spring Data JPA provides two ways to define custom query methods that can meet most of these custom requirements:
-
Defining custom methods in the repository interfaces with specific naming patterns. Spring Data can internally parse these methods and generate the query from it.
-
Defining custom methods and providing an SQL query that is directly used by the Spring Data to query the entities.
In this section, you’ll learn the first option to define query method signatures so that Spring Data can parse the provided methods and generate the queries. Spring Data has a predefined method naming pattern that is understood by its method parser. It supports the following commonly used patterns:
-
Query—For querying entities, it lets you define
find..By,read..By,get..By,query..By,stream..By, andsearch..Bymethods. -
Count—This pattern is used to define
count..By()methods to count the entities. -
Exists—This pattern is used to define
exists..By()methods that check the existence of an entity. -
Delete—To delete entities, it lets you define
delete...By()andremove...By()methods.
Additionally, you can also use additional clauses to fine-tune the methods. For instance, you can use Distinct or All expression in the method. Further, you can also use the And and Or expressions to concatenate additional entity properties.
Spring Data uses the concept of a Subject and Predicate to parse the methods. It splits the method signature based on the By clause and treats the first half as the subject and the remaining part as the predicate. Thus, if you define a method named findDistinctCourseByCategoryOrderByName(), then the part DistinctCourse is the subject, and the CategoryOrderByName is the predicate. This is demonstrated in figure 3.6. Let’s use a technique to learn how you can define query methods to retrieve data from the database.

3.4.2 Technique: Defining custom query methods to retrieve domain objects from a relational database with Spring Data JPA
In this technique, we’ll explore how to create custom query methods to retrieve entities from a relational database.
You need to use Spring Data JPA to define custom query methods to retrieve entities from a relational database in your Spring Boot application.
Spring Data JPA lets you define custom query methods to retrieve business entity details from the database. In this exercise, you’ll learn to use this technique by defining a few custom query methods in the CourseTracker application.
In the previous technique, you’ve used the CourseRepository interface to extend the CrudRepository interface and accessed methods defined in it. Let’s modify the CourseRepository interface to provide a few query method signatures, as shown in the following listing.
Listing 3.21 CourseRepository interface with custom query methods
package com.manning.sbip.ch03.repository;

// Import Statements are excluded as a matter of readability

@Repository
public interface CourseRepository extends CrudRepository<Course, Long> {


    Iterable<Course> findAllByCategory(String category);                   ①
    Iterable<Course> findAllByCategoryOrderByName(String category);        ②
    boolean existsByName(String name);                                     ③
    long countByCategory(String category);                                 ④
    Iterable<Course> findByNameOrCategory(String name, String category);   ⑤
    Iterable<Course> findByNameStartsWith(String name);                    ⑥
    Stream<Course> streamAllByCategory(String category);                   ⑦
}
① Finds all courses by category. A find query returns an Iterable type.
② Finds all courses by category and orders the entities by name
③ Checks if a course with the supplied name exists. Returns true if course exists and false otherwise. Exists queries return the Boolean type.
④ Returns the count of courses for the supplied category. Count queries can return an integer or long type.
⑤ Finds all courses that match the supplied course name or the course category
⑥ Finds all courses that start with the supplied course name string
⑦ Finds all courses by category and returns a Java 8 Stream
You’ve defined seven custom query methods that find the course details and related information from the database. Let’s explain these methods in detail. Note that you’ve only defined the method signatures and not provided any implementation for these methods. Spring Data JPA parses the method signatures and ensures a concrete implementation internally:
-
findAllByCategory—This is the simplest query method you’ve defined in theCourseRepositoryinterface. You can relate it with thefindById(..)method defined in theCrudRepositoryinterface that finds an entity with the supplied entity ID. This method takes the same concept a step further and lets you define a custom method that finds a list of entities that belongs to a category. You can define more custom query methods that use other entity properties. For instance, to find a course that matches the supplied course description, you can define a method namedfindByDescription(String description). -
findAllByCategoryOrderByName—This is an extension to thefindAllByCategory(..)method with the exception that it returns courses in ascending order of the course name. -
existsByName—This method checks if a course with the supplied name exists. It returnstrueif the course exists orfalseotherwise. -
countByCategory—This method returns the count of courses for the supplied category. -
findByNameOrCategory—Finds all courses that match the supplied course name or the course category. Like theORclause, you can also use theANDclause if you need to define a query that requires both properties to be available. -
findByNameStartsWith—Finds all courses that start with the supplied course name string. The supplied course name method parameter can be a substring of the actual course name. -
streamAllByCategory—Finds all courses by category and returns a Java 8 Stream. AStreamreturn type is different from theIterablereturn type, which you’ve seen in the previous methods. AnIterableis a data structure that contains the returned data that you can iterate. A Stream is not a data structure; instead, it points to a data source from which the data can be streamed.
Let us define a test case to use these query methods in practice, as shown in the following listing.
Listing 3.22 Unit test to validate custom query methods
package com.manning.sbip.ch03;

// Import Statements are excluded as a matter of readability

@SpringBootTest
class CourseTrackerSpringBootApplicationTests {

    @Autowired
    private CourseRepository courseRepository;

    @Test
    public void givenCreateCourseWhenLoadTheCourseThenExpectSameCourse() {
        // Saving a list of courses
        courseRepository.saveAll(getCourseList());
        assertThat(courseRepository.findAllByCategory("Spring")).hasSize(3);
        assertThat(courseRepository.existsByName
➥ ("JavaScript for All")).isTrue();
        assertThat(courseRepository.existsByName
➥ ("Mastering JavaScript")).isFalse();
        assertThat(courseRepository.countByCategory("Python"))
➥ .isEqualTo(2);
        assertThat(courseRepository.findByNameStartsWith
➥ ("Getting Started")).hasSize(3);
    }

    private List<Course> getCourseList() {
        // Get Course List
    }
}
In the test case of listing 3.22, you have created a few courses and saved them into the database table. You then used the custom query methods and asserted their outcome. If you execute this test case, you’ll find that all assertions are true.
In this section, you’ve learned a couple of important concepts of Spring Data JPA. Let’s summarize the concepts you’ve explored so far:
-
You have learned how to define custom repository query methods based on the entity properties. You’ve also seen how you can use various patterns, such as
Or,StartsWith, andOrderBy, to control the query and the returned result ordering. These are only a few expressions we’ve demonstrated in this example. You can refer to http://mng.bz/raND to learn more about the other expressions you can use in the query method name. -
You’ve seen how to define a repository method with a Java 8 Stream in the repository interface and subsequently use the returned stream in your application. This contrasts with the
Iterablereturn type through which you return a collection. You can leverage the Stream features, such asmap-filter-reducetechniques, using the defined repository Stream method. Refer to the Java 8 Stream to learn more about how to leverage the Stream features.
3.4.3 Implementing pagination with PagingAndSortingRepository
Pagination is a technique to break a large set of data into multiple pages. It is an effective and server-friendly way to return the results to your user. Typically, application users will not look beyond the first few results, irrespective of the number of results shown to them. Thus, retrieving, processing, and returning a large set of data, at times, result in a waste of bandwidth and CPU time. Besides, if the returned data contains resources such as images, it can slow down the application loading and impact the user experience. Imagine showing a product catalogue with hundreds of items and each catalogue item containing an image.
Spring Data provides the PagingAndSortingRepository interface that provides you with the ability to page and sort the returned data. And since this interface extends CrudRepository, you can also access the core CRUD features provided in the CrudRepository interface. Let’s explore the use of the PagingAndSortingRepository interface in the next technique.
3.4.4 Technique: Using PagingAndSortingRepository interface to paginate and sort the data
In this technique, we’ll demonstrate how to use Spring’s PagingAndSortingRepository interface for pagination and sorting.
Loading, sorting, and returning a large set of data to the application users waste the server resources and impact the application user experience. You need to return the data into a smaller subset in terms of pages.
Pagination is the technique to split the data into a smaller chunk, known as a page. You can configure the size of the page that determines the number of records or data contained in a page. For a better user experience, you can optionally sort the data in ascending or descending order.
In this technique, you’ll use Spring Data’s built-in PagingAndSortingRepository to implement pagination. In this technique, we’ll load a few courses and return the courses to the users in terms of pages.
Let’s define the CourseRepository interface that extends the PagingAndSortingRepository interface, as shown in the following listing. We’ll look into the PagingAndSortingRepository interface shortly.
Listing 3.23 Extending PagingAndSortingRepository
Next, let’s define a test case that uses the PagingAndSortingRepository interface, as shown in the following listing.
Listing 3.24 Unit test to use PagingAndSortingRepository
@Test
void givenDataAvailableWhenLoadFirstPageThenGetFiveRecords() {
    Pageable pageable = PageRequest.of(0,5);
    assertThat(courseRepository.findAll(pageable)).hasSize(5);
    assertThat(pageable.getPageNumber()).isEqualTo(0);

    Pageable nextPageable = pageable.next();
    assertThat(courseRepository.findAll(nextPageable)).hasSize(4);
    assertThat(nextPageable.getPageNumber()).isEqualTo(1);
}
We are performing the following activities:
-
Creating a
PageRequestinstance using the staticofmethod by specifying the page number and the number of records on the page. You’ve specified the page number0and the record size on the page as5. -
Using a pageable instance in the
findAll()method of theCourseRespositoryto load the first page. ThisfindAll()method is from thePagingAndSortingRepositoryinterface. -
Using the various methods of Pageable instances to assert on the values, such as next page and page number.
Let’s now explore the use of sorting facilities provided in the PagingAndSortingRepository interface, as shown in the following listing.
Listing 3.25 Pagination usage example
@Test
void givenDataAvailableWhenSortsFirstPageThenGetSortedSData() {
    Pageable pageable = PageRequest.of(0,5, Sort.by(Sort.Order.asc("Name")));
    Condition<Course> sortedFirstCourseCondition = new Condition<Course>() {
        @Override
        public boolean matches(Course course) {
            return course.getId() == 4
➥ && course.getName().equals("Cloud Native
➥ Spring Boot Application Development");
        }
    };
    assertThat(courseRepository.findAll(pageable))
➥ .first().has(sortedFirstCourseCondition);
}

@Test
void givenDataAvailableWhenApplyCustomSortThenGetSortedResult() {
    Pageable customSortPageable = PageRequest.of(0,5, Sort.by(“Rating”)
.descending().and(Sort.by(“Name”)));
    Condition<Course> customSortFirstCourseCondition = new Condition<Course>() {
        @Override
        public boolean matches(Course course) {
            return course.getId() == 2
➥ && course.getName().equals("Getting Started
➥ with Spring Security DSL");
        }
    };
    assertThat(courseRepository.findAll(customSortPageable))
➥ .first().has(customSortFirstCourseCondition);
}
In the above code snippet, you’ve performed sorting of the data:
-
First, with the custom sort order with the course name in ascending order
-
Second, defining a custom sorting order with descending sorting order on course rating and ascending sorting on course name
The PagingAndSortingRepository is a useful interface that lets you achieve custom pagination and sorting features in your application. The following listing shows this interface from the Spring Data codebase.
Listing 3.26 The PagingAndSortingRepository interface definition
@NoRepositoryBean
public interface PagingAndSortingRepository<T, ID> extends
➥ CrudRepository<T, ID> {

   Page<T> findAll(Pageable pageable);

   Iterable<T> findAll(Sort sort);

}
The first findAll(..) method takes an instance of Pageable. The Pageable interface provides several useful methods to construct page requests as well as access the page information. For instance, you’ve used the of(..) method to construct the page request that lets you specify the page number with the number of records in it. Further, it also allows you to access the previous and next pages.
The second findAll(..) method takes an instance of Sort. The Sort class is flexible and provides myriad ways to construct a sorting order. For instance, in the second test case, you have constructed a custom sort order with rating in descending and name in ascending order.
3.4.5 Specifying query using @NamedQuery
In section 3.4.1, you saw there are two approaches to defining query methods. You learned the first approach in the defining custom query methods to retrieve domain objects from a relational database with Spring Data JPA technique, where we explained how to define custom query method signatures from which Spring Data generates the queries. In this section, you’ll learn the other approach to manually define custom queries directly in your repository methods, so Spring Data can use them as is instead of deriving them through the names of the methods.
Although the method name-based query approach works fine in most circumstances, sometimes you would like to define the queries explicitly that should be used by Spring Data. Let’s discuss the scenarios in which you might want to use this alternative approach:
-
If you have defined a fine-tuned query and leveraged datastore-specific features.
-
If there is a requirement to access more than one table with table joins. In this scenario, you might have defined a query that joins multiple tables.
In this section, you’ll learn several features to manually specify the query using Spring Data’s NamedQuery, Query, and QueryDSL features. In this section, let’s start with the NamedQuery feature.
A NamedQuery is a predefined query that is associated with a business entity. It uses Jakarta Persistence Query Language (JPQL; see http://mng.bz/AxpK) to define the query. You can define a NamedQuery in an entity or its superclass. You’ll see an example of this shortly.
You can define a named query with the @NamedQuery annotation in your entity class. This annotation has four arguments: name, query, lockMode, and hints. The name and query attributes of the @NamedQuery annotations are mandatory, whereas the remaining two attributes are optional. Let’s start with the next technique that shows the usage of NamedQuery in your Spring Boot application.
3.4.6 Technique: Using a named query to manage domain objects in a relational database with Spring Data JPA
In this technique, we’ll discuss how to use named query to manage domain objects.
You need to use named query with Spring Data JPA to define custom queries in repository interface methods to manage domain objects in a relational database.
Although the query methods with query method signature definition approach work well enough in most scenarios, there are cases in which it has some limitations. For instance, if you need to join multiple tables and retrieve the data, there is no easy way to define the method signatures. With the named query, you can provide the query along with the method signature so that the same can be used to retrieve the data.
To begin with, let’s modify the Course class to add the @NamedQuery annotation, as shown in the following listing.
Listing 3.27 Course interface with @NamedQuery annotation
package com.manning.sbip.ch03.model;

import javax.persistence.*;

@Entity
@Table(name = "COURSES")
@NamedQuery(name = "Course.findAllByCategoryAndRating",
➥ query = "select c from Course c where c.category=?1
➥ and c.rating=?2")                                       ①
public class Course {

    @Id
    @GeneratedValue(strategy = GenerationType.IDENTITY)
    private long id;
    private String name;

    // Remaining parts omitted for brevity
}
① The @NamedQuery annotation lets you specify the query for the repository method in JPQL format.
In the Course POJO, you’ve provided the query details that fetch all courses by the supplied category in the @NamedQuery annotation. The name attribute contains the entity and method name concatenated with a dot(.). In the query, you’ve provided the query along with two positional parameters: ?1 and ?2. It uses the supplied parameter values when the repository method is invoked.
Further, you can use @NamedQuery annotation more than once in the entity if you need to define more than one repository method for which you want to use the @NamedQuery feature, which is shown in the following listing.
Listing 3.28 Use of @NamedQueries annotation to include multiple @NamedQuery annotation
@Entity
@Table(name = "COURSES")
@NamedQueries({
    @NamedQuery(name = "Course.findAllByRating",
➥ query = "select c from Course c where c.rating=?1"),
    @NamedQuery(name = "Course.findAllByCategoryAndRating",
➥ query = "select c from Course c
➥ where c.category=?1 and c.rating=?2"),
})
public class Course {

// other members are excluded as a matter of readability
}
Let us redefine the CourseRepository interface, which now contains a custom method with the same method name provided in the @NamedQuery annotation in the Course entity. The following listing shows the updated CourseRepository interface.
Listing 3.29 CourseRepository interface with the method defined in @NamedQuery annotation
package com.manning.sbip.ch03.repository;

// Import Statements are excluded as a matter of readability

@Repository
public interface CourseRepository extends CrudRepository<Course, Long> {

    Iterable<Course> findAllByCategoryAndRating(String category, int rating); ①
}
① The repository method is defined in the @NamedQuery annotation. It is defined here, so you can use it with CourseRepository instance.
Let’s validate the use of the findAllByCategoryAndRating(..) method by defining a test case, as shown in the following listing.
Listing 3.30 Unit test to use @NamedQuery annotation
package com.manning.sbip.ch03;

// Import Statements are excluded as a matter of readability

@SpringBootTest
class CourseTrackerSpringBootApplicationTests {

    @Autowired
    private CourseRepository courseRepository;

    @Test
    public void givenCoursesCreatedWhenLoadCoursesBySpringCategory
➥ ThenExpectThreeCourses(){
        courseRepository.saveAll(getCourseList());
        assertThat(courseRepository
➥ .findAllByCategoryAndRating("Spring", 4)).hasSize(1);
    }

    private List<Course> getCourseList() {
        // get course list
    }
}
If you run the test case, you’ll see it executes successfully. In the next section, let’s discuss the @Query annotation.
3.5 Specifying query using @Query
Although the named queries to declare queries in the entity class work fine, they unnecessarily add persistence information in the business domain class (recall that you added the @NamedQuery annotation in the Course class). This can be a concern, as it tightly couples the persistence details in the business domain classes.
As an alternative, you can provide the query information in the repository interface. This co-locates the query method and the JPQL query together. You can use the @Query annotation in the repository interface methods to do this. Besides, the benefit of using the @Query annotation over the named queries is that the @Query annotation lets you use the native SQL queries as well. Thus, you can use both JPQL as well as native SQL queries with the @Query annotation. Let’s explore the use of @Query annotation in the next technique.
3.5.1 Technique: Using @Query annotation to define queries and retrieve domain objects in a relational database with Spring Data JPA
In this technique, we’ll discuss how to use @Query annotation to define and retrieve domain objects.
You want to use @Query annotation with Spring Data JPA to define custom queries in repository interface methods to manage domain objects in a relational database.
The @Query annotation allows you to provide the queries along with the method signature in the repository interface. This is considered a better approach, as the business domain objects are kept free from persistence-related information.
Let’s redefine the CourseRepository interface in which you’ll provide three repository methods using the @Query annotation, as shown in the following listing.
Listing 3.31 Updated CourseRepository with custom query methods with @Query annotation
package com.manning.sbip.ch03.repository;

// Import Statements are excluded as a matter of readability

@Repository
public interface CourseRepository extends CrudRepository<Course, Long> {

    @Query("select c from Course c where c.category=?1")       ①
    Iterable<Course> findAllByCategory(String category);
    @Query("select c from Course c where
➥ c.category=:category and c.rating >:rating")                ②
    Iterable<Course>
➥ findAllByCategoryAndRatingGreaterThan(@Param("category")
➥ String category, @Param("rating") int rating);

    @Query(value = "select * from COURSE where rating=?1",
➥ nativeQuery = true)                                         ③
    Iterable<Course> findAllByRating(int rating);

    @Modifying
    @Transactional
    @Query("update Course c set c.rating=:rating
➥ where c.name=:name”)                                        ④
    int updateCourseRatingByName(@Param(“rating”) int rating,
➥ @Param("name") String name);
}
① The repository method that finds all the courses belong to the supplied category. The @Query annotation lets you specify the JPQL Query. You have used a positional argument with ?1, which is replaced by the supplied category in this example.
② The repository method finds all the courses that belong to the supplied category and has a rating value greater than the one supplied in the rating parameter. You have used named parameters in this example. These named parameters are replaced by the supplied category and rating values in this example.
③ The repository method that finds all the courses for a given rating. This is not a JPQL query, and we’ve set the nativeQuery to true to indicate this query is a native SQL database query.
④ The repository method lets you update a course rating. The @Modifying annotation indicates that the query specified in the @Query annotation is a modifying query. The @Transactional annotation bounds the method execution in a transaction context as it is performing a database update.
There is quite a lot happening in the updated CourseRepository interface. Let us examine what it’s achieved in detail:
-
You’ve used the
@Queryannotation to define the JPQL query that should be used by Spring Data to fetch the courses. This query is similar to what you’ve used in the named queries technique in section 3.4.6. This query also uses positional arguments to use the supplied argument. In this query, you are retrieving all courses that belong to the provided category. -
In the next query, you’ve used the
@Queryannotation to define the query to be used by Spring Data. However, there are a few notable differences in the syntax. Instead of the positional argument-based approach, you’ve used named parameters. Although the positional-based approach works well, at times it is error-prone if the position of the parameter changes while performing code refactoring. To avoid this issue, you are using the@Paramannotation to provide the parameter with a name and binding the name in the query. -
In the third query, you’ve specified an SQL query and set the
nativeQueryflag totrueto indicate the query is a native SQL query. Typically, different database vendors offer database-specific features that are native to the specific database. Thus, if you need to leverage database-specific features, you can define the SQL query withnativeQueryflag set totrue. -
The fourth query is quite interesting. So far, most of the queries in the earlier demonstrations have been used to retrieve data from the database. Unlike those queries, the fourth query is a data manipulation query that updates content in the database. Along with the
@Queryannotation, this method also specified two additional annotations and a different return type. Let’s explain these in detail:-
The
@Transactionalannotation is used to bound the method execution in a transaction context, as it is performing a database update. Note that we are not performing any transaction explicitly; instead, Spring is managing the transaction via aspect-oriented programming. -
The
@Modifyingannotation indicates that the query specified in the@Queryannotation is a modifying query. This annotation only works in conjunction with the@Queryannotation. In addition to theUPDATEstatements, you can also specifyINSERT,DELETE, and other DDL statements in the@Queryannotation. Note that we’ll get anInvalidDataAccessApiUsageExceptionif this annotation is not specified. -
The return type of the query must be either
int/Integerorvoid, as it is a modifying query. If the return type isint/Integer, it returns the number of rows modified by the query.
-
To understand the supported return types in the query methods, you can refer to Spring Data JPA documentation at http://mng.bz/W7Z4 for a list of supported return types. Let’s now define a test case to see these methods in practice, as shown in the following listing.
Listing 3.32 Unit test to examine the use of the @Query annotation
package com.manning.sbip.ch03;

// Import Statements are excluded as a matter of readability

@DataJpaTest
class CourseTrackerSpringBootApplicationTests {

    @Autowired
    private CourseRepository courseRepository;

    @Test
    public void givenCoursesCreatedWhenLoadCoursesWithQuery
➥ ThenExpectCorrectCourseDetails() {
        saveMockCourses();
        assertThat(courseRepository.findAllByCategory("Spring"))
➥ .hasSize(3);
        assertThat(courseRepository.findAllByRating(3)).hasSize(2);
        assertThat(courseRepository.findAllByCategory
➥ AndRatingGreaterThan("Spring", 3)).hasSize(2);
        courseRepository.updateCourseRatingByName(4,
➥ "Getting Started with Spring Cloud Kubernetes");
        assertThat(courseRepository.findAllByCategory
➥ AndRatingGreaterThan("Spring", 3)).hasSize(3);
    }

    private void saveMockCourses() {
         // Save List of Courses
    }
}
If you execute this test case, you’ll find that all the assertions are true.
The @Query mechanism is an excellent feature that lets you specify the JPQL and the SQL queries directly in the repository query methods. It offers several benefits compared to the other two approaches (e.g., query methods and named query).
The Spring Data query method has a limitation when you need to fetch data from multiple tables and when you wish to use any native database feature. The @Query approach is useful if you need to fetch data from multiple tables with a complex table join query. You can define the query and let the Spring Data repository use the query to retrieve the data. You can also use native SQL features of the underlying database if required.
Although similar, the named query approach introduces persistence details with @NamedQuery annotation, which is not always considered a best practice. An attentive reader might counter that the @Query approach also specifies native SQL queries inside the Java class, which also is not considered as a best practice. To overcome this problem, Spring Data also lets you externalize the queries in a property file. You can create a folder named META-INF inside the srcmain
esources folder. Add a file named jpa-named-queries.properties inside the META-INF folder. You can then externalize the queries in the Entity.finderMethod=Query format. For example, you can externalize the query for the findAllByCategory(..) method, as shown here: Course.findAllByCategory = select c from Course c where c.category=?1. Spring Data automatically refers to this externalized query when it needs to execute the findAllByCategory(..) method.
Although the named query and the query approaches seem like excellent alternatives to control how to fetch data, both techniques suffer from a major drawback. In these approaches, there is no syntax check of the provided query at compile time, and any syntax issue in the query only surfaces at run time. In the next section, you’ll learn two different techniques to programmatically define queries in a type-safe manner.
3.6 Using Criteria API with Spring Data JPA
One of the major drawbacks of using JPQL is the lack of its type safety and absence of static query checking. This is because JPQL queries are not validated at compile time. Thus, any error in the query can only be detected at execution time.
The Criteria API (http://mng.bz/8lnZ) introduced in JPA 2.0 adds a type-safe way to create queries. It lets you express a query in a programmatic and type-safe manner. The type safety of a query is achieved using the interfaces and classes that represent various parts of the query, such as the select clause, order-by, and others. Type safety is also achieved in terms of referencing attributes of an entity. Let’s define a technique to see the use of Criteria API in conjunction with Spring Data JPA.
3.6.1 Technique: Using Criteria API to manage domain objects in a relational database with Spring Data JPA
In this technique, we’ll demonstrate the use of Criteria API.
Previously, you’ve used JPQL or native SQL queries to access data from the database. However, both JPQL and SQL do not provide any mechanism to validate the correctness of the queries at compile time. Instead, all query syntax issues are detected at runtime. You need to implement a technique that lets you define queries programmatically in a type-safe manner to reduce execution-time errors in the queries.
Criteria API is a native API of JPA specification. Thus, you don’t need additional libraries to use in your Spring Boot application.
Most of the components in the CourseTracker application require no change to use Criteria API. Thus, the previously defined Course class, CourseRepository interface, and other configurations remain unchanged. Let’s define a test case to see the use of Criteria API in practice, as shown in the following listing.
Listing 3.33 Unit test to demonstrate the use of Criteria API
package com.manning.sbip.ch03;

// Import Statements are excluded as a matter of readability

@SpringBootTest
class CourseTrackerSpringBootApplicationTests {

    @Autowired
    private CourseRepository courseRepository;

    @Autowired
    private EntityManager entityManager;
    @Test
    public void givenCoursesCreatedWhenLoadCoursesWithQuery
➥ ThenExpectCorrectCourseDetails() {
        courseRepository.saveAll(getCourseList());

        CriteriaBuilder criteriaBuilder =
➥ entityManager.getCriteriaBuilder();

        CriteriaQuery<Course> courseCriteriaQuery =
➥ criteriaBuilder.createQuery(Course.class);

        Root<Course> courseRoot = courseCriteriaQuery
➥ .from(Course.class);

        Predicate courseCategoryPredicate =
➥ criteriaBuilder.equal(
➥ courseRoot.get("category"), "Spring");

        courseCriteriaQuery.where(courseCategoryPredicate);

        TypedQuery<Course> query =
➥ entityManager.createQuery(courseCriteriaQuery);
        Assertions.assertThat(query.getResultList()
➥ .size()).isEqualTo(3);

    }

    private List<Course> getCourseList() {
        // Get Courses
    }
}
You perform the following activities in the test case:
-
Autowire the
EntityManagerin the test class and use it to create an instance ofCriteriaBuilder. AnEntityManagerinstance is associated with a persistence context, which is a set of entity instances. Within the persistence context, the entity instances and their lifecycle are managed. TheCriteriaBuilderinstance allows you to construct criteria queries, selections, ordering, and more. -
The returned
CriteriaBuilderis used to define aCriteriaQuery, and its type is bound to theCoursetype. -
You then define the
Rootof the query using the returnedCriteriaQuery. -
Subsequently, you define a
Predicatethat defines a condition. In this example, the predicate represents the category asSpring. -
Lastly, you used the predicate in the previously defined
CriteriaQueryand define aTypedQuery, which provides the query output.
To use Criteria API in your application, you need to follow a series of steps to construct the query. At first, you define an instance of CriteriaBuilder instance through the EntityManager. Subsequently, you use this CriteriaBuilder instance to create any of the CriteriaQuery, CriteriaUpdate, CriteriaDelete instances based on your need. CriteriaQuery provides you with the functionalities to construct a query. The CriteriaUpdate and CriteriaDelete allow you to define queries to perform bulk updates and deletes, respectively.
You then use CriteriaQuery to construct various query parts using methods, such as from(..), where(..), groupBy(), orderBy(), and others. A CriteriaQuery instance is typed, as you use the entity type in the CriteriaBuilder interface to create it. For instance, in the test case shown earlier, you’ve used the Course type to bound the type. You use CriteriaQuery to define the query root, which is always the reference entities (e.g., Course in our example).
The obtained Root is used to define the expressions. For instance, we have defined the expression that the course category is Spring. This expression is used to define a Predicate, which is used in CriteriaQuery. You use the EntityManager instance to create a TypedQuery from the already created CriteriaQuery. The TypedQuery interface controls the execution of the types of queries. You used the methods provided in the TypedQuery instance to obtain the query result. For example, we’ve used the getResultList(..) method to execute the query and retrieve the result.
Providing an in-depth guide to Criteria API is beyond the scope of this book. You can refer to chapter 6 of the JPA specification, which is available at http://mng.bz/wnrq, to learn more about this API.
3.7 Using QueryDSL with Spring Data JPA
In section 3.6 you explored the use of Criteria API with Spring Data JPA. Although Criteria API is a native JPA API, one of the major challenges is its verbose nature. To execute even a simple SELECT query, you need to write quite a few lines of code.
The Querydsl (http://www.querydsl.com/) is an alternative third-party library that also lets you build type-safe queries more concisely using its fluent API. Like Criteria API, it also ensures that the following checks are made at compilation time:
-
Entity types specified in a query exist and can be persisted in the database.
-
All properties used in a query exist in the entity and can be persisted in the database.
Spring Data provides a QuerydslPredicateExecutor interface to leverage QueryDSL features in Spring Data modules. In the next technique, let’s examine the use of Querydsl with JPA.
3.7.1 Technique: Using QueryDSL to manage domain objects in a relational database with Spring Data JPA
In this technique, we’ll discuss the use of QueryDSL.
Criteria API is a native JPA API and provides a means to build queries in a type-safe manner. However, this API is often criticized for being verbose, as you need to perform too many tasks to even execute a simple query. You need a relatively simple alternative.
QueryDSL is an alternative to Criteria API that provides a fluent and concise API. Like Criteria API, it allows you to define the queries programmatically in a type-safe manner. In this technique, you’ll see the use of QuerydDSL API with Spring Data JPA to manage domain objects in a relational database.
To use QueryDSL, we need to add the querydsl-apt, querydsl-jpa Maven dependencies and the apt-maven-plugin plugin in the pom.xml to enable the Querydsl capabilities in the application, as shown in the following listing.
Listing 3.34 Updated pom.xml file with QueryDSL dependencies and apt-maven-plugin
<?xml version="1.0" encoding="UTF-8"?>
<project xmlns="http://maven.apache.org/POM/4.0.0"
➥ xmlns:xsi="http://www.w3.org/2001/XMLSchema-instance"
         xsi:schemaLocation="http://maven.apache.org/POM/4.0.0
➥ https://maven.apache.org/xsd/maven-4.0.0.xsd">
    <modelVersion>4.0.0</modelVersion>

    // Other pom.xml components

    <dependencies>
        // Other dependencies
        <dependency>
            <groupId>com.querydsl</groupId>
            <artifactId>querydsl-apt</artifactId>
        </dependency>
        <dependency>
            <groupId>com.querydsl</groupId>
            <artifactId>querydsl-jpa</artifactId>
        </dependency>
    </dependencies>

    <build>
        <plugins>
            <plugin>
                <groupId>org.springframework.boot</groupId>
                <artifactId>spring-boot-maven-plugin</artifactId>
            </plugin>
            <plugin>
                <groupId>com.mysema.maven</groupId>
                <artifactId>apt-maven-plugin</artifactId>
                <version>1.1.3</version>
                <executions>
                    <execution>
                        <phase>generate-sources</phase>
                        <goals>
                            <goal>process</goal>
                        </goals>
                        <configuration>
                            <outputDirectory>
➥ target/generated-sources/java</outputDirectory>
                            <processor>com.querydsl.apt.jpa.JPAAnnotationProcessor</processor>
                        </configuration>
                    </execution>
                </executions>
            </plugin>
        </plugins>
    </build>

</project>
Let’s explore the use of these additional Maven dependencies and the plugin:
-
The
querydsl-aptlibrary is an annotation processing tool (APT) that enables the processing of the annotation in the source files before they move to the compilation stage. This tool generates the so-calledQ-typesclasses that are related to the entity classes present in the application. TheseQ-typesare classes that are directly related to the entity classes of your application but are prefixed with the letterQ. For example, for theCourseentity, you’ll see a QCourse.java source file created by this tool. -
The
querydsl-jpais theQuerydsllibrary designed to be working alongside a JPA application. Similarly, if you would like to use QueryDSL with MongoDB database, you need to usequerydsl-mongodbMaven dependency. -
The
apt-maven-pluginensures that theQ-typesare generated at the time of the process goal of the Maven build. Besides, as the name indicates, theoutputDirectoryproperty is the place where the generatedQ-typesare kept. Furthermore, this directory needs to be included as the source folder of the project, as you’ll use these generated Java files in your application.
Let’s now focus on the CourseRepository interface, as shown in the following listing.
Listing 3.35 Updated CourseRepository interface with QuerydslPredicateExecutor
package com.manning.sbip.ch03.repository;

// Import Statements are excluded as a matter of readability

@Repository
public interface CourseRepository
➥ extends CrudRepository<Course, Long>,
➥ QuerydslPredicateExecutor<Course> {
}
You can notice that, along with the CrudRepository interface, CourseRepository now also extends the QuerydslPredicateExecutor interface. Although this interface is not compulsory to be implemented to use Querydsl, it provides several overloaded methods that let you use Querydsl instances with the familiar query methods (e.g., Iterable<T> findAll(OrderSpecifier<?>... orders);). Note that the query method from the CrudRepository interface does not take any argument. You’ll see the usage of the methods from this interface shortly.
For this demonstration, there is no change in the Course POJO. Since the common IDEs are automatically configured to process annotations, you should find the generated QCourse.java Java file in the configured outputDirectory, as configured in the apt-maven-plugin plugin in the pom.xml file. For this demonstration, you’ve configured the target/generated-sources/java directory where this QCourse.java file is generated. If the sources are not generated automatically, then you can run the mvn generate-sources command from the root directory of your project to generate the source code.
Ensure that the root package of the generated java file is marked as the source directory. Otherwise, you won’t be able to use this Java file in your application. In IntelliJ IDEA, you can right-click on the java folder inside the generated-sources folder and click on Mark Directory as and then Generated Sources Root options.
You’ll now use the generated QCourse class to define the queries in our application codebase. Typically, you’ll use the Q-classes inside the service layer to define the queries. To keep things simple, we will define a test case and use the QCourse class to define the queries, which is demonstrated in the following listing.
Listing 3.36 Unit test to examine the use of QueryDSL
package com.manning.sbip.ch03;

// Imports excluded as a matter of readability

@SpringBootTest
class CourseTrackerSpringBootApplicationTests {

    @Autowired
    private CourseRepository courseRepository;

    @Autowired
    private EntityManager entityManager;

    @Test
    public void givenCoursesCreatedWhenLoadCoursesWithQuery
➥ ThenExpectCorrectCourseDetails() {
        courseRepository.saveAll(getCourseList());
        QCourse course = QCourse.course;                           ①
        JPAQuery query1 = new JPAQuery(entityManager);             ②
        query1.from(course).where(course.category.eq("Spring"));   ③

        assertThat(query1.fetch().size()).isEqualTo(3);            ④

        JPAQuery query2 = new JPAQuery(entityManager);
        query2
➥ .from(course)
➥ .where(course.category.eq("Spring")
➥ .and(course.rating.gt(3)));
        assertThat(query2.fetch().size()).isEqualTo(2);
        OrderSpecifier<Integer> descOrderSpecifier =
➥ course.rating.desc();                                           ⑤
        assertThat(Lists.newArrayList(
➥ courseRepository.findAll(descOrderSpecifier))
➥ .get(0).getName())
➥ .isEqualTo("Getting Started with Spring Security DSL");
    }

    private List<Course> getCourseList() {
        // getCourseList implementation goes here. Method body is excluded as a matter of readability
    }
}
③ Builds the query using the from and where clauses. Notice the use of DSL (e.g., the use of from and where).
④ Executes the query and retrieves the courses
⑤ OrderSpecifier represents the order-by instance in the course. In this case, we are creating a descending order-by instance with the course rating.
Let’s discuss the test case in detail:
-
It has a dependency on the
CourseRepositoryand theEntityManager. TheEntityManageris used to create the JPA query instances. -
You have defined a local variable named course and initialized it with the
QCourse.coursestatic instance. -
Subsequently, you have created an instance of
JPAQueryusing the EntityManager. It is the default implementation of theJPQLQueryinterface for JPA inQuerydsl. -
You then start building the query using Querydsl’s fluent API. You pass the course instance to the
from()method ofJPAQueryand build the conditional clause of the query using thewhere()method. -
Following that, you invoke the
fetch()method on the created query to fetch courses from the database and assert the result. -
Subsequently, in the next
JPAQuery(query2), you’ve used theand(..)method in thewhere()method to provide additional criteria in the query. -
You then invoke
fetch()on the generated query and assert the result. -
Lastly, you’ve created an instance of
OrderSpecifier, which represents theorder-byinstance in theCourse. It defines the descending order based on the rating property of theCourseentity. -
You then use the
findAll(..)method ofCourseRepositorythat accepts theOrderSpecifierinstance. It returns all courses ordered as per theOrderSpecifierinstance.
Note that this findAll(..) method is from QuerydslPredicateExecutor. Since CourseRepository extends this interface, you can invoke using the CourseRepository instance.
With this technique, you’ve seen the use of Querydsl API with Spring Data JPA. Querydsl is a popular framework that enables you to construct statically typed SQL-like queries for several data sources. One of the major reasons for this library’s popularity is its static type checking, fluent API, and concise nature. This static type check ensures that queries are syntactically correct at compilation time.
QueryDSL was introduced to maintain Hibernate Query Language (HQL) queries in a type-safe way. Incorrect string concatenation and reference to domain types and properties in HQL queries often lead to runtime query execution issues. QueryDSL reduces these errors by performing static type checking at query compilation time. In QueryDSL, queries are constructed based on the generated query types, which are essentially the properties of the business domain class. In the QueryDSL method invocations are also done in a type-safe manner. You can refer to the QueryDSL reference manual at http://mng.bz/mx9rs for further details.
3.8 Managing domain object relationships
Accessing data from a single table is relatively simple, but this is seldom the case for modern enterprise applications. In most scenarios, you are likely to use more than one table to retrieve the required data.
In the relational database nomenclature, retrieving the required columns from different tables is known as projection. Spring Data lets you use projections either through interface-based projection or class-based projection.
An interface-based projection allows you to limit the attributes of an entity by declaring an interface that exposes accessor methods for the properties to be read. For instance, if you want to read only the description field of the Course entity when finding the courses by course name, you can first define an interface that returns the only description, as shown in the following listing.
Listing 3.37 Interface-based projection
You can then add a query method in the CourseRepository interface that returns a collection of DescriptionOnly types, as shown in the following listing.
Listing 3.38 Query method with interface-based projection
package com.manning.sbip.ch03.repository;

// Import Statements are excluded as a matter of readability

@Repository
public interface CourseRepository extends CrudRepository<Course, Long> {
    Iterable<DescriptionOnly> getCourseByName(String name);
}
The test case presented in the following listing validates the interface-based projection.
Listing 3.39 Unit test to validate interface-based projection
@Test
public void givenACourseAvailableWhenGetCourseByName
➥ ThenGetCourseDescription() {
    Iterable<DescriptionOnly> result = courseRepository.getCourseByName("Rapid Spring Boot
➥ Application Development");

assertThat(result)
            .extracting("description").contains("Spring Boot
➥ gives all the power of the Spring Framework without all
➥ of the complexity");
}
The getCourseByName(..) method returns an Iterable of type DescriptionOnly, and we retrieve the description. Next, we assert the returned description with the actual description.
A class-based projection is also referred to as a data transfer object (DTO). A DTO is a Java POJO class that contains the selected properties returned by the query. As the name suggests, the main purpose of this object is to transfer data from the DAO layer to a higher layer, such as the service layer. You may recall that, as a best practice, a service layer bridges the DAO layer, and the Spring controllers and DAO layers are not accessed directly. You’ll examine an example of class-based projection shortly.
Another important concept to understand while dealing with more than one entity is the relationship between them. Based on their association, this relationship is classified into the following categories:
-
One-to-One—This relationship type indicates that one entity is associated with exactly one entity of the other type. For example, in ourCourseentity example, let’s assume we have another entity namedCourseDetailsthat captures the additional details about aCourse. Thus, we can say that theCourseandCourseDetailsentities have aOne-to-Onerelationship, as aCoursecan have only oneCourseDetails. -
One-to-Many—This relationship type indicates that one entity is associated with more than one entity of the other type. For instance, an entityPersoncan have more than oneAddress. Thus, the relationship between thePersonand theAddressisOne-to-Many. -
Many-to-One—This relationship type indicates that many entities of one type are associated with one entity of the other type. For instance, the relationship between the entityBookand entityPublisheris ofMany-to-One, as multipleBookscan be published by aPublisher. -
Many-to-Many—This relationship type indicates that more than one entity of one type is associated with more than one type of the other entity type. For instance, in the course management example, oneCoursemay be authored by multipleAuthors. Similarly, oneAuthorcan author multipleCourses. The relationship in this context isMany-to-Manybetween the author and course entities.
Let’s demonstrate the use of DTO and the implementation of a many-to-many relationship in the following technique.
3.8.1 Technique: Managing domain objects with many-to-many relationships in a relational database with Spring Data JPA
In this technique, we’ll demonstrate how to manage many-to-many relationships in domain objects.
While managing object relationships in your application, you often encounter scenarios in which objects maintain many-to-many relationships. For instance, in the CourseTracker application, entities Author and Course maintain a many-to-many relationship. You need to manage the many-to-many relationship among two entities using Spring Data JPA.
Many-to-many relationships are some of the most-used relationships for managing between entities. For instance, the Course and Author entities have a many-to-many relationship among them. In such a scenario, you must maintain the author and course details along with the relationship between course and author. For example, an author can author multiple courses, and many authors can collaborate on a course. Thus, in this case, you need to maintain the author and course information as well as their relationship details. Hence, you need to maintain three tables: one for the Author details, another for the Course details, and one for their related information. Figure 3.7 shows the entity–relationship (ER) diagram:

Figure 3.7 Author and Course entity–relationship diagram. In an ER diagram, the relationship table is represented by the relationship arrow itself. Thus, the relationship table is not present in the diagram.
Before continuing further, let us understand the data model you’ll use in this technique. The Author entity is represented by the AUTHOR table in the database.
The mapping table between the Author and the Course entities is represented by the AUTHORS_COURSES table. To represent a relationship on Relational Database Management System, the rule is to use relationship tables in which the relationship between author and course is represented with a DB entry containing the corresponding unique identifiers of the two tables. For example, the AUTHORS_COURSES table contains the mapping information of authors and courses based on author_id and course_id. The following listing shows the schema.sql DDL scripts used in this technique.
CREATE TABLE authors (
  id   BIGINT NOT NULL,
  bio  VARCHAR(255),
  name VARCHAR(255),
  PRIMARY KEY (id)
);

CREATE TABLE authors_courses (
  author_id BIGINT NOT NULL,
  course_id BIGINT NOT NULL,
  PRIMARY KEY (author_id, course_id)
);

CREATE TABLE courses (
  id          BIGINT NOT NULL,
  category    VARCHAR(255),
  description VARCHAR(255),
  name        VARCHAR(255),
  rating      INTEGER NOT NULL,
  PRIMARY KEY (id)
);

ALTER TABLE authors_courses
  ADD CONSTRAINT course_id_fk FOREIGN KEY
➥ (course_id) REFERENCES courses (id);               ①

ALTER TABLE authors_courses
  ADD CONSTRAINT author_id_fk FOREIGN KEY (author_id)
➥ REFERENCES authors (id);                           ②
① A foreign key constraint to ensure that the course_id in the authors_courses table is a valid course ID from the courses table
② A foreign key constraint to ensure that the author_id in the authors_courses table is a valid author ID from the authors table
Let’s now define the INSERT scripts in the data.sql file, as shown in listing 3.41. We’ve created three courses and two authors. Besides, we’ve added the author and course relationship by mapping courses 1 and 2 with author 1 and courses 1, 2, and 3 with author 2. Thus, courses 1 and 2 are co-authored by both author 1 and author 2.
Listing 3.41 The data.sql script
INSERT INTO COURSES(ID, NAME, CATEGORY, RATING, DESCRIPTION)
➥ VALUES(1, 'Rapid Spring Boot Application Development',
➥ 'Spring', 4, 'Spring Boot gives all the power of the
➥ Spring Framework without all of the complexity');
INSERT INTO COURSES(ID, NAME, CATEGORY, RATING, DESCRIPTION)
➥ VALUES(2, 'Getting Started with Spring Security DSL',
➥ 'Spring', 5, 'Learn Spring Security DSL in easy steps');
INSERT INTO COURSES(ID, NAME, CATEGORY, RATING, DESCRIPTION)
➥ VALUES(3, 'Getting Started with Spring Cloud Kubernetes',
➥ 'Python', 3, 'Master Spring Boot application deployment
➥ with Kubernetes');
INSERT INTO AUTHORS(ID, NAME, BIO)
➥ VALUES(1, 'John Doe',
➥ 'Author of several Spring Boot courses');
INSERT INTO AUTHORS(ID, NAME, BIO)
➥ VALUES(2, 'Steve Muller', 'Author of several
➥ popular Spring and Python courses');
INSERT INTO AUTHORS_COURSES(AUTHOR_ID, COURSE_ID) VALUES(1, 1);
INSERT INTO AUTHORS_COURSES(AUTHOR_ID, COURSE_ID) VALUES(1, 2);
INSERT INTO AUTHORS_COURSES(AUTHOR_ID, COURSE_ID) VALUES(2, 1);
INSERT INTO AUTHORS_COURSES(AUTHOR_ID, COURSE_ID) VALUES(2, 2);
INSERT INTO AUTHORS_COURSES(AUTHOR_ID, COURSE_ID) VALUES(2, 3);
To automatically execute the schema.sql and the data.sql we have added the following additional properties in the application.properties file, as shown in the following listing.
Listing 3.42 Additional properties in the application.properties file
① We are using schema.sql to initialize schema; thus, we are instructing JPA not to manage the schema.
② This is to indicate Spring Boot to execute the schema.sql in our H2 database.
Let’s now start by defining the Author entity, as shown in the following listing.
Listing 3.43 The Author entity
package com.manning.sbip.ch03.model;

// Import Statements are excluded as a matter of readability

@Entity(name = "AUTHOR")
@Table(name="AUTHORS")
public class Author {

    @Id
    @GeneratedValue(strategy = GenerationType.IDENTITY)
    private long id;
    private String name;
    private String bio;
    @ManyToMany
    @JoinTable(name = "AUTHORS_COURSES",
            joinColumns = {
      @JoinColumn(name="author_id",
➥ referencedColumnName = "id", nullable = false,
➥ updatable = false)},
            inverseJoinColumns = {
      @JoinColumn(name="course_id",
➥ referencedColumnName = "id", nullable = false,
➥ updatable = false)}
    )
    private Set<Course> courses = new HashSet<>();

    public Author() {}

    public Author(String name, String bio) {
        this.name = name;
        this.bio = bio;
    }
    public long getId() {
        return id;
    }

    public String getName() {
        return name;
    }

    public String getBio() {
        return bio;
    }

    public Set<Course> getCourses() {
        return courses;
    }

    @Override
    public String toString() {
        return "Author{" +
                "id=" + id +
                ", name='" + name + ''' +
                ", bio='" + bio + ''' +
                '}';
    }
}
In the Author class, you’ve initialized an empty set of courses to store the relationship between Author and Course. The following listing shows the Course entity.
Listing 3.44 The updated Course entity
package com.manning.sbip.ch03.model;

// Import Statements are excluded as a matter of readability

@Entity(name = "COURSE")
@Table(name = "COURSES")
public class Course {

    @Id
    @GeneratedValue(strategy = GenerationType.IDENTITY)
    private long id;
    private String name;
    private String category;
    private int rating;
    private String description;

    @ManyToMany(mappedBy = "courses")               ①
    private Set<Author> authors = new HashSet<>();

    // Constructor, getter, setters are excluded as a matter of readability

}
① The mappedBy attribute of @ManyToMany annotation in the non-owning side of the relationship
The Course entity contains information related to a course and specifies the many-to-many relationship with the authors. Note that you’ve specified the mappedBy attribute of @ManyToMany annotation in the non-owning side of the relationship. We can create the courses and map to the authors who created it, as shown in the following listing.
Listing 3.45 Mapping course details with authors
Course rapidSpringBootCourse =
➥ new Course("Rapid Spring Boot Application Development",
➥ "Spring", 4,"Spring Boot gives all the power of the
➥ Spring Framework without all of the complexity");

Course springSecurityDslCourse =
➥ new Course("Getting Started with Spring Security DSL",
➥ "Spring", 5, "Learn Spring Security DSL in easy steps");

Author author1 = new Author("John Doe",
➥ "Author of several Spring Boot courses");

author1.getCourses().addAll(Arrays
➥ .asList(rapidSpringBootCourse, springSecurityDslCourse));
Also, besides the core annotations, such as @Entity, @Table, and @Id, there are other annotations specified to capture the relationship information with the Course entity. Let’s explore these annotations.
The @ManyToMany annotation specifies the many-valued association with many-to-many multiplicity. Each such association has two sides—the owning side and the non-owning side. The owning side indicates the entity that owns the relationship, and the non-owning side is the inverse side of the relationship.
In the case of a one-to-many relationship, the many part of the relationship is the owning side. This is because every object of the many sides can easily have a reference to the one side. Otherwise, you need to maintain many references from the single object (i.e., the one part) to the many objects.
For many-to-many relationships, you can choose which side should be declared as the owning side, since both sides can own the relationship. For instance, in this demonstration, we have selected the Author entity as the owning side. This is chosen based on the understanding that an author owns its courses.
You additionally specify the @JoinTable annotation on the owning side of the relationship. As discussed, since an author owns a course, you have specified @JoinTable annotation on the Author entity. In the case of the non-owning side, you specify the mappedBy parameter in @ManyToMany annotation to specify the field of the owning side. You’ll see the use of the mappedBy parameter in the Course entity.
This annotation is specified on the owning side of the relationship and is typically used in the mapping of many-to-many and unidirectional one-to-many associations. You’ve specified this annotation to define the AUTHORS_COURSES join table. If this annotation is not provided, then the default values of the annotation are applied. For example, if the table name is not provided, then the table names of the entities are concatenated together with an underscore character, where the owning side table is used first. Besides, you have specified the joinColumns and inverseJoinColumns attributes with @JoinTable annotation. The joinColumns specifies the foreign key columns of the join table (e.g., AUTHORS_COURSES), which references the primary table (e.g., AUTHORS), which owns the association. The inverseJoinColumns specify the foreign key columns of the join table, which reference the primary table (e.g., COURSES) of the non-owning side.
This annotation lets you specify a column for joining an entity association. To recap, the following is the usage of the JoinColumn attribute:
The name attribute specifies the name of the foreign key column of the relationship table. The referencedColumnName attribute allows you to specify the database column that should be referenced by the foreign key column. The nullable attribute indicates whether the foreign column is nullable. The updatable attribute specifies whether the column is included in SQL UPDATE statements of the relationship table generated by the persistence provider. Let’s define the AuthorCourse entity, as shown in the following listing.
Listing 3.46 The AuthorCourse entity
package com.manning.sbip.ch03.model;

// Import Statements are excluded as a matter of readability
@Entity(name = "AUTHOR_COURSE")
@Table(name = "AUTHORS_COURSES")
public class AuthorCourse {
    @Id
    @Column(name = "author_id")
    private long authorId;
    @Column(name = "course_id")
    private long courseId;

    // Constructor, Getter, and Setters excluded as a matter of readability
}
This class stores the relationship information of Author and Course entities and contains the primary keys of both tables. Besides, this entity also represents the AUTHORS_COURSES table, as you’ve annotated it with the @Table entity. You’ll see the use of this AUTHORS_COURSES table when we define join query to retrieve data in our repository interface. Let’s now discuss the AuthorCourseDto DTO class presented in the following listing.
Listing 3.47 The AuthorCourseDto entity
package com.manning.sbip.ch03.dto;

public class AuthorCourseDto {

    private long id;
    private String authorName;
    private String courseName;
    private String description;

    public AuthorCourseDto(long id, String authorName,
➥ String courseName, String description) {
        this.id = id;
        this.authorName = authorName;
        this.courseName = courseName;
        this.description = description;
    }

    @Override
    public String toString() {
        return "{" +
                "id=" + id +
                ", authorName='" + authorName + ''' +
                ", courseName='" + courseName + ''' +
                ", description='" + description + ''' +
                '}';
    }
}
If you recall, a DTO class (the class-based projection) allows you to retrieve data from different tables through projection that might not be represented by an existing entity. Thus, a DTO is an object-oriented representation of the tuple data projection from the repository method. You can use a DTO class as the repository return type for queries with joins, as shown in the next listing.
Listing 3.48 The AuthorRepository interface
package com.manning.sbip.ch03.repository;

// Import Statements are excluded as a matter of readability

@Repository
public interface AuthorRepository extends CrudRepository<Author, Long> {

    @Query("SELECT
➥ new com.manning.sbip.ch03.dto.AuthorCourseDto
➥ (c.id, a.name, c.name, c.description) from AUTHOR a,
➥ COURSES c, AUTHORS_COURSES ac where a.id = ac.authorId
➥ and c.id=ac.courseId and ac.authorId=?1")
    Iterable<AuthorCourseDto> getAuthorCourseInfo(long authorId);
}
In the AuthorRepository interface presented in listing 3.48, there is a query method that fetches data from the AUTHORS, COURSES, and AUTHORS_COURSES tables. Since the data obtained through the projection do not represent either the Author or Course entity, it is represented with the AuthorCourseDto class.
The AuthorRepository interface extends the CrudRepository to access the basic CRUD features. It also defines a custom finder method to fetch the course details authored by an author through the authorId. As you’ve seen in the earlier techniques, the @Query annotation allows you to specify the query that should be used to fetch the data from the database tables. Notice the query specified in the @Query annotation is not an SQL query. It is a JPQL query that joins all three tables to fetch the data and map to the provided DTO instance. In figure 3.8, there are three tables, namely AUTHORS, AUTHORS_COURSES, and COURSES. You’ve defined a query method with the query that joins AUTHORS, COURSES, and AUTHORS_COURSES tables and fetches data based on the criteria specified in the query. Thus, you’ve created the AuthorCourseDto Java POJO that represents the columns in the returned projection.

Now, we’ll add a test case to see the usage of the getAuthorCourseInfo(..) method of AuthorRepository in practice, as shown in the following listing.
Listing 3.49 Unit test to validate many-to-many relationship
package com.manning.sbip.ch03;

// Import Statements are excluded as a matter of readability

@SpringBootTest
class CourseTrackerSpringBootApplicationTests {

    @Autowired
    private AuthorRepository authorRepository;

    @Test
    public void whenCountAllCoursesThenExpectFiveCourses() {
        assertThat(authorRepository.getAuthorCourseInfo(2)).hasSize(3));
    }
}
In listing 3.49 you defined a test case that fetches courses authored by author ID 2. In this example, the author ID has authored three courses. Thus, you’ve asserted the number of courses to 3. If you execute this test case, you’ll see that it runs successfully and asserts that 3 courses are authored by author ID 2.
In this section, you’ve seen an example of how to manage the many-to-many relationship among the entities. Although the presented example is a very basic one, it demonstrated the features offered by Spring Data JPA to establish and maintain many-to-many relationships between your business domain objects. For instance, you’ve seen the use of @ManyToMany annotation in both the entities maintaining the many-to-many relationship.
Besides, you’ve also learned the concept of projection. We’ve explored both the interface and class-based projections with examples. An interface-based projection allows you to selectively fetch columns from an entity, whereas a class-based projection with the notion of DTOs allows you to access data that belongs to multiple entities.
Discussing all the relationship types with code examples is beyond the scope of the book. We encourage you to implement the other relationship types once you are comfortable with the concepts described in this technique.
Summary
In this chapter, you’ve explored a variety of topics related to database communication from a Spring Boot application. Many of these features are used extensively in Spring Boot application development. Let’s quickly summarize the concepts you’ve learned in this chapter:
-
You have been introduced to Spring Data, why it’s needed, and various Spring Data modules.
-
You can configure a relational database and NoSQL databases with Spring Boot.
-
You can initialize the database schema with schema.sql and data.sql as well as through Spring Data JPA.
-
You gained an understanding of Spring Data
CrudRepositoryandPagingAndSortingRepositoryinterfaces and their use in a Spring Boot application. -
You can access data from a relational database using query methods,
@NamedQuery,@Query, Criteria API, andQuerydsl. -
You know how to manage the many-to-many relationship between domain objects in a Spring Boot application.
In chapter 4, you’ll dive into two important concepts of Spring Boot: autoconfiguration and actuator. Spring Boot autoconfiguration performs a lot of automatic configuration under the hood for us and makes it relatively simple to start developing applications. Spring Boot Actuator provides an infrastructure that lets you monitor and interact with a Spring Boot application. Let’s discuss these in the next chapter!