
2
Defining and Using Sequelize Models
For our Avalon Airlines project that we introduced in the previous chapter, we will need to instruct our application on how we want to define our database’s schematics. A database can have various roles and applications but only a single purpose, and that purpose is to organize our data (storage is the filesystem’s job). Before we can begin defining our models within the Node.js application, we need to think about the entities of our business logic and models from a project’s perspective (and each project will have different requirements). Most projects will structure their schema in a way that categorizes organizations (for example, customers, employees, vendors, and companies) and things such as products, planes, and receipts from transactions.
Object-relational mapping (ORM) helps us ensure that the database is organized from the data and team’s perspective. Sequelize will help us manage the nomenclature for our project (for example, whether to define tables using a snake_case or with a PascalCase pattern). Relations—or associations—between models will be automatically created and managed by Sequelize. Business logic workflows can also be established so that you do not have to remember workflows such as removing the customer’s boarding pass if they canceled their trip. That part would be handled in one organized place versus invoking RemoveBoardingPass(...) in every code section that cancels a trip (regardless of whether the method was called from the customer, an employee, and so on). This chapter will teach you how to define and synchronize your models with a database and how to apply the data to a Node.js runtime application using Sequelize. This will be the initial foundation on how to operate Sequelize.
This chapter will introduce you to the following concepts:
- Defining models for a database
- Exploring the various Sequelize data types and when to use them
- Migrating schematic changes and data from Sequelize to the database
- Manipulating and querying data using Sequelize
- Advanced Sequelize options for defining models
Technical requirements
You can find the code files present in this chapter on GitHub at https://github.com/PacktPublishing/Supercharging-Node.js-Applications-with-Sequelize/tree/main/ch2
Defining models for a database
In this section, we will go over a brief overview of our project’s requirements and establish which kinds of models we need to define. After that, we will run a script generator command from the Sequelize command-line interface (CLI) tool and inspect the basic structure of a model’s definition.
For Avalon Airlines, we will begin modeling with the following organizations and things:
- Airplanes
- Customers
- Flight schedules
- Boarding tickets
Each model will have its own table within the database. We will eventually associate these models or tables with columns, indices, validation, and relations to other models. For now, we will define, select (or query), insert, update, and delete data from these tables using Sequelize within our Node.js application. If you are working on a pre-existing project that already has a database, the Manipulating and querying data using Sequelize section will pertain to you more than to someone starting on a project from a clean slate.
We will first generate our models with the minimum requirements for columns using the Sequelize CLI tool. Then, we will go over the code that was generated by the CLI so that you are more familiar with how to define Sequelize models without depending on the CLI. Generate the previously mentioned models with the following commands within the project’s root directory:
sequelize model:generate --name Airplane --attributes planeModel:string,totalSeats:integer
sequelize model:generate --name Customer --attributes name:string,email:string
sequelize model:generate --name FlightSchedule --attributes originAirport:string,destinationAirport:string,departureTime:date
sequelize model:generate --name BoardingTicket --attributes seat:string
You may have noticed we used a singular noun for our models’ names. Sequelize will automatically pluralize the associated table and models for us. You can disable this behavior via Sequelize configuration settings, which will be discussed in detail further in this chapter. For our BoardingTickets model, we will generate associations of a customer and flight schedules in the next chapter, but for now, we can build the bare minimum for the table.
Tip
Sequelize comes with some useful utility functions available to the developer. The framework uses a library called Inflection, which comes with a set of string manipulation functions. Sequelize exposes underscore, singularize, and pluralize functions directly from Sequelize.
Opening the models/flightschedule.js file, we should see the following generated code:
'use strict';
const {
  Model
} = require('@sequelize/core');
module.exports = (sequelize, DataTypes) => {
  class FlightSchedule extends Model {
    /**
     * Helper method for defining associations.
     * This method is not a part of Sequelize lifecycle.
     * The `models/index` file will call this method
       automatically.
     */
    static associate(models) {
      // define association here
    }
  };
  FlightSchedule.init({
    originAirport: DataTypes.STRING,
    destinationAirport: DataTypes.STRING,
    departureTime: DataTypes.DATE
  }, {
    sequelize,
    modelName: 'FlightSchedule',
  });
  return FlightSchedule;
};
The 'use strict'; line in the preceding code snippet will tell our Node.js runtime to execute the JavaScript file (models/flightschedule.js) with a set of rules to help alleviate sloppy mode. Strict mode will prohibit the developer from assigning values to undeclared variables, using reserved keywords as defined by ECMAScript 2015 (ES6), and so on. This mode is completely optional for the contents of this book; however, if you wish to learn more, Mozilla offers a helpful guide on the differences between strict and sloppy mode here: https://developer.mozilla.org/en-US/docs/Web/JavaScript/Reference/Strict_mode/Transitioning_to_strict_mode.
The next set of instructions is to import the Model class from Sequelize, which we will use to initialize the model in the next few commands. The module.exports line that follows is a pattern that the Sequelize model loader (the models/index.js file) can interpret and how to invoke the file. The first argument provides an instance of Sequelize to us with all of the parameters and configuration settings that we established from the models/index.js file. The second parameter, DataTypes, provides a more ergonomic way of declaring the various data types for our columns (for example, instead of having to type out sequelize.DataTypes.STRING, we can omit the sequelize. instance prefix and just use DataTypes.STRING).
Next, we define our FlightSchedule class and extend Sequelize’s Model class. Here, we can define our associations, hooks/events, table information, and so on. The CLI will generate a static function for us called associations. For now, we can leave this function as is; we will modify it later throughout the book.
The last instruction within this file takes our FlightSchedule class and invokes the init() function, which will set up internal rules and instructions to help Sequelize navigate the model’s definition. This is also where Sequelize learns how to synchronize the model with the database, as shown in the following screenshot. If you were to set Sequelize’s option to sync: true, there would be additional Structured Query Language (SQL) commands executed such as DROP TABLE IF EXISTS for when we want to test our application on a clean slate every runtime. Having the sync option set to true is useful for unit tests and early prototype development. It is not recommended to set this option to true within a production environment:
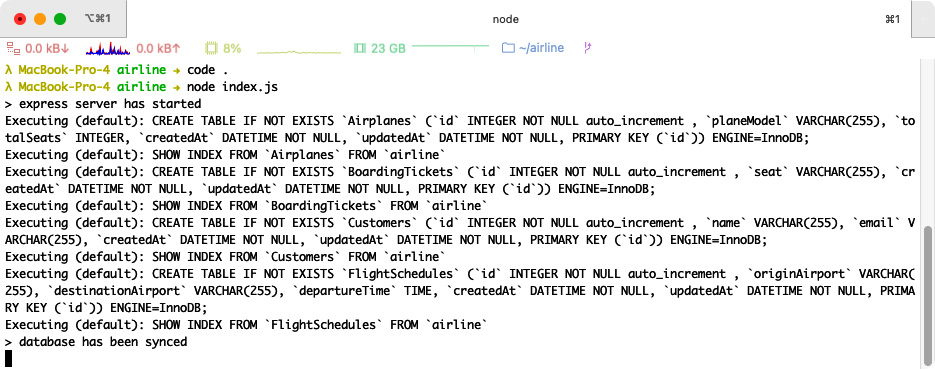
Figure 2.1 – Sequelize’s automatic synchronization
Note
Running our Node.js application and letting Sequelize synchronize our database is fine for the initial implementation phase, but we will go over the methodology of using Sequelize’s CLI and migrations to perform the necessary SQL commands to synchronize the database. Migrations offer incremental changes/updates as opposed to the Sequelize synchronize option, which is more of a generic solution.
The first parameter of the init() function is where we define our model’s attributes (or columns). The pattern for this is typically an object with the keys as column names and the value for each key is either a DataType, a literal string value, or an object containing advanced options for each column. From this example, we are shown three columns (originAirport, destinationAirport, and departureTime) with string, string, and date data types respectively.
The second parameter lets us define instance type settings for the model explicitly. This is where we can define a different table name, choose whether to pluralize our tables, disable meta columns (such as createdAt and updatedAt), and so on. We will go into details about these options later in this chapter.
If you prefer to not use classes in your project, there is another way to define our models. The following code snippet provides an example of using Sequelize’s define() function:
module.exports = (sequelize, DataTypes) => {
    return sequelize.define('FlightSchedule', {
        originAirport: DataTypes.STRING,
        destinationAirport: DataTypes.STRING,
        departureTime: DataTypes.DATE
    }, {
        sequelize,
    });
};
The parameters remain relatively the same as init() except that the first parameter is now the model’s name. Either way is acceptable and one does not provide advantages over the other from Sequelize’s point of view. This book will use the former example throughout its code base (the Model class), but for advanced configuration settings and adding associations, this book will illustrate both styles as there are some fundamental differences, ergonomically speaking. For programmers who favor using TypeScript over JavaScript, the Model class method may provide a more native experience to you.
Now that we have an understanding of how models are defined in Sequelize, we can go over which built-in attribute data types Sequelize has to offer, along with a brief explanation to help guide your future model designs.
Exploring the various Sequelize data types and when to use them
As explained earlier, Sequelize offers us various data types to help map our model’s attributes to their respective database management system (DBMS) column types. Next is a list of what Sequelize has to offer, along with a brief explanation.
STRING
The STRING data type refers to a Variable Character Field (VARCHAR) column type, which is a non-fixed character column. The maximum storage for this column type varies depending on the DBMS. VARCHAR fields usually contain meta information to help optimize the DBMS’ query planner. MySQL explicitly adds another byte to the column’s prefix header if the size of the string is greater than 255 bytes. A query planner could use this information to help alleviate pressure from memory, or the central processing unit (CPU), when retrieving/collecting/analyzing the data. To call VARCHAR with a fixed paging length, you would define the column as DataTypes.STRING(100) instead of DataTypes.STRING.
Within a VARCHAR column type, the DBMS will not store the value as a fixed length (no padding is required). If you need data to be retrieved in the exact same way it was stored, you could use the VARCHAR BINARY column type. This can be achieved by declaring the column’s data type as DataTypes.STRING.BINARY.
Despite having the word “binary” in the data type’s name, for storing movies, pictures, and so on, it is often recommended to use the BLOB type over VARCHAR BINARY. The binary part of VARCHAR BINARY performs comparisons over the binary representation of that column versus a character set (charset).
For instance, suppose we had the following rows in a database: A, a, B, and b. The VARCHAR column type would have an internal map to tell the database that “A” and “a” will be listed prior to “B” and “b”. In a VARCHAR BINARY column, the sum binary representation of A, a, B, and b would be 0, 2, 1, 3, which would sort into the following: A, B, a, b. There is no internal map/charset for VARCHAR BINARY columns, so the database would not be able to tell that “A” and “a” are actually the same letter.
For the most part, we could use VARCHAR BINARY and BLOB interchangeably in MySQL versions above 5.0.2. There are some small subtle differences, as indicated here:
- An index prefix length must be specified for BLOB indexes
- BLOB column types cannot have default values
CHAR
The CHAR data type is similar to the STRING data type, except that it references the CHAR column type. Traditionally, a DBMS will cap the length of a CHAR column to 255 characters. A VARCHAR type will allow you to go over the specified paging size without an error or an exception. A CHAR column could be used as a last-resort effort for validating your data and ensuring it does not exceed the specified length (for example, CHAR(20) would cap the data to 20 characters defined by the table’s collation). CHAR column types are padded to their fixed length, which could help optimize the DBMS—or even your application—presuming that the pre-determined length is appropriate for the scenario’s paging size.
TEXT/TINYTEXT/MEDIUMTEXT/LONGTEXT
Database designers understand that sometimes, our text data requires a considerable amount of space or needs to be associated with rows larger than 65,535 bytes (a MySQL VARCHAR limitation). In this case, we would use a TEXT column type. Every DBMS has its nuances and limitations; since this book uses MySQL, we will briefly go over MySQL’s TEXT limitations, as follows:
- TINYTEXT: 255 bytes
- TEXT: 64 kilobytes (KB)
- MEDIUMTEXT: 16 megabytes (MB)
- LONGTEXT: 4 gigabytes (GB)
DataTypes.TEXT will default to the TEXT column type, and if you wanted to declare your column type as TINYTEXT, MEDIUMTEXT, or LONGTEXT, you would use DataTypes.TEXT('TINY'), DataTypes.TEXT('MEDIUM'), or DataTypes.TEXT('LONG'), respectively. Unlike the VARCHAR type, there is no BINARY option for TEXT column types. For storing serialized binary types, you would use VARCHAR BINARY or BLOB instead.
CITEXT
CITEXT stands for Case-Insensitive Text, which is a column that preserves the data’s casing except for comparison operations. This option is available for Postgres and SQLite databases only.
NUMBER
Not to be confused with Postgres’ NUMERIC type, the NUMBER data type is an abstraction for more than an explicit type, depending on its configuration settings. This data type should not be used directly unless you are extending/adding your own numeric data type. This abstract data type could help organize your code if you use the same precision and scale values throughout your database, or if your online store sells a product in different denominations and currencies.
The following code snippet provides an example of how you would extend your own numeric data type:
// INT(4)
var unsignedInteger = DataTypes.NUMBER({
    length: 4,
    zerofill: false,
    unsigned: true,
});
// FLOAT(5,4)
var specificFloat = DataTypes.NUMBER({
    length: 5,
    zerofill: false,
    unsigned: false,
    decimals: 4
});
// DECIMAL(6,4)
var specificPrecision = DataTypes.NUMBER({
    zerofill: false,
    unsigned: false,
    precision: 6,
    scale: 4
});
INTEGER/TINYINT/SMALLINT/MEDIUMINT/BIGINT
With DataTypes.INTEGER, DataTypes.SMALLINT, and so on, we can associate our attributes with the respective column types. You can find references for minimum and maximum values for each integer type with MySQL here: https://dev.mysql.com/doc/refman/5.7/en/integer-types.html. To declare your model’s attribute as an unsigned value, we can attach the UNSIGNED option to our data type, like so:
DataTypes.INTEGER(21).UNSIGNED
If we wanted to have our attribute unsigned and zero-filled, we can chain the data-type options, as follows:
DataTypes.INTEGER(21).UNSIGNED.ZEROFILL
Note
Depending on which DBMS you use, the ZEROFILL option may not be available to you. If you are using a Postgres database, then the order of assigning those attributes is important (UNSIGNED must be declared before ZEROFILL). In MySQL, the ZEROFILL option will also imply UNSIGNED automatically. The ZEROFILL attribute will only affect the data from an aesthetics perspective (when you select data) and will not modify your data in storage.
FLOAT/REAL
Traditionally, a DBMS will differentiate between FLOAT and REAL column types by their bit precisions. FLOAT columns are usually stored with 32-bit precision, and REAL column types are stored with 64-bit precision. Microsoft SQL Server (MSSQL) is the inverse of this, where REAL column types are 64-bit and FLOAT columns are 32-bit. To make things even more confusing, MySQL will treat REAL as the same as a DOUBLE (also known as DOUBLE PRECISION and DECIMAL) column.
Internally, Sequelize handles FLOAT, REAL, and DOUBLE in the same way. There is a small float validation performed for the FLOAT type explicitly, but otherwise, Sequelize will translate the column type directly to the DBMS. Just as with the integer data types, UNSIGNED and ZEROFILL can be defined on these attributes as well, as follows:
DataTypes.FLOAT.UNSIGNED.ZEROFILL
DECIMAL/DOUBLE
The DECIMAL or DOUBLE data type allows us to define a precise length and scale for our columns using the traditional format of DECIMAL(P, S) where P > S. The P variable is the number’s precision and the S variable is the number’s scale. The precision determines the maximal length of the whole number part, and the scale defines the maximal length of the decimal part. For example, DataTypes.DECIMAL(6, 4) will give us a decimal column with a precision of 6 and a scale of 4. An example value for this column could be 38.3411.
Note
You may use DataTypes.NUMERIC as an alias for DataTypes.DECIMAL.
BOOLEAN
There are many ways to express a Boolean. Some applications prefer to use numerical values (or as a single bit) of 0 for false and 1 for true. Sometimes, the Boolean value will be stored as a string such as true, false, t, or f. Sequelize will automatically handle numerical—or bit—values, as well as the “true” or “false” string expressions as appropriate Boolean values for Node.js. If the value is marked as “t” or “f”, then Sequelize will pass the raw value along to the programmer to handle (as a way to avoid being over presumptuous—this behavior may change in the future). A Boolean column can be defined with just DataTypes.BOOLEAN. There are no arguments or inputs to process for this data type.
DATE/DATEONLY/TIME
The DATE data type references the DATETIME column types for MySQL, MariaDB, and SQLite. For Postgres, the DATE data type will be translated as TIMESTAMP WITH TIME ZONE.
In MySQL, you can define fractional seconds for DATETIME columns by up to six digits, like so:
DataTypes.DATE(6)
If you wish to keep just the date or time, you may use DataTypes.DATEONLY or DataTypes.TIME, respectively.
Quick note on Postgres without time zones
If you are using Postgres with a column type of TIMESTAMP WITHOUT TIME ZONE, and you know the data’s time differentiates that from the server that is running the application, it is recommended to set the time zone’s offset. This can be achieved via the pg Node.js library, as illustrated here:
var types = require('pg').types
function setTimestampWithoutTimezoneOffset(val) {
// '+0000' being the UTC offset, change this to the desired time zone
return val === null ? null : new Date(stringValue + '+0000');
}
types.setTypeParser(types.builtins.TIMESTAMP, setTimestampWithoutTimezoneOffset);
For more information on setting types for Postgres within Node.js, refer to the following link: https://github.com/brianc/node-pg-types
NOW
DataTypes.NOW is a special type within Sequelize. It is not to be used as the column’s type but as the attribute’s value and is traditionally set as the attribute’s defaultValue option. If we wanted a Receipt model that kept track of when a transaction was made, it would look similar to this:
Receipt.init({
    total: DataTypes.DECIMAL(10,2),
    tax: DataTypes.DECIMAL(10,2),
    dateOfPurchase: {
        type: DataTypes.DATE,
        defaultValue: DataTypes.NOW
    }
}, {
    sequelize,
    modelName: 'Receipt'
});
Whenever we insert a Receipt record, Sequelize will automatically convert the dateOfPurchase attribute’s value to the DBMS’ NOW() function from the attribute’s defaultValue option using Sequelize’s DataTypes.NOW data type. If we have defined a value for the attribute initially, then Sequelize will use that value instead.
HSTORE
HSTORE is for Postgres only. This data type is used for mapped key-value types but is often replaced by JSON or JSON Binary (JSONB). If your project requires the use of HSTORE, there is a caveat to keep in mind, which is to install the pg-hstore Node.js library. The full installation command would look like this:
npm install --save sequelize pg pg-hstore
For selecting data, in Sequelize, your where clause would be an object instead of an integer, string, and so on. An example would look like this:
MyModel.find({
  where: {
    myHstoreColumn: {
      someFieldKey: 'value',
    }
  }
});
JSON
The JSON data type is available for SQLite, MariaDB, MySQL, and Postgres. When defining an attribute with the JSON type, you can query information similar to how the HSTORE type is queried, with the exception of having the ability to deeply nest your search clause. Let us say we had the following JSON data type stored in a column:
{
    "someKey": {
        "deeply": {
            "nested": true
        }
    }
}
We would search for the nested value like so:
MyModel.find({
    where: {
        myJsonColumn: {
            someKey: { deeply: { nested: true } }
        }
    }
});
Please note that MySQL and MariaDB introduced support for JavaScript Object Notation (JSON) fields in MySQL 5.7.8 and MariaDB 10.2.7 respectively. For former versions, you can define models with situations where the DataTypes.JSON attribute type will not be compatible with your database. To resolve this issue, you can define models with getters/setters that will store and retrieve the JSON document, like so:
sequelize.define('MyModel', {
    myJsonColumn: {
        type: DataTypes.TEXT,
        get: function () {
            return JSON.parse(this.getDataValue('value'));
        },
        set: function (val) {
            this.setDataValue('value',JSON.stringify(val));
        }
    }
});
Note
For users of MSSQL 2016 and above, please refer to https://sequelize.org/master/manual/other-data-types.html#mssql as a workaround for handling JSON column types with this DBMS.
JSONB
The JSONB data type is reserved for Postgres only. If you are using a JSON column for storage, it is recommended to use the JSON column type, and if you are using comparison operators on the column, it is recommended to use the JSONB column type.
Other than the previously mentioned way of querying JSON data, you can also query JSONB data types with the following formats:
// String matching
MyModel.find({
  where: {
    "someKey.deeply.nested": {
      [Op.eq]: true
    }
  }
});
// Using the Op.contains operator
MyModel.find({
  where: {
    someKey: {
      [Op.contains]: {
        deeply: {
          nested: true
        }
      }
    }
  }
});
BLOB
Several databases, including MySQL, offer a range of binary large object (BLOB) types. Regardless of the input for the BLOB attribute type, Postgres will always be converted into a bytea (byte array) column type. This data type is useful for storing anything binary-related, such as images, documents, or serialized data. You can see an example of it in use here:
DataTypes.BLOB // BLOB
DataTypes.BLOB('tiny') // TINYBLOB
DataTypes.BLOB('medium') // MEDIUMBLOB
DataTypes.BLOB('long') // LONGBLOB
Here is a table of different BLOB types with their byte prefix length and their maximum storage length for MySQL:
|
BLOB Type |
Byte Prefix Length |
Maximum Storage (in bytes) |
|
TINYBLOB |
1 byte |
2^8 - 1 |
|
BLOB |
2 bytes |
2^16 - 1 |
|
MEDIUMBLOB |
3 bytes |
2^24-1 |
|
LONGBLOB |
4 bytes |
2^32 - 1 |
RANGE
RANGE data types are reserved for Postgres only. Supported range types are INTEGER, BIGINT, DATE, DATEONLY, and DECIMAL. You may define an attribute with the range type like so:
var MyModel = sequelize.define('MyModel', {
    myRangeColumn: DataTypes.RANGE(DataTypes.INTEGER)
});
There are a couple of ways to create ranges for our models, as illustrated here:
// inclusive boundaries are the default for Sequelize
   var inclusiveRange = [10, 20];
MyModel.create({ myRangeColumn: inclusiveRange });
// inclusion may be toggled with a parameter
   var range = [
    { value: 10, inclusive: false },
    { value: 20, inclusive: true }
];
MyModel.create({ myRangeColumn: range });
When querying a range column, the data for that attribute will always return in object notation with the value and inclusive keys.
UUID/UUIDV1/UUIDV4
A universally unique identifier (UUID) is a 128-bit label with some sort of constraints and stipulations for uniqueness and near to no chance of a collision with other values. The UUIDV1/UUIDV4 data types work in conjunction with the UUID attribute type. We can declare a model that has a default UUIDV4 value as its primary key (PK) like so:
sequelize.define('MyModel', {
    id: {
        type: DataTypes.UUID,
        defaultValue: DataTypes.UUIDV4,
        allowNull: false,
        primaryKey: true
    }
});
VIRTUAL
The VIRTUAL attribute type is a special type that will hydrate the data within Sequelize but will not populate the data into the database. The VIRTUAL field could be used for organizing code, validations, and extending Sequelize to any protocol or framework that requires nested typing (for example, GraphQL, Protocol Buffers (Protobuf), and so on), which is covered in Chapter 9, Using and Creating Adapters.
We can define a VIRTUAL attribute like so:
sequelize.define('MyModel', {
    envelope: DataTypes.STRING,
    message: {
        type: DataTypes.VIRTUAL,
        set: function(val) {
            // the following line is optional
            // but required if you wish to use the
               validation associated with the attribute
            this.setDataValue('message', val);
            this.setDataValue('envelope',
                               encryptTheMessage(val));
        },
        validate: {
            noDadJokes: function(val) {
                if (val === "knock knock") {
                    throw new Error("Who is there? Not this
                                     message")
                }
            }
        }
    }
});
For retrieving VIRTUAL attributes, we would need to define a data type as a parameter for the DataTypes.VIRTUAL invocation. If we want to pass through other attributes within our VIRTUAL attribute, we would define a list as the second parameter. An example is shown here:
sequelize.define('MyModel', {
    envelope: DataTypes.STRING,
    message: {
        type: DataTypes.VIRTUAL(DataTypes.STRING, ['en
        velope']),
        get: function() {
            return decryptTheMessage(this.get('envelope'));
        },
        set: function(val) {
            this.setDataValue('envelope',
                               encryptTheMessage(val));
        }
    }
});
ENUM
Sequelize has a DataTypes.ENUM attribute type for enumerated columns. At the moment, only Postgres has this feature enabled. A solution for other database engines would be to define a custom validation rule for your model that performs some sort of inclusion operator. Custom validations for our models will be discussed in the next chapter. There are three different ways of defining enumerated attributes, as illustrated here:
// Defining enums with function arguments
DataTypes.ENUM('a', 'b')
// Defining enums with an array argument
DataTypes.ENUM(['a', 'b'])
// Defining enums with an object argument
DataTypes.ENUM({
    values: ['a', 'b']
})
ARRAY
ARRAY attribute types are supported for Postgres only at the moment. This type requires a parameter of an applicable data type. You can see an example here:
DataTypes.ARRAY(DataTypes.STRING) // text[]
DataTypes.ARRAY(DataTypes.DECIMAL) // double precision[]
GEOMETRY
Sequelize can handle geometric data for MariaDB, MySQL, and Postgres (as long as the PostGIS extension is enabled). The GeoJSON specification (https://tools.ietf.org/html/rfc7946) can be useful for querying geometric data for an airline business. For example, we can mark the coordinates of an airport and the current location of an airplane to determine the estimated time of arrival without manually memorizing the Haversine algorithm (a formula to determine the distance between two points on a sphere). Reference examples can be found in the following code snippet:
var MyModel = sequelize.define('MyModel', {
    point: DataTypes.GEOMETRY('POINT'),
    polygon: DataTypes.GEOMETRY('POLYGON')
});
var point = {
    type: 'Point',
    coordinates: [44.386815, -82.755759]
}
var polygon = { type: 'Polygon', coordinates: [
    [
        [100.0, 0.0], [101.0, 0.0], [101.0, 1.0],
        [100.0, 1.0], [100.0, 0.0]
    ]
]};
await MyModel.create({ point, polygon });
In the preceding snippet, we first define our model with two attributes (point and polygon) with the respective geometry data types (for a complete list, you may reference the Request for Comments (RFC) manual previously mentioned). Then, we create our geometric objects with a set of defined values (a point will accept two coordinates, and a polygon can accept N coordinates). The last line will create an entry with the defined values for the corresponding attribute.
Note
GeoJSON is handled differently depending on whether we are using the Postgres or MariaDB/MySQL dialect. The Postgres dialect will call the ST_GeomFromGeoJSON function for interpretation of GeoJSON, and MariaDB/MySQL will use the GeomFromText function. The following reference goes into detail on spatial columns with MySQL: https://dev.mysql.com/doc/refman/5.7/en/spatial-types.html.
GEOGRAPHY
For MariaDB/MySQL, the GEOGRAPHY attribute type will work the same as the GEOMETRY type, but for Postgres, Sequelize will utilize PostGIS’ geography data type. The GEOGRAPHY attribute type follows the same GeoJSON syntax as the GEOMETRY type.
Note
If you are looking for a complete set of utility functions and querying complex relationships between several coordinates, then the GEOMETRY type is recommended over the GEOGRAPHY type. If you need to use geodetic measurements instead of Cartesian measurements, or if you have simpler relationships over large areas, then the GEOGRAPHY type would be more applicable to you.
CIDR/INET/MACADDR
These three attribute types are for Postgres only. All of these types perform some type of internal validation respective to the type. These types do not have an input parameter. The following are brief explanations, with references, for each of these data types:
- CIDR—This stands for Classless Inter-Domain Routing and is used for allocating Internet Protocol (IP) addresses and route tables (https://datatracker.ietf.org/doc/html/rfc4632)
- INET—Common ways of identifying over the net (https://datatracker.ietf.org/doc/html/rfc6991)
- MACADDR—Unique identifiers (UIDs) for network interfaces (https://www.rfc-editor.org/rfc/rfc7042.html)
TSVECTOR
The TSVECTOR data type is used for searching through text columns with advanced operators available in Postgres’ to_tsquery() function. These operators include wildcard matching, negate matching, and Boolean search. This attribute type is for Postgres only and will only accept string variables for values. When querying a TSVECTOR attribute, Sequelize will not interpret the attribute type with its associated functions implicitly (for example, to_tsvector). Let’s suppose we have the following model definition:
var MyModel = sequelize.define('MyModel', {
    col: DataTypes.TSVECTOR
});
MyModel.create({
    col: 'The quick brown fox jumps over the lazy dog'
});
Then, we want to query a value on the col field, like so:
MyModel.find({
    where: { col: 'fox' }
});
The generated SQL would look similar to this:
SELECT * FROM MyModel WHERE col = 'fox';
Sequelize will interpret this query with an equals operator for the where clause. In order to take advantage of the TSVECTOR column type, we would have to be explicit with our intentions, like so:
MyModel.find({
    where: {
        col: {
            [Op.match]: sequelize.fn('to_tsvector', 'fox')
        }
    }
});
This will convert the where clause’s operator from equal to matching (@@). The sequelize.fn method allows you to explicitly invoke a function from your DBMS. The query generated by this procedure would look like this:
SELECT * FROM MyModel WHERE col @@ to_tsvector('fox');After learning how to define our model and which data types are available to us in Sequelize, we can now begin migrating our definitions to an actual database. Sequelize offers a migration subcommand within its command-line tool, to make this easy for us.
Migrating schematic changes and data from Sequelize to the database
We have defined our database’s schema with the generated files from the command-line tool, and we are now ready to migrate those definitions to our DBMS. Using Sequelize’s migrations can help teams of developers maintain the same schema structure across multiple machines. Migrations can provide a historical reference as to how your database has changed over time, which can also help us undo certain changes and revert our database’s schema to a specific time.
Migrating schematic changes
The Sequelize CLI provides a convenient way of propagating updates toward a database. All of our schematic changes will be located within the migrations directory, and all of our data seeds will be located within the seeders directory. This chapter will cover only the initialization of the database’s structure. In subsequent chapters, there will be examples of adding and removing columns (or indices) using the migration tool.
In the Defining models for a database section, we used the Sequelize CLI to generate our models, which should have created several files in the migrations directory. Each file is prefixed with a timestamp, a call to action (CTA) (for example, create), and the model’s name. An example for one of the files (20210914153156-create-airplane.js) would look like this:
'use strict';
module.exports = {
  up: async (queryInterface, Sequelize) => {
    await queryInterface.createTable('Airplanes', {
      id: {
        allowNull: false,
        autoIncrement: true,
        primaryKey: true,
        type: Sequelize.INTEGER
      },
      planeModel: {
        type: Sequelize.STRING
      },
      totalSeats: {
        type: Sequelize.INTEGER
      },
      createdAt: {
        allowNull: false,
        type: Sequelize.DATE
      },
      updatedAt: {
        allowNull: false,
        type: Sequelize.DATE
      }
    });
  },
  down: async (queryInterface, Sequelize) => {
    await queryInterface.dropTable('Airplanes');
  }
};
Sequelize will use the scope of the up(…) method when we invoke the migrations subcommand. The down(…) method is reserved for when we decide to undo, or revert, a migration. The query interface is a database-agnostic adapter that executes generic SQL commands that are available to all supported database engines. We will go into detail about the query interface in a later chapter.
You may have noticed that Sequelize has added several columns to our model’s definition. With the default settings, Sequelize will generate three additional columns, as follows:
- id—A PK as an integer value with autoIncrement set to true. The autoIncrement flag will create a sequence value (some databases, such as MySQL, will call sequences auto-increment columns).
- createdAt—This field will generate a timestamp upon the row’s creation. Since this is a Sequelize-recognized column, the default value for this column does not require us to explicitly state DataTypes.NOW or any equivalent value. Sequelize will hydrate the row’s value automatically when using applicable methods such as create().
- updatedAt—Similar to the createdAt field, except this value will update automatically from Sequelize every time the row is updated.
Note
We can prevent Sequelize from creating these attributes automatically through configuration settings. These settings will be explained in detail later in this chapter.
In the root directory of our project, run the following command to initialize migrations:
sequelize db:migrate
This command will perform several more instructions than iterating through the migrations directory. Sequelize will first look for a table called SequelizeMeta that holds meta information on which files have already been processed through the migrations subcommand. After the table has been found or created, Sequelize will iterate through the migrations table in sequential order of the file’s name (timestamps are a convenient way of maintaining this order) and skip any files found within the SequelizeMeta table.
Note
The sequelize-cli db:migrate and db:seed commands will use the NODE_ENV environmental variable to determine where to migrate/initialize data to. As an alternative, you can state which database to connect to with the --url option, like so: sequelize db:migrate --url 'mysql://user:[email protected]/database'.
If we made a mistake on a model’s definition, after migration, we always have the option to revert our changes, like so:
sequelize db:migrate:undo
This will revert the last migration performed by Sequelize. If we want to undo all of our changes, there is another subcommand, shown here:
sequelize db:migrate:undo:all
If we want to revert all of our migrations up until a certain point (this is why prefixing your filenames with a timestamp is important for congruity), we can run the following command:
sequelize db:migrate:undo:all --to XXXXXXXXXXXXXX-airlines.js
After the migration is completed, we should run the following commands:
$ mysql -uroot airline
mysql> show tables;
The tables shown in the following screenshot should be displayed:
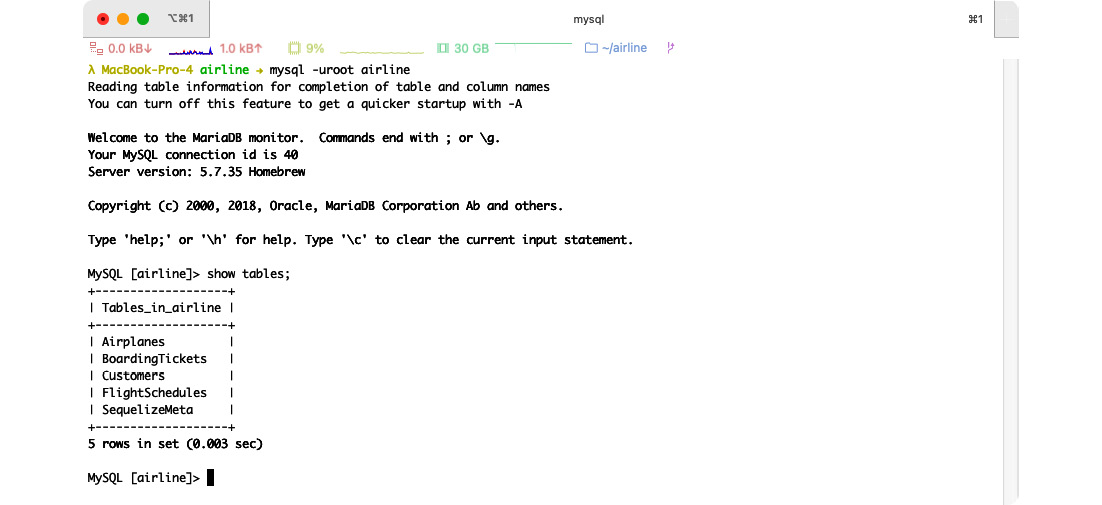
Figure 2.2 – Display of the project’s tables
Initializing seed data
Now that we have our schema in place, we can start populating our database with actual data by generating seeder files within the seeders directory. Seed data is conventionally used for initial configuration data, static information, and so on. Good thing too—our business partner just notified us that they have purchased five airplanes to help get us started. We can create seed data for these airplanes, like so:
sequelize seed:generate --name initial-airplanes
This will generate a file in our project’s seeders directory that contains the bare minimum for migrating seed data into the database. Similar to our migration files, there are only two methods exposed to the CLI: up(…) and down(…).
We will replace the file’s contents with the following code:
'use strict';
module.exports = {
  up: async (queryInterface, Sequelize) => {
    await queryInterface.bulkInsert('Airplanes', [{
      planeModel: 'Airbus A220-100',
      totalSeats: 110,
      createdAt: new Date(),
      updatedAt: new Date()
    }, {
      planeModel: 'Airbus A220-300',
      totalSeats: 110,
      createdAt: new Date(),
      updatedAt: new Date()
    }, {
      planeModel: 'Airbus A 318',
      totalSeats: 115,
      createdAt: new Date(),
      updatedAt: new Date()
    }, {
      planeModel: 'Boeing 707-100',
      totalSeats: 100,
      createdAt: new Date(),
      updatedAt: new Date()
    }, {
      planeModel: 'Boeing 737-100',
      totalSeats: 85,
      createdAt: new Date(),
      updatedAt: new Date()
    }], {});
  },
  down: async (queryInterface, Sequelize) => {
    await queryInterface.bulkDelete('Airplanes', null, {});
  }
};
Note
Unlike Sequelize’s create() function, the query interface’s bulkInsert() method will not hydrate the createdAt or updatedAt columns automatically. If you omit these columns from the seed file, the database will return an error since the columns do not have a default value.
Now, we can process our seed data via the following command:
sequelize db:seed:all
We can confirm the changes by entering the following SQL command into our database:
SELECT * FROM airplanes;
We then get the following results:
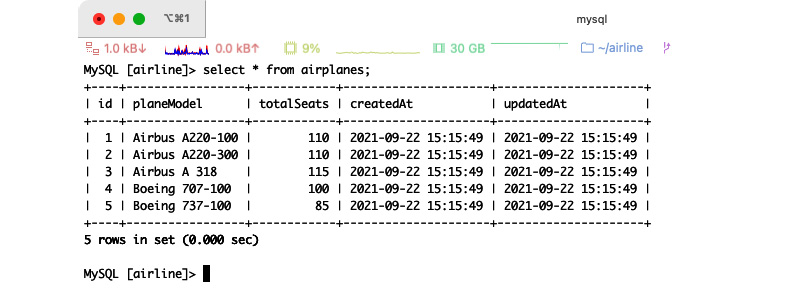
Figure 2.3 – Querying a list of airplanes
Reverting seed data is similar to the migrations subcommand, as we can see here:
sequelize db:seed:undo
sequelize db:seed:undo:all
sequelize db:seed:undo --seed <the name of your seed file>
Tip
Sequelize uses another project internally for migrations called Umzug. A full reference, and more examples on how to tune your migration cycle, can be found at the project’s GitHub repository: https://github.com/sequelize/umzug.
Once we are done inserting seed data into a database, we can now query or manipulate that data using Sequelize. The following section will provide a very brief introduction for incorporating Sequelize for an Express application following more of a reference style for Sequelize. This will help give you an idea of how we will apply Sequelize in subsequent chapters for our airline project, and enough technical knowledge to help you become comfortable with making your own adjustments.
Manipulating and querying data using Sequelize
After initializing our database’s structure and data, we should be able to view, modify, and remove the airplanes from our dashboard. For now, we will create very naive and simple implementations for our administrative tasks, but since we are the only technical employee at Avalon Airlines, this will not be a problem. As we continue creating the project, we will modify our application to become more robust and function with safety measures in mind.
Reading data
Replace the app.get('/', …) block with the following code (in index.js):
app.get('/', async function (req, res) {
    const airplanes = await models.Airplane.findAll();
    res.send("<pre>" + JSON.stringify(airplanes, undefined,
              4) + "</pre>");
});
After that, save the file and run our application with the following command:
npm run start
Now, we can visit our website at http://localhost:3000 and should see results similar to those shown here:

Figure 2.4 – Listing our airplanes
Now, we will create another route that will return the results to us for a specific airplane. If the airplane cannot be found, then we should send a Not Found Hypertext Transfer Protocol (HTTP) response code (which is 404). Add the following route below the root Uniform Resource Locator (URL) route (the app.get('/', …) block):
app.get('/airplanes/:id', async function (req, res) {
    var airplane = await models.Airplane.findByPk
                   (req.params.id);
    if (!airplane) {
        return res.sendStatus(404);
    }
    res.send("<pre>" + JSON.stringify(airplane, undefined,
              4) + "</pre>");
});
The findByPk method will try to find a record from the model’s PK attribute (by default, this will be Sequelize’s generated id column). When a record is found (for example, http://localhost:3000/airplanes/1), the application will return the record to us, but if we changed the id parameter from 1 to 10 (http://localhost:3000/airplanes/10), we should receive a Not Found response.
Here is a list with a brief explanation of Sequelize functions relating to retrieving data:
- findAll—Use this when you want to use the where clause in your query and retrieve more than one row.
- findOne—Similar to the findAll function, except that this function will return a single row.
- findByPk—A function that returns a single row using the model’s defined PK.
- findOrCreate—This function will return a single instance of the row that was either found or instantiated from the database. Sequelize will compose the attributes defined within the where and defaults key.
Complex querying
Sometimes, you will need more than just a simple where clause with an AND operator. Sequelize has several operators built in to help write queries with a more complex where clause. A full list of these operators is shown here:
- and/or—Logical AND and logical OR. These values contain an array of where clause objects.
- eq/ne—Equal (=) or Not Equal (!=).
- gte/gt—Greater-Than-or-Equal (>=) and Greater-Than (>).
- lte/lt—Lesser-Than-or-Equal (<=) and Lesser-Than (<).
- is/not—IS NULL and IS NOT TRUE, respectively.
- in/notIn—IN and NOT IN operators of any array with values.
- any/all/values—ANY (Postgres only), ALL, and VALUES operators respectively.
- col—Converts column string values into identifiers (IDs) specified by the database/dialect.
- placeholder—Internal operator used by Sequelize.
- join—Used internally by Sequelize.
- match—Match operator used for text searching (Postgres only).
- like/notLike—LIKE and NOT LIKE, respectively.
- iLike/notILike—Case-insensitive version of LIKE and NOT LIKE (Postgres only).
- startsWith/endsWith—Shorthand for the LIKE '%...' and LIKE '...%' expressions.
- substring—Shorthand expression for LIKE '%...%'.
- regexp/notRegexp—REGEXP and NOT REGEXP for MySQL and Postgres only.
- between/notBetween—BETWEEN x AND y and NOT BETWEEN x AND y.
- overlap—Postgres-only range operator for overlap (&&).
- contains/contained—Postgres-only range operator for @> and <@, respectively.
- Adjacent—Postgres-only range operator for adjacent querying (-|-).
- strictLeft/strictRight—Strict operators for Postgres ranges (<< and >>).
- noExtendRight/noExtendLeft—No extension range operators for Postgres (&< and &>).
Querying a complex where clause may look something like this:
const { Op } = require("@sequelize/core");
MyModel.findAll({
    where: {
        [Op.or]: [
            { status: 'active' },
            sequelize.where(sequelize.fn('lower', se
            quelize.col('name')), {
                [Op.eq]: 'bob'
            },
            {
                [Op.and]: {
                    age: {
                        [Op.gte]: 40
                    },
                    name: {
                        [Op.like]: 'mary%'
                    }
                }
            }
        }]
    }
});
This will then produce the following query:
SELECT
    ...
FROM "MyModel"
WHERE (
    status = 'active'
    OR
    lower(name) = 'bob'
    OR (
        age >= 40
        AND
        name LIKE 'mary%'
    )
)
Deleting data
For deleting an instance (a single record), we can call a destroy() function, like so:
var record = MyModel.findOne({ where: { /* ... */ } });
await record.destroy();
Note
If there is no attribute marked as a PK within your model’s definition, then Sequelize may not delete the correct record. The instance’s destroy() method would be called with a where clause that tried to match all of the instance’s attributes. This could lead to unintentional deletions.
To delete multiple rows at once, execute the following code:
MyModel.destroy({ where: { name: 'Bob' }});You can remove all of a table’s data by passing a configuration option to the destroy() method, like so:
await MyModel.destroy({ truncate: true });
// or
await MyModel.truncate();
Updating and saving data
Sequelize offers a few ways of updating attributes/data, depending on where you are updating from. If you wish to update multiple rows, we could use the model’s update() function, like so:
await MyModel.update({ name: "John" }, {
  where: { name: null }
});
This query will update all of the records’ names to John, where the current value is NULL. For updating a specific instance, we would change the attribute’s value and then call the save() function, as follows:
var record = MyModel.findOne();
record.name = "John";
await record.save();
If you are in the middle of changing a record’s attributes and your workflow requires you to reset the record’s data back to the original values (without touching the database), you may do so with the reload() method, as follows:
var record = MyModel.findOne({ where: { name: 'John' } });
record.name = "Bob";
record.reload();
// the record.name attribute's value is now back to John
Creating data
To create a single row, the code for Sequelize would look similar to this:
await MyModel.create({ firstName: 'Bob' }, { ... });The second parameter accepts the following options for create():
- raw—If this Boolean value is set to true, then Sequelize will ignore the virtual setter attributes within the model’s definition. This is useful when you want to skip transforming the data through setter functions and wish to use the raw values that are provided from the query directly instead.
- isNewRecord—A Boolean value that can enable (if set to true) Sequelize’s behavior for applying default values, updating a timestamp column, and so on. The default value for this method is true.
- include—An array containing include options for Sequelize. This book will provide examples and further details in a later chapter.
- fields—An array of strings containing column names that will filter which attributes will be updated, validated, and saved.
- silent—If this value is set to true, then Sequelize will not update the updatedAt timestamp column.
- validate—A Boolean value to toggle whether or not to execute validations.
- hooks—A Boolean value that enables/disables running before/after create, update, and validate life cycle events.
- logging—A function that will pass down the query’s statement.
- benchmark—Logs execution query time (in milliseconds) and will be passed as the second parameter for the logging function.
- transaction—You may pass a transaction Sequelize instance for this option.
- searchPath—Postgres-only option for defining which search_path to use when querying.
- returning—Postgres-only option for selecting which fields to return when creating a new record. A Boolean true value will return all of the fields, but an array of strings will filter which columns to return.
Bulk-inserting data is very similar to creating a single row with Sequelize. The following code snippet illustrates an example of this:
await MyModel.bulkCreate([
    { firstName: 'Bob' },
    { firstName: 'William' }
], {...});
The first parameter is an array of values, and the second parameter is for configuration options. These options are identical to the create() method: fields, validate, hooks, transaction, logging, benchmark, returning, and searchPath. In addition, the bulkCreate() method also offers us the following options:
- individualHooks—Executed before/after create life cycle events for each record individually. This does not affect bulk before/after life cycle events.
- ignoreDuplicates—Ignores duplicated rows by any constrained key defined on the table. This feature is not supported on MSSQL or Postgres versions below 9.5.
- k—An array of fields to update if there is a duplicated key entry (for MySQL/MariaDB, SQLite 3.24.0+, and Postgres 9.5+ only).
Ordering and grouping
When sifting through your data, you can order (or group) your columns like so:
MyModel.findAll({
    where: { name: 'Bob' },
    order: [
        ['name', 'DESC']
    ]
});
For grouping, depending on which database you are using, you may have different results from other database engines (such as requiring you to select only aggregated functions and grouped columns). Consult your database’s documentation for the specific nuances and rules that are required for grouping. Here is an example of a simple GROUP BY statement:
MyModel.findAll({ group: 'name' });Caution
Sequelize will treat the group’s input as a literal value. If you are grouping by user-generated content, it is highly recommended to escape your value to avoid SQL injections (https://en.wikipedia.org/wiki/SQL_injection). You may escape values using the sequelize.escape('...'); method.
Limits and pagination
We can simply use the offset and limit key values for our finder methods, like so:
MyModel.findAll({ offset: 5, limit: 10 });This will select from the MyModel table with a limit of 10 and an offset of 5.
Note
The limit property will tell the database to only retrieve that number of rows (in MSSQL, this would be SELECT TOP N or FETCH NEXT N ROWS). The offset property will skip N rows before retrieving the results. For MSSQL 2008 (and earlier) users, Sequelize will offer offset support by nesting queries to simulate offset behavior for compatibility and completeness.
Now that we have finished referencing Sequelize’s methodologies for querying and manipulating data, we can now go over the more advanced options when defining a model. These options can change the way Sequelize will transform data internally, filter queried data, and adjust naming conventions, allowing you to better adapt Sequelize’s behavior to your company/project’s requirements.
Advanced Sequelize options for defining models
When defining a model, within Sequelize, the last input parameter for the init() and define() methods offers us a way to fine-tune our project’s requirements and Sequelize’s behavior. These parameter options are useful for situations such as when we need to construct Sequelize in a pre-existing environment that does not adhere to Sequelize’s naming conventions (for example, a column named PersonIsMIA as opposed to Sequelize’s "PersonIsMia" convention).
sequelize
A copy (or new) instance of Sequelize to associate with the model. Sequelize will return an error if this field is not provided (except when using the sequelize.define method). Useful for querying across data centers or even databases.
modelName
Explicitly defines the model’s name with a string. This would be the first parameter in Sequelize’s define() method. If you are using ES6 class definitions, the default for this value would be the class name.
defaultScope/scopes
An object for values that will set the model’s default scope and set applicable scopes for the model, respectively. Scopes can be useful for code organization or enforcing a basic access control list as a default behavior. We will go into detail about scoping in a later chapter.
omitNull
Setting this Boolean value to true will tell Sequelize to omit any columns that have a null value when saving a record.
timestamps
This option allows us to control Sequelize’s behavior for adding createdAt and updatedAt timestamp columns for the model. The default value for this setting is true (Sequelize will create timestamp columns).
Note
You can always override the default settings for the createdAt and updatedAt attributes by defining them explicitly within your model. Sequelize will know to use those attributes for timestamp-related columns.
paranoid
This Boolean option, when set to true, will prevent Sequelize from deleting the data (by default) and adds a deletedAt timestamp column. The timestamps option must be set to true in order to make paranoid applicable. The default value for paranoid is false.
The following query will perform a “soft deletion”:
await Post.destroy({
  where: {
    id: 1
  }
});
This query will update the Post record of ID 1 and update the deletedAt column. If we wanted to remove the record from the database (instead of updating it), we would use the force parameter, as illustrated in the following code snippet:
await Post.destroy({
  where: {
    id: 1
  },
  force: true
});
This would perform a delete query versus an update query on the database.
createdAt/updatedAt/deletedAt
This option will rename the createdAt, updatedAt, and deletedAt attributes, respectively. If you provide camel-cased values and the underscored option is set to true, Sequelize will automatically convert the column’s casing. Setting the value as false instead of a string will tell Sequelize to disable its default behavior for that respective column.
underscored
By default, Sequelize will create columns using camel case (for example, updatedAt, firstName, and so on). If you prefer underscores or snake case (for example, updated_at, first_name, and so on), then you would set this value to true.
freezeTableName
As previously mentioned, Sequelize will pluralize table names derived from the model’s name by default. Setting this value to true would prevent Sequelize from transforming the table’s name.
tableName
Explicitly defines the table name for Sequelize to use when creating SQL queries. A typical use case for this option is when you are integrating Sequelize into a pre-existing database/schema or when the pluralization is incorrectly set.
name
An object with two available options to define singular and plural names to use when associating this model with others. A clearer explanation, and an example, will be provided when we go over model associations and relations in a later chapter, but you can see an overview of the two options here:
- singular—The name to use when referencing a single instance from a model (defaults to Sequelize.Utils.singularize(modelName))
- pluralize—The name to use when referencing multiple instances of a model (defaults to Sequelize.Utils.pluralize(modelName))
schema
Defines the model’s schema (this would be referenced as search_path in Postgres). Not all databases support schemas, and some will refer to schemas as databases entirely.
engine
Applicable to MySQL only, this is where you can define your table’s engine type (typically InnoDB or MyISAM). The default is InnoDB.
charset
Specifies the table’s charset. Useful for when your table’s contents can be deterministically defined to a set of characters that could help reduce database size (if you do not need universal encodings and only Latin characters, then you would use a Latin-derived charset).
collation
Specifies the table’s collation (sorting and ordering rules for the characters).
comment
Adds a comment to the table (if applicable to the DBMS).
initialAutoIncrement
Sets the initial AUTO_INCREMENT value for applicable dialects (MySQL and MariaDB).
hooks
An object with keys mapped to hooks (or life cycle events). The values may be a function or an array of functions. We will go into details about hooks in a later chapter.
validate
An object to define model validations. We will go into detail about validations in the next chapter.
indexes
An array of objects that define table indices’ definitions. These indices are created when calling sync() or using the migration tool. Each object has the following options:
- name—The name of the index (Sequelize will default to the model’s name and applicable fields joined by an underscore).
- type—A string value for defining the index’s type (only for MySQL/MariaDB). Typically, this is where you would define FULLTEXT or SPATIAL indices (UNIQUE as well, but there is a dialect-agnostic option for creating unique indices).
- unique—Setting this value to true would create a unique index.
- using—The USING clause value for the index’s SQL statement. A few examples would be BTREE (typically, a DBMS will use this index type as the default), HASH (MySQL/MariaDB/Postgres only), and GIST/GIN (Postgres only).
- operator—Defines an operator to use for this index (primarily used for Postgres but can be used in other dialects).
- concurrently—Setting this to true offers a way of creating indices without writing locks (Postgres only).
- fields—An array of index fields to define for the model. Refer to the Index fields section, next.
Index fields
Each index definition’s fields value can be one of the following:
- A string indicating the name of the index
- Sequelize literal object functions (for example, sequelize.fn())
- An object with the following keys:
- attribute—A string value for the column to index
- length—Defines the length for a prefix index (if applicable to your DBMS)
- order—Determines whether the sorting should be ascending or descending
- collate—Defines the collation for the column
A quick example is provided here to illustrate how to use some of these advanced options when defining a Sequelize model:
class User extends Model { }
User.init({
    name: DataTypes.STRING,
}, {
    sequelize,
    modelName: 'User',
    omitNull: true,
    // renames deletedAt to removedAt
    deletedAt: 'removedAt',
    // start with ID 1000
    initialAutoIncrement: 1000,
    validate: {
        isNotBob() {
            if (this.name === 'bob') {
                throw new Error("Bob is not allowed to be a
                                 user.");
            }
        }
    },
    indexes: [
        { unique: true, fields: ['name'] }
    ],
});
Summary
In this chapter, we went through a detailed overview of the various parameters and configuration settings for defining models with Sequelize. We also learned how to use the Sequelize CLI to automatically generate models’ definition (and data) files and how to migrate those definitions to a database. This chapter has also covered the various attribute types provided by Sequelize, as well as the methodologies for querying or updating data from Sequelize to the database.
In the next chapter, we will go over model validations, establishing foreign relationships, and how to constrain your data to meet your project’s requirements.