
8
Builds and Adapters
In the previous four chapters, we’ve spent a significant amount of time discussing various routing techniques. From simple routing to pages that can be rendered as static HTML and speed up our application, to more complex tactics where we ensure the data is of an expected type through the use of regular expressions. While these techniques represent core features of SvelteKit, they are not all there is to it. Another useful quality found in SvelteKit is its ability to run in nearly any environment through the use of adapters. Before we dive into various adapters and their configurations, we’ll analyze the process involved when creating a production build of a SvelteKit application.
Firstly, we’ll need to address how to build our application for a production environment. Vite makes this step simple, so we’ll then pivot to how we can use different adapters to adjust builds for various environments. While each adapter has its own requirements, it would quickly become repetitive to discuss them all. Instead, we’ll focus on three different adapters that are each suited to unique environments.
In this chapter, we will cover the following topics:
- Creating a Build
- Adapting the App
Once complete, you’ll be able to build and deploy your very own applications to a multitude of platform types, including static hosts, Node.js, and a plethora of serverless environments.
Technical requirements
The complete code for this chapter is available on GitHub at: https://github.com/PacktPublishing/SvelteKit-Up-and-Running/tree/main/chapters/chapter08.
Creating a Build
In other books about web development frameworks, a section related to creating a production build of the application usually doesn’t come until the very end. But because SvelteKit and Vite make it so simple, there’s really no reason to wait. I’m sure you’re eager to get your application available as soon as possible, so let’s get straight to it.
So far, we’ve only worked with our application in the development environment. In essence, Vite started a development server on the local machine when we ran the npm run dev command. To shut down the development server, we use Ctrl + C. To prepare a production build of our application, we can use the provided npm script:
npm run build
If you open the project’s package.json, you’ll notice this particular script runs the vite build command. It does exactly what it sounds like by kicking off Vite’s build process, which involves the bundling process from Rollup, packaging static assets, and running the configured adapter. Upon completion of the command, you’ll notice the output in your terminal lists various files as well as their size. If there are any errors in the build, they will be shown here.
By default, the fully built application will be output to .svelte-kit/. To change this directory, we can open svelte.config.js and pass in the preferred directory name to the config.kit.outDir option. When opening the build folder, you’ll notice that the built application has a different structure compared to our source code. This is, of course, by design and varies based on the adapter we’re using. To confirm that our production build works, we can preview it using the following command:
npm run preview
Once run, Vite will alert us to the new URL and port that our application can be accessed from. We can view and use the application there just as we can when running our development server. What differs is that file changes will not be automatically updated, as the files being used to run this version of the application need to be regenerated on each build – that is, unless build.watch has been set in the vite.config.js project.
Having run the first official build of our application, there are a few things to make note of before we begin discussing adapters. Firstly, think back to Chapter 4 when we covered Page Options. In that section, we looked at how we can specify server-side rendering, client-side rendering, and prerendering on a per-route basis. We can also apply those options to layouts. In fact, if we intended to create a single-page application, we would achieve it by disabling ssr in the root +layout.js file. Just keep in mind that prerendering takes place during the build of the application. As such, any fetch() requests that happen on prerendered pages will happen at build time. We can confirm this with a simple change to our fetch example. Where we previously set ssr = false, change it now to prerender = true;:
src/routes/(site)/fetch/+page.js
const key = 'DEMO_KEY'; // your API key here
export const prerender = true; // change this line
export function load() {
  const pic = fetch(`https://api.nasa.gov/planetary/apod?api_key=${key}`)
    .then(response => {
      console.log('got response');
      return response.json();
    });
  return {pic};
}
Once we’ve enabled prerendering on this particular route, we can go ahead and rebuild the application. Now, when we open our build folder, we should see the file at the .svelte-kit/output/prerendered/pages/fetch.html path. Upon opening this file, we’ll see the image element as well as all of the other data pulled from the NASA API shown as static HTML. This confirms to us that prerendering happens during the build process. It is very much something developers need to be cognizant of when preparing their applications for production environments.
There are a few other idiosyncrasies to take note of when building your application:
- Disabling csr and ssr will result in an empty page being rendered.
- It is not possible to prerender pages that rely on form actions as the page relies on HTTP POST requests.
- It is also not possible to prerender pages that make use of url.searchParams.
- It is possible to prerender pages that load data based on dynamic parameters in the route; however, SvelteKit will need to observe links to those endpoints to do so.
As demonstrated, preparing an application for production is quite simple. Vite bundles dependencies quickly and even provides a means to preview the application. That being said, there are a few things to keep in mind before packaging the application. In the next section, we’ll look at a few commonly used adapters and how they each produce builds specific to the intended environment.
Adapting the app
Now that we know how to build our application, we can explore some of the adapters that transform it for specified environments. For the entire time we’ve worked on our project, we’ve been using the @sveltejs/adapter-auto package. So far, we haven’t run into any issues, but if we want to build and deploy our application to a real production environment, we’ll need to get more specific. While adapter-auto is great, it doesn’t accept any configuration options and only works with Cloudflare Pages, Vercel, Netlify, and Azure Static Web Apps. If we wanted to host our application on a Node.js server or elsewhere, we would need to use a different adapter. Let’s explore a few of the different options available in the following section. The adapters we’ll look at are as follows:
- adapter-node
- adapter-cloudflare
- adapter-static
This list is not comprehensive, as the SvelteKit project supports many more environments. Meanwhile, the SvelteKit community continues creating and releasing adapters for a variety of platforms. Be sure to check the Svelte community resources before building your own adapter.
adapter-node
To begin, we’ll start with adapter-node, as most web developers have at least some familiarity with Node.js environments. This adapter can be installed by running the following command:
npm install -D @sveltejs/adapter-node
Once installed, we can add it to our project by importing it into our svelte.config.js and specifying the adapter accordingly:
svelte.config.js
import adapter from '@sveltejs/adapter-node';
const config = {
    kit: {
        adapter: adapter(),
        alias: {
            db: '/src/db.js',
            img: '/src/lib/images'
        }
    },
};
export default config;
As before, this configuration only differs in that it imports adapter-node instead of adapter-auto.
Once the adapters have been switched out, we can build the application for a Node.js environment by running npm run build in the terminal. By default, this adapter will output the built application to the build/ directory.
So far in this project, we’ve only included one dependency, and that was bcrypt. If we hadn’t included that dependency, we wouldn’t even need to do this next step. But because it seems rare to find a project that’s not using other dependencies, we’d better cover it. To ensure our Node.js production environment has access to all the required dependencies, we’ll need to install them. We do this by copying package.json and package-lock.json to the build/ directory. To ensure our build works successfully, we’ll simulate an automated deployment. We can do this by copying the entire build/ directory (which now also includes package.json and package-lock.json) to another location on our machine. Once done, we can use npm’s clean install command in the same directory to download the required production dependencies. This is the recommended installation method for automated deployments and continuous integration environments. We don’t need development dependencies, as SvelteKit is now bundled into pure JS so the command looks like this:
npm ci --omit dev
Running this command in the same directory as our build will download the dependencies required.
We can then launch the application with the following command:
ORIGIN=http://0.0.0.0:3000 node build
In this instance, build is the name of the directory we would like Node.js to target. We’ve also specified the ORIGIN environment variable so that adapter-node can correctly determine the URL of the application. Without this, SvelteKit would block any POST requests as a means of protection against Cross-Site Request Forgery (CSRF) attacks. After running the command, we’ll see that the application is listening on 0.0.0.0:3000. To change the IP address or listening port, we can set those environment variables before running node build. For instance, launching the application at 127.0.0.1:8000 would look like HOST=127.0.0.1 PORT=8000 ORIGIN=http://127.0.0.1:8000 node build.
To further customize your builds, this adapter provides the following options:
- out – A string specifying the directory the build should be output to. It defaults to build and should not have a / character at the end.
- precompress – A Boolean value that defaults to false and controls whether or not assets and prerendered pages should be compressed using gzip and brotli.
- envPrefix – A string value specifying a prefix applied to environment variables, which proves quite useful when your hosting provider doesn’t provide you with access to the standard environment variables such as HOST or PORT. Setting this will allow you to create your own environment variables.
- polyfill – A Boolean value defaulting to true that allows you to specify whether or not your build should include polyfills that add functionality not available in older Node.js releases.
After everything we’ve just covered, you should be able to deploy your own SvelteKit application to just about any Node.js environment. And if the destination environment limits your control, you should be able to customize the build using various options. Because Node.js environments are so prevalent, it would have been a huge mistake to not explain some of the functionality behind adapter-node and how it can streamline your deployment process.
adapter-cloudflare
While adapter-node is great for when we’re running Node.js applications, there are adapters that allow us to deploy without needing to manage, configure, or maintain a server. Platforms such as Vercel, Netlify, and Cloudflare all provide these services and empower developers to ship their code faster than ever before. For demonstration purposes, let’s look at how easy it is to deploy to Cloudflare Pages.
To begin, we’ll install the adapter just like we have done with other packages:
npm i -D @sveltejs/adapter-cloudflare
Once done, we can change our svelte.config.js to reflect the new adapter. Again, we simply need to import the new adapter:
svelte.config.js
import adapter from '@sveltejs/adapter-cloudflare';
const config = {
    kit: {
        adapter: adapter(),
    }
};
export default config;
Before delving too deep, it’s important to note that the application we have built thus far will not deploy to Cloudflare in its current state. Attempting to do so will result in many errors. In fact, you can see the errors for yourself by attempting to build the application using the Cloudflare adapter we just installed. The reason for this is quite simple. Cloudflare Workers and Pages do not run Node.js, which is required by one of our dependencies. While they are built off V8, which is the same engine that powers Node.js and Chromium-based browsers, they do not implement all of the APIs found in Node.js or those browsers. Instead, they exist as separate applications in their own right. And because we included the bcrypt package earlier, our application will fail to build as bcrypt makes extensive use of Node.js APIs. To successfully build and deploy the application, we will need to make a couple of changes.
If you’d prefer not to make these changes in your application, you can create a fork of this book’s code repository found under the Technical requirements section listed at the beginning of each chapter. In that repository, there is a branch labeled cloudflare that has all of the necessary changes. When forking the repository, be sure to deselect the box that says Copy the main branch only as you will need the cloudflare branch. As for the necessary changes, let’s take a brief detour and examine them now:
- Uninstall bcrypt with the npm uninstall bcrypt command.
- Remove references to bcrypt in src/routes/(app)/login/+page.server.js, as shown in the following code snippet.
- Change src/lib/users.json passwords to plaintext values:
src/routes/(app)/login/+page.server.js
import users from '$lib/users.json';
export const actions = {
  login: async ({request, cookies}) => {
    const form = await request.formData();
    const exists = users.filter(user => user.username === form.get('username'));
    const auth = exists.filter(user => user.password === form.get('password'));
    if(!exists.length || !auth.length) {
      return {msg: 'Invalid login!'};
    }
    cookies.set('identity', auth[0].identity, {path: '/'});
    return {msg: 'success!'}
  }
}
This new version of +page.server.js simply removes references to the bcrypt package and instead compares the text supplied in the password field to the plain text values in the src/lib/users.json file. It cannot be stressed how terrible this is from a security standpoint and I am trusting you to never do this outside of this particular demonstration.
Now that we have removed all dependencies that require Node.js, we can proceed with our deployment to Cloudflare. Firstly, we should log in to a Cloudflare account, navigate to Workers and Pages, and click create application. From there, we can connect to a GitHub or GitLab account, and select a repository to connect with our Pages project. Cloudflare provides a few methods for moving your project to their platform, but we’ll only cover how to do so by connecting with a Git repository. Once a repository is selected, we then provide a project name, which defaults to the repository name, and select a branch to deploy from. If you are deploying from a fork of this book’s repository, you should specify cloudflare here. Typically, this would be the main branch.
From there, we can set up a few options. Cloudflare makes this next step a breeze by asking whether we’re using a framework, which we are. Selecting SvelteKit from the Framework preset dropdown will auto-populate the Build command and Build output directory fields with the appropriate values. See Figure 8.1 for more information:
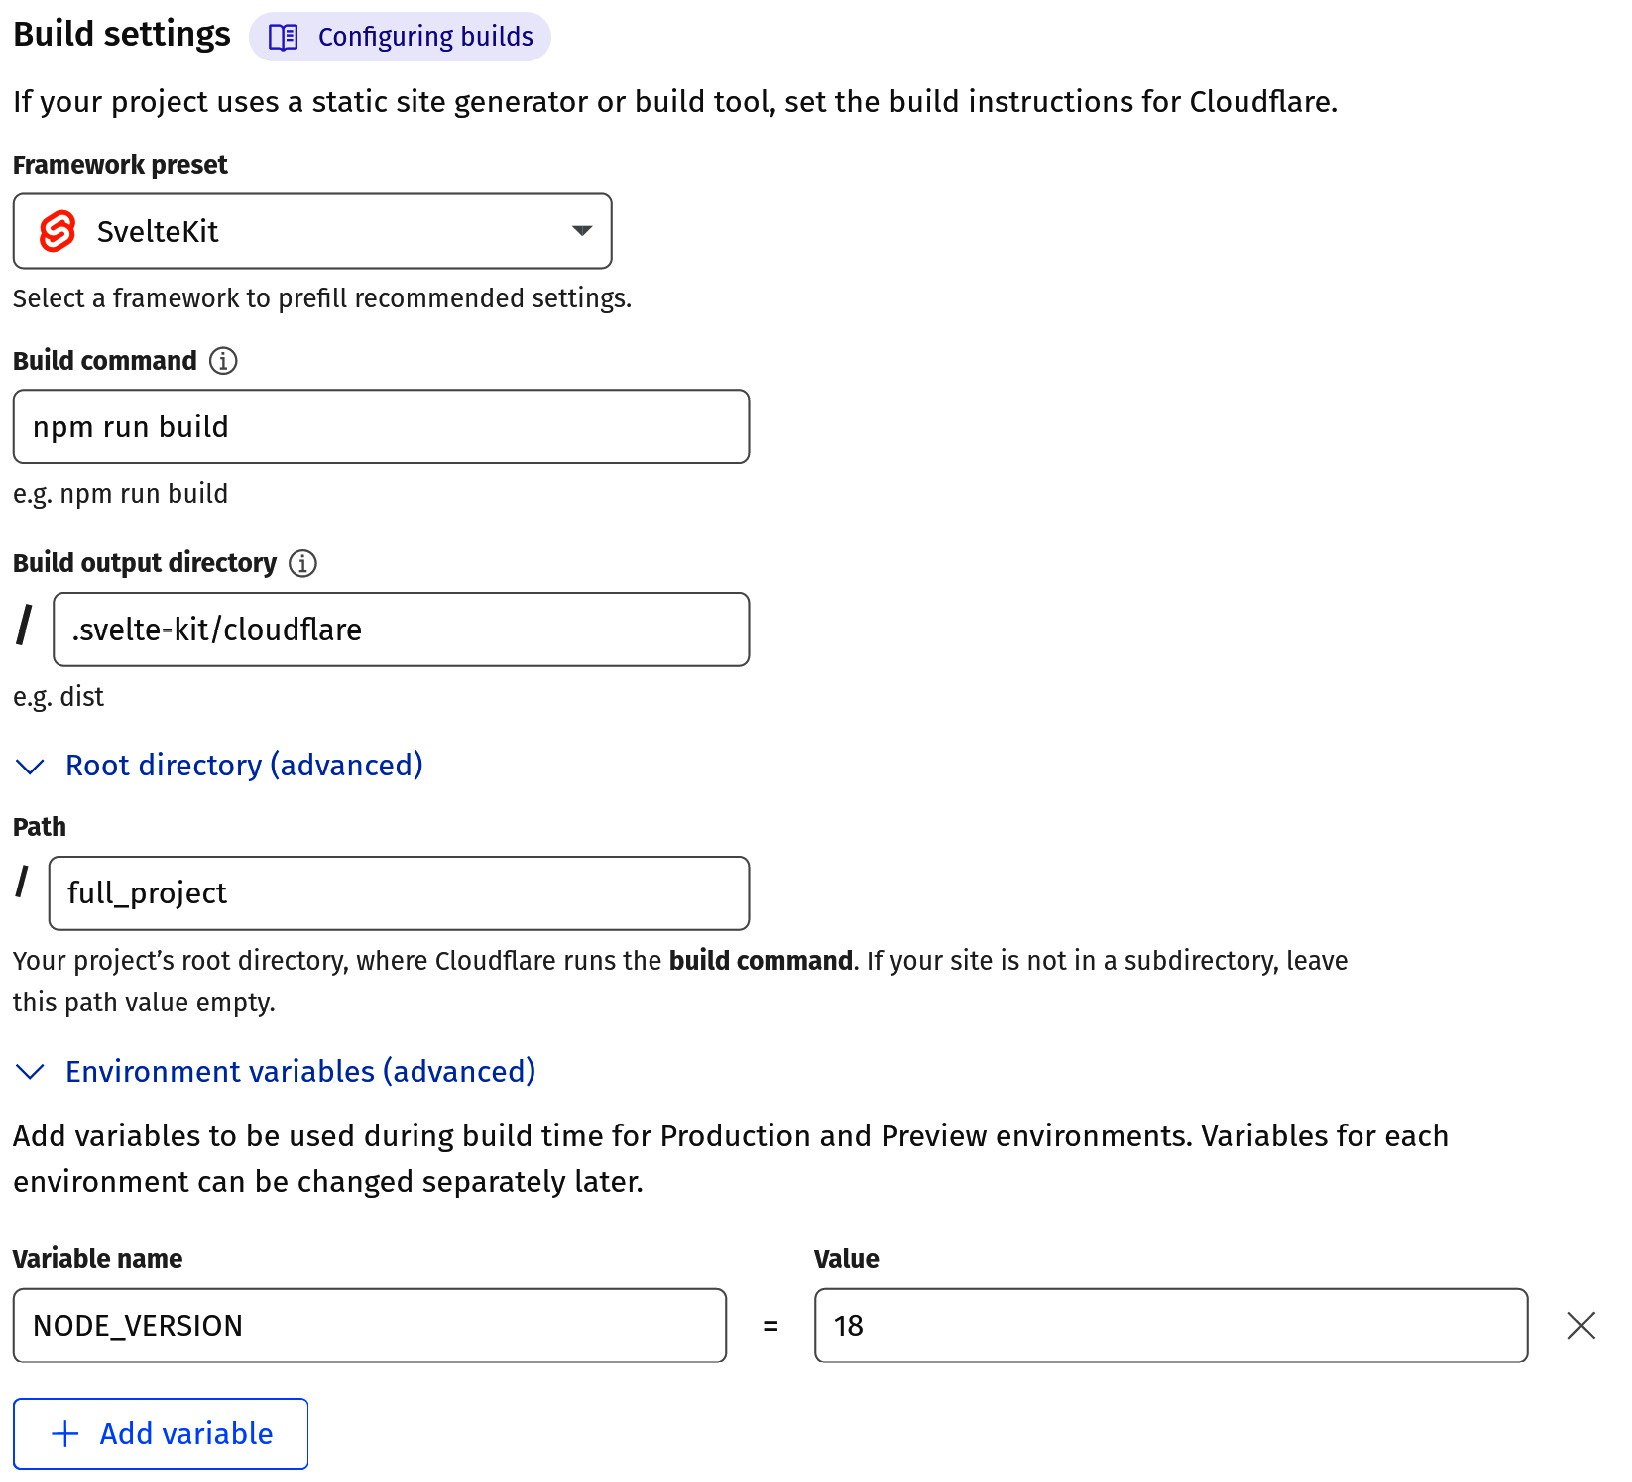
Figure 8.1 – Cloudflare Pages project settings
Because the source code for the project we’re attempting to deploy from is in a subdirectory of the Git repository, we’ll have to specify that directory in the Path field. We then also need to specify NODE_VERSION in the Environment variables section. Though SvelteKit only requires Node.js 16.14 or higher, we’ve specified version 18 as that is the current latest Long-Term Support version of SvelteKit as well as the version used throughout the development of this book. Once everything has been filled out appropriately, you can save and deploy the project!
Cloudflare will then check out your code and attempt to build it. If everything is successful, you’ll be provided with a URL pointing to your application. For reference, a version of the application we’ve created thus far is live at https://sveltekit-up-and-running.pages.dev/. Deploying an update to an application is as simple as pushing code to the appropriate branch in the project repository.
As you can see, deploying a SvelteKit application can be almost effortless once set up on serverless platforms such as Cloudflare Pages. The Vercel and Netlify adapters have similar processes, which you are encouraged to explore at your leisure. While our particular project ran into a slight issue with an included dependency requiring Node.js, this example hopefully demonstrated how using the right adapter can simplify deployments.
adapter-static
While we only ran into one minor problem with our previous adapter, we’ll most certainly run into problems with adapter-static. The reason for that is that this adapter is intended to only be used on platforms that can host static content – that is, platforms where no server backend logic exists. If you have a host that can serve static HTML, CSS, and JS, you can host an entire SvelteKit application there using this adapter. A common example is GitHub pages, but Cloudflare and many others also support this method. Hosting static applications has the added benefit of increased speed since no server backend exists to communicate with.
Since we won’t be able to get adapter-static working with our project, we won’t attempt to install it on our existing project. But it is still an adapter worth discussing. Just like other adapters, it is easily installed via this command:
npm install -D @sveltejs/adapter-static
And again, it can then be imported in svelte.config.js. This adapter varies from the others in that it prerenders the entire application. It is able to do this because we will insert export let prerender = true; at the lowest level layout of our application. In each case, this will be src/routes/+layout.js.
To customize the builds produced with this adapter, we’re provided with a few options. These options are passed to the adapter in svelte.config.js:
- pages – A string value defaulting to build that determines where prerendered pages will be output to.
- assets – A string value defaulting to the value provided to pages that determines where static assets should be output to.
- fallback – A string value specifying a fallback file to use when SSR has been disabled sitewide. Disabling SSR application-wide enables Single-Page App (SPA) mode. Typically, this is index.html, 200.html, or 404.html.
- precompress – A Boolean value that determines whether files should be compressed using brotli and gzip compression algorithms.
- strict – A Boolean value that prevents the application from building if certain endpoints will not exist when prerendered. It can be useful to disable if your application makes use of pages that exist only in specific circumstances.
If you’re interested in trying adapter-static for yourself, consider creating a new SvelteKit application using the skeleton template. You can try with the Demo App, but will run into issues with server routes unable to be prerendered. These can be removed to get it working, but if your goal is to simply see how the static adapter works, it will likely be easier to deploy from the skeleton template. Again, the steps for building a static application are fairly straightforward:
- Install the adapter with npm install -D @sveltejs/adapter-static.
- Import the adapter in svelte.config.js.
- Ensure the application is entirely prerenderable by adding export let prerender = true; in src/routes/+layout.js.
- Run the npm run build command!
Once your application has been built, you can simply copy it to anywhere that can serve static files. Of course, certain hosts may have their own requirements so be sure to read their documentation as well.
A great way to learn about SvelteKit is by working with it. If you don’t already have a personal website, consider creating one using the SvelteKit static adapter. Not only does it not require a database or backend but it can also be deployed to almost any hosting provider. If you’re wondering where to start, Josh Collinsworth created a fantastic project using the static adapter. It enables users to add blog posts using Markdown while still existing as a static site. This means that hosting can be done for free on platforms such as GitHub Pages. You can find a link to Josh’s project in the Resources section at the end of this chapter. While our project and many others cannot make use of adapter-static as they are not prerenderable, the value that this particular adapter provides for generating static sites is clear.
Summary
Having covered how the SvelteKit build process works, we then observed how we can preview our builds locally. We also looked at how page options can affect our builds. We took what we learned about the build process and saw how we can tailor our application to various platforms by selecting the right adapter. The application we’ve built so far is best suited to Node.js environments but we’ve also seen how simple it is to deploy to Cloudflare Pages and platforms such as Netlify or Vercel. By using the correct adapter and development strategies, we can even turn our application into a static website. Now that you’ve seen how to prepare your application for different production environments, you can go forth and release your SvelteKit applications into the wild.
In the next chapter, we’ll learn how we can manipulate requests across our entire application through the use of hooks. We’ll also address how we can utilize these hooks to assist in managing errors. Because no application is perfect, we’ll address how SvelteKit lets us customize the user experience when issues do arise.
Resources
- Svelte Society – A central resource that provides many community-maintained Svelte-related projects including adapters: https://sveltesociety.dev/
- How Cloudflare Workers Work: https://developers.cloudflare.com/workers/learning/how-workers-works
- SvelteKit Blog Starter by Josh Collinsworth: https://github.com/josh-collinsworth/sveltekit-blog-starter