Work with Reminders
A reminders list won’t do you much good unless you capture the thoughts you need to remember. In this chapter, we’ll look at the quickest ways to add a reminder—no matter what you’re doing—as soon as you think of it. We’ll also cover the basics of rearranging, copying, and deleting them, so you can Manage Reminders like a pro.
Those who need an extra push will learn to Sound the Alarm at a certain time or even a certain place, and Set Other Options, like adding note or phone number. Finally, because it’s the most satisfying part, you’ll learn how to Check Off Completed Reminders and how to show and hide them.
Add a Reminder
Adding a reminder is a cinch, because Apple gives you so many shortcuts. Your job is to find the one that works best for you.
Talk to Siri
If you’ve always wondered if Siri had any, well, useful uses, you’ve found one. Creating reminders with Siri is so quick and natural that you may never do it any other way. After Activating Siri on your Mac, iOS device, or Apple Watch—whatever you have at hand—say something like:
- “Add cookies to my Groceries list.”
- “Remind me to call Bob at 2 pm tomorrow.”
- “Remind me to take out the garbage tonight.”
The advantage of this is that you can do it whenever an idea strikes. In other words, before you forget!
Unless you specify otherwise, the reminder is added to your default list, which can be different, say, on your Mac or your iPhone depending on how you’ve set things up (see Change Your Default Reminder List).
Add an Item in the Reminders app
You can, of course, also add a reminder when you’re on your Mac. If you’re in the Reminders app, select a list in Reminders sidebar (View > Show Sidebar). Then do one of the following:
- Choose File > New Reminder, or press Command-N.
- Click the Add
 button.
 - Click the first blank line in the list at the right.
A circle appears at the bottom of the list. (Click this circle to check off the item.) Type your reminder text on the line next to it.
Once you’ve created one reminder, press Return to go down a line and start the next.
Use the Share Button
Most of the time, you probably won’t be in the Reminders app when you think of something you want to remember.
If you see something you want to come back to later when you’re in another app, it’s easy to make a quick reminder by using the Share ![]() button and choosing Reminders in the list. This works, for instance, when you’re looking at a Web page in Safari, a note in Apple’s Notes, an address in Contacts, or a location in Maps.
button and choosing Reminders in the list. This works, for instance, when you’re looking at a Web page in Safari, a note in Apple’s Notes, an address in Contacts, or a location in Maps.
In the dialog that appears (Figure 57), either keep the default text (in this case, the Web page’s title) or type your own. If you want the reminder to live somewhere other than your default list, click Reminders in the lower-left corner and then choose the list you want. Click Add and you’re done.

Manage Reminders
No matter the reminder mishap, it’s easy to move, rearrange, rename, and delete reminders that have gone astray.
Change a Reminder’s Place in the List
For the most part, changing a reminder’s place in a list is a matter of drag and drop. Click the blank area to the right of the reminder’s text and then drag it up or down in the list to change its order.
This works with more than one reminder, too. Shift-click to select contiguous reminders (ones that are next to each other) or Command-click to select non-contiguous reminders (ones that aren’t next to each other) and move the whole lot together.
Move a Reminder to Another List
Stuck a reminder in the wrong place or going on a reorganization spree? It’s no problem to put reminders right where you want them.
Click the blank area to the right of a reminder’s text and then drag it onto another list in the sidebar. This also works when you select more than one reminder at a time (by Shift-clicking contiguous items or Command-clicking non-contiguous ones).
Copy a Reminder
Sometimes you might want to keep a local copy of some reminders, while including them in a shared list, too. In that case, use good ole copy-and-paste.
Select one reminder (or a bunch by Shift- or Command-clicking). Choose Edit > Copy, select your target list in the sidebar (this is where you want the copies to go), and then choose Edit > Paste.
Delete a Reminder
It’s a piece of cake to delete errant reminders:
- Click the blank area next to a reminder’s text to select it, and then press Delete.
- To delete more than one reminder at once, Shift- or Command-click to select them, and then press Delete.
Note: Siri will not delete reminders for you. This is probably to prevent us from accidentally deleting everything when Siri activates in our coat pockets.
Sound the Alarm
Arguably the most important thing you can do when you’re using Reminders to ensure you don’t forget something is set yourself an alarm. Reminders can notify you at a certain time or even when you’re in a certain place, like at your house or in your car. These notifications take on the form that you set up in System Preferences on your Mac or the Settings app in iOS; see Set Up Notifications for advice on setting these up.
Set a Time and Date
To add a time-based alarm to a reminder, double click the reminder to see your options. (Or, hover your pointer over a reminder and then click the Info ![]() button.) Select the On a Day checkbox and then fill in the date and time (Figure 58). You can either press Tab to move the insertion point from year to month to day as you type or click the date in the date picker. Click Done.
button.) Select the On a Day checkbox and then fill in the date and time (Figure 58). You can either press Tab to move the insertion point from year to month to day as you type or click the date in the date picker. Click Done.

Make It Repeat
If you need help remembering something regularly—like that it’s time to take out the recycling, change the litter box, or bring your lunch to work—set up an alarm that repeats.
Look for the Repeat option below the alarm settings. Click this to see the possibilities (Figure 59).
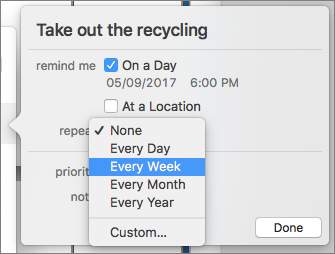
Choose Custom to set up your alarm to repeat at more particular times—for instance, on specific days of the week (every Monday, Wednesday, and Friday), times in the month (the 2nd Tuesday of every month), or the same time every year (the last weekday of February).
Pick a Location
One of Reminders’ coolest features is the capability to remind yourself about something when you reach a certain place. Although you can create a location-based reminder on your Mac, in order for you to receive the notification when you reach a destination, Location Services must activated on an iOS device that you carry with you (see the sidebar Location, Location, Location, later).
For instance, let’s say you always forget to check your Groceries List, to your spouse’s chagrin. Create a reminder that alerts you as soon as you arrive at your local grocery store and you’ll finally come home with everything on the list.
Here’s how to add a location-based alarm to a reminder:
- Double-click a reminder to bring up the its options.
- Select the At a Location checkbox and then either type in an address or just start typing the name of the location in the Enter a Location field. Reminders generates results below the search field. Click one to select it.
- Select the Arriving or Leaving radio button, depending on whether you want to be alerted when you reach the destination or when you leave it. In the case of a grocery store, select Arriving. If you want to remind yourself not to forget your lunch when you walk out of the door in the morning, you might choose Leaving.
- By default, you’ll get a notification when you’re within 1,312 feet of the address. However, you can shrink or expand the radius by clicking and dragging the dot on the blue circle (Figure 60). This can be helpful if you find yourself triggering the notification at the wrong time (like, blocks away from home).

Figure 60: Drag the blue dot on the map to control how far from the address you’ll be pinged. On the other hand, if the problem is that you need a nudge to remember a chore altogether, you could, for instance, create a “go to the grocery store” reminder in your Groceries List with a location-based alert and then expand the radius, so that the reminder will trigger the next time you get anywhere near the store.
- Click Done.
Set Other Options
When you bring up a reminder’s options by double-clicking the blank space next to its name, force-clicking its name, or by clicking its Info ![]() button, a couple more options are available.
button, a couple more options are available.
Make a Reminder High Priority
To indicate just how urgent a reminder is, click Priority and choose from None, Low, Medium, or High.
Exclamation marks appear before a reminder’s name in the Reminders list. (Figure 61) The more exclamation marks, the higher a reminder’s priority.

Add Notes
Sometimes you need extra information to help you complete a reminder—say, a telephone number or the exact brand and flavor of ice cream your children like. In that case, click Notes and type in the field.
Notes appear underneath the reminder’s title in the Reminders list.
Check Off Completed Reminders
It’s time for the best part—checking things off your list! When you complete a reminder, click the empty circle next to it to mark it as complete.
Show Your Completed Items
I, for one, like reminders to vanish when I’ve completed them, which is the default. But serious lovers of to-do lists may live for the sight of a list filled with checked items (Figure 62).

To see checked-off items, open the list in question and click Show at the top of the list. (If you have a lot of reminders in this list, you may have to scroll to the top. Also, you’ll see the option to Show only if the list has completed items.) Click Hide to make them disappear again.
Whether or not you show completed items, Reminders includes a grand total of all the reminders you’ve ever completed for this list. Reminders don’t disappear or retire after a certain amount of time and there’s no way to limit this number to current reminders.