Work with Reminders
The basic unit of Reminders is, not so peculiarly, a reminder. In this chapter, I take you through the quickest ways to add a reminder—no matter what you’re doing—as soon as you think of it. That includes a new way to create reminders for emails you need to act on, too. I cover the basics of rearranging, copying, and deleting them, so you can Manage Reminders like a pro. And I look at how to Assign a Reminder in a shared list, so that everyone knows their responsibilities.
Those who need an extra push can learn to Sound the Alarm at a certain time or place, or even when you’re messaging a particular person; and to Set Other Options, like adding a note, URL, phone number, image, or sketch. Finally, because it’s the most satisfying part, you’ll learn how to Work with Completed Reminders and how to show and hide them.
Add a Reminder
Adding a reminder is a cinch, because Apple gives you so many shortcuts. Your job is to find the one that works best for you.
I get into all additional options that a reminder can have, such as a due date or time, location, or priority, in Set Other Options.
Add an Item in the Reminders App
You can, of course, also add a reminder when you’re on your Mac. If you’re in the Reminders app, select a list in Reminders sidebar (View > Show Sidebar).
Then do one of the following:
Choose File > New Reminder, or press ⌘-N.
Click the Add
 icon at the top of a list.
Click in the empty area below all items in the list on the right.
A unfilled completion circle appears; you check it later to mark the item as finished. Type your reminder text on the line next to it.
Starting in Monterey, Reminders supports what’s called “natural language” entry, allowing you to compose a reminder similar to how you’d speak one to Siri. For example, type Take out trash tomorrow at 9 or Call grandma June 2 and the app suggests an alarm (Figure 61). Select the matching details from popup menus that appear. Reminders can handle sentences that involve slightly more complicated time settings—like Call Dad every Tuesday at 2 PM—but it’s incapable of sophisticated recurring requests like Put out the trash every Monday and Wednesday even though you can configure a reminder manually that meets those terms.

Once you’ve created one reminder, press Return to go down a line and start the next.
Tell Siri to Remind You
Creating reminders with Siri is so quick and natural that you may never do it any other way. After How to Activate Siri on your Mac, iPhone, iPad, Apple Watch, or HomePod—whatever you have at hand—say something like:
“Add cookies to my Groceries list.”
“Remind me to call Bob at 2 p.m. tomorrow.”
“Remind me to take out the garbage tonight.”
The advantage of this is that you can do it whenever an idea strikes. In other words, before you forget!
Unless you specify otherwise, the reminder is added to your default list, which can be different, say, on your Mac or your iPhone depending on how you’ve set things up (see Change Your Default Reminders List).
Use the Share Icon to Add Reminders
Most of the time, you probably won’t be in the Reminders app when you think of something you want to remember.
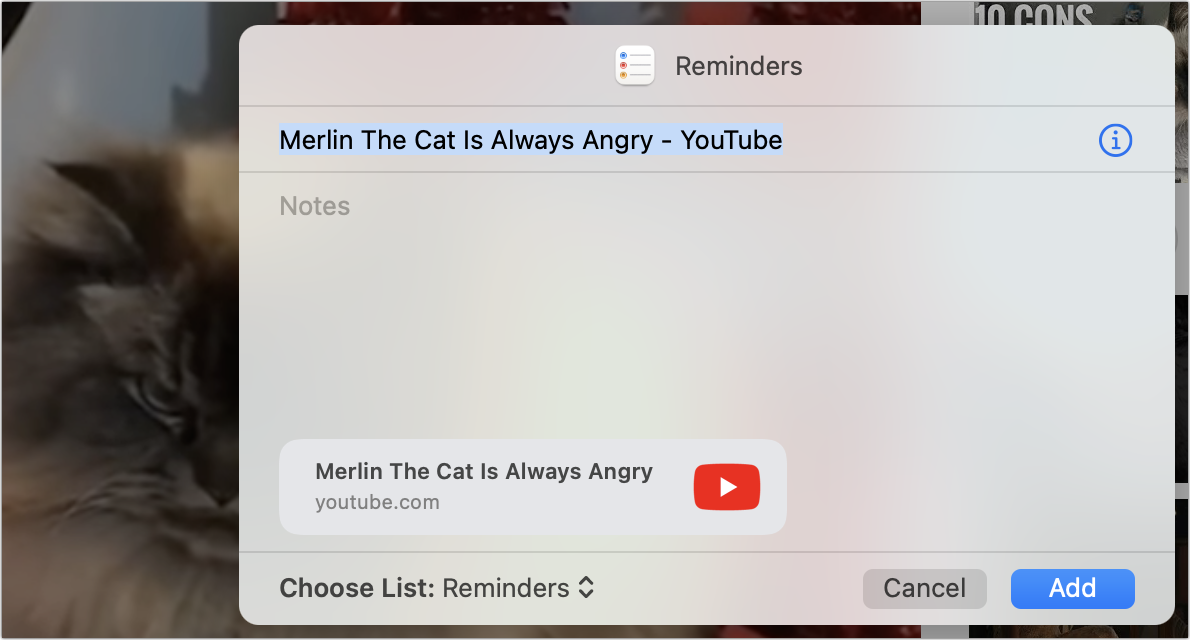
If you see something you want to come back to later when you’re in another app, it’s easy to make a quick reminder by using the Share ![]() icon and choosing Reminders from the menu. This works, for instance, when you’re looking at a webpage in Safari, a note in Apple’s Notes, an address in Contacts, or a location in Maps.
icon and choosing Reminders from the menu. This works, for instance, when you’re looking at a webpage in Safari, a note in Apple’s Notes, an address in Contacts, or a location in Maps.
In the dialog that appears (Figure 62), either keep the default text (in this case, a video’s title) or type your own. Choose a different list from the Choose List pop-up menu if you want to add this item to a list other than the default one. Click Add and you’re done.
In the Mail app, you can create a reminder while reading a message—maybe to tell you to answer that email later—by Control-clicking or right-clicking the message’s subject and choosing Share > Reminders. A dialog appears as in Figure 62. Click the Mail ![]() icon by the reminder’s title in Reminders to jump to the message used to create it.
icon by the reminder’s title in Reminders to jump to the message used to create it.
Remind Yourself in Mail
Starting in Ventura and iOS 16/iPadOS 16, the Mail app can remind you about specific messages independently of Reminders. (This feature is not connected to Reminders, but uses a similar approach.) It’s tweaky. It works only for messages that remain in your inbox: file them before the reminder time and no reminder happens.
Control-click or right-click a message in the mail list or touch and hold in iOS/iPadOS, and then choose Remind Me > Remind Me Duration or Remind Me Later and pick a time. The Mail app then resurfaces that message in your inbox at the selected moment, moving your message to the top or bottom of your inbox depending on your sort order.
If the message in question is already in the most-recent position there, you might never notice any reminder at all. It feels like an early sketch of something that could mature later.
Remind Yourself to Make a Call
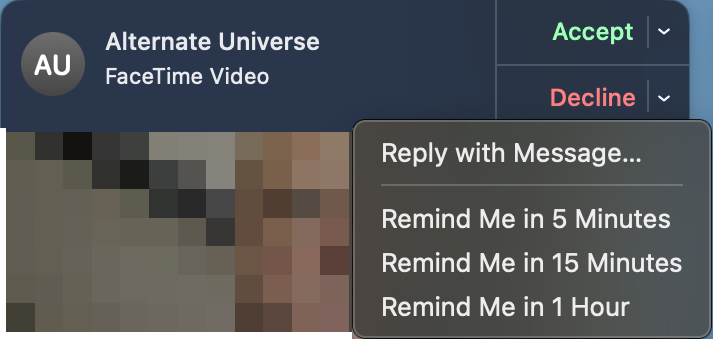
When you don’t have time to take a call on your iPhone or Mac, tap Remind Me, or click the arrow next to Decline, to see options for making a quick reminder (Figure 63).
When you’re reminded on a Mac, click the notification to open the Reminders app. Then, click the FaceTime ![]() icon next to the reminder to start the call. On an iPhone, just tap the notification.
icon next to the reminder to start the call. On an iPhone, just tap the notification.
Manage Reminders
Reminders are malleable: you can rearrange, rename, sort, move them between lists, and delete them. Reminders can be nested underneath under reminders, too, creating de facto headings.
Change a Reminder’s Place in a List
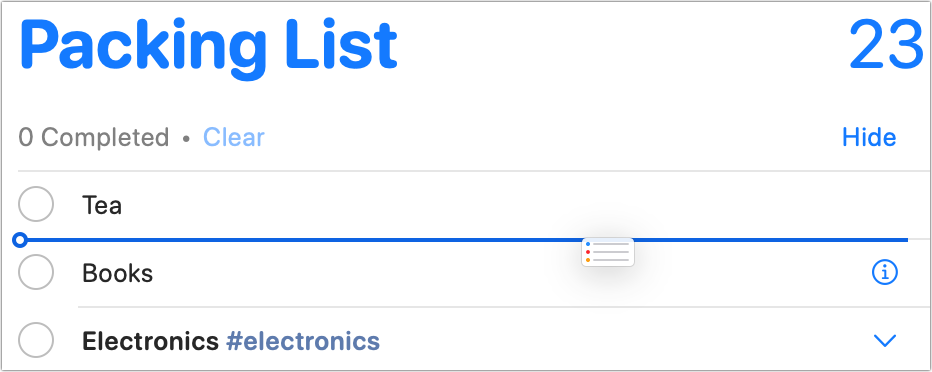
For the most part, changing a reminder’s place in a list is a matter of drag and drop. Click and drag the blank area to the right of the reminder’s text up or down in the list to change its order. Reminders shows a tiny Reminders icon to indicate you’re dragging, and inserts a long blue line to indicate the point in the list where an item will be deposited when you release. You can also select multiple continuous or non-contiguous items.
Nest Reminders
What if something on your to-do list involves a series of smaller steps, or subtasks? For example, clean the garage might include a subset of tasks like bag the trash, hang up tools, organize gardening supplies, and so on. Nest reminders so that all the steps that make up one bigger task become visible (Figure 65).
To create a set of nested reminders on a Mac, first make the top-level reminder. Then, create the subtasks. Select those in the list—either one by one, or by Shift-clicking to select them all—and choose Edit > Indent Reminder (or press ⌘-]) to indent them under the main reminder.
Alternatively, select reminders in the list, and:
If there’s no nested item underneath a heading item yet, drag them on top of the main item until it highlights. Release, and the reminders are now nested.
With existing nested reminders, drag to any location under the heading item, and you’ll see a shorter blue line—one that doesn’t stretch the full width of the list—that indicates a nested position. Release, and they’re inserted in that location under the main head.
If you want to remove nesting on an item, select a reminder and choose Edit > Outdent Reminder (or press ⌘-[).
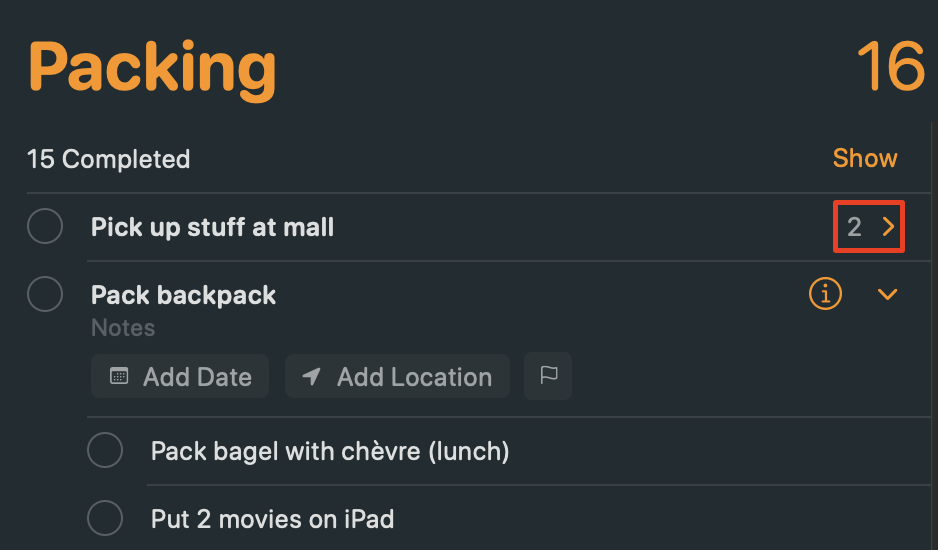
When a reminder includes subtasks, you can hover over the item to reveal a disclosure arrow. Click it to collapse the subtasks. The list then shows the number of subtasks and keeps an arrow visible on the heading task’s line. Click to reveal. You can also press ⌘-E to expand all subtasks or ⌘-Shift-E to collapse them.
Sort Reminders
To help yourself stay on top of what you need to do next, you can sort the reminders in a particular list. When you’re looking at a list, choose View > Sort By and choose an option from the menu (Figure 66). Manual is the default; it leaves items right where you put them. Or, choose Due Date, Priority, Creation Date, or Title (to sort items alphabetically). In Ventura, you can also change the order by choosing View > Sort By > Earliest First or Latest First.

Move or Copy a Reminder to Another List
If a reminder isn’t where you want it or you want to duplicate a reminder, the app makes it easy to do so.
To move a reminder from one list to another, select it and drag it onto the other list. You can select multiple reminders and drag them, too.
You can also use the Copy or Cut commands to copy or remove one or more reminders from one list and Paste to drop them into a different list. Here’s how:
Select one or more reminders.
Choose Edit > Copy (⌘-C) to leave them in the original location or Edit > Cut (⌘-X) to remove them.
Select the list in the sidebar where you want the copies to go.
Choose Edit > Paste (⌘-V).
Delete a Reminder
It’s a piece of cake to delete errant (or no-longer-needed) reminders on your Mac:
Click the blank area next to a reminder’s text to select it, and then press Delete.
To delete more than one reminder at once, Shift- or ⌘-click to select them, and then press Delete.
Control-click or right-click a reminder (or reminders) and choose Delete from the contextual menu.
Siri can now delete individual reminders, too. Say something like “Delete ‘Call Dave’ reminder.” Siri asks you to confirm the action and deletes the reminder.
If you change your mind about deleting a reminder on your Mac before doing anything else, you can undo the action by pressing ⌘-Z. Unfortunately, you can’t undo if you’ve used Siri to delete a reminder.
Sound the Alarm
Arguably the most important thing you can do in Reminders to ensure you don’t forget something is to set an alarm. Reminders can notify you at a certain date and time; when you’re in a certain place, like at your house or in your car; or when you’re messaging a certain person. (Earlier, you can read about how these notifications appear in Set Up Notifications.)
Set a Date and Time
You can set an optional date and refine it with a time for any reminder. You can do so when you create the reminder or later by clicking in the reminder’s title to shift it into its inline reminder editing mode. Pseudo-buttons appear at the bottom.
Click the Add Date button. It offers three suggestions: Today, Tomorrow, or This Weekend (Figure 67). If none of those fit, choose Custom to use a calendar picker to select a date.

Once you’ve added a date, an Add Time button appears. Click it and select one of the preset times: 9 a.m., 12 p.m., and 3 p.m., 6 p.m., and 9 p.m. You can also type a time into the field.
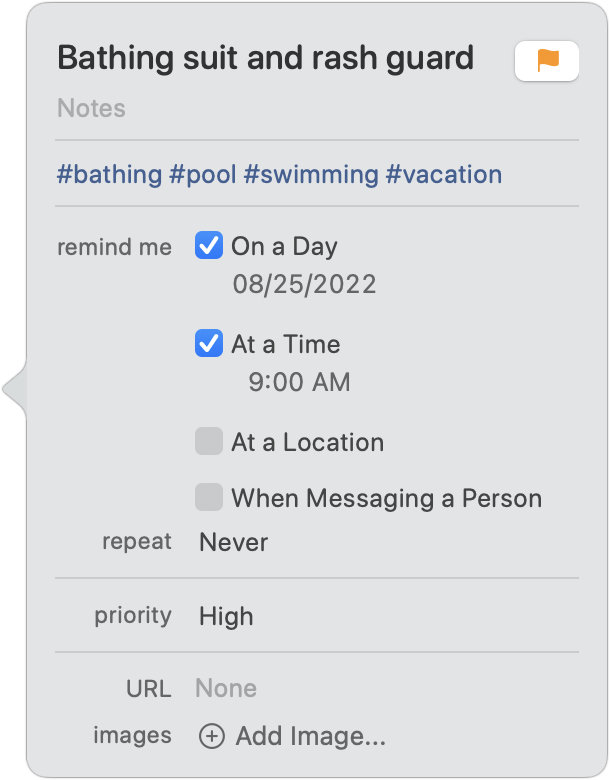
Reminders offers an entirely different interface for editing an item’s details, too! Hover over a reminder and click the info ![]() icon, double-click the reminder in the white area to the right of its name, or choose View > Show Reminder Info. This brings up a dialog with all the settings at once, including extras like URL and Add Image, where available (Figure 68). You can check On a Day, type a date’s details, or use the calendar picker, and then optionally click At a Time and enter a time. You can also edit any details already set.
icon, double-click the reminder in the white area to the right of its name, or choose View > Show Reminder Info. This brings up a dialog with all the settings at once, including extras like URL and Add Image, where available (Figure 68). You can check On a Day, type a date’s details, or use the calendar picker, and then optionally click At a Time and enter a time. You can also edit any details already set.
If you prefer, you can avoid fiddly date and time setting by including those details when you compose the event using natural language as described in Add an Item in the Reminders App.
You can also include a date and time when using Siri to add a reminder via any of your Siri-enabled devices. Say something like: “Remind me to put the turkey in the refrigerator to defrost at 9 a.m. on November 19.” Siri requires you to be specific or it makes some assumptions:
If you say a day, but don’t mention a time, you’re notified by default that day at 9 a.m.
If you ask Siri to remind you about something “in the morning,” it sets the alarm for 7 a.m. Likewise, if you ask it to remind you “at night,” it sets the alarm for 7 p.m.
If you specify only a time—“Remind me to feed the cat at 2 p.m.”—and it’s already past that time today, you’re notified tomorrow.
Make It Repeat
If you need help remembering something regularly—like that it’s time to take out the recycling, change the litter box, or bring your lunch to work—set up an alarm that repeats.
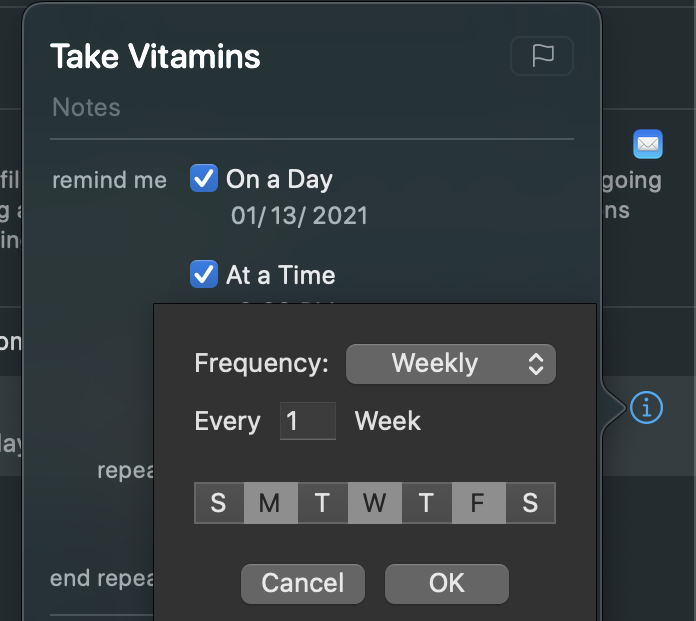
Look for the “repeat” menu below the alarm settings in the Reminder Info dialog. Click that menu to see the possibilities, from hourly to yearly. Choose Custom to set up your alarm to repeat at more particular times (Figure 69). For instance, on specific days of the week (every Monday, Wednesday, and Friday), times in the month (the second Tuesday of every month), or the same time every year (the last weekday of February).
A repeating reminder can recur endlessly, or you can use the “end repeat” menu to choose an end date. This is useful for something like a 12-week course, a round of antibiotics, or a payment you need to make for a period of time.
Pick a Location
Wouldn’t it be nice to receive a reminder when you arrived at or left a certain place? For instance, let’s say you always forget to check your grocery list, to your spouse’s chagrin. Create a reminder that alerts you as soon as you arrive at your local grocery store and you’ll finally come home with everything on the list.
You can—but only if you have an iPhone, iPad, or Apple Watch and Location Services for Reminders is active. Alerts appear only on those devices, though you can set up a location-based alert on a Mac as well.
Go to Settings > Privacy/Privacy & Security > Location Services to confirm the following options are set:
Location Services must be enabled.
Under the list of apps, Reminders needs to have While Using the App selected.
Also in the Reminders settings, Precise Location must be enabled.
With these conditions met, here’s how to set location-based reminders in a variety of ways.
Set a Location Alert on a Mac
You can add a location-based alarm to a reminder in macOS while creating a reminder or when editing it afterwards. While you can use the inline editor, I suggest avoiding it: it’s too limited when setting up location-based alerts. Instead, use the Reminder Info dialog: With an item selected, click the info ![]() icon or choose View > Show Reminder Info, check the At a Location box, and click in the Enter a Location field that appears.
icon or choose View > Show Reminder Info, check the At a Location box, and click in the Enter a Location field that appears.
When you click in the field, Reminders offers four suggestions: Current Location, your home (as determined by your card in Contacts), Getting in Car, and Getting out of Car (Figure 70). (See Set a Location Alert for Your Car.)
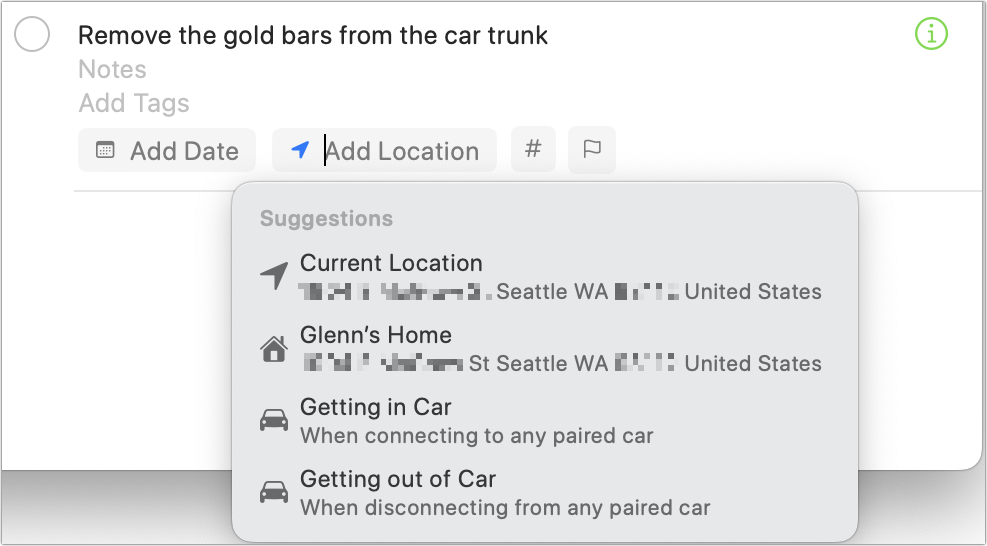
You can choose a suggested location, or start typing an address, the name of a location (like your hair salon’s name or a subway stop), or paste in a location. Reminders generates what it thinks are matches below the search field. Click one to select it.
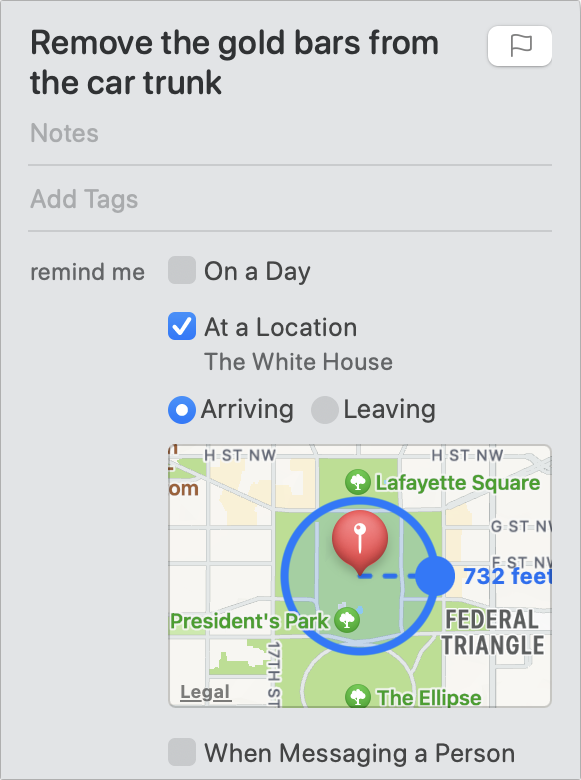
Reminders creates an Arriving alert; use the Reminder Info dialog to select when creating or change it to Leaving.
Below the radio buttons, a mini map appears with a blue circle and dot. By default, you’ll get a notification within several hundred feet (a few hundred meters) of the address—the distance initially selected by Reminders seems to depend on the size of the building or address specificity. However, you can shrink or expand the radius by dragging the blue dot handle from as little as 328 feet (100 meters) up to 8 million feet (1,500 miles or 2,400 kilometers) (Figure 71).
You may find it helpful to shrink the radius if you find yourself triggering the notification at the wrong time (like, blocks away from home). On the other hand, if the problem is that you need a nudge to remember a chore altogether, you could, for instance, create a “go to the grocery store” reminder in your Grocery List with a location-based alert and then expand the radius, so that the reminder triggers the next time you get anywhere near the store.
Set a Location Alert via Siri
The easiest way to create a location-based reminder on any of your devices is to use Siri. Just say something like “Remind me to get soy milk when I go to New Seasons grocery store on NE Broadway” or “Remind me to preheat the oven when I get home.”
Set a Location Alert in iOS/iPadOS
On an iPhone or iPad, icons appear on the QuickType bar above the keyboard when you create a new reminder. Tap the Add Location ![]() icon to create a location-based alarm. Choose one of the suggestions, like Arriving Home or Getting in Car, or tap Custom to enter an address and access more options.
icon to create a location-based alarm. Choose one of the suggestions, like Arriving Home or Getting in Car, or tap Custom to enter an address and access more options.
Set a Location Alert for Your Car
Need to remember something when you get in the car? If you pair your iPhone with your car using Bluetooth or CarPlay, you can set a location-based reminder to automatically detect when it connects or disconnects.
Use the Add Location button to choose one of the suggested car locations. Or say something to Siri like “Remind me to buy gas when I get in the car” and it creates a location-based reminder for you.
Get a Reminder When Messaging
Need to ask a friend about something? Now you can get a reminder the next time you chat with them in Messages.
Follow these steps on a Mac:
Create your reminder.
Click the info
 icon or choose View > Show Reminder Info.
In the info dialog, check the When Messaging a Person box.
Click Add Contact and choose the person from the list of your contacts (Figure 72).
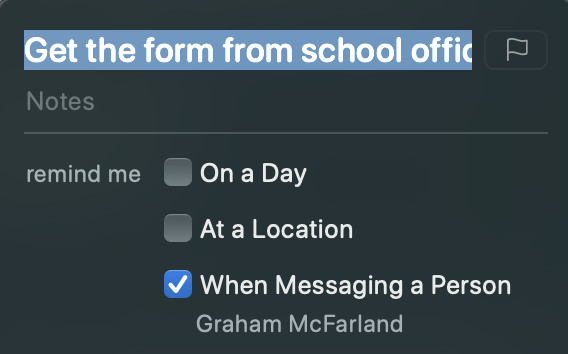
Figure 72: Create a reminder to jog your memory the next time you message with someone.
As soon as you start chatting with the person in question, a notification reminds you to bring up the topic in question (Figure 73).

Assign a Reminder
Whether it’s a big project at work or just the weekly household chores, most of us don’t get things done all by ourselves—Reminders embraces teamwork. Once you Share Lists with Others, you can assign reminders to the participants, so everyone knows their part.
Here’s how:
Once you’ve created a list filled with reminders and shared it, hover over one of the reminders and then click the info
icon to the right of its name.Choose a person from the Assign To pop-up menu (Figure 74). (Everyone who shares the list will appear.)

Figure 74: Click the “assign to” pop-up menu and choose a person from the list. Click out of the reminder and either the person’s initial or their image appears by the reminder’s name (Figure 75).

If you want to reassign or remove an assignment, follow the steps above, but choose a different person or None from the pop-up menu.
Set Other Options
When you bring up a reminder’s options by double-clicking the blank space next to its name, force-clicking its name, or clicking its info ![]() icon on a Mac, you see several additional choices.
icon on a Mac, you see several additional choices.
Flag a Reminder
Flag a reminder to mark it as important. A flag ![]() icon appears next to it in its reminders list on all your devices; the reminder also automatically appears in the Flagged smart list (Figure 76).
icon appears next to it in its reminders list on all your devices; the reminder also automatically appears in the Flagged smart list (Figure 76).
Here’s how to flag a reminder:
When you’re looking at the Info popover on a Mac, click the Flag
 icon that appears next to the reminder’s name.
When you’re creating a reminder on a Mac, click the flag
icon that appears next to the edit buttons.

To remove a flag, hover over the reminder to reveal the info ![]() icon, click it, and then click the flag
icon, click it, and then click the flag ![]() icon next to the reminder’s name.
icon next to the reminder’s name.
Make a Reminder High Priority
To indicate just how urgent a reminder is, click Priority and choose from None, Low, Medium, or High. Exclamation marks appear before a reminder’s name in the Reminders list. (Figure 77) The more exclamation marks, the higher a reminder’s priority.

You can sort your reminders by priority (see Sort Reminders) to make it easy to see at a glance what tasks are the most pressing.
Add Tags to Reminders
Monterey (and iOS 15/iPadOS 15) introduced tags for Reminders. These are freeform hashtag-style entries that you can type in to create a different kind of grouping of tasks without using the formal creation of a smart list (see Manage and Create Smart Lists).
Type a # (hash symbol) followed by words and punctuation (no spaces) to create a tag. You could mark a reminder for #travel, #packing, and #big-sur-trip-2023, and then have that reminder appear when you search, filter or browse. As soon as you type #, Reminds offers suggestions of already created tags in reverse order of creation—that is, the most recent appears first.
Apple offers flexibility with where tags appear. You can type a tag in a reminder’s title, in its notes, or using the Add Tags field in the inline editor or Reminder Info dialog.
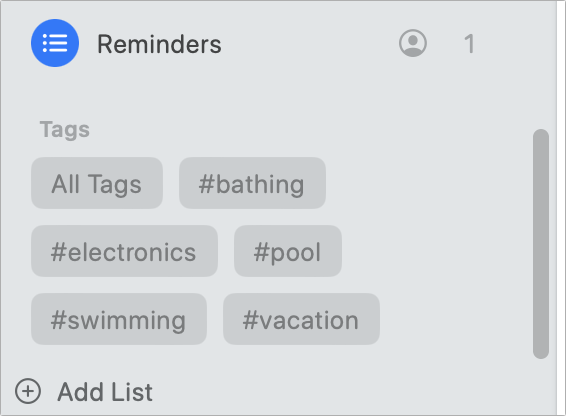
The Tag Browser appears in the sidebar at the bottom under Tags. Click a tag in that list to filter matching reminders (Figure 78).
Add Notes
Sometimes you need extra information to help you complete a reminder—say, a telephone number or the exact brand and flavor of ice cream your children like. In that case, click Notes and type in the field. Notes appear underneath the reminder’s title in the Reminders list.
Add a URL
If a web address will help you accomplish your task, record it in the URL field. For example, if you’re reminding yourself to stop your mail before you leave town, copy and paste the U.S. Postal Service’s Hold Mail page address (https://holdmail.usps.com/) into this field. You don’t even need to type the https:// part—Reminders adds it automatically. A clickable link appears in your reminder, complete with a thumbnail image (Figure 79).

Local reminders and iCloud-synced reminders can have URLs; other calendar servers don’t support them.
Add Images
Whether it’s a picture of a part you need to find at the hardware store or a receipt you need to enter in your budget app later, sometimes an image makes a reminder much more useful. You can add images from your Photos library as well as directly import images and sketches from your iPhone or iPad using Continuity Camera or the Continuity Sketch feature added in mac OS 10.15 Catalina (Figure 80).

To add an image to a reminder on a Mac, click the info ![]() icon or choose View > Show Reminder Info, and click the Add Image button.
icon or choose View > Show Reminder Info, and click the Add Image button.
You have four options to choose among:
Photos: Choose this option to see a palette with the contents of your Photos library. Drag an image from this onto the popover to attach it to your reminder.
Take Photo or Scan Documents: Both these options take advantage of Continuity Camera (Figure 81). Choose Take Photo if you want to add an image of a person or object. Choose Scan Documents if you want to take a photo of a document. When you select these options, your iPhone or iPad lights up, ready to capture an image. Take the shot, tap Done, and the image is added as an attachment.

Figure 81: To take and then import an image directly from your iPhone or iPad, choose either Take Photo or Scan Documents in the Add Image pop-up menu. Add a Sketch: Choose this and your iPhone opens to the Notes app so you can draw something with your finger or, on an iPad, an Apple Pencil. When you’re satisfied, tap Done. Reminders imports the sketch as an attachment. (Read Apple’s requirements here for Continuity Camera.)
Work with Completed Reminders
Reminders offers a distinct sense of completion when you’re done with task: you just click its circle. How you handle completed reminders varies by your preference and by macOS version, with a new option added in Ventura and iOS 16/iPadOS 16.
Check Off Completed Reminders
When you complete a reminder, click the empty circle next to it to mark it as complete. Reminders fills that circle with a solid circle—in the same color as the list that the reminder is part—of rather than an X or checkmark (Figure 82). The reminder’s text dims.
If you mark a reminder complete that has recurring notifications, only the reminder for that day moves to the completed section of the list. The reminder for the next date appears as normal.

At the top of the list or smart list in which a reminder appears, Reminders shows the number of finished items as X Completed. The total number of reminders for the list includes completed items and appears in the list’s upper-right corner.
Show Your Completed Items
Serious lovers of to-do lists may live for the sight of a list filled with checked items, as in Figure 83, while others prefer for them to disappear. Apple provides both options.
You can opt to toggle the state of showing completed items in two ways:
At the top of a list, a Show or Hide link appears that, when clicked shows completed items or hides them, and then swaps text with the other state.
You can also choose View > Show Completed or View > Hide Completed (or press ⌘-Shift-H to toggle).

Completed reminders don’t retire after a set number of days—they never disappear. There’s no way to limit the number of completed items that appear to relatively recent reminders.
You can delete individual reminders or a selection of reminders at once—see Manage Reminders—or you can click Clear at the top of any list that contains completed tasks. Reminders warns if you click Clear that you can’t restore the removed tasks (Figure 84).
If you don’t delete completed tasks, they’re available to search against (see Search for Reminders, below). In Ventura, you can use Completed, a new smart list, to view all completed tasks.

Search for Reminders
Reminders lets you find reminder text, people, locations, and text in notes. As you type your search term, the app shows matches, grouped by list (Figure 85). Current and completed reminders appear, as do partial matches, like “email” for “mail.”

If you use reminders a lot, this could prove useful both when you’re trying to remember something you did a while back and when you want to recreate a set of tasks. (Why type out steps for doing something again when you can reuse old reminders?)