
Prep for Meetings
We all like to put our best foot forward, and appearing on video can be daunting if you don’t do it all time—even among trusted colleagues, but especially with students, instructors, your boss or higher-ups, family, and friends.
As I write this book, a good hunk of the world is under shelter-at-home or tighter lockdown rules, requiring us to put our home working spaces under scrutiny when we use Zoom for video. That can make it even more fraught, but you can increase your comfort.
A few years ago, I had a contract job in which there were regular video meetings. I wound up making a number of changes in my work area to make it look tidy and professional and so I felt less self-conscious on camera—realizing that nobody else particularly cared about my space or appearance.
Consider all of the following as a way to put your best visual foot forward.
Set Up for Video
Obtaining the best results from a stream of video can be a fickle endeavor. Built-in and add-on webcams often perform poorly in low light, adding noise, and in mixed light, such as with bright lights in frame or pointing towards a frame.
You can fix lighting, add a backdrop, and make other changes that bump up your video quality. Here are a few tips that can help you produce the best conditions (Figure 6).

Manage Your Camera
Whatever kind of camera or device you’re using, make sure the camera is positioned and angled well to show your entire face, mostly, er, head on. Nobody wants to look up your nose or see just your eyes and forehead (Figure 7).

Stabilize a Mobile Device
If you own a relatively recent smartphone or tablet, it may have a very nice front-facing camera for selfies and videos. But other people will find it distracting if you’re holding the device in your hand and it’s constantly jiggling or moving.
There are a zillion smartphone and tablet tripods in the $15 to $40 range that include an adjustable clamp to fit any size of device. Or, you can buy an adapter for about $10 to $20 for smartphones and tablets that works with a tripod you already own.
If you’re using a camera or tablet as an adjunct to Zoom on desktop, either joining from multiple devices (see Present with Multiple Devices) or using virtual camera passthrough software like Camo, you may need a mount that attaches to your laptop screen or desktop monitor, so the camera is placed in the right location relative to your face. Two useful options include:
Ten One Design offers for laptops, the Mountie ($24.95) for phones and smaller tablets and Mountie+ ($34.95) for larger ones.
Bibtic has a magnetic-based flexible mount for phones ($29.99).
Frame Yourself on the Desktop
Depending on the type of camera you use, you might try these tricks:
Laptop: Put a laptop on a higher surface than you would normally use to type and work on. The screen should be close to level with your head. You can use a stack of books, an adjustable riser used to convert a table into a standing desk, or a laptop stand.
My wife loves the portable Roost stand ($74.95 or $89.95), which is remarkably versatile and folds up into an absurdly small bundle. We use this constantly for Zoom calls to friends and family (Figure 8).

Figure 8: Using the Roost and a Jabra speakerphone for better position and sound on a family call. Integral display: For cameras built into a monitor’s top, you may need to adjust the display’s height or tilt it while in meetings to get the optimum angle.
- Add-on: Cameras designed to plug in to a computer (typically via USB) almost always come with one of following: an integral clip or folding stand, an internal mount (or boss) that fits all standard tripod screws, or an external stand. Whatever the case, place the camera lens at nearly eye height—or just a bit above—without obscuring your view of the monitor.
Change the Lights
Your lighting may not be ideal. In fact, it almost surely isn’t. At my workspace, my face is entirely blown out unless I tweak the placement of lights. You can try a few options:
Balance lights so there’s some light behind and some ambient light cast over you. Make sure you’re not lit entirely from behind. You will be hard to make out. Don’t point a light directly at you. This causes a webcam to overexpose your face, removing detail.
Close or open window shades depending on the time of day and their position relative to the camera.
Search on retailers for “studio ring lights,” which are simple rings of LEDs designed to cast a glow on your face. Some “selfie lights” are battery powered and clip on to a laptop top or monitor; others come with a stand.
You should also make sure that you don’t have an unintentional light source. I have a two-monitor display, and I’ve found that depending on how I size my Zoom window and what I have in other parts of the screen, the emitted light from the monitors can wash out my face, too. I try to remember to bring up a dark background or hide windows that are all or mostly white.
Add a Backdrop
Is your area too messy or busy, or full of your personal life? A backdrop can help block it out—and remove distractions.
Let Zoom Drop In a Background
Zoom can swap in a background via the Virtual Background option, which you can use to choose a still image or a looped video with a desktop app or a still image in iOS or iPadOS (Figure 9).

Zoom uses an algorithm to determine the edge between you and whatever is behind you. The algorithm is smart, but doesn’t always neatly cut out a background; I discuss using a green screen later.
In desktop apps, you can add your own images and videos in Settings > Background & Filters. Click the + button and select an appropriate media item, knowing it will be cropped to a 16:9 ratio. Hover over backgrounds and click the X to remove an image or video.
In iOS/iPadOS apps, you can only add a background during a meeting. Tap the More  icon and then tap Virtual Background. You can tap to add a still image from the library on your device. To remove it from your choices, tap Remove while it’s selected.
During a meeting on an iPhone or iPad, you can tap More > Minimize Meeting and then Settings > Meeting Settings > Keep Virtual Background For to select All Meetings. This retains it for subsequent meetings.
Backgrounds should be picked wisely:
For personal and social calls, you can go all out. Have some fun and use a picture of Tahiti or the ski slopes behind you, or place yourself in a loop or Rihanna performing on stage. (But also see the sidebar just below.)
With a professional call, I suggest you exercise restraint. A neutral color could be appropriate, or even a fake background of an office! Seems a little ridiculous, even skeuomorphic, but it’s familiar. (This will work better with a green screen, described next.)
Teachers may want to use classroom pictures. Some teachers I know via Twitter showed me their virtual backgrounds in Zoom: they were the classrooms kids and young adults normally found themselves in when school wasn’t canceled. It was rather sweet.
In both mobile and desktop apps, turn off the background by clicking or tapping None.
Hang a Green Screen
In desktop apps, you can also combine the physical and virtual world by hanging a solid contrasting color backdrop behind you (Figure 10). This is typically a bright green, because it’s rare we’re wearing anything in that color range and nobody’s skin tone falls into that range, either.

In the Zoom app, check “I have a green screen” and the app will subtract the physical background much more accurately than it otherwise could. If the color doesn’t subtract correctly, you can click the background color picker to match your backdrop.
Try a Real Backdrop
You can also opt for a purely physical backdrop. I bought an inexpensive curtain rod and mounted it to the ceiling, and I clip a cheap plain white or black photography backdrop to it when I’m on camera.
Some backdrops are designed to velcro onto a chair to act like a peacock tail behind you. You can get fancier—or weirder—and buy a backdrop of books on shelves or other decoration, also often at very low cost (Figure 11).

A backdrop can help with lighting, by providing a closer surface for indirect light and allowing a webcam to handle contrast better.
Consider How You Appear
There are two sides to how you look on camera. One is what you look like, some aspects of which you can control if you wish. The other is keeping track of when you’re on a video stream—and avoiding the pitfall of showing up when you didn’t mean to.
Tweak Your Appearance
You don’t need to turn yourself into a TV presenter, but you can also be confident and well received with very little effort:
Smooth your face (desktop apps, iOS/iPadOS app): Zoom offers “Touch up my appearance” in Settings > Video (desktop) and in Settings > Meetings (iOS/iPadOS). When selected, the app applies a live smoothing algorithm that removes some of the variation of texture of your skin (Figure 12). The desktop app lets you control the intensity, from mild to full-on anime-style smoothness.

Figure 12: My smiling, slightly grizzled face (left) becomes sleeker, as my pores and uneven skin tone have been removed. Adjust low light: Desktop apps have an option to adjust the brightness of your video feed if your scene appears too dark. In Settings > Video, select “Adjust for low light.” If the automatic compensation doesn’t seem to fit or you want to set and hold the change, choose Manual from the pop-up menu that appears and use the slider to find the right level.
Consider makeup: Far be it from me—or anyone—to tell you how to decorate your face or what to wear. However, if you have an interest in appearing in a particular way on screen, consider whether makeup might assist no matter your gender. For people who generally avoid makeup, a little light powder applied correctly can reduce glare—especially for folks like me who are follically challenged. This guide from Shutterstock’s The Beat offers some good advice and links for the “no makeup” makeup style.
Wear clothes you find appropriate: Because Zoom can be used for a variety of purposes, you may have a wide range of choices about what you wear. You may want to test tops or dresses using the Zoom video settings preview to see what presents well on camera.
Look Like You’re Paying Attention
Nobody has yet cracked the problem that the camera lens that captures your face isn’t centered on the screen where you’re watching video. Mobile devices are better optimized for that, because your camera lens and device input are effectively the same plane of the screen.
On the desktop, it can be much harder. Zoom’s default view shows the currently speaking person front and center, and the most recent ones in a small row at the top. With the alternative, Gallery View, the grid of videos means your eyes might dart left and right, up and down as people talk. (See Adjust the View for more how other participants can appear in your app.)
You can improve how people see how you’re paying attention, and also how they read your facial expression and feedback in a few ways:
Keep yourself close to the screen so your head is most of the top-to-bottom space in the camera. Many people lean way back. You may need to adjust your setup to make this feasible. (See also Manage Your Camera.)
Move your Zoom selfie video stream as close to your camera as possible. There’s a psychological tendency to want to look at oneself, and if you do that while your image is close to the camera, your gaze will look more as if it were aimed at the other person.
Remember to not glance around your space, at a second or other monitor, check your cell phone in your hand, or engage in other obviously distracted activities that people can easily pick up. We’re really good at noticing differences in patterns.
Use in-person cues with the camera. When you’re talking or listening, look regularly into the camera directly. When listening, provide visual, non-verbal feedback, like nodding.
People May Be Watching You
I don’t want to make you self-conscious, but in a videoconference in which your webcam is streaming, people can in fact see you. They may not be looking at you all the time unless you’re speaking or a presenter—that would be pretty creepy, in fact—but folks watching in Grid View or seeing you as a recent speaker with Speaker View selected will have your video on screen.
You might want to hide the video view of yourself, so you aren’t watching yourself watching yourself. However, this could lead you to forget you can be seen. Don’t floss your teeth. Don’t pick your nose. And don’t be naked! You think I’m kidding? Let me quote from a 2020 New York Times “Work Friend” column:
I was recently talking to a group of professional women across a wide range of ages and geographic locations. Two had firsthand accounts of witnessing someone appear fully or partially nude while dialing in to a work meeting because he or she was unaware the call featured video as well as audio. Don’t assume that because you can’t see someone, they can’t see you.
A video circulated after that of a large videoconference on an academic topic in which a participant walked with their laptop into the bathroom and—well, everybody screamed. They simply forgot they were broadcasting to everyone else.
You can disable your video feed with a click or tap of the Stop Video button in any Zoom app. (See Interact in a Meeting for more.)
However, if you want ensure you never broadcasting video when you don’t mean to, blocking the webcam lens is a great solution:
Pick Default Settings for Joining
Zoom lets you make choices about what happens when you join a meeting through their apps. If you use Zoom on different platforms, like macOS and Android, you can choose different options in each app.
You can make these changes before joining any meeting, allowing you to set defaults, and change them at any time. However, most of the default choices can also be changed while a meeting is active, which I discuss in the next chapter, Participate in a Meeting.
In the following sections, I pull out the most useful settings by desktop preference category.
Because Zoom’s desktop and mobile apps have such different settings and organization, I call out which options are can also be applied in mobile apps, where they are all found in Settings > Meetings in both Android and iOS.
Name and Profile Picture
Zoom relies on what participants provide as their name and (optional) profile picture to share with the group when they join. In fact, there’s no good way to prevent this as a participant, so think wisely about how you set these two items up.
If you have a registered Zoom account and are logged in to a Zoom app, Zoom picks up your profile settings when you join a meeting. If you’re joining without an account, Zoom asks when you join what name you want to use. That name remains in place for future meetings if you’re using a native app.
You can rename yourself one of three ways and add or change a photo in two places:
Zoom website: With a registered account at any time, go to your profile on the Zoom website. Click Change to add or change your photo, including framing and zoom an existing or new one, or Delete to remove your photo. To change your name, click Edit on the far right.
Desktop app: Click Participants, hover over your name in the list and click More
, and then choose Rename. You can also click More and Add Profile Picture to select, frame, and zoom one, or Edit Profile Picture to swap it out or change the frame and zoom.Mobile app: Tap Participants, your entry in the list, and Rename. You can’t modify your profile photo.
Hosts have some leeway as to how they let you use profile names and pictures. A host can disable name changes in a meeting, and they can also force-change yours. If you don’t see an option to rename yourself in a desktop or mobile app, or you see your name change, that’s why.
A host can also choose to not allow profile pictures if they have concerns people might pick inappropriate or actively harassing images.
General
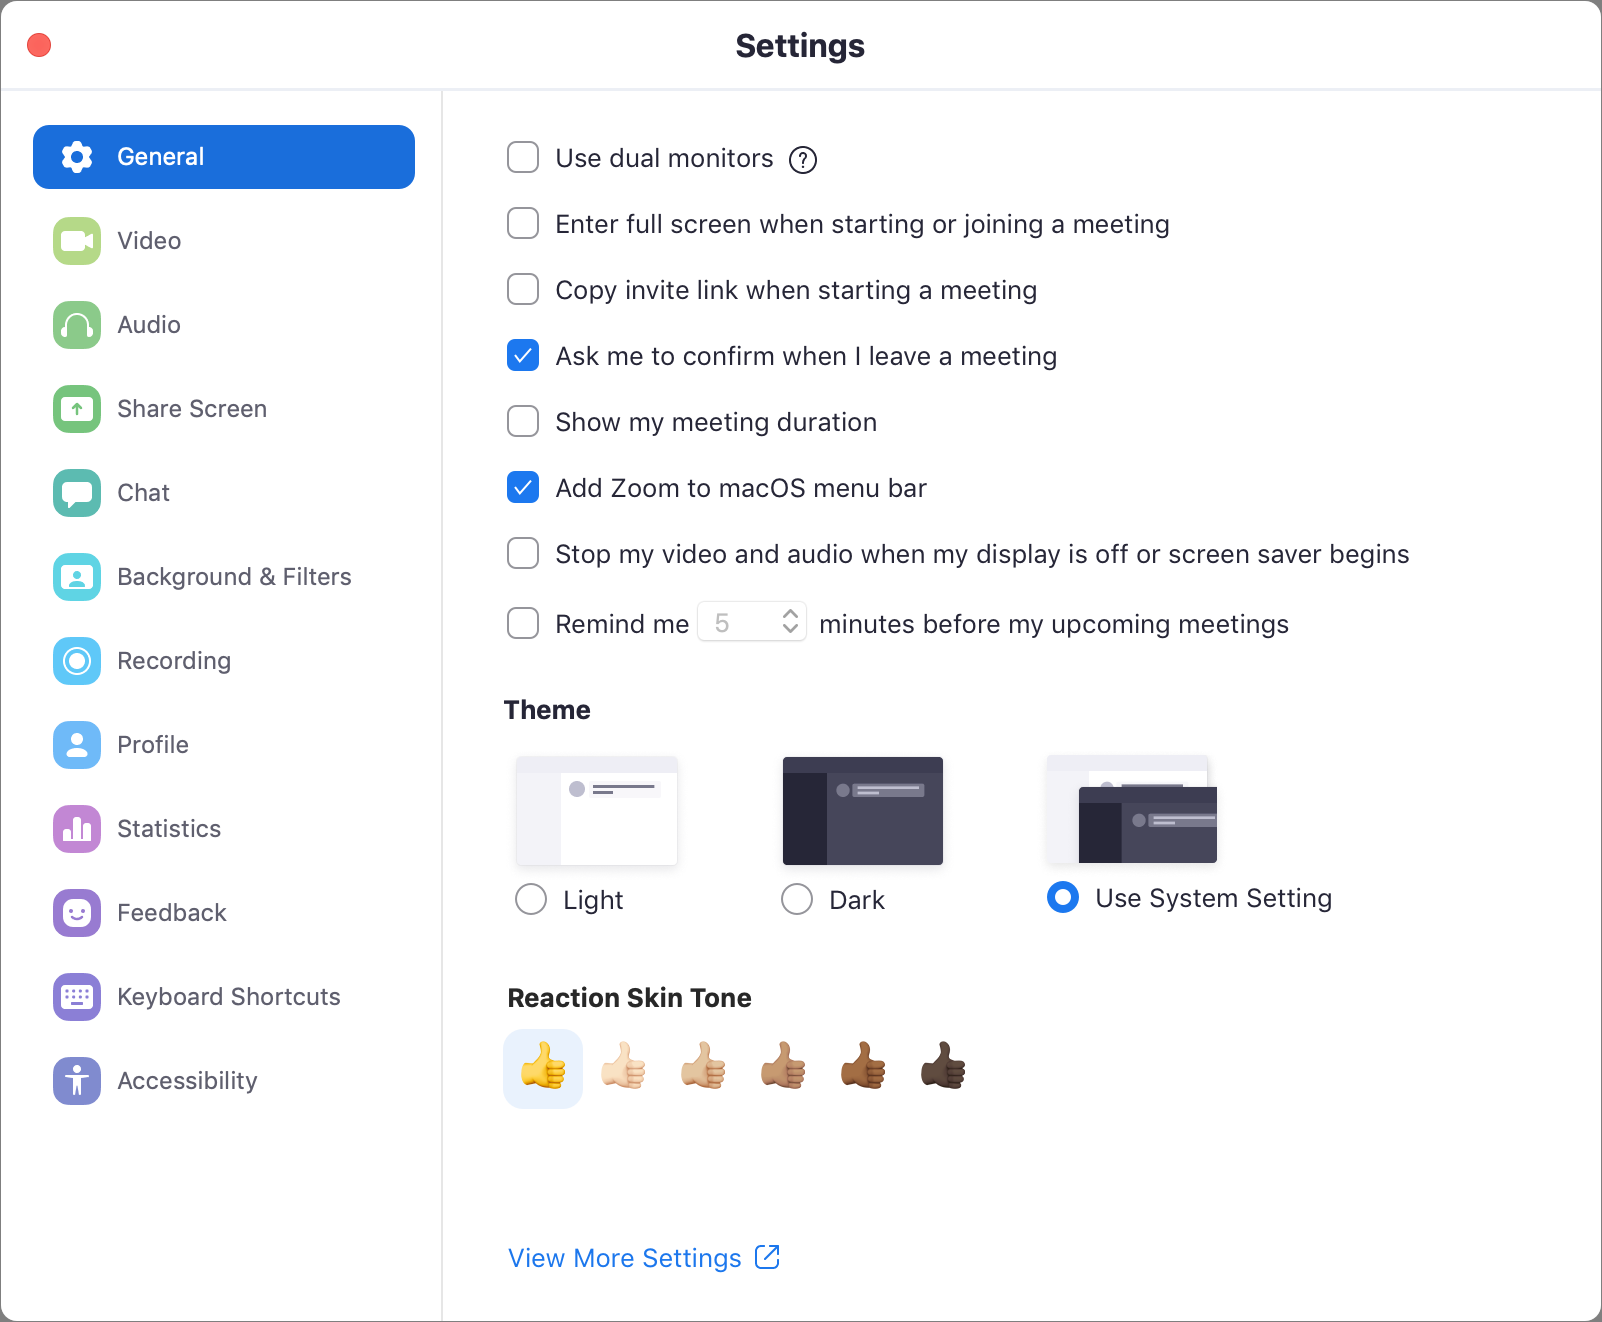
Zoom’s General settings in desktop apps have a few key items that will help you manage your interaction with the app (Figure 13):
Ask me to confirm when I leave a meeting: With this checked, it prevents you from exiting a meeting immediately if you accidentally click the Leave Meeting button.
Show my meeting duration/connected time (plus mobile): A clock appears when you join the meeting showing elapsed time. (The wording of this setting is different on macOS than on other platforms.)
Stop my video and audio when my display is off or screen saver begins: If you walk away from your computer, you may not want audio and video streaming into the meeting to continue. I recommend checking this.
Remind me X minutes before my upcoming meetings: With calendar integration enabled in Zoom, the app provides an alert 5, 10, or 15 minutes ahead of scheduled meetings.
Video
Video settings in desktop apps let you choose a camera (if you have more than one) and see a preview. Many of the Video options make sense to consider, if not change, before you first join meetings:
Widescreen versus original ratio: Some webcams offer multiple cropping options, and you can select which of these two you prefer if they’re available.
Enable HD: Zoom handles high-definition video quite well, but you may want to turn this off depending on your broadband connection speed or how your ISP charges you for service. Also, as I write this in August 2020, Zoom has throttled video below HD for all users; paid plans can choose to enable 720p video. See Zoom Degrading Video for Now for more details.
Mirror my video: Most of us see ourselves in a mirror, and that’s the familiar version of ourselves. For video, you may want to preserve that effect, so what you see onscreen matches your internal conception. This setting applies only to what you see in your copy of Zoom, both in the preview in Settings and in the version of your feed that you see in a Zoom meeting. No matter whether you have “Mirror my video” selected, however, everyone else in a meeting always sees you on screen unmirrored, as in life.
Touch up my appearance (plus iOS/iPadOS): Zoom can employ some simple smoothing that removes blemishes, pores, and other signs that we are imperfect physical beings.
Turn off my video when joining a meeting (plus mobile): I recommend this, as it avoids you having video streaming to others before you’re sure you’re ready. (In mobile, the setting is “Always Turn Off My Video.”)
Always show video preview dialog when joining a video meeting: It’s worthwhile to see what you look like on camera before you start.
Spotlight my video when speaking: Zoom has a variety of options for how people are displayed in a conference. With this setting checked, whenever you speak, you appear in your own app front and center, which can be useful if you want to use that as feedback while you present.
Display up to 49 participants per screen: For very large conferences, you need a quite powerful desktop computer to show up to 49 participants per screen. Less-powerful hardware will show a smaller area in the Grid View. This options will be dimmed for machines with less computational capability.
Audio
In desktop apps, use these settings to pick your output and input devices. You likely won’t change these settings often, but it’s good to test them, as desktop audio selection and USB-connected devices can be fickle (Figure 14). Mobile apps have a couple useful audio settings in Settings > Meetings noted below worth examining.

Manage Your Audio Input
I generally recommend turning off “Automatically adjust microphone volume” in desktop apps. Instead, test and set a volume for your mic, and use a meeting recording or other participants in a test to ensure that it’s the right volume. Unless you’re in a noisy environment or vary your speaking voice enormously without realizing you do, adjusting mic input levels simply isn’t necessary.
You should enable two settings for simplicity:
Automatically join computer audio when joining a meeting (desktop apps): Zoom lets hosts choose to allow audio from the same device as the app or via a dial-up phone number. Unless you think you will ever call in on a phone, turn this on.
Auto-Connect to Audio (mobile apps): Zoom offers as many as four options, depending on your device, account, and platform. You might see all four of these:
Off: No audio is selected when you join a meeting.
Call Over Internet: Zoom uses device audio and sends it from within the app.
Call My Phone Number: On meetings started by paid accounts with an add-on option and that option enabled for the meeting, you can opt to have Zoom call you via your associated phone number.
Auto-Select Based on Network: If you’re on a Wi-Fi network, device audio is used; otherwise, you’re prompted to call or your phone is called.
Mute microphone when joining a meeting (desktop, mobile): As with not starting video automatically, I think it’s a smart idea to choose when to start audio streaming only after joining and when you’re ready. (In mobile, the setting is “Always Mute My Microphone.”)
Control Your Audio Volume
If you’re using a device that cannot have its output level controlled by your desktop operating system—I have such a USB headset, which has hardware volume buttons—then changing the output level in Zoom will likewise have no effect.
In mobile apps, there’s a different quirk: Zoom overrides system-wide audio settings. Even if you mute audio output, setting the volume slider to zero, Zoom will still use its own setting. To truly mute audio coming out of your mobile device, tap the tiny speaker  icon in the upper-left corner that’s showing a few sound waves coming out. When you tap it, wait a second: there’s a short delay before it switches to a speaker with an x
  icon, indicating sound output is muted.