Command Keyboards
Typing in iOS is pretty self-explanatory, but a few tricks are easy to miss, especially the new ones in iOS 13. To learn about special features of the iPad keyboard, see Keyboarding on the iPad.
Learn Text-Editing Basics
Typing in iOS and iPadOS is largely self-explanatory, but editing text isn’t always obvious, and iOS and iPadOS 13 have rethought how text editing works. Here are the basics:
Display the insertion point: Tap in a text area where you want the cursor placed.
Move the insertion point: Tap where you want to type or place a finger on the insertion point and drag it where you want to go. While dragging the insertion point, it’ll grow extra large and hover near your fingertip.
Select text: Double-tap to select a single word. Without lifting your finger, you can drag it to continue selecting text. Triple-tap to select an entire line or quadruple-tap to select a paragraph. After text is selected, you can drag the handles to shrink or expand the expansion (Figure 25).

Figure 25: After selecting text, move the handles on each end to adjust the selection. Copy text: With text selected, pinch in with three fingers. You’ll see Copy appear at the top of the screen.
Cut text: With text selected, pinch in once with three fingers to copy, and then again to cut. You’ll see Cut appear at the top of the screen.
Paste text: Move the insertion point to where you want to paste text and then pinch out with three fingers.
Undo and redo: Swipe from right to left with three fingers to undo the last action and swipe with three fingers from left to right to redo the last action.
Special characters: Typing special characters, like è or ü, is easy in iOS. Touch and hold the base letter on the keyboard—for example, e for è—until a popover appears, then tap the character you want to type.
Save Time Typing
Typing on a piece of glass can be frustrating, but iOS includes some features that make working with text faster:
QuickType: As you type, the QuickType bar suggests words. Tap one to insert it (Figure 26). QuickType can also suggest things like emojis, names, phone numbers, and places. If you have multiple language keyboards enabled, it can also suggest words in those languages.
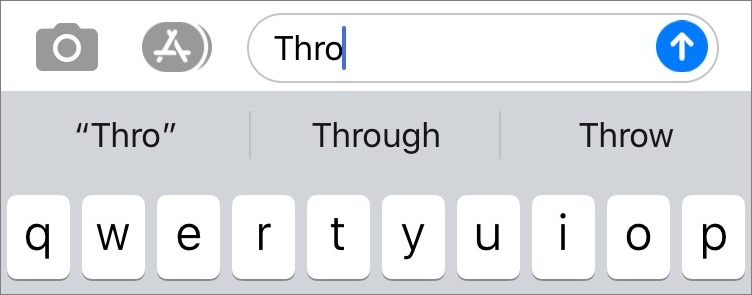
Figure 26: The QuickType bar helps you quickly complete words. QuickPath: New to iOS and iPadOS 13, you can now swipe over the letters on the keyboard to type words. Place your finger on the first letter of the word, drag your finger to the second letter, and so on. Lift your finger after you reach the last letter of the word and the keyboard inserts the word it thinks you meant, with alternatives displayed in the QuickType bar.
Text replacement: You can enter commonly used bits of text, such as your email address, by typing only a few characters. For example, I’ve created a shortcut where, when I type
xtb,it’s replaced withTidBITS.To create a new shortcut, tap Settings > General > Keyboard > Text Replacement and tap the plus
 button in the upper-right corner. In the Phrase field, type the text you want to be entered; in Shortcut, type a shortcut for it. Tap Save.
Dictate Text
iOS lets you dictate text using your device’s microphone. Here’s how:
Make sure Enable Dictation is enabled in Settings > General > Keyboards.
Tap where you want your text to go.
On the keyboard, tap the Dictate
 key.
key.If you have multiple language keyboards enabled, tap the globe
 icon to switch between dictation languages.
Talk. Be sure to explicitly speak punctuation and spaces (for example, “Hi comma Tony period”).
Tap the keyboard
 icon when you’re done.
Type Other Languages and Emojis
You can type in multiple languages in iOS. To add a new keyboard, go to Settings > General > Keyboard > Keyboards, tap Add New Keyboard. To remove a keyboard from the list, swipe left on it and tap Delete. Tap the globe ![]() key to switch between languages. Alternatively, touch and hold the globe
key to switch between languages. Alternatively, touch and hold the globe ![]() key to see all available keyboards.
key to see all available keyboards.
One additional keyboard that’s enabled by default is Emoji. Emojis are small pictographs. With emojis, for example, instead of typing a colon, hyphen, and parenthesis :-) to indicate a smile, you can type a cute smiley face  ! If the only other keyboard you have enabled is Emoji, it’ll display as a smiley
 ![]() face instead of a globe
face instead of a globe ![]() .
.
Type One-Handed
On the iPhone and iPod touch, when you touch and hold the globe ![]() or emoji
or emoji ![]() key, you see three icons used to adjust the keyboard’s position (Figure 27).
key, you see three icons used to adjust the keyboard’s position (Figure 27).

Tapping one of those icons shifts the keyboard’s position, so if you tap the right-hand ![]() button, it shifts the keyboard to the right so you can easily access all the keys with your right hand (Figure 28).
button, it shifts the keyboard to the right so you can easily access all the keys with your right hand (Figure 28).

You can also set the keyboard’s orientation in Settings > General > Keyboard > One Handed Keyboard.
Autofill Passwords
iOS can manage passwords for websites and apps, or help you fill in passwords from your favorite password management app.
To set up iOS’s password AutoFill to use a third-party app, go to Settings > Passwords & Accounts > AutoFill Passwords and turn on whichever apps you’d like to access passwords from, such as 1Password or LastPass. If you don’t have one of these apps, iCloud Keychain is always an option.
Here’s how to autofill passwords with the keyboard:
When logging into an app, tap a login field. If you see a login in the QuickType bar, tap it to insert it (Figure 29).

Figure 29: Logging in to an app can be as easy as tapping an entry in the QuickType bar. If you don’t see the login you want, tap the key
 icon on the QuickType bar. If that icon doesn’t appear, you’ll have to enter the password manually or copy it from a password manager.
After tapping the key
icon, tap either a password, or a password source, like 1Password. When prompted, authenticate with Touch ID, Face ID, or a passcode.iOS displays your stored logins, and places logins at the top it thinks are useful for this app. You can use the search box at the top to whittle down the list of logins.
Tap a login to autofill it in the app’s login prompt.
Manage your logins stored in iCloud Keychain in Settings > Passwords & Accounts > Website & App Passwords. For more, see Improve Your Passwords.
Install Third-Party Keyboards
Does the iOS keyboard not do it for you? The good news is that Apple allows third-party developers to create system-wide keyboards that users can install.
To enable a third-party keyboard:
Install the app containing a keyboard, such as Gboard, from the App Store.
Open Settings and tap General > Keyboard > Keyboards.
Tap Add New Keyboard.
Tap the keyboard on the Third-Party Keyboard list.
Most keyboards require Full Access to be fully operational. To enable it, still on the Keyboard screen, tap the keyboard’s name and turn on the Allow Full Access switch. An alert warns you that with Full Access, the developer can see anything you’ve typed. Tap Allow or Don’t Allow.
To switch keyboards, tap the globe ![]() key to cycle through keyboards, or touch and hold the globe
key to cycle through keyboards, or touch and hold the globe ![]() key to see a list of installed keyboards. (This behavior may change depending on the keyboard in use.)
key to see a list of installed keyboards. (This behavior may change depending on the keyboard in use.)