Classes and Objects in OOP
Void methods that return no value and simply execute code
Value methods that return a value of a specific data type after executing
Parameter methods that take actual values as their parameters and that may or may not return a value of a specific data type after executing
Overloaded methods, which are methods with the same name but different parameters
There are many methods used in our code, which are not written by us, for example, WriteLine(), Write(), ReadLine(), ToDouble(), ToInt32(), and ToDateTime(). The methods we have created and the methods we have not created but have used all have one thing in common:
They all live inside a class; they are part of a class.
Methods
Variables
When we create our own classes, they act in the same way as the classes in .NET or any other classes in that they can be reused, usually by creating instances of them, to create one or more objects.
A Class Is a Data Structure
In the software development world, there are many programming languages and many different types of program. Some languages and programs are what can be called legacy languages and legacy programs . COBOL is one such legacy programming language, but it is still a very powerful language that widely exists in many commercial applications. On the other hand, other languages are popular and use the latest methods or features in object-oriented programming (OOP). With traditional languages like COBOL, developers often coded the programs as a set of instructions that followed a sequence, and hence it was called sequential programming . With object-oriented programming (OOP) , there is now a focus on structuring the code more and using objects. This is achieved by organizing or capturing the code in logically related methods and data objects called classes. This process of organizing or capturing the data and methods is called encapsulation .1
Data members that store data associated with the class or data associated with an instance of the class, the object. We can simply think of them as a variable if they are private or protected and as a field if they are public.
Function members that are used to execute code. They are the methods we use to hold our code.
In a class we can have different types, and when trying to learn about classes and objects, it is very important that we understand what the types are and what their role is, so we will look at these in more detail now.
Type 1: Fields
- A class called QuoteArithmetic that held details about an insurance quote and had fields that represented the
Age of the vehicle in terms of years. It was called vehicleAgeInYears.
Current mileage of the vehicle. It was called vehicleCurrentMileage.
- A class called MethodsV1 that held details about an insurance claim and had fields that represented the
id of the repair shop making the claim. It was called repairShopID.
Claim amount. It was called claimAmount.
The access level of the field, for example, public or private
The type of the field, for example, double, string, etc.
The name of the field, for example, premium
A class with a public field
Example | Explanation |
|---|---|
public class QuoteArithmetic { public int vehicleAgeInYears; } | Access modifier is public. Type is int. Name is vehicleAgeInYears. |
A class with a private field
Example | Explanation |
|---|---|
public class MethodsV1 { private String repairShopID; } | Access modifier is private. Type is String. Name is repairShopID. |
Type 2: Constants
Identifying the access level of the field, for example, public or private.
Adding the const modifier.
Identifying the type of the field, for example, double, String, etc.
Identifying the name of the field. In C# the naming convention may be to use PascalCase for class names, method names, and constants or readonly variables, whereas in Java the naming convention could be to use capital letters for the name of a constant, for example, BASEINSURANCEAMOUNT. Ultimately it is a convention, rather than a must-do.
Setting its fixed value.
A class with a constant field with public access
Example | Explanation |
|---|---|
public class QuoteArithmetic { public const int maximumDriverAge=100; } | Access modifier is public. Modifier const makes it a constant value. Type is int. Name is maximumDriverAge. Value is fixed to 100. |
A class with a constant field with private access
Example | Explanation |
|---|---|
public class MethodsV1 { private const double minimumQuote=100.00; } | Access modifier is private. Modifier const makes it a constant value. Type is double. Name is minimumQuote. Value is fixed at 100.00. |
Type 3: Methods
Methods form a large part of the C# language. Our C# application will start its execution from within the Main() method, so in our code the Main() method will exist in one of our classes and forms the entry point for the application being developed. As developers we use methods to modularize our code and make it easier to read and maintain. More importantly, methods form the basis for the vitally important concept of Test-Driven Development (TDD), where the idea is to test a unit of code, which is usually a method. In Test-Driven Development we write tests first before we write our classes and methods – yes, that is strange. With Test-Driven Development the tests themselves are methods, which are inside a class, called the test class. So once again we see the importance of classes with methods and variables.
The access level of the method
Optional modifiers such as abstract, sealed, static, override, and virtual
The return type of the method
The name of the method
Any parameters that are passed into the method
Example method code snippet
Access level of the method is public.
The static modifier has been applied to the method, and we will learn more about static in this chapter.
The return type of the method is void – it does not return anything.
The name of the method is HowManyClaimsAreBeingMade.
No parameters are passed into the method – it is parameterless.
Type 4: Properties
As we saw in Tables 13-1, 13-2, 13-3, and 13-4, it is possible to set the field access modifier as public or private. Private fields are referred to as variables and public fields are referred to as fields. The reason for setting the field as private is to ensure that it cannot be accessed directly from outside the class, by another class. We may therefore wonder how we can read the value of a variable or write a value to a variable from outside its class if it is set as private. Well, the answer is by using a property, which is a mechanism that allows for reading and writing, getting or setting, of the variable.
Get accessor, getter
Example code snippet for a getter
Set accessor, setter
Example code snippet for a setter
So, in essence, the setter method sets the value of a field. In Listing 13-3 we can see that the setter is used to set the value of the field totalOfAllClaims. The set accessor assigns the new value to the field.
Type 5: Constructor
We now know that fields with an access modifier of private can have their value amended using a setter. There is also a very special method that can exist in a class and can be used for the purpose of initializing the values of the fields or writing some code. This special method is called a constructor and will be created by the developer.
Default Constructor
If we do not want to initialize the fields, they will have the default value for the data type of the particular field, for example, the int data type has a default of 0 and the double data type has a default of 0.00. When we choose not to develop a constructor and therefore leave the default values for the fields, there is still a constructor in the class; it is called a default constructor and it will not be visible.
Here we have created an instance of the class MethodsV1 – we are instantiating the class.
This instantiation passes in no values, arguments, to the class called MethodsV1, as there are no values between the open and close brackets ().
This means that the default constructor has been used and the fields of the class will have the default value for their data type.

An 8-line code exhibits the use of open and close parentheses to instantiate the new Methods V 1 class.
Instantiate the class using the default constructor , no values
Custom Constructor

A 13-line code exhibits the use of no return type and custom constructor parameters, namely, repair Shop I d type string and claim Amount type double.
Creating the custom constructor
It must have the same name as the class – in this example it is MethodsV1.
It must have an access modifier of public.
It has no return type, not even void.
It has parameters, and they are of the same type as the fields that are to be initialized. Here we have a string followed by a double.
The constructor, method, is “activated” when the class is created. We will see more about this as we code the examples in this chapter. The way a class is “activated” is by creating an instance of the class. The reason we use an instance of the class is because the class itself is a template and should not be used directly.
In the code shown in Figure 13-2, we could have used the keyword this to refer to the fields of the class, and we would do this to differentiate between the field of the class and the parameter of the method. But wait a minute! Could we not have named the parameters of the method different from the field names of the class and then avoided using the this keyword? Yes, of course we could, but in terms of clean code and convention, using the same name for the variables can be seen as preferential, and therefore we use the this keyword. We can think of this as referring to the current object, the field of the class we are in.
This instantiation passes in two values, arguments, to the constructor of the MethodsV1 class.
As we can see from the two values between the open and close brackets (), we are passing in one string, “RS1234”, followed by one double, 2999.50, to the constructor of the class called MethodsV1.
The values, arguments, are passed to the constructor, which has been created, and the constructor accepts these arguments as its parameters.
The values are of types string and double in this specific order.
Remember, the default constructor accepts no values.
Since we are using a custom constructor, we know that the default constructor does not exist.

An 8-line code exhibits the Methods V 1 class, my Instance Of Methods V 1 instance, and quoted R S 1234, 299.50 arguments of the custom constructor.
Instantiate the class using a custom constructor, values passed .
Class with custom constructor
Figure 13-3 shows that when the class is instantiated, the first argument is the value “RS1234”.
This argument is accepted by the repairShopId parameter, as in Listing 13-4, and the default value of the repairShopId field is overwritten. The value becomes “RS1234”.
Figure 13-3 shows that when the class is instantiated, the second argument is the value 2999.50.
This argument is accepted by the claimAmount parameter, as in Listing 13-4, and the default value of the claimAmount field is overwritten. The value becomes 2999.50.
The constructor, as in Listing 13-4, therefore uses the arguments passed to it to initialize the fields.
this.repairShopId, in Listing 13-4, refers to the field repairShopID of the class.
The field repairShopID, in Listing 13-4, is therefore assigned the value “RS1234”.
this.claimAmount, in Listing 13-4, refers to the field claimAmount of the class.
The field claimAmount, in Listing 13-4, is therefore assigned the value 2999.50.
Since there is a constructor method in this example, it means that the default constructor no longer exists – it has been overwritten.
Constructor Overloading
Constructor overloading – more than one custom constructor
Follow the code and the flow of events easier.
Find things quicker.
To structure the program code better, we could break the code into small functional parts, each part performing one task. When we have a functional part, which does one particular thing, it may be possible for that functional part to be used by other parts of the program.
In the last chapter on methods, we created methods that performed one task, and then the methods were called as required. Well, this section will develop this concept even further.
AgentCommission()
AgentBonus()
CustomerPersonalDetails()
CustomerVehicleDetails()
Suppose all the methods are inside a class and outside the Main() method. Now, this would be fine, and the code could work, and it’s similar to what we did when coding in Chapter 12. But, looking closely at the method names, we might suggest that they relate to two distinct categories or groups , an Agent and a Customer.
If this is the case, we should think, Would it not be better if each method was placed inside a class that related to its category? This would mean that our code could now look something like the three classes shown in Listings 13-6, 13-7, and 13-8.
Class 1
Class with the Main() entry point
Class 2
Class for the Agent
Class 3
Class for the Customer
Our code is now organized into classes and into methods within the classes. More importantly, the distinct classes hold methods and fields that have a similar purpose. This is a good starting point, and we might, even at this stage, think we could have completed the separation process in a different way. We could, and that is part of the “joy” of programming, as developers think in different ways, and no one way is the right way.
Length property of the Arrays class
Parse method of the Int32 class – also the ReadLine() method
When the line of code in Listing 13-10 is entered into the Integrated Development Environment (IDE) and the full stop is typed after the word Int32, a pop-up window appears.
The pop-up window displays the methods and fields that are part of the Int32 class.
The methods have the cube icon.
The fields have the spanner icon, but there are no fields for Parse.
The constants have the rectangle with lines icon.
However, some Integrated Development Environments use the symbols M for a method and F for a field.
The Int32 class has only methods that are associated with 32-bit integers.

A pop-up window highlights the Parse method among the options with icons for I n t 32 class constants and methods. The dot notation after I n t 32 is highlighted in the code.
Int32 class with its methods and constants
Sqrt() method from the Math class
When the code in Listing 13-11 is entered into the Integrated Development Environment (IDE) and the full stop is typed after the word Math, a pop-up window appears.
The pop-up window displays any methods and fields that are part of the Math class.
The methods have the cube icon.
The fields would have the spanner icon, but Math has no fields.
The constants have the rectangle with the lines, for example, PI and Tau.
The Math class has only methods that are associated with mathematics.

A pop-up window highlights the S q r t method among the options with icons for Math class constants and I n t 32 class methods. The dot notation after Math class is highlighted in the code.
Math class with its methods
Great, now we can think of methods that come with C# and from the imports, not just being coded in one class but in numerous classes. With these classes there is a high degree of code separation . We call it separation of concern (SoC), where associated methods are kept together, and this is what we can do – we have done this in Chapter 12. Think about separation of concern using these real-world examples.
The head teacher
The senior teachers
The teachers
The administration staff
The facilities staff
The canteen staff
All roles have separate concerns, but all concerns serve one purpose, to keep the school working.
The consultants
The doctors
The nurses
The care assistants
The administration staff
The facilities staff
The catering staff
All roles have separate concerns, but all concerns serve one purpose, to keep the hospital functioning.
Let's code some C# and build our programming muscle.
Now it is time for us to code some classes with methods and show the separation of concern working in our application. We will be programming the same application that we have just completed in Chapter 12, so we can choose to copy and paste code as required, but the following instructions assume that we are starting again with no code.
- 1.
Right-click the solution CoreCSharp.
- 2.
Choose Add.
- 3.
Choose New Project.
- 4.
Choose Console App from the listed templates that appear.
- 5.
Click the Next button.
- 6.
Name the project Chapter13 and leave it in the same location.
- 7.
Click the Next button.
- 8.
Choose the framework to be used, which in our projects will be .NET 6.0 or higher.
- 9.
Click the Create button.
- 10.
Right-click the project Chapter13 in the Solution Explorer panel.
- 11.
Click the Set as Startup Project option.
- 12.
Right-click the Program.cs file in the Solution Explorer window.
- 13.
Choose Rename.
- 14.
Change the name to ClaimApplication.cs.
- 15.
Press the Enter key.
- 16.
Double-click the ClaimApplication.cs file to open it in the editor window.
- 17.
In the editor window, add the code in Listing 13-12.
Class with the Main() method
- 18.
Right-click the Chapter13 project in the Solution Explorer panel.
- 19.
Choose Properties from the pop-up menu.
- 20.
Choose the Chapter13.ClaimApplication class in the Startup object drop-down list.
- 21.
Close the Properties window.
- 22.
Right-click the Chapter13 project in the Solution Explorer window.
- 23.
Choose Add.
- 24.
Choose New Item.
- 25.
Choose Class.
- 26.
Change the name to ClaimDetails.cs.
- 27.
Click the Add button.
ClaimDetails class with no Main() method
- 28.
Amend the code, as in Listing 13-14, to create the required class-level variable.
Add the class-level variable
REMEMBER
- 29.
Amend the ClaimDetails code, as in Listing 13-15, to add method 1. Notice that static has been removed.
Add method 1
- 30.
Click the File menu.
- 31.
Choose Save All.
- 32.
Amend the ClaimApplication class, as in Listing 13-16, to create an instance of the ClaimDetails class.
Create an instance of the ClaimDetails class
- 33.
Amend the Main() method to call the HowManyClaimsAreBeingMade() method , method 1, and assign it to the numberOfClaimsBeingMade variable, as in Listing 13-17.
Call the HowManyClaimsAreBeingMade() method
A class without a Main() method has been created to hold methods and fields.
From another class, which has a Main() method, an instance of the class containing the methods is created.
Using the instance of the class, we have access to the methods and fields of the class that have the public access modifier and are not static, that is, they belong to the instance of the class, not the class itself.
Adding the full stop after the instance name means those methods and fields that are accessible will be displayed. This is called the dot notation.
This means that we could create as many methods as we like in the class and create as many classes as we like. This idea of separating our code into methods and our methods into classes is exactly what a C# application should look like when it is being coded.
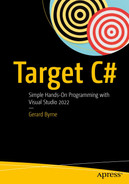
The word static in front of a method or field of a class means that the method or field belongs to the class it is declared in.
When we make an instance of the class, we will not be able to access the static fields or the static methods using the instance name.
Static fields and methods are available directly inside the class they are declared in.
To access a static field or a static method, we use the class name, not the name of the instance of the class.
A two-part window exhibits the failed my Instance Of Example Static lines on the right side from the static i n t and static void lines on the left side.
Static fields and methods not accessible from a class instance
- 34.
Click the File menu.
- 35.
Choose Save All.
- 36.
Click the Debug menu.
- 37.
Choose Start Without Debugging.
- 38.
Type 2 and press the Enter key.
- 39.
Press the Enter key.

A console window depicts 2 as the number of claims to be made. Below is a C colon address followed by an instruction to close the window.
Method called from another class
- 40.
Amend the ClaimDetails class, as in Listing 13-18, to add the additional fields we require and initialize the existing variable to 0.
Add the additional class-level variables and array we will use
- 41.
Amend the ClaimDetails code , as in Listing 13-19, to add method 2 after method 1. Notice that static has been removed.
Add method 2
- 42.
Amend the ClaimDetails code, as in Listing 13-20, to add method 3 after method 2. Notice that static has been removed.
Add method 3
- 43.
Amend the ClaimDetails code , as in Listing 13-21, to add method 4 after method 3. Notice that static has been removed.
Add method 4
- 44.
Amend the ClaimDetails code, as in Listing 13-22, to add method 5 after method 4. Notice that static has been removed.
Add method 5
- 45.
Amend the ClaimDetails code , as in Listing 13-23, to add method 6 after method 5. Notice that static has been removed.
Add method 6
- 46.
Amend the ClaimDetails code, as in Listing 13-24, to add method 7 after method 6. Notice that static has been removed.
Add method 7
- 47.
Amend the ClaimDetails code , as in Listing 13-25, to add method 8 after method 7. Notice that static has been removed.
Add method 8
- 48.
Amend the ClaimDetails code, as in Listing 13-26, to add method 9 after method 8. Notice that static has been removed.
Add method 9
- 49.
Amend the ClaimDetails code, as in Listing 13-27, to add method 10 after method 9. Notice that static has been removed.
Add method 10
- 50.
Amend the ClaimDetails code , as in Listing 13-28, to add method 11 after method 10. Notice that static has been removed.
Add method 11
- 51.
Amend the ClaimDetails code, as in Listing 13-29, to add method 12 after method 11. Notice that static has been removed.
Add method twelve
- 52.
Amend the ClaimDetails code , as in Listing 13-30, to add method 13 after method 12. Notice that static has been removed.
Add method 13
- 53.
Amend the ClaimDetails code, as in Listing 13-31, to add method 14 after method 13. Notice that static has been removed.
Add method 14
- 54.
Amend the ClaimDetails code , as in Listing 13-32, to add method 15 after method 14. Notice that static has been removed.
Add method 15
Code Analysis
We have created a new class without a Main() method – it is called ClaimDetails.
We have added the fields that we will use in the methods of the class.
We have added the original methods we had in the MethodsValue class in the last chapter.
We have created a class called ClaimApplication with a Main() method.
- In the Main() method we have
Created an instance of the ClaimDetails class
Accessed the method called HowManyClaimsAreBeingMade() by using the name of the class instance we created, followed by a full stop (dot notation), and then selecting the method
- 55.
Amend the code, as in Listing 13-33, in the ClaimApplication class, to add the rest of the fields we will need in this class.
Add the two additional fields we need in the Main() method class
- 56.
Now add the do while loop within the Main() method, as in Listing 13-34.
Add the do while construct
Now we will call the method that will read the repair shop id, remembering that the method does not exist in the class we are in. We will need to call it using the instance of the class that we created, myClaimDetailsInstance. Remember, after we enter the instance name and type the dot, the list of fields and methods of the class will appear if they are accessible, so we should select the method rather than typing it.
- 57.
Add the code in Listing 13-35, to call the repair shop id method.
Call the ReadTheRepairShopId() method from the other class

A window pops up following the use of dot notation after my Claim Details Instance. It exhibits only the accessible methods and not the private fields.
Methods in the ClaimDetails class that are accessible
- 58.
Add the code in Listing 13-36, to call the method to write the repair shop id to the array.
Call the WriteRepairShopIdToTheArray() method
- 59.
Add the code in Listing 13-37, to call the two methods we require to read the policy number and then write it to the array.
Call the read and write policy number methods
- 60.
Add the code in Listing 13-38, to call the two methods we require to read the amount being claimed and then write it to the array and then call the method that accumulates the total for all claims.
Call the read and write claim amount methods
- 61.
Add the code in Listing 13-39, to call the two methods we require to read the repair date and then write it to the array.
Call the read and write claim date methods
Now we have the bulk of the work done because we have our methods in one class and we have called the methods from the other class with the Main() method to get the user input and store the details in an array.
- 62.
The start of the Main() method should be as shown in Listing 13-40.
Remove the method-level variable
- 63.
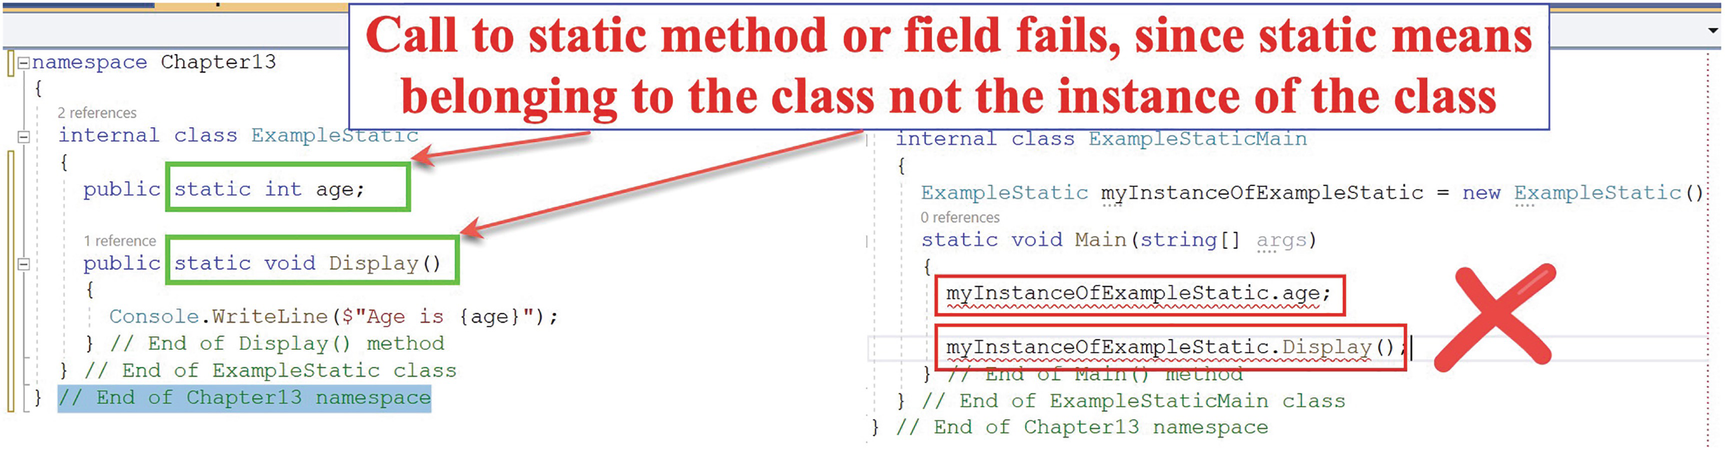
Add the code in Listing 13-41, to increment the number of claims that have been entered by one using the static field in the other class.
Increment the number of claims entered counter
A pop-up window exhibits the inaccessibility issue regarding the use of the number Of Claims Entered in the line of code. It exhibits 32-bit signed integer, C S 0122, and potential fixes.
Field not accessible
- 64.
Open the ClaimDetails class.
- 65.
Right-click the numberOfClaimsEntered field.
- 66.
Choose Quick Actions and Refactorings as shown in Figure 13-10.

A context menu for the number Of Claims Entered exhibits the highlighted Quick Actions and Refactorings option above Rename. Both have keyboard shortcuts.
Right-click the field and choose Quick Actions and Refactorings
- 67.
Choose Encapsulate field : numberOfClaimsEntered (but still use field) as shown in Figure 13-11.

A 9-part menu exhibits various functions under Quick Actions and Refactorings. In the Encapsulate field, the number Of Claims Entered but still used field is highlighted.
Encapsulate the field
The accessor for numberOfClaimsEntered is added to the class
- 68.
Open the ClaimApplication class.

A context menu exhibits the highlighted Number Of Claims Entered accessor above other entries on the right of get and set with a semicolon each within curly brackets.
NumberOfClaimsEntered property
- 69.
Amend the call to use the NumberOfClaimsEntered accessor. Inside the while() remove the old method variable and replace it with the instance variable NumberOfClaimsEntered accessor, as in Listing 13-43.
The accessor NumberOfClaimsEntered is used (capital N)
Call the DetermineVATAmount() method, passing it the totalOfAllClaims and the vatAmount.
Call the DisplayAllItemsInTheArray() method.
Write the total of all claims to the console.
Call one of the DisplayInvoiceReceipt() methods, passing it the totalOfAllClaims and the vatAmount.
Call one of the DisplayInvoiceReceipt() methods, passing it the totalOfAllClaims, the vatAmount, and a message.
- 70.
Add the ClaimApplication code in Listing 13-44, to call the method that will display the invoice receipt based on the total of the claims, the VAT amount, and the message string.
Call the method that will display the invoice
- 71.
Click the File menu.
- 72.
Choose Save All.
- 73.
Click the Debug menu.
- 74.
Choose Start Without Debugging.
- 75.
Type 2 and press the Enter key.
- 76.
Type RS000001 for the repair shop id and press the Enter key.
- 77.
Type VP000001 and press the Enter key.
- 78.
Type 1200 and press the Enter key.
- 79.
Type 2021/10/01 and press the Enter key.
- 80.
Type RS000001 for the repair shop id and press the Enter key.
- 81.
Type VP000002 and press the Enter key.
- 82.
Type 3600 and press the Enter key.
- 83.
Type 2021/10/01 and press the Enter key.

A console window exhibits the invoice for vehicle repairs with values for Nett claim, V A T amount, and Total amount between lines of asterisks.
Receipt, having used classes
- 84.
Press the Enter key to close the console window.
This is the same application as MethodsValue() and the same invoice receipt, with different amounts. The big difference is the separation of the methods from the class that contains the Main() method.
A class can contain fields.
A class can contain methods.
To use a class from within another class, we create an instance of the class – this is called instantiation.
The instantiated class gives us access to the fields and methods of the class.
Constructor
Creating an instance of the class
The new ClaimDetails() section of the code means we are not passing in any arguments to the class; this is why there are no values between the brackets (). This means we are calling the default constructor, and we read earlier that the constructor “method” can be used to initialize the value of the fields in the class. It may be used to initialize all the fields or some of them, or in the case of a default constructor, none of the fields are initialized – they just have their default values.
It must have the same name as the class. We will therefore use the name ClaimDetails.
It must have an access modifier of public.
It does not have a return type, not even void.
It takes in arguments of the same type as the fields being initialized.
Next
We will create a constructor that has a DateTime parameter.
The new constructor will therefore overwrite the default constructor.
We will use a DateTime field with a readonly keyword, which means the field can only be assigned a value as part of the declaration or in a constructor in the same class. The readonly field can be assigned and reassigned multiple times within the field declaration and constructor.
By setting the date field to the date read from the computer, we will not need to have the method that asks the user to input the date of the claim, method 9, so this method will not be called from the Main method.
When we then write the date to the array, we will use the new DateTime field we are setting up in the class and initializing with the computer date.
For now, we will leave the method in the ClaimDetails class .
- 1.
In the ClaimDetails amend the code to add the readonly DateTime field and a constructor that will set the date field to the current computer date, as in Listing 13-46.
Add a new constructor that has a DateTime parameter

An error message exhibits a lack of argument, simplification of new expression, and option to reveal potential fixes for new Claim Details parentheses.
Error because we now have no default constructor
- 2.
Amend the ClaimApplication code , as in Listing 13-47, to read the date from the computer.
Read the date from the computer
- 3.
Amend the code, as in Listing 13-48, to pass the DateTime to the constructor.
Use the custom constructor, passing in the DateTime
- 4.
As we now have the date, we do not need to ask the user to input the date. The method call can be removed or commented out, as it is not used, as in Listing 13-49.
Comment the line where the repair date reading method is called
- 5.
Right-click the claimDate field in the ClaimDetails class.
- 6.
Choose Quick Actions and Refactorings.
- 7.
Choose Encapsulate field: claimDate (but still use field).
- 8.
Now we need to call the DateTime field so we can write the date to the array. In the ClaimApplication, class amend the code to call the accessor, as in Listing 13-50.
Call the DateTime field through its property
- 9.
Click the File menu.
- 10.
Choose Save All.
- 11.
Click the Debug menu.
- 12.
Choose Start Without Debugging.
- 13.
Type 2 and press the Enter key.
- 14.
Type RS000001 for the repair shop id and press the Enter key.
- 15.
Type VP000001 and press the Enter key.
- 16.
Type 1200 and press the Enter key.
We have removed the call to the method that asks the user to input the date of the repair so we will not be asked for the date of the repair.
- 17.
Type RS000001 for the repair shop id and press the Enter key.
- 18.
Type VP000002 and press the Enter key.
- 19.
Type 3600 and press the Enter key.
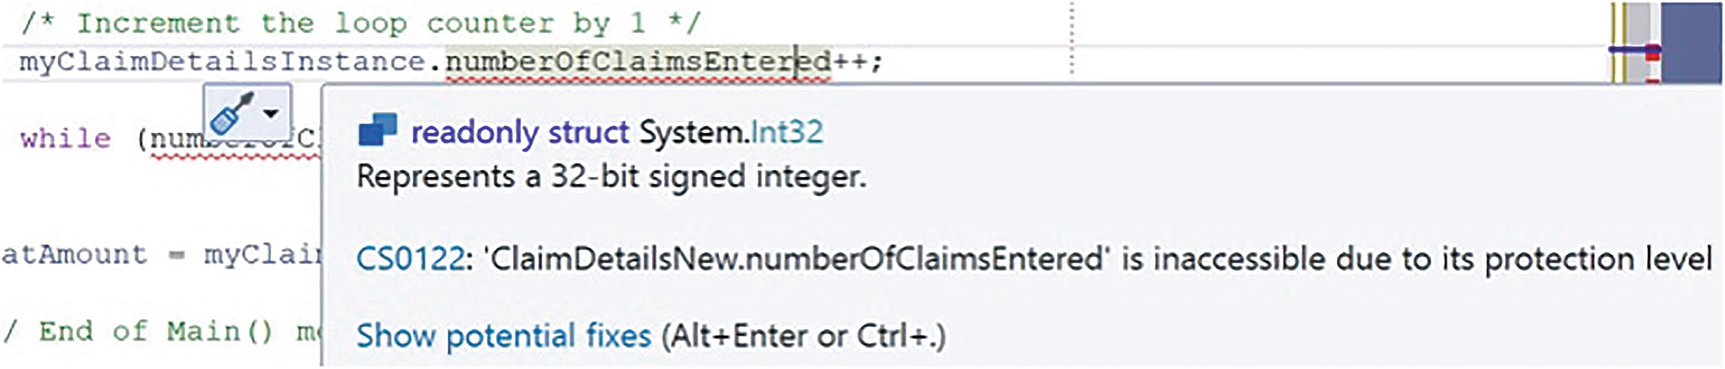
A console window depicts similar computer date entries among items in the array in the invoice receipt. Invoice for vehicle repairs is also exhibited.
The computer date is displayed
- 20.
Press the Enter key to close the console window.
Another Constructor
We will now create a second constructor, which will set the date field and a message field of data type String. This new constructor will therefore be different from the first constructor, as it has two arguments as opposed to one, This is constructor overloading.
- 21.
Amend the ClaimDetails code , as in Listing 13-51, to add the field called message.
Add a String field and assign it a value
- 22.
Amend the ClaimDetails code, as in Listing 13-52, to add the second constructor.
Add the second constructor
Calling the method to display the invoice receipt
Here we are calling the method DisplayInvoiceReceipt() and we have passed it a message, which the method uses to display the message.
However, we have just created a constructor that accepts a message string and assigns this string value to the field called message.
As we have the new constructor, we could pass our message at the time we instantiate the class, and the message will then exist in the class.
We can then remove method 15 where we accepted the message.
We can call method 14, which accepts only two parameters, not the message:
We can then add an extra line to method 14 to display the message field because we have direct access to the field in the other class.
- 23.
Amend the ClaimDetails class code, as in Listing 13-54, to remove method 15 or simply comment the method code.
Comment all of method 15 (don’t worry about YAGNI!)

An error message depicts nonexistent overload for the Display Invoice Receipt method with 3 arguments from a line that starts with my Claim Details Instance.
Error as the method accepting three arguments does not exist
- 24.
Amend the code to delete the line of code with the error. With this line removed, the code should be as shown in Listing 13-55.
Remove the second call to the DisplayInvoiceReceipt() method
- 25.
Now amend the instantiation code line, in the ClaimApplication class , to pass the two values to the new constructor, as in Listing 13-56.
Add the two arguments to the method call
- 26.
Amend the DisplayInvoiceReceipt() method in the ClaimDetails class to add the new line, which will print the message line, as in Listing 13-57.
Display the message
- 27.
Open the ClaimApplication class.
- 28.
Click the File menu.
- 29.
Choose Save All.
- 30.
Click the Debug menu.
- 31.
Choose Start Without Debugging.
- 32.
Type 2 and press the Enter key.
- 33.
Type RS000001 for the repair shop id and press the Enter key.
- 34.
Type VP000001 and press the Enter key.
- 35.
Type 1200 and press the Enter key.
We have removed the call to the method that asks the user to input the date of the repair so we will not be asked for the date of the repair.
- 36.
Type RS000001 for the repair shop id and press the Enter key.
- 37.
Type VP000002 and press the Enter key.
- 38.
Type 3600 and press the Enter key.

A console window depicts similar computer date entries in the invoice receipt and a thank you message in the invoice for vehicle repairs below.
The message and the computer date are displayed
- 39.
Press the Enter key to close the console window.
- 40.
Amend the instantiation code line to comment out the first call and add the new call to the constructor, as in Listing 13-58.
Use the constructor with one parameter
- 41.
Click the File menu.
- 42.
Choose Save All.
- 43.
Click the Debug menu.
- 44.
Choose Start Without Debugging.
- 45.
Type 2 and press the Enter key.
- 46.
Type RS000001 for the repair shop id and press the Enter key.
- 47.
Type VP000001 and press the Enter key.
- 48.
Type 1200 and press the Enter key.
We have removed the call to the method that asks the user to input the date of the repair so we will not be asked for the date of the repair.
- 49.
Type RS000001 for the repair shop id and press the Enter key.
- 50.
Type VP000002 and press the Enter key.
- 51.
Type 3600 and press the Enter key.

A console window exhibits the absence of a message below the invoice receipt and invoice for vehicle repairs.
No message displayed using the constructor with one parameter
- 52.
Press the Enter key to close the console window.
Additional Example for Classes and Objects
- 1.
Right-click the Chapter13 project.
- 2.
Choose Add.
- 3.
Choose Class.
- 4.
Name the class ShapeCalculator.cs.
- 5.
Click the Add button.
- 6.
Amend the code, as in Listing 13-59, by adding a Main() method.
Class with a Main() method as the entry point for the program
- 7.
Right-click the Chapter13 project in the Solution Explorer panel.
- 8.
Choose Properties.
- 9.
In the Startup object drop-down list, choose the ShapeCalculator file.
- 10.
Close the Properties window.
CircleFormulae Class
- 1.
Right-click the Chapter13 project.
- 2.
Choose Add.
- 3.
Choose Class.
- 4.
Name the class CircleFormulae .cs.
- 5.
Click the Add button.
- 6.
Amend the code, as in Listing 13-60, by adding the start of a method that will calculate the area of a circle.
Class with NO Main() method
- 7.
Amend the code, as in Listing 13-61, to create variables that will hold the radius and the area of the circle, setting their initial value to be 0.
Create and initialize the variables
- 8.
Amend the code, as in Listing 13-62, to ask the user to input the radius of the circle and assign the value to the radiusLength variable.
Read the radius input and convert it to type double
- 9.
Now add the code in Listing 13-63, to calculate the area of the circle.
Add the formula for the area of a circle
- 10.
Now add the code in Listing 13-64, to display the area and radius, using the Format() method.
Display the radius and area of the circle
- 11.
Open the ShapeCalculator class and create an instance of the CircleFormulae class, calling it myCircleFormulae, as in Listing 13-65.
Instantiate the CircleFormulae class using a default constructor
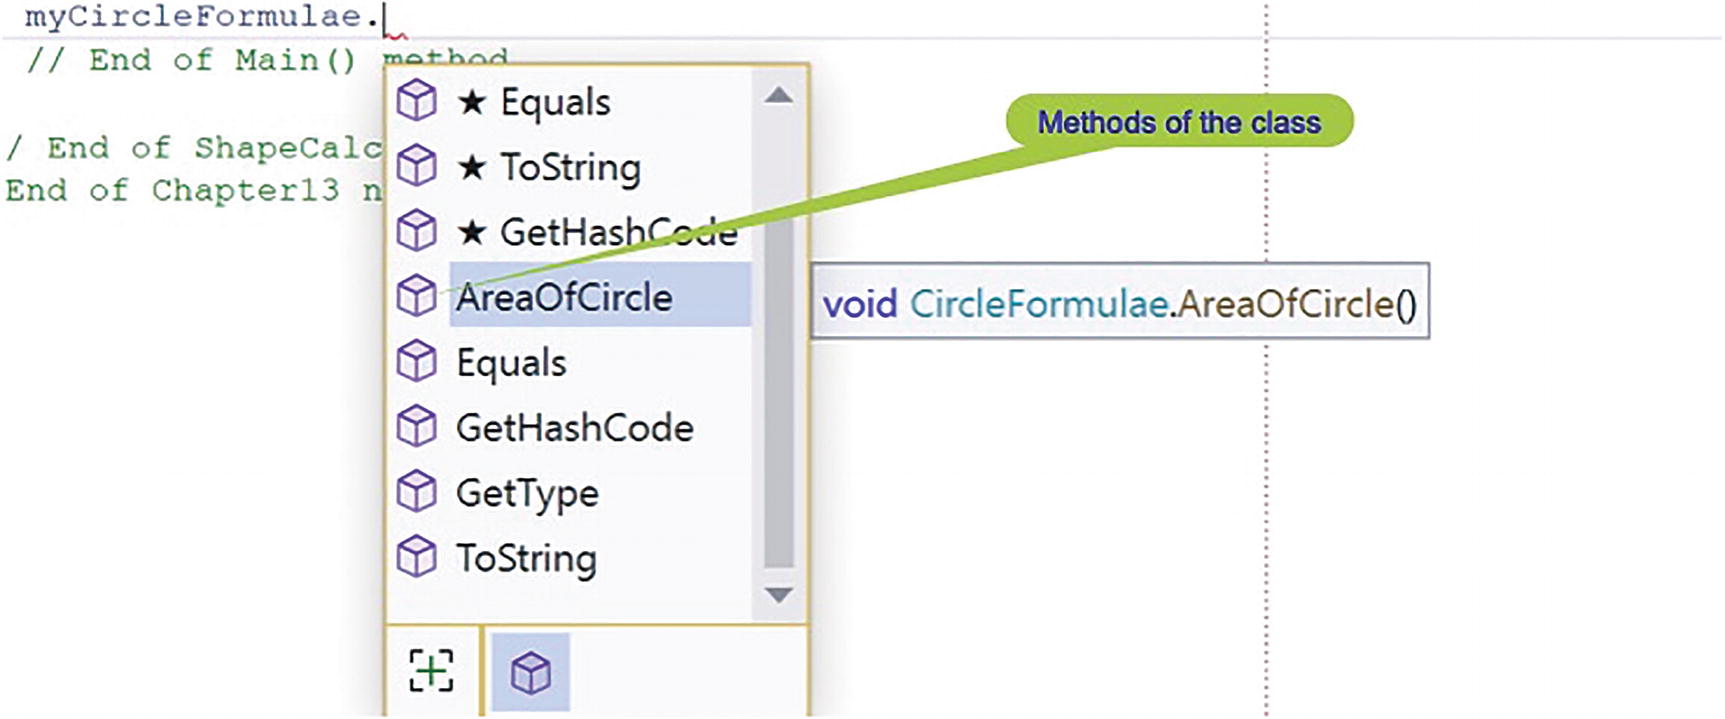
A window pops up following the use of dot notation after the my Circle Formulae instance. Area Of Circle is highlighted among other methods of the class.
Methods accessible in the CircleFormulae class – no fields exist
- 12.
Now add the code in Listing 13-66, to call the AreaOfCircle() method .
Call the AreaOfCircle() method that is in the other class
- 13.
Click the File menu.
- 14.
Choose Save All.
- 15.
Click the Debug menu.
- 16.
Choose Start Without Debugging.
- 17.
Type 10 and press the Enter key.

A console window exhibits 314.16 as the area of a circle with a radius size of 10 after the Area Of Circle parentheses method is called.
AreaOfCircle() method called and working
- 18.
Press the Enter key to close the console window.
- 19.
Amend the code, as in Listing 13-67, in the CircleFormulae class to add the start of a method that will calculate the circumference of the circle.
Add a method to calculate the circumference of the circle
- 20.
Amend the code, as in Listing 13-68, to create a variable to hold the circumference of the circle.
Create and initialize the variable for the circumference
- 21.
Now add the code in Listing 13-69, to calculate the circumference.
Add the formula for the circumference of a circle
- 22.
Now add the code in Listing 13-70, to display the circumference and radius, using the Format() method.
Display the radius and circumference of the circle
- 23.
In the AreaOfCircle() method, call the CircumferenceOfCircle() method, as in Listing 13-71.
Call the CircumferenceOfCircle() method
- 24.
Click the File menu.
- 25.
Choose Save All.
- 26.
Open the ShapeCalculator class.
- 27.
Click the Debug menu.
- 28.
Choose Start Without Debugging.
- 29.
Type 10 and press the Enter key.
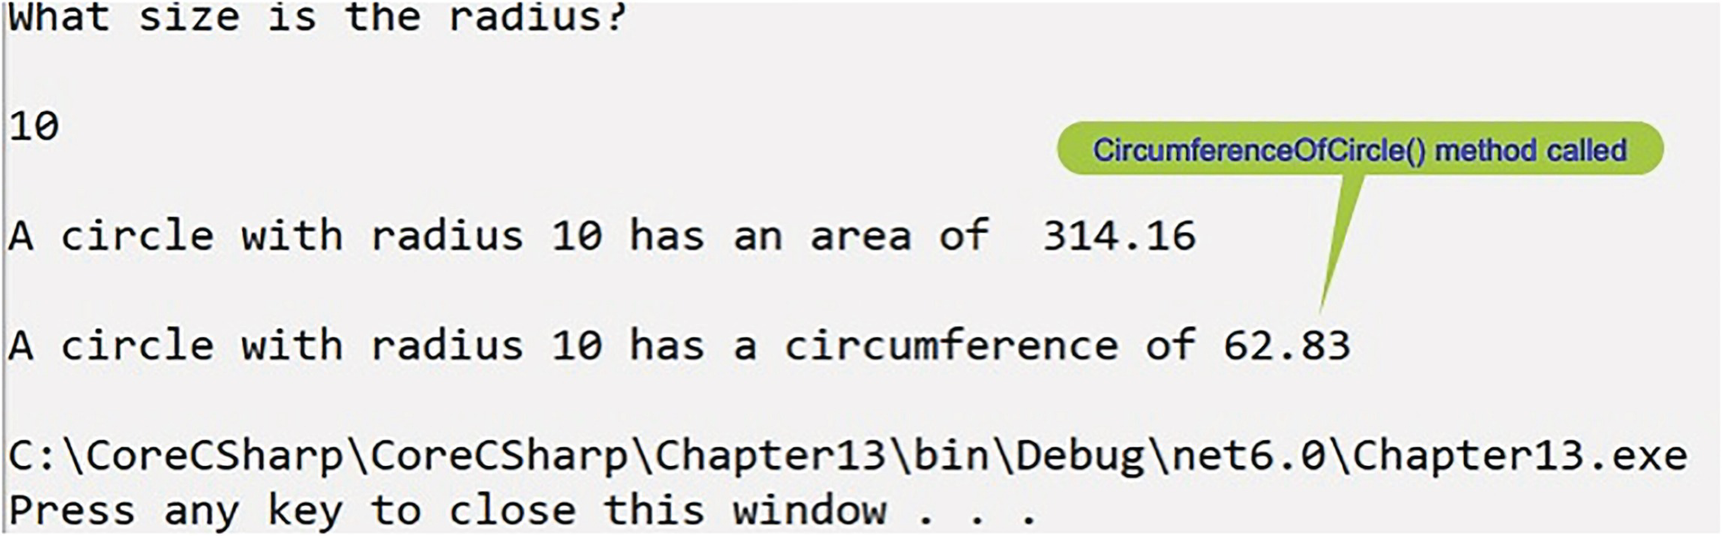
A console window depicts 62.83 as a circumference of a circle with a 10 radius and 314.16 area post- Circumference Of Circle parentheses method call.
CircumferenceOfCircle() method called and working
- 30.
Press the Enter key to close the console window.
We see two decimal places in the circumference as we used 0.## in the Format() method. This is excellent! Our two methods that contain the business logic, the formulae, were created in a class and have been called from another class.
We can see that we have used the principle of “separation of concern,” where we have kept our circle formulae separate from the class with the Main() method. We will now reinforce the principle of “separation of concern” by creating another class that will be related to a rectangle and will hold any formula related to a rectangle.
RectangleFormulae Class
- 1.
Right-click the Chapter13 project.
- 2.
Choose Add.
- 3.
Choose Class.
- 4.
Name the class RectangleFormulae .cs.
- 5.
Click the Add button.
- 6.
Amend the code, as in Listing 13-72, by adding the start of a method that will calculate the area of a rectangle.
Creating the method for the area of a rectangle
- 7.
Amend the code, as in Listing 13-73, to create variables to hold the length, breadth, and area of the rectangle and initialize them to 0.
Create and initialize the variables for the rectangle formulae
- 8.
Amend the code, as in Listing 13-74, to ask the user to input the length and breadth of the rectangle and then convert the inputs to type double.
Ask for user input for length and breadth
- 9.
Now add the code in Listing 13-75, to calculate the area of the rectangle.
Add the formula for the area of a rectangle
- 10.
Now add the code in Listing 13-76, to display the length, breadth, and area, using the Format() method.
Display the length, breadth, and area of the rectangle
- 11.
Open the ShapeCalculator class and create an instance of the RectangleFormulae class, as in Listing 13-77.
Instantiate the RectangleFormulae class
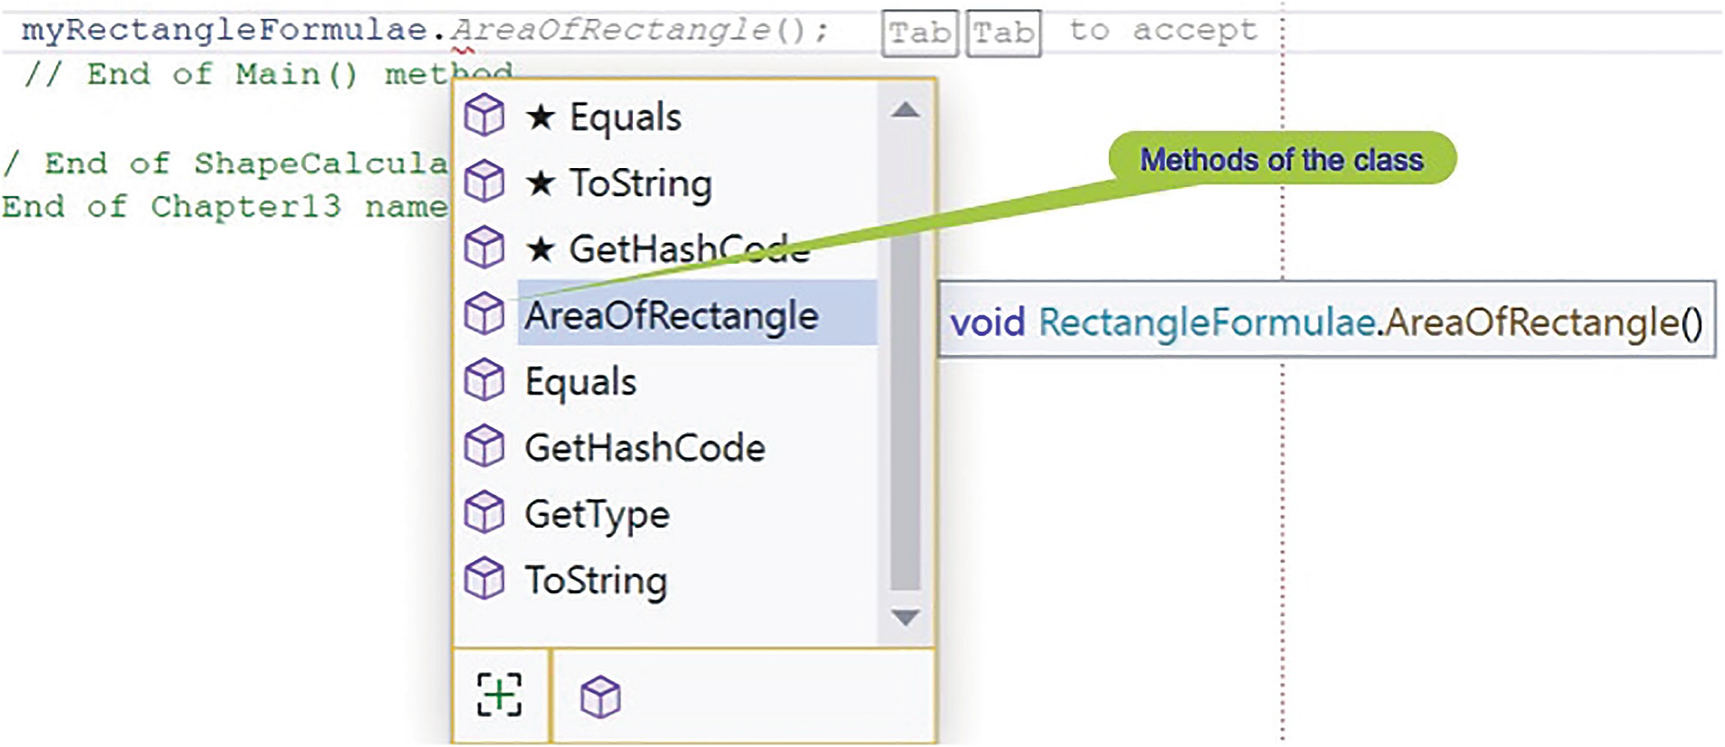
A window pops up following the use of dot notation after the my Rectangle Formulae instance. Area Of Rectangle is highlighted among other class methods.
Methods accessible in the RectangleFormulae class
- 12.
Now add the code in Listing 13-78, to call the AreaOfRectangle() method of our new instance class.
Call the AreaOfRectangle method
- 13.
Click the File menu.
- 14.
Choose Save All.
- 15.
Click the Debug menu.
- 16.
Choose Start Without Debugging.
- 17.
Type 10 and press the Enter key.
- 18.
Type 10.5 and press the Enter key.
- 19.
Type 20.5 and press the Enter key.

A console window depicts an area of 215.3 below other rectangle and circle measurements post-Area Of Rectangle parentheses method call.
AreaOfRectangle() method called and working
- 20.
Press the Enter key to close the console window.
- 21.
Amend the code, as in Listing 13-79, in the RectangleFormulae class to add the method that will calculate the perimeter of the rectangle/
Add the PerimeterOfRectangle() method
- 22.
Amend the code, as in Listing 13-80, to create a variable to hold the perimeter of the rectangle.
Add a variable that will hold the perimeter
- 23.
Now add the code in Listing 13-81, to calculate the rectangle perimeter.
Add the formula for the perimeter of the rectangle
- 24.
Now add the code in Listing 13-82, to display the perimeter of the rectangle.
Display the length, breadth, and perimeter of the rectangle
- 25.
In the AreaOfRectangle() method, add the code in Listing 13-83, to call the PerimeterOfRectangle() method.
Call the PerimeterOfRectangle() method
- 26.
Click the File menu.
- 27.
Choose Save All.
- 28.
Click the Debug menu.
- 29.
Choose Start Without Debugging.
- 30.
Type 10 and press the Enter key.
- 31.
Type 10.5 and press the Enter key.
- 32.
Type 20.5 and press the Enter key.

A console window depicts a perimeter of 62 below other rectangle and circle measurements post-Perimeter Of Rectangle parentheses method call.
PerimeterOfRectangle() method called and working
- 33.
Press the Enter key to close the console window.
Chapter Summary
So, finishing this chapter on classes, we should remember what was covered in Chapter 12 on methods, because the two concepts are highly connected. Classes contain methods and fields, and we have created classes to hold methods and fields and have created separate classes when necessary, so that each class represents related items. We can access classes from the Main() method of another class, and in doing this we create a copy of the class. We use this instance, the copy of the class, to give us access to the methods and properties of the class.
We have come a long way from Chapter 1, and getting to this stage, where we can create and use our own classes, is an absolutely fantastic achievement for us in our learning. We are making fantastic progress in our programming of C# applications and we should be very proud of our achievements. In finishing this very important chapter, we have increased our knowledge further, and we are advancing to our target.

An illustration of concentric circles with two differently colored regions above a text that reads Our target is getting closer.