
CHAPTER 11
Taking Photos and Videos

The Camera app on the iPad enables you to take both still photos and videos, and the Photo Booth app helps you take fun photos. You can also edit your photos on the iPad, edit your videos using the Trim feature, and share your photos and videos with others.
Take Photos with the Camera App
Take HDR Photos and Square Photos
Using the Self-Timer and the Grid
Take Fun Photos with Photo Booth
Crop, Rotate, and Straighten Photos
Take Photos with the Camera App
Your iPad includes a high-resolution camera in its back for taking still photos and videos, plus a lower-resolution camera in the front for taking photos and videos of yourself and for making video calls.
To take photos using the cameras, you use the Camera app. For the rear camera, this app includes a digital zoom feature for zooming in and out, a feature for taking HDR (high dynamic range) photos, and a grid that you can use for composing your photos.
Take Photos with the Camera App

![]() Press Home.
Press Home.
The Home screen appears.
![]() Tap Camera (
Tap Camera (![]() ).
).
The Camera app opens, showing whatever is positioned in front of the lens.
![]() Aim the iPad so that your subject appears in the middle of the photo area.
Aim the iPad so that your subject appears in the middle of the photo area.
Note: If you need to take tightly composed photos, get a tripod and a tripod mount that fits the model of iPad you have. You can find various models on Amazon, eBay, and photography sites.
![]() Place two fingers together on the screen and pinch outward to zoom in or pinch together to zoom out.
Place two fingers together on the screen and pinch outward to zoom in or pinch together to zoom out.

The zoom slider appears.
![]() Tap Zoom In (
Tap Zoom In (![]() ) to zoom in or Zoom Out (
) to zoom in or Zoom Out (![]() ) to zoom out. Tap as many times as needed up to 5× zoom.
) to zoom out. Tap as many times as needed up to 5× zoom.
![]() You can also zoom by tapping and dragging the zoom slider.
You can also zoom by tapping and dragging the zoom slider.

![]() Tap where you want to focus.
Tap where you want to focus.
The focus changes.
Note: By default, the Camera app focuses on the middle of the screen, because that is where your subject is most likely to be. If what you see on the screen appears blurred, try tapping the subject to change the focus.
![]() Tap Take Photo (
Tap Take Photo (![]() ).
).
Note: On many iPad models, you can tap and hold Take Photo (![]() ) to take a burst of photos.
) to take a burst of photos.
The Camera app takes the photo and displays a thumbnail.
![]() Tap the thumbnail.
Tap the thumbnail.

The photo appears.
![]() From the photo screen, you can navigate as discussed in Chapter 10. Tap a thumbnail to display its photo, swipe your finger to the left to display the next photo, or swipe to the right to display the previous photo.
From the photo screen, you can navigate as discussed in Chapter 10. Tap a thumbnail to display its photo, swipe your finger to the left to display the next photo, or swipe to the right to display the previous photo.
![]() You can tap Delete (
You can tap Delete (![]() ) to delete the photo.
) to delete the photo.
![]() Tap Done to go back to the Camera app.
Tap Done to go back to the Camera app.
Take HDR Photos and Square Photos
To help you capture photos with lush, vibrant color, the Camera app includes a feature called high dynamic range, HDR for short. HDR combines several photos into a single photo with adjusted color balance and intensity.
By default, both the front and rear cameras take photos in a rectangular, 4:3 aspect ratio. You can crop any photo to a different aspect ratio, as explained later in this chapter. But when you need to take a photo that is perfectly square, you can use the Square feature instead.
Take HDR Photos and Square Photos

Take an HDR Photo
![]() Press Home.
Press Home.
The Home screen appears.
![]() Tap Camera (
Tap Camera (![]() ).
).
The Camera app opens, showing whatever is positioned in front of the lens.
![]() Tap HDR (
Tap HDR (![]() ).
).

![]()
![]() changes to
changes to ![]() .
.
![]() The HDR flag appears at the bottom of the screen.
The HDR flag appears at the bottom of the screen.
![]() Tap Take Photo (
Tap Take Photo (![]() ).
).
Camera takes a photo.
Note: HDR photos have a larger file size than regular photos.

Take a Square Photo
![]() In the Camera app, tap Square.
In the Camera app, tap Square.
Note: Square photos are useful for adding to contact records and similar needs.

![]() Camera reduces the frame to a square by displaying black borders at the sides.
Camera reduces the frame to a square by displaying black borders at the sides.
![]() Tap Take Photo (
Tap Take Photo (![]() ).
).
Camera takes a photo.
Using the Self-Timer and the Grid
The Camera app includes a self-timer feature that enables you to set the app to take a burst of photos 3 seconds or 10 seconds after you tap the Take Photo button. By using the self-timer, you can include yourself in group shots or simply minimize camera shake when taking photos of still subjects.
The Camera app also includes a Grid feature that you can turn on to help you compose your pictures. You can display the grid at any point when you will find it useful, or simply display the grid all the time.
Using the Self-Timer and the Grid

Open the Camera App and Take a Timed Photo
![]() Press Home.
Press Home.
The Home screen appears.
![]() Tap Camera (
Tap Camera (![]() ).
).
The Camera app opens.
![]() Tap Timer (
Tap Timer (![]() ).
).
The Timer settings appear.

![]() Tap 3s or 10s to set the number of seconds for delay.
Tap 3s or 10s to set the number of seconds for delay.
The delay appears next to the Timer icon.
![]() Compose the photo.
Compose the photo.
![]() Tap Take Photo (
Tap Take Photo (![]() ).
).
The Camera app displays an on-screen countdown.
When the countdown ends, the app takes a burst of photos.
Note: The timer remains set until you change it.

Turn the Grid On or Off
![]() Press Home.
Press Home.
The Home screen appears.
![]() Tap Settings (
Tap Settings (![]() ).
).
The Settings screen appears.
![]() Tap Photos & Camera (
Tap Photos & Camera (![]() ).
).
The Photos & Camera screen appears.
![]() Set the Grid switch to On (
Set the Grid switch to On (![]() ) or Off (
) or Off (![]() ), as needed.
), as needed.
![]() To control whether the Camera app keeps the normal photo when taking HDR photos, set the Keep Normal Photo switch to On (
To control whether the Camera app keeps the normal photo when taking HDR photos, set the Keep Normal Photo switch to On (![]() ), the default setting, or Off (
), the default setting, or Off (![]() ).
).

Compose Photos Using the Grid
![]() Press Home.
Press Home.
The Home screen appears.
![]() Tap Camera (
Tap Camera (![]() ).
).
The Camera app opens.
![]() Use the grid to position your subject and align the iPad.
Use the grid to position your subject and align the iPad.
![]() Tap Take Photo (
Tap Take Photo (![]() ).
).
The Camera app takes the photo.
Take Time-Lapse Movies
The Camera app’s Time-Lapse feature enables you to take time-lapse movies easily: All you need to do is point the camera lens at your subject, select the Time-Lapse feature, start taking the movie — and then stop it at the appropriate point. This feature is great for shooting movies of sunrises and sunsets, changing weather patterns, or wildlife.
To take effective time-lapse movies, use a tripod or another type of holder to keep your iPad still and aimed in the right direction.
Take Time-Lapse Movies

![]() Set up the iPad on the tripod or holder.
Set up the iPad on the tripod or holder.
![]() Press Home.
Press Home.
The Home screen appears.
![]() Tap Camera (
Tap Camera (![]() ).
).
The Camera app opens.
![]() Aim the lens at your subject.
Aim the lens at your subject.
![]() Scroll the Camera options down if necessary and then tap Time-Lapse.
Scroll the Camera options down if necessary and then tap Time-Lapse.

The view changes to that of the video camera.
![]() Tap Take Time-Lapse Movie (
Tap Take Time-Lapse Movie (![]() ).
).

The Camera app starts filming.
![]() When the time has elapsed, tap Stop Recording (
When the time has elapsed, tap Stop Recording (![]() ).
).
![]() Tap the thumbnail for the movie.
Tap the thumbnail for the movie.

The movie opens.
![]() Tap Play (
Tap Play (![]() ).
).
The movie starts playing.
Note: The Camera app stores your time-lapse movies in both the Videos album and in the Time-Lapse album. In the Videos album, you can easily identify the time-lapse movies by the Time-Lapse symbol (![]() ) on their thumbnails.
) on their thumbnails.
Take Fun Photos with Photo Booth
Your iPad includes the Photo Booth app, which you can use to take photos using special effects such as Thermal Camera, X-Ray, or Kaleidoscope.
On your iPad, you can use Photo Booth with either the front camera — the one on the screen side — or the rear camera, so you can apply the effects to subjects other than yourself if you choose. Photo Booth stores the photos you take in the Camera Roll album, so they appear together with the photos you take with the Camera app.
Take Fun Photos with Photo Booth

![]() Press Home.
Press Home.
The Home screen appears.
![]() Tap Photo Booth (
Tap Photo Booth (![]() ).
).

Photo Booth opens, showing the front camera on your iPad.
![]() Tap the effect you want to use. This example uses Kaleidoscope.
Tap the effect you want to use. This example uses Kaleidoscope.

Photo Booth displays the camera’s input full screen with the effect applied.
![]() Compose your features to suit the effect.
Compose your features to suit the effect.
![]() Tap Take Photo (
Tap Take Photo (![]() ).
).
Photo Booth takes the photo.
![]() Tap Switch Cameras (
Tap Switch Cameras (![]() ).
).

Photo Booth switches to the rear camera.
![]() Tap Filters (
Tap Filters (![]() ).
).
The screen for choosing effects appears.
![]() Tap the effect you want. This example uses Thermal Camera.
Tap the effect you want. This example uses Thermal Camera.
The effect appears on-screen.
![]() Compose your photo.
Compose your photo.
![]() Tap Take Photo (
Tap Take Photo (![]() ).
).
Photo Booth takes the photo.
Crop, Rotate, and Straighten Photos
If you have a photo where the subject is sideways or upside down, you can use the Rotate feature in the Photos app to rotate the photo so it is the right way up. If the photo is the right way up but is not straight, you can straighten it. This works both for photos you take on the iPad and for photos you copy to the iPad. Before taking the following steps, press Home to display the Home screen, and then tap Photos (![]() ) to launch the Photos app.
) to launch the Photos app.
Crop, Rotate, and Straighten Photos

![]() Open the photo that you want to rotate.
Open the photo that you want to rotate.
Note: You may need to tap the screen to reveal the controls at the top of the screen. These options disappear after a brief period of inactivity.
![]() Tap Edit.
Tap Edit.
Note: If the This Photo Is Not Editable dialog opens when you tap Edit, tap Duplicate and Edit to create a duplicate photo in your Camera Roll album and open it for editing.

The editing controls appear.
![]() Tap Crop (
Tap Crop (![]() ).
).

The Photos app automatically applies any straightening that it detects the photo needs.
![]() You can tap Reset to undo the automatic straightening.
You can tap Reset to undo the automatic straightening.
![]() You can move the rotation dial to adjust the straightening.
You can move the rotation dial to adjust the straightening.
![]() You can tap Rotate (
You can tap Rotate (![]() ) to rotate the photo 90 degrees counterclockwise. Tap again to rotate to 180 degrees; tap a third time to rotate to 270 degrees.
) to rotate the photo 90 degrees counterclockwise. Tap again to rotate to 180 degrees; tap a third time to rotate to 270 degrees.

Note: You can tap Cancel and then tap Discard Changes to abandon the edit.
![]() Tap and drag a corner crop handle or a border to adjust the cropping.
Tap and drag a corner crop handle or a border to adjust the cropping.
![]() Tap Done.
Tap Done.
Photos saves your changes to the photo.
Note: When you rotate an image, the original image in the album is changed. You can revert the image back to its original state while in Edit view by tapping Revert and then tapping Revert to Original.
Enhance Photos
To instantly improve the appearance of a photo, use the Enhance feature. Enhance analyzes the brightness and color balance of the photo and attempts to improve them by lightening or darkening the photo, raising the contrast, and boosting dull colors.
Before taking the following steps, press Home to display the Home screen, and then tap Photos (![]() ) to launch the Photos app.
) to launch the Photos app.
Enhance Photos

![]() Open the photo that you want to enhance.
Open the photo that you want to enhance.
![]() Tap Edit.
Tap Edit.
Note: You may need to tap the screen to reveal the menu options at the top of the screen. These options disappear after a brief period of inactivity.

The Edit Photo screen appears.
![]() Tap Enhance (
Tap Enhance (![]() ).
).
Photos enhances the image.
Note: Tap Enhance (![]() ) to toggle Enhance off and on so you can judge the effect.
) to toggle Enhance off and on so you can judge the effect.
![]() Tap Done.
Tap Done.
Note: When you enhance an image, the original image in the album is changed. You can revert the image back to its original state while in Edit view by tapping Revert and then tapping Revert to Original.
Reduce Red-Eye in Photos
Red-eye is a photographic effect that occurs when the camera’s flash reflects off the back of the subject’s eyes, causing the eyes to glow red. You can reduce or remove red-eye by using the Red-Eye feature in the Photos app.
Before taking the following steps, press Home to display the Home screen, and then tap Photos (![]() ) to launch the Photos app.
) to launch the Photos app.
Reduce Red-Eye in Photos

![]() Open the photo for which you want to reduce red-eye.
Open the photo for which you want to reduce red-eye.
![]() Tap Edit.
Tap Edit.
Note: You may need to tap the screen to display the controls.
The Edit Photo screen appears.

![]() Tap Red-Eye (
Tap Red-Eye (![]() ).
).
![]() Tap each red eye in the photograph.
Tap each red eye in the photograph.
Photos tries to remove the red-eye.
Note: You can tap each red eye again to undo your changes.
![]() Tap Done.
Tap Done.
Note: When you remove red-eye from an image, the original image in the album is changed. You can revert the image back to its original state while in Edit view by tapping Revert, and then tapping Revert to Original.
Apply Filters to Photos
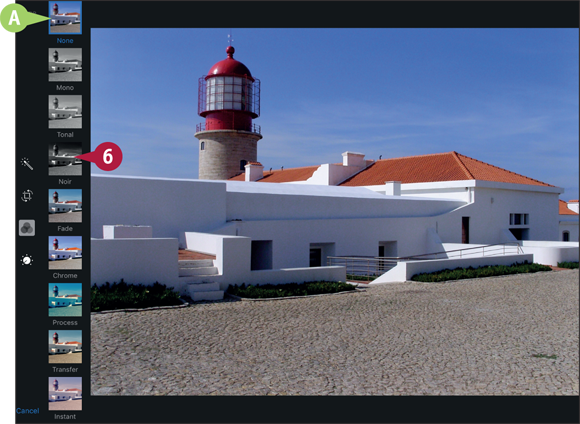
You can use the Filter feature in the Photos app to change the look of a photo by applying a filter such as Mono, Tonal, Chrome, Transfer, or Instant. If you like the effect, you can save the photo with the effect applied.
Photos applies the filter as an effect overlaid on the photo rather than by making it an integral part of the photo. This means you can subsequently remove the filter, returning the photo to its previous state. Alternatively, you can apply another filter, giving the photo a different look.
Apply Filters to Photos

![]() Press Home.
Press Home.
The Home screen appears.
![]() Tap Photos (
Tap Photos (![]() ).
).
The Photos app opens.
![]() Navigate to the photo and tap it.
Navigate to the photo and tap it.
The photo appears.
![]() Tap Edit.
Tap Edit.

The editing controls appear.
![]() Tap Filters (
Tap Filters (![]() ).
).
![]() The Filters bar appears.
The Filters bar appears.
![]() Tap the filter you want to apply.
Tap the filter you want to apply.

Photos displays the filter effect on-screen.
![]() Tap Done.
Tap Done.
Photos saves the change to the photo.
Capture Video
Along with capturing still photos, the cameras on your iPad can capture high-quality, full-motion video. The rear camera records 1080p video, while the front camera records 720p video. A single video can use only one resolution.
To capture video, you use the Camera app. You launch the Camera app as usual, and then switch it to Video Mode. After taking the video, you can view it on the iPad screen.
Capture Video

![]() Press Home.
Press Home.
The Home screen appears.
Note: To change the video resolution, tap Settings (![]() ), tap Photos & Camera (
), tap Photos & Camera (![]() ), tap Record Video, and then tap the resolution.
), tap Record Video, and then tap the resolution.
![]() Tap Camera (
Tap Camera (![]() ).
).
The Camera screen appears, showing the image the lens is seeing.
![]() Some iPad models can also shoot video in slow motion. Tap Slo-Mo to access this feature.
Some iPad models can also shoot video in slow motion. Tap Slo-Mo to access this feature.
![]() Tap Video.
Tap Video.
The video image and video controls appear.
![]() Aim the camera at your subject.
Aim the camera at your subject.
![]() Tap Record (
Tap Record (![]() ).
).

The camera starts recording.
![]() The time readout shows the time that has elapsed.
The time readout shows the time that has elapsed.
![]() To finish recording, tap Stop Recording (
To finish recording, tap Stop Recording (![]() ).
).

The Camera app stops recording and displays a thumbnail of the video’s first frame.
![]() Tap the thumbnail.
Tap the thumbnail.

The video appears.
![]() Tap Play (
Tap Play (![]() ).
).
The video starts playing.
Note: Tap anywhere on the screen to display the video controls.
Note: If you want to trim the video, follow the procedure described in the next section, “Edit Videos with the Trim Feature,” before tapping Done.
![]() When you finish viewing the video, tap Done.
When you finish viewing the video, tap Done.
The Camera app appears again.
Note: Video takes up a lot of space on your iPad, so delete any videos that are not worth keeping.
Edit Videos with the Trim Feature
When you capture video, you normally shoot more footage than you want to keep. You then edit the video to keep only the footage you need.
The Camera and Photos apps on your iPad share a straightforward Trim feature that you can use to trim the beginning and end of a video clip. For greater precision in editing, or to make a movie out of multiple clips, you can use the iMovie app, which you can download from the App Store; it is free for all new iOS devices.
Edit Videos with the Trim Feature

![]() Press Home.
Press Home.
The Home screen appears.
![]() Tap Photos (
Tap Photos (![]() ).
).
The Photos screen appears.
![]() Tap Albums (
Tap Albums (![]() changes to
changes to ![]() ).
).
The Albums list appears.
![]() Tap Videos.
Tap Videos.
The videos appear.
![]() Tap the thumbnail for the video you want to trim.
Tap the thumbnail for the video you want to trim.
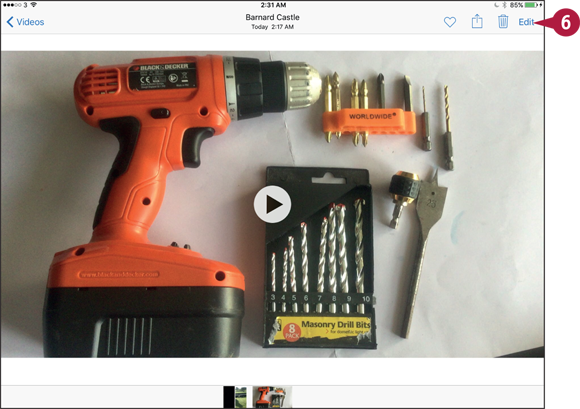
The video opens.
![]() Tap Edit.
Tap Edit.

Photos opens the video for editing.
![]() Tap the left handle and drag it to the right until you see the frame at which you want to start the clip.
Tap the left handle and drag it to the right until you see the frame at which you want to start the clip.
![]() Tap the right handle and drag it to the left until you see the frame at which you want to end the clip.
Tap the right handle and drag it to the left until you see the frame at which you want to end the clip.
![]() Tap Done.
Tap Done.
The Trim dialog appears.
![]() Tap Trim Original if you want to trim the original clip. Tap Save as New Clip to create a new clip from the trimmed content, leaving the original clip unchanged.
Tap Trim Original if you want to trim the original clip. Tap Save as New Clip to create a new clip from the trimmed content, leaving the original clip unchanged.

Photos trims the video and then displays it.
![]() Tap Play (
Tap Play (![]() ) to view the video and verify it is correctly trimmed.
) to view the video and verify it is correctly trimmed.
![]() Tap Videos (
Tap Videos (![]() ).
).
The Videos screen appears.
Share Your Photos and Videos
After taking photos and videos with your iPad camera, or after loading photos and videos on the iPad using iTunes, you can share them with other people.
Chapter 5 shows you how to share photos via AirDrop, Twitter, and Facebook, and Chapter 10 explains how to share photos via e-mail and Messages. This section explains how to assign a photo to a contact, use a photo as wallpaper, and print a photo.
Share Your Photos and Videos

Select the Photo or Video to Share
![]() Press Home.
Press Home.
The Home screen appears.
![]() Tap Photos (
Tap Photos (![]() ).
).
The Photos app opens.
![]() Navigate to and tap the photo or video you want to share.
Navigate to and tap the photo or video you want to share.
![]() Tap Share (
Tap Share (![]() ).
).
The Share sheet opens.
![]() Tap the appropriate button — Use as Wallpaper (
Tap the appropriate button — Use as Wallpaper (![]() ), Assign to Contact (
), Assign to Contact (![]() ), or Print (
), or Print (![]() ) — and then follow the instructions in the next sets of steps.
) — and then follow the instructions in the next sets of steps.

Set a Photo as Wallpaper
![]() On the Share sheet, tap Use as Wallpaper (
On the Share sheet, tap Use as Wallpaper (![]() ).
).
![]() Move the photo to display the part you want.
Move the photo to display the part you want.
![]() If necessary, pinch in to shrink the photo or pinch out to enlarge it.
If necessary, pinch in to shrink the photo or pinch out to enlarge it.
![]() Tap Perspective Zoom to toggle perspective zoom between On and Off.
Tap Perspective Zoom to toggle perspective zoom between On and Off.
![]() Tap Set Lock Screen, Set Home Screen, or Set Both, as needed.
Tap Set Lock Screen, Set Home Screen, or Set Both, as needed.
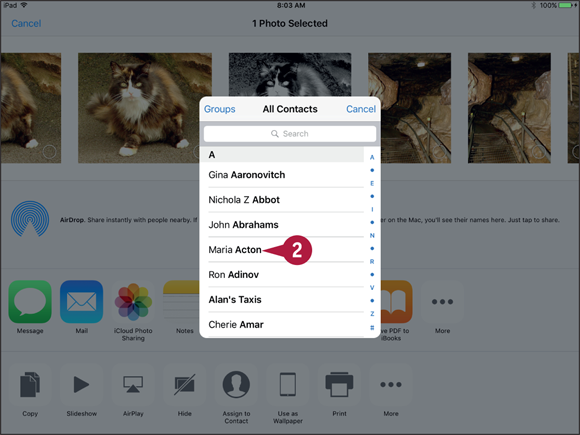
Assign a Photo to a Contact
![]() On the Share sheet, tap Assign to Contact (
On the Share sheet, tap Assign to Contact (![]() ).
).
The Contacts list appears.
![]() Tap the contact you want to assign the photo to.
Tap the contact you want to assign the photo to.

The Move and Scale screen appears.
![]() Move the photo so that the face appears centrally.
Move the photo so that the face appears centrally.
![]() If necessary, pinch in to shrink the photo or pinch out to enlarge it.
If necessary, pinch in to shrink the photo or pinch out to enlarge it.
![]() Tap Use.
Tap Use.