
2
Exploring Terraform
In this chapter, we continue our exploration of Terraform. We start by explaining the Terraform state and how Terraform uses it to plan which actions it needs to take. We show various commands on how to investigate the current state, and what to watch out for. We then show how teams can collaborate by using the backend state.
We will look at meta-arguments, which are particular Terraform constructs, to enable you to write efficient Terraform code.
In this chapter, we are going to cover the following main topics:
- Understanding the Terraform state
- Using the backend state
- Understanding Terraform meta-arguments
- Using the self_link attribute
Technical requirements
We assume you now have a local environment with Terraform and gcloud installed and an appropriate Google Cloud project.
The source code for this chapter is located in chap02 of our GitHub repository: https://github.com/PacktPublishing/Terraform-for-Google-Cloud-Essential-Guide. Just as we did in the previous chapter, we placed the code of each section in the corresponding subdirectory.
Understanding the Terraform state
Note
The code for this section is under chap02/statefile in the GitHub repo of this book.
Understanding the concept of state is essential to master Terraform. A Terraform configuration is a declaration of the desired state—that is, you specify how you want things to be. Terraform’s job is to bring the current state to the desired state.
So, when you started, you specified in your configuration—that is, the collection of .tf files—that you would like to have one compute instance. Then, when you run terraform apply, Terraform takes the necessary actions to bring the resource address into the desired state. Since you didn’t have any compute instance as specified in your configuration file, Terraform created one.
To start this section, run Terraform by executing the following two commands. This provisions the infrastructure where we left off in the last chapter:
$ terraform init
$ terraform apply
Now, run terraform apply again. Terraform determines the difference between the actual state and the desired state. Since the actual state maps to the desired state, Terraform does not need to take any action.
Terraform stores the existing state in the Terraform state file. By default, it is stored in a file called terraform.tfstate in the current directory. Go ahead and look at it. As it is in JSON format, it is human-readable. For this single resource, it is over 100 lines; for even slightly complex deployments, the state file runs into 1,000 lines. Generally speaking, you should never need to read or manipulate the state file directly.
Looking at the state file, you notice it starts with some metadata. It then lists the outputs and the resources. For this single resource of compute instance, it lists all the attributes.
Since the JSON file is just an internal representation of that state and is not meant to be edited or read by humans, Terraform provides several commands to make the state file more accessible and safer to manipulate. terraform show prints out the current state file (or plan file) in a human-readable format, but it is usually very lengthy, particularly if you have provisioned multiple resources. The complete state file representation for this single resource is over 70 lines.
The terraform state list command is more practical. It lists all the resources in the state file. In our case, it shows a single resource with the resource address google_compute_instance.this. You notice that the resource address is a concatenation of the resource type (google_compute_instance) and the name (this).
The terraform state show ADDRESS command shows all the attributes of that resource. Thus, in our current state, we can see one resource with the resource address google_compute_instance.this:
$ terraform state list
google_compute_instance.this
$ terraform state show google_compute_instance.this
# google_compute_instance.this:
resource "google_compute_instance" "this" {
    can_ip_forward          = false
    cpu_platform            = "Intel Broadwell"
    current_status          = "RUNNING"
    deletion_protection     = false
    enable_display          = false
    guest_accelerator       = []
    id                      = "projects/…/zones/us-central1-a/instances/state-file"
    instance_id             = "497903608900010349"
    label_fingerprint       = "42WmSpB8rSM="
    machine_type            = "e2-micro"
    metadata_fingerprint    = "nb0qL5x7PbM="
….
Terraform uses the resource address to uniquely identify resources. For example, google_compute_instance.this uniquely identifies the single server that we specified in our configuration. For resource specification, the syntax is resource_type.resource_name[instance index].
Where resource_type is the type of resource—that is, google_compute_instance and resource_name is the name that we gave it—in this case, this. If we have a list of resources, instance_index identifies the instance within that list. We will show this later in the chapter.
Interacting with the Terraform state
One useful command is terraform console, which enables you to interact with the current state. You can execute functions (more on that later), but you can also show parts of the resource. This can be very useful to determine the exact syntax for a particular attribute.
For example, let’s say you want to output the public IP address of a server that you provisioned. google_compute_instance.this lists all the attributes of that resource. You can see that the IP list is listed in the network_interface block but you don’t know the exact syntax that is required to list only the IP address.
Using the console, you can examine the attributes of a resource one by one, and traverse the structure of that resource interactively. You can see that google_compute_instance.this.network_interface is actually a list (more on that later) as an instance can have more than one network interface. google_compute_instance.this.network_interface[0].access_config[0] lists all the attributes of that block and google_compute_instance.this.network_interface[0].access_config[0].nat_ip shows the external IP address.
Understanding destructive changes
Once you start working with Terraform and running it repeatedly, it is critical to understand the implications of running Terraform.
Using the web console, you should see a server with the name state-file. Add a label to the compute instance, as shown in Figure 2.1. Make sure that you click on both SAVE buttons, to actually apply the label:

Figure 2.1 – Adding a label using the web console
Now, run terraform plan. In the plan, Terraform will inform you that it will change one resource. Looking at the detailed plan, Terraform shows that it will change the labels attribute by changing the label that you just added to null:
$ terraform plan
google_compute_instance.this: Refreshing state... [id=projects/tf-gcp-01/zones/us-central1-a/instances/state-file]
…
        id                      = "projects/…/zones/us-central1-a/instances/state-file"
      ~ labels                  = {
          - "environment" = "sandbox" -> null
        }
        name                    = "server-2-1"
        tags                    = [
            "http-server",
        ]
        # (17 unchanged attributes hidden)
        # (4 unchanged blocks hidden)
    }
Plan: 0 to add, 1 to change, 0 to destroy.
…
Now, run terraform apply, and inspect the compute instance using the web console. You will see that the label is gone. Terraform changed the actual state of your compute engine, which had a label to the desired state, which does not have a label. But nothing else changed.
Now, let’s make another change using the web console. This time, remove the startup script. Make sure to hit SAVE, and take note of the external IP address. When you run terraform plan, the plan will report that it will destroy one resource and add another. If you look at the details, you’ll find that the plan says that google_compute_instance.this must be replaced. This is known as a destructive change.
Run terraform apply to perform the change. You will see that Terraform first destroyed—meaning it removed the instance—and then created a new instance. Note that the public IP address of the instance has changed. Thus, destructive changes can have major consequences.
It takes some time to learn which changes can be performed in-place—that is, are non-destructive—and which changes are destructive. Thus, you should always look at the Terraform plan and inspect carefully the actions Terraform plans to take to bring the actual state to the desired state.
Avoiding configuration drift
This brings us to an important issue of Infrastructure as Code (IaC), which is known as configuration drift (or is sometimes referred to as environment drift). Configuration drift occurs when resources are changed, created, or deleted outside of the IaC tool (that is, outside of Terraform).
It is tempting to make changes using the Google Cloud console or the command-line interface (CLI) because, let’s face it, often it is faster. However, this creates problems. At best, the next time you run Terraform, the change will be undone. At worst, a serious configuration drift can take much work to resolve.
Using the Google Cloud console create a new compute instance with the name instance-1. Next, run Terraform, but let’s give the server the name instance-1 on the command line using the -var argument. It should look like this:
$ terraform plan -var "server_name=instance-1" -out plan
The summary informs you that Terraform will destroy one resource and add a new one. Looking at the details shown as follows, you see the reason why the instance needs to be replaced is that the name of the server changes from state-file to instance-1:
$ terraform plan -var "server_name=instance-1" -out plan
google_compute_instance.this: Refreshing state...
…
  # google_compute_instance.this must be replaced
-/+ resource "google_compute_instance" "this" {
…
      ~ name                    = "state-file" -> "instance-1" # forces replacement
Now, let’s see what happens when we apply the plan (make sure to specify the generated plan). Here’s the command to do so:
$ terraform apply plan
First, Terraform deletes the compute instance named state-file as expected. However, Terraform then throws up an error that an instance with the name instance-1 already exists.
This illustrates two issues. First, Terraform can only look at the resources that it knows exist—that is, the resources in the state file. Terraform has no knowledge that a server with the name instance-1 exists, so it goes ahead and takes action to create it.
Now, Terraform actually makes calls to the Google API. Thus, when Terraform attempts to create a server with the name instance-1, the Google API reports an error as you cannot have two compute engines with the same name and reports that back to Terraform.
So, at plan time, Terraform only knows about resources created through Terraform. Later in the book, you will learn how to import existing resources into the state, but we should caution you that this is fraught with its own set of issues.
The second issue is that Terraform destroyed the existing server before attempting to create a new one (which failed), so we are left with no servers (as far as Terraform is concerned).
Now, let’s recreate the destroyed server. Since we are using IaC, this is as easy as running the following command:
$ terraform apply
This will create a new compute instance with the default name of state-file, shown as follows:
$ terraform state list
It then gives us a list of resources in the state. Now, we can remove the resource from the state file using the following command:
$ terraform state rm google_compute_instance.this
It is essential to understand that while the resource was removed from the state file, it was not actually removed from Google Cloud. Go to the web console to see that the state-file server still exists. Now, if we run terraform plan and terraform apply, the same error as before would be incurred. Terraform will plan to create a new virtual machine (VM) (Compute Engine), but when it actually tries to create it, it will report an error as the server already exists. It is just that Terraform didn’t know about the existence of the server.
Thus, there are two important lessons. First, you should not add or remove resources to the state file unless in exceptional circumstances. Second, once you use Terraform (or any other IaC tool), you should not use the Google Cloud console or the CLI to make changes. All changes must be done through the configuration file in Terraform.
Additional state commands
Now, sometimes you want to force Terraform to replace a resource. The terraform taint ADDRESS command will taint a resource—that is, it labels it so that the next time Terraform is run, the resource will be removed and rebuilt. Thus, go to the web console and remove all compute instances. Then, run terraform apply to recreate the server and put it in the Terraform state:
$ terraform apply
$ terraform plan
When you now run terraform plan, Terraform does not detect any changes. Now, execute the following command:
$ terraform taint google_compute_instance.this
$ terraform plan
If you now run terraform plan, Terraform reports that it will replace the instance. terraform untaint removes the taint.
Occasionally, Terraform informs you of the changes in the metadata of Google resources that might cause changes to occur when you generate a plan or call apply next. Thus, it is a good idea to occasionally run terraform refresh, which updates the current state with the latest metadata.
Using the backend state
Note
The code for this section is under chap02/backend in the GitHub repo of this book.
By default, the Terraform state is stored locally in the current directory in a file called terraform.tfstate. This is fine as long as you are the only one working on the Terraform code and you are always working on the same machine. However, most of the time, you are part of a team that works jointly on the cloud infrastructure. If everybody stored their own version of the state file, chaos would ensue.
To enable collaboration, Terraform allows remote storage of the state file using the concept of state backends. (Please note that this is different from remote states, which we discuss in Chapter 5, Managing Environments with Terraform.) For Google Cloud, the remote backend is stored in Google Cloud Storage. Thus, instead of the state file being stored locally, the state file is stored in a Cloud Storage bucket where all team members (with the right permission) can access the state file. Furthermore, backends support locking so that only one member can run Terraform at a time. When terraform apply is run, Terraform places a lock in Cloud Storage and only releases the lock once it has completed all actions. If another person or process attempts to run Terraform while the lock is in place, Terraform reports an error and does not execute.
To specify a backend, create a file named backend.tf (as we mentioned, naming in Terraform is largely irrelevant, but the backend is specified in a file called backend.tf by convention):
chap02/backend/backend.tf
terraform {
  backend "gcs" {
    bucket = "<PROJECT_ID>-tf-state"
    prefix  = " chap02/backend"
  }
}
Now, the bucket must exist beforehand. Thus, this is one of the few times you should create a resource outside of Terraform using the Google Cloud console or gcloud. The bucket should not be part of the current state file, and you only have to create the bucket once per project. Now, since buckets have to be uniquely named, an easy way to ensure there is no naming conflict is to use the project name followed by the suffix tf-state. We use this convention throughout the remainder of this book. Thus, whenever you create a new project, please remember to create the corresponding bucket to store the state file remotely.
You can use a prefix attribute to place the state file in a folder of the bucket. It is also a good idea to enable versioning so that you can recover the state in case anything goes wrong.
If you have previously applied any infrastructure changes locally, they are stored in the local state file. Thus, the first time after you specify the backend, Terraform asks you whether you want to migrate the existing state from the local directory to the backend. Now, run terraform apply. While Terraform is running, go to the cloud storage using the web console and observe the contents of your bucket. You see a file named default.tflock appearing and disappearing once Terraform has completed its run. (Please note that the .tflock file only exists while Terraform is running, so it might disappear rather quickly.):
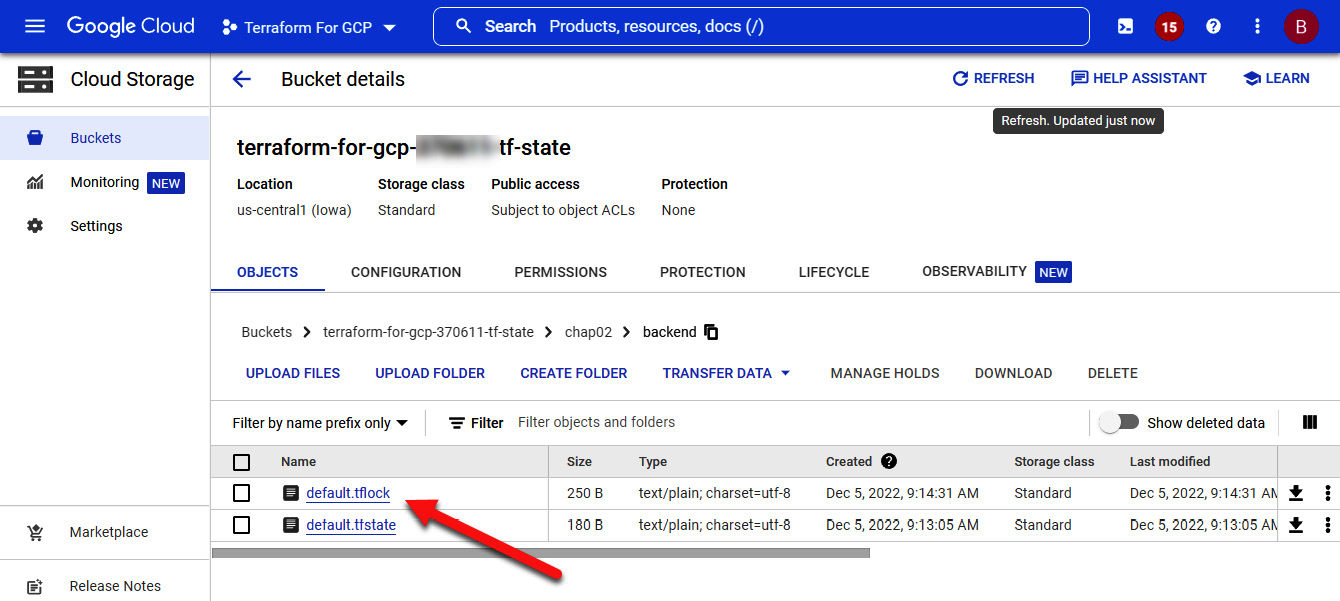
Figure 2.2 – Terraform backend state
Now that you have a good understanding of the Terraform state and when you should use a backend state, let’s move to additional concepts in Terraform.
Understanding Terraform meta-arguments
Meta-arguments are special constructs in Terraform. You already encountered the provider meta-argument, but let’s look closely at it and other meta-arguments.
The provider meta-argument
Note
The code for this section is under chap02/provider in the GitHub repo of this book.
We introduced the provider meta-argument in the first chapter. Technically speaking, a provider is a plugin that communicates with the external API—in our case, the Google Cloud API. As mentioned, there are actually two providers for Google Cloud: google and google-beta. The latter provides the interface to the Google Beta API while the former provides the interface to the API that is in General Availability (GA). You can use both providers in your configuration code, and specify which provider you want to use for a resource:
chap02/provider/provider.tf
…
provider "google" {
  project = var.project_id
  region  = var.region
  zone    = var.zone
}
provider "google-beta" {
  project = var.project_id
  region  = var.region
  zone    = var.zone
}
chap02/provider/main.tf
resource "google_compute_instance" "ga-server" {
  provider = google
....
resource "google_compute_instance" "beta-server" {
  provider = google-beta
…
In addition, you can have other providers in your configuration. For example, Terraform has a provider for Kubernetes, which provides an alternative to kubectl, the default tool to interact with Kubernetes. Thus, you can use the Kubernetes provider in your configuration code by specifying the kubernetes provider, and then use Terraform to provision resources both in Google Cloud and in your Kubernetes cluster.
It is recommended that you only combine providers that are related to each other. Generally, try not to mix and match providers in the same configuration unless you have a good reason for it.
As we mentioned, Terraform and its providers have a very dynamic developer community—that is, new versions are constantly released. Thus, it is good practice to place version constraints on both Terraform and the provider. The place to do so is in the Terraform block (https://www.terraform.io/language/settings), which is usually inserted in the provider.tf file. The required_version settings set a version constraint on the Terraform version, whereas the required_providers block specifies the source of the provider and the version constraint, as shown in the following code snippet:
chap02/provider/provider.tf
terraform {
  required_version = "~> 1.3.0"
  required_providers {
    google = {
      source  = "hashicorp/google"
      version = "~> 4.40"
    }
  }
}
provider "google" {
  project = var.project_id
  region  = var.region
  zone    = var.zone
}
While not absolutely required, it is good practice to include the Terraform block and the version constraint, and we will do so from now on.
The count meta-argument
Note
The code for this section is under chap02/count in the GitHub repo of this book.
Often, you will find yourself wanting to create (nearly) identical resources—for example, several web servers. You could copy the code multiple times, but that would be tedious and make maintenance of the code more difficult. The count meta-argument provides the capability to create identical resources in a single block. Let’s examine the following code:
chap2/count/main.tf
resource "google_compute_instance" "this" {
  provider     = google
  count        = 3
  name         = "${var.server_name}-${count.index}"
  machine_type = var.machine_type
  zone         = var.zone
  boot_disk {
    initialize_params {
      image = "debian-cloud/debian-11"
    }
  }
  network_interface {
    network = "default"
    access_config {
      // Ephemeral public IP
    }
  }
  metadata_startup_script = file("startup.sh")
  tags = ["http-server"]
}
We use the count meta-argument to specify that we want to have three servers. Let’s take a look at the fourth line, the one we highlighted:
name = "${var.server_name}-${count.index}"As you know, Google Cloud requires a unique name for each compute engine. We can generate a unique name using the count.index construct, which provides an index starting at 0. Here, we also are introducing a new syntax called interpolation. Interpolation “…evaluates the expression given between the markers, converts the result to a string if necessary, and then inserts it into the final string” (https://www.terraform.io/language/expressions/strings).
Thus, as we set the server_name variable to webserver in terraforms.tfvars, "${var.server_name}-${count.index}" produces the following strings:
- webserver-0
- webserver-1
- webserver-2
Interpolation is useful when you want to concatenate strings to produce unique names.
The for_each meta-argument
Note
The code for this section is under chap02/for-each in the GitHub repo of this book.
While the count meta-argument is helpful in creating nearly identical resources, there are times when you want to create multiple instances of resources that have more variations. That is where the for_each meta-argument comes in handy. The for_each meta-argument takes a map or set of strings as input and creates a distinct resource for each item.
Let’s illustrate the use of for_each with a real-life example. Google recommends deleting the default network as a best practice (https://cloud.google.com/architecture/framework/security/network-security#disable_default_networks) and defining a custom network. To create a new network, you define several subnets in different regions with different Classless Inter-Domain Routing (CIDR) ranges.
Let’s assume you want to create a new virtual private cloud (VPC) with different subnets. You could create three google_compute_subnetwork resources. Now, if you want to add a fourth subnet, you have to add yet another resource. Instead, we can define a map variable with the subnets and the required information. We can then use the for_each meta-argument to reiterate over that map:
chap02/for-each/terraform.tfvars
network = "my-network"
subnets = {
  south-carolina = {"region" : "us-east1", "ip_cidr_range" : "192.168.2.0/24" },
  iowa = {"region" : "us-central1", "ip_cidr_range" : "192.168.1.0/24" },
  singapore = {"region" : "asia-southeast1", "ip_cidr_range" : "192.168.3.0/24" },
}
After this, we can use a single resource definition to define all of our subnets, regardless of the number of subnets:
chap02/for-each/vpc.tf
resource "google_compute_network" "this" {
  project                 = var.project_id
  name                    = var.network
  auto_create_subnetworks = false
}
resource "google_compute_subnetwork" "this" {
  project                  = var.project_id
  for_each                 = var.subnets
  network                  = var.network
  name                     = each.key
  region                   = each.value["region"]
  ip_cidr_range            = each.value["ip_cidr_range"]
  private_ip_google_access = "true"
}
We use the for_each meta-argument and the each.key and each.value addresses to reference the values in the map. Terraform then creates a unique resource for each entry in the map. So, run terraform apply to create a custom VPC. If you get an error, just run terraform apply again. We address the error in the next meta-argument.
Now, you can achieve the same using count and lists. For example, using the count meta-argument, you can define the appropriate firewall rules, like this:
chap02/for-each/firewall.tf
resource "google_compute_firewall" "firewall" {
  count   = length(var.firewall)
  network = google_compute_network.this.id
  name    = "${google_compute_network.this.name}-${var.firewall[count.index]["name"]}"
  direction = var.firewall[count.index]["direction"]
  allow {
    protocol = var.firewall[count.index]["allow"]["protocol"]
    ports    = var.firewall[count.index]["allow"]["ports"]
  }
  source_ranges = var.firewall[count.index]["source_ranges"]
  target_tags   = var.firewall[count.index]["target_tags"]
}
And then, you can specify a list of firewall rules in terraform.tfvars:
chap02/for-each/terraform.tfvars
firewall = [
  {
    "name" : "allow-all-internal",
    "direction" : "INGRESS",
    "allow" : {
      "protocol" : "all",
      "ports" : []
    },
    "source_ranges" : ["192.168.0.0/16"],
    "target_tags" : [],
  },
  {
    "name" : "allow-http",
    "direction" : "INGRESS",
    "allow" : {
      "protocol" : "tcp",
      "ports" : ["80"]
    },
    "source_ranges" : ["0.0.0.0/0"],
    "target_tags" : ["http-server"],
  },
]
However, there is a difference. Change the order of the subnet map and the firewall list in terraform.tfvars. That is, change the subnet map so that the singapore entry comes first and change the firewall list so that the allow-http rule comes first. Then, run terraform apply –auto-approve.
The subnet resources remain the same, but the firewall rules are replaced. That is because in a list, the order matters, whereas in a map, the order does not matter.
Thus, use the count meta-argument when the resources are nearly identical but use for_each when they are different. In either case, use them with caution because while it’s true that you can create very compact code, it can become hard to understand for somebody else reading your code.
The depends_on meta-argument
You probably encountered an error when you ran Terraform the first time in the last section, but when you reran it a minute or two later, you didn’t encounter this error. Let’s investigate what happened and how we can mitigate it.
When you ran terraform apply the first time, you probably received an error message, shown as follows:
│ Error: Error creating Subnetwork: googleapi: Error 404: The resource 'projects/…/global/networks/my-network' was not found, notFound
Terraform is quite good at determining the order in which it needs to create resources. Thus, it knows that it must create a network before creating a subnetwork and both before creating a compute instance.
If you look at the output of the apply step, you can observe the progress of the creation of the resources. Terraform logs when it starts and completes the creation of a resource:
google_compute_network.this: Creating...
google_compute_network.this: Still creating... [10s elapsed]
…
google_compute_network.this: Creation complete after 11s
…
google_compute_subnetwork.this["singapore"]: Creating...
google_compute_subnetwork.this["singapore"]: Still creating... [10s elapsed]
google_compute_subnetwork.this["singapore"]: Still creating... [20s elapsed]
google_compute_subnetwork.this["singapore"]: Creation complete after 24s
However, you might also notice that Terraform creates resources in parallel. That is, it does not wait for a resource’s creation to be completed before it starts a new creation. By default, Terraform runs 10 resource operations in parallel.
In our case, Terraform tried to create a subnetwork before the network was fully provisioned, and hence it threw up an error. The second time you ran terraform apply, the network was fully provisioned; hence, a subnetwork was created with no error.
Now, we could force Terraform to provision resources one at a time by limiting the number of parallel operations to one. You can do that by using the -parallelism=n argument, shown as follows:
$ terraform apply -parallelism=1
However, that is not very efficient as it takes much longer to provision all the resources. Instead, you can explicitly declare a dependency to ensure that Terraform waits for the resource to be created before attempting to create the other resource. In our case, we can explicitly declare that a network has to be created before Terraform creates a subnetwork.
So, we can add a line with the depends_on meta-argument that takes a list of resources as an argument. That is, the resources in that list need to be completely provisioned before the creation of that resource starts:
chap02/for_each/vpc.tcf
resource "google_compute_subnetwork" "this" {
 depends_on               = [resource.google_compute_network.this]
  project                  = var.project_id
  for_each                 = var.subnets
  network                  = var.network
  name                     = each.key
  region                   = each.value["region"]
  ip_cidr_range            = each.value["ip_cidr_range"]
  private_ip_google_access = "true"
}
Thus, Terraform now explicitly waits for the network to be completed before creating subnetworks.
Generally speaking, the depends_on meta-argument is considered an escape hatch when the provider does not allow you to draw more logical dependency. Using the same example, we can avoid that escape hatch if we replace network = var.network with network = resource.google_compute_network.this.name. This achieves the same result as it makes the dependency explicit.
There is one more meta-argument that we need to discuss: the lifecycle meta-argument.
The lifecycle meta-argument
Note
The code for this section is under chap02/lifecycle in the GitHub repo of this book.
When Terraform needs to change a resource, it will do so in-place. This is known as a non-destructive change. However, when an in-place change is not possible, Terraform will first destroy the current resource and then recreate it with the change applied. Using the lifecycle meta-argument, you can change this behavior.
If create_before_destroy is set to true, Terraform attempts to create a new resource before it destroys it. We show how this can be useful in Chapter 6, Deploying a Traditional Three-Tier Architecture.
You can also use the lifecycle meta-argument to prevent a resource to be deleted. This is useful in preventing accidental data loss. If prevent_destroy is set to true, Terraform reports an error when attempting to destroy a resource, and it will not destroy the resource.
The third attribute in this block, ignore_changes, can also be very useful. Let’s say your cloud environment uses a third-party tool that uses labels to store information. Then, whenever you run Terraform, it performs an update-in-place operation and resets the labels. When we include the ignore_changes meta-argument, Terraform will ignore changes to any attribute in the list in applying its lifecycle rules:
chap02/lifecycle/main.tf
resource "google_compute_instance" "this" {
…
  tags = ["http-server"]
  lifecycle {
    ignore_changes = [
      labels,
    ]
  }
}
Run the code in the chap02/lifecycle subdirectory. Then add a label to the instance named lifecycle. Now, when you run terraform plan, Terraform removes the label. However, when you have the lifecycle rule as shown in the preceding code snippet, Terraform ignores any changes to the label and does not change the instance.
Meta-arguments are integral to the Terraform language and are used with all cloud providers. Before we conclude the chapter, let’s look at one concept unique to Google Cloud.
Using the self_link attribute
Note
The code for this section is under chap02/self-link in the GitHub repo of this book.
In the for_each example, we used the name attribute of the subnetwork resource to specify the subnet for our VM:
subnetwork = google_compute_subnetwork.this['iowa'].name
In Google Cloud, nearly every resource has a unique name, but it is better to use the self_link attribute, which is a unique Google Cloud construct. To understand self_link, let’s look at the details of the Iowa subnet using the gcloud command:
$ gcloud compute networks subnets describe iowa
--region us-central1
..
gatewayAddress: 192.168.1.1
id: '4434945742234922953'
ipCidrRange: 192.168.1.0/24
..
selfLink: https://www.googleapis.com/compute/v1/projects/tf-gcp-01/regions/us-central1/subnetworks/iowa
stackType: IPV4_ONLY
Then look at the same resource using the terraform state show command:
$ terraform state show   'google_compute_subnetwork.this["iowa"]'
# google_compute_subnetwork.this["iowa"]:
resource "google_compute_subnetwork" "this" {
…
    gateway_address            = "192.168.1.1"
…
    ip_cidr_range              = "192.168.1.0/24"
    name                       = "iowa"
 …
   self_link                  = "https://www.googleapis.com/compute/v1/projects/tf-gcp-01/regions/us-central1/subnetworks/iowa"
    stack_type                 = "IPV4_ONLY"
}
You see that the Terraform state lists much of the same information as the gcloud command including the self_link attribute, which is a unique identifier (UID) containing additional information. Thus, it is good practice to refer to resources using the self_link attribute, and we use that from now onward.
Summary
In this chapter, we discussed how Terraform uses the state to keep track of the current resources and to decide which actions it needs to perform to bring the current state to the desired state. A thorough understanding of the state is critical to mastering Terraform and anticipating what Terraform will do. We also introduced the concept of the backend where you store the Terraform state in Google Cloud Storage so that teams can collaborate without stepping on each other’s toes. We recommend that you use backend states even if you work by yourself. Storing the Terraform state in Google Cloud Storage guarantees that it will never get lost, and if you enable versioning in your bucket, you can retrieve older versions if necessary.
We then introduced meta-arguments, which are special Terraform constructs to influence the behavior of Terraform and help to write Terraform code more efficiently.
In the next chapter, we continue our exploration of Terraform by introducing expressions and functions that help you write more efficient Terraform code.