

CHAPTER ONEHome Decor and More
Having a Cricut means you can label and customize ALL THE THINGS! Signs, drinkware, journals … these are just the tip of the iceberg! You can customize these projects to fit your personal style and aesthetic to craft a cozy home for yourself, your friends and family, or start a business!
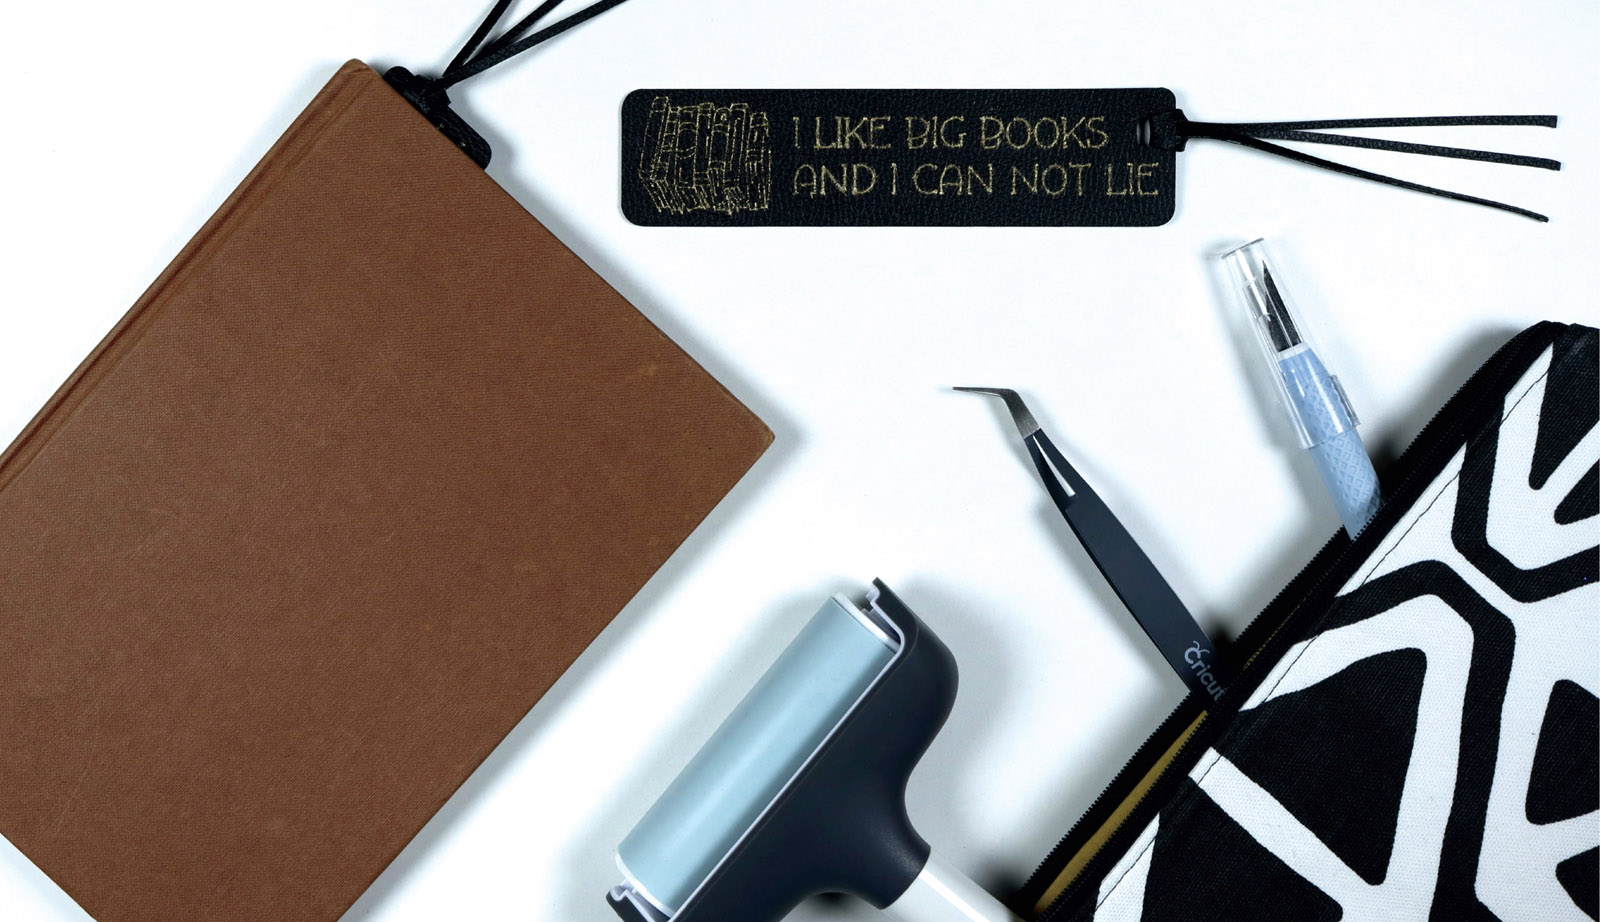
Bookmark with Foil
Creating custom bookmarks with your Cricut is a breeze! Grab some faux or genuine leather and find your favorite witty book-related pun and you’re all set. For this bookmark we’ll be using Cricut’s Foil Transfer tool to create a sophisticated keepsake.
Materials Needed
Faux or genuine leather
Foil Transfer tool
Foil Transfer sheets
Washi or painter’s tape
Craft knife (optional)
Ruler (optional)
Self-healing mat (optional)
Glue gun or leather adhesive
Machine Compatibility
Any Cricut machine
Images Used
Stack of Books #M231CE56F
Rectangle #M7F037EA
Oval #M2AAB3D97
DESIGN IT
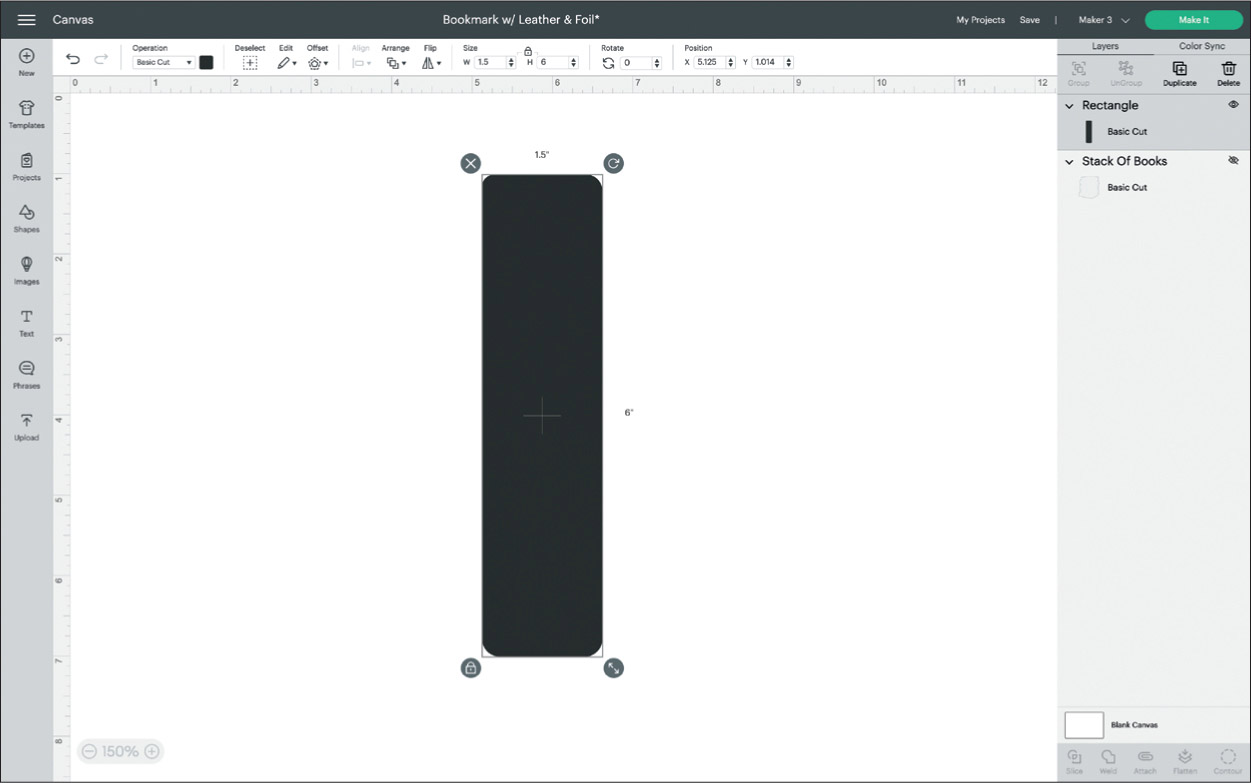
Start with your overall desired shape. If you choose a rectangle, decide whether you want rounded or squared corners. Add the shape to your Design Space canvas and size it to your liking. I went with a rectangle with rounded corners and sized it 1.5” x 6”.

Now comes the fun part of adding your text and any images you like by using the Text tab on the left side of your canvas. Adjust the sizes and alignment of your design elements at this time. In the image here, you can see in the Layers panel that the Basic Cut layer of the book image is hidden. You can hide layers by tapping the eye/hide icon. In the Operation dropdown menu, change the text and image by selecting Foil, then Bold.

What’s a bookmark without a tassel? Okay, it can still be a bookmark, just a little less fun. If you’d like your bookmark to have a tassel, add a shape to serve as the hole to attach your tassel. I chose an oval because I’ll make my tassel out of leather scraps and need a little more width. More on that in a minute.

When your design is the way you want it, in the Layers panel, click on all the layers and then click on Attach, as shown here. (You can delete the Basic Cut layer that will be hidden, but you don’t have to.)
MAKE IT
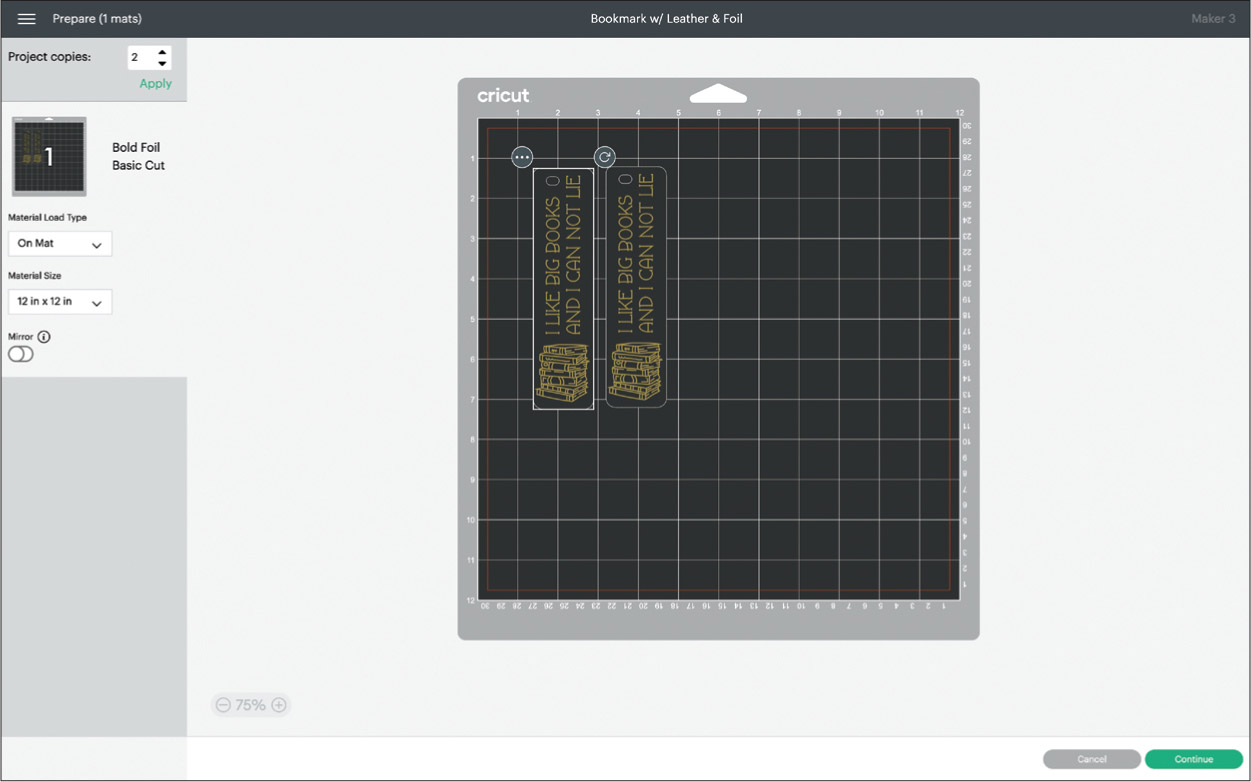
Now you’re ready to click on the green Make It button. Once on the Make It screen, move your project down into the grid a bit. I brought mine down just a bit more than 1” from the top and 1” from the left side. Keep this positioning in mind as you place your leather onto your mat. The reason for doing this is to give some clearance around your material so it doesn’t hit the star wheels (small white wheels) on the bar of your machine or leave imprints on your material.

The Foil Transfer tool process is a bit different than just cutting your material straightaway. You’ll need to start by laying the foil over your leather material, keeping in mind where your leather and the designs are on the Make It screen. Using the tape that comes with the foil transfer sheets, or washi or painter’s tape, make sure you tape all four edges of the foil down. Try to make the foil as smooth and secure as you can—if it’s not taped well, your foil will shift.

Before you start your machine, swap out your Fine-Point Blade for the Bold Foil Transfer tip (the one with three lines), then follow the prompts on your screen. When this first process is complete, remove the foil but do not unload your mat. Just slide the foil out from underneath the carriage. Next, swap out the Foil Transfer tool for your Fine-Point Blade and then cut the material.
When the cutting process is complete, you can begin to assemble your bookmark. All it needs now is a tassel. You can make a tassel out of yarn, ribbon, or even the leather scraps from this project. If you’d like to create your tassel out of leather scraps, read on for a few suggestions.
MAKE IT EXTRA

Faux leather is perfect for a bookmark because it is thin enough that it won’t cause your book to warp or bulge, but it is sturdy enough to use book after book. Have fun with the types of leathers, designs, and text to customize bookmarks for all the book-loving people in your life!
Using the leather scraps as the tassel also makes this bookmark a bit extra. You’ll need a ruler, craft blade, and a self-healing mat. You can use scissors for the next step, but it might become a bit tedious. Using the excess leather (scraps from your project), create a small, thin rectangle to use as your tassel. See the image above for an example of what your leather scraps may look like and what section may be useful to use as your tassel.
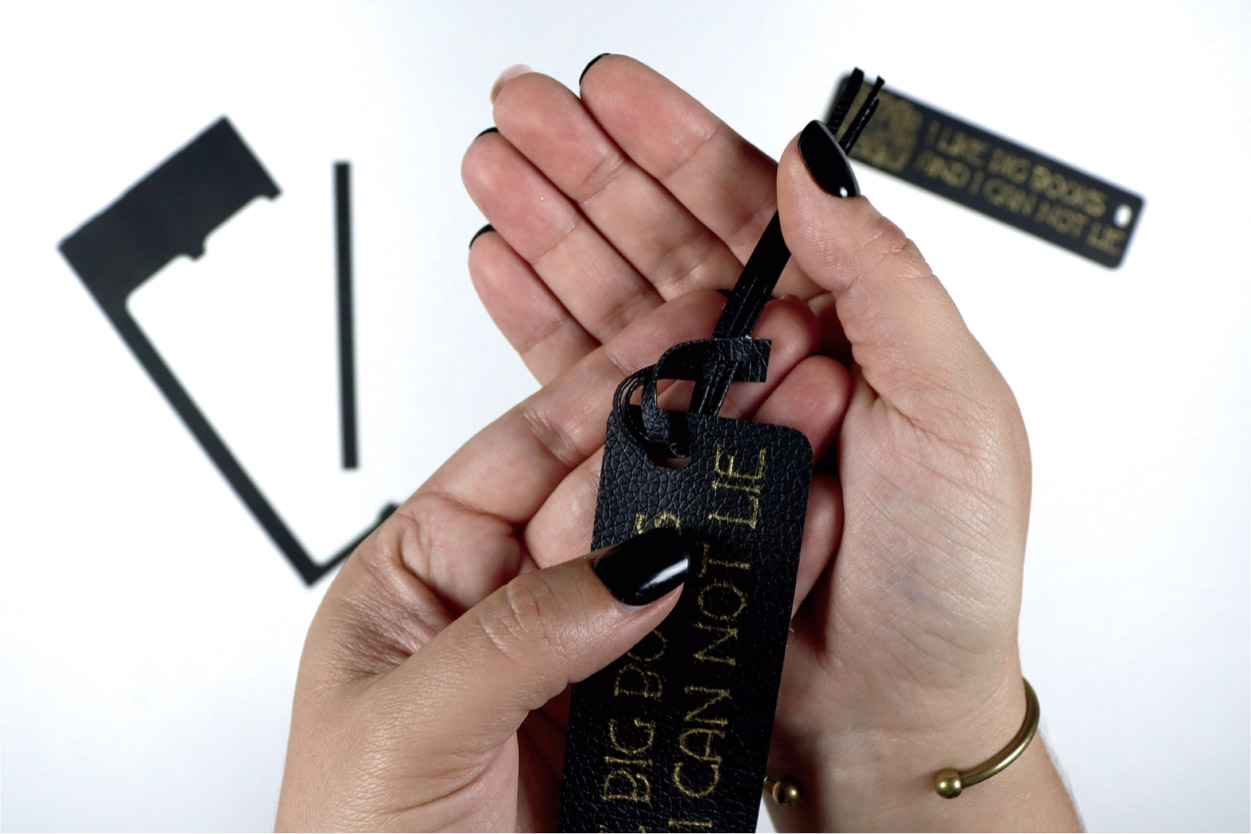
From there you can make a small slit about 1/3” in from one end. This will be used to create a lark’s head knot. I took this a step further and split the rest of the leather in thirds lengthwise to create a bit of a fringe. Just be sure to leave some room between the initial slice and your new fringe. Then loop it through the hole in the bookmark.

Secure the end of the leather to the back of the bookmark as shown here. You’re all set with a unique and personalized bookmark!

Felt Banner
Felt banners are so versatile! The soft texture of the felt, along with the beauty of the iron-on, can add a homey touch to any room. For this project you can use either the Maker or Explore machine and the outcome will be the same, but the process is different. The Maker uses a Rotary Blade to cut the felt easily, while the Explore requires any fabric to be bonded. However, you can easily cut the felt banner by hand no matter what machine you choose to use.
Materials
Felt
Iron-on material
Weeding tool
Heat press
Heat press mat
Felt glue/adhesive
Wooden dowel
Ribbon/jute
If using a Maker:
Rotary Blade
If using an Explore:
Tools to cut banner (scissors, craft blade, rotary cutter, ruler, self-healing mat)
Machine Compatibility
Maker or Explore series (and cut the banner by hand)
Images Used
Rectangle #M2AAB3E02
Flowers #M33FB83A6
Flowers #M338F1DBC
Pennant #M2AAB3EE0
DESIGN IT

I’ll be designing the whole project in Design Space and depending on which machine you’re using, you can either cut the felt with the Maker or Rotary Blade. If you’re using an Explore machine, you can cut the felt by hand, as mentioned on the previous page.
Begin by bringing the Pennant image (#M2AAB3EE0) onto your canvas. I’ve sized mine to 10.5” x 10.5”, as shown here. Your final size will depend on the size of your felt, so be sure to measure your felt first.
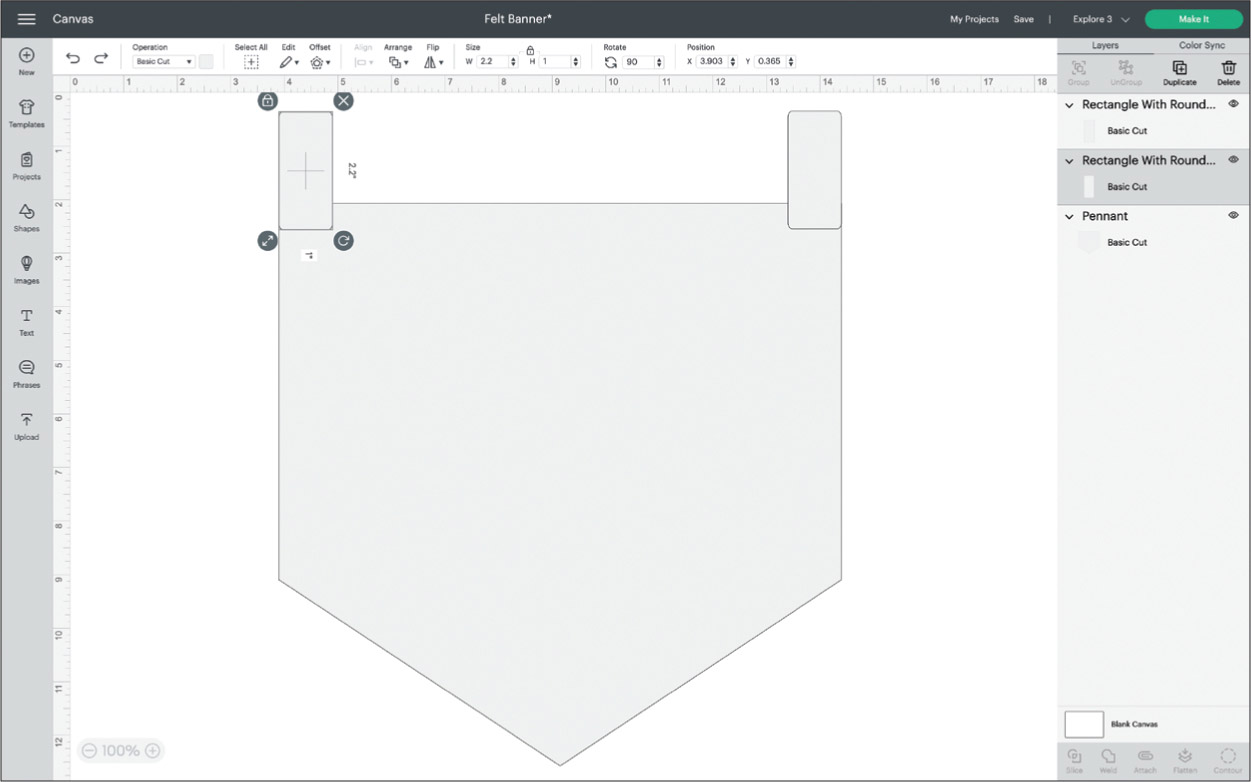
Tabs will be used to hang the banner on a wooden dowel, so add two small rectangles to your canvas as well. I used the Rounded Rectangles (#M2AAB3E02) and then aligned them to the upper-left and upper-right corners of the banner, as shown here. Size each tab 1” wide and a little more than 2” long. Position the tabs so they overlap the banner image just a bit.

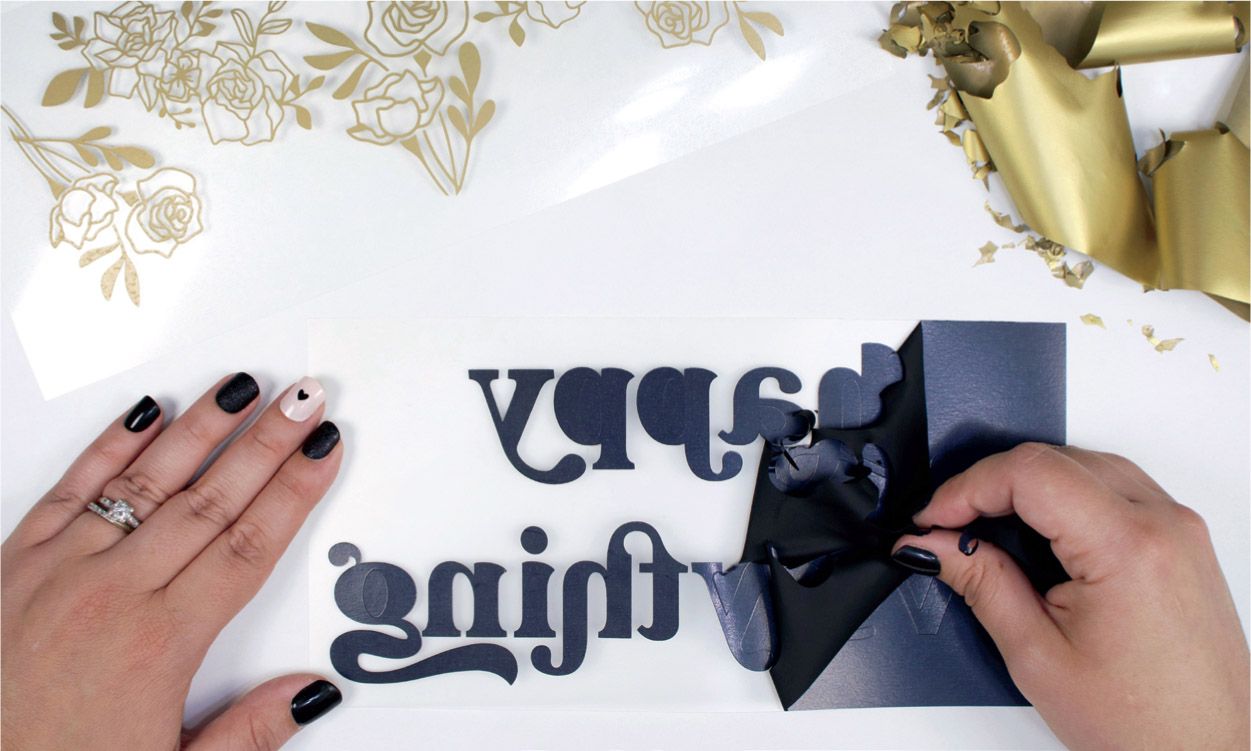
Next, select all three layers and then click on Weld. This will create one cut around the perimeter of the three layers combined. Next, you can decorate the banner with any text or images you like.
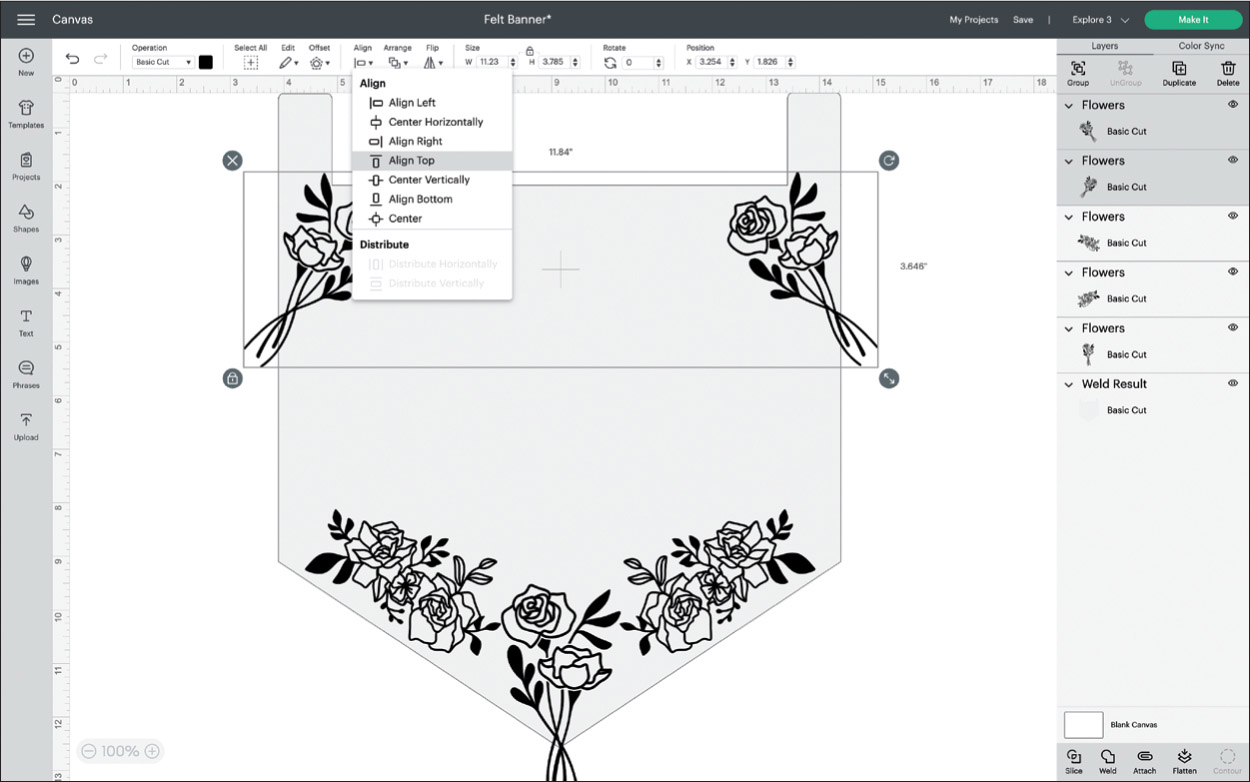
The flowers shown here make a beautiful addition to this banner. If you want your banner to be (mostly) symmetrical, just bring one of each flower onto your canvas, then you can use the tools found on the Edit Bar to duplicate, flip, resize, and otherwise edit the designs to fit your banner. In the image here you can see I used the two flower images, but I duplicated, rotated, and flipped them to create a symmetrical border on the banner. I suggest using the Align tool to make sure everything is centered and matching.
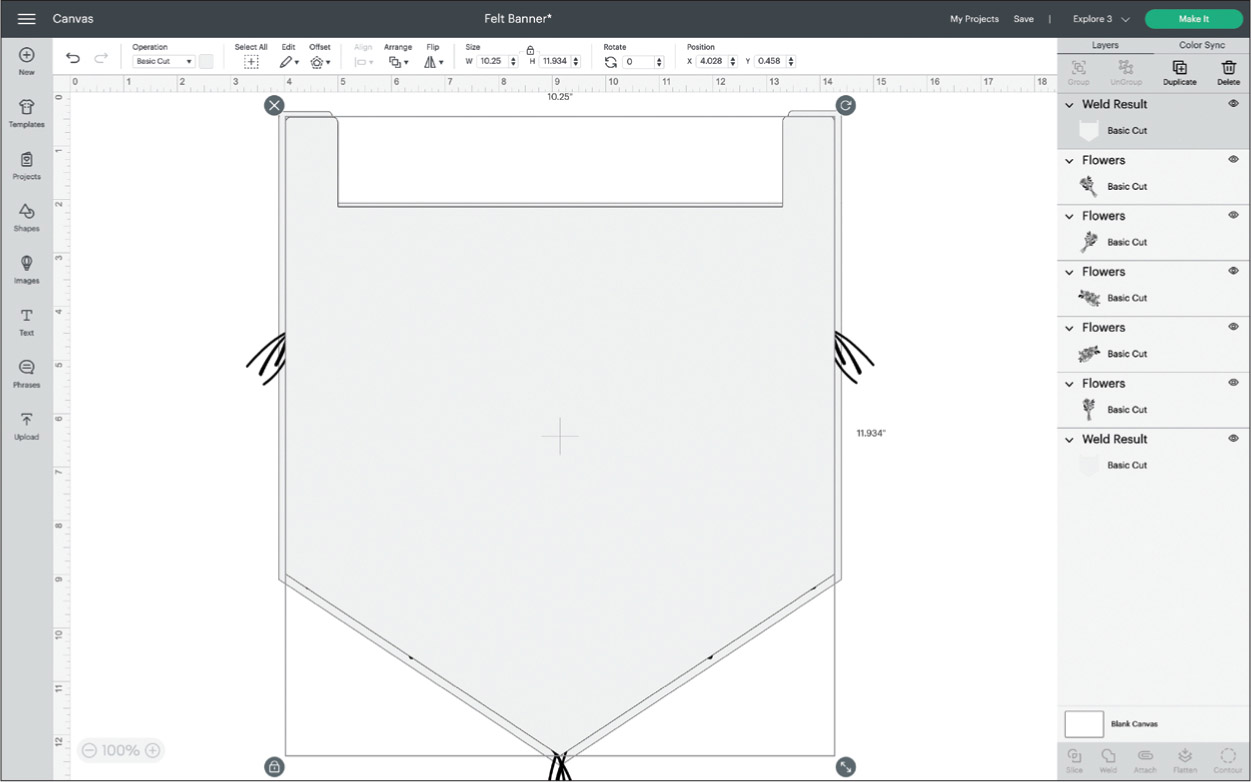
You may have noticed the flowers are hanging off the edges of this banner. Let’s take care of that. This next step is optional but might give you a cleaner-looking result than if you trimmed them by hand. Start by duplicating the background banner layer and shrinking it a bit, creating an even border all the way around the outer edges, like the image here (see the stems hanging over the edges).

You can only Slice two layers at a time, so select the small banner layer and one flower, and work your way around to each of the three flowers and then Slice. This will create extra layers, but go ahead and delete those as you go. Keep only your banner and freshly trimmed flowers. You should end up with something similar to the image here.

To make the cutting and assembly part easy and precise, I suggest selecting the top two flower layers and then click on Attach; this will keep your images in place and aligned when it comes time for your machine to cut. Repeat this process for the bottom three flowers, like the image here shows. Changing the colors of the layers can also be done at this time, so when you add your text in the next step, your machine will know that you want multiple materials/ colors to be used.
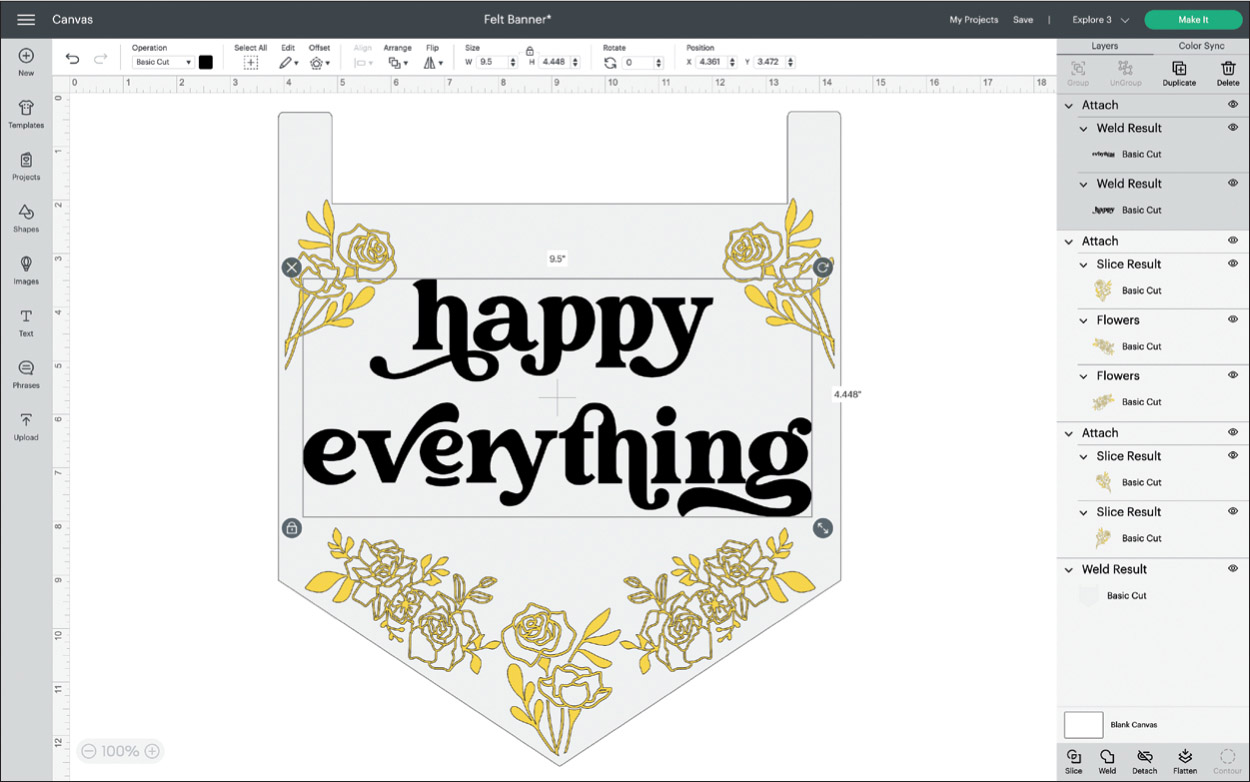
Now you can add any text you like on your canvas. I added “happy everything” and used the Weld function for each line of text. I also clicked on Attach for the two lines of text so it will cut exactly as shown on the canvas. This eliminates possible mishaps with misalignment when it comes time to heat press your project.
MAKE IT
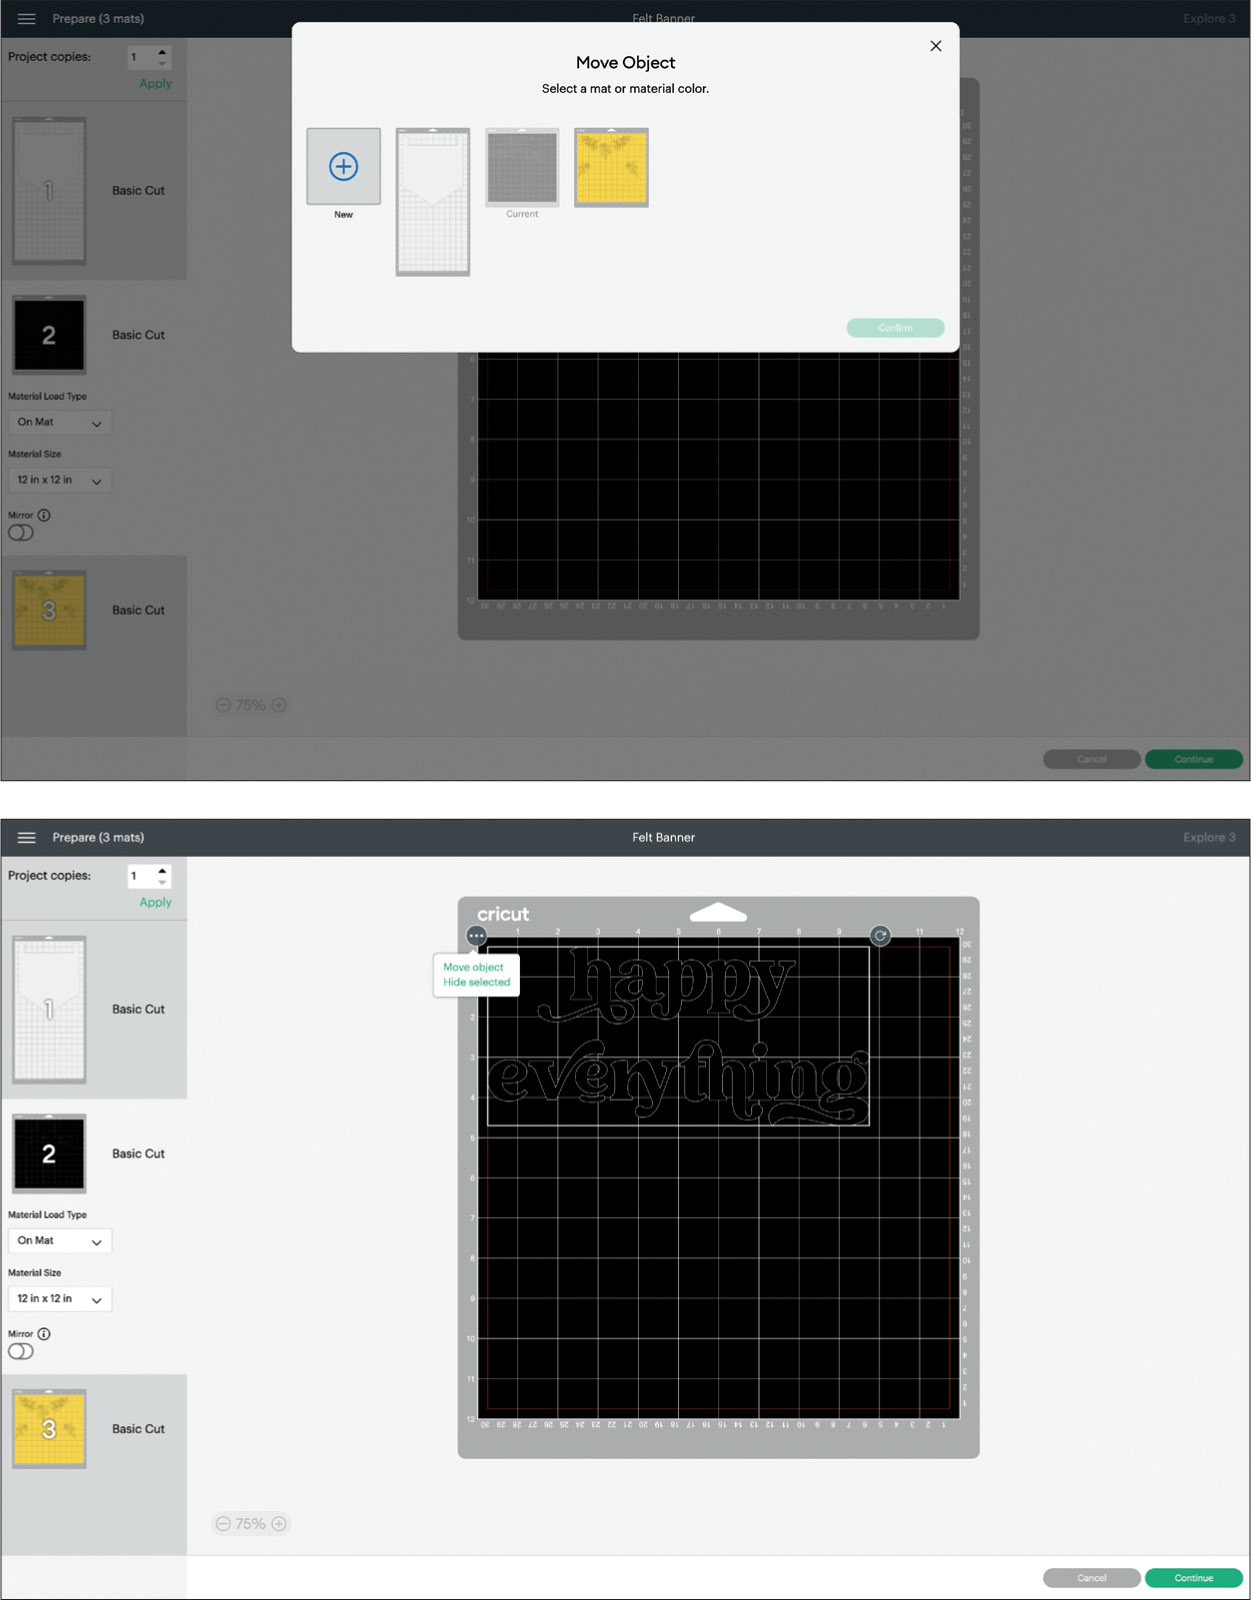
Now you’re ready to click on the green Make It button. Here are a few tips to save time and material, and to make the heat pressing part a bit easier. On the Make It screen, you can arrange your elements on one mat (if they fit). Do this by selecting the image you’d like to move to another mat and click on the three dots in the upper-left corner of the image, then select Move Object. When prompted, select the mat you’d like to move the image to; in this case it’s mat 3 (as shown here). Remember to adjust the Mirror settings and make sure to toggle ON for the mats that you’ll be using iron-on with. As a general rule, basic iron-on is placed shiny side down on the cutting mat and mirrored. This is so when you flip it over to heat press, your text/images will be correct.
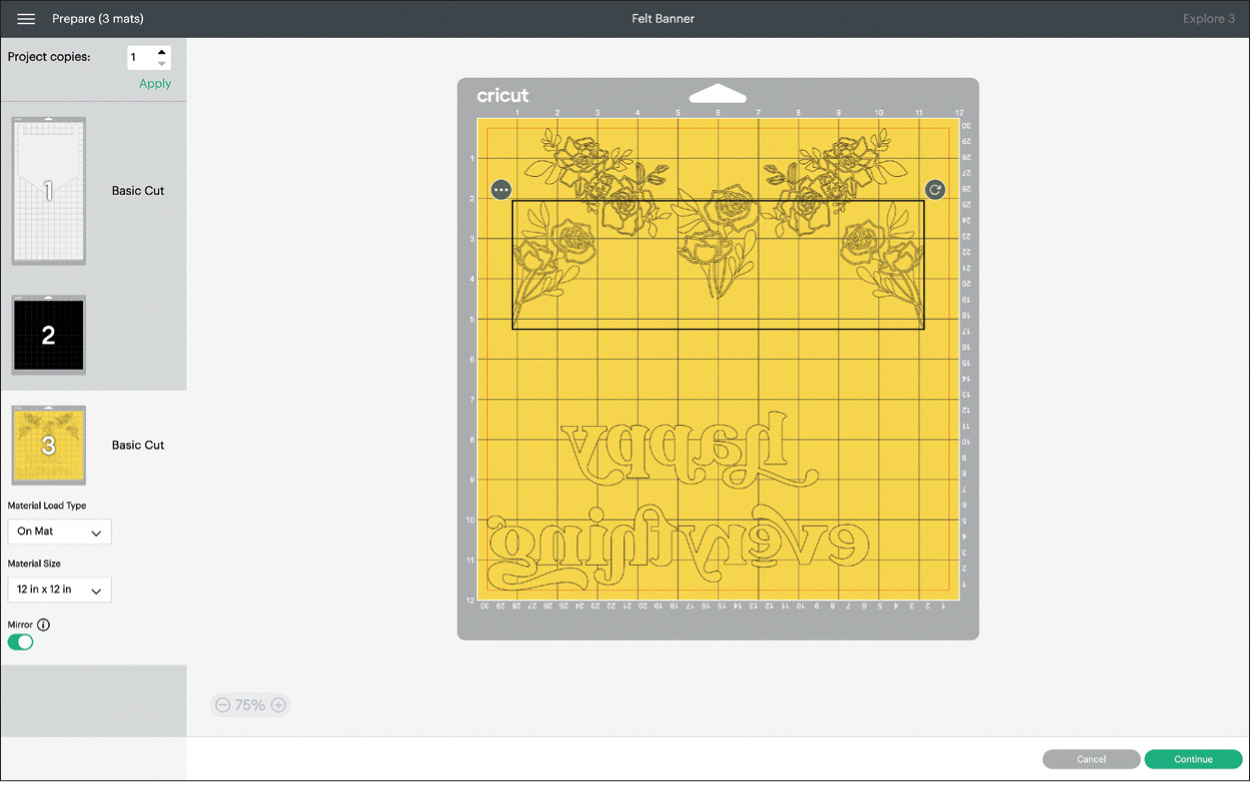
To take this a step further and save a bit of material, you can move the flowers up closer together. This helps maintain their alignment after everything is cut. The image here shows how the final mat looks on the Make It screen, and also how you should set up the mat with iron-on to be cut, if you’ve chosen to move all of your iron-on material onto one mat.

Check that your machine has cut all the way through the felt before unloading your mat.
When you insert your iron-on material mat into the machine put the Fine-Point Blade back in.
Now that all your materials have been cut, grab your weeding tool and remove all the unnecessary pieces of your iron-on, leaving only your design.
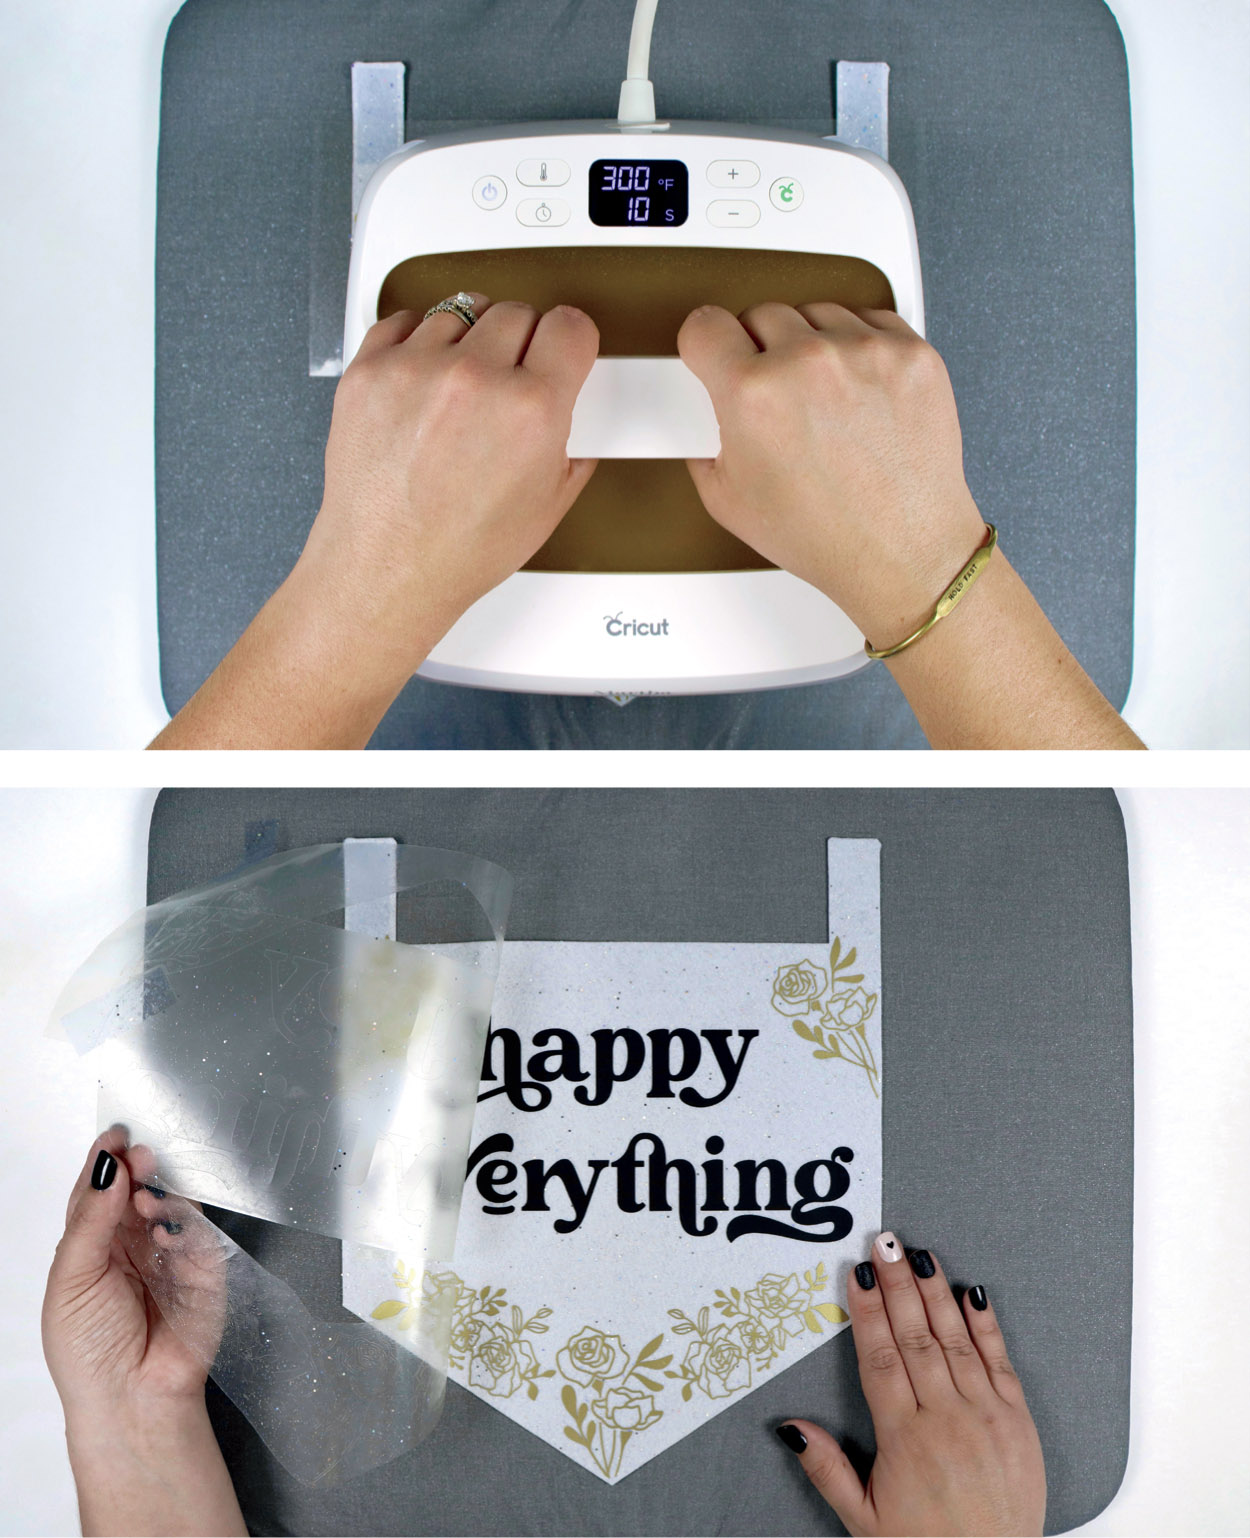
On your heat press mat, lay down your felt with the iron-on design positioned where you want it, then follow the instructions for your particular iron-on material and apply the heat press for the designated time and temperature settings. Also note if your iron-on material requires a warm or cool/ cold peel. Specialty materials often call for a cool/cold peel to allow the material to bond before removing the carrier sheet. As instructed by your material specifications, remove the clear carrier sheet slowly, making sure your iron-on material has adhered well to the felt. If your iron-on material looks like it’s not adhered well, apply the heat press with more pressure for just a few more seconds.

Now is the time to add the wooden dowel. Flip your banner over and glue the ends of the tabs down, leaving enough room to feed the wooden dowel through, as shown here.

Finally, attach your favorite ribbon, string, yarn, or jute on either side of the wooden dowel, leaving enough slack to hang your new banner.
MAKE IT EXTRA
There’s so much more you can do with this project idea! Once your felt banner is complete you can add tassels, ribbon curls, or pom-poms to each end of the wooden dowel. These cute banners would make the sweetest birth announcements in a nursery, or a fun learning tool in a classroom or playroom. With any text or designs, you can transform this idea to fit any style or theme!
Glass Etching
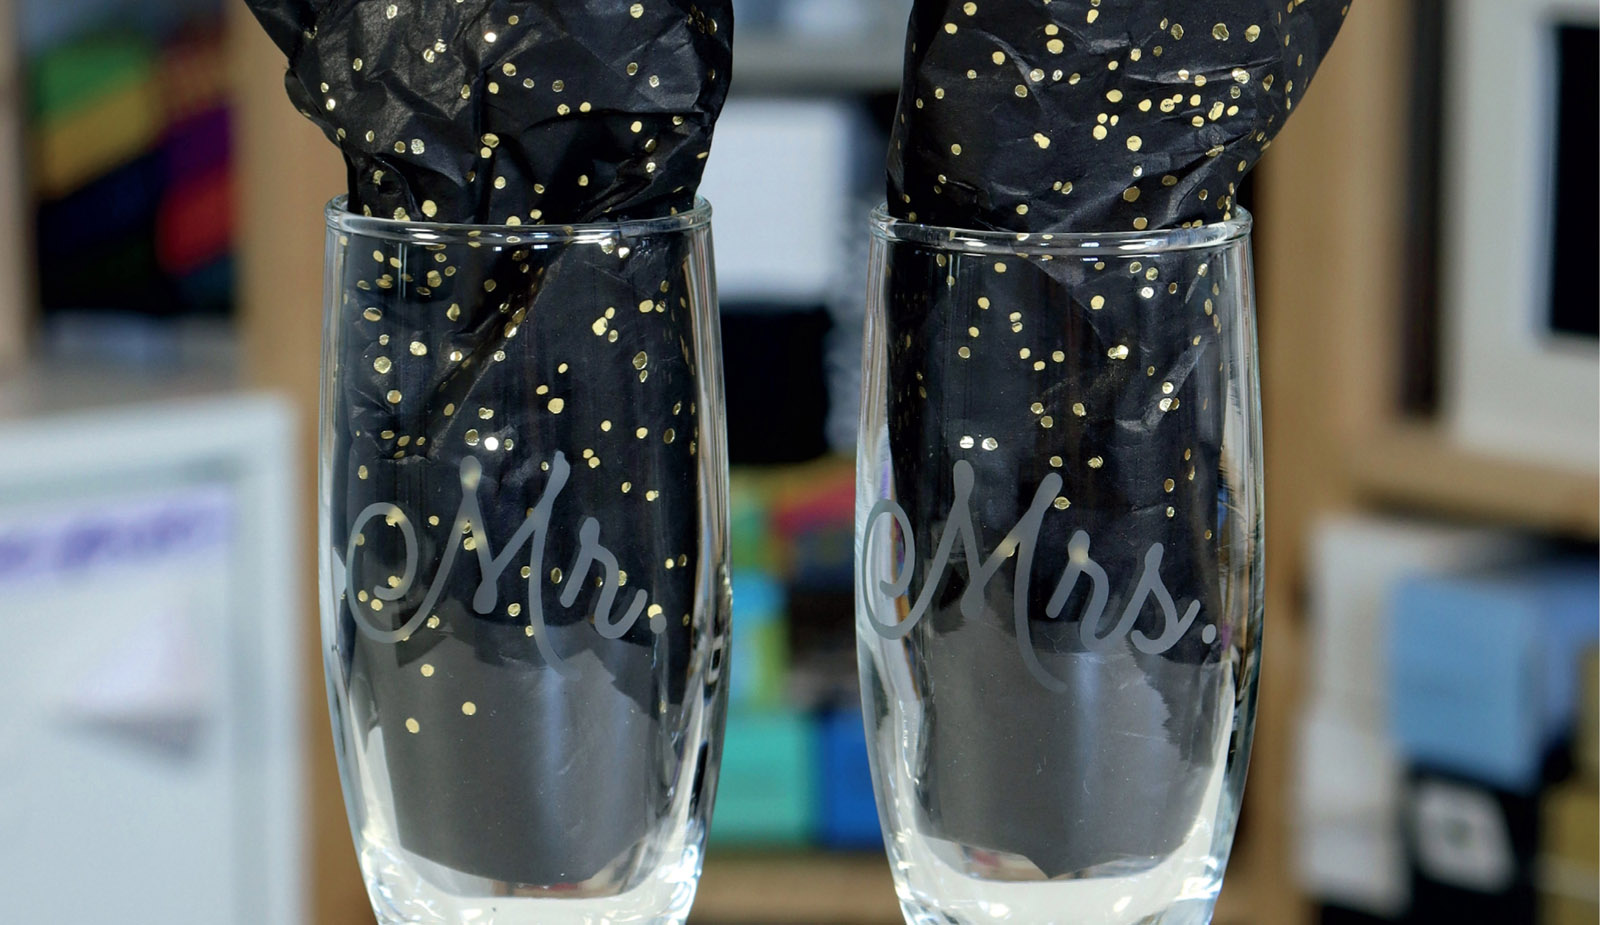
Etching glass can turn a basic champagne flute, wine glass, canning jar, casserole dish, or cutting board into a custom piece of professional-looking art. Etched champagne flutes make great gifts for newlyweds too, so let’s make a matching set!
Materials Needed
Glass surface (champagne flutes)
Stencil film/removable vinyl
Transfer tape/paper
Weeding tool
Scraper tool
Etching cream
Protective gloves and eyewear
Paint or foam brush
Running water or basin for rinsing
Machine Compatibility
Any Cricut machine
DESIGN IT

Begin by measuring your blank glass saurface. How much room do you have to work with? For these champagne flutes the maximum width, I’d suggest is 2.25”. This measurement will make the text large enough to be transferred nicely and will be legible without wrapping too far around the glass. You can use any text or image you like, but try to keep your designs on the simple side until you’ve tested your materials and have become familiar with the process.
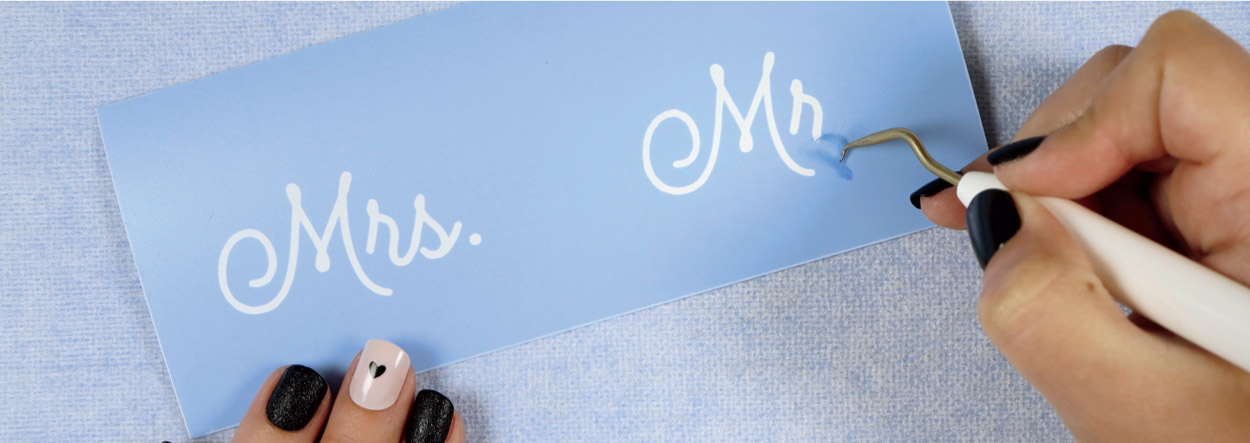
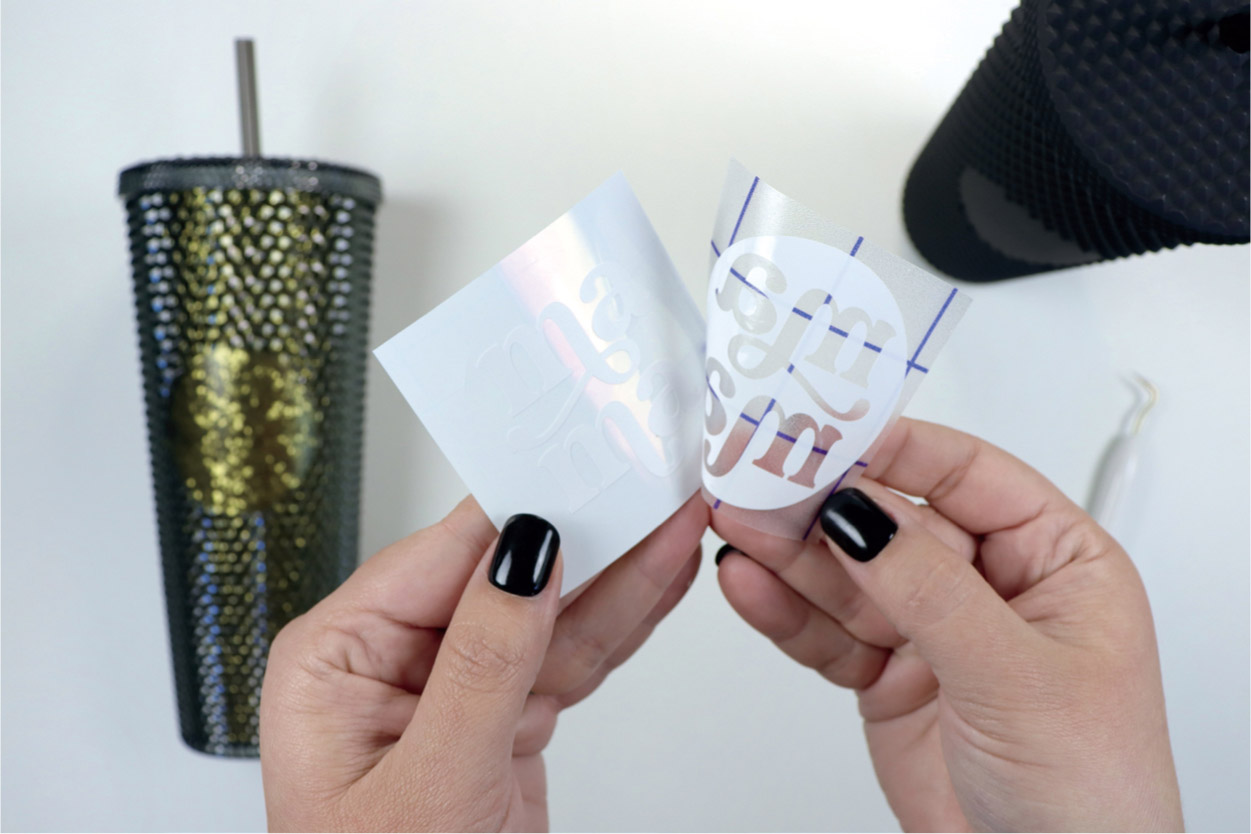
Make sure you Weld the layers of each surface you’ll be etching. For example, in the image below, you can see that “Mr.” and “Mrs.” have been welded on two separate layers. This will allow for you to move these layers independently on the Make It screen, which is important.
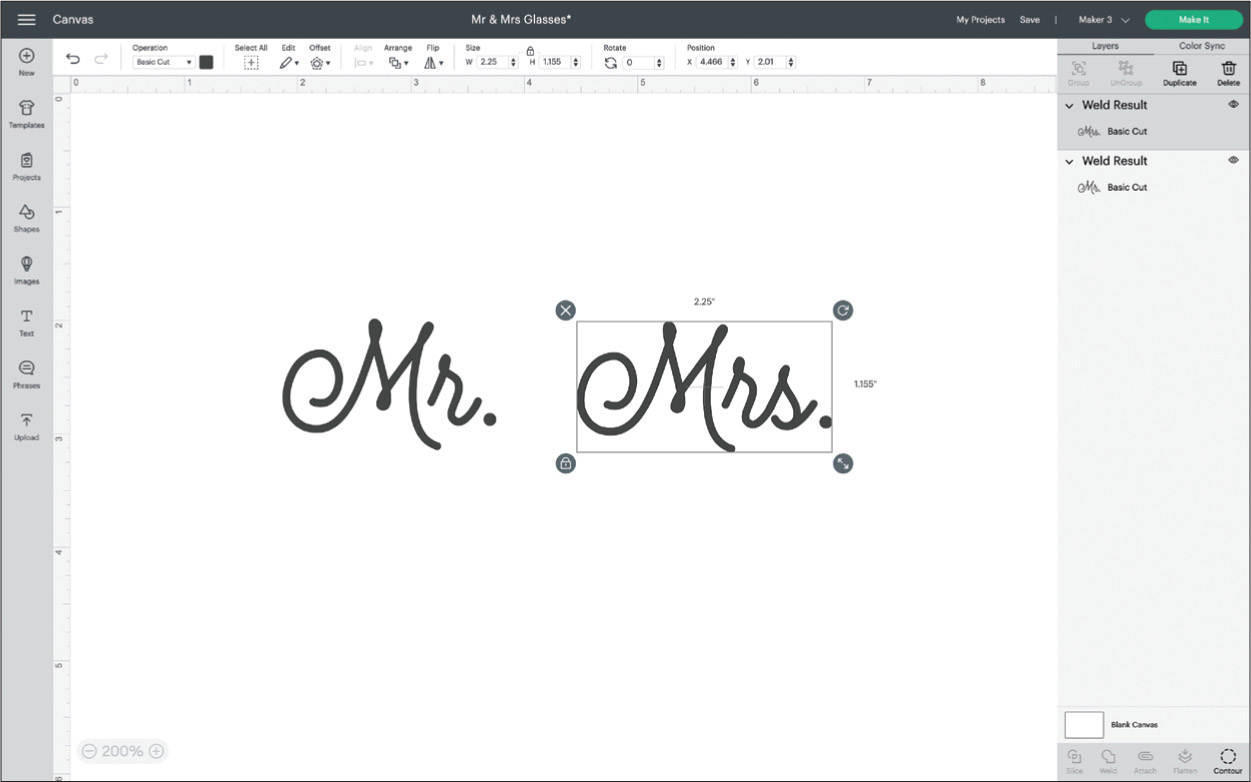
Also, because a script font was used here, welding creates a single cut path around the letters, as if you were writing Mr. and Mrs. in cursive. When your design is ready, click the green Make It button.
MAKE IT

On the Make It screen, move your designs over and down a bit by clicking and dragging each design. This will allow enough room to cut around your stencil and will also provide a border around your design so you can apply the etching cream without getting any unwanted cream on your surface.
Cut your designs and then weed the design from your stencil material. Typically, for a vinyl decal, you’d remove the negative space; however, for stencils the process is reversed (in this case you remove the letters).

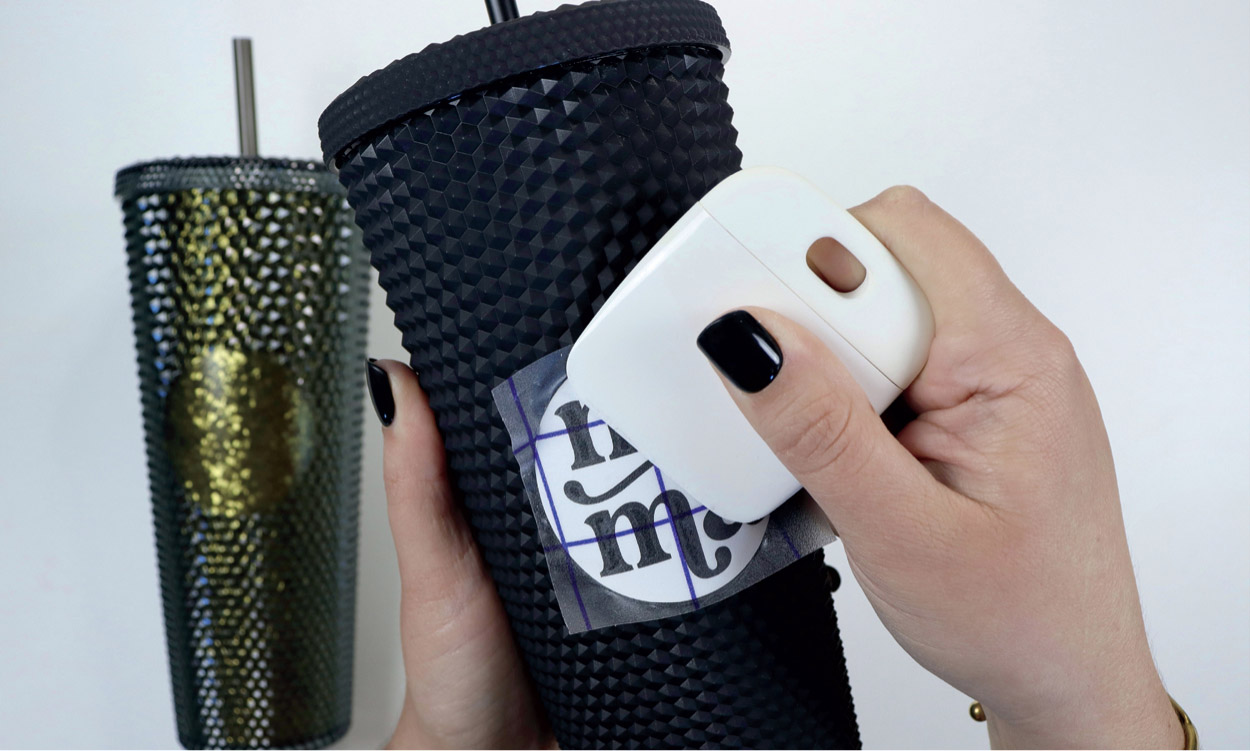
After your design has been fully weeded, apply a piece of transfer tape over your design. You can see in the image here my transfer tape doesn’t fully cover the stencil material, which is OK. You want the transfer tape to just cover your image so you can transfer all those fine details. Make sure to use a scraper tool to get good adhesion between the transfer tape and your stencil material and also to remove any possible air bubbles.

Gently peel the stencil material off its backing, making sure to pick up any small pieces of vinyl that may be left behind. Then apply your stencil material to your glass surface, again using your scraper tool to remove any possible air bubbles. If there are bubbles and gaps, the etching cream might leak into those spots and etch unwanted parts of your glass.

When you’re sure you’ve got a good seal around your design, gently peel away the transfer tape. You’ll see in the image here there are creases in the stencil material, but the design itself has a great seal all the way around it. When you wrap flat material on a curved surface there are bound to be wrinkles and creases, and that’s OK. Just make sure that your design is adhered well. You can even go back over the stencil with your scraper tool or fingers to make sure it’s on there securely.
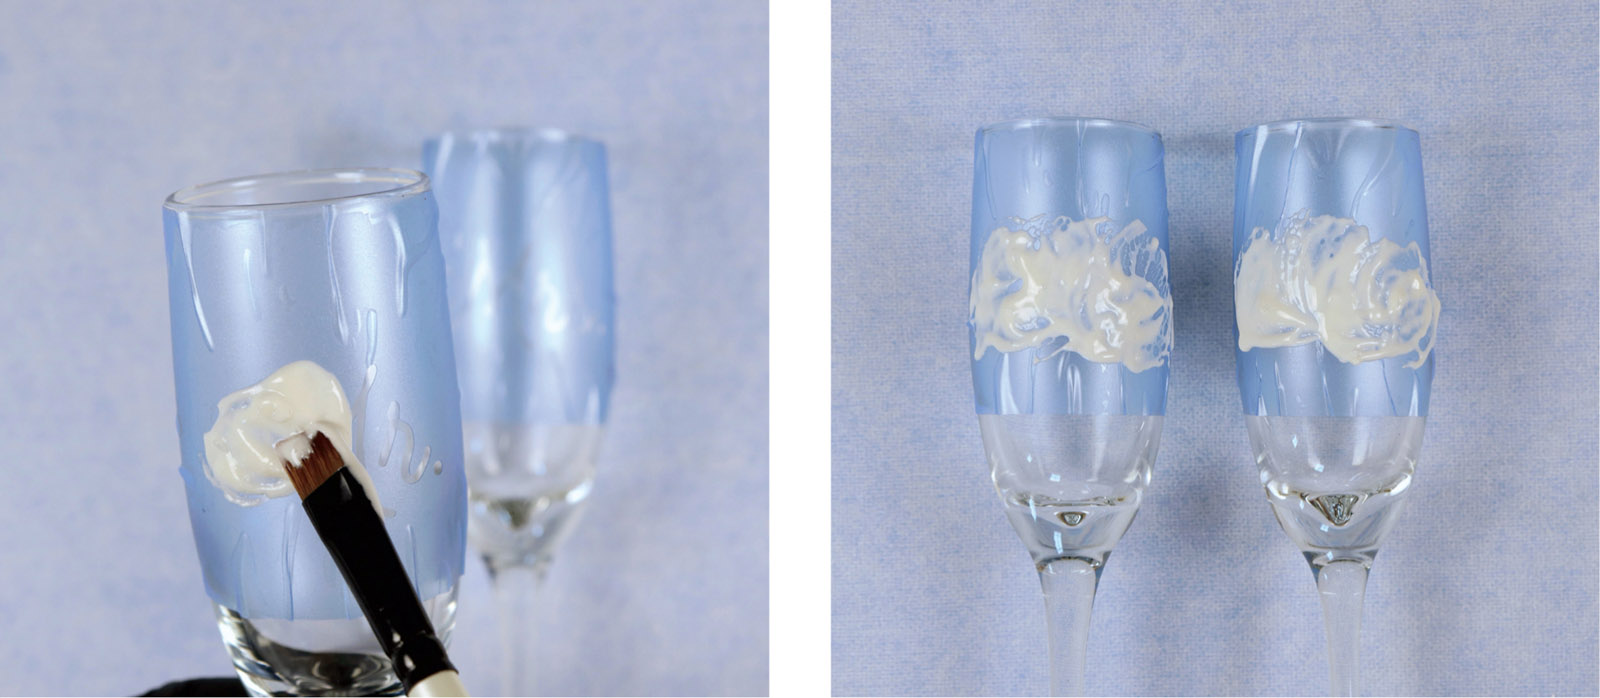
Always wear protective gloves and eyewear when working with etching cream. Using your paint or foam brush, apply the etching cream over your stencil. Gentle tapping and dabbing motions will work best to apply the etching cream. Once the cream has been spread over your entire design, you can swirl the cream around to make sure you’ve got full coverage.

Refer to the directions on your particular etching cream to see how long you should leave the solution on your surface. When the time is up, rinse off your glass with the stencil still on it, making sure you wash off all the etching cream. Dry your surface and then slowly peel away the stencil material. Wash your surface again just to be sure there isn’t any etching cream on your glass after removing the stencil.
MAKE IT EXTRA
Have fun playing with different images and text! For these glasses you could apply the couple’s names on the other side of the glass, or perhaps the anniversary date. If you’re customizing a mirror, a plaque, or some other glass surface that won’t be washed regularly, you can use a pigmented metallic finish like Rub ‘n Buff to create a lustrous look on your newly etched surface. This really brings out the detail, but you would lose the frosty look of the etching. And remember that a little Rub ‘n Buff goes a long way.

Custom Labels
One of the perks of owning a Cricut machine is the ability to label all the things! You can use this project idea to create labels for your pantry, closet, office, or craft room! Smart Paper Sticker Cardstock is really the hero here. You can also use Smart Label Writable Paper if you’re using a Cricut Joy.
Materials Needed
Sticker cardstock
Cricut pen
Machine Compatibility
Any Cricut machine
Images Used
Weapons of Mass Creation #M284FDE7E
Art Utensils Bag Design #M284FE001
Rounded Corner Label #M10E79A3D
DESIGN IT

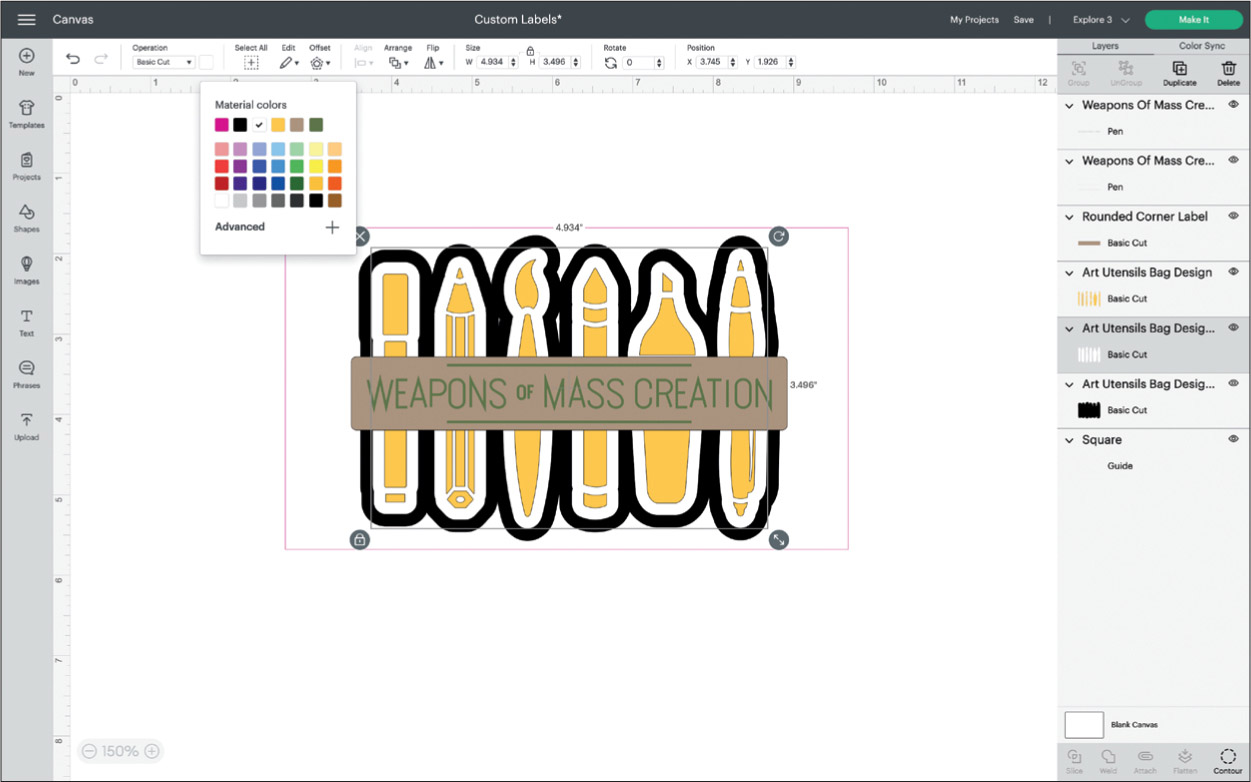
Although you can make labels for anything in your house, let’s start with a project for your craft space. This Weapons of Mass Creation image is cute as is, but I decided to edit the crayons out and add the variety of the Art Utensils image. This project will show several techniques within Design Space to edit an image.
Start by bringing the images listed on the previous page onto your canvas.

Next, Detach the Weapons of Mass Creation image and delete everything except the text and lines layers. You should be left with four layers, like the image here.
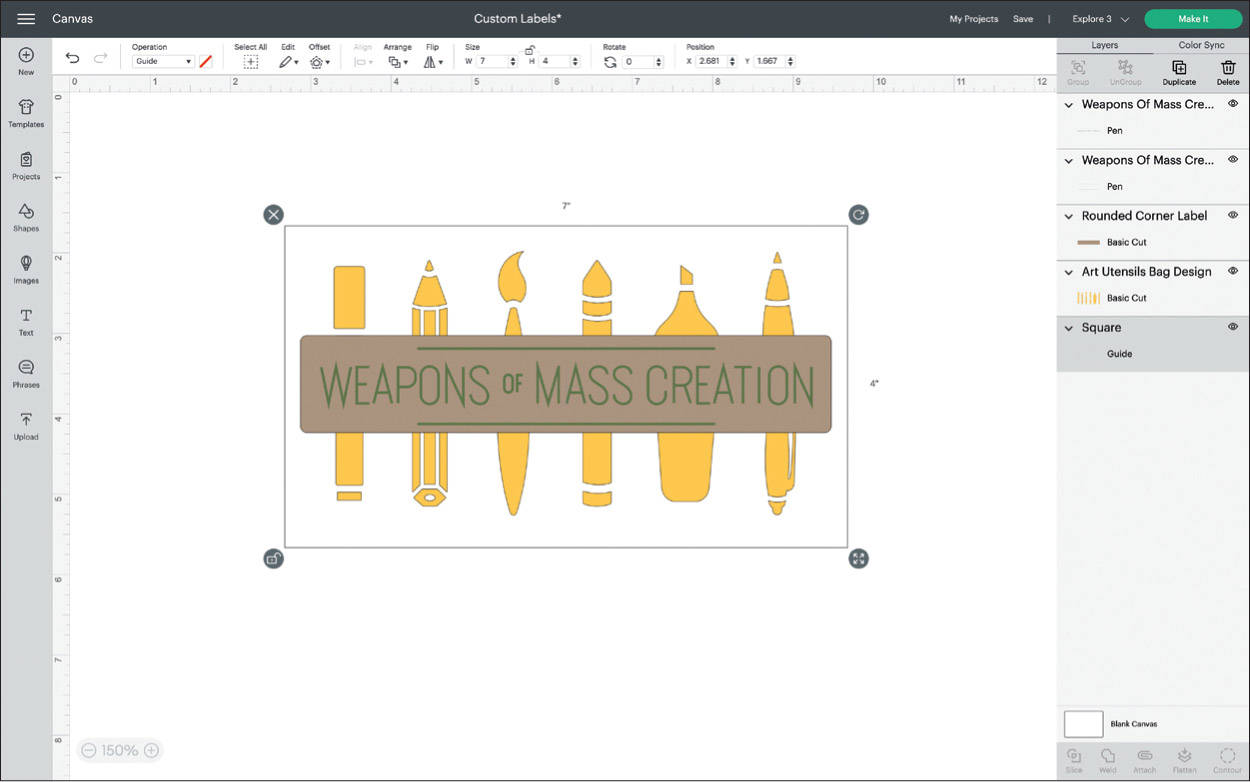
Before you go any further, measure the surface where you plan to put your label. The storage caddy used in this project has a maximum area of 7” x 4”. Create a rectangle shape with those dimensions, and from the Edit Bar, set the Operation type to Guide for that layer. Guide layers do not cut on the final Make It screen, they only serve as a template while designing. Arrange the images within your Guide as shown here. This won’t be the final design but is just a rough draft for sizing.

Play with stretching and resizing your images to your liking, and then from the Edit Bar select the Art Utensils layer and create a thin offset of about 0.15”.
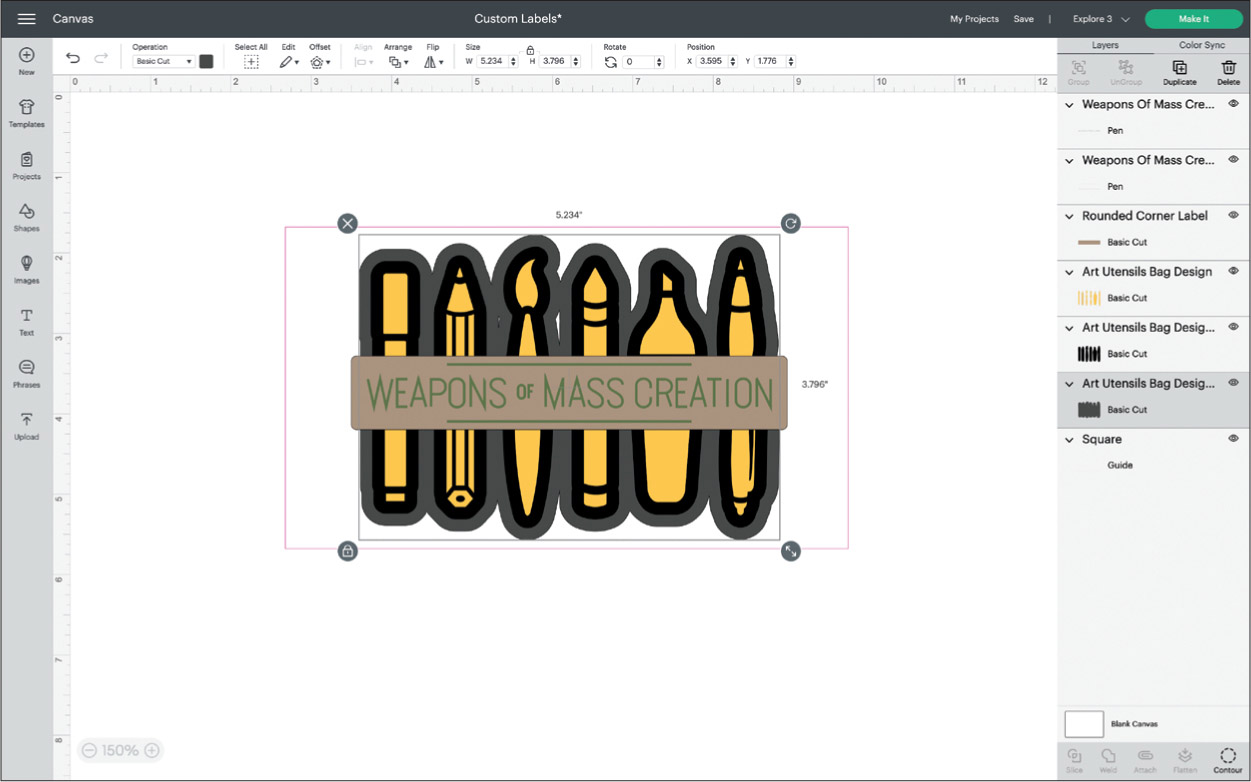
Next, select your new offset layer and do one more offset. You should have something that resembles the image here.
Now that all the elements are there, it’s time to fine-tune the operations, colors, and final-cut appearance. Working from the outside in, let’s change the colors of the offset layers by selecting the desired offset layer and then clicking the colored square next to the Operation menu at the top of your canvas.
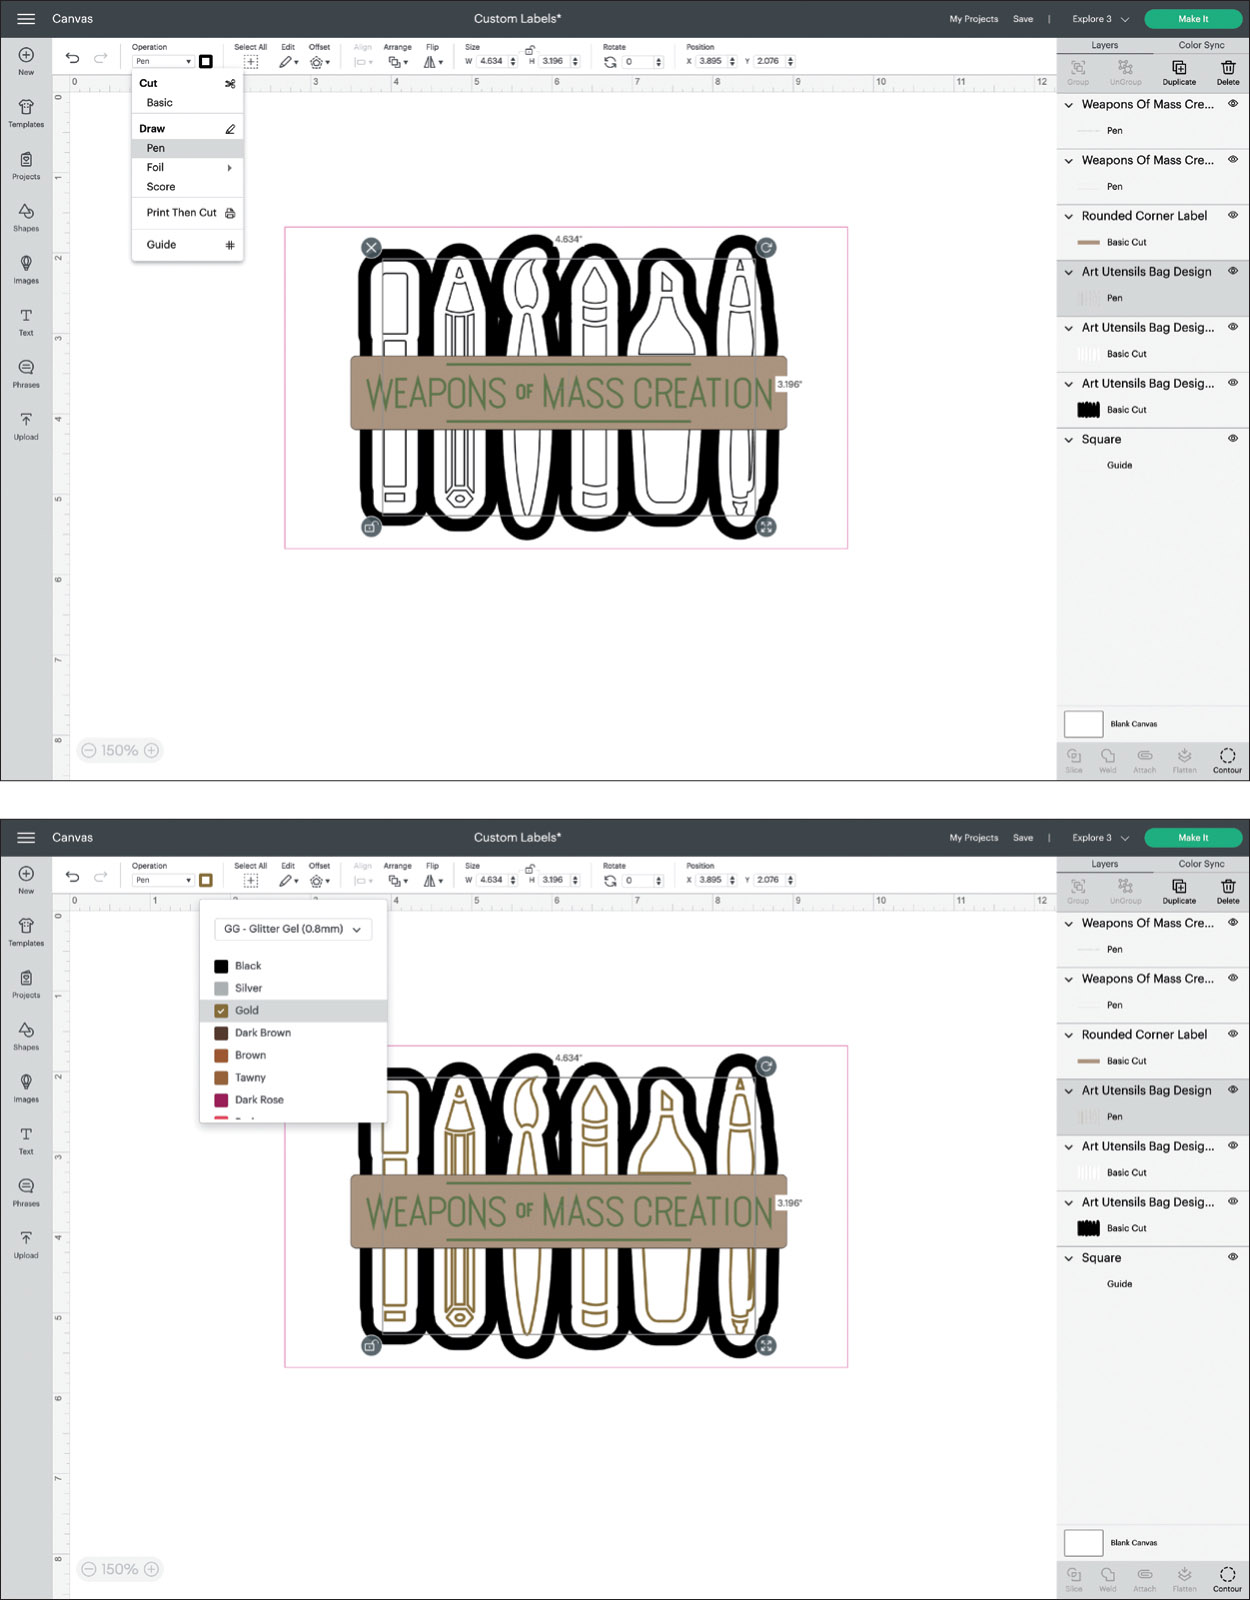
Next, change the Operation of the original Art Utensils layer from Basic Cut to Pen, and change the color of the pen by going back to the square next to the Operation menu and selecting your desired pen and color.
We’re halfway there! Next up is to work on the Rounded Corner Label layer. Select that layer and change the color to match your sticker cardstock. Also change the color of your pen for the writing across the label.
Duplicate the Rounded Corner Label layer and arrange it directly behind the one that is currently there. You can do this by selecting the layer you’d like to move and clicking the Arrange function in the Edit Bar, then selecting Send Backward. The next step is to select the Art Utensils pen layer and one of the Rounded Corner Label layers, then Slice. You’ll then remove three of the four new layers that the slicing tool just created, leaving only the Pen layer of the Art Utensils layer, as shown here.
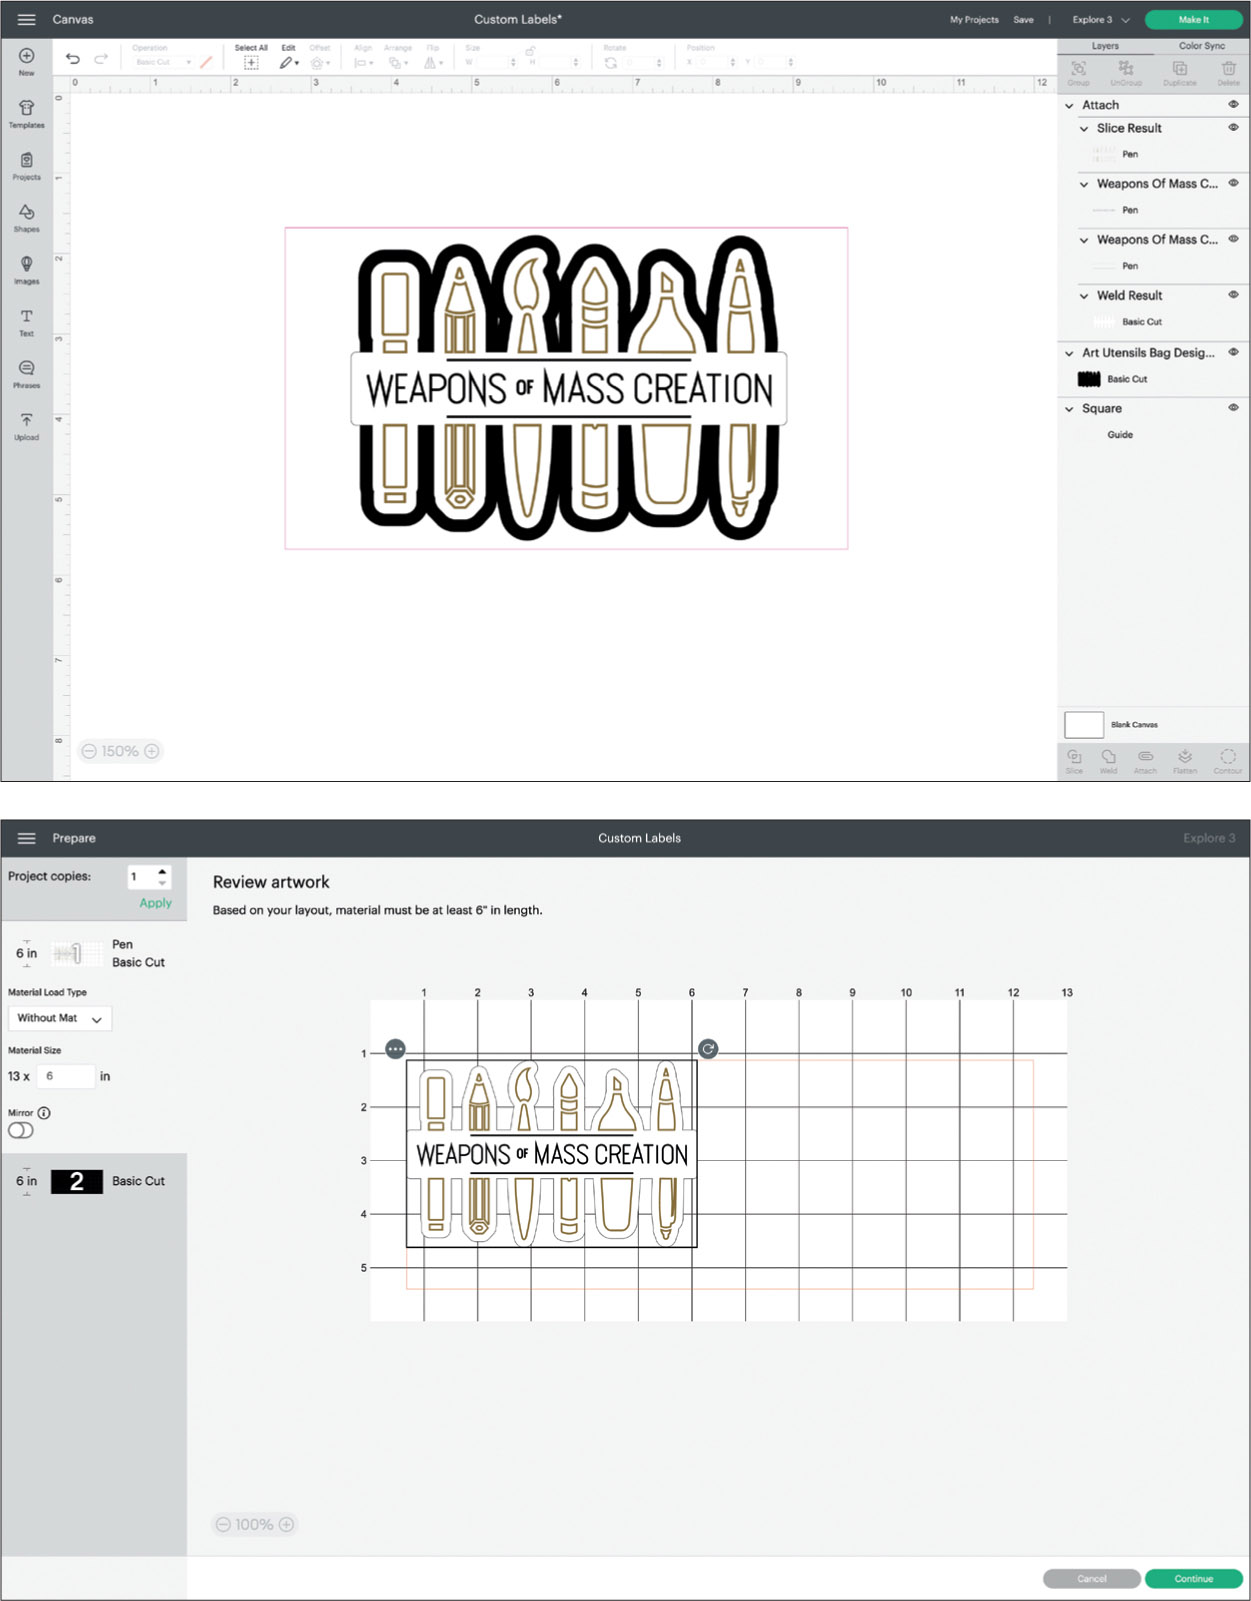
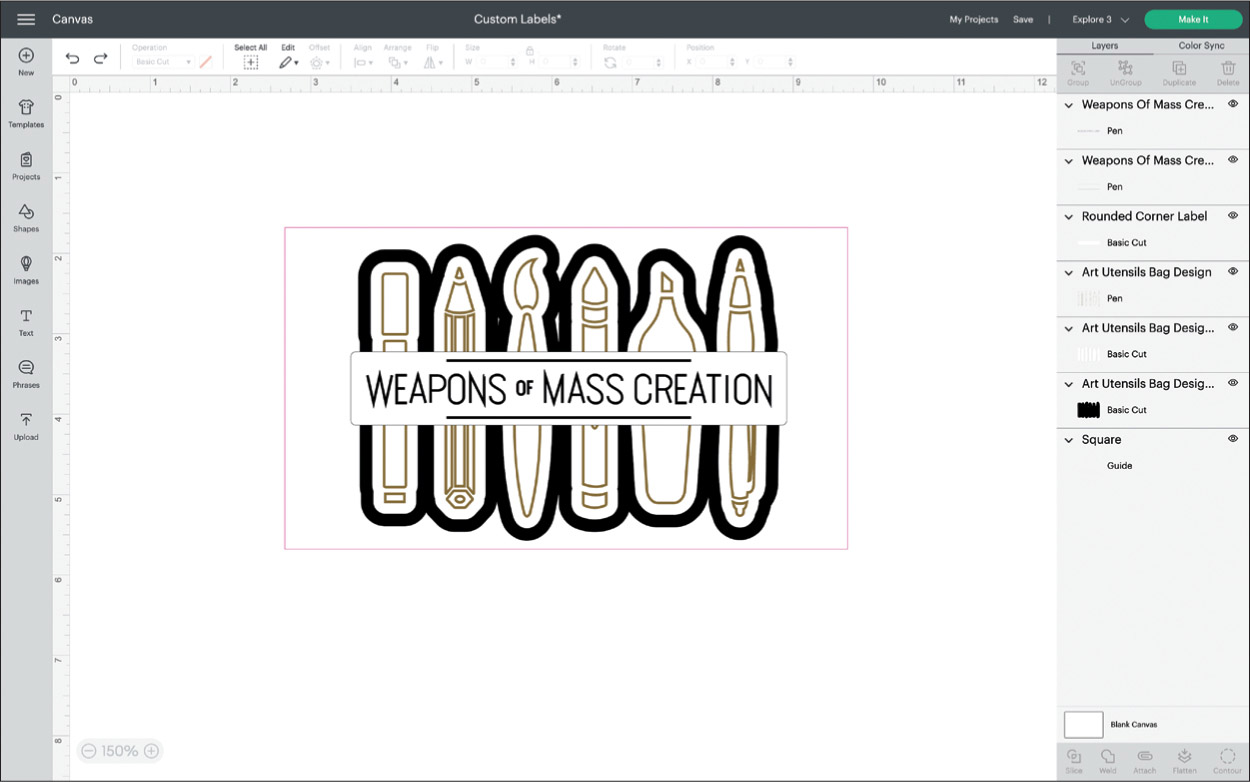
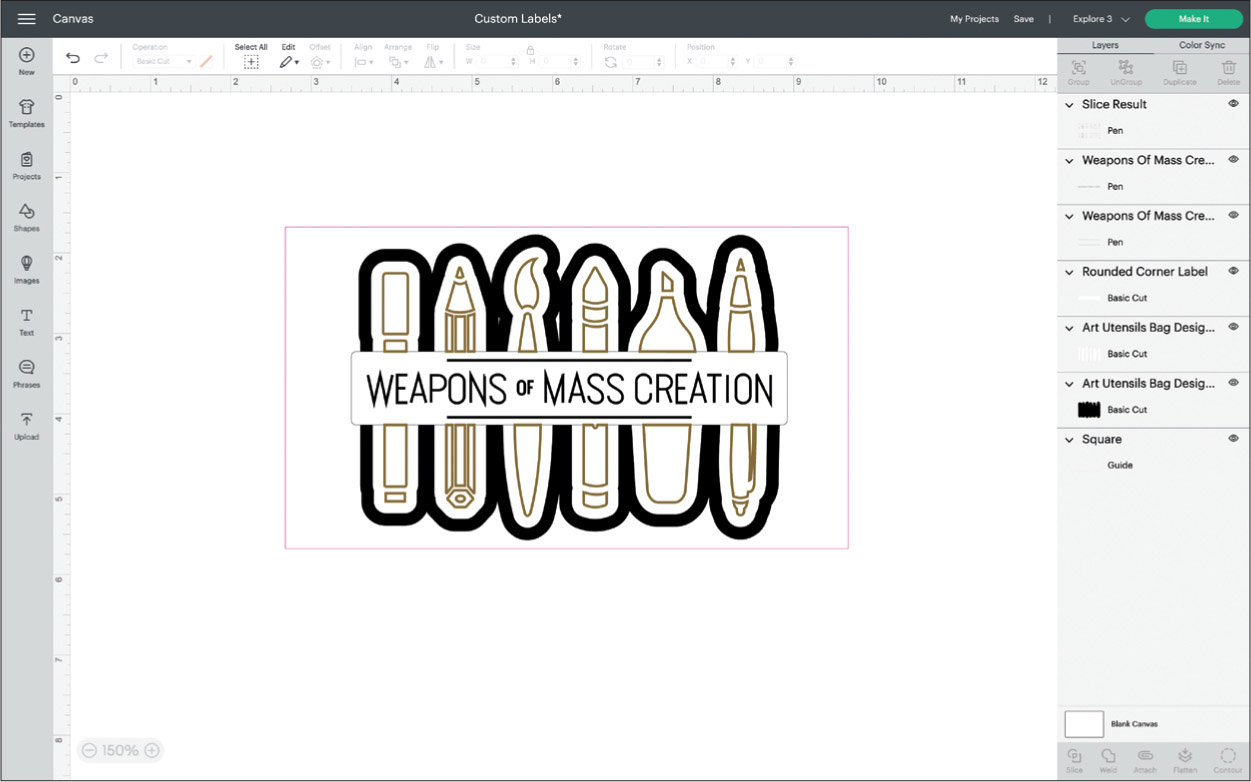
Let’s start combining some of these layers now. Select the first offset layer (white layer) and the Rounded Corner Label layer and Weld them to become a single layer. This new layer will move to the top of the stack, so you’ll need to select that layer and Arrange it to Send Backward until all the pen layers show again. Next, select all the pen layers plus your new welded layer and Attach them. Your Cricut will now recognize that all those elements are on one layer. Although the images from the previous step and the one shown here look the same, look at the layers panel and you will see they are different. Also, check the Make It screen to make sure it looks like the image here. If not, go back through the steps and make sure to Attach the layers where needed.
MAKE IT
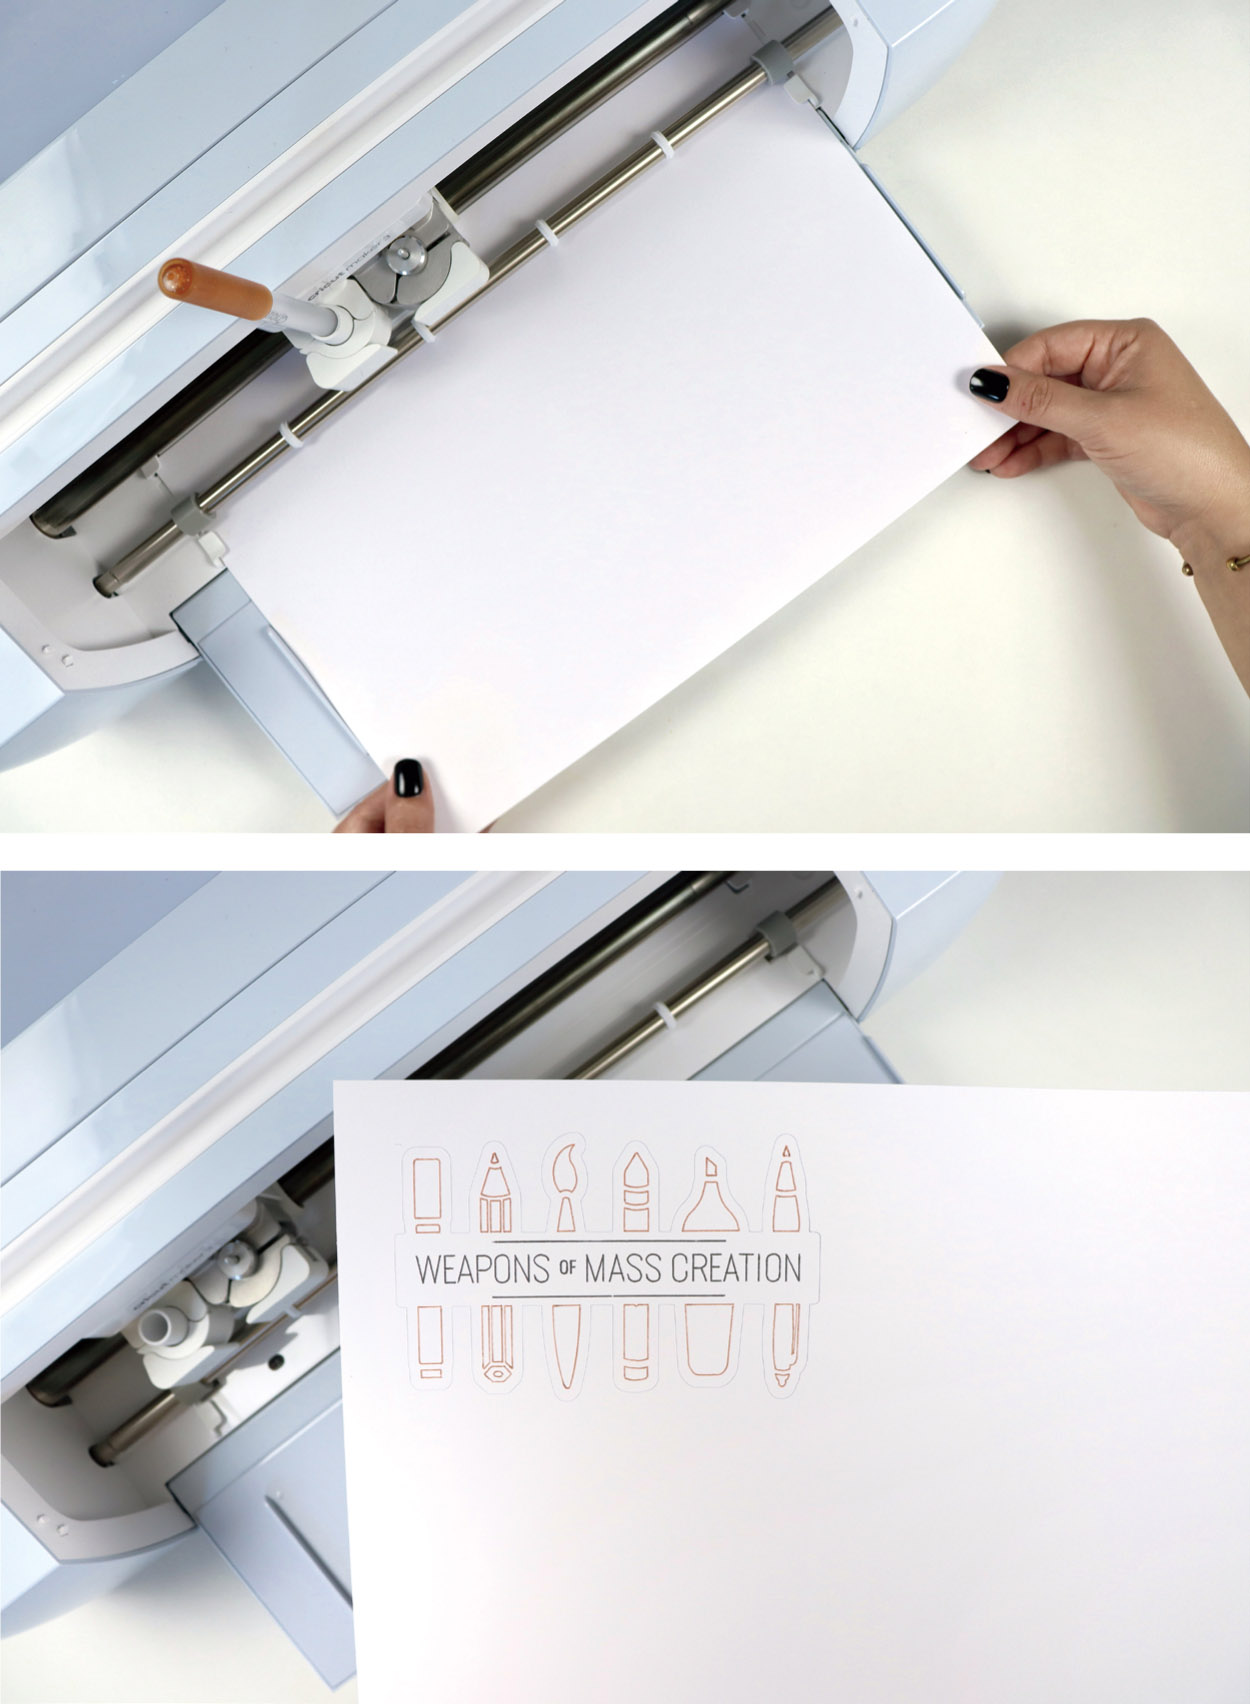
After all those steps, the machine does most of the remaining work. Click on the green Make It button and load your sticker cardstock into your machine. Follow the prompts that will tell you which pen to put in first and when it’s time to switch pens.
Look how cool this sticker cardstock is. Simply peel off the backing and lay the offset layer onto your surface. No transfer tape necessary!

Next, peel the backing off your second layer, center it, and then apply it on top of the background layer. That’s it!
MAKE IT EXTRA
These labels can be made large or small. You can design custom labels for jars, candles, drawers, storage pieces … literally, anything you can put a sticker on!
Reverse Canvas
Did you know that most art canvases are wrapped around the most beautiful wooden frames? Truly! For this project we will take one of those wrapped canvases and unwrap it, take it apart, and then put it back together again—but backwards. If this sounds confusing, don’t worry, I’ll break it down for you and you’ll be a pro in no time!
Materials Needed
Iron-on material (also known as heat transfer vinyl)
Wrapped canvas (from craft or dollar store)
Craft knife
Weeding tool
Heat press
Heat press pad
Glue gun/strong adhesive
Machine Compatibility
Any Cricut machine (depending on size of canvas/design)
Image Used
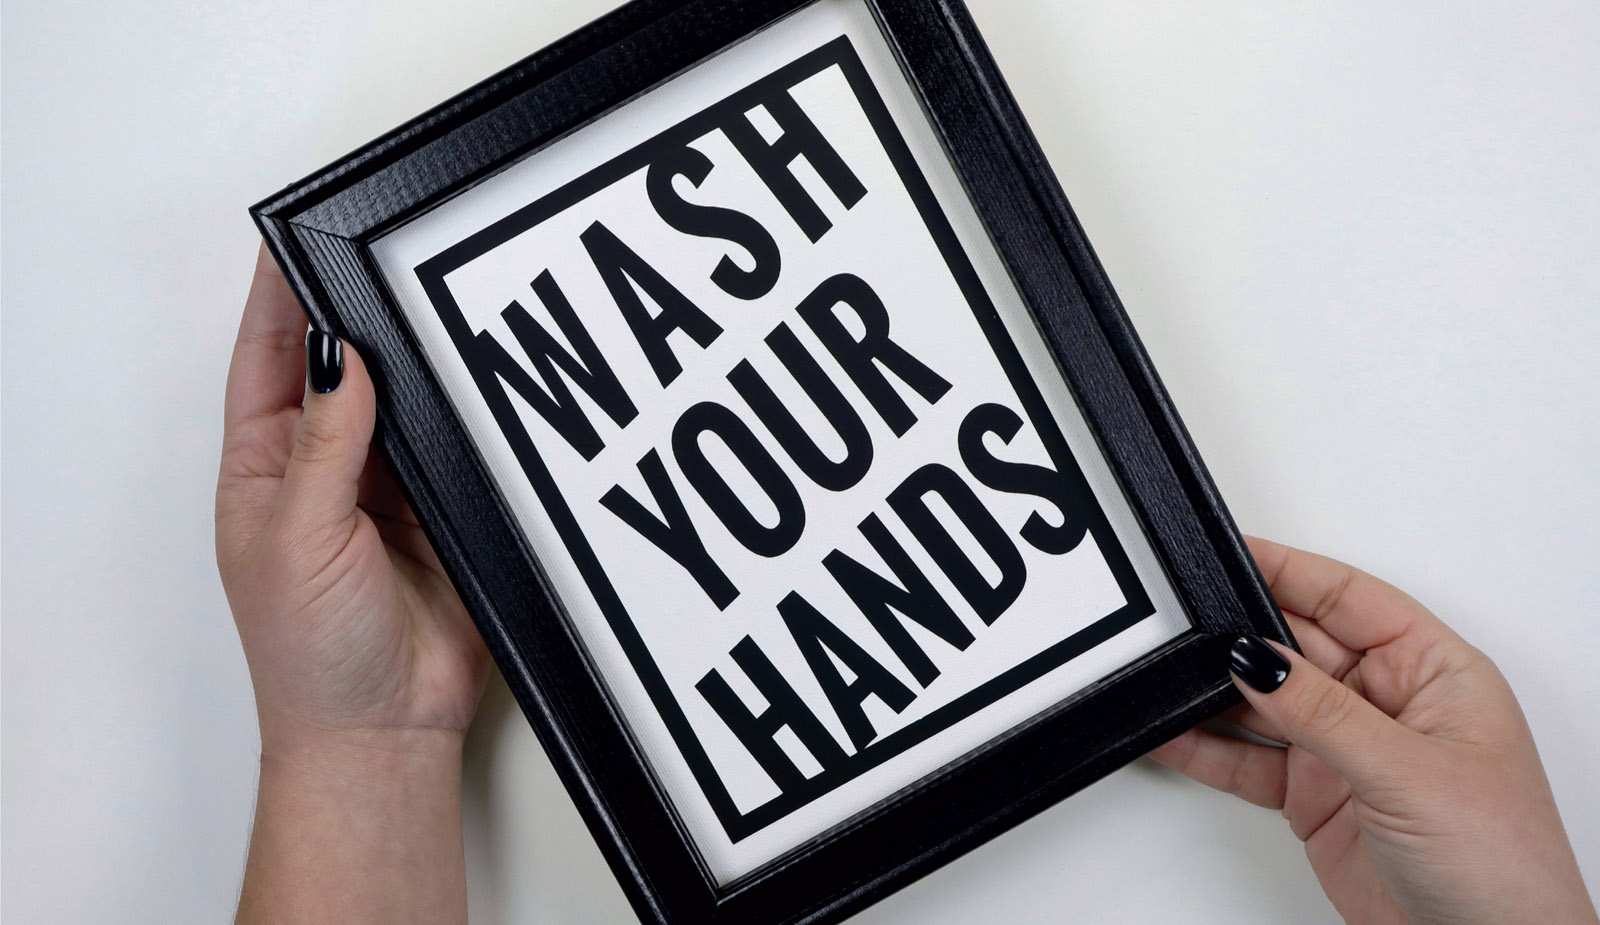
Wash Your Hands #M14756BED
DESIGN IT
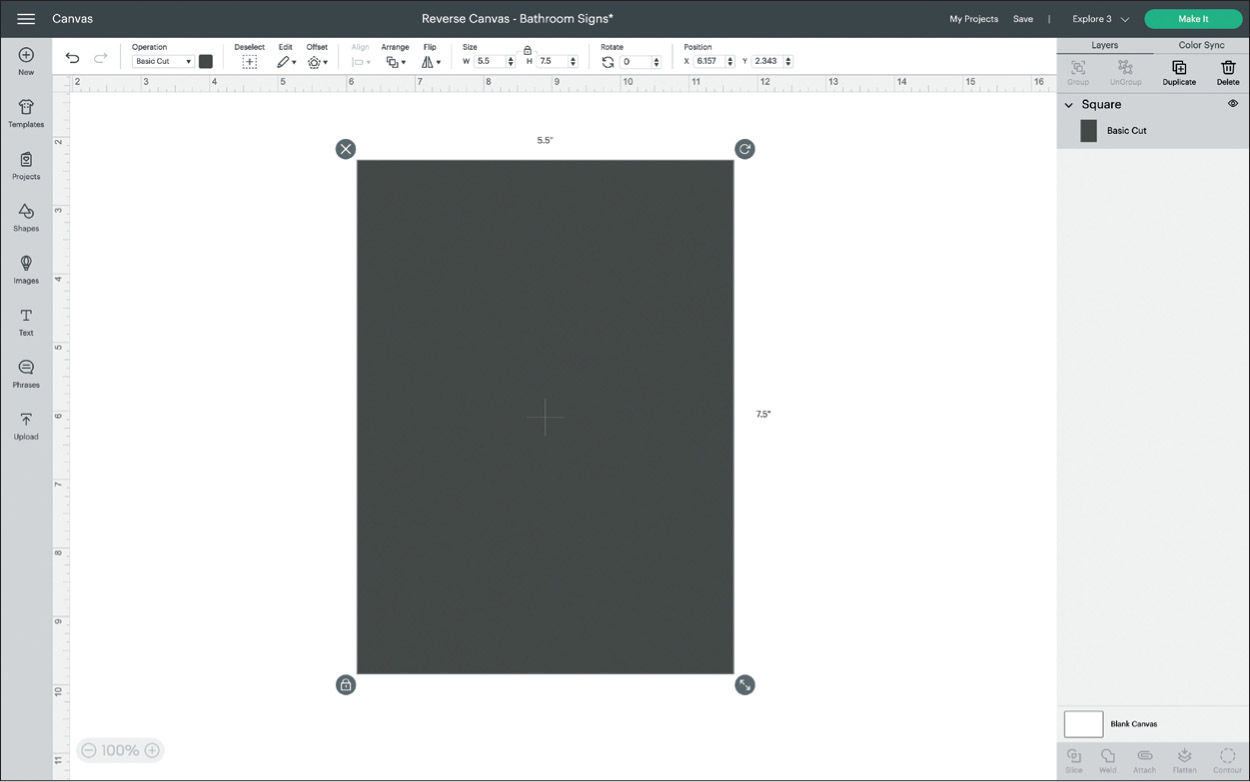
Before you start designing, measure the dimensions of the inside of the frame. The canvas frame used in this project is 8” x 10”. To create a bit of a border around the image and the inside of the frame, begin with a rectangle that is 5.5” x 7.5” in Design Space.

Next, insert whatever image you’d like to add to your sign. I’ll be hanging this sign in the bathroom so my kiddos can have a gentle reminder to wash their hands.
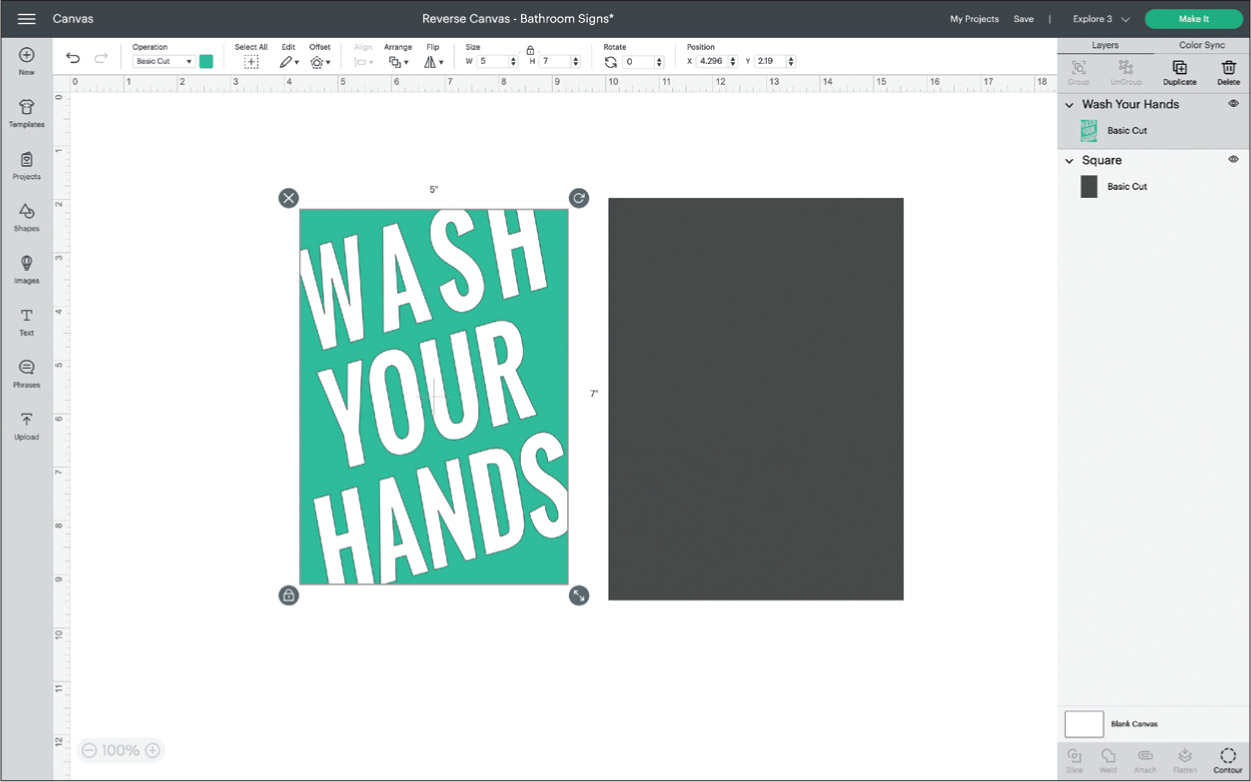
When your design is ready to go, size it to fit inside the rectangle on your canvas. I like to leave a bit of a border between the frame and the design, as you can see here.
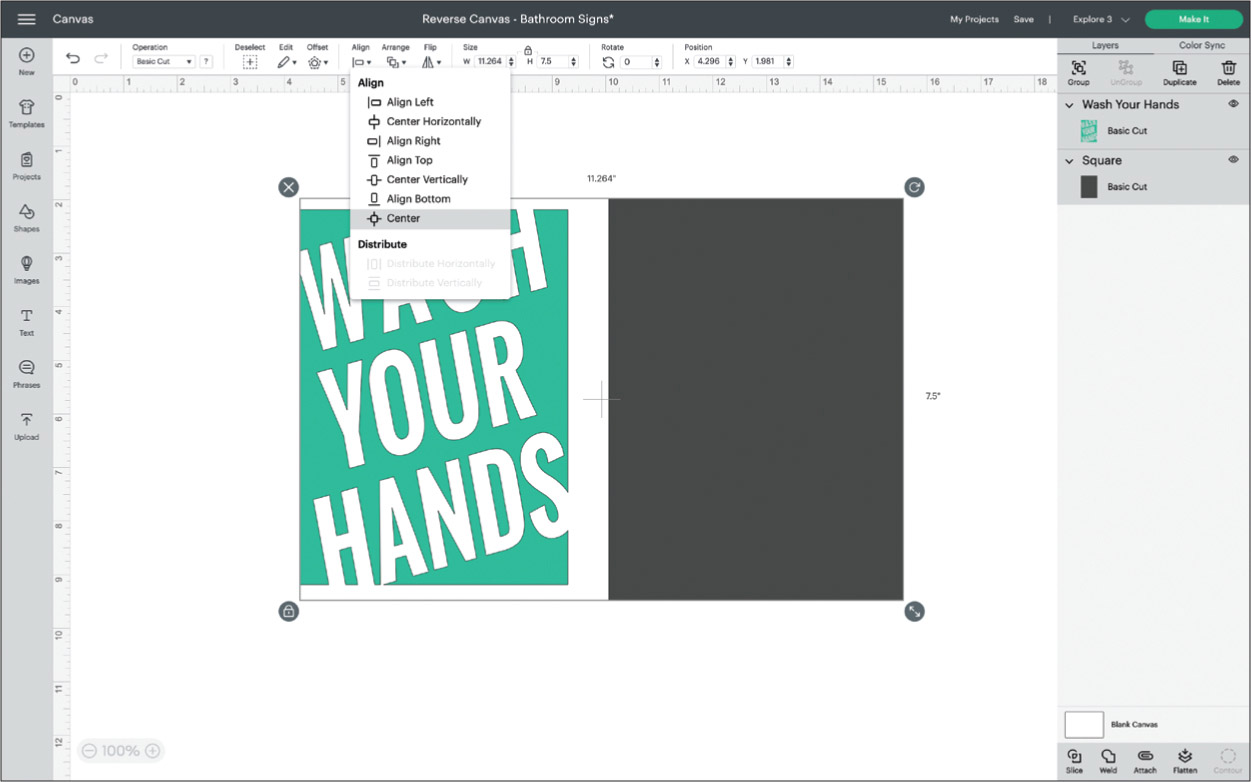
With the two layers selected, click on Align and then select Center in the drop-down, as shown here.

With everything centered, the next step is to Attach both layers. You can see here, this creates a border and also changes the color of the layers to be the same. Your Cricut will now cut these two layers just as they show on the Design Space screen, from one piece of material.
MAKE IT

Now click on the green Make It button. On the Make It screen, check that you toggle the Mirror option, especially if your image has text. Remember to place the iron-on material shiny side down on the mat.
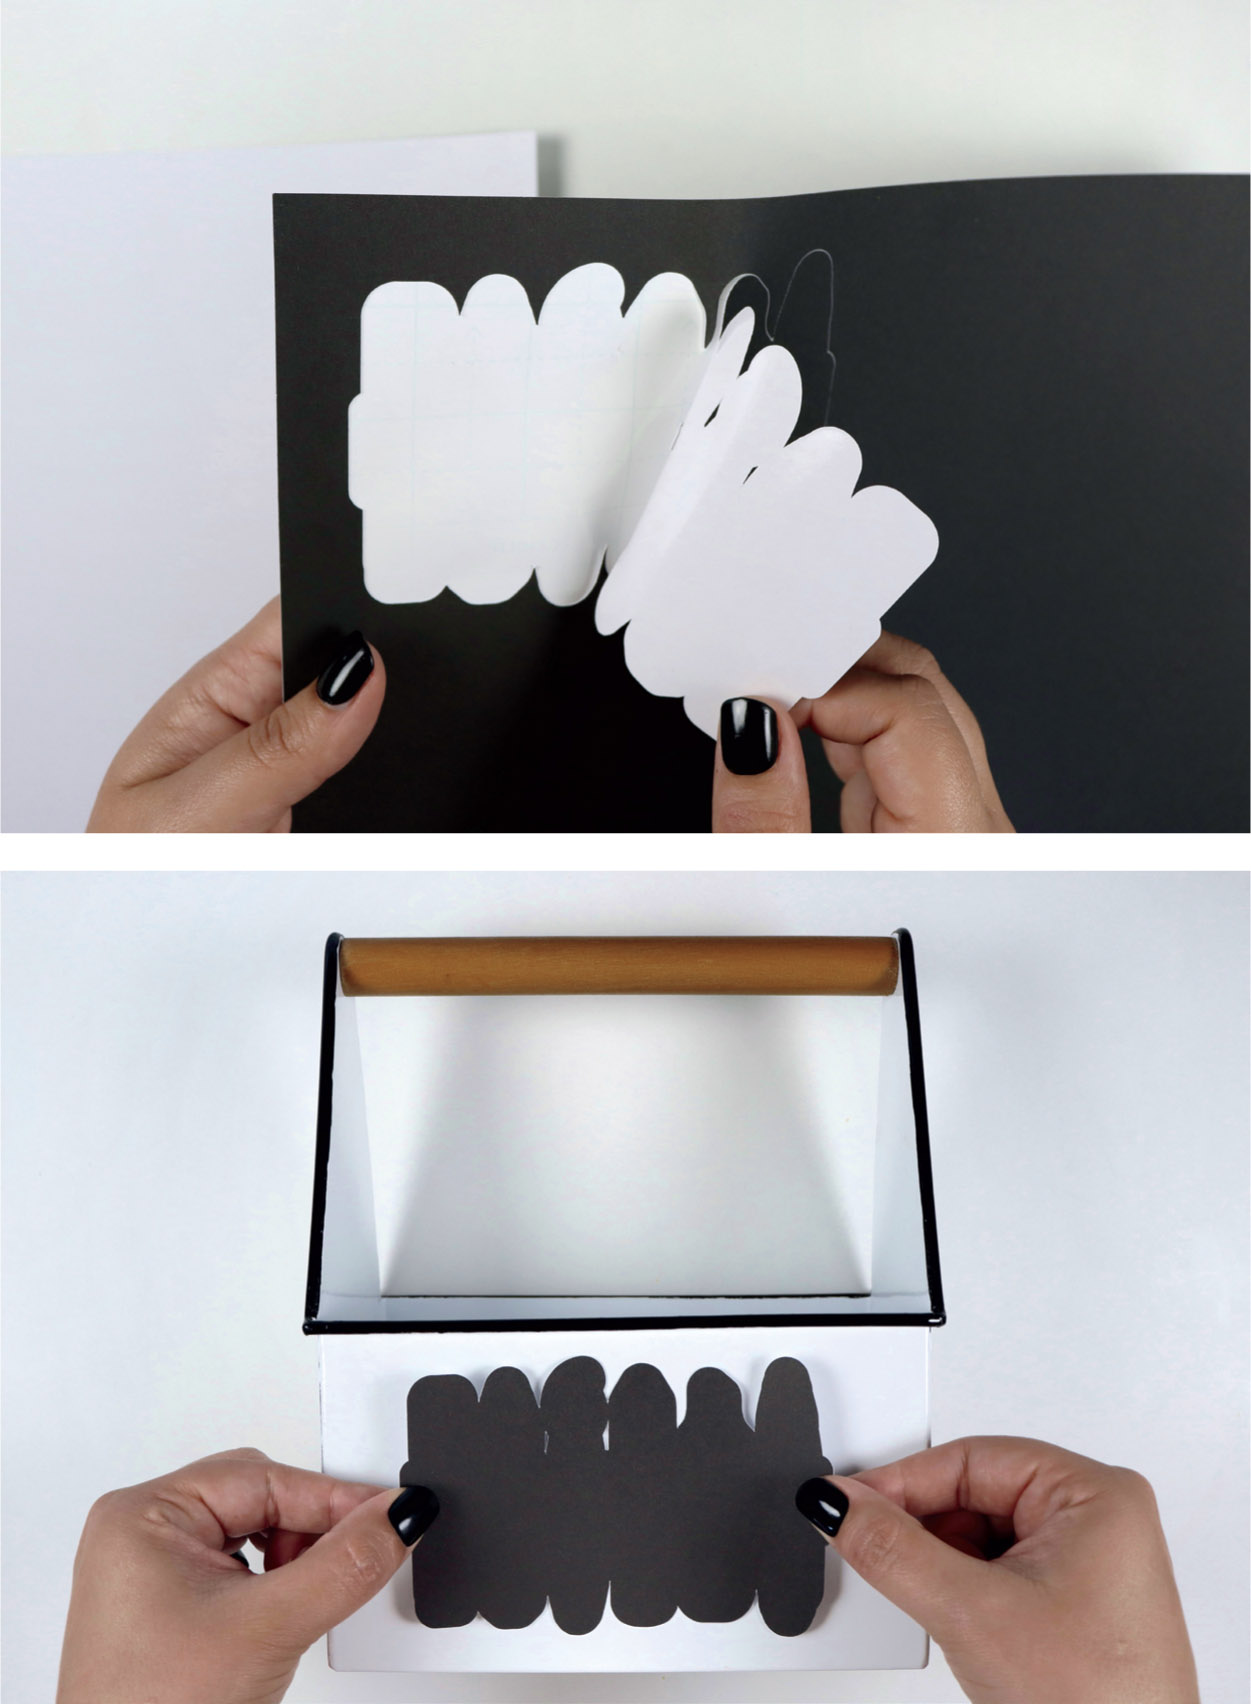
As your machine is cutting, let’s go ahead and remove the canvas from the frame. Grab a craft knife/blade and carefully cut around the back of the canvas, as shown here.
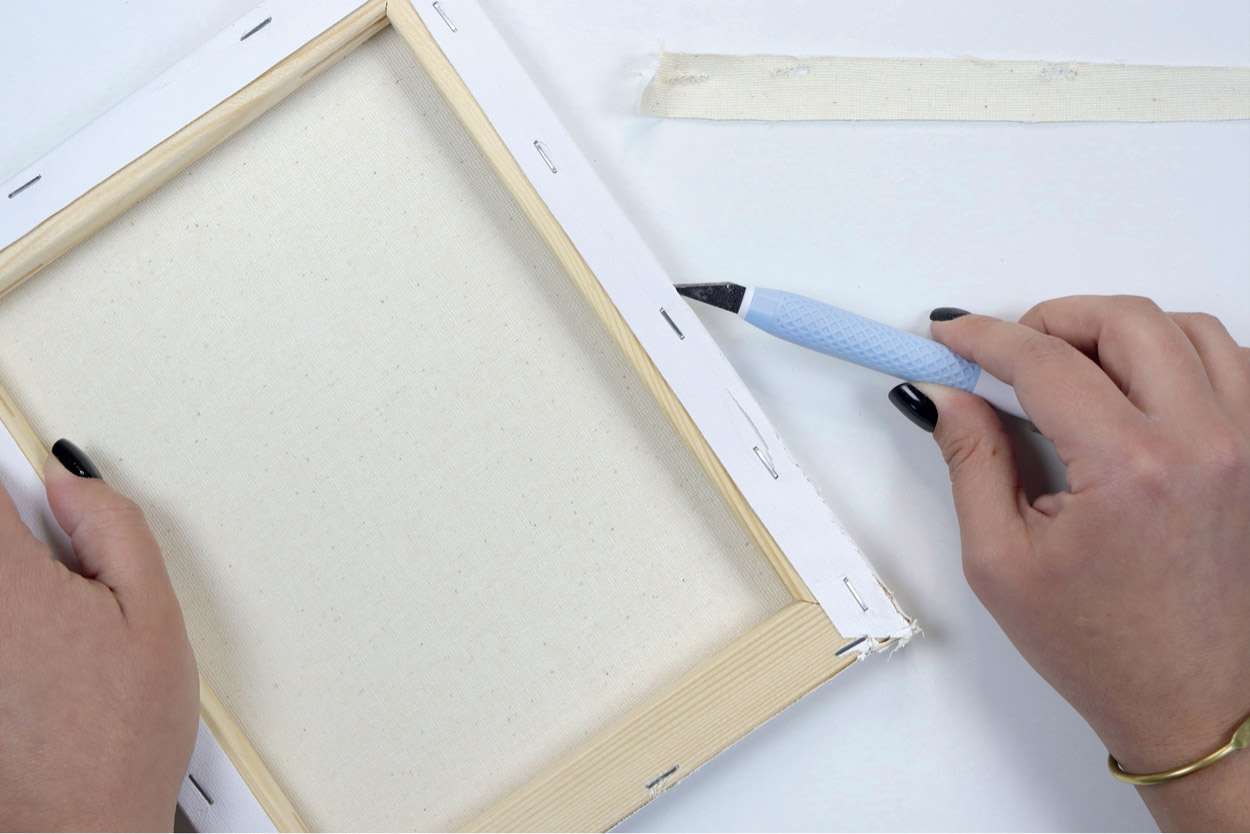
After cutting all around the frame, remove any leftover strips of canvas. You can remove the staples, if you like, but you don’t have to as they’ll be covered in the final steps.

The image here shows the beauty of the frame that was hidden by the canvas. You can paint or stain the frame any color you like and set it aside for now. We’ll work on the canvas for the next few steps.
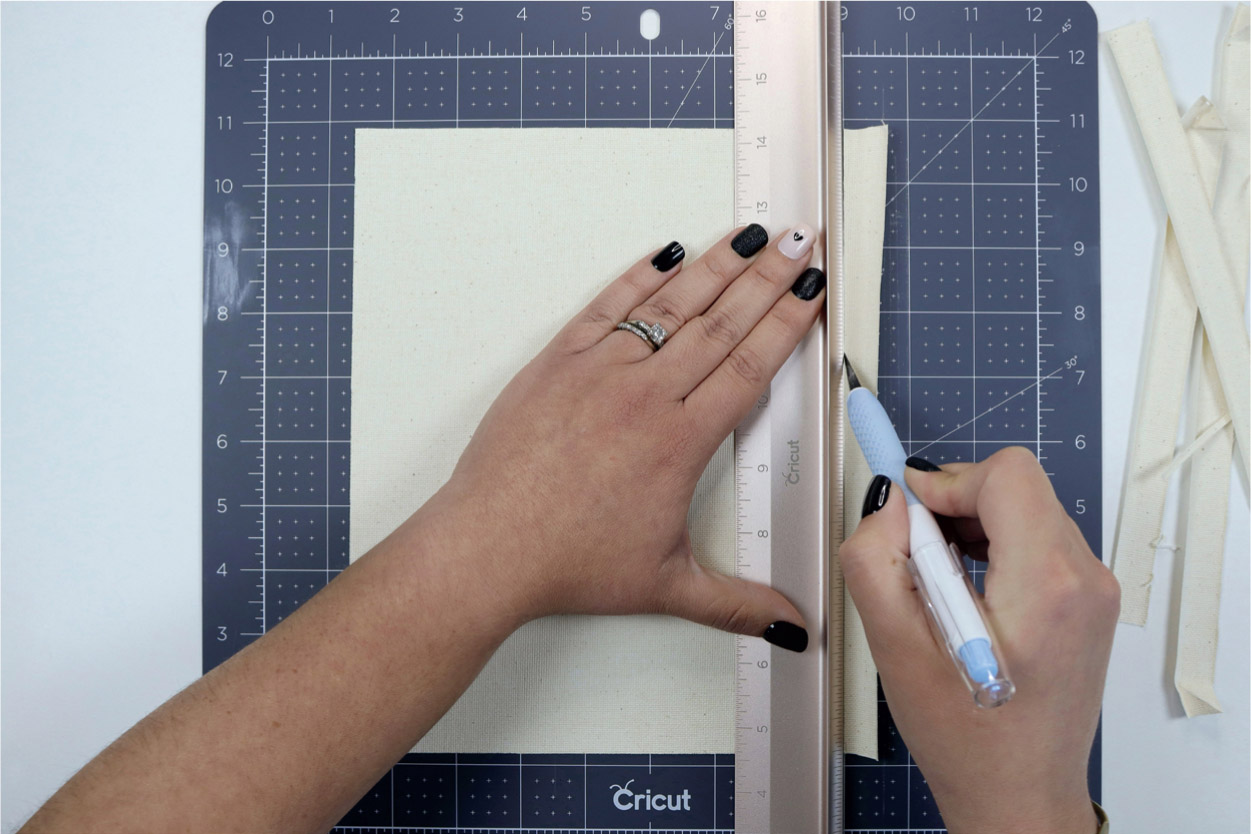
Trimming your canvas can easily be done with a craft knife, scissors, or rotary cutter. Be sure to protect your fingers as you trim. Trim this to roughly the same size as your frame. I like to make mine a little smaller than the frame so the canvas won’t hang over the edges when it is assembled.
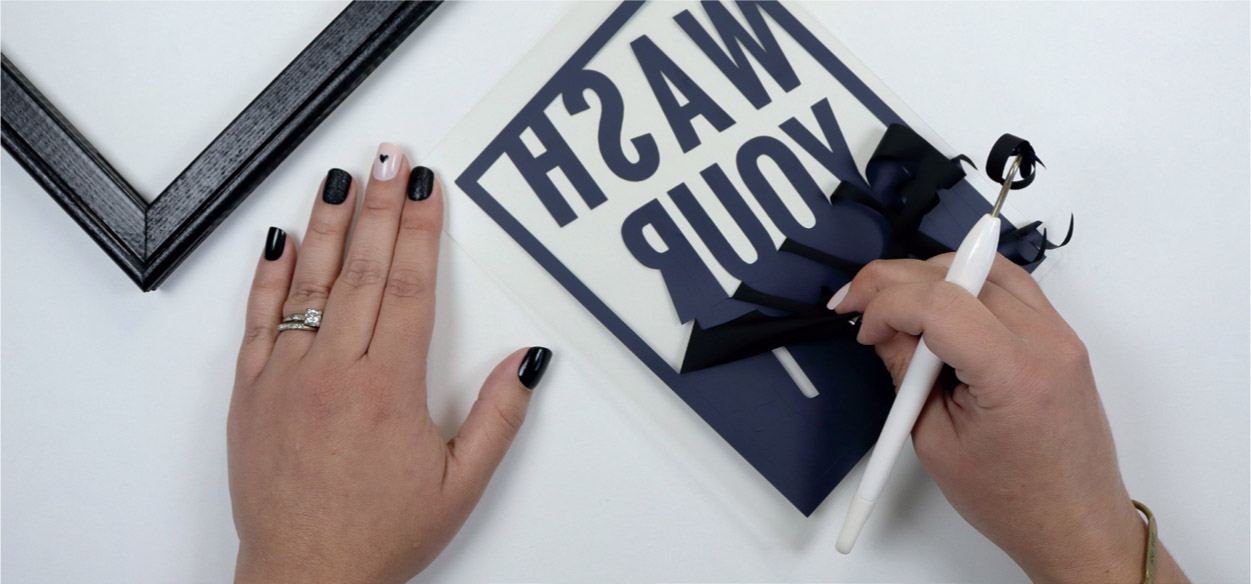
Now that everything is disassembled, painted, and prepped, it’s time to weed your cut iron-on design. I like to start by removing the large pieces and work my way inward, like the photo shows here.

When your weeding is complete, place the design in the middle of your trimmed canvas, as shown here.

For this next step, check the time/temperature settings for your particular material. I set my Cricut EasyPress to 340° for 30 seconds and applied light pressure during this process. Protect your workspace with a towel or heat pressing pillow.
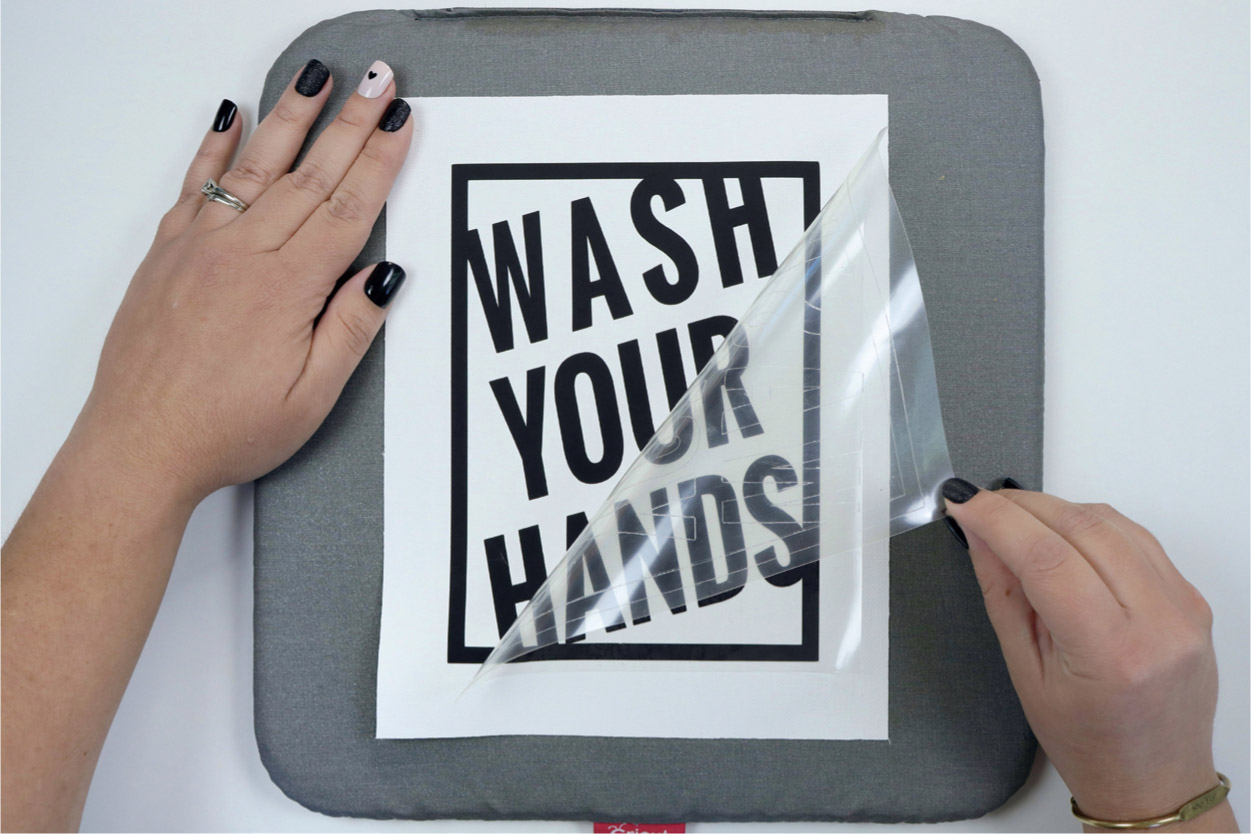
Check if your material is a hot or cool peel and proceed as instructed. Peel off the carrier sheet to reveal your custom canvas.

The final step is assembly. I like to use a glue gun for this step and glue one edge at a time, working around the frame. Remember, you’ll glue the canvas to the back of the frame, as shown here.
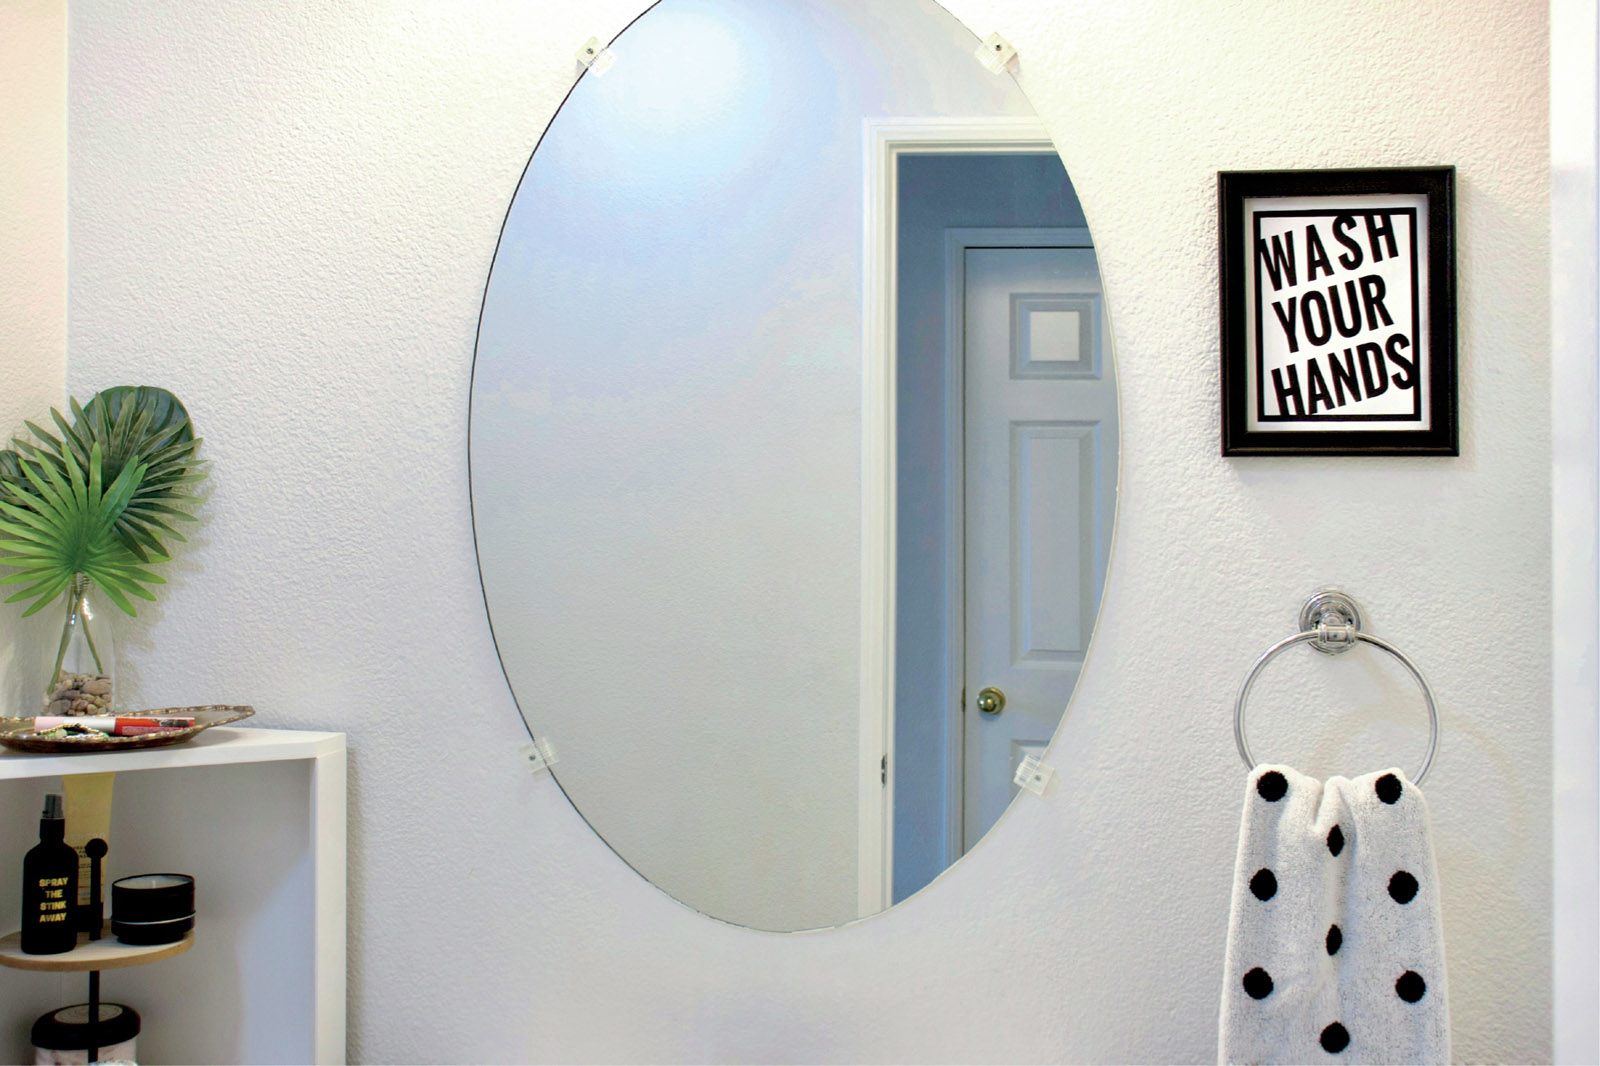
You can attach a bracket to the back of your frame, if you’d like to hang it on a wall, or display your new custom sign however you like.
MAKE IT EXTRA
This technique can be used with many different sizes of frames and can be customized with an endless array of colors and designs of your choosing. Have fun with it! These reverse canvases will look great in any room of your home and they can be lovely gifts with a sweet personalization. A gallery wall with a variety of designs would also make a great accent in any room!
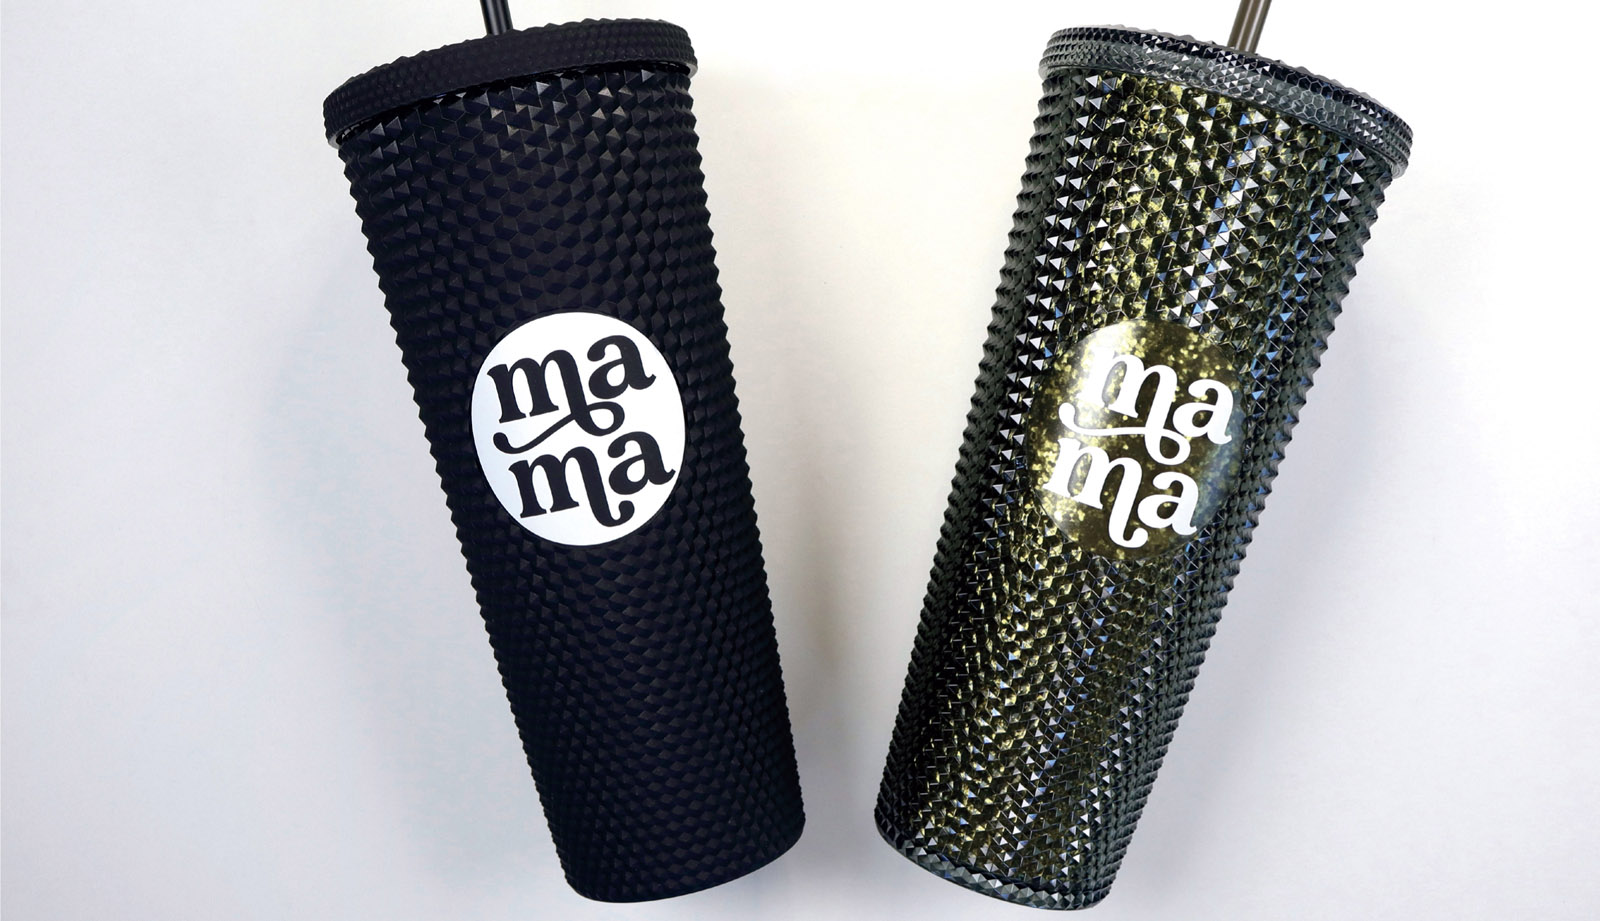
Tumbler Decals
Adhesive vinyl decals can be added to nearly any smooth surface. A little decal can add a lot of cuteness to a set of tumblers, like I’ll be showing you in this project. The key to this project is using both the positive and negative cuts from the vinyl: It’s the ultimate way to stretch your materials and get two projects out of one cut. It’s all in how you set up your project in Design Space. Ready? Let’s do this!
Materials
Adhesive vinyl
Transfer tape
Tumblers (with a smooth surface for your decal)
Weeding tool
Scraper tool
Machine Compatibility
Any Cricut machine
DESIGN IT
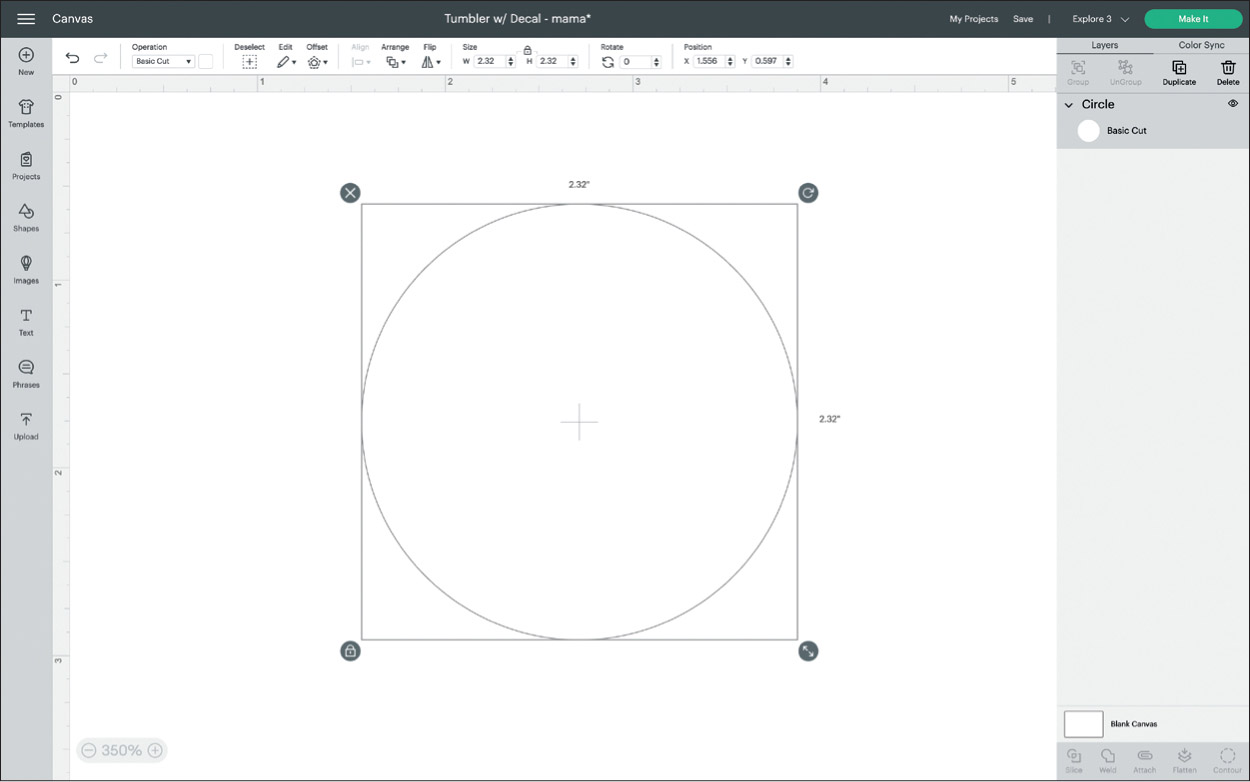
Measure your tumbler to see how much space you have to work with. The tumbler used in this project has a spot specifically for customization. Begin by choosing a shape for your overall decal; this specific tumbler calls for a circle that is sized it to 2.32”, as shown here.

Next, add your text or image inside your shape. I’ve added some text and arranged it inside the circle. Make sure to leave a bit of space between your image and the outer edge of your shape. It’s best to start with simple shapes until you become familiar with this process.
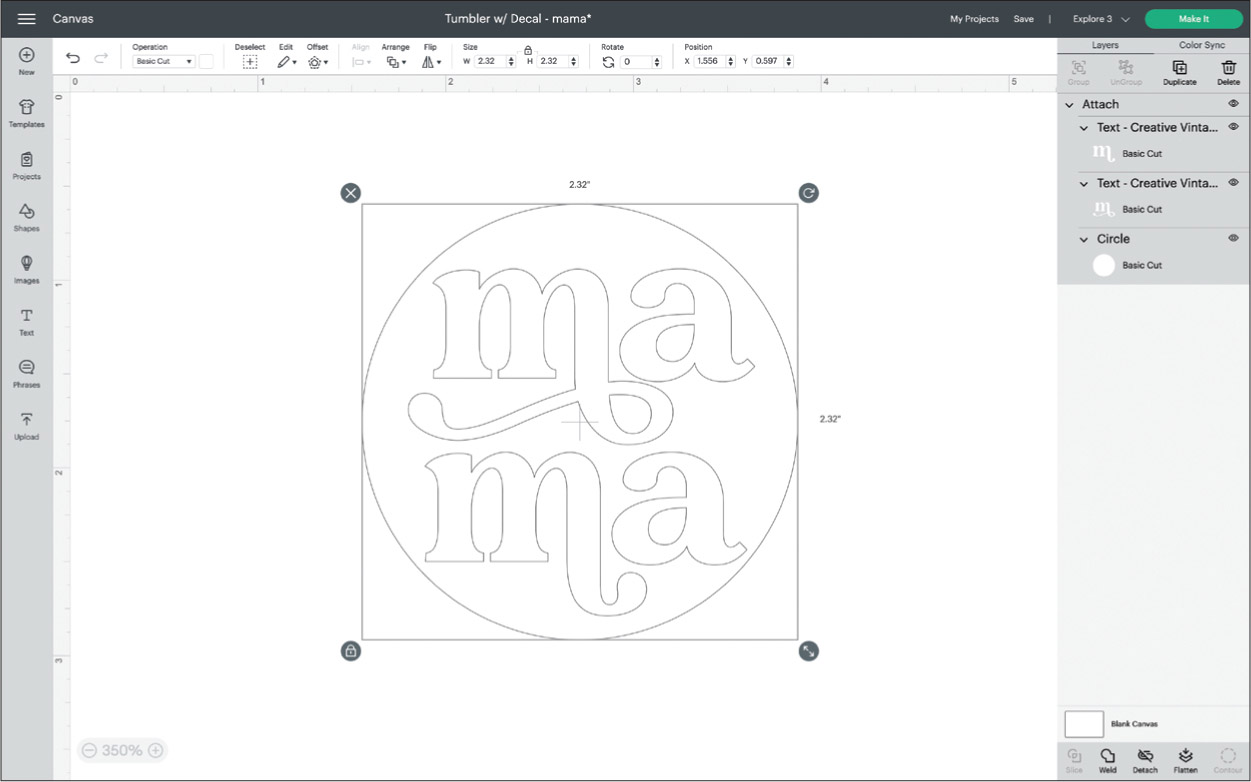
When your image/text is how you’d like it, select all the layers, and click on Attach. Your Cricut will cut your design exactly as it appears on the canvas, in a single layer.
MAKE IT

With these decals, the magic happens during the weeding process. From this single cut, you can utilize both the negative and positive areas. Before applying any vinyl, clean the tumbler’s surface with rubbing alcohol to ensure good adhesion.
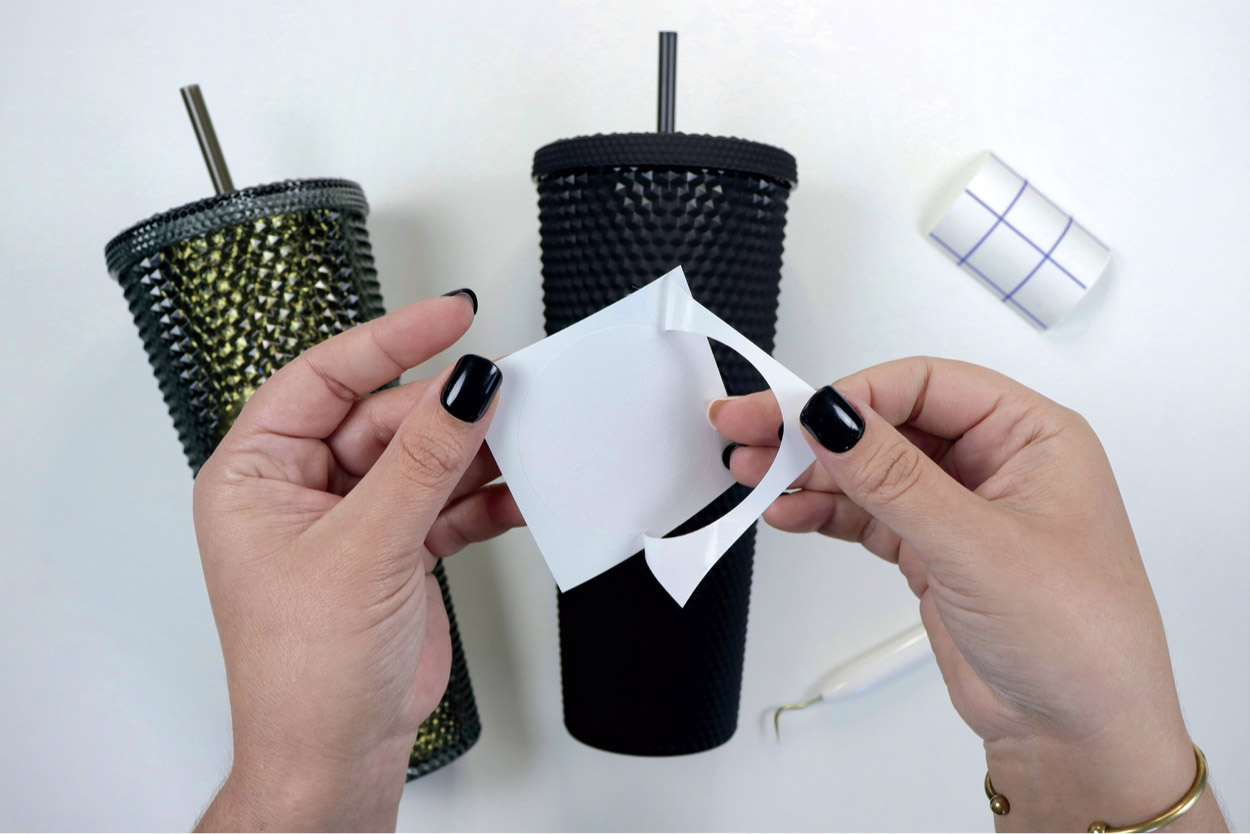
The only part of this cut that won’t be used is the very outer area, so you can weed that part away but leave the rest.

Take a small piece of transfer tape, just a bit larger than your decal and gently lay it on top of your vinyl. Using your scraper tool, remove any air bubbles and make sure your vinyl is smooth and attached securely to your transfer tape.
Gently peel away the transfer tape, but only remove the outer shape. Leave your image/text on the vinyl backing. Take your time and make sure not to rip the vinyl with any details your design may have. You can see in the image here that I only removed part of the vinyl as I lifted away the transfer tape.

Now that you have your isolated design on your transfer tape, place it onto your tumbler how you’d like it. First press the center of the decal down and then apply pressure working from the center to the outer edges, making sure to push out any bubbles that may be trapped.
After all the vinyl has been pressed down, use a scraper tool to make sure your vinyl is well adhered to your tumbler. Go over your decal gently, several times, with the transfer tape still attached.

Slowly pull the transfer tape away from the decal, pulling at an angle. If the vinyl seems to be pulling away with the transfer tape, you can use the scraper tool to ensure the vinyl stays put. Then try to peel again. Take your time until you get the hang of it.

After you’ve removed the transfer tape from your first tumbler, you can use that same transfer tape with the remaining decal that was left on the vinyl backing, as shown here.

Just as you applied the first decal, repeat the process on your second tumbler. Again, start by pressing down on the center of the decal and apply pressure outward. After the vinyl is fully adhered, gently remove the transfer tape at an angle.

Cheers! You now have a matching set of tumblers, one for you and one for a gift. Or keep them both for yourself. No judgment here!
MAKE IT EXTRA
This technique can be used with many different materials, by adding an outer shape you can create two projects from one cut. You can make besties shirts with iron-on material, multiple cards with the same cardstock design, or create more tumblers for you, your friends and family, or even for sale. Remember to peel your vinyl slowly to prevent ripping, and start with simple shapes and fonts until you’re comfortable with more complex designs.
I love to use this technique with patterns like polka dots and polka hearts … that’s a thing, right? But really, have fun and get creative!
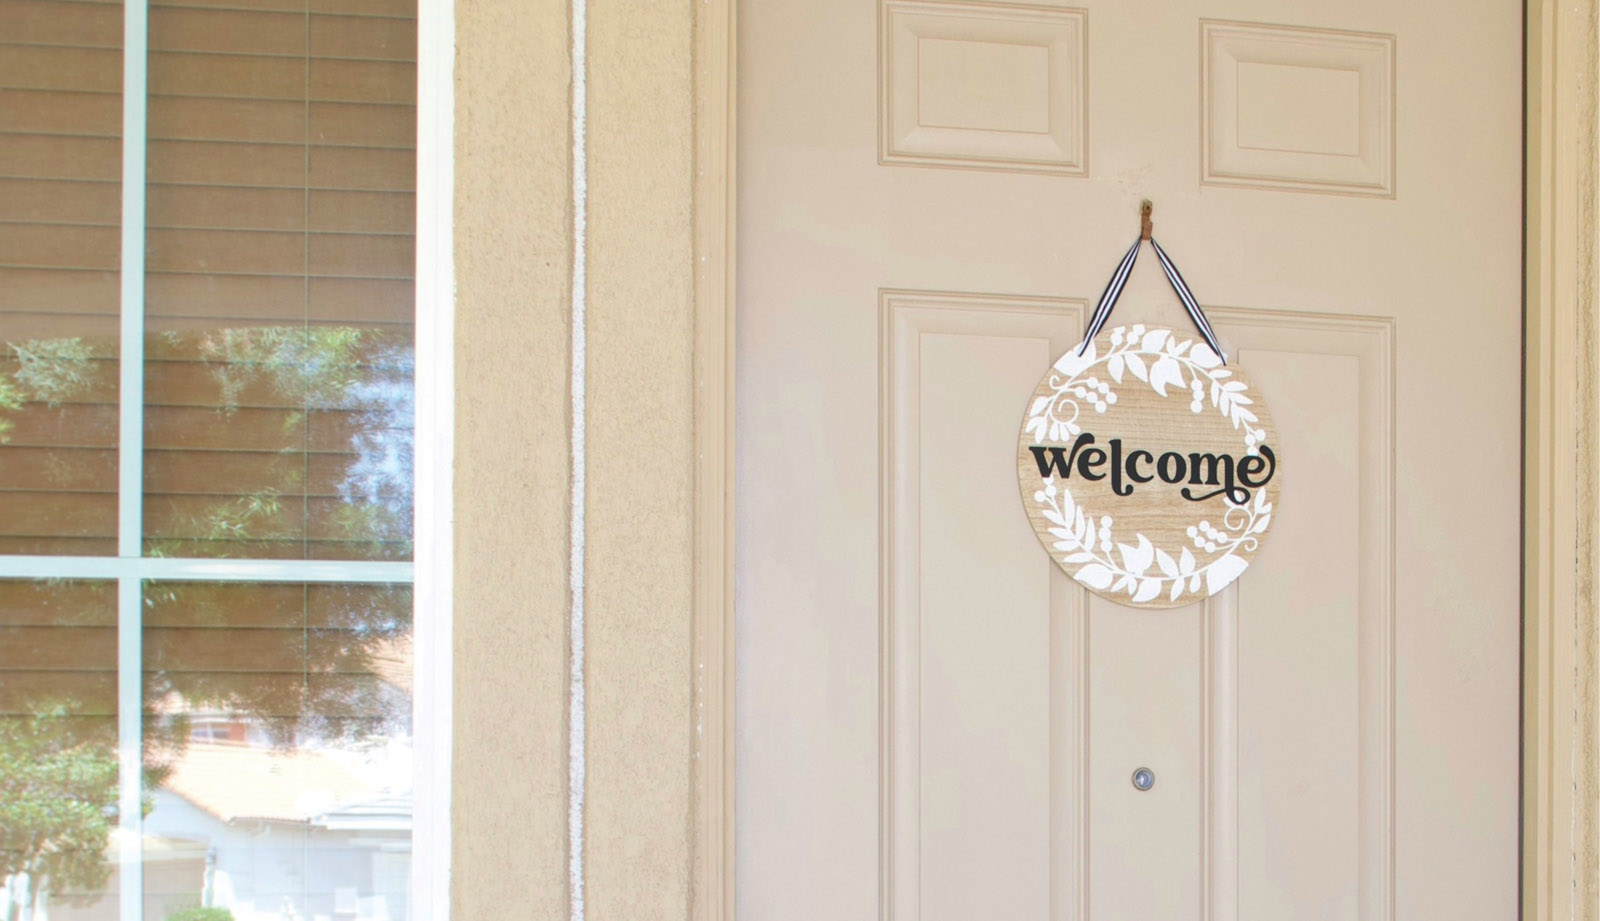
Wooden Sign
Welcome! This is a great sign to hang on your front door. Your sentiment can be as welcoming or as snarky as you like since this project is so easily customizable. We’ll be using stencil material for this project for a rustic painted look, but you could also use adhesive vinyl or iron-on vinyl to create your wooden sign.
Materials Needed
Stencil film/material (stencil film or removable vinyl)
Weeding tool
Blank wooden sign
Transfer tape/paper
Scraper tool/ squeegee
Painter’s tape (optional)
Paint
Foam/paintbrush
Machine Compatibility
Explore or Maker series
Image Used
Botanical Wreath #M1803E971
DESIGN IT

Before you start designing, measure your wood piece and then bring in a shape with the proper dimensions onto your Design Space canvas. First select your shape layer, and then on the Edit Bar in the Operation drop-down menu (where you find the Cut > Basic option), select Guide. This option will help you size your elements, but your machine will not cut this layer; it only serves as a template. My circle template is 11.75”, as shown here.

Next, add some images and a bit of text. I went with a simple “welcome” and added a bit of fun with the glyphs of the letters. Size these new elements to fit inside your template from the previous step.
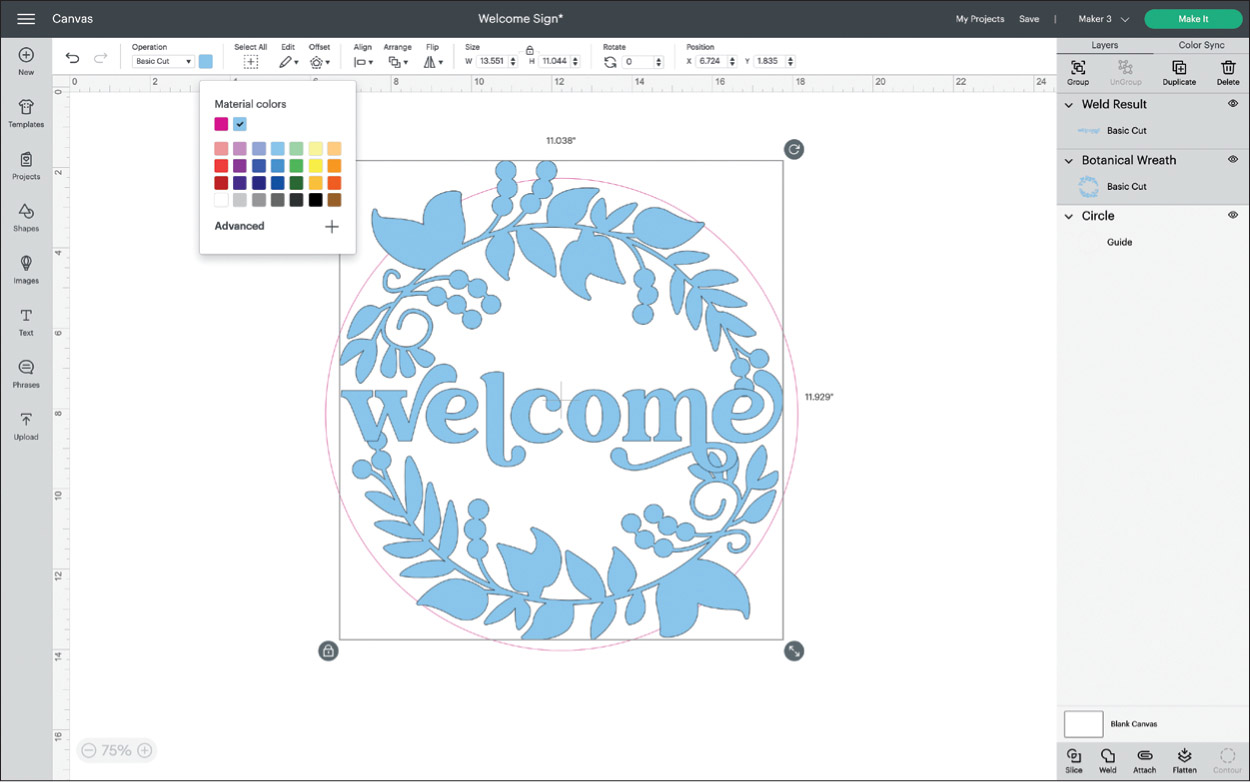
If you’ll be using Stencil Film, it makes it easy if you change your elements to the same color, this will communicate to your Cricut that these elements will be cut from the same material.
After your design and/or text is finalized, click on the green Make It button.
MAKE IT
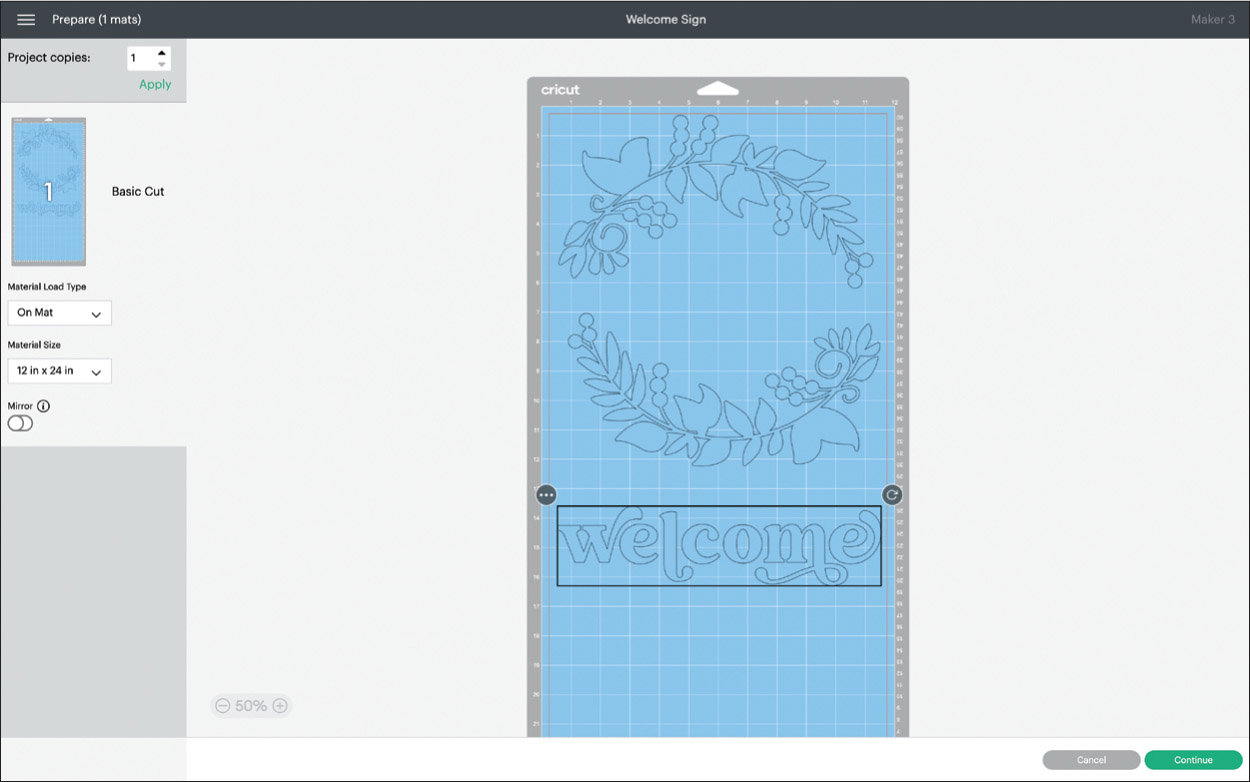
On the Make It screen you’ll want to create some space between your images. Your images should have a border of at least 1” so you have some room to work when painting. The less space you leave, the more careful you’ll have to be when applying your paint. Simply select an image and drag it down a bit (it’s also helpful if you center it, which makes the assembly process easier).

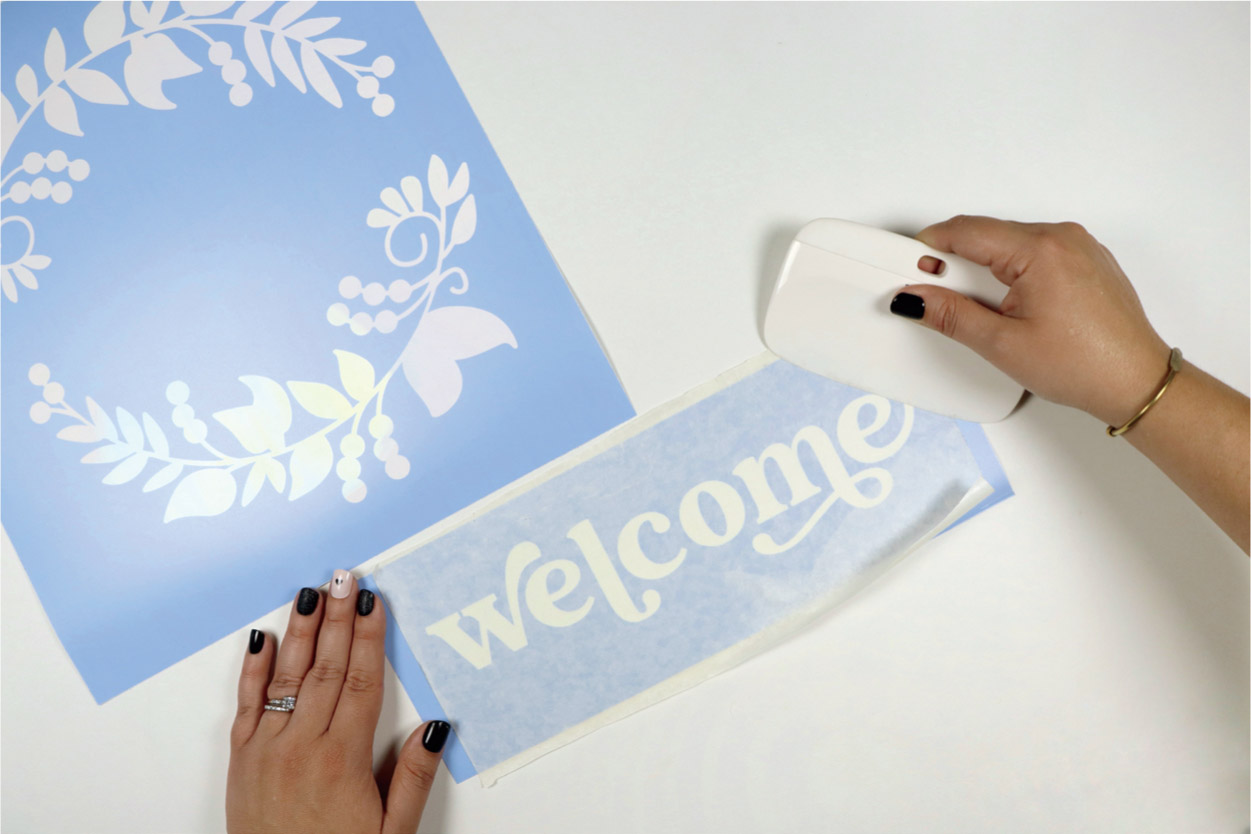
Once your material has been cut, weed your design. For this particular project, weed away any areas where you want to add paint. See the image here, which shows where to weed.
After you’ve completed weeding all your elements, cover your image with transfer tape. Make sure to eliminate any air bubbles by using a scraper tool/squeegee.
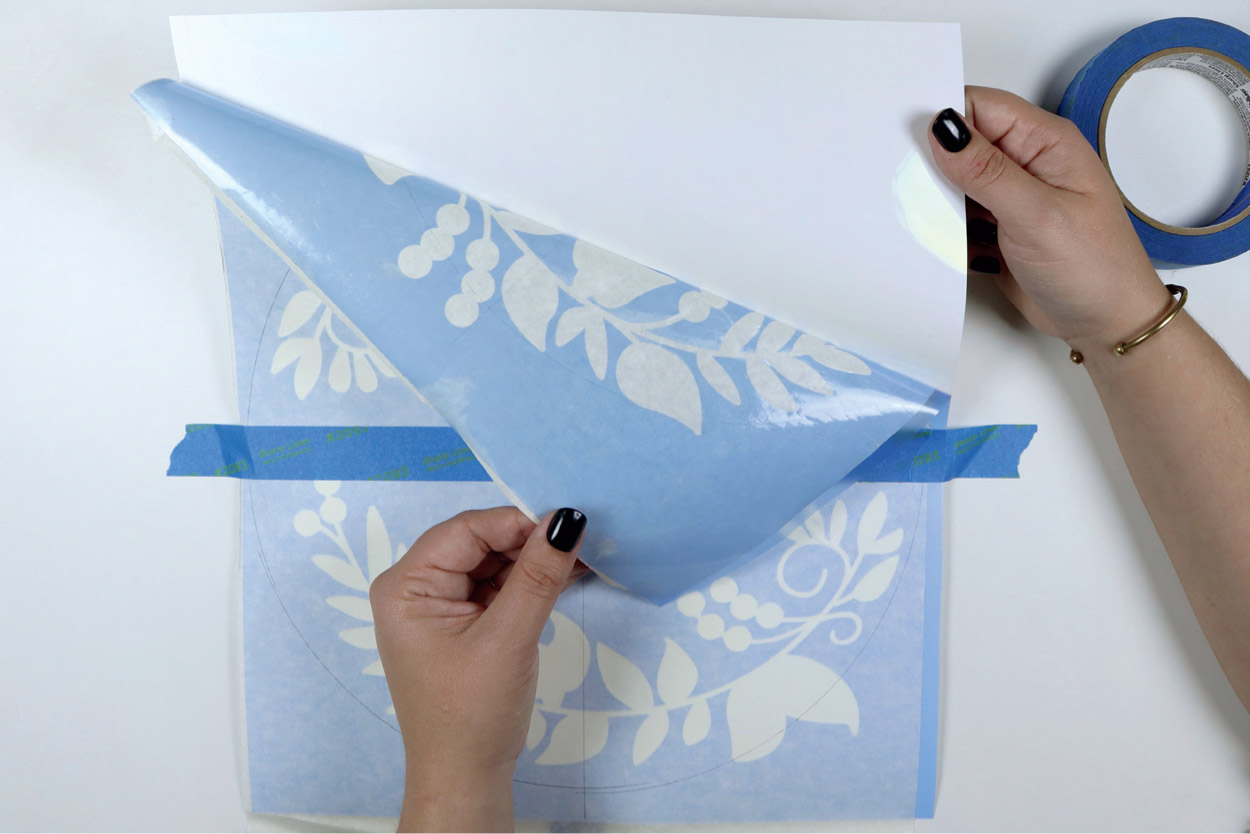
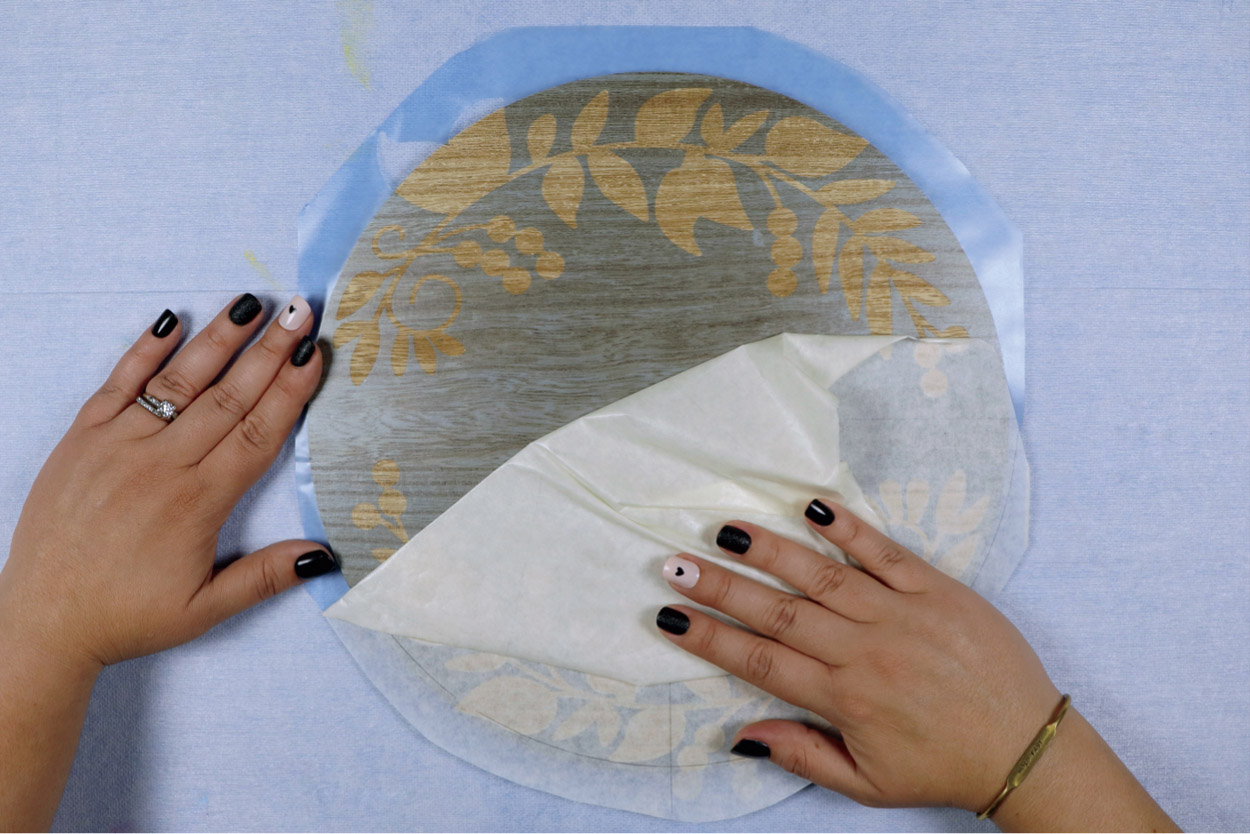
Once you’ve got your stencil pieces covered in transfer tape, apply the background design (in this case the floral wreath) to the wood round first, using what is called the hinge method. This is a great way to apply a medium- or large-sized decal or stencil. Begin by placing your stencil over your wood surface where you want it to be. Then take a piece of painter’s tape and place it across the middle of your stencil and extend the tape on either side of the wood so it will stick to your worktable and keep your stencil in position, as shown in the image here. Being sure not to move your wood, peel back your stencil only as far as the painter’s tape hinge.

Now that half of your stencil is exposed and pulled over the hinge, use your scissors and cut off the backing from that half of your stencil material.
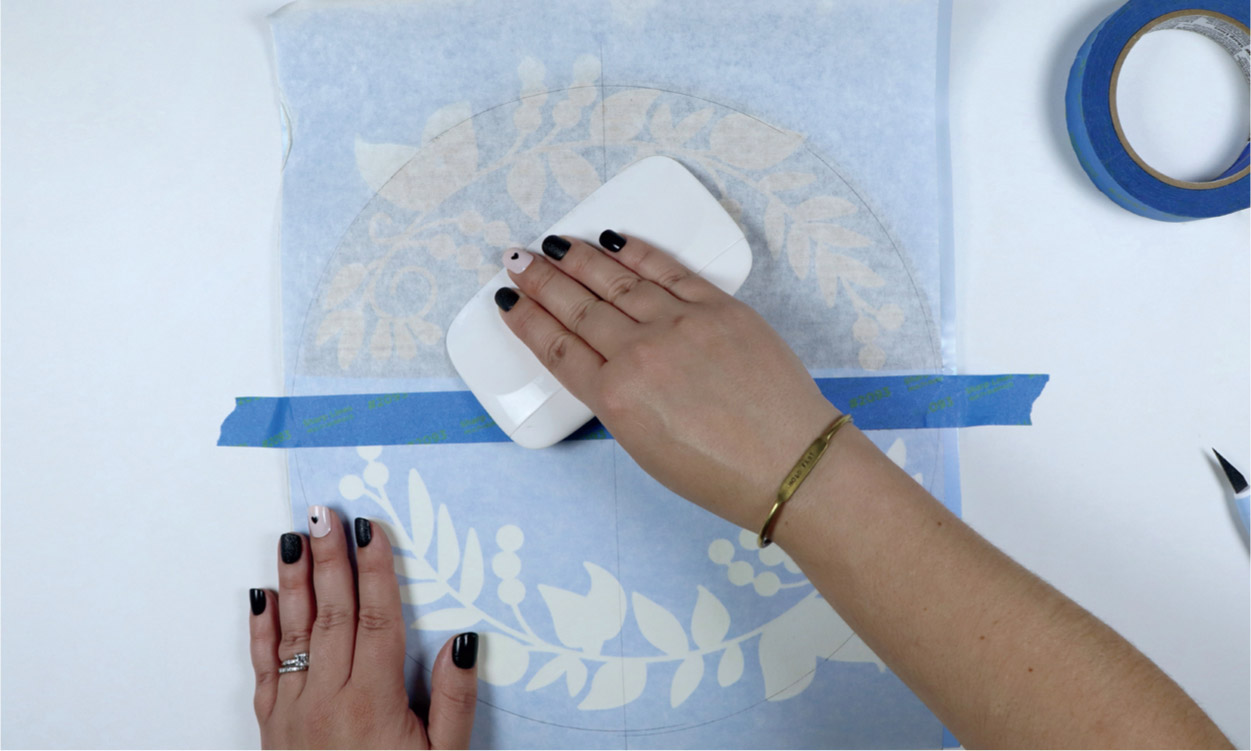
Place the stencil onto the wood and use the scraper tool/squeegee to make sure there are no air bubbles under your stencil.

Repeat the same steps on the other half of your stencil: Lift your stencil up to the hinge; remove the stencil material backing; lay your stencil down and remove all the air bubbles using your scraper tool/squeegee.
When all the air bubbles have been smoothed out, peel away the transfer tape. Make sure you don’t lift or rip any pieces of your stencil material. Slow and steady wins the race. It is also helpful to pull back the transfer tape at a low angle.
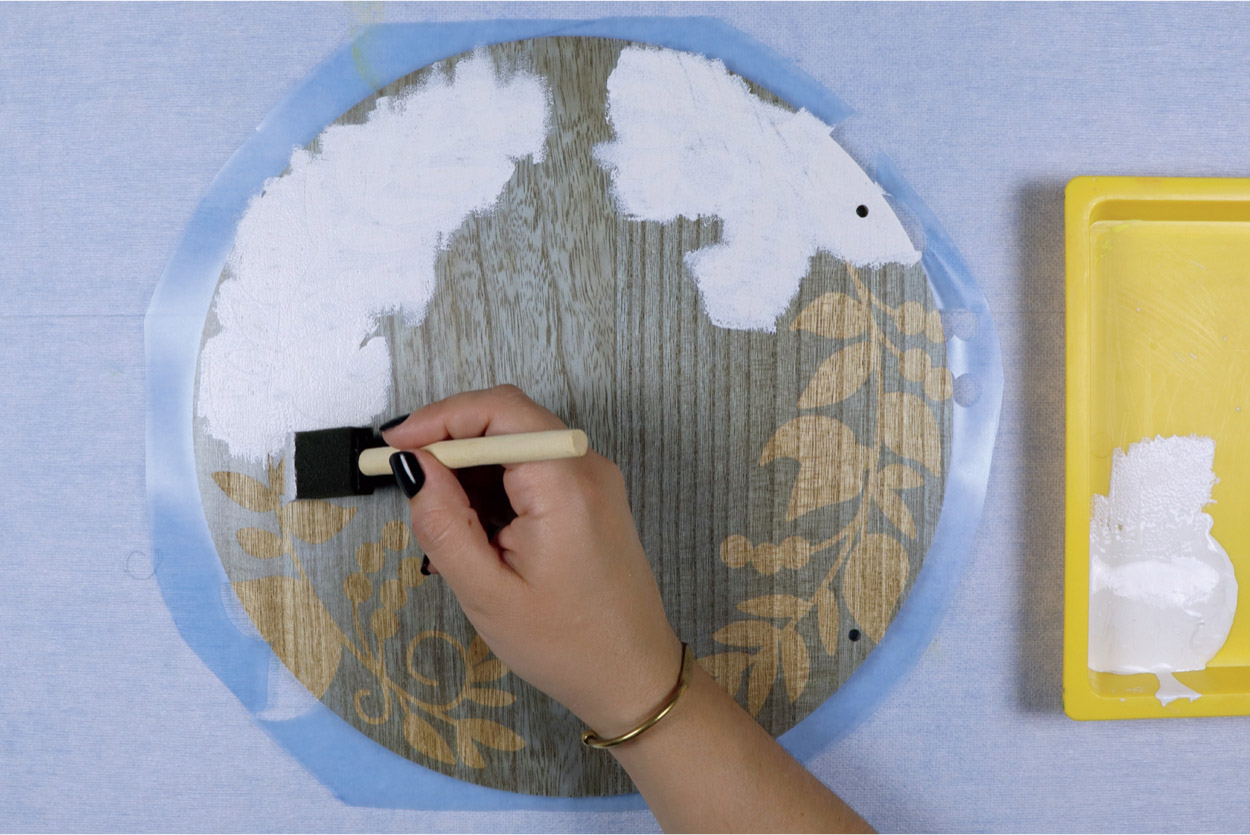
Now that your stencil is in place and the transfer tape has been removed, it’s time to apply your paint. You can use various types of paint on your stencils; just make sure it has a medium-thick consistency because thin paint tends to bleed under the stencil. Also, apply a small bit of paint to your brush at a time; you don’t want to get too much paint in one spot as that can also bleed under your stencil.
When you’ve allowed your paint to set for a few minutes, you can peel away the transfer tape. Some say to wait until the paint is fully dry, but you don’t have to. I find that when the paint is too dry, it can pull away with the stencil.
Allow the first layer of paint to fully dry before moving on to the next steps.

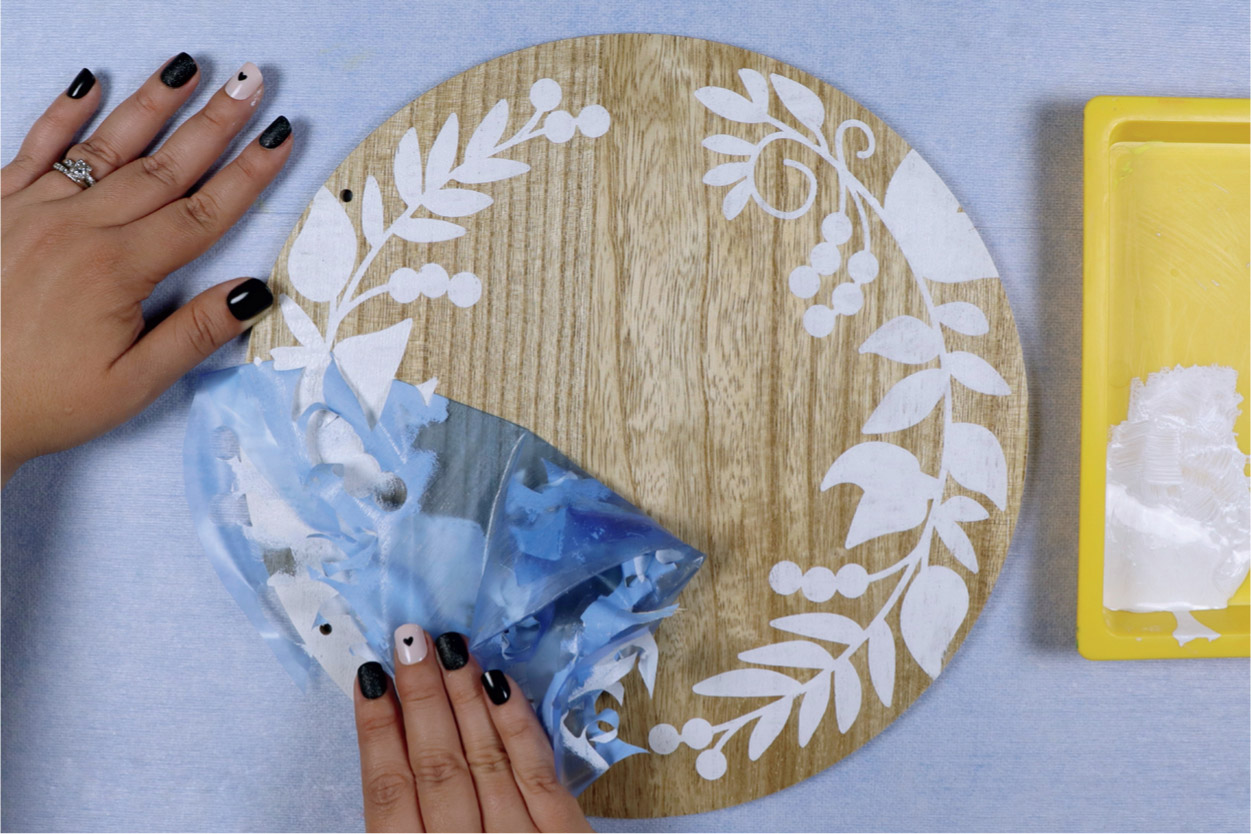
To apply the next layer, use the hinge method again. Center your stencil and then place a piece of painter’s tape down the middle of your stencil. Peel back half of your stencil and cut away the stencil material backing. Apply that half onto the wood and smooth out any air bubbles. Then repeat these steps for the other half of your design and then remove the transfer tape.
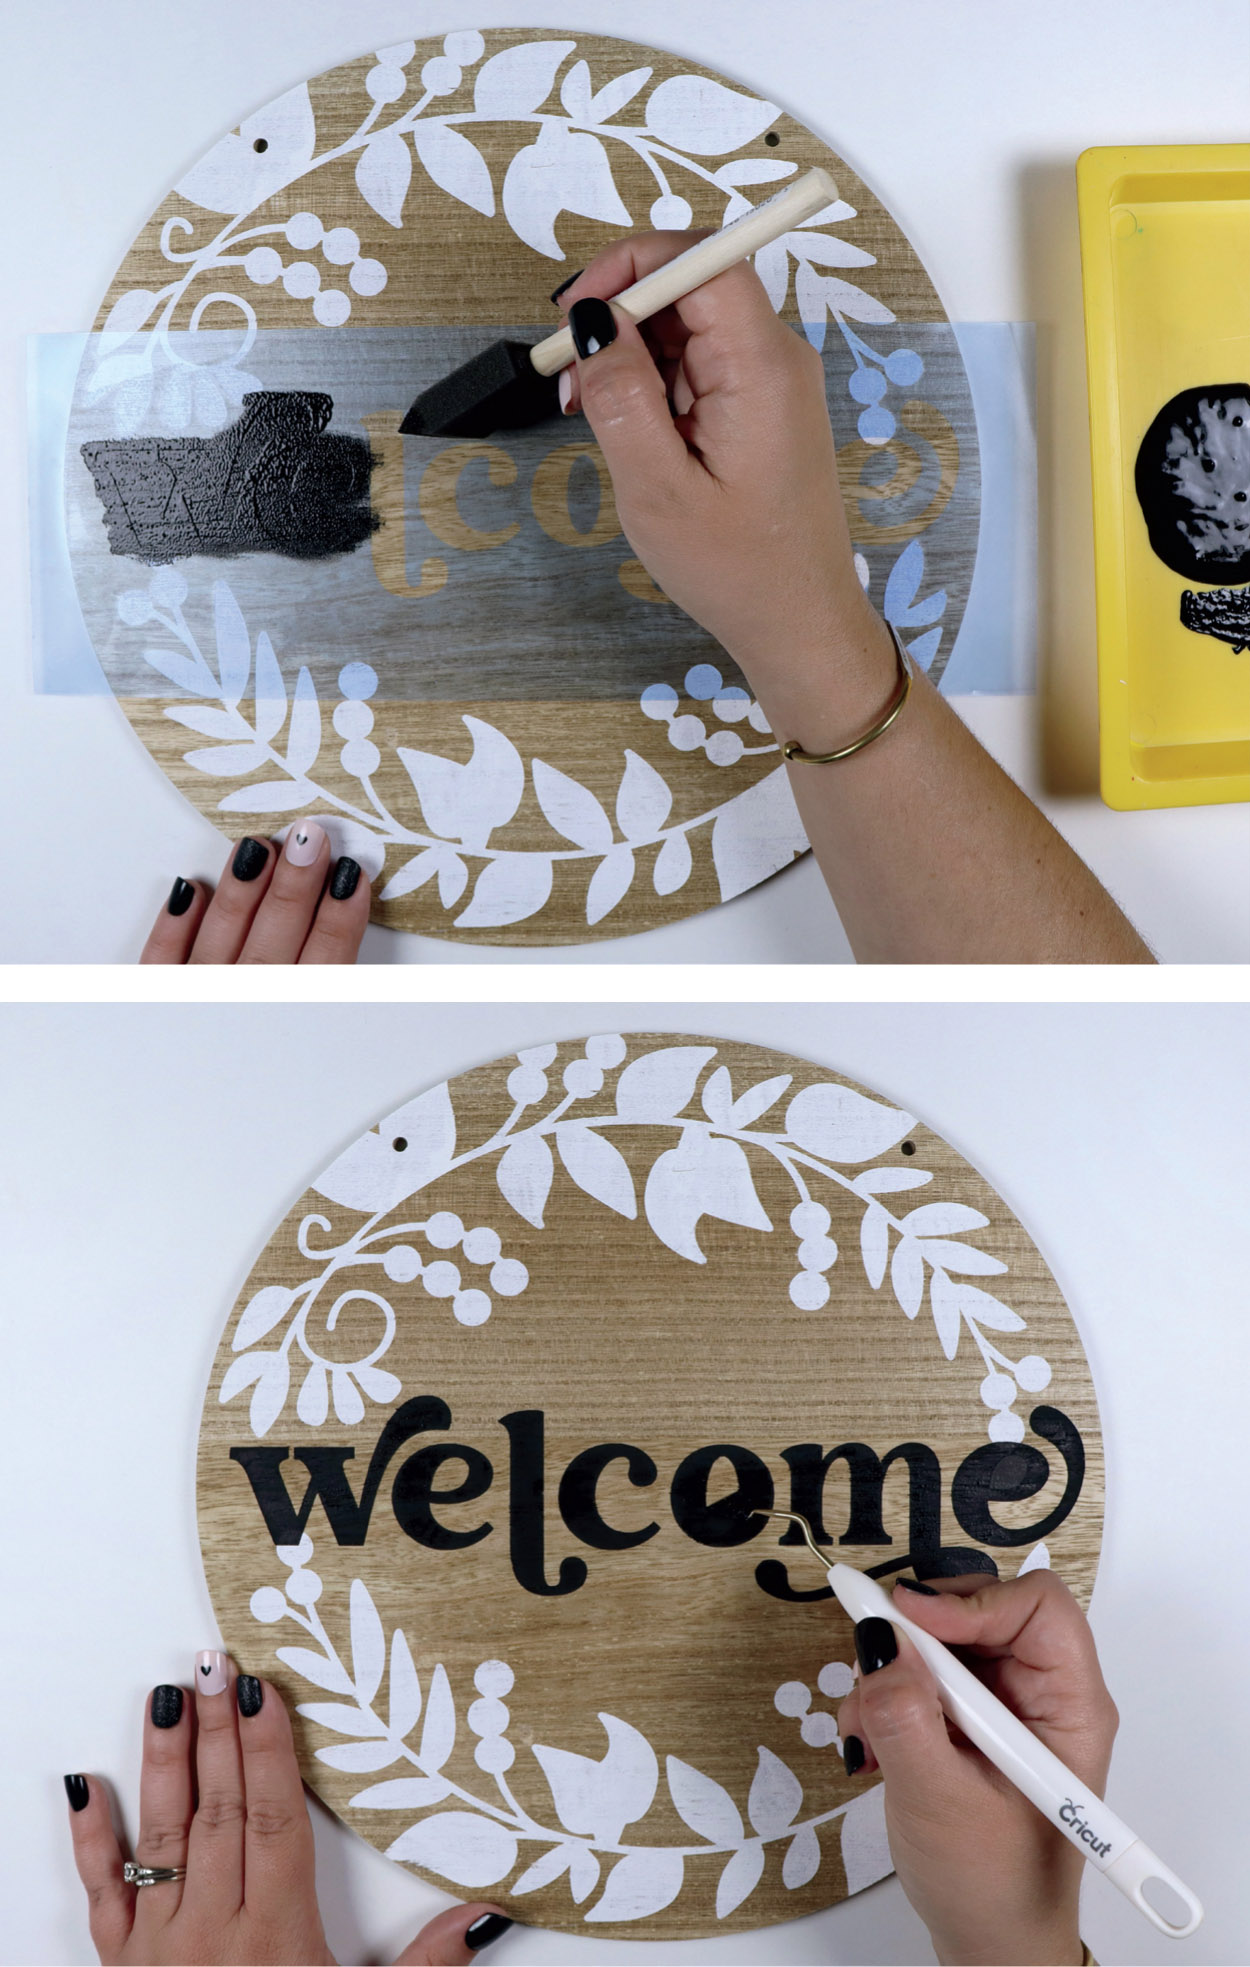
Again, apply the paint with a dabbing motion and when the paint has set for a few minutes, peel back the stencil. Make sure you don’t get any paint from the stencil on your project, especially when weeding out the middles of your text/design.
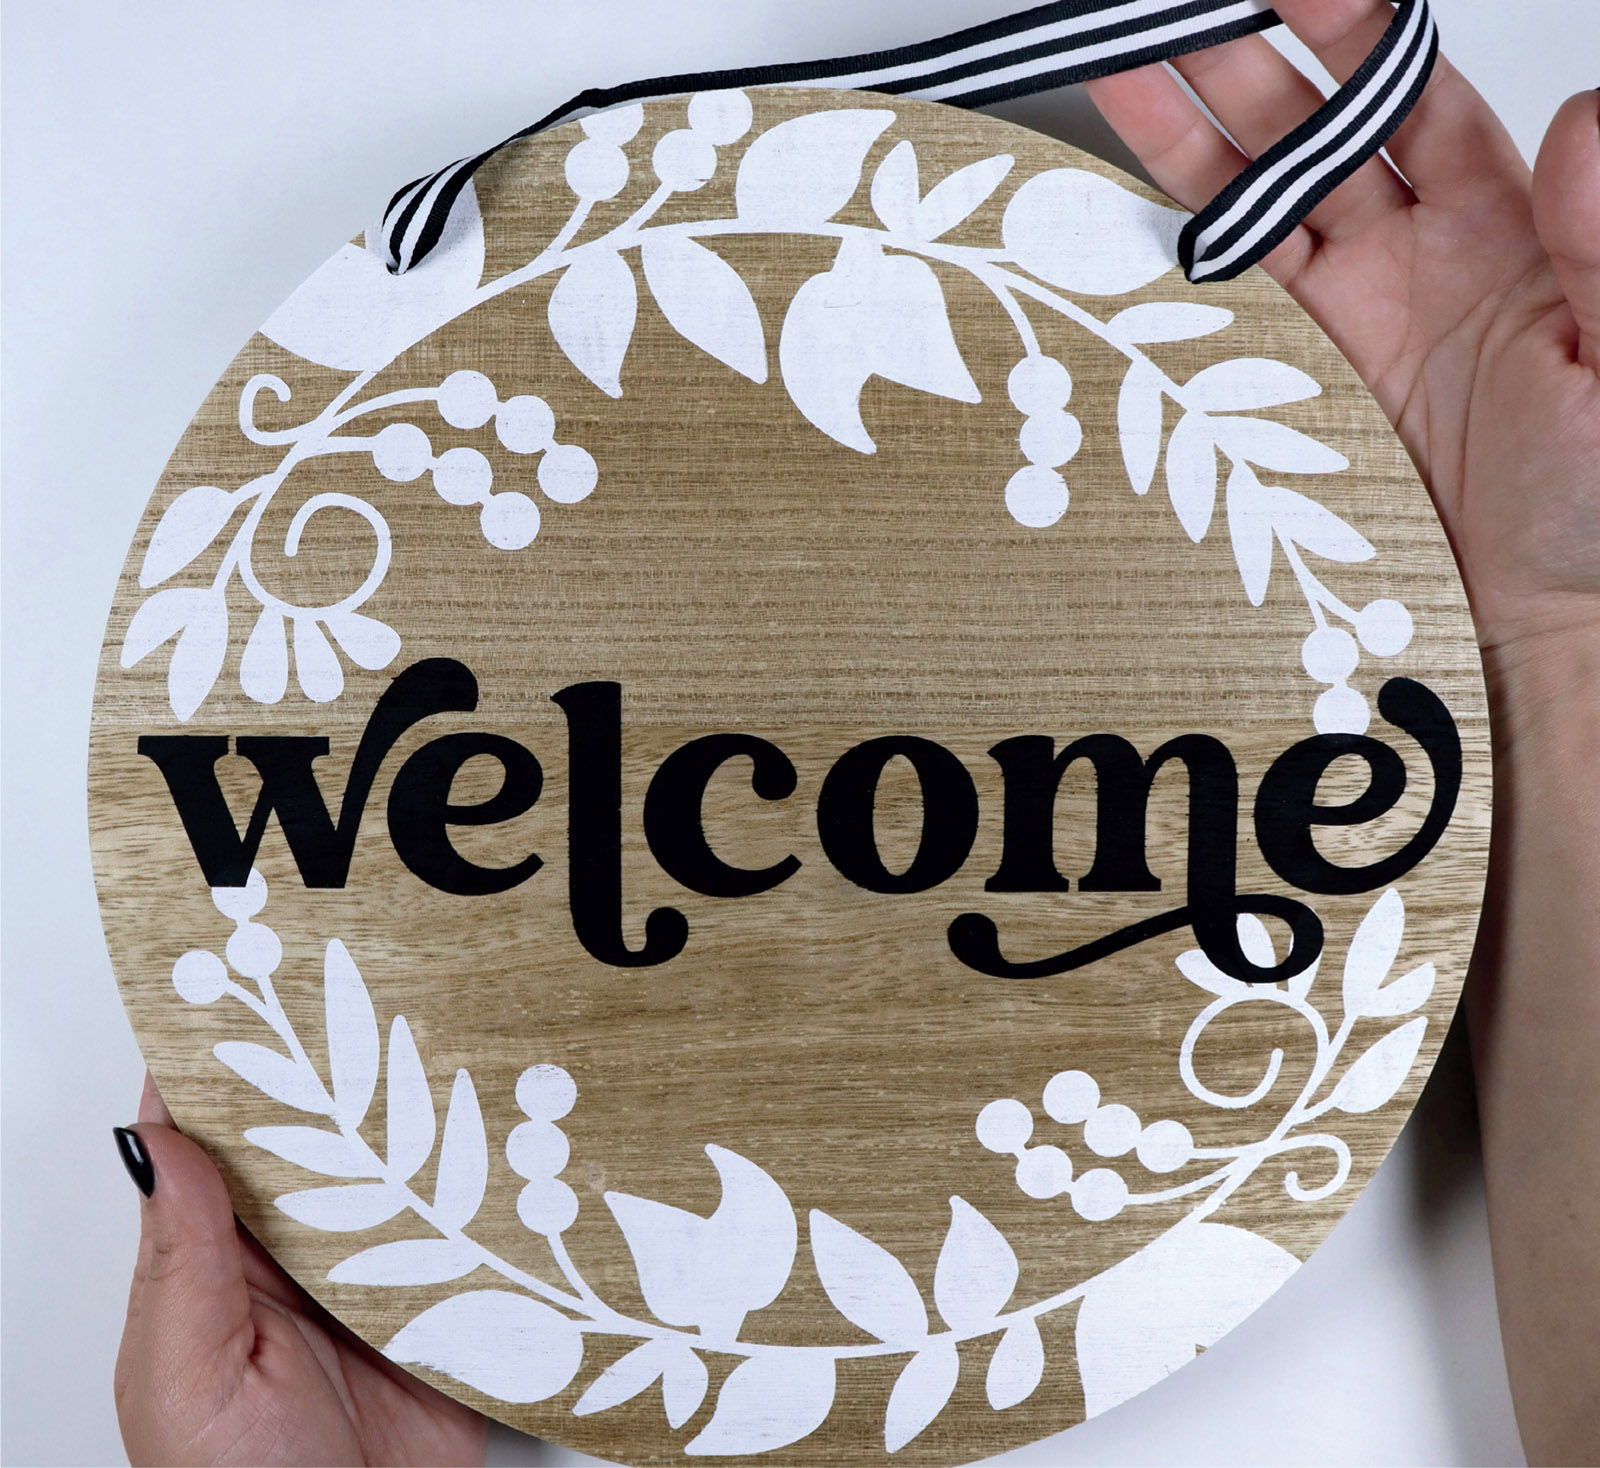
The final step is applying whatever material you’d like to use for hanging your wood sign. Ribbon, wire, leather, or jute are great options.
MAKE IT EXTRA
Adding faux flowers, leaves, or stems to your stenciled sign is a great way to make it even more extra. You can even add bows, ribbons, or festive elements to really make your sign pop with personality!
