
5
Constructing Python – Classes and Methods
Overview
By the end of this chapter, you will be able to use and distinguish between class and instance attributes, use instance methods to perform calculations based on the instance attributes of an object, use static methods to write small utility functions to refactor code in a class to avoid repetition, use property setters to handle the assignment of values to computed properties and perform validation, and create classes that inherit methods and attributes from other classes.
Introduction
In Chapter 4, Extending Python, Files, Errors, and Graphs, you began to move beyond the basic and fundamental into writing defensive code and anticipating potential issues. In this chapter, you will be introduced to one of the cornerstones of object-oriented programming (OOP) – classes. Classes contain the definition of the objects we work with. All objects you work within OOP are defined by a class, either in your code or in a Python library. So far in this book, we have been using this method, but we have not discussed how to extend and customize the behavior of objects. In this chapter, you will start with objects you are familiar with and build on these by introducing the concept of classes.
Perhaps you have been working with a string object in Python. What exactly is a string? What sort of things can you do with strings? Are there things you’d like to be able to do with strings that Python’s string object doesn’t allow? Can you customize the behavior of this object somehow? This chapter will answer these questions by exploring classes. Writing classes will unlock a world of possibilities, in which you’ll be able to elegantly modify and combine code from external sources to fit your requirements.
For example, say you find a third-party library for managing calendars that you want to incorporate into your organization’s internal application. You will want to inherit classes from the library and override methods/properties in order to use the code as per your particular context. So, you can see how methods can come in handy.
Your code will become increasingly intuitive and readable, and your logic will be more elegantly encapsulated according to the Don't Repeat Yourself (DRY) principle, which will be explained later in the chapter.
We will be covering the following topics:
- Classes and objects
- Defining classes
- The __init__ method
- Methods
- Properties
- Inheritance
Technical requirements
You can find the code files used in this chapter on GitHub at https://github.com/PacktPublishing/The-Python-Workshop-Second-Edition/tree/main/Chapter05.
Classes and objects
Classes are fundamental to OOP languages such as Python. A class is simply a template for creating objects. Classes define an object’s various properties and specify the things you can do with that object. So far in this book, you have been relying on classes defined in the Python standard library or built into the Python programming language itself. For example, in Exercise 38 – finding the system date of Chapter 3, Executing Python – Programs, Algorithms, and Functions, you used the datetime class to retrieve the current date. You will start off by exploring some more of the classes you’ve already been using. This can be performed in a Python shell or Jupyter notebook.
Create a new integer object called x in a Python console:
>>> x = 10
>>> x
10
You can see the class that x was created from by calling the type function:
>>> type(x)
<class 'int'>
The integer class doesn’t just let you store a single number – the x object has other properties, too:
>>> x.bit_length()You will get the following output:
4
This method computes the number of binary digits needed to represent x as a binary number (1010).
As you learned in Chapter 3, Executing Python – Programs, Algorithms, and Functions, you can also view the docstring to read about this object and its class:
>>> print(x.__doc__)
int([x]) -> integer
int(x, base=10) -> integer
Convert a number or string to an integer, or return 0 if no arguments are given. If x is a number, return x.__int__(). For floating point numbers, this truncates toward zero.
So, you can see that even the simplest objects in Python, such as strings, have many interesting properties and methods that can be used to retrieve information about the object or perform some computation with the object. When you reach a point in your programming where you want to customize the behavior of these methods, or perhaps create a new type of object entirely, you will need to start writing your own classes. For example, perhaps instead of a string object, you want a name object that has a string as its main property and also contains methods that allow you to translate the name into other languages.
Exercise 71 – exploring strings
Many of our examples and exercises so far have involved strings. In this exercise, you will go beyond the text that a string object can store and look at the other properties and methods available in this class.
The aim of the exercise is to demonstrate that the string objects you are already familiar with have many other methods and properties that you might not have been aware of. This exercise can be performed in a Jupyter notebook:
- Define a new string:
my_str = 'hello World!'
- Check what class our object has:
type(my_str)
You will get the following output:
str
- View the docstring of the str class:
print(my_str.__doc__)
You will get the following output:

Figure 5.1 – The docstring of the str class
- View the full list of properties and methods of my_str:
my_str.__dir__()
The output will be as follows:

Figure 5.2 – A complete list of the properties and methods of my_str
Note
The output in the preceding figure is truncated.
You will get the following output:
'Hello world!'
Now, let’s get the output in uppercase:
my_str.upper()Now the output will be as follows:
'HELLO WORLD!'
Now, let’s get the output in lowercase without any spacing:
my_str.replace(' ', '')The output changes to this:
'helloWorld!'
In this exercise, you explored the various properties of a string object in Python. The purpose here was to illustrate that you are already working with objects that don’t just represent simple data types but have more complex definitions. We will now turn to creating templates to build our own custom objects using classes.
Defining classes
Built-in classes and classes imported from Python packages are sometimes sufficient for our requirements. However, often you want to invent a new type of object because there isn’t an object in the standard libraries that has the properties/methods that you require. Remember that a class is like a template for creating a new object.
For example, create a new class called Australian:
class Australian:
    is_human = True
    enjoys_sport = True
You now have a new template for creating Australian objects (or people, if you prefer). Our code assumes that all new Australians will be human and enjoy sport.
You will firstly create a new object of Australian:
john = Australian()Check the class of our Australian:
>>> type(john)
<class '__main__.Australian'>
You will also view some of John’s attributes:
>>> john.is_human
True
>>> john.enjoys_sport
True
The is_human and enjoys_sport attributes are called class attributes. Class attributes do not change between objects of the same class. For example, let’s create another Australian:
>>> ming = Australian()Ming is also human and enjoys sport. We will soon learn about instance attributes, which can vary between objects created by a class.
Exercise 72 – creating a Pet class
The aim of this exercise is to create our first class. You will create a new class called Pet, with class attributes and a docstring. You will also create instances of this class:
- Define a Pet class with two class attributes and a docstring:
class Pet:
"""
A class to capture useful information regarding my pets, just in case
I lose track of them.
"""
is_human = False
owner = 'Michael Smith'
- Create an instance of this class:
chubbles = Pet()
- Check the is_human property of our new pet, chubbles:
chubbles.is_human
You will get the following output:
False
- Check the owner:
chubbles.owner
print(chubbles.__doc__)

Figure 5.3 – Output showing that Chubbles is owned by Michael Smith and output of a class to capture useful information
In this exercise, we created our first class and examined the properties of an object created with this new class.
The __init__ method
In Exercise 72 – creating a Pet class, you used the Pet class to create a Pet object called chubbles in the following manner:
chubbles = Pet()Here, you’ll explore more about what happens when you create objects from a class in this manner.
Python has a special method called __init__, which is called when you initialize an object from one of our class templates. For example, building on the previous exercise, suppose you wanted to specify the height of a pet. You would add an __init__ method as follows:
class Pet:
    """
    A class to capture useful information regarding my pets, just in case
    I lose track of them.
    """
    def __init__(self, height):
        self.height = height

    is_human = False
    owner = 'Michael Smith'
The init method takes the height value and assigns it as an attribute of our new object. You can test this as follows:
chubbles = Pet(height=5)
chubbles.height
This will give us the following output:
out: 5
Exercise 73 – creating a Circle class
The aim of this exercise is to use the init method. You will create a new class called Circle with an init method that allows us to specify the radius and color of a new Circle object. You then use this class to create two circles:
- Create a Circle class with a class attribute called is_shape:
class Circle:
is_shape = True
- Add an init method to our class, allowing us to specify the radius and color of the specific circle:
class Circle:
is_shape = True
def __init__(self, radius, color):
self.radius = radius
self.color = color
- Initialize two new Circle objects with different radii and colors:
first_circle = Circle(2, 'blue')
second_circle = Circle(3, 'red')
Let’s have a look at some of the attributes of the Circle objects:

Figure 5.4 – Checking the attributes of our circles
In this exercise, you learned how to use the init method to set instance attributes.
Note
Any Circle objects created from our Circle class will always have is_shape = True but may have different radii and colors. This is because is_shape is a class attribute defined outside of the init method, and radius and color are instance attributes set in the init method.
Keyword arguments
As we learned in Chapter 3, Executing Python – Programs, Algorithms, and Functions, in the Basic functions section, there are two types of arguments that can go into functions – positional arguments and keyword arguments (kwargs). Remember that positional arguments are listed first and must be specified when calling a function, whereas keyword arguments are optional:

Figure 5.5 – Args and kwargs
The examples so far in this chapter have just contained positional arguments. However, you may want to provide a default value for an instance attribute. For example, you can take your previous example and add a default value for color:
class Circle:
    is_shape = True

    def __init__(self, radius, color='red'):
        self.radius = radius
        self.color = color
Now, if you initialize a circle without specifying a color, it will default to red:
my_circle = Circle(23)
my_circle.color
You will get the following output:
'red'
Exercise 74 – the Country class with keyword arguments
The aim of this exercise is to use keyword arguments to allow optional instance attribute inputs to be specified in the init function.
You create a class called Country, where there are three optional attributes that can be passed into the init method:
- Create the Country class with three keyword arguments to capture details about the Country object:
class Country:
def __init__(self, name='Unspecified', population=None, size_kmsq=None):
self.name = name
self.population = population
self.size_kmsq = size_kmsq
- Initialize a new Country, noting that the order of parameters does not matter because you are using named arguments:
usa = Country(name='United States of America', size_kmsq=9.8e6)
Note
Here, e is shorthand for “10 to the power of” – for instance, 2e4 == 2 x 10 ^ 4 == 20,000.
- Use the __dict__ method to view a list of the attributes of the usa object:
usa.__dict__
You will get the following output:

Figure 5.6 – Dictionary output of our usa object
In this exercise, you learned how keyword arguments can be used when initializing an object with a class.
Methods
You have already come across one special method, the init method. However, the power of classes will start to become more obvious to you as you begin writing your own custom methods. There are three types of methods you will explore in the following sections:
Instance methods
Instance methods are the most common type of method you will need to use. They always take self as the first positional argument. The __init__ method discussed in the previous section is an example of an instance method.
Here is another example of an instance method, extending our Circle class from Exercise 73 – creating a Circle class:
import math
class Circle:
    is_shape = True

    def __init__(self, radius, color='red'):
        self.radius = radius
        self.color = color

    def area(self):
        return math.pi * self.radius ** 2
The area method will use the radius attribute of the circle to compute the area of the circle using the following formula, which you may recall from math classes:
Figure 5.7 – A formula to calculate the area of a circle
You can now test the area method:
circle = Circle(3)
circle.area()
The output is as follows:
28.274333882308138
As you may have realized by now, self represents the instance (that is, the object) within the method. This is always the first positional argument of an instance method, and Python passes it to the function without you needing to do anything. So, in the preceding example, when you call the area function, behind the scenes, Python passes the circle object through as the first argument.
This is necessary because it allows you to access other attributes and methods of your Circle object within the method.
Note the elegance of being able to change the radius of our circle without needing to worry about updating the area.
For example, taking our previously defined circle object, let’s change the radius from 3 to 2:
circle.radius = 2
circle.area()
Now you will get the output:
12.566370614359172
If you had set area as an attribute of Circle, you would need to update it each time the radius changed. However, writing it as a method where it is expressed as a function of the radius makes your code more maintainable.
Exercise 75 – adding an instance method to our Pet class
The aim of this exercise is to add our first instance method to a class in order to determine whether or not our pet should be considered tall.
You will continue and add an instance method to the Pet class created in Exercise 72 – creating a Pet class:
- Start with your previous definition of Pet:
class Pet:
def __init__(self, height):
self.height = height
is_human = False
owner = 'Michael Smith'
- Add a new method that allows you to check whether your pet is tall or not, where your definition of tall is where Pet has a height of at least 50:
class Pet:
def __init__(self, height):
self.height = height
is_human = False
owner = 'Michael Smith'
def is_tall(self):
return self.height >= 50
- Now, create a Pet object and check whether he is tall:
bowser = Pet(40)
bowser.is_tall()
You will get the following output:
False
- Now, suppose that Bowser grows. Then, you need to update his height and check again whether he is tall:
bowser.height = 60
The output is as follows:
True
Adding arguments to instance methods
The preceding example showed an instance method that took only the positional self parameter. Often, you need to specify other inputs to compute your methods. For instance, in Exercise 75 – Adding an instance method to our Pet class, you hardcoded the definition of “tall” as any pet with a height greater than or equal to 50. Instead, you could allow that definition to be passed in via the method in the following manner:
class Pet:
    def __init__(self, height):
        self.height = height

    is_human = False
    owner = 'Michael Smith'

    def is_tall(self, tall_if_at_least):
        return self.height >= tall_if_at_least
You can then create a pet and check whether its height exceeds some arbitrary benchmark that you specify:
bowser = Pet(40)
bowser.is_tall(30)
You will get the following output:
True
Now, let’s change the height to 50, as mentioned here:
The output now will be:
False
Exercise 76 – computing the size of our country
The aim of this exercise is to use a keyword argument in the context of an instance method.
You will create a Country class and add a method to calculate the area of a country in square miles:
- Start with the following definition of Country, which allows the name, population, and size in square kilometers to be specified:
class Country:
def __init__(self, name='Unspecified', population=None, size_kmsq=None):
self.name = name
self.population = population
self.size_kmsq = size_kmsq
- There are 0.621371 miles in a kilometer. Use this constant to write a method that returns the size in square miles. The class should now look like this:
class Country:
def __init__(self, name='Unspecified', population=None, size_kmsq=None):
self.name = name
self.population = population
self.size_kmsq = size_kmsq
def size_miles_sq(self, conversion_rate=0.621371):
return self.size_kmsq * conversion_rate ** 2
- Create a new Country object and check the conversion:
algeria = Country(name='Algeria', size_kmsq=2.382e6)
algeria.size_miles_sq()
You will get the following output:
919694.772584862
- Suppose someone told you that the conversion rate was incorrect, and that there are 0.6 miles in a kilometer. Without changing the default parameter, recalculate the size of Algeria in square miles using the new rate:
algeria.size_miles_sq(conversion_rate=0.6)
You will get the following output:
857520.0
In this exercise, you learned how to allow optional keyword arguments to be passed into instance methods to alter the calculation performed.
The __str__ method
Like __init__, the __str__ method is another special instance method that you need to know about. This is the method that is called whenever an object is rendered as a string.
For example, this is what is displayed when you print the object to the console. You can explore this in the context of your Pet class. Suppose you have a Pet class in which you can assign a height and name to the Pet instance:
class Pet
    def __init__(self, height, name):
        self.height = height
        self.name = name

    is_human = False
    owner = 'Michael Smith'
Now, you create a pet and print it to the console:
The output will be as follows:
Figure 5.8 – An unhelpful string representation of the Pet object
This is not a very helpful representation of our pet. So, we need to add __str__ method:
class Pet:
    def __init__(self, height, name):
        self.height = height
        self.name = name

    is_human = False
    owner = 'Michael Smith'

    def __str__(self):
        return f"{self.name} (height: {self.height} cm)"
Like any instance method, our __str__ method takes self as the first argument in order to access attributes and other methods of the Pet object. You can create another pet:
You will get the following output:
Figure 5.9 – A much nicer string representation of the object
This is a much nicer representation of our Pet object and makes it easier to quickly inspect objects without diving into the individual attributes. It also makes it easier for someone to import your code into their work and be able to understand what the various objects represent.
Exercise 77 – adding an __str__ method to the Country class
The aim of this exercise is to learn how to add string methods in order to give more helpful string representations of objects when printed to the console.
You extend the Country class from Exercise 76 – computing the size of our country by adding an __str__ method to customize how the object is rendered as a string:
- Start with our previous definition of Country:
class Country:
def __init__(self, name='Unspecified', population=None, size_kmsq=None):
self.name = name
self.population = population
self.size_kmsq = size_kmsq
- Add a simple string method that returns the name of the country:
def __str__(self):
return self.name
- Create a new country and test the string method:
chad = Country(name='Chad')
print(chad)
You will get the following output:
Chad
- Now try adding a more complex string method that displays the other information regarding our country, but only if that information is available:
def __str__(self):
label = self.name
if self.population:
label = f'{label}, population: {self.population}'if self.size_kmsq:
label = f'{label}, size_kmsq: {self.size_kmsq}'return label
- Create a new country and test the string method:
chad = Country(name='Chad', population=100)
print(chad)
The output is as follows:
Chad, population: 100
In this exercise, you learned how to add a string method to improve the string representation of objects when printed to the console.
Static methods
Static methods are similar to instance methods, except that they do not implicitly pass the positional self argument. Static methods aren’t used as frequently as instance methods, so they only warrant a brief mention here. Static methods are defined using the @staticmethod decorator. Decorators allow us to alter the behavior of functions and classes.
Here is an example of a static method added to our Pet class:
class Pet:
    def __init__(self, height):
        self.height = height

    is_human = False
    owner = 'Michael Smith'

    @staticmethod
    def owned_by_smith_family():
        return 'Smith' in Pet.owner
nibbles = Pet(100)
nibbles.owned_by_smith_family()
You will get the following output:
True
The @staticmethod notation is how decorators are added to functions in Python. Technically, this is actually passing the owned_by_smith_family function to a higher-order function that alters its behavior. However, for now, just think of it as allowing us to avoid having the positional self argument. This method should not be written as an instance method, because it does not rely on any instance attributes of the Pet object – that is, the result will be the same for all pets created from the class. Of course, you could alternatively write this as a class attribute – that is, owned_by_smith_family = True.
However, generally, you prefer to avoid writing code that needs to be updated in two places when one piece of underlying information changes. If you changed the pet owner to Ming Xu, you would also need to remember to update the owned_by_smith_family attribute to False. The preceding implementation avoids this problem, as the owned_by_smith_family static method is a function of the current owner.
Exercise 78 – refactoring instance methods using a static method
Static methods are used to store utilities related to a class. In this exercise, you will create a Diary class and show how you can use a static method to apply the DRY principle (refer to Chapter 3, Executing Python – Programs, Algorithms, and Functions, which discussed helper functions) to refactor our code:
- Create a simple Diary class that stores two dates:
import datetime
class Diary:
def __init__(self, birthday, christmas):
self.birthday = birthday
self.christmas = christmas
- Suppose you want to be able to view dates in a custom date format. Add two instance methods that print out the dates in the dd-mm-yy format:
def show_birthday(self):
return self.birthday.strftime('%d-%b-%y')def show_christmas(self):
return self.christmas.strftime('%d-%b-%y') - Create a new Diary object and test one of the methods:
my_diary = Diary(datetime.date(2020, 5, 14), datetime.date(2020, 12, 25))
my_diary.show_birthday()
The output will be as follows:
'14-May-20'
- Imagine you had a more complex Diary class, where you needed to format dates in this custom manner throughout our code. You would have the strftime(‘%d-%b-%y’) line appearing many times in your code. If someone came to you and asked you to update the display format throughout the entire code base, you would need to change the code in lots of places. Instead, you could create a format_date static method utility to store this logic once:
class Diary:
def __init__(self, birthday, christmas):
self.birthday = birthday
self.christmas = christmas
@staticmethod
def format_date(date):
return date.strftime('%d-%b-%y')def show_birthday(self):
return self.format_date(self.birthday)
def show_christmas(self):
return self.format_date(self.christmas)
Now, if someone asks you to update the date format, there is a single location in the code that is your source of truth.
Class methods
The third type of method you will explore is class methods. Class methods are like instance methods, except that instead of the instance of an object being passed as the first positional self argument, the class itself is passed as the first argument. As with static methods, you use a decorator to designate a class method. For example, we can take our Australian class and add a class method:
class Australian:
    is_human = True
    enjoys_sport = True

    @classmethod
    def is_sporty_human(cls):
        return cls.is_human and cls.enjoys_sport
Note that the first positional argument of this method is cls, not self. You can call this method on the class itself:
Australian.is_sporty_human()You will get the following output:
True
Alternatively, you can also call it on an instance of the class:
aussie = Australian()
aussie.is_sporty_human()
You will get the following output:
True
Another way class methods are used is to provide nice utilities for creating new instances.
For example, let’s take our Country class, as defined earlier:
class Country:
    def __init__(self, name='Unspecified', population=None, size_kmsq=None):
        self.name = name
        self.population = population
        self.size_kmsq = size_kmsq
Suppose you want to avoid a situation where you create a country where people can specify the size in square miles rather than square kilometers. You could use a class method that takes the square mile input from the user and converts it into square kilometers, before initializing an instance of the class:
    @classmethod
    def create_with_msq(cls, name, population, size_msq):
        size_kmsq = size_msq / 0.621371 ** 2
        return cls(name, population, size_kmsq)
Now, suppose that you want to create a mexico object and you know that it has an area of 760,000 square miles:
The output is as follows:
1968392.1818017708
Exercise 79 – extending our Pet class with class methods
In this exercise, we will show two common uses of class methods in the context of our Pet class:
- Start with the following definition of the Pet class:
class Pet:
def __init__(self, height):
self.height = height
is_human = False
owner = 'Michael Smith'
- Add a class method that returns whether the pet is owned by a member of the Smith family:
@classmethod
def owned_by_smith_family(cls):
return 'Smith' in cls.owner
- Now, suppose that you want a way of producing pets with various random heights. Perhaps you’re performing some simulations regarding buying 100 pets, and you want to see what the average height might be. Firstly, import the random module:
import random
- Next, add a class method that picks a random number from 0 to 100 and assigns it to the height property of a new pet:
@classmethod
def create_random_height_pet(cls):
height = random.randrange(0, 100)
return cls(height)
- Lastly, you create 5 new pets and see what their heights are:
for I in range(5):
pet = Pet.create_random_height_pet()
print(pet.height)
The output is as follows:
99
61
26
92
53
In this exercise, you learned how class methods can be used to customize the creation of new objects and how to perform a basic calculation based on a class attribute.
Note
Your output may look different because these are random numbers between 0 and 100.
Properties
Properties are used to manage the attributes of objects. They are an important and powerful aspect of OOP but can be challenging to grasp at first. For example, suppose you have an object that has a height attribute and a width attribute. You might also want such an object to have an area property, which is simply the product of the height and width attributes. You would prefer not to save the area as an attribute of the shape because the area should update whenever the height or width changes. In this sort of scenario, you will want to use a property.
You will start by exploring the property decorator and then discuss the getter/setter paradigm.
The property decorator
The property decorator looks similar to the static methods and class methods that you have already encountered. It simply allows a method to be accessed as an attribute of an object, rather than it needing to be called like a function with ().
To understand the need for this decorator, consider the following class, which stores information about the temperature:
class Temperature:
    def __init__(self, celsius, fahrenheit):
        self.celsius = celsius
        self.fahrenheit = fahrenheit
Let’s create a new temperature and check the fahrenheit attribute:
freezing = Temperature(0, 32)
freezing.fahrenheit
You will get the following output:
32
Now, suppose you decide it would be better to just store the temperature in Celsius and convert it to Fahrenheit when needed:
class Temperature:
    def __init__(self, celsius):
        self.celsius = celsius

    def fahrenheit(self):
        return self.celsius * 9 / 5 + 32
This is nicer because if the value of the temperature in Celsius is updated, you won’t need to worry about updating fahrenheit as well:
my_temp = Temperature(0)
print(my_temp.fahrenheit())
my_temp.celsius = -10
print(my_temp.fahrenheit())
You will get the following output:
32.0
14.0
In the preceding code, you can see that you need to call the fahrenheit instance method with (), whereas when you were accessing the attribute before, no parentheses were necessary.
This could be a problem if the previous version of this code was being used elsewhere or by other people. All references to fahrenheit would have to have parentheses appended. Instead, you could turn fahrenheit into a property, which allows us to access it like an attribute, despite it being a method of the class. To do this, you simply add the property decorator:
class Temperature:
    def __init__(self, celsius):
        self.celsius = celsius

    @property
    def fahrenheit(self):
        return self.celsius * 9 / 5 + 32
You can now access the fahrenheit property in the following manner:
The output will be as follows:
212.0
Exercise 80 – the full name property
The aim of this exercise is to use the property decorator to add object properties.
In this exercise, you create a Person class and learn how to use a property to display its full name:
- Create a Person class with two instance attributes, the first and last names:
class Person:
def __init__(self, first_name, last_name):
self.first_name = first_name
self.last_name = last_name
- Add a full_name property with the @property decorator:
@property
def full_name(self):
return f'{self.first_name} {self.last_name}' - Create a customer object and test the full_name property:
customer = Person('Mar','Lo')customer.full_name
You should get the following output:
'Mary Lo'- Suppose someone was using your code and decided to update the name of this customer in the following manner:
customer.full_name = 'Mary Schmid'
They would see the following error:

Figure 5.10 – Trying to set a value of a property that doesn’t support attribute setting
The following section introduces the concept of setters, which allow you to customize how input is handled when you try to assign attributes in this way.
The setter method
The setter method will be called whenever a user assigns a value to a property. This will allow us to write code so that a user doesn’t need to think about which attributes of an object are stored as instance attributes, rather than computed by functions. Here is an example of what Exercise 80 – the full name property would look like if we added a full name setter:
class Person:
    def __init__(self, first_name, last_name):
        self.first_name = first_name
        self.last_name = last_name

    @property
    def full_name(self):
        return f'{self.first_name} {self.last_name}'

    @full_name.setter
    def full_name(self, name):
        first, last = name.split(' ')
        self.first_name = first
        self.last_name = last
Note the following conventions:
- The decorator should be the method name, followed by .setter
- It should take the value being assigned as a single argument (after self)
- The name of the setter method should be the same as the name of the property
Now you can create the same customer, but this time you can update their first and last names simultaneously by assigning a new value to the full_name property:
customer = Person('Mar','Lo')
customer.full_name = 'Mary Schmid'
customer.last_name
You should get the following output:
'Schmid'Exercise 81 – writing a setter method
The aim of this exercise is to use a setter method to customize the way values are assigned to properties.
You will extend the Temperature class by allowing a user to assign a new value for fahrenheit directly to the property:
- Let’s start with the Temperature class from earlier:
class Temperature:
def __init__(self, celsius):
self.celsius = celsius
@property
def fahrenheit(self):
return self.celsius * 9 / 5 + 32
- Add an @fahrenheit.setter function that converts the fahrenheit value to Celsius and stores it in the celsius instance attribute:
@fahrenheit.setter
def fahrenheit(self, value):
self.celsius = (value–- 32) * 5 / 9
- Create a new temperature and check the fahrenheit property:
temp = Temperature(5)
temp.fahrenheit
The output is as follows:
41.0
- Update the fahrenheit property and check the celsius attribute:
temp.fahrenheit = 32
temp.celsius
The output is as follows:
0.0
In this exercise, you wrote your first setter method, allowing you to customize how values are set to properties.
Validation via the setter method
Another common use of the setter method is to prevent a user from setting values that shouldn’t be allowed. If you consider our previous example with the Temperature class, the minimum temperature theoretically possible is approximately -460 degrees Fahrenheit. It seems prudent to prevent people from creating temperatures that are lower than this value. You can update the setter method from the previous exercise as follows:
    @fahrenheit.setter
    def fahrenheit(self, value):
        if value < -460:
            raise ValueError('Temperatures less than -460F are not possible')
    self.celsius = (value–- 32) * 5 / 9
Now, if the user attempts to update the temperature to an impossible value, the code will throw an exception:
You should get the following output:

Figure 5.11 – Demonstrating validation as part of the setter property
We will now move on to our last topic of the chapter.
Inheritance
Class inheritance allows attributes and methods to be passed from one class to another. For example, suppose there is already a class available in a Python package that does almost everything you want. However, you just wish it had one extra method or attribute that would make it right for your purpose. Instead of rewriting the entire class, you could inherit the class and add additional properties, or change existing properties.
The DRY principle revisited
Remember the DRY principle: “Every piece of knowledge or logic must have a single, unambiguous representation within a system.” So far in this chapter, we have seen how classes allow us to more elegantly encapsulate logic about what objects represent. This has already moved us further along the path to writing clean, modularized code. Inheritance is the next step in this journey. Suppose we wanted to create two classes, one representing cats and the other, dogs.
Our Cat class may look like this:
class Cat:
    is_feline = True

    def __init__(self, name, weight):
        self.name = name
        self.weight = weight
Similarly, our Dog class would look the same, except that it would have a different value for the is_feline class attribute:
class Dog:
    is_feline = False

    def __init__(self, name, weight):
        self.name = name
        self.weight = weight
You can probably already see that this is a violation of the DRY principle. A lot of the preceding code is identical in the two classes. However, suppose that, in our program, cats and dogs are sufficiently different to require separate class definitions. You need a way to capture the common information about cats and dogs, without repeating it in both class definitions — enter inheritance.
Single inheritance
Single inheritance, also known as subclassing, involves creating a child class that inherits the attributes and methods of a single parent class. Taking the preceding example of cats and dogs, we can instead create a Pet class that represents all the common parts of the Cat and Dog classes:
class Pet:
    def __init__(self, name, weight):
        self.name = name
        self.weight = weight
The Cat and Dog classes can now be created by subclassing the parent class, Pet:
class Cat(Pet):
    is_feline = True

class Dog(Pet):
    is_feline = False
You can check whether this is working as expected:
my_cat = Cat('Kibbles', 8)
my_cat.name
You will get the following output:
'Kibbles'
Now, the logic in the init method is specified only once, and our Cat and Dog classes simply inherit it from the parent class, Pet. Now, if you decide to change the logic in the init method, you don’t need to change it in two places, making our code easier to maintain. Likewise, it will be easier in the future to create different types of Pet classes. Additionally, you could create further subclasses of the Dog class if you wanted to create different types of Dog classes, depending on breed. You can show the structure of our classes as a hierarchy, much like a family tree:

Figure 5.12 – Class inheritance
Exercise 82 – inheriting from the Person class
The goal of this exercise is to see how methods and attributes are inherited by child classes from parent classes.
In this exercise, you will create a Baby class and an Adult class, which will both inherit from a common Person class:
- Start with the following Person class definition, which takes first and last names as inputs in the init function:
class Person:
def __init__(self, first_name, last_name):
self.first_name = first_name
self.last_name = last_name
- Create a Baby class that inherits from Person, and add a speak instance method:
class Baby(Person):
def speak(self):
print('Blah blah blah') - Do the same for an Adult class:
class Adult(Person):
def speak(self):
print('Hello, my name is %s' % self.first_name) - Create a Baby and an Adult object, and make them speak:
jess = Baby('Jessie', 'Mcdonald')jess.speak()
tom.speak()
You will get the following output:
Figure 5.13 – Our baby and adult speaking
In this exercise, you learned how to inherit attributes and methods between classes.
Subclassing classes from Python packages
In our examples so far, you have written the parent class ourselves. However, often, the reason for subclassing is that a class already exists in a third-party package, and you just want to extend the functionality of that class with a few custom methods.
For example, suppose you wanted to have an integer object where you could check whether it was divisible by another number. You could create your own integer class and add a custom instance method, as follows:
class MyInt(int):
    def is_divisible_by(self, x):
        return self % x == 0
You could then use this class to create integer objects that have this useful method:
a = MyInt(8)
a.is_divisible_by(2)
The output is as follows:
True
Exercise 83 – subclassing the datetime.date class
The aim of this exercise is to show how you can inherit from classes in external libraries.
In this exercise, you create your own custom date class by inheriting from the datetime module. You add our own custom method that allows you to increment the date by a given number of days:
- Import the datetime module:
import datetime
- Create a MyDate class that inherits from datetime.date. Create an add_days instance method that uses a timedelta object to increment the date:
class MyDate(datetime.date):
def add_days(self, n):
return self + datetime.timedelta(n)
- Create a new object using the MyDate class, and try out your custom add_days method:
print(d.add_days(40))
print(d.add_days(400))
You should get the following output:
Figure 5.14 – Adding days to a date
In this exercise, you learned how to inherit from classes in external libraries. This will often be useful, as external libraries may get you 90% of the way to solving the problem, but they’re rarely built exactly for your own use case.
Overriding methods
When inheriting classes, you often do so in order to change the behavior of a class, not just to extend the behavior. The custom methods or attributes you create on a child class can be used to override the method or attribute that was inherited from the parent.
For example, suppose the following Person class was provided by a third-party library:
class Person:
    def __init__(self, first_name, last_name):
        self.first_name = first_name
        self.last_name = last_name

    @property
    def full_name(self):
        return f'{self.first_name} {self.last_name}'

    @full_name.setter
    def full_name(self, name):
        first, last = name.split(' ')
        self.first_name = first
        self.last_name = last
Perhaps you are using this class but have problems when setting the names of people whose full names consist of three parts:
You will get the following output:

Figure 5.15 – Failing to set a property
Suppose that in cases where there are three or more names that make up a full name, you want to assign the first part of the name to the first_name attribute and the rest of the names to the last_name attribute. You could subclass Person and override the method, as follows:
- Start by creating a BetterPerson class that inherits from Person:
class BetterPerson(Person):
- Add a full name property that combines the first and last names:
@property
def full_name(self):
return f'{self.first_name) {self.last_name}' - Add full_name.setter to first split the full name into its components, then set the first name equal to the first part of the name, and set the last name equal to the second part of the name. The code also deals with cases where there are more than two components to the name, and it puts everything except the first name into the last name:
@full_name.setter
def full_name(self, name):
names = name.split(' ')self.first_name = names[0]
if len(names) > 2:
self.last_name = ' '.join(names[1:])
elif len(names) == 2:
self.last_name = names[1]
- Now, create a BetterPerson instance and see it in action:
my_person = BetterPerson('Mary', 'Smith')print(my_person.first_name)
print(my_person.last_name)
The output is as follows:
Mary
Anne Smith
Calling the parent method with super()
Suppose the parent class has a method that is almost what you want it to be, but you need to make a small alteration to the logic. If you override the method as you did previously, you’ll need to specify the entire logic of the method again, which may become a violation of the DRY principle. When building an application, you often require code from third-party libraries, and some of this code can be quite complex. If a certain method has 100 lines of code, you wouldn’t want to include all that code in your repository in order to simply change one of those lines.
For example, suppose you have the following Person class:
class Person:
    def __init__(self, first_name, last_name):
        self.first_name = first_name
        self.last_name = last_name

    def speak(self):
        print('Hello, my name is', self.first_name)
Now, suppose you want to create a subclass to make the person say more things in the speak method. One option would be to do so as follows:
class TalkativePerson(Person):
    def speak(self):
        print('Hello, my name is', self.first_name)
        print('It is a pleasure to meet you!')
john = TalkativePerson('John', 'Tomic')
john.speak()
The output will be as follows:
Figure 5.16 – Our talkative person speaking
This implementation is okay, though it isn’t ideal that you’ve copied the Hello, my name is John line from the Person class. All you wanted to do was add additional things for TalkativePerson to say; you didn’t need to change the way they say their name. Perhaps the Person class will be updated in the future to say something slightly different, and you want the TalkativePerson class to also reflect those changes. This is where the super() method comes in handy. super() allows you to access the parent class without explicitly referring to it by name. In the preceding example, you can use super() as follows:
class TalkativePerson(Person):
    def speak(self):
        super().speak()
        print('It is a pleasure to meet you!')
john = TalkativePerson('John', 'Tomic')
john.speak()
You will get the following output:
Figure 5.17 – Using the super() method to write cleaner code
The super() method allows you to access the parent class, Person, and call the corresponding speak method. Now, if any updates were made to the Person class’s speak method, it would be reflected in what our TalkativePerson says as well.
Exercise 84 – overriding methods using super()
The aim of this exercise is to learn how to override methods using the super function. We will subclass our previously created Diary class and show how super can be used to modify the behavior of a class without unnecessarily repeating code:
- Import the datetime module:
import datetime
- Start with the Diary class, as defined previously:
class Diary:
def __init__(self, birthday, christmas):
self.birthday = birthday
self.christmas = christmas
@staticmethod
def format_date(date):
return date.strftime('%d-%b-%y')def show_birthday(self):
return self.format_date(self.birthday)
def show_christmas(self):
return self.format_date(self.christmas)
- Suppose you’re unhappy with the fact that the hardcoded date time format is in the format_date method, and you would prefer a custom format that could be specified for each diary object separately. One temptation would be to simply copy the whole class and start making modifications. However, when dealing with more complex classes, this is almost never a good option. Instead, let’s subclass Diary and start by allowing it to be initialized with a custom date_format string:
class CustomDiary(Diary):
def __init__(self, birthday, christmas, date_format):
self.date_format = date_format
super().__init__(birthday, christmas)
- You also want to override the format_date method to use your new date_format attribute:
def format_date(self, date):
return date.strftime(self.date_format)
- Now, when you create diary objects, each object can have a different string representation of the dates:
first_diary = CustomDiary(datetime.date(2018,1,1), datetime.date(2018,3,3), '%d-%b-%Y')
print(first_diary.show_birthday())
print(second_diary.show_christmas())
You will get the following output:
Figure 5.18 – Viewing our diary dates
In this exercise, you learned how to override methods using the super function. This allows you to more carefully override methods in the parent classes you inherit from.
Multiple inheritances
You often think of inheritance as allowing us to reuse common methods and attributes between related child classes. For example, a typical class structure could look like this:

Figure 5.19 – Single inheritance
Each child class inherits from a single parent class, Person.
However, it’s also possible to inherit from more than one parent class. Often, there are elements of multiple classes that you want to combine to create a new class. For example, you might combine an Adult class with a Calendar class to make an OrganizedAdult class:
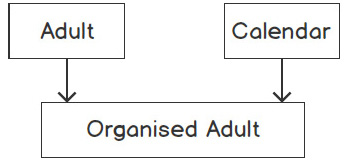
Figure 5.20 – Multiple inheritance
Exercise 85 – creating a consultation appointment system
Suppose you are running a hospital and building a consultation appointment system. You want to be able to schedule appointments for various types of patients.
In this exercise, you will start with the previously defined Adult and Baby classes and create OrganizedAdult and OrganizedBaby classes by inheriting from a second parent class, Calendar:
- Import the datetime module:
import datetime
- Start with the Baby and Adult classes, as defined previously:
class Person:
def __init__(self, first_name, last_name):
self.first_name = first_name
self.last_name = last_name
class Baby(Person):
def speak(self):
print('Blah blah blah')class Adult(Person):
def speak(self):
print('Hello, my name is', self.first_name) - Create a Calendar class that you can use to help the adults and babies become more organized:
class Calendar:
def book_appointment(self, date):
print('Booking appointment for date', date) - Create OrganizedBaby and OrganizedAdult classes that inherit from multiple parent classes:
class OrganizedAdult(Adult, Calendar):
pass
class OrganizedBaby(Baby, Calendar):
pass
Note
If you want to define a class without adding or customizing its methods/attributes, you simply write pass.
- Create some objects from your new classes and test their methods:
andres = OrganizedAdult('Andres', 'Gomez')andres.speak()
boris.speak()
boris.book_appointment(datetime.date(2018,1,1))
The output is as follows:

Figure 5.21 – Booking an appointment
- Suppose you wanted to warn a user when they try to book an appointment with a baby. You could override the book_appointment method, using the super() method, to run the book_appointment method on the Calendar class:
class OrganizedBaby(Baby, Calendar):
def book_appointment(self, date):
print('Note that you are booking an appointment with a baby.')super().book_appointment(date)
- Now, test whether it works:
boris = OrganizedBaby('Boris', 'Bumblebutton')boris.book_appointment(datetime.date(2018,1,1))
The output is as follows:
Figure 5.22 – Booking an appointment with a baby
Note that it’s not always necessary to use inheritance when building your classes. If you only have one child class, having a parent class is often unnecessary. In fact, your code may be more readable if it’s all stored in one class. Sometimes, the job of a good programmer is to consider the future and answer the question, “Will it become useful at some point to have built this with multiple inherited classes?” Answering this question simply becomes easier with experience.
Method resolution order
Suppose you were inheriting from two parent classes, both of which have a method of the same name. Which would be used when calling the method on the child class? Which would be used when calling it via super()? You should find this out through an example. Suppose you have Dog and Cat classes, and you combine them to make a monstrosity, DogCat:
class Dog:
    def make_sound(self):
        print('Woof!')

class Cat:
    def make_sound(self):
        print('Miaw!')
class DogCat(Dog, Cat):
    pass
What sort of sounds would such a creature make?
my_pet = DogCat()
my_pet.make_sound()
You will get the following output:
Woof!
So, you can see that Python first checks for the existence of the make_sound method on the Dog class, and since it is implemented, you don’t end up calling the make_sound method of the Cat class. Simply, Python reads from left to right in the list of classes. If you switched the order of Dog and Cat, our DogCat would miaw:
class DogCat(Cat, Dog):
    pass
my_pet = DogCat()
my_pet.make_sound()
You should get the following output:
Miaw!
Suppose you wanted to override the method on DogCat and use the super() method. The same method resolution order would apply:
class DogCat(Dog, Cat):
    def make_sound(self):
        for i in range(3):
            super().make_sound()
my_pet = DogCat()
my_pet.make_sound()
You will get the following output:
Woof!
Woof!
Woof!
Activity 14 – creating classes and inheriting from a parent class
Suppose you are writing a computer game where the graphics are made up of various types of shapes. Each shape has certain properties, such as the number of edges, area, and color. The shapes also behave in different ways. You want to be able to customize the way each shape behaves independently, while also not duplicating any code between the definition of each shape.
The aim of this activity is to create classes that can be used to represent a rectangle and a square. These two classes will inherit from a parent class called Polygon. The Rectangle and Square classes will have a property for computing the number of sides, the perimeter, and the area of the shape. Let’s see the steps:
- Add a num_sides property to the Polygon class that returns the number of sides.
- Add a perimeter property to the Polygon class.
- Add docstring to the Polygon class.
- Add a __str__ method to the Polygon class that represents the polygon as “polygon with X sides,” where X is the actual number of sides of the Polygon instance.
- Create a child class called Rectangle, which accepts two arguments from the user in the init method: height and width.
- Add an area property to Rectangle.
- Create a Rectangle object and check the computation of the area and perimeter.
You will get the following output:
(5, 12)
- Create a child class called Square that inherits from Rectangle. You should only take one argument from the user when initializing a square.
- Create a Square object and check the computation of the area and perimeter. You will get the following output:
(25, 20)
Note
The solution for this activity can be found in Appendix on GitHub.
Summary
In this chapter, you have begun your journey into a cornerstone of OOP – classes. You learned how classes allow you to write more elegant, reusable, and DRY code. You learned about the importance of and distinction between class and instance attributes, and how to set them in class definition. You also explored various types of methods and when to use them. You explored the concept of a property and the Pythonic implementation of getters and setters. Lastly, you learned how to share methods and attributes between classes via single and multiple inheritance.
In the next chapter, you will explore the Python standard library and the various tools you can avail yourself of before needing to turn to third-party modules.