This chapter will equip you with essential React techniques required to pass data between React classes and functional components. First, you will be introduced to various ways of passing data from a parent to its child components. You will get a good hang of the techniques by practicing multiple hands-on exercises. This chapter will also introduce you to various design patterns, such as the Context API, higher-order components, and render props, which will enable you to solve common problems you will face when passing data between components. By the end of this chapter, you will have a firm grasp of the React techniques required to pass data.
Introduction
React is a UI library that helps us build single-page web and mobile applications. In single-page applications, the page is loaded only once. When the user interacts with the page, say, they click a button, the application will make a request to the server. When the page receives data from the server, it will only update the page partially without entirely reloading the page.
Since a single-page application has a lot of coding in one place, the code could get quite complex to manage. As we saw in the previous chapter, React allows us to split components into smaller pieces and helps in building reusable components with a consistent UI design.
Having reusable components means developers can use each component multiple times in their application as each component can be developed further separately and can contain its own business logic. It's much easier to test the individual smaller components as this will not bind any complex logic together.
While there are many benefits to having smaller reusable components, it is important to understand how these components communicate with each other and send data between each other properly.
For example, imagine a ToDo app with the ToDo container as the parent component and multiple ToDo items as the child components. When we look at the component structure, each ToDo container (parent component) will contain two child components – the ToDo item and a Complete button, as shown in the following diagram:

Figure 7.1: The parent and child components
In each ToDo list, we can update the status of a task by clicking the Complete button next to each item, as shown in the preceding diagram. When we change a task's status by clicking the button, we need to send data between components – that is, from the Complete button, which is a child component, to the ToDo container, which is the parent component. Similarly, the data is sent from the parent component (the ToDo container) back to the child component (the Complete button):

Figure 7.2: Interface of Todo
In the next section, we will learn how data is passed between parent and child components.
Getting Started
There are many ways we can send data between components. In this chapter, we will cover four major ways of passing data:
- From a parent to a child component
- From a child to a parent component
- Between any components, such as sibling components
Through the React Context API, between components
Note
In React's hierarchical order, the parent component refers to the component located at the top, while the child components refer to the components located below the parent component in the hierarchy.
As you learned in the previous chapters, props are read-only, which means we cannot update props from a component. Instead, we are going to send data through props. In the React tree hierarchy, props can only be used to send data down from a parent to child components. This can cause a problem when we want to send data from child components to a parent component instead. We'll learn how to solve that problem in a bit.
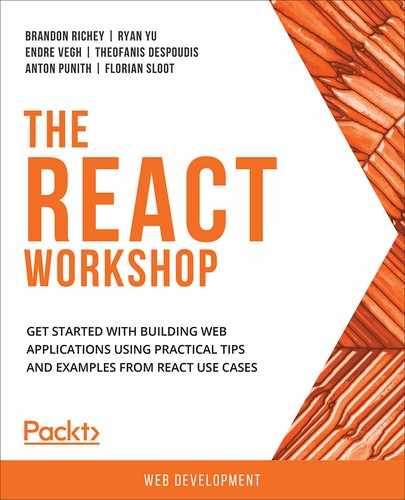
Also, we will face another problem called prop-drilling. Prop-drilling refers to the process of passing down values to child components multiple levels down. Here, some of the child components in the middle might not actually make use of the data. For example, in the following diagram, the data is being sent from component 1 and being used in component 6:
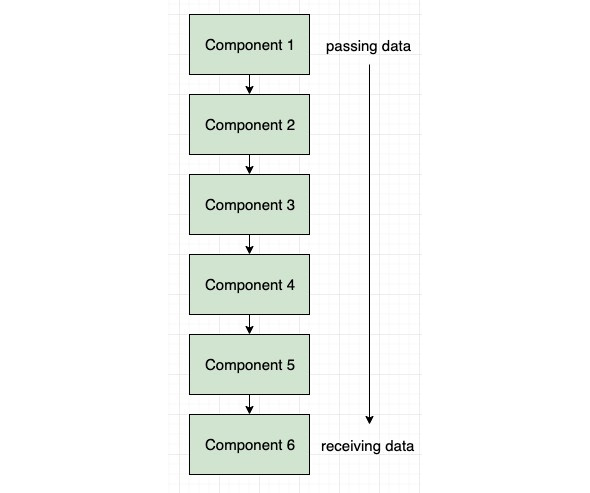
Figure 7.3: Prop-drilling problem
When we receive the data in component 6, we should pass it through all the components in the middle. This is the prop-drilling process.
For example, let's say we have an email app displaying our emails on the dashboard. The structure may look like this:
- Component 1: EmailApp component
- Component 2: EmailPanel component
- Component 3: EmailList component
- Component 4: EmailItem component
- Component 5: EmailContent component
- Component 6: EmailTitle component
Let's say the EmailApp component (component 1) receives the email data and we want to send the subject line of the email to the EmailTitle component (component 6) through props. In such a case, we need to pass the data through all the components between component 1 and component 6, which is exactly what happens when prop-drilling comes into the picture. Later in this chapter, we'll learn how to solve this problem by avoiding prop-drilling using the React Context API.
We are also going to create an app that will display a list of endangered animals. As we build the app, we will learn about all the important ways to pass data between components and allow them to communicate with each other.
Passing Data from Parent to Child Components
React applications are typically built with many smaller components and, in most cases, each component sends and/or receives data from the others to make the app more functional. As we saw in the previous section, we can only send data down from parent components to child components.
This one-way data flow does the following:
- Helps components behave the same way since the data flow is predictable. So, we can make components reusable.
- Makes components easy to debug as we know where the data is coming from (a single source of truth).
To explicitly understand how data is transmitted from a parent to direct child components, let's move on to the following section.
Passing Data to Direct Child Components
Let's take a look at the following diagram, where data is being sent from a parent to its direct child component:

Figure 7.4: Sending data from a parent component to its direct child component
To send data to a direct child component, we provide a value to the props in the parent component, which the child component receives. As we learned in the previous chapter, props can be anything, including strings, numbers, arrays, and objects; however, props can also be a function or a component.
First, let's discuss how to send primitive values such as string, number, and Boolean to a direct child component through an example.
Example 1: Sending Data from a Parent Component to a Direct Child Component
To explain how data is sent via a prop from a parent component, we are going to add a render() method in the App class. The render method will return an Animal component with a name as a property and Tiger as its value:
class App extends Component {
render() {
return <Animal name="Tiger" />;
}
}
Note
The preceding code will not give an output since we have not created the Animal component yet. We will do that in the next section.
From the preceding code example, we can see that the prop called name has a value of Tiger. This value is sent as an object from the parent component, App, to the child component, <Animal>, as shown in the following diagram:
Next, let's take a look at how to receive the prop values in the child class component.
Example 2: Receiving Data in a Child Class Component
To understand how data is received, we will create an Animal class component. Then, we will add a render method that returns a <div> element. Inside the <div> element, we will add the text of Animal: To display the sent value, we will also add {this.props.name}, as shown in the following code:
class Animal extends Component {
render() {
return <div>Animal: {this.props.name}</div>;
}
}
Now, let's see how data being sent and received via props happens in a child class component. When we combine the two preceding examples, we will get the following code:
import React, { Component } from 'react';
import './App.css';
class App extends Component {
render() {
return <Animal name="Tiger" />;
}
}
class Animal extends Component {
render() {
return <div>Animal: {this.props.name}</div>;
}
}
export default App;
If you run the preceding code, it will result in the following output:
// Animal: Tiger
In a class-based component, the props can be accessed using this.props from a Component instance. To receive the name prop value, we call {this.props.name} in the curly braces. The curly braces are JSX syntax for evaluating the JavaScript expression.
Based on this output, we can see that we have successfully sent the data from a parent component (in Example 1) and received it in a child component (in Example 2). Now, let's see how we can receive the data in a functional child component.
Example 3: Receiving Data in a Child Function Component
In this example, we will create an Animal function component. We will pass a props value as an argument to the function component and return a <div> element. Inside the <div> element, we will add Animal: and {props.name}, like so:
return <div>Animal: {props.name}</div>;
};
As we can see from the preceding code example, we are receiving the prop, name, with its value, Tiger, from the parent component, <App>.
Note
Unlike the class-based component, we do not need this keyword to receive the name value from the prop as we have passed the props as an argument in the Animal functional component.
Run the following code in order to understand how data is received in a child function component:
import React, { Component } from 'react';
import './App.css';
class App extends Component {
render() {
return <Animal name="Tiger" />;
}
}
const Animal = props => {
return <div>Animal: {props.name}</div>;
};
export default App;
The output will be the same as before:
// Animal: Tiger
While the output is the same, here, we have received data in a child function component.
So far, we have only sent string data types across components. Now, let's send other data types such as number and Boolean as props and see what happens.
Example 4: Sending number and Boolean as Props from the Parent Component
In the App parent component, we are going to add two props called number and endangered (along with the existing name prop) with two different datatypes: number and Boolean. Their respective values will be 3890 and true:
class App extends Component {
render() {
return <Animal name="Tiger" number= {3890} endangered={true} />;
}
}
Note
The preceding code will not give an output since we have not defined the Animal component yet. We will do that in the next section.
In the preceding code example, we are sending props such as name, number, and endangered with their values as an object to the child component, <Animal>, from the parent component, <App>.
Note
Both the integer and Boolean values were enclosed in curly braces to keep the value type, such as integer and Boolean.
In the first two examples, we sent and received a single prop value. In this example, we sent two prop values of different data types. Now, let's see how we can receive them in class-based and functional child components.
Example 5: Receiving number and boolean Values in Class-Based and Functional Components
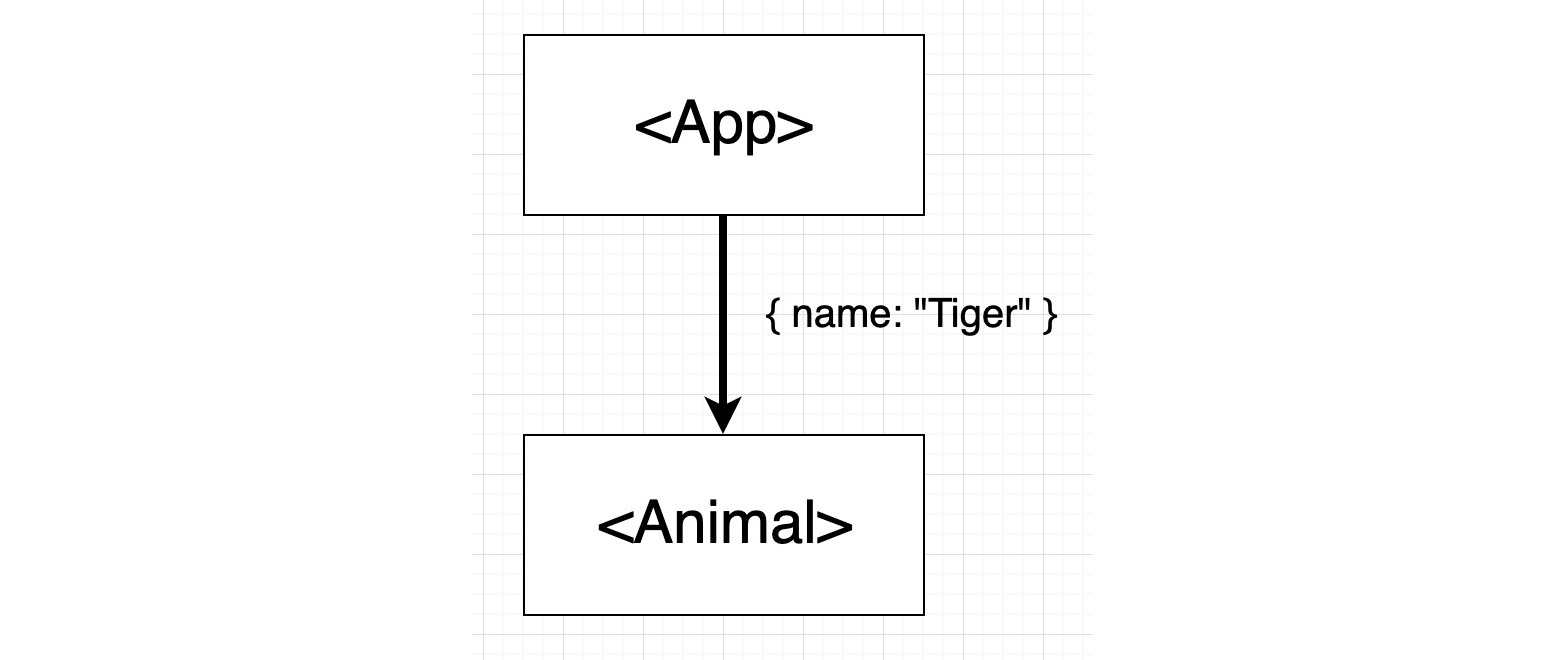
First, let's receive the number and Boolean values in a class-based component. To do this, in the Animal class component, we are going to add parentheses after return so that we have a multiline JSX expression. Inside <div>, we will add three <p> elements and inside each <p> element, we will add the following props:
Animal: {this.props.name}
Number: {this.props.number}
Let's design the Endangered: element like this: Add a JSX condition to display Yes if the value is true and No if the value is false:
class Animal extends Component {
render() {
return (
<div>
<p>Animal: {this.props.name}</p>
<p>Number: {this.props.number}</p>
<p>Endangered: {this.props.endangered ? 'Yes' : 'No'}</p>
</div>
);
}
}
In the Animal child component, we are receiving props with the number and endangered statuses. For the endangered status, we check whether the value is true or false and if it's true, we display Yes; otherwise, we display No.
Now, let's see what happens when we run the code for the parent App (we created this in the previous example) and the child Animal class components together. We are doing this to see how data of multiple datatypes can be sent and received between them:
import React, { Component } from 'react';
import './App.css';
class App extends Component {
render() {
return <Animal name="Tiger" number={3890} endangered={true} />;
}
}
class Animal extends Component {
render() {
return (
<div>
<p>Animal: {this.props.name}</p>
<p>Number: {this.props.number}</p>
<p>Endangered: {this.props.endangered ? 'Yes' : 'No'}</p>
</div>
);
}
}
export default App;
The output of the preceding code will be as follows:
// Animal: Tiger
// Number: 3890
// Endangered: Yes
To receive the prop value in a child functional component, we just need to modify the previous code and drop this keyword, as shown here:
const Animal = props => {
return (
<div>
<p>Animal: {props.name}</p>
<p>Number: {props.number}</p>
<p>Endangered: {props.endangered ? 'Yes': 'No'}</p>
</div>
);
};
Note
You can run the parent App component along with the child Animal function component to see the output.
The output will be similar to the previous output, as shown here:
// Animal: Tiger
// Number: 3890
// Endangered: Yes
Destructuring Props
To make the code simpler and more readable, let's destructure the props array object. Destructuring assignment was introduced in ES2015 (https://www.ecma-international.org/ecma-262/6.0/#sec-destructuring-assignment) and it allows us to extract values from arrays or properties from objects into their own variables.
For example, let's say we have an array called colors:
const colors = ['blue', 'red', 'green', 'pink'];
In the colors array, we are storing four color names as strings. We can destructure the array so that we can define the values that have been unpacked from the sourced variables:
const colors = ['blue', 'red', 'green', 'pink'];
const [waterColor, fireColor, lawnColor] = colors;
console.log(waterColor); // expected output: blue
console.log(fireColor); // expected output: red
console.log(lawnColor); // expected output: green
In this example, we have assigned the items in the colors array to three local variables – waterColor, fireColor, and lawnColor – using array destructuring. Notice that each variable is mapped to the corresponding item at the same index on the colors array. So, waterColor takes the value blue, fireColor takes the value red, and lawnColor takes the value green.
Let's utilize this concept to destructure our prop values.
Example 6: Destructuring Prop Values in a Child Class Component
In this example, we are going to destructure prop values in a child class component. Since we will be starting with the render method, we will add a destructuring assignment with the properties: name, number, and endangered. We are going to extract the values of these properties from the this.props object. We no longer need this.props inside the return method now, so we can remove it from there:
class Animal extends Component {
render() {
const { name, number, endangered } = this.props;
return (
<div>
<p>Animal: {name}</p>
<p>Number: {number}</p>
<p>Endangered: {endangered ? 'Yes' : 'No'}</p>
</div>
);
}
}
Note
For object destructuring, use a pair of enclosing parentheses {}. We used a pair of third brackets [] previously since we were performing array destructuring .
Now, we can use our return method to just display the values of the three properties.
We can also directly extract values if we have the assignment inside the function parameter, as shown in the following code. So, instead of having the destructuring assignment in the render method, we can move it inside the render method so that it acts as the function parameter:
class Animal extends Component {
render({ name, number, endangered } = this.props) {
return (
<div>
<p>Animal: {name}</p>
<p>Number: {number}</p>
<p>Endangered: {endangered ? 'Yes' : 'No'}</p>
</div>
);
}
}
If you want to see the output, combine the parent App component and the child Animal class component together, as follows:
import React, { Component } from 'react';
import './App.css';
class App extends Component {
render() {
return <Animal name="Tiger" number={3890} endangered={true} />;
}
}
class Animal extends Component {
render({ name, number, endangered } = this.props) {
return (
<div>
<p>Animal: {name}</p>
<p>Number: {number}</p>
<p>Endangered: {endangered ? 'Yes' : 'No'}</p>
</div>
);
}
}
export default App;
The output will be the same as what we got in the previous example:
// Animal: Tiger
// Number: 3890
// Endangered: Yes
For the function component, we can destructure the object directly in the function parameter.
Example 7: Destructuring Prop Values in a Function Component
In this example, we are going to destructure prop values in a child function component. To do this by using the preceding code, for the parameter, we will add parentheses and remove props. Then, we will add curly braces inside the parentheses and add the name, number, and endangered properties. Finally, inside return, we are going to remove the props in the JSX expression so that only the values of the {name}, {number}, and {endangered ? 'Yes' : 'No'} properties will be displayed:
const Animal = ({ name, number, endangered }) => {
return (
<div>
<p>Animal: {name}</p>
<p>Number: {number}</p>
<p>Endangered: {endangered ? 'Yes' : 'No'}</p>
</div>
);
};
To see the output, we need to combine the parent App and child Animal components:
import React, { Component } from 'react';
import './App.css';
class App extends Component {
render() {
return <Animal name="Tiger" number={3890} endangered={true} />;
}
}
const Animal = ({ name, number, endangered }) => {
return (
<div>
<p>Animal: {name}</p>
<p>Number: {number}</p>
<p>Endangered: {endangered ? 'Yes' : 'No'}</p>
</div>
);
};
export default App;
The output should appear as follows:
// Animal: Tiger
// Number: 3890
// Endangered: Yes
So far, we have discussed how to send and receive primitive values in various ways. Now, let's take a look at how to send an object and receive it in the child component.
In regard to the preceding examples, instead of sending each prop separately, this time, we will gather all the props in an object and send it to the child component.
Exercise 7.01: Sending and Receiving Objects as Props from the Parent
In this exercise, we will work with objects and send and receive them from the parent and child components. We will continue to use the same code we wrote in the Passing Data to a Direct Child Component section. To do so, let's go through the following steps:
- Open the App.js file inside the src folder.
- Import the component from React:
import React, { Component } from 'react';
- Construct an object called details and add some properties and values.
- In return, remove all the props from the <Animal> component and add details as a prop:
render() {
const details = {
name: 'Tiger',
number: 3890,
endangered: true
};
return <Animal details={details} />;
}
}
- When receiving the object in the child class component, destructure it in the same way as we did for the class-based component but this time for the function component:
class Animal extends Component {
render() {
const {name, number, endangered} = this.props.details;
return (
<div>
<p>Animal: {name}</p>
<p>Number: {number}</p>
<p>Endangered: {endangered ? 'Yes' : 'No'}</p>
</div>
);
}
}
export default App;
In the preceding code, we have specified the details for the destructuring assignment. For the function component, we will do something similar to what we did for the class-based component.
- Instead of destructuring directly in the function parameter, take it out and create a destructuring assignment right above the return function, as shown in the previous examples:
const Animal = props => {
const { name, number, endangered } = props.details;
return (
<div>
<p>Animal: {name}</p>
<p>Number: {number}</p>
<p>Endangered: {endangered ? 'Yes' : 'No'}</p>
</div>
);
};
One more optional way of sending multiple props to a child component is to use the spread attribute as a spread operator and send whole props at once, as shown in the following code:
class App extends Component {
render() {
const details = {
name: 'Tiger',
number: 3890,
endangered: true
};
return <Animal {...details} />;
}
}
- In the Animal component, we should receive the data by destructing the props instead of props.details:
const Animal = props => {
const { name, number, endangered } = props;
return (
<div>
<p>Animal: {name}</p>
<p>Number: {number}</p>
<p>Endangered: {endangered ? 'Yes' : 'No'}</p>
</div>
);
};
The output is as follows:
// Animal: Tiger
// Number: 3890
// Endangered: Yes
As we can see, we can receive the props sent by the spread attribute by doing what we did in Step 5 for the class component and Step 6 for the function component.
Note
Spread attributes are a JavaScript concept. According to JSX in Depth (https://reactjs.org/docs/jsx-in-depth.html#spread-attributes), "Spread attributes can be useful but they also make it easy to pass unnecessary props to components that don't care about them or to pass invalid HTML attributes to the DOM. We recommend using this syntax sparingly."
We recommend using the spread attribute with caution. Use it only if it is certainly necessary and makes the component more reusable. We will see how it is used later.
The {children} Prop
In React, there is a special prop called children. The children prop takes the DOM elements inside the component and passes them down to the child component.
For example, let's say we want to add a paragraph tag inside a child component from the parent component:
<ChildComponent><p>this is a paragraph</p></ChildComponent>
Here, we can receive the paragraph, <p> this is a paragraph</p>, from ChildComponent using a children prop, like this:
<p>this is a paragraph</p>
const ChildComponent = props => {
return <div>{props.children}</div>;
}
We will practice how to receive the children prop in the following exercise.
Exercise 7.02: Sending Child Elements Using the children Prop
In this exercise, we are going to practice how to send the child elements from the parent component and receive them through the children prop in the child component. We will use the same code from Exercise 7.01, Sending and Receiving Objects as Props from the Parent. Perform these steps to complete this exercise:
- In the App parent component, add the <h1> element with the text Endangered Animals.
- Inside src/App.js, write the following:
import React, { Component } from 'react';
class App extends Component {
render() {
return (
<Animal name="Tiger" number={3890} endangered={true}>
<h1>Endangered Animals</h1>
</Animal>
);
}
}
- To receive the child component, h1, from the function component, add an extra property, children, in the destructuring assignment. Add {children} right below the opening <div> element in the return method:
const Animal = props => {
const {name, number, endangered, children} = props;
return (
<div>
{children}
<p>Animal: {name}</p>
<p>Number: {number}</p>
<p>Endangered: {endangered ? 'Yes' : 'No'}</p>
</div>
);
};
export default App;
The output of the preceding coding example should appear as follows:
Figure 7.6: Output of the children prop
The children prop is a great thing to use when you need to reuse the child elements from the component. Furthermore, you can read each element by iterating with the React.Children (https://reactjs.org/docs/react-api.html#reactchildren) utility and modifying the element if necessary.
So far, we have looked at how to send and receive strings, numbers, Booleans, and objects. Now, let's discuss how to send an array and iterate within that array.
Sending and Receiving an Array through Props
In the previous sections, we learned how to receive data of various data types in various formats through props in a child component. In this section, we will discuss how to send and receive an array through props and display it in the child components.
To send an array, we would do exactly the same as what we did for the other types of data. Inside the render method, add the fruits array:
const fruits = [
{
name: 'apple',
color: 'red'
},
{
name: 'banana',
color: 'yellow'
},
{
name: 'melon',
color: 'green'
}
];
<FruitList list={fruits} />
In the preceding example, the fruits array contains three elements where each element has a name and color. Now, to receive the data from the child component, we can get it through a prop, just like we did for the other types of data we discussed in the previous sections:
const FruitList = props => {
const fruits = props.list;
return(<ul><li>Fruit list goes here</li></ul>);
};
Now, to render each array item from the array, we can use the map() method to loop the array.
Note
Array.Map is a part of the JavaScript methods.
Please make sure that you add a key to the outermost element inside map(). key is a special string attribute that helps React identify what element has been added, updated, or removed:
const FruitList = props => {
const fruits = props.list;
const fruitList = fruits.map((fruit, index) => (
<li key={index}>
<p>Name: {fruit.name}</p>
<p>Color: {fruit.color}</p>
</li>
));
return(<ul>{fruitList}</ul>);
};
The complete code for the preceding example, which combines the parent and child components, looks as follows:
import React, { Component } from 'react';
import './App.css';
class App extends Component {
render(){
const fruits = [
{
name: "apple",
color: "red"
},
{
name: "banana",
color: "yellow"
},
{
name: "melon",
color: "green"
}
];
return (
<FruitList list={fruits} />
);
}
}
The functional component FruitList would like this:
const FruitList = props => {
const fruits = props.list;
const fruitList = fruits.map((fruit, index) => (
<li key={index}>
<p>Name: {fruit.name}</p>
<p>Color: {fruit.color}</p>
</li>
));
return(<ul>{fruitList}</ul>);
};
export default App;
If you run the preceding code, the output will be as follows:

Figure 7.7: The FruitList child component
Alternatively, you can use map() directly inside return() like so:
const FruitList = props => {
const fruits = props.list;
return(
<ul>
{fruits.map((fruit, index) => (
<li key={index}>
<p>Name: {fruit.name}</p>
<p>Color: {fruit.color}</p>
</li>
))}
</ul>
);
};
We now have a good idea of how to send an array to the child components and display each array item in the child components using the map() method. Next, let's practice what we have learned so far through an exercise.
Exercise 7.03: Sending, Receiving, and Displaying an Array from a Parent to a Child
In this exercise, we will work with arrays and learn how to send, receive, and display an array through props sent from a parent to a child component. We will add two more objects and put those objects in an array. To do so, let's go through the following steps:
- Start with the parent App component. Inside the render method, define the details array:
class App extends Component {
render() {
const details = [
{
name: 'Tiger',
number: 3890,
endangered: true
},
{
name: 'Brown Bear',
number: 200000,
endangered: false
},
{
name: 'Red Panda',
number: 10000,
endangered: true
}
];
- In the return method, inside the Animal component, add <h1> with a heading, Endangered Animals:
return (
<Animal details={details}>
<h1>Endangered Animals</h1>
</Animal>
);
}
}
- Now, let's receive the array from the child Animal class component. Assign the details prop in an array to the details variable:
class Animal extends Component {
render() {
const details = this.props.details;
}
}
- Loop the details array with a map method. Using the map function creates a new array and assigns it to the listDetails variable:
class Animal extends Component {
render() {
const details = this.props.details;
const listDetails = details.map(detail => (
));
}
}
- Inside the map method, we are going to receive each object value with name, number, and endangered. Construct JSX with the <li>, <div>, and <p> elements and assign the constructed JSX to the listDetails variable. Finally, add {listDetails} inside <ul> in JSX. The complete code will look as follows:
class Animal extends Component {
render() {
const details = this.props.details;
const listDetails = details.map(detail => (
<li>
<div>
<p>Animal: {detail.name}</p>
<p>Number: {detail.number}</p>
<p>Endangered: {detail.endangered ? 'Yes' : 'No'}</p>
</div>
</li>
));
return (
<div>
{this.props.children}
<ul>{listDetails}</ul>
</div>
);
}
}
The output of the preceding code should appear as follows:
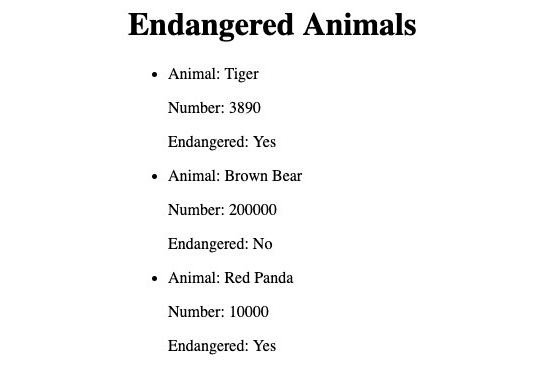
Figure 7.8: Output
This looks all good; however, if you open the Developer Tools (the F12 key in Chrome) from your browser, you may see a similar warning message to the following:

Figure 7.9: Array warning with no unique key prop
This has occurred because we have not assigned a unique key to each element inside the array for a stable identity. The key is required when you create a list of elements so that React can identify which element is being added, changed, reordered, and removed. The best way to choose the key is by getting an ID from data; however, as we have not sent an ID inside the array, we will use the item index as a key.
- Let's add a unique key. Add index as the second argument inside the map method. Then, add a key attribute to <li> and add {index} to key as a value. Now, the code will look like this:
class Animal extends Component {
render() {
const details = this.props.details;
const listDetails = details.map((detail, index) => (
<li key={index}>
<div>
<p>Animal: {detail.name}</p>
<p>Number: {detail.number}</p>
<p>Endangered: {detail.endangered ? 'Yes' : 'No'}</p>
</div>
</li>
));
…
return (
<div>
{this.props.children}
<ul>{listDetails}</ul>
</div>
);
}
}
By doing this, each <li> element obtains a key value and the warning sign should disappear. So far, we have constructed the JSX elements from the loop, <listDetails />, and added them to the return method. This time, we will discuss how we can directly loop the array inside JSX. For this example, we will update the code for the function component.
- Alternatively, let's receive the array inside JSX. Assign the details prop in an array to the details variable. In JSX, use the map method to loop the details. Since this is a JSX expression, we should enclose the code in curly braces. Get the detail and index in the function parameter, like so:
const Animal = props => {
const details = props.details;
return (
<div>
{props.children}
<ul>
{details.map((detail, index) => (
…
))}
</ul>
</div>
);
};
- Construct JSX with the <li>, <div>, and <p> elements. Add values such as name, number, and endangered. Also, add a key with {index}. The complete code will look as follows:
const Animal = props => {
const details = props.details;
return (
<div>
{props.children}
<ul>
{details.map((detail, index) => (
<li key={index}>
<div>
<p>Animal: {detail.name}</p>
<p>Number: {detail.number}</p>
<p>Endangered: {detail.endangered ? 'Yes' : 'No'}</p>
</div>
</li>
))}
</ul>
</div>
);
};
The output is as follows:

Figure 7.10: Output of the app
In this exercise, we learned how an array can be passed from a parent component and received as a prop in the child components.
Passing Data to a Child Component Multiple Levels Down
So far, we have learned how to send data to a direct child component and display the data in the UI. In this section, we are going to learn how to send data to child components located multiple levels down. As we mentioned earlier, in React, it is recommended to split your components into smaller pieces to make the components reusable. When we have several hierarchical levels of components, quite often, we need to send data through nested components, as shown in the following diagram:

Figure 7.11: Data passed from the parent to its child components
There are several ways we can send data down to such child components:
- Props: As we practiced in the previous section, we can keep passing the props down to the child components until the last child component in the hierarchy. In this section, we are going to learn more about how to pass props through multiple levels of child components.
- React Context API: The main problem with passing props down to each child component is there could be a lot of layers of components in-between the data source and the user. This is called props-drilling. For example, if there are 10 child components inside a parent component and we want to send data to the tenth child component from the parent component, we need to pass the data 10 times through the other child components. With the React Context API, we can provide the data from the parent component and consume it directly from a component on any level without passing it through the other child components. We will learn how to use the Context API in the following section.
- Redux: Redux is one of the most powerful state management libraries. It is commonly used with React, but it can be used standalone with other JavaScript libraries. With Redux, we can centralize the state by storing it in an object tree within a store so each component can access any state from the store.
In this book, we are not going to discuss Redux but if you want to learn more about it, please check the getting started guide (https://redux.js.org/introduction/getting-started) on the Redux documentation page.
Before we jump into any of these ways to pass data from a parent to a child at any other level, it will be useful to understand how to split a component into further smaller, reusable components. We will see how to do that in the following section.
Splitting a Component into Smaller Components
To understand how to split a component into smaller, reusable ones, we'll be splitting the Animal component from our previous examples into smaller components and passing the data to the child components:

Figure 7.12: Passing data down to multiple child components
In the following exercises, we are going to separate a portion of the code from the Animal component and add the code to a new child component called AnimalDetails, as shown in the preceding diagram. Let's practice how to split the component by taking a look at the following exercise.
Exercise 7.04: Splitting into Smaller Components
In this exercise, we are going to separate the Animal component and move the animal details to the AnimalDetails component. To do so, let's go through the following steps:
- Create a new function component called AnimalDetails. Then, copy the <li> elements from the Animal component and paste them into the return function:
const AnimalDetails = props => {
return (
<li key={index}>
<div>
<p>Animal: {detail.name}</p>
<p>Number: {detail.number}</p>
<p>Endangered: {detail.endangered ? 'Yes' : 'No'}</p>
</div>
</li>
);
};
- Above the return function, destructure the props:
const {name, number, endangered} = props.detail;
- Update the props value in the return function accordingly:
const AnimalDetails = props => {
const {name, number, endangered} = props.detail;
return (
<li key={props.key}>
<div>
<p>Animal: {name}</p>
<p>Number: {number}</p>
<p>Endangered: {endangered ? 'Yes' : 'No'}</p>
</div>
</li>
);
};
- Now, let's update the Animal component. Inside the map method in the Animal component, add the <AnimalDetails> component. Add the detail and index props to the <AnimalDetails> component:
const details = props.details;
return (
<div>
{props.children}
<ul>
{details.map((detail, index) => (
<AnimalDetails detail={detail} key={index} />
))}
</ul>
</div>
);
};
The output of this will be as follows and will be similar to what we mentioned earlier:
// Animal: Tiger
// Number: 3890
// Endangered: Yes
As you can see, first, we passed the details data through the details prop to the <Animal> component and the detail prop to <AnimalDetails>.
Passing a Component through a Prop
So far, we have learned about passing props of various types, such as string, number, Boolean, array, and object. In the following sections, we are going to discuss sending components and functions through props. First, let's learn how to send a component.
Passing a component as a prop to a child component from a parent component allows us to reuse components and directly display the React elements with updated values.
Note
In this section, we are using Unsplash (https://unsplash.com/), which is where you can download free photos and use them for any project.
We are going to put the details data, including the animal's name, number, endangered status, and photo, in the App component and make use of this data in the following sections:
// the details data located in the App component
const details = [
{
name: 'Tiger',
number: 3890,
endangered: true,
photo: 'https://source.unsplash.com/Si6Obte6Bu0/200x100'
},
{
name: 'Brown Bear',
number: 200000,
endangered: false,
photo: 'https://source.unsplash.com/c8XlAc1akIU/200x100'
},
{
name: 'Red Panda',
number: 10000,
endangered: true,
photo: 'https://source.unsplash.com/2zYHKx8jtvU/200x100'
}
];
To display the photo of the animal, we are going to create a new component called <Photo> and reuse this component by sending it through a prop. The following exercise will teach us how we can create a new functional component.
Exercise 7.05: Creating a Photo Function Component
In this exercise, we are going to create a child function component called Photo and pass that as a component through the props from the parent component, <Animal>, to the child component, <AnimalDetails>. To do so, let's go through the following steps:
- Create a <Photo> function component and return an <img> element. We are also going to receive two props, path for the src attribute and name for the alt attribute:
return <img src={props.path} alt={props.name} />;
};
- Let's pass the <Photo> component to the <AnimalDetails> component.
- For <AnimalDetails> in the <Animal> component, add a new prop called image with the value <Photo path={detail.photo} title={detail.name} />. Make sure to enclose it in curly braces:
const details = props.details;
…
return (
<div>
{props.children}
<ul>
{details.map((detail, index) =>
…
<AnimalDetails image={<Photo path={detail.photo} title={detail.name} />}
detail={detail} key={index} />
)
)}
</ul>
</div>
);
};
- Now, let's receive the <Photo> component from the <AnimalDetails> component.
- Right below the opening <div>, add {props.image}. This will display the <Photo> components with the props value we sent through, such as the photo path and title:
const AnimalDetails = props => {
const { name, number, endangered } = props.detail;
return (
<li key={props.key}>
<div>
<p>{props.image}</p>
<p>Animal: {name}</p>
<p>Number: {number}</p>
<p>Endangered: {endangered ? 'Yes' : 'No'}</p>
</div>
</li>
);
};
The output of the preceding code should appear as follows:

Figure 7.13: Photo function component
As we saw in this exercise, our Endangered Animals app now contains all the necessary information to function, including the Photo component. The Photo component was passed as a prop from the parent to the child component. In the next section, we are going to learn about a more advanced React concept known as Higher-Order Components (HOC).
Higher-Order Components
According to the React documentation (https://reactjs.org/), "... a higher-order component is a function that takes a component and returns a new component". A HOC is not a React API, it is a pattern that shares common functionalities. From the name itself, you may think it is some sort of component; however, it is actually a function. A HOC function accepts a component as an argument and returns a new component. HOCs help us reuse code with the same functionalities between components so that we do not have to repeat the same code.
To see HOCs in action, we are going to add a new feature to our Endangered Animals app that we created previously. We are going to add another property in the details data called Donation and if the amount of a donation is bigger than 50, we will update the color of the donation to green. Otherwise, we will keep the donation color red.
Before we start the exercise, let's update the details object we used in the Passing a Component through a Prop section and add the donation property with a number for each animal:
const details = [
{
name: 'Tiger',
number: 3890,
endangered: true,
photo: 'https://source.unsplash.com/Si6Obte6Bu0/400x300',
donation: 100
},
{
name: 'Brown Bear',
number: 200000,
endangered: false,
photo: 'https://source.unsplash.com/c8XlAc1akIU/400x300',
donation: 10
},
{
name: 'Red Panda',
number: 10000,
endangered: true,
photo: 'https://source.unsplash.com/2zYHKx8jtvU/400x300',
donation: 50
}
];
To iterate through the details array, inside the map method, instead of calling the AnimalDetails component, we are going to call a new component called WrapperComponent:
const Animal = props => {
const details = props.details;
return (
<div>
{props.children}
<ul>
{details.map((detail, index) => (
<WrapperComponent image={<Photo path={detail.photo} title={detail.name} />} detail={detail} key={index} />
))}
</ul>
</div>
);
};
Now, we are going to create another component by calling the HOC function. Here, we are going to create the AnimalDetails component as an argument, as follows:
const WrapperComponent = withDonationColor(AnimalDetails);
By doing so, in the HOC, we can access all the props that were sent to the AnimalDetails component in the HOC function.
Exercise 7.06: Creating a HOC Function That Can Be Called with DonationColor
In this exercise, we are going to create a HOC function that will check if the amount of the donation is greater than 50. If it's greater than 50, we will change the text color of the donation amount to green; otherwise, it will stay red.
Note
Before you complete this exercise, ensure that you have modified the code so that it looks like what we had in the previous section.
- Create a HOC function called withDonationColor that receives a component as an argument called WrappedComponent. Inside the function, we are going to create a class-based component and directly return it:
const withDonationColor = WrappedComponent => {
return class extends Component {
}
};
- Inside the class component, add a constructor method and pass the props. Add a super() keyword while passing the props to it and initialize the state with the donation color set to black:
const withDonationColor = WrappedComponent => {
return class extends Component {
constructor(props) {
super(props);
this.state = { donationColor: 'black' };
}
}
};
- Under the constructor method, create the componentDidMount method. Inside the componentDidMount life cycle, we are going to get the amount of the donation, followed by checking whether it's bigger than 50. If it's bigger than 50, update the donationColor state to green; otherwise, update it to red:
const withDonationColor = WrappedComponent => {
return class extends Component {
constructor(props) {
super(props);
this.state = { donationColor: 'black' };
}
…
componentDidMount() {
const donationAmout = this.props.detail.donation;
const donationColor = donationAmout > 50 ? 'green' : 'red';
this.setState({ donationColor });
}
}
};
- Lastly, add a render method. In the render method, we are going to return the WrappedComponent component we received as an argument, but with a new prop called donationColor. We will still apply the remaining props with the spread attributes we learned about in the previous section:
const withDonationColor = WrappedComponent => {
return class extends Component {
constructor(props) {
super(props);
this.state = { donationColor: 'black' };
}
componentDidMount() {
const donationAmout = this.props.detail.donation;
const donationColor = donationAmout > 50 ? 'green': 'red';
this.setState({ donationColor });
}
render() {
return <WrappedComponent {...this.props} donationColor={this.state.donationColor} />;
}
};
};
- Now, in the AnimalDetails component, we can access the donationColor prop that we sent from the HOC function.
- Now, let's add donationColor. Add an inline style to the donation amount, along with the amount. Please make sure to add two sets of curly braces. The first set of curly braces (outside) will be for adding a JavaScript expression, while the second set of curly braces (inside) will be for the inline style (https://reactjs.org/docs/dom-elements.html#style):
const AnimalDetails = props => {
const { name, number, endangered, donation} = props.detail;
return (
<li key={props.index}>
<div>
<p>{props.image}</p>
<p>Animal: {name}</p>
<p>Number: {number}</p>
<p>Endangered: {endangered ? 'Yes' : 'No'}</p>
<p style={{ color: props.donationColor }}>Donation amount: ${donation}</p>
</div>
</li>
);
};
The output of the preceding code should appear as follows:
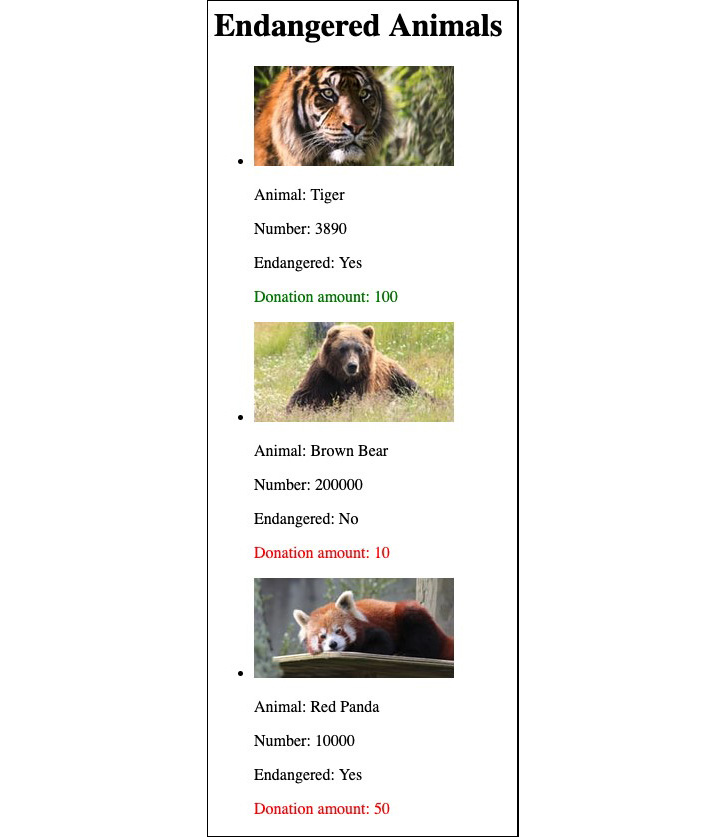
Figure 7.14: Output of the donation amount (in color)
In this exercise, we practiced how to update the color of the animal depending on the amount of the donation. From here, you can make the HOC function more reusable by separating the color and amount.
Render Props
In the previous section, we learned what a HOC is and how to use it. In this section, we are going to learn about one more advanced React concept, render props.
Like HOCs, render props help us reuse the code between components and help us avoid repeating the same code. On the other hand, unlike HOCs, which take a component and return an updated component, render props take a function and return a React element. In the next exercise, we are going to do exactly the same as what we did for HOCs, that is, we'll update the color of the donation amount if the amount is bigger than 50.
The details object we mentioned previously will be the same and we are going to update it from the Animal component.
Exercise 7.07: Adding donationColor
In this exercise, similar to what we did for the HOC function exercise, we are going to create a render prop function and check if the amount of the donation is greater than 50. If it's greater than 50, we will change the text color of the donation amount to green; otherwise, we'll change it to red. Follow these steps to complete this exercise:
As with the HOC, create a new component called WrapperComponent, but this time for render props. Here, we are going to add a render prop to <WrapperComponent> and send a function.
- Inside the map method, add <WrapperComponent>. Also, add the donationAmount and render props to <WrapperComponent>:
const Animal = props => {
const details = props.details;
return (
<div>
{props.children}
<ul>
{details.map((detail, index) => (
<WrapperComponent
key={index}
donationAmount={detail.donation}
render={() => (
)}
/>
))}
</ul>
</div>
);
};
- In the render prop, we are going to pass a function. Since we want to receive the donation color, add donationColor as a parameter. Make sure to destructure the object as we only want to receive the donationColor parameter from the object:
const Animal = props => {
const details = props.details;
return (
<div>
{props.children}
<ul>
{details.map((detail, index) => (
<WrapperComponent
key={index}
donationAmount={detail.donation}
render={({ donationColor }) => (
)}
/>
))}
</ul>
</div>
);
};
- Add the <AnimalDetails> component in the function alongside the donationColor parameter we received previously, along with the image, detail, and index props:
const Animal = props => {
const details = props.details;
return (
<div>
{props.children}
<ul>
{details.map((detail, index) => (
<WrapperComponent
key={index}
donationAmount={detail.donation}
render={({ donationColor }) => (
<AnimalDetails
donationColor={donationColor}
image={<Photo path={detail.photo} title={detail.name} />}
detail={detail}
key={index}
/>
)}
/>
))}
</ul>
</div>
);
};
- Now, let's create the <WrapperComponent>. The WrapperComponent will have the logic that will decide the color of the donationColor and return an object containing the donationColor. First, add a constructor method and call super(props). Also, initialize the state of the donationColor parameter with black as a default value:
class WrapperComponent extends Component {
constructor(props) {
super(props);
this.state = { donationColor: 'black' };
}
}
- Add the componentDidMount() life cycle method. When the component is mounted, we are going to check if the donation amount is bigger than 50 and if so, update the donationColor state to green; otherwise, we will update it to red:
class WrapperComponent extends Component {
constructor(props) {
super(props);
this.state = { donationColor: 'black' };
}
componentDidMount() {
const donationAmout = this.props.donationAmount;
const donationColor = donationAmout > 50 ? 'green' : 'red';
this.setState({ donationColor });
}
}
- Add the render() method. In the render method, return an object with donationColor as a property:
class WrapperComponent extends Component {
constructor(props) {
super(props);
this.state = { donationColor: 'black' };
}
componentDidMount() {
const donationAmout = this.props.donationAmount;
const donationColor = donationAmout > 50 ? 'green' : 'red';
this.setState({ donationColor });
}
render() {
return this.props.render({
donationColor: this.state.donationColor
});
}
}
- Lastly, in the <AnimalDetails> component, we are going to update the donation color. Add an inline style with the donationColor parameter for the donation color:
const AnimalDetails = props => {
const { name, number, endangered, donation } = props.detail;
return (
<li key={props.index}>
<div>
<p>{props.image}</p>
<p>Animal: {name}</p>
<p>Number: {number}</p>
<p>Endangered: {endangered ? 'Yes' : 'No'}</p>
<p style={{ color: props.donationColor }}>Donation amount: ${donation}</p>
</div>
</li>
);
};
The output from the render props we created here should display the donation amount text in either green or red, as shown in the following screenshot:

Figure 7.15: App showing the donation amount
As we can see, the donationColor details, which were created as a WrapperComponent, were added to each Animal component.
So far, we have learned how to use HOCs and render props. Both HOCs and render props allow us to share the same functionality between components. There is no hard and fast rule of which one to use over the other. However, as a general rule of thumb, go with render props first. This is because render props require less boilerplate code and are easier to set up. Apart from this, they are more predictable when debugging with state or props. However, when you find too many nested render props (similar to callback hell), go with small HOCs and compose them together.
Passing Data from Children to a Parent
As we have already mentioned, data can only be passed down to a child component from the parent component. However, there could be instances where you might need to send data from the child components to the parent components:

Figure 7.16: Communicating from children to a parent
In this section, we are going to continue with the Endangered Animals app from Exercise 7.07, Adding donationColor ,but this time, we are going to add a remove button to each animal section and when we click the remove button, we will remove the animal from the list. The outcome of this should look something like the following:
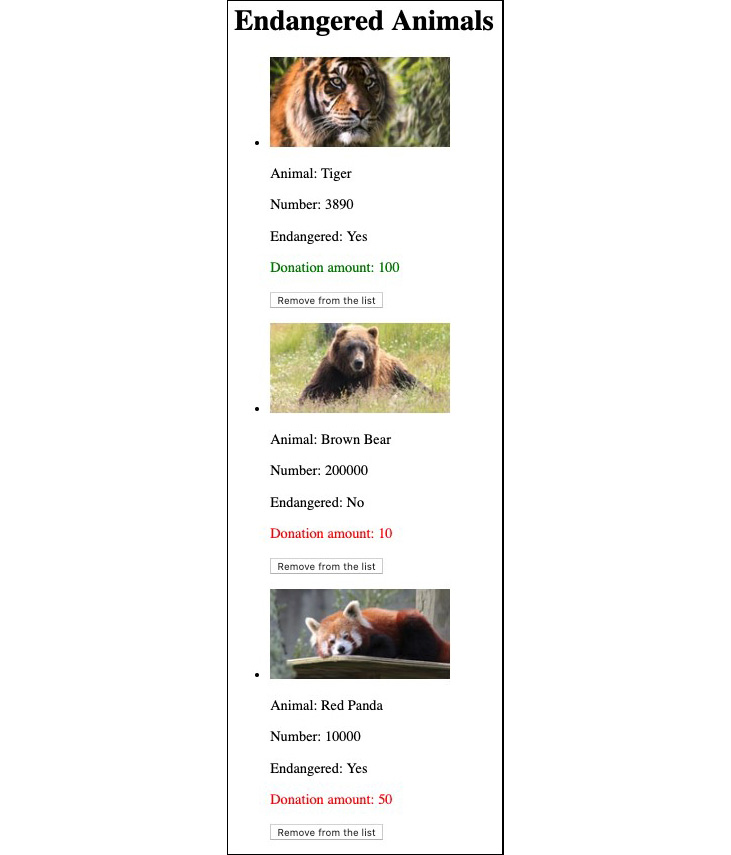
Figure 7.17: Outcome of the remove button
The overall plan for this functionality is as follows:
- In the <App> component, we are going to update the details object to a state so that when we remove the details in the state, it will re-render the components and display the updated UI.
- In the <App> component, we are going to create a new function called removeList. This function will take an id of the details object as an argument and have the logic to update the state by removing the object matching the ID.
- In the <App> component, we are going to send the removeList callback function through a prop.
- In the <Animal> component, we are going to send the removeList prop to <WrapperComponent>.
- In the <AnimalDetails> component, we are going to reference the removeList callback function in the onClick event on the button element.
We are going to execute this in the form of steps of an exercise.
Exercise 7.08: Passing Data from a Child to a Parent Component
In this exercise, we will pass data from a child to a parent component using a callback function that will remove the animal section if we click the remove button in the child component. Follow these steps to complete this exercise:
- At the top of the <App> component, create a constructor method and pass props as an argument. Inside the constructor method, add a super() keyword while passing props to it. Move the details object from the render method to this.state under the super keyword:
App.js
3 class App extends Component {
4 constructor(props) {
5 super(props);
6
7 this.state = {
8 details: [
9 {
10 id: '1',
11 name: 'Tiger',
12 number: 3890,
13 endangered: true,
14 photo: 'https://source.unsplash.com/Si6Obte6Bu0/200x100',
15 donation: 100
The complete code can be found here: https://packt.live/3dKxyMV.
- In the <App> component, create the removeList function under the constructor method. Accept id as an argument. The id is the id of the animal in the details state. Call this.setState with the functional approach. We will filter out by matching the ID from the details state and return a new state:
App.js
3 class App extends Component {
4 constructor(props) {
5 super(props);
…
37 removeList(id) {
38 this.setState(prevState => {
39 const list = prevState.details.filter(item => item.id !== id);
40 return { prevState, details: list };
41 });
42 }
44 render() {
45 return (
46 <Animal details={this.state.details} removeList={this.removeList.bind(this)}>
The complete code can be found here: https://packt.live/3dVNgVJ.
- In the render() method, pass the removeList function through the removeList prop in the <Animal> component. Make sure to bind(this) to make this keyword work in the callback:
render() {
return (
<Animal details={this.state.details} removeList={this.removeList.bind(this)}>
<h1>Endangered Animals</h1>
</Animal>
);
}
}
- In the <Animal> component, we are going to receive the removeList prop as props.removeList. Pass it through the removeList prop in <WrapperComponent>:
const Animal = props => {
const details = props.details;
return (
<div>
{props.children}
<ul>
{details.map((detail, index) => (
<WrapperComponent
key={index}
image={<Photo path={detail.photo} title={detail.name} />}
detail={detail}
index={index}
removeList={props.removeList}
/>
))}
</ul>
</div>
);
};
- In the <AnimalDetails> component, add a <button> element with the text, Remove from list. In the <button> element, add an onClick event and a reference to the removeList callback function. Make sure to send the id of the animal as an argument:
const AnimalDetails = props => {
const { id, name, number, endangered, donation } = props.detail;
return (
<li key={id}>
<div>
<p>{props.image}</p>
<p>Animal: {name}</p>
<p>Number: {number}</p>
<p>Endangered: {endangered ? 'Yes' : 'No'}</p>
<p style={{ color: props.donationColor }}>Donation amount: {donation}</p>
<button onClick={() => props.removeList(id)}>Remove from the list</button>
</div>
</li>
);
};

Figure 7.18: Output
As you can see, when you click on the remove from the list button, the animal section should be removed from the list. This is how you can communicate with the parent component from the child component.
Passing Data Between Components at Any Level
In the previous sections, we learned how to communicate between parent components and child components. In this section, we are going to learn how we can pass data between components at any level.
A good example of this is an e-commerce site. When you add a product to a shopping cart, by clicking the Add to cart button, it will update the number of products in the cart. In this case, we may have a product details component under the product component, whereas the cart component would be located in a totally different hierarchical level to the product details. In the following exercises, we will use this concept and we will learn how to send data from a component to a component in a different hierarchical tree.
Let's look at the diagram for our case:
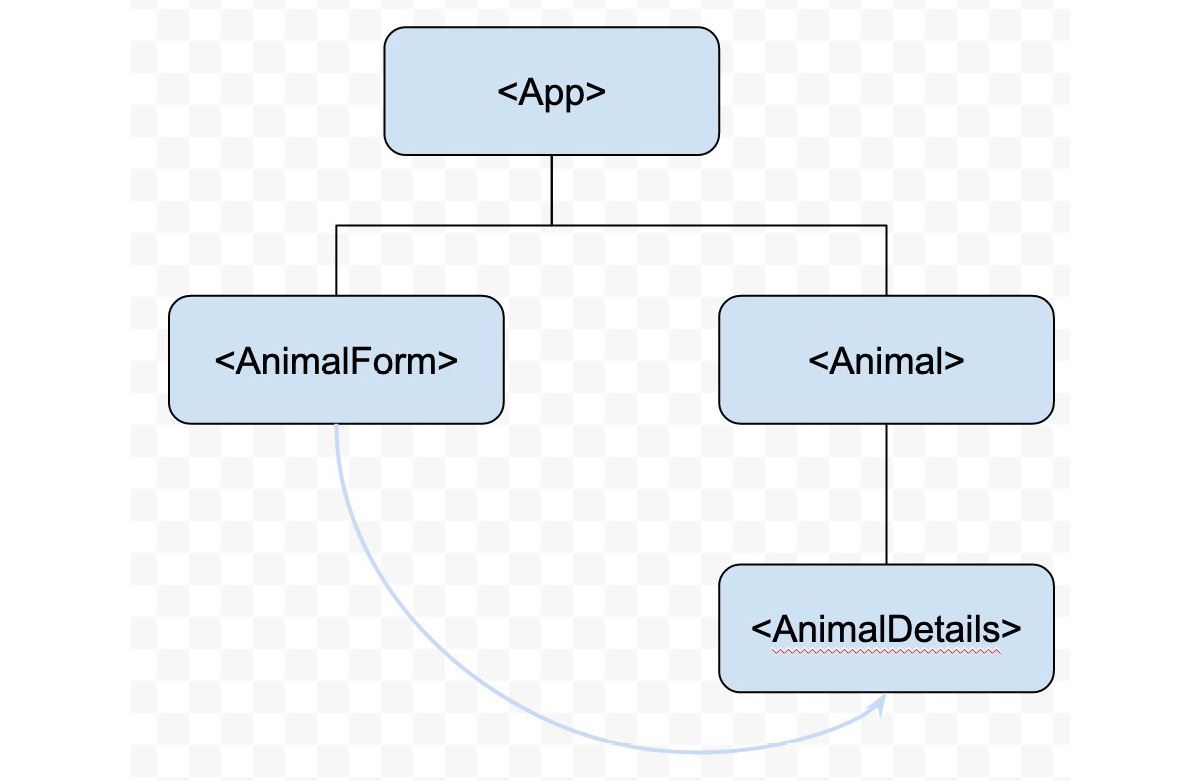
Figure 7.19: Passing data between any components
In this section, we are going to create new component called <AnimalForm>. The <AnimalForm> component will have a form where people can submit new animal details. When people submit the form with the new details, the newly added animal details will appear through the <AnimalDetails> component:

Figure 7.20: Output of the <AnimalForm> component
First, let's add some simple styles so that we can lay out the list of the animals better. We will create a new file called styles.css in the src folder. Right below this, we will add an import statement for React at the top of the page, import a styles.css. Then, add the styles like so:
label {
min-width: 50px;
}
.title {
margin-top: 10px;
}
button {
margin-top: 10px;
}
.list {
display: flex;
list-style: none;
margin: 0 0 20px;
padding: 0;
}
.list li {
margin: 10px;
}
Let's start off with some exercises to learn how we can pass data between any component. In the first exercise, we will create a callback function and then in the next exercise, we will pass that callback function through a prop so that we can pass data between any component, irrespective of the hierarchy.
Exercise 7.09: Adding the addList Callback Function
In this exercise, we will create a callback function called addList, within which we are going to update the state. Follow these steps to complete this exercise:
- In the <App> component, add a new function called addList and receive the details parameter. Inside the function, we are going to update the state. Add this.state and receive prevState. In the setState function, first, get a new ID by incrementing one from the total number of the details array (prevState.details.length + 1) and create a newDetails object by adding the new ID. Finally, return the new state with the newDetails added:
addList(details) {
this.setState(prevState => {
const newId = prevState.details.length + 1;
const newDetails = { ...details, id: newId };
return { ...prevState, details: [...prevState.details, newDetails] };
});
}
- To use addList as a callback function, we need to send it through a prop. In the render method, add the <AnimalForm> component, add a new prop called addList, and send the callback function we just created:
render() {
return (
<React.Fragment>
<Animal details={this.state.details} removeList={this.removeList.bind(this)}>
<h1>Endangered Animals</h1>
</Animal>
<AnimalForm addList={this.addList.bind(this)} />
</React.Fragment>
);
}
So far, we have prepared the callback function and sent it through the addList prop to the AnimalForm component. This callback function will allow us to add a new animal list.
- Now, let's create the <AnimalForm> component. The <AnimalForm> component will contain several functions and JSX elements so that we can output the form with a submit button. We will pass the addList callback function as a prop and pass a value from one component to the other.
- Create a class-based component called AnimalForm.
- In the constructor method, initialize a state. This technique is called Controlled component (more on that in Chapter 8, Introduction to Formik):
this.state = {
name: '',
number: 0,
endangered: false,
photo: '',
donation: 0
};
- Add a render method and return the following JSX element to display a form:
App.js
115 render() {
116 return (
117 <form onSubmit={this.handleSubmit}>
118 <h2>Add new animal details</h2>
119 <label>
120 <div className="title">Name:</div>
121 <input type="text" name="name" />
122 </label>
123 <label>
149 <div className="title">Photo:</div>
150 <input type="text" name="photo" />
151 </label>
The complete code can be found here: https://packt.live/3cx9Vas.
- For each input element, add a value from the state. Each property name from the state we initialized in the constructor method will be the same as the name of the input element:
App.js
render() {
return (
<form onSubmit={this.handleSubmit}>
<h2>Add new animal details</h2>
<label>
<div className="title">Name:</div>
<input type="text" value={this.state.name} name="name" />
</label>
<label>
<div className="title">Number:</div>
<input type="number" value={this.state.number} name="number" />
The complete code can be found here: https://packt.live/3cx9Vas.
- Let's update the value of each input element when the value gets changed. To do this, we are going to create a new function called handleChange and reference to it in the onChange event. First, add the onChange event and add a reference to the handleChange function:
App.js
115 render() {
116 return (
117 <form onSubmit={this.handleSubmit}>
118 <h2>Add new animal details</h2>
119 <label>
120 <div className="title">Name:</div>
121 <input type="text" value={this.state.name} name="name" onChange={this.handleChange} />
122 </label>
123 <label>
129 <div className="title">Number:</div>
130 <input type="number" value={this.state.number} 131name="number" onChange={this.handleChange} />
The complete code can be found here: https://packt.live/2Asns4Z.
- For the onChange event, we need to bind this keyword. Add it to the constructor method:
constructor(props) {
super(props);
this.state = {
name: '',
number: 0,
endangered: false,
photo: '',
donation: 0
};
this.handleChange = this.handleChange.bind(this) ;
}
- Create the handleChange function and receive the event.
- First, assign event.target to inputTarget. By doing this, we are going to get the value from the target. Since we have two different input types – text (including number) and radio – we are going to create another function called getInputValue and return the value in the next step. On the next line, assign the target name.
- Finally, update the state with the input name as a property with the value:
handleChange(event) {
const inputTarget = event.target;
const inputValue = this.getInputValue(inputTarget);
const inputName = inputTarget.name;
this.setState({ [inputName]: inputValue });
}
- Create the getInputValue function. We are going to receive a target and check the type and value and return the proper input value to update in the state:
getInputValue(target) {
if (target.type === 'radio' && target.value === 'yes') {
return true;
} else if (target.type === 'radio' && target.value === 'no') {
return false;
}
return target.value;
}
- Now, we need to handle the submit event. So, when people submit the form, we are going to send the details from the state through the addList callback function.
- First, add a handleSubmit reference in the form's onSubmit event:
render() {
return (
<form onSubmit={this.handleSubmit}>
<h2>Add new animal details</h2>
<label>
...
- Then, bind this keyword in the constructor method:
constructor(props) {
super(props);
this.state = {
name: '',
number: 0,
endangered: false,
photo: '',
donation: 0
};
this.handleChange = this.handleChange.bind(this);
this.handleSubmit = this.handleSubmit.bind(this);
}};
- Create the handleSubmit function and receive event.
Inside the handleSubmit function, we will add event.preventDefault() to prevent a browser reload/refresh when submitting the form. If the browser gets reloaded, our app will lose all the data in the state. On the next line, invoke the addList callback function by sending the state of the details that were updated by the form elements:
handleSubmit(event) {
event.preventDefault();
this.props.addList(this.state);
The output is as follows:
Figure 7.21: Animal details
When we submit new details, the handleSubmit function will invoke the addList callback function and it will update the state of the animal details. Once the state is updated, it will re-render the child components and display our newly added animal list. From the preceding output, we can see that we have added new animal details for Orangutan.
The Context API
Throughout this chapter, we have learned how to pass data through props to communicate between components. However, as we had mentioned briefly earlier, we will face the prop-drilling issue while passing data through props.
From the Endangered Animals app we built earlier to pass data from the <App> component to the <AnimalDetails> component, we had to pass the data through the intermediate component, which is the <Animal> component, even if the <Animal> component does not make use of the prop.
In our app, there is only one intermediate component for now. However, if our app gets more complex, we will have to pass the data through several intermediate components.
So how can we pass the data to the child component directly without going through multiple intermediate components in-between? We could use Redux, which manages the state in one place, called a store, and each component can access its store when needed. However, since this is a React book, we will focus more on the React way and look at the Context API.
The Context API provides us with a way to pass state across multiple levels of components without passing through props. Therefore, we do not have to pass a prop through every layer of the component tree.
To see the Context API in action, we are going to add the total number of endangered animals between the list of endangered animals and the form for adding new animal details. The output of the app should appear as follows:
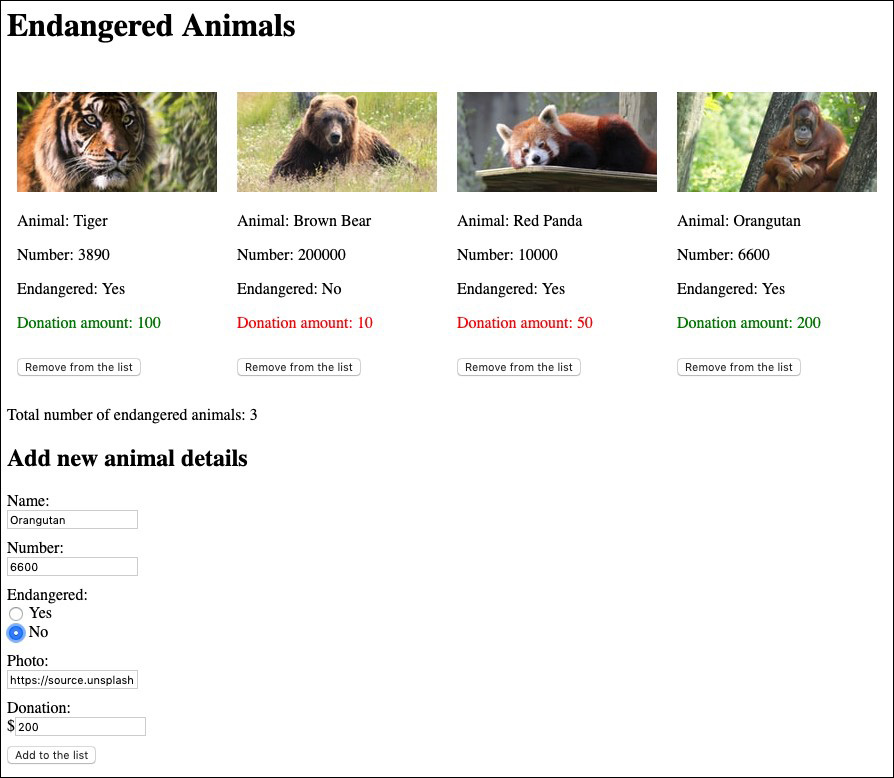
Figure 7.22: The output of the total number of endangered animals
To add the total number of endangered animals, we are going to create one more component called AnimalCount:

Figure 7.23: New AnimalCount component
The <AnimalCount> component will sit under the <Animal> component. The state of the total number will be managed from the <App> component level, but we will directly receive the total number in the <AnimalCount> component from the <App> component without passing through the <Animal> component.
Moreover, when we add new animal details from the <AnimalForm> component, the total number of endangered animals will be automatically updated in the <AnimalCount> component.
Exercise 7.10: Creating the <AnimalCount> Component Using the React Context API
In this exercise, we will see the Context API in action. We will add another component called <AnimalCount> to the <Animal> component using the Context API. We will continue to add additional code where we left off in the previous section. Perform these steps to complete this exercise:
- Create a Context object with a default value of the count, zero, above the <App> class-based component:
const CountContext = React.createContext(0);
class App extends Component {
constructor(props) {
super(props) ;
...
- Initialize the count to zero in the state in the constructor method of the <App> component:
const CountContext = React.createContext(0);
class App extends Component {
constructor(props) {
super(props);
this.state = {
details: [...],
count: 0
};
}
- Create a Provider component with the count value from the state, <CountContext.Provider value={this.state.count}>, and wrap both of the <Animal> and <AnimalForm> components in the render method. The Provider component should be created and should wrap the parent component so that the consuming components will consume the value:
render() {
return (
<React.Fragment>
<CountContext.Provider value={this.state.count}>
<Animal details={this.state.details} removeList={this.removeList.bind(this)}>
<h1>Endangered Animals</h1>
</Animal>
<AnimalForm addList={this.addList.bind(this)} />
</CountContext.Provider>
</React.Fragment>
);
}
- Create a new function component to display the total number of endangered animals.
- Create a Consumer in the return(), <CountContext.Consumer>, and receive the props. The props value will contain the count that was sent from the Provider:
const AnimalCount = () => {
return (
<CountContext.Consumer>
{props => (
<div>
Total number of endangered animals:
<span> {props}</span>
</div>
)}
</CountContext.Consumer>
);
};
- Now, if we update the count from the App component, the total number in <AnimalCount> will be automatically updated too.
- Let's update the count when a new list of animal details is added. The count will only go up by one if the new animal is endangered. In the <App> component, add a function called updateCount() and update the count state:
updateCount() {
this.setState(prevState => {
return {
...prevState,
count: this.state.details.filter(item => item.endangered === true).length
};
});
}
- When a new list of animal details is added, we will call the updateCount function. In the addList function, add a callback of setState and add the updateCount(). This way, we can invoke the updateCount function after the state gets updated and we can update the count number properly:
addList(details) {
this.setState(
prevState => {
const newId = prevState.details.length + 1;
const newDetails = { ...details, id: newId };
return { ...prevState, details: [...prevState.details, newDetails] };
},
() => {
this.updateCount();
}
);
}
- Finally, we also need to initially update the count number when the app is loaded. The best way to invoke the updateCount function is in the componentDidMount life cycle:
componentDidMount() {
this.updateCount();
}
- Finally, let's add the AnimalCount component to the Animal component:
const Animal = props => {
const details = props.details;
return (
<div>
...
<AnimalCount />
</div>
);
};
The output is as follows:
Figure 7.24: Endangered Animals app
In the output, the total number of endangered animals is displayed. When we add a new animal list, the number will go up, whereas when we remove the animal list, the number will go down. By using the Context API, we can receive the total number from the App component and send it to the AnimalCount component without passing through the intermediate component, Animal. There you have it. We have learned a lot of important techniques on how to communicate between components. Now, you can use these techniques in your real-world projects and make your apps more functional.
Activity 7.01: Creating a Temperature Converter
The aim of this activity is to build an app that converts the temperature between Celsius and Fahrenheit and displays the temperature status, such as hot, warm, cool, and cold. The output of the app should appear as follows:

Figure 7.25: Temperature converter
When a user enters a number and updates either the Celsius or Fahrenheit input field, the other input field will display the number calculated and converted. Also, the status underneath the input fields will get updated too. Before we begin, ensure that you have completed all the exercises in this chapter as this activity will require some of the techniques we have discussed throughout the exercises.
Here is the diagram of the component tree you can follow:

Figure 7.26: Pictorial representation of the temperature converter
The recommended file structure is as follows:

Figure 7.27: File structure of the activity
Here are some instructions to help you complete building the app:
- The <App> component will contain the following functions:
- getFahrenheit: This function updates the celsius value to fahrenheit. The formula for this is F = (C * 9) / 5 + 32.
- getCelsius: This function updates the fahrenheit value to celsius. The formula for this is C = ((F - 32) * 5) / 9.
- updateTemperature: This is a callback function that's sent to the <ConverInput> component. It will be invoked when an onChange event is triggered and converts the temperature.
- The <ConvertForm> component will contain two <ConverInput> components, one for celsius and the other for fahrenheit. It also includes <ConvertStatus>.
- The <ConvertInput> component will contain the input elements with the callback function of updateTemperature.
- To update the status of the temperature, we are going to use the Context API. Create the Context object and Provider components from the <App> component.
- To consume the Context values, create a <ConverStatus> component and add the conditions shown in the following code block. Then, return the status wrapped with the Consumer.
- Optionally, make use of HOCs for the status. In the <ConvertForm> component, create a HOC function and pass the <ConvertStatus> component through the HOC.
- The sample code for the status is as follows. Please use it to show the status depending on the temperature. For example, when the celsius value goes higher than 50, the status should show Very hot, whereas if it's lower than 0 but higher than -10, the Cool status should be displayed:
if (value > 50) {
return 'Very hot';
} else if (value > 30) {
return 'Hot';
} else if (value > 15) {
return 'Warm';
} else if (value > 0) {
return 'Cool';
} else if (value > -10) {
return 'Cold';
} else if (value <= -10) {
return 'Very cold';
}
Note
The solution to this activity can be found on page 656.
Summary
In this chapter, we have learned how to pass data so that components can communicate with each other. There are various ways to pass data between components, and this chapter has covered all the essential methods of sending data to other components at different levels. Throughout this chapter, we looked at building an Endangered Animals app that showed us a list of animals along with a status of whether the animal is endangered or not. It also allowed us to submit new animal details.
First, we discussed how to send data from a parent to a child component. As React only allows us to pass data to a child component from a parent component, it is essential to understand how we can send data through props down to the child components first.
Then, we learned how to pass different types of props, including strings, numbers, Booleans, arrays, and components. We also learned about two important advanced React concepts, higher-order components and render props. Both techniques help make our app more reusable.
We also learned how to pass data from child to parent components by using callback functions. In the exercise on this, we discussed how to remove the list of animal details by referencing the callback function from <AnimalDetails> to the <App> component.
Furthermore, we discussed how components at different levels can communicate with each other. Between the components, we referenced a callback function that updates the state from the parent component. By updating the state, the app will be re-rendered and update the data from the component.
Finally, we learned what the React Context API is and how it can help avoid props-drilling. To use the Context API, we created the Context object and then created a Provider component so that we could pass the values to the consuming components. To receive the data from another component, we created a Consumer component and displayed the values from the props that were sent from the Provider.
With this essential understanding of how each component at different levels can communicate, we can now pass data around components as well as making components reusable. Having a good understanding of this will certainly help you make your React apps more functional. In the next chapter, we are going to discuss other important React topics, React forms and routing, which will allow us to build more complex React applications.