
As usual with software in general—and especially software where you yourself play a role in building and configuring it—you’ll experience that something isn’t working as it should, how you expected, or that it’s not working at all.
It is best to optimize your workflow to reduce the risk of introducing bugs, but mistakes are a part of life, so debugging is inevitable. Often, figuring out where to look takes longer than the fix itself. In this guide, our aim is to show you the best places to look first to debug and troubleshoot problems with TYPO3.
There is a whole world of software testing and quality assurance tooling available for you to use and explore. There are many excellent resources available about debugging technologies like CSS, HTML, and PHP that are under the hood of TYPO3 that we’re not covering here.
In this guide, we’ll look at debugging TYPO3 quickly and efficiently, using some useful functionality built into TYPO3 itself.
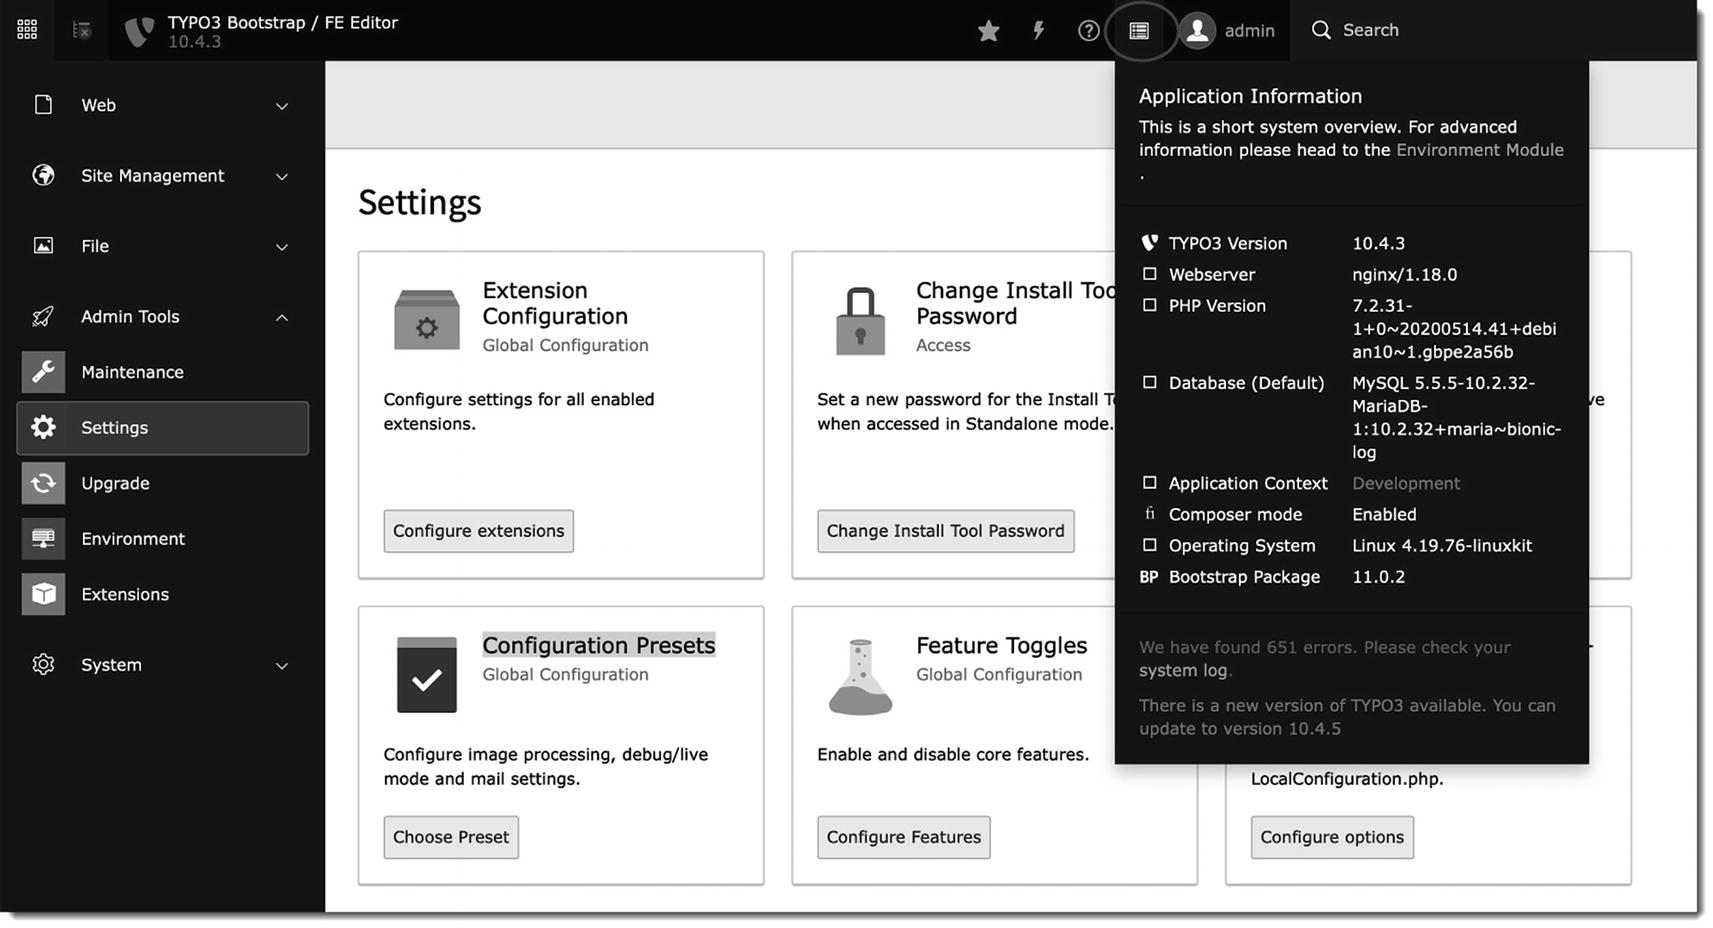
The Application Information panel
At the end of this tutorial...
Fluid templates
TypoScript
TYPO3-specific PHP code
You will also know how to make TYPO3 tell you more about what’s going on by outputting debugging information and how to reset an admin password using the Install tool.
Prerequisites
You will need a modern computer, web browser, and an Internet connection.
A TYPO3 site to test the methods suggested.
A DDEV-Local development environment from the previous guides.
Considerations before you start
We recommend using unexpected behavior resulting from your work with the previous guides as a good reason to read this guide. As such, this guide can be used in parallel with the other guides.
Do not use development mode or debug configurations for a live or publicly accessible TYPO3 instance – It will make TYPO3 slower, log files can eat up your storage quota, and the extensive error messages might disclose sensitive information.
Never leave debug statements in production code.
Disable the Install tool on live sites. If at all possible, do not reset your password as described below in step 6 on live production sites. You should perform the reset on a local copy of the site. In any case, be certain to follow all the steps, including deleting the temporary user and disabling the Install tool again at the end.
Step 1: Setting the application context to “Development”
The application context is the setting for whether your TYPO3 instance is in production (running live sites on a public server) or undergoing development. The environment variable “TYPO3_CONTEXT” is used to set TYPO3’s application context.
- 1.
From the installation’s root folder (where the composer.json file is located), create a new file in .ddev/docker-compose.typo3.yaml.
- 2.Paste in the following content (this is a YAML file, so the indentations are important):version: '3.6'services:web:environment:- TYPO3_CONTEXT=Development
- 3.
In the command line, run ddev restart.
Expected outcome: Your test site should now be running in development context, and “Development” should be displayed in the Application Information drop-down menu (see Figure 14-1). You’ll be able to define different settings using conditions in the public/typo3conf/AdditionalConfiguration.php file and using conditions in TypoScript and Fluid.
Step 2: Enabling the debug configuration preset
- 1.
Log in to the TYPO3 backend as an admin user.
- 2.
Go to the Admin tools ➤ Settings module.
- 3.
In the Configuration Presets box, click the Choose Preset button. The Configuration Presets window displays.
- 4.
In the Debug Settings section, select the Debug option.
- 5.
Click the Activate Preset button.
You can also find information on how to fine-tune PHP error and exception logging in the TYPO3 documentation.2

TYPO3 can display information-rich exception information
Step 3: Debugging and troubleshooting PHP in TYPO3
- 1.
Go to the System ➤ Log module (this module is part of the “belog” system extension).
- 2.
In the Action drop-down list, select “Errors.” The list of errors shows the backend user and workspace whose action generated the error.
- 3.
Now go to your file system. From the installation’s root folder (where the composer.json file is located), go to the var/log/ directory.
This directory contains two types of files:- i.
typo3_*.log (e.g., “typo3_f80b4d6693.log”) contains exception traces, log messages, and error messages from Fluid template rendering.
- ii.
typo3_deprecations_*.log (e.g., “typo3_deprecations_f80b4d6693.log”) contains deprecation warnings.
You can implement logging in your own PHP code. Check out the section on logger in the TYPO3 documentation.3 By default, log entries will end up in the typo3_*.log file.
Expected outcome: You now know where to find error and deprecation logs in the file system and TYPO3 backend.
Step 4: Debugging and troubleshooting Fluid
Fluid is TYPO3’s HTML-based templating system. Each template file is parsed and cached as PHP files. Errors and exceptions can occur both during the parsing of the HTML and the execution of the resulting PHP code.
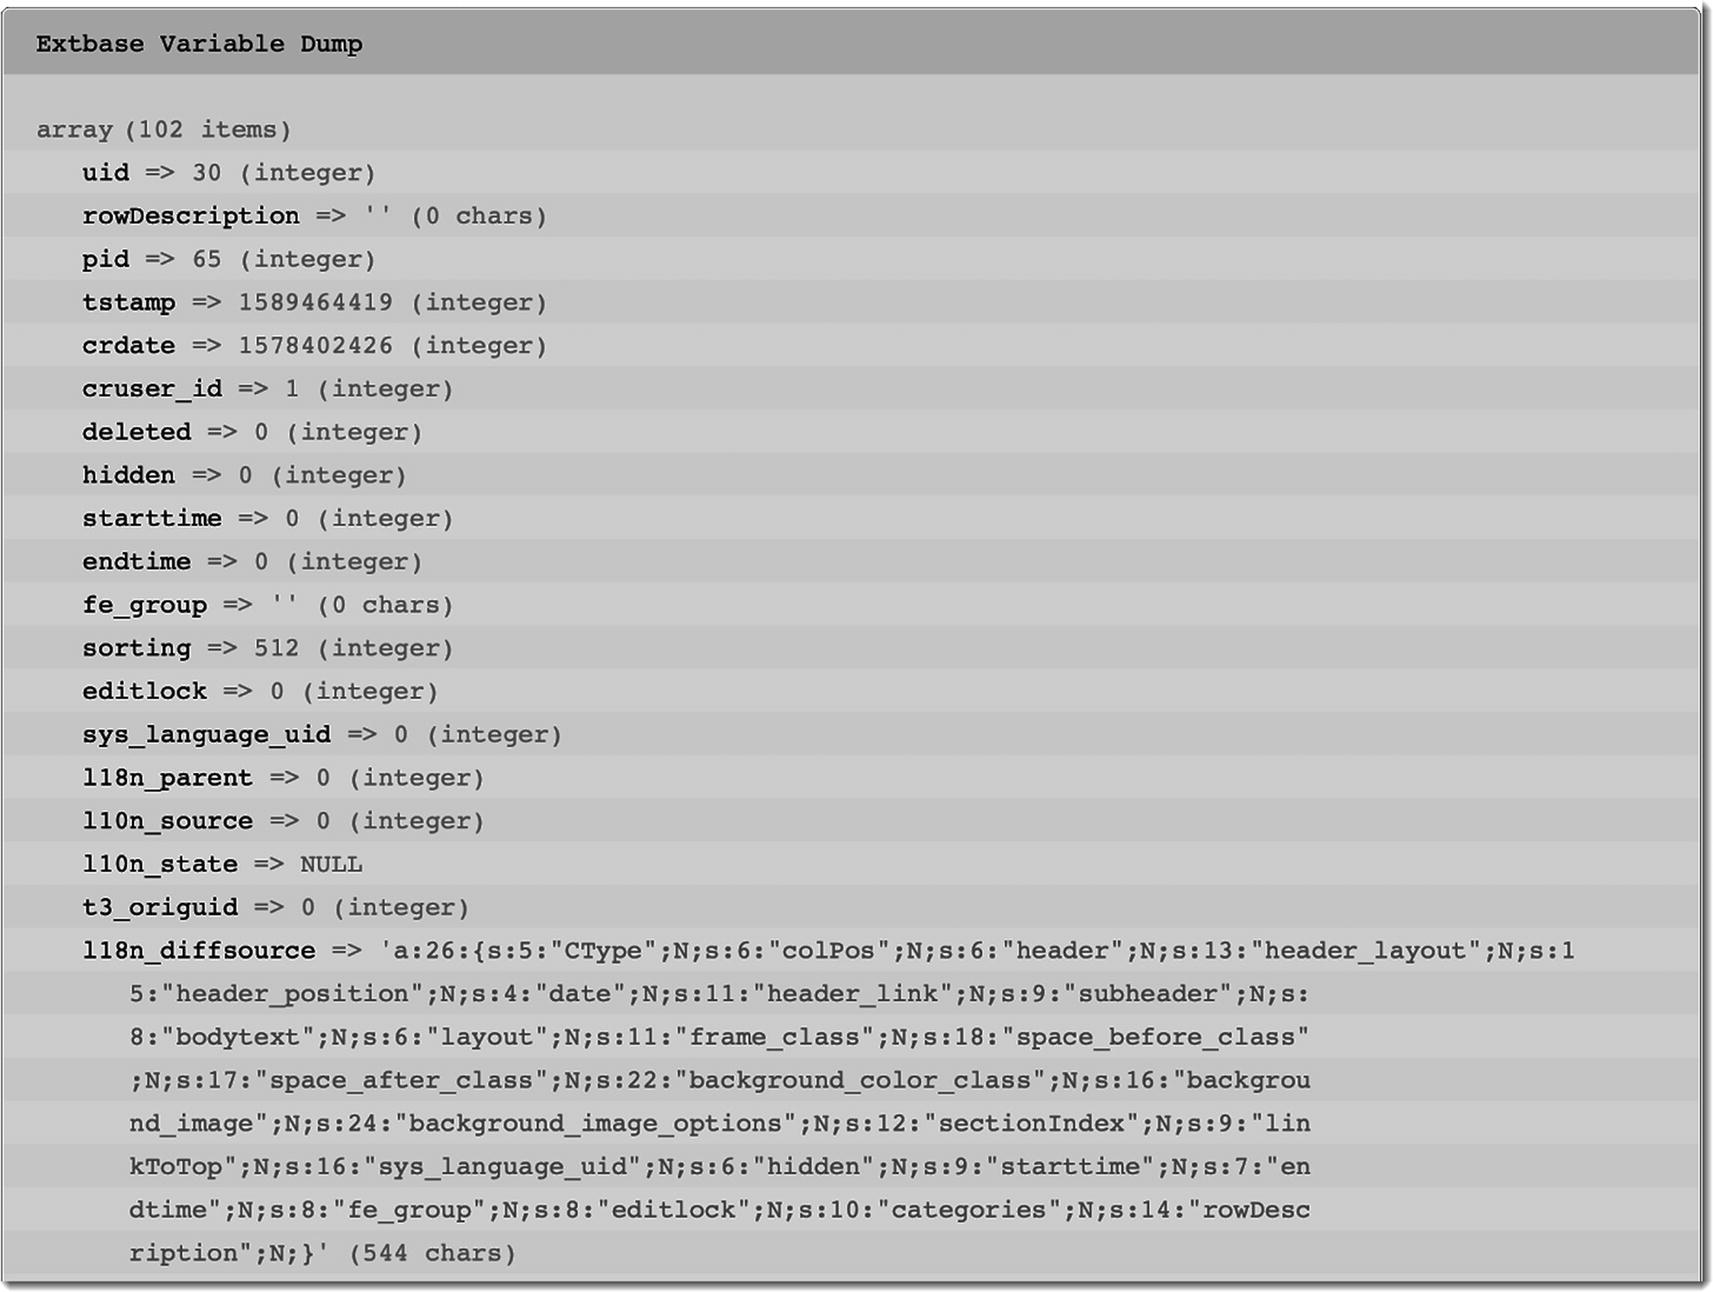
Part of the output from the <f:debug> tag for a text content element’s data
Never leave debug statements in production code.
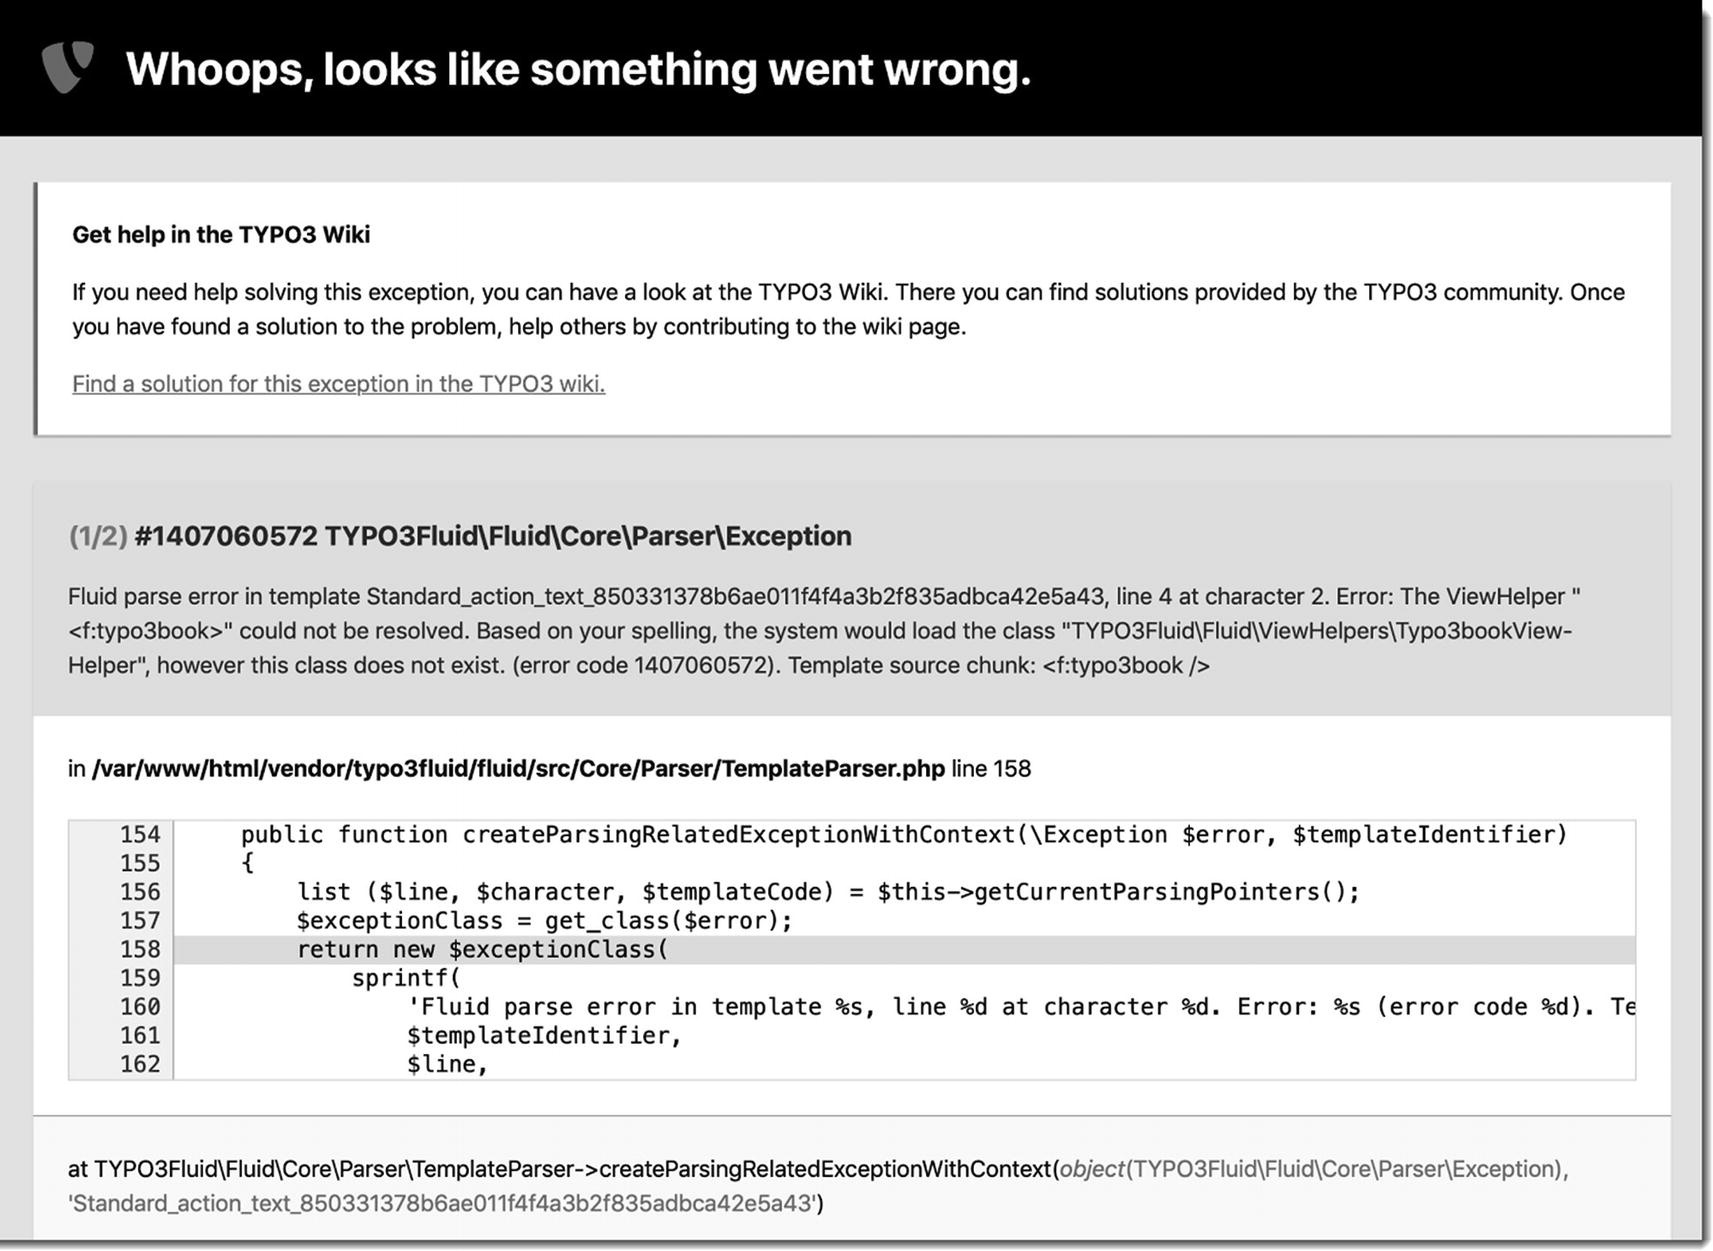
We tried to use the f:typo3book viewHelper in a Fluid template, but it doesn’t exist
In the preceding screenshot , you can see how a Fluid parser exception will look when you have enabled the debug configuration preset in step 2.
The exception message tells you that it is trying to find a class called TYPO3FluidFluidViewHelpersTypo3bookViewHelper. This is because the tag has the “f” XML namespace, which is assigned to the TYPO3FluidFluidViewHelpers class namespace. If you have created a custom Typo3bookViewHelper class, it is somewhere else than within the Fluid extension.
The parser doesn’t display the original file name and calls it “Standard_action_text_850331378b6ae011f4f4a3b2f835adbca42e5a43”. You’ll find somewhat more information about the template-include-paths by scrolling down in the exception message. The best approach is to test your templates often to avoid spending time looking for your mistake.
Fluid templates are cached. This means you should disable caching or clear the cache (through the TYPO3 backend) to see your changes. Otherwise, you might not see your own mistake until it’s too late. Another way is to append “?no_cache=1” to the URL. This will disable caching and will often be all you need to do (as in “example.ddev.site/contact?no_cache=1”). This trick can be a nonintrusive help during debugging, but it should be disabled on production sites by setting $GLOBALS['TYPO3_CONF_VARS']['FE']['disableNoCacheParameter'] = true in LocalConfiguration.php or AdditionalConfiguration.php.
Expected outcome: You now know how to debug data within the Fluid templates and know a little bit about the exceptions that the Fluid parser will throw and how to read them.
Step 5: Debugging and troubleshooting TypoScript
TypoScript is unique to TYPO3, so it can only be debugged within the CMS. TypoScript has not always been easy to debug, but new core features, such as code highlighting and autocompletion, have made it easier to edit TypoScript in the backend. TypoScript is designed to “fail gracefully,” without displaying an error message on your public website.
When working with TypoScript in files, check if your IDE has support for TypoScript. In the IDEs PhpStorm, WebStorm, and IntelliJ from JetBrains, purchasing sgalinski’s TypoScript plugin4 will give you code highlighting, autocompletion, type hinting, and a long list of other helpful, powerful features.
Here are three ways to debug your TypoScript code within TYPO3.
Method 1: Template module
- 1.
In the TYPO3 backend, navigate to the Web ➤ Template module.
- 2.
Select your site’s root page in the page tree. The template module will load.
- 3.
Click the root page in the list of pages on the Template tools screen.
- 4.
From the drop-down list at the top of the screen, choose “TypoScript Object Browser” (Figure 14-5). This view allows you to navigate and search the TypoScript object hierarchy and see the parsed TypoScript properties. Using the Browse list, you can see both “Constants” and “Setup” (see Guide 2: Creating your first TYPO3 site to learn more). You can even simulate TypoScript conditions using check boxes at the bottom of the listing. Errors are highlighted and include a Show details link bringing you to the “Template Analyzer.”
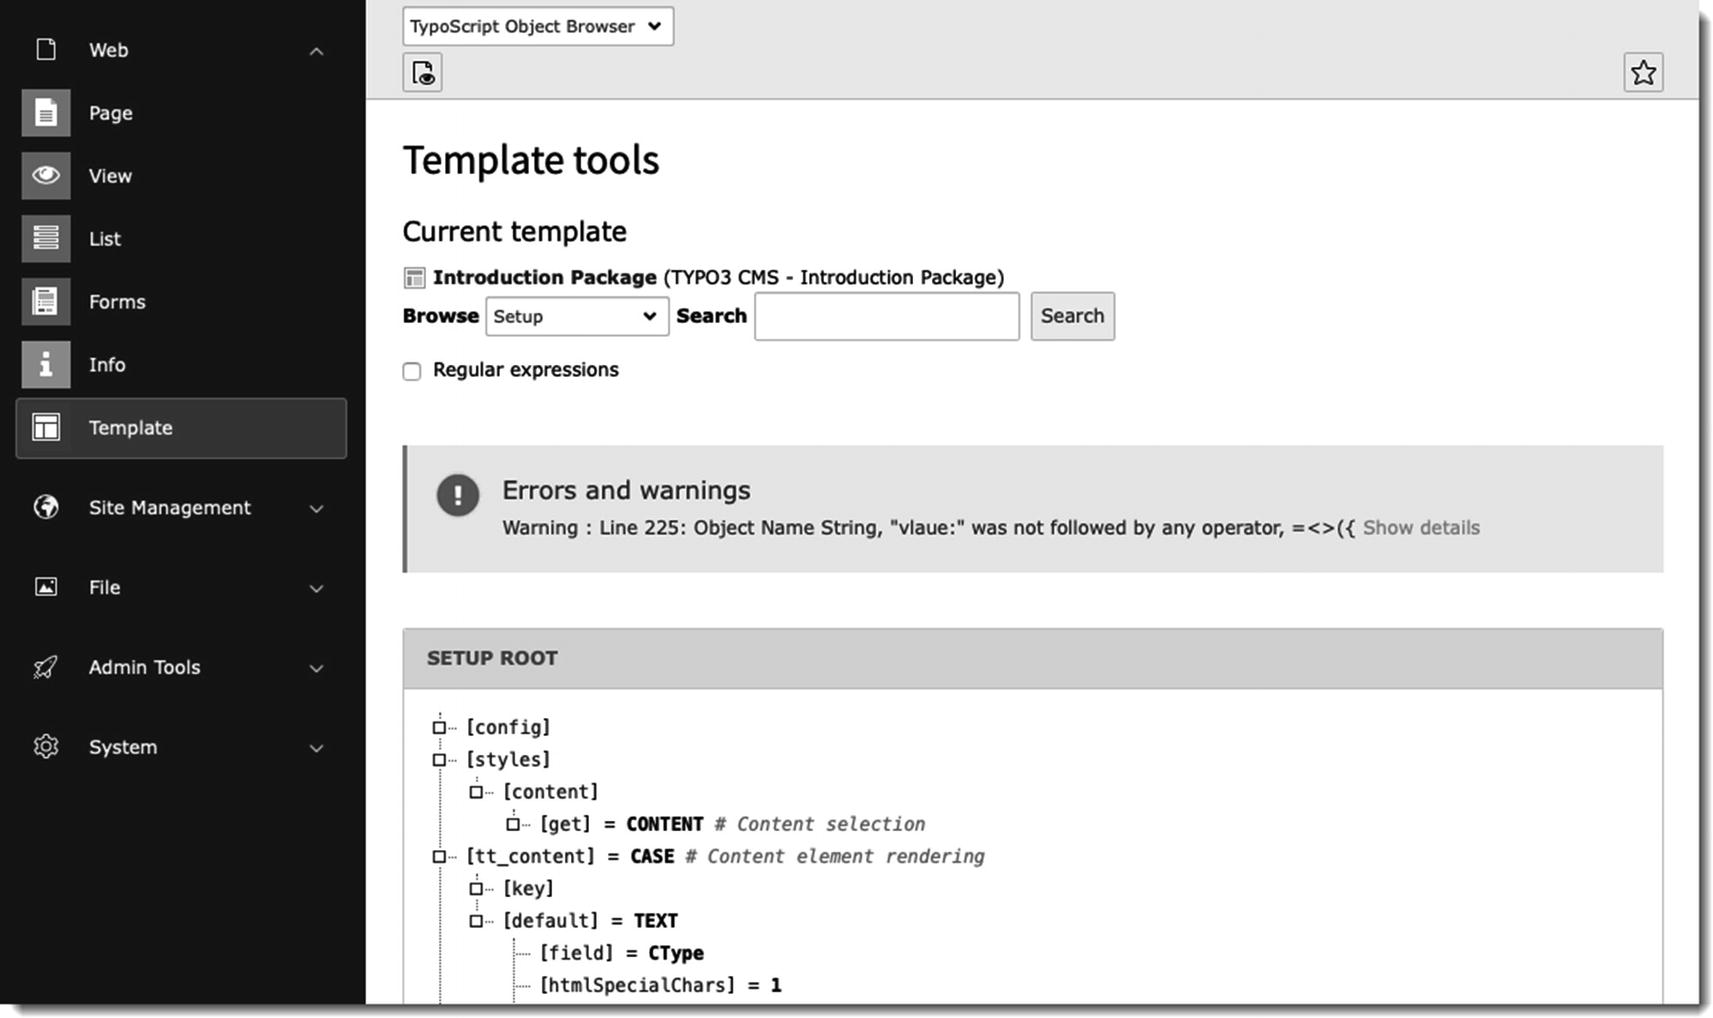
The TypoScript Object Browser
- 5.
You can also reach the Template Analyzer from the drop-down list at the top of the screen, by choosing “Template Analyzer.” Scroll down to see the template hierarchy in their actual load order, a button to display the complete TypoScript, and check boxes for display options.
- 6.
Click a TypoScript template in the Template hierarchy, or click the View the complete TS listing to see the full TypoScript code with any parser errors highlighted (Figure 14-6). A single TYPO3 website might include tens of thousands of lines of TypoScript code, so the web browser’s text search (“Find”) feature will come in handy.
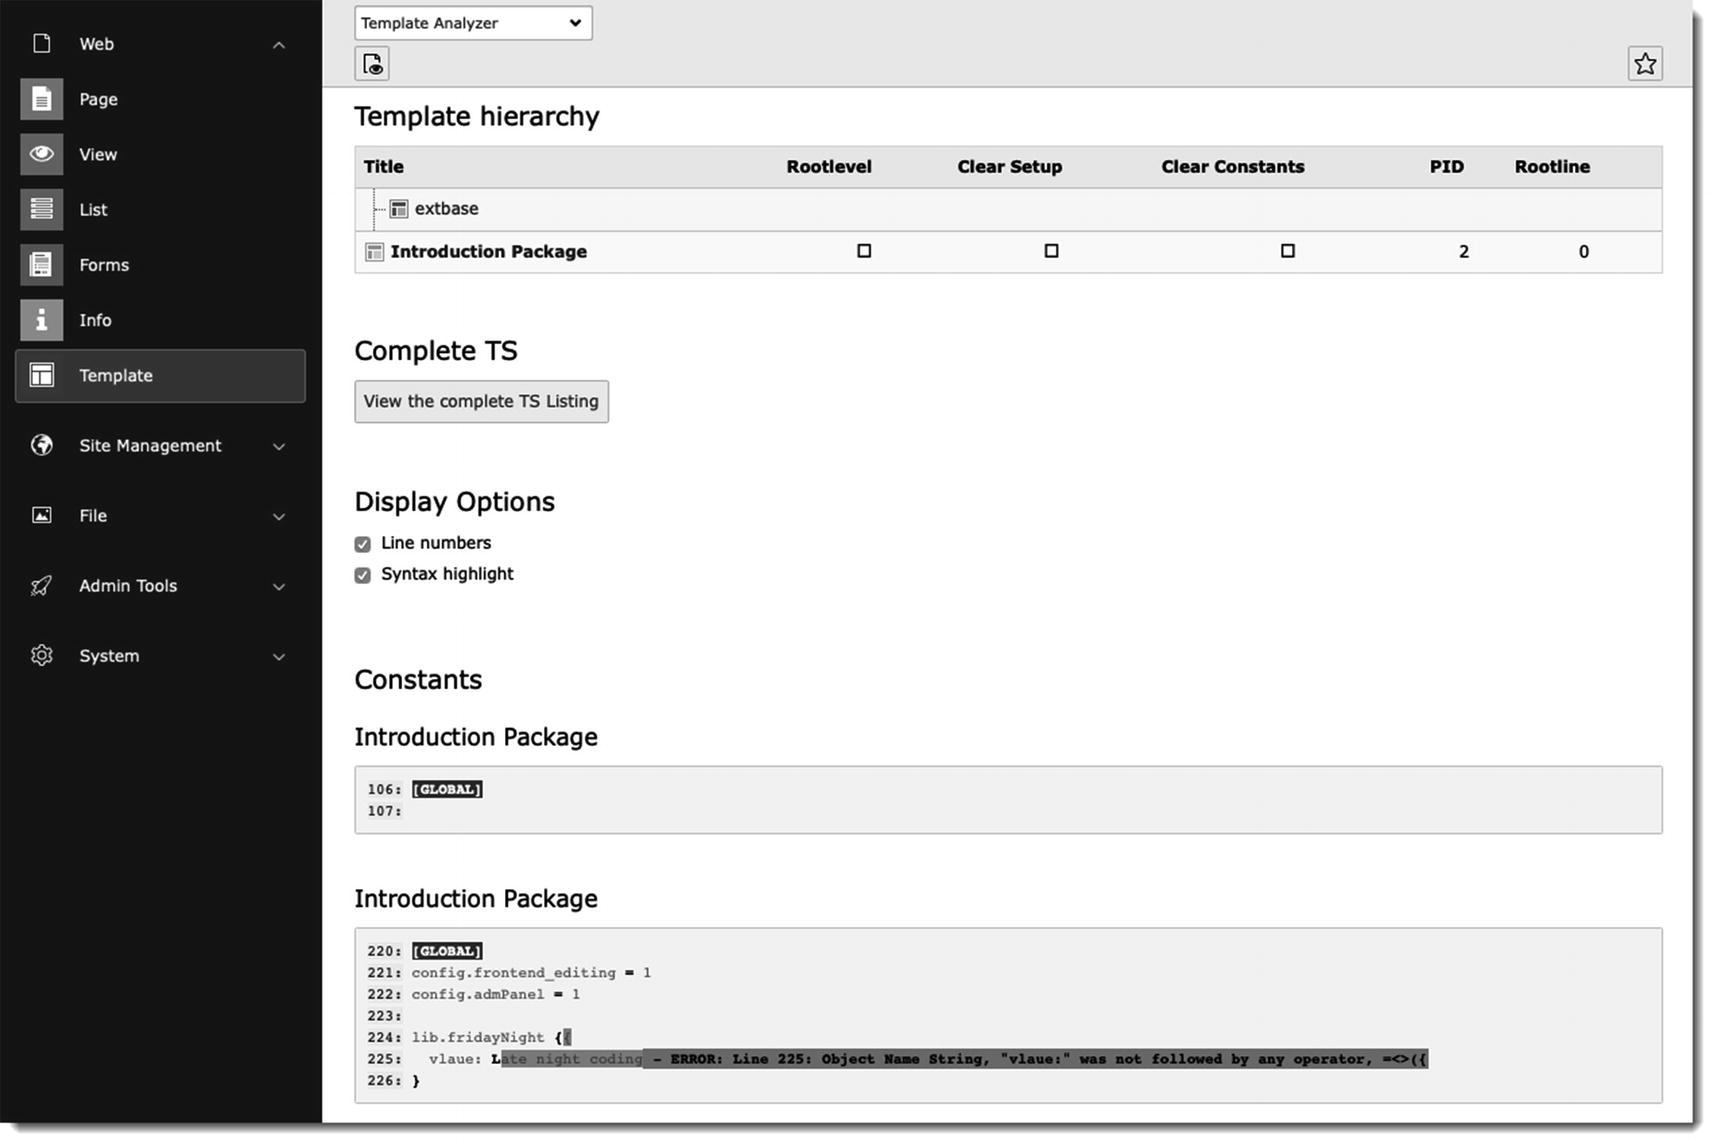
The Template Analyzer showing a parser error highlighted in the Introduction Package
Method 2: Isolate the TypoScript
If you have written TypoScript, and it doesn’t work as expected, you might want to isolate it from the influence of other TypoScript code. As long as the code doesn’t depend on any previous code, you can insert it on its own page type.
- 1.
In the TYPO3 backend, navigate to the Web ➤ Template module.
- 2.
Select your site’s root page in the page tree. The template module will load.
- 3.
Click the root page in the list of pages on the Template tools screen.
- 4.
From the drop-down list at the top of the screen, choose “Info/Modify.”
- 5.
Click the edit (pen) button on the “Setup” row .
- 6.On a blank line below any other code, paste the following code and adapt it to your needs. See Table 14-1 for more information:testPage = PAGEtestPage {typeNum = 99910 = TEXT10 {data = date : d-m-ywrap = <p>|</p>}20 < lib.typo3Book}
Item | Description |
|---|---|
testPage = PAGE | Creates a new page object. |
typeNum = 999 | Sets the page’s type number to “999”, meaning you can access it at example.ddev.site/?type=999. |
10 = TEXT and the following four lines | Outputs the current date based on hardcoded TypoScript. |
20 < lib.typo3Book | Inserts TypoScript from lib.typo3Book onto the page. Maybe we have created TypoScript here to insert somewhere else. |
Method 3: Use the stdWrap function
Many TypoScript objects implement the stdWrap function, such as the “TEXT” object used earlier. It includes useful properties to enable debug output, especially “debug,” “debugFunc,” and “debugData ,” explained in detail in the official TYPO3 documentation’s TypoScript reference.5
If you expect to work a lot with TypoScript, we recommend a deep dive into the TypoScript Template Reference6 (also dubbed “TSRef”). (Tip: If you are using continuous integration or deployment (CI/CD), you could find the TypoScript linter by Martin Helmich7 helpful.)
Expected outcome : You will now know three ways to debug TypoScript code from within TYPO3. You’ll be better equipped to find out where and what is wrong in a site when your TypoScript code isn’t working as you expect.
Step 6: Resetting your backend admin password
It has happened to everyone. You set up a new local development environment, but forget your “easy-to-remember” admin password. How do you get back into your TYPO3 installation? TYPO3 doesn’t store your password in plain text; it hashes it using a complex salt plus algorithm combination, so you can’t just change the database field. Instead, we are going to show you how to use the Installer tool and a temporary user to reset your admin password.
Avoid doing this on a live production site. These steps are much safer to carry out on a local development environment. Do not reset your password as described below in step 6 on live production sites, if you can avoid it. Perform the reset on a local copy of the site, if possible, and be certain to follow all the steps, including deleting the temporary user and disabling the Install tool again at the end.
- 1.
In a web browser, visit your website’s Install tool. The URL will be similar to example.ddev.site/typo3/install.php, though the domain will probably be different; “/typo3/install.php” is always a part of it.
- 2.
In your terminal, move into the typo3conf folder by running `cd public/typo3conf`.
- 3.
Create the file that enables the Install tool by running `touch ENABLE_INSTALL_TOOL`.
- 4.
Reload example.ddev.site/typo3/install.php in the browser.
- 5.
Enter a password of your choice, and click Login. The Install tool will tell you the password doesn’t work, but will also output a hash.
- 6.
Copy the hash.
- 7.
Open public/typo3conf/LocalConfiguration.php in a plain text editor or IDE.
- 8.
On line six (where it says “”), paste in the new hash to replace the old hash:
- 9.
Save and close the LocalConfiguration.php file.
- 10.
Return to your browser, and click the login button again. (Your password should still be in the field; otherwise, retype it.) You should be able to log in successfully.
- 11.
Click the Create administrative user button, and follow the instructions to set a new username and password.
- 12.
Remove the ENABLE_INSTALL_TOOL file you created in step 3 to disable the Install tool. This file should never be present on a live system.
- 13.
Reset your original admin user’s password in the backend.
- 14.
Delete the temporary user you created.
Expected outcome: You should have access to TYPO3’s backend again with your original admin user.
Summary
In this guide, you have learned how to enable debugging output, how to debug different aspects of your TYPO3 installation, and how to reset your admin user password.
What’s next?
Debugging is a skill that develops with experience. Everyone was a beginning once, and the TYPO3 community will be happy to help if you have problems. We recommend visiting Stack Overflow8 or using the TYPO3 Slack.9 You should also not be afraid to ask your questions at meetups, camps, or conferences, too.
If you know an answer, give back by helping and answering others. Even those times when you might be wrong, you’ll probably learn useful ways to improve your own code, too!