
10. Ping: iTunes Goes Social
If you like talking music with your friends, you’ll love Ping, a social network that’s new in iTunes 10. Discover new music, share your favorites, and follow your friends and favorite artists.
iTunes 10 brings a whole new world of music-based social networking to iTunes. It’s called Ping, and it’s a great way to connect with friends, your favorite artists, and fellow music lovers. When you turn on Ping, you can connect with other iTunes users who share your interests and see what they’re listening to. When you buy, like, or review music in the iTunes Store, the activity appears in your Ping Recent Activity feed, where anyone who follows you learns about it. In the same way, you’re informed of the purchases, reviews, and other activities of the people you follow.
In this chapter, you’ll learn how to get started with Ping: create your profile, choose your privacy settings, and find people and artists to follow. A quick guided tour gets you familiar with the site and shows you how to use Ping with the iTunes sidebar so that you know what’s going on even when you’re not in the iTunes Store. Other topics covered include inviting your friends to join Ping, interacting with other users, finding concerts near you (as well as getting tickets and letting your friends know you’ll be there), reviewing albums, and using Ping on your iPod Touch, iPhone, or iPad.
The fun is all in the interaction, so let’s get started.
Getting Started with Ping
Ping is part of the iTunes Store, so you need an iTunes Store account to use it. After you have your account in place, it’s easy to turn on Ping and create your profile.
![]() Don’t have an iTunes Store account yet? See “Creating Your iTunes Store Account” (in Chapter 3, “Shopping in the iTunes Store”) to learn how to set one up.
Don’t have an iTunes Store account yet? See “Creating Your iTunes Store Account” (in Chapter 3, “Shopping in the iTunes Store”) to learn how to set one up.
Creating a Ping Profile
Every Ping user has a profile that contains (at the very least) his or her name. But to get the most out of Ping, you should create a profile that shares your musical tastes and makes it easy for friends and like-minded music fans to find you.
![]() LET ME TRY IT
LET ME TRY IT
Turning on Ping and Creating Your Profile
To get started with Ping, follow these steps:
- In the left iTunes source list, under Store, click Ping. (Alternatively, open the iTunes sidebar by clicking the button at the status bar’s right side; click Learn More.)
- Click Turn On Ping.
- Sign in to your iTunes Store account using your Apple ID and password.
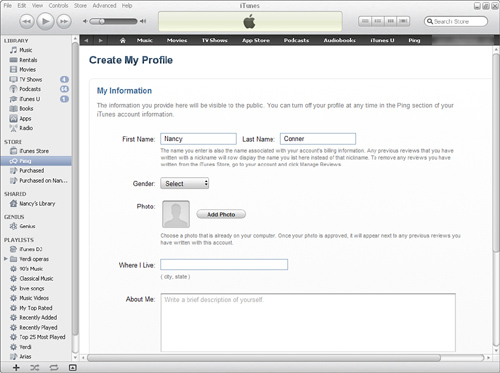
- Create your profile; see Figure 10.1 for the first step. Your profile holds public information that’s visible to other Ping users:
• Name—iTunes has already filled in the First Name and Last Name fields, based on your iTunes Store account. You must use the same name for Ping that you use for your iTunes Store account—no nicknames allowed.
• Gender—Choose yours from the drop-down list.
• Photo—Click the Add Photo button to find and select a picture from your computer to upload to Ping. Ping shows you the uploaded photo in an Edit Photo dialog box so that you can adjust its size or choose a different photo. When the picture looks good, click Set.
• Where I Live—This field is already filled in, based on the information in your iTunes Store account.
• About Me—Write a brief description of yourself in this text box.
• Genres I Like—Check up to three genres that best describe your favorite kinds of music.
Figure 10.1. Creating a Ping profile: giving your information
- Click Continue.
- On the next page, shown in Figure 10.2, tell Ping how to display music that you like—up to ten selections—on your profile. Choose one of these options:
• Automatically Display All Music I Like, Rate, or Purchase—When you choose this option, your profile automatically reflects your favorite music: Music that you buy, rate, or give a “Like” thumbs-up shows on your profile.
• Manually Pick the Music to Display—This option puts you in control of the music that shows on your profile; you pick your favorite songs to display there. When you select this option, a search box appears (see Figure 10.2) that lets you search your iTunes library for the tunes you want to show on your profile.
• Don’t Display Music That I Like on My Profile—If you prefer to keep your musical tastes to yourself, choose this option.
Figure 10.2. Creating a Ping profile: selecting music to display on your profile

- Click Continue.
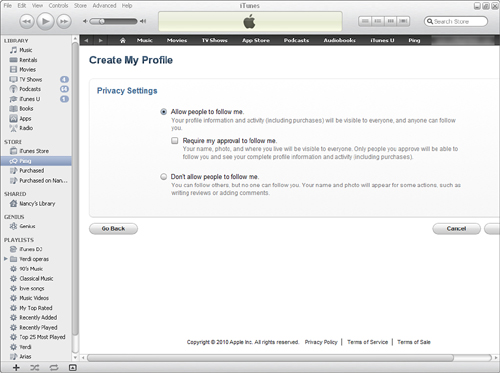
- Choose your Ping privacy settings (see Figure 10.3):
• Allow People to Follow Me—If you want your friends to find you and see what you’re doing, select this option.
• Require Approval to Follow Me—When you allow people to follow you, you can choose to have Ping check with you before it approves any follower. When you select the box that turns on this option, Ping sends you a notification when someone wants to follow you, and you can approve or deny that person.
• Don’t Allow People to Follow Me—When you choose this option, you can follow other people, but no one can follow you.
Figure 10.3. Creating a Ping profile: choosing privacy settings
- Click Done to create your profile and start using Ping.
After your account is set up, iTunes opens Ping (see Figure 10.4) and sends a welcome email to your registered email address. (You don’t have to respond to the email—your account is already set up.)
Figure 10.4. The Ping home page

Tell Me More: Media 10.1—Ping and Privacy
![]()
Access this audio recording through your registered Web Edition at my.safaribooksonline.com/9780132660273/media.
Finding Your Way around Ping
After you’ve turned on Ping and created your profile, Ping looks something like the page shown in Figure 10.4. Here’s what you’ll find there:
• Ping links—On the right side of the page are these links (they may change a bit, depending on which page you’re on):
• My Profile—This link takes you to your profile page, where you can see your profile as it looks to others and edit your information.
• My Reviews—When you’ve reviewed at least one album, song, or video, this link opens your reviews.
• People—Click this link to view and manage the people you follow and those who follow you.
• Featured Artists—This link takes you to a page where you can read about and follow artists who are active on Ping.
• Featured People—Artists aren’t the only people on Ping. This page highlights celebrities, songwriters, music industry professionals, and just plain interesting music lovers who have a following on Ping.
• Search box—This box lets you search Ping for a specific artist or friend so you can connect.
• Invite button—Click this button to begin the process of inviting your friends to join Ping.
• Artists We Recommend You Follow—This list is ranked by popularity (total number of followers), not your particular musical tastes. So if you listen only to jazz, don’t be surprised to see Lady Gaga or Taylor Swift showing up here.
• Recent Activity—This newsfeed in this section shows what the friends and artists you follow have been doing on Ping lately.
Show Me: Media 10.2—Taking a Look around Ping
![]()
Access this video file through your registered Web Edition at my.safaribooksonline.com/9780132660273/media.
Following Artists and Friends
In Ping, all the fun comes from following interesting people: artists, celebrities, friends, and people who love the same kind of music you do. You have lots of options for finding and following people on Ping.
Show Me: Media 10.3—Finding and Following People
![]()
Access this video file through your registered Web Edition at my.safaribooksonline.com/9780132660273/media.
Following Featured Artists and People
iTunes lists some of the most popular artists and people who are active on Ping on its Featured Artists and Featured People pages. You can get to either of these pages from the Ping links on the right side of the Ping home page (see Figure 10.4) and most other pages in Ping. Figure 10.5 shows an example of the Featured People page. When you find someone you want to follow, click that person’s Follow button.
Figure 10.5. The Featured People page

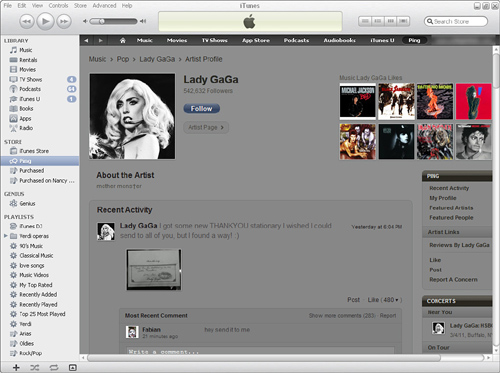
If you want to check out someone’s profile before you decide whether to follow, click that person’s name or photo. This opens the person’s profile (like the one shown in Figure 10.6), where you can see recent activity, preferred music, reviews, other followers, and more. To follow someone from a profile, click the Follow button.
Figure 10.6. An artist’s profile
Viewing Artist Pages in the iTunes Store
In Ping, an artist’s profile offers information about the artist—favorite music, recent activity on the site, upcoming concerts, and so on (a lot like your own profile). Each artist’s profile also has a link to that artist’s page in the iTunes Store. An Artist Page lists all of that artist’s albums, songs, and music videos available for purchase through the iTunes Store. You can preview songs, go to an item’s page, or buy items right from the Artist Page.
In Ping, you can get to an artist’s Artist Page in either of these ways:
• From the Featured Artists list—Click the Artist Page link to the right of an artist’s name.
• From an artist’s profile—Click the Artist Page button below the artist’s name.
![]() To find out how to buy items in the iTunes Store, see “Buying Music and Other Media” (in Chapter 3).
To find out how to buy items in the iTunes Store, see “Buying Music and Other Media” (in Chapter 3).
Finding People with Similar Tastes
When you follow a favorite artist, you can see who else is following that artist and check out those followers’ profiles—maybe you’ll find someone interesting to follow that way. On the right side of each artist’s profile is a section called People, listing some of the artist’s followers. Click See All to view a list of everyone who’s following the artist. Click any name or profile photo to learn more about a follower (depending on that person’s privacy settings). If the person looks like someone you would enjoy following, click Follow.
Searching for a Specific Person
Instead of browsing for people to follow, you can search for a specific person—your favorite artist, for example, or a friend who’s on Ping. At the top of the Ping home page, type the name of the person you’re searching for into the Search box and press Enter.
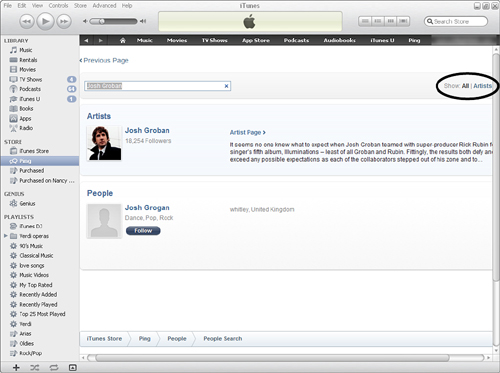
Ping returns a list of matches (and near-matches), as shown in Figure 10.7. Results are split into Artists and People—regular Ping users who don’t have an artist’s account. (If you get a lot of results and want to look only for artists, click the upper-right Artists link.) Click Follow to become a follower of any person on the page, or click a name or photo to see that person’s profile.
Figure 10.7. A search results page, where you can see all results or limit results to just artists by clicking one of the circled links
Inviting Friends to Join Ping
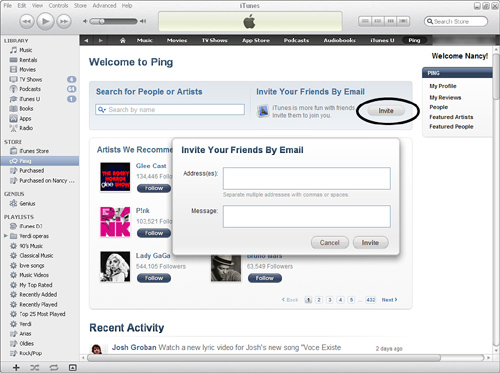
If you can’t find a friend on Ping, you can nudge that friend to join by sending an email invitation. On the Ping home page, click Invite. This opens a dialog box similar to the one shown in Figure 10.8. Type in your friend’s email address (if you want to send multiple invitations, separate email addresses with commas or spaces) and, if you want, add an optional message. Click Invite.
Figure 10.8. Sending an invitation to join Ping; click the Invite button (circled) to open the invitation dialog box.
iTunes sends an email to the addresses you listed, inviting your friends to join Ping. The email comes from the iTunes Store and has your name in the subject line: “Jane Smith has invited you to join iTunes Ping.” The email explains what Ping is and includes two links:
• A link to the iTunes download page, for people who don’t yet have iTunes
• A link that opens Ping in iTunes, for people who have iTunes but haven’t yet turned on Ping
Finding Concerts
Listening to recorded music through iTunes at home or on your iPod is great, but most music lovers agree that nothing beats the energy, excitement, and sound of a live performance. Use Ping to find out when your favorite artists are on tour—you can even buy tickets and let your friends know you’ll be there.
To look for concerts, go to any artist’s profile. On the right side of the page, look for a Concerts section. If the artist is currently touring, you’ll see upcoming dates and venues in that section. (If one of those concerts is near you, it appears at the top of the list.) Click See All for a full list on the artist’s Tour Info page, shown in Figure 10.9.
Figure 10.9. An artist’s Tour Info page
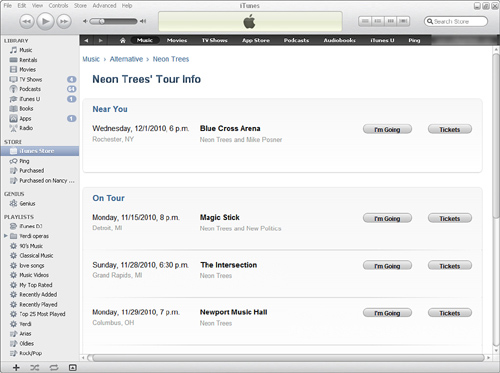
On the Tour Info page, click Tickets to open a third-party ticket site (such as Ticketmaster) in a new window, where you can purchase tickets. Click I’m Going to inform your followers that you’ll be at this concert. When you do, a dialog box opens so you can add an optional comment about the event; type in a comment if you want (like “Let’s meet up in the lobby!”), and then click Post to put the comment in your Recent Activity feed.
Using the iTunes Sidebar
You can keep tabs on your favorite artists and friends even when you don’t have Ping open. The iTunes sidebar, shown in Figure 10.10, keeps you in touch with your Recent Activity feed while you do other things in iTunes, such as browse your Music library or edit a playlist. But the iTunes sidebar is more than just Ping. It combines Ping activity with Genius recommendations—music you might want to know about based on your library and listening habits.
Figure 10.10. The iTunes sidebar, showing Ping activity
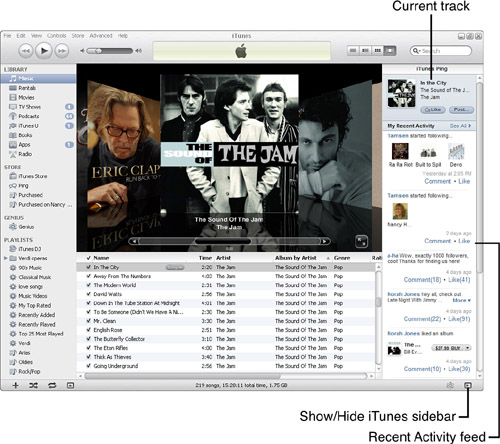
To open the iTunes sidebar, click the Show/Hide iTunes sidebar button (circled in Figure 10.10) at the status bar’s far right. The sidebar opens, displaying the currently selected track at the top, with convenient buttons that let you Like or Post the track to your Recent Activity feed. So when a track plays and you think, “Hey, I really like this song,” you can immediately share your enthusiasm with your Ping followers.
Beneath the current track is your Recent Activity feed, showing the most recent posts. If you want to see more of this feed, click the See All link above the feed to go to Ping and read all of your posts.
Getting Social on Ping
Now that you’re following some artists and other people on Ping—and maybe have picked up a few followers of your own—you’re ready to get the most out of Ping. Interact with others, manage followers, share your favorite music, and manage your activities—this section shows you how.
Interacting with Others
After you’ve started following some people, their recent activity—posts, songs or albums they’ve liked or bought, reviews they’ve written, people they’ve followed, and so on—appears in your Recent Activity feed (see Figure 10.11 for an example). This is the same page that welcomes you when you open Ping, and you can always find it by clicking Recent Activity in the Ping links on the right.
Figure 10.11. Recent Activity shows posts from people you follow.
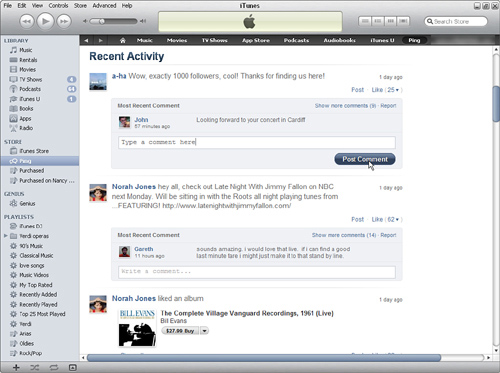
You can interact with the people you follow by responding to their activity in any of these ways:
• Like an activity—Click the Like button to the right of an activity to show your approval.
• Comment on an activity—Beneath each activity is a text box where you can write a comment about the post. Type in your comment and click the Post Comment button to share your thoughts.
• Read others’ comments—The most recent comment appears below each activity. If you want to read more comments, click the Show More Comments link on the right.
• Post an activity to your followers—Click the Post link to share an activity with your own followers. When you click this link, the activity appears on your profile and in the Recent Activity feed of anyone who follows you.
Managing Friends and Followers
After you’ve followed some people and gained some followers yourself, you can manage your Ping relationship on the People page (see Figure 10.12). To get there, click People in your Ping links on the right.
Figure 10.12. A People page, which shows people and artists you follow
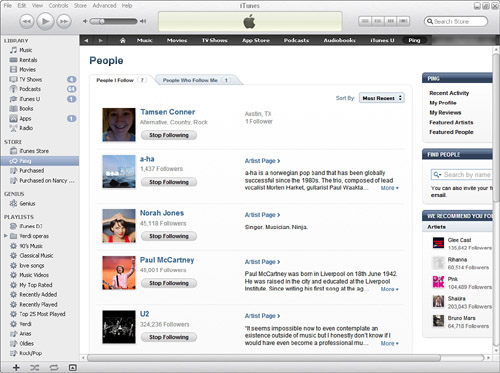
As Figure 10.12 shows, your People page has two tabs: one listing people you follow and the other listing people who follow you. People are added to these lists in chronological order, with the most recent additions at the top of the list. You can sort the list by alphabetical order (ascending or descending) by selecting the option you want from the upper-right Sort By drop-down list.
Handling Follow Requests
If you’ve set your privacy settings to require your approval before someone can follow you, you need to manage any follow requests that you get. With this setting, when another Ping member clicks the Follow button on your profile, iTunes emails you a notification that someone wants to follow you. You’ll also see a Follow Requests link in your Ping links, followed by a number that shows how many requests you have.
![]() For more about Ping’s privacy settings, listen to “Ping and Privacy” (mentioned earlier in this chapter).
For more about Ping’s privacy settings, listen to “Ping and Privacy” (mentioned earlier in this chapter).
When you receive a request from someone who wants to follow you, you can handle it in one of these ways:
• Click the link in your notification email that reads, “To confirm or ignore this request, click here.”
• In Ping, click the Follow Requests link in your Ping links section on the right.
• In Ping, click People under Ping links and make sure the Follow Requests tab is selected.
Any of these routes takes you to the Follow Requests tab of your People page, shown in Figure 10.13. This tab shows who’s requesting to follow you. You can click a person’s name or photo to see that person’s profile page and learn more about him or her. Click Confirm to allow the person to start following you, or click Ignore to deny the request.
Figure 10.13. Handling a follow request
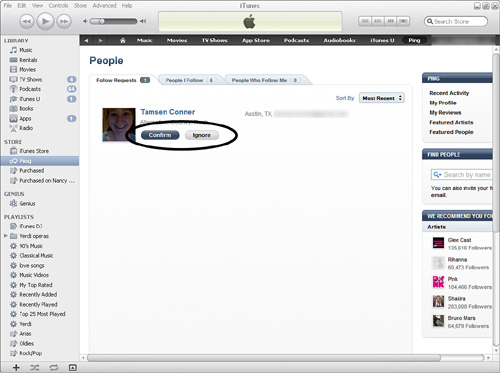
After you confirm a follow request, Ping immediately gives you the option to follow the person back. Click Follow if you want to do so.
Reporting Inappropriate Behavior
If you see someone behaving in a way that doesn’t respect the Ping community—such as posting spam comments or hate speech—you can report that bad behavior. If you notice an inappropriate post or comment in your Recent Activity feed, you can report the problem then and there. Above and to the right of the problematic post, click the Report link. This opens the Report a Concern dialog box, shown in Figure 10.14.
Figure 10.14. Reporting inappropriate behavior
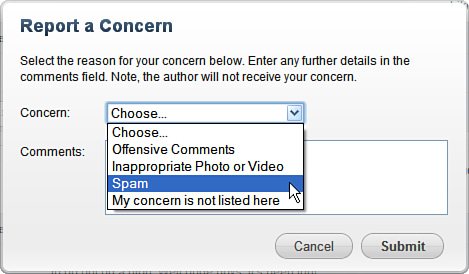
Choose your concern from the drop-down list: You can report offensive comments, inappropriate photos or videos, spam, or any other action that you feel is inappropriate. Optionally, you can add a comment in the Comments box. When you’ve expressed your concern, click Submit.
Reporting a concern can get the offending action removed or, in some cases, ban a user from Ping.
Unfollowing Someone
Tastes change, and maybe that band that seemed so cutting-edge a year ago no longer thrills you. If you no longer want to follow someone, you can remove him or her from the list of people you follow from either of these places:
• Your People page—Click the People I Follow tab and find the person you want to stop following. Click the Stop Following button below the person’s name.
• The person’s profile—If you’re on the profile page of the person you no longer want to follow, look in the Ping links on the right. Click Stop Following.
When you stop following someone, iTunes removes that person from your People I Follow list and the person’s posts disappear from your Recent Activity feed.
Sharing Music with Your Followers
Love a song? Hate it? Let the world know! Ping gives you several ways to share music—and your thoughts about it—with your followers. Here’s a quick breakdown:
• Liking a song or album—When you click the Like button for some music, you give it a quick thumbs-up so your followers know you enjoyed it.
• Posting a song or album—You highlight the song or album, along with a comment about it, in your Recent Activity feed.
• Rating an album—When you rate an album, you give it a grade, from a low of one star to a high of five stars.
• Reviewing an album—When you want to share your opinion about an album at length, this is the best way to do it. Reviews get posted on the album’s page in the iTunes Store and in your Recent Activity feed.
This section covers all the different ways you can share music on Ping.
Show Me: Media 10.4—Sharing Music on Ping
![]()
Access this video file through your registered Web Edition at my.safaribooksonline.com/9780132660273/media.
![]() LET ME TRY IT
LET ME TRY IT
Liking or Posting a Song from Your Music Library
When you come across music from your iTunes library that you want to share, here’s what to do:
1. In your iTunes Music library, use List or Album List view to find the song you want to share. Select the song.
2. Click the Ping button that appears to the right of the selected song title.
3a. If you want to tell others that you like the song, choose Like from the context menu.
3b. If you want to post the song in Ping, choose Post from the context menu.
3c. Choosing Post opens the Post As dialog box, shown in Figure 10.15. Type in a comment about the song (telling your followers why you like it, for example). Click Post.
Figure 10.15. Posting a song from your Music library to Ping
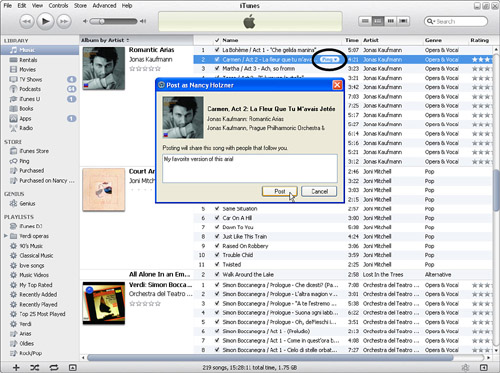
4. iTunes posts the song (along with your comment if you chose Post) to your Ping profile. It also appears in the Recent Activity posts of anyone who follows you.
When you share a song in Ping, your friends and followers can listen to a sample of the song right from your post by clicking its Play button. If they like what they hear, they can click the song’s Buy button and buy it then and there. Or they can click the song to go to its album in the iTunes Store.
Liking or Posting a Song from the iTunes Store
When you’re browsing the iTunes Store and come across a great song, you can share your find with your friends on Ping. Next to the song’s Buy button (at the far right of the listing) is a downward-pointing arrow; click that. From the context menu that appears, choose either Like or Post. (If you choose Post, type in a comment and then click the Post button.) iTunes lets all your Ping friends know about the great song on your profile and in the Recent Activity section of your followers.
![]() For tips on finding music in the iTunes Store, see “Browsing for Music” and “Searching for Music and Other Content” (both in Chapter 3).
For tips on finding music in the iTunes Store, see “Browsing for Music” and “Searching for Music and Other Content” (both in Chapter 3).
![]() LET ME TRY IT
LET ME TRY IT
Liking or Posting an Album from Your Music Library
To share an album from your iTunes Music library, follow these steps:
1. In your iTunes Music library, click the Grid View button (at the top of the screen) to display your library in Grid view.
2. Find the album you want to share on Ping and either right-click it (on a PC) or Ctrl-click it (on a Mac).
3a. If you want to tell others that you like the album, choose Like from the context menu.
3b. If you want to post the album in Ping, choose Post from the context menu.
3c. Choosing Post opens the Post As dialog box, which looks just like the one shown for a song (see Figure 10.15). Type an optional comment about the album. Click Post.
4. iTunes posts the album (along with your comment, if you chose Post) to your Ping profile. It also appears in the Recent Activity feed of anyone who follows you.
Liking or Posting an Album from the iTunes Store
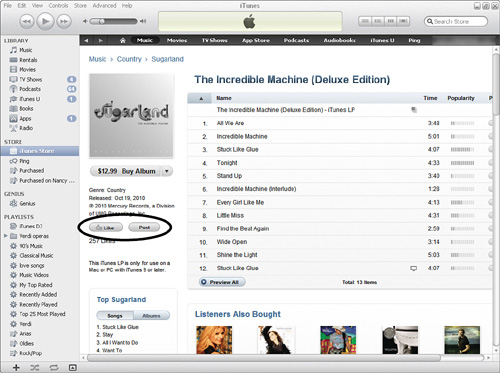
Just as you can like or post any song from the iTunes Store, you can do the same with an album. Open the album’s page in the iTunes Store. On the left side, below the information about the album, are Like and Post buttons for the album, as shown in Figure 10.16. Click the one you want (if you’re posting the album, enter an optional comment in the Post As dialog box).
Figure 10.16. Liking or posting an album from its iTunes Store page
Rating and Reviewing an Album
When you review an album in the iTunes Store, you share your opinion with iTunes Store shoppers and your followers on Ping, both at the same time. Reviews get posted on the album’s page in the iTunes Store and linked to via the My Reviews link on your Ping profile. You can just rate an album (assign it the number of stars you think it deserves), or you can write a full review to share your thoughts in more detail.
Here’s how to rate and review an album in iTunes:
- In the iTunes Store, go to the page of the album you want to review.
- In the Customer Reviews section (just below the Customer Reviews heading), click the Write a Review link.
- If prompted, sign in to your iTunes Store account.
- In the Write a Review form (see Figure 10.17), click the number of stars you want to assign to the album: one star means you hated it, five stars means you think it’s great.
Figure 10.17. Reviewing an album
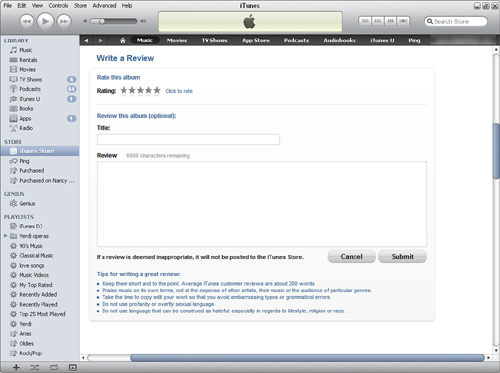
- Give your review a title (optional) in the Title box. This could be something like “My favorite album ever!” or “I wish this band would go back to its roots.”
- Type your review (optional) into the Review text box. A review can be up to 6,000 characters, including spaces.
- When your review looks good (take the time to read it through for typos), click Submit.
Managing Your Ping Activities
As you spend time on Ping, you may want to change your profile or delete a post or comment you made. Read on to find out how.
Editing Your Profile
Maybe you’ve discovered a great new album that you want to list as one of your favorites. Maybe you want a new profile picture. Or maybe you’ve moved to a different town. When you want to make changes to your Ping profile, start on your profile page. (In your Ping links, click My Profile.) When your profile opens, click Edit Profile.
The Edit My Profile page opens. This looks exactly like the form you filled out to create your profile, except that your current information is already filled in. Make whatever changes you want: photo, town, About Me description, favorite genres and albums, or privacy settings. When you’re finished, click Save to apply the changes to your profile.
Deleting a Post
If you post about something and then change your mind and want to take it back, it’s easy to delete a post. Go to your profile and, in your Recent Activity feed, find the post you want to delete. Click the Remove link on its right side to remove the post.
Deleting a Comment
You can remove comments you make on others’ posts. Use either of these methods:
• In your Recent Activity feed or on the profile page of the artist or person whose post you commented on, find your comment. When you point at the comment with your mouse pointer, an x appears to its right. Click the x to delete the comment.
• On your profile, a Remove link appears to the right of each of your comments and posts. Click Remove, and the comment disappears.
Going Mobile with Ping
You can take Ping with you wherever you go, thanks to your iPod Touch, iPhone, or iPad. Just like on your computer, you’ll find Ping in the iTunes Store on your portable device. Tap iTunes and then, at the bottom of the screen, tap Ping. Figure 10.18 shows how Ping looks on an iPhone.
Figure 10.18. Ping on an iPhone
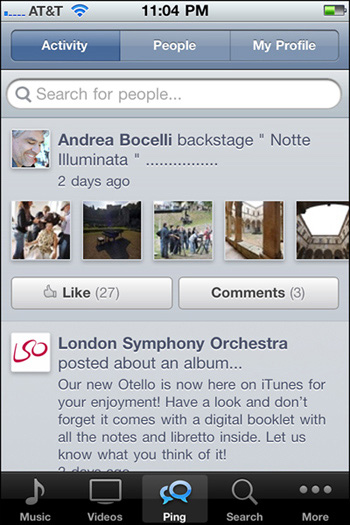
Across the top of the screen are three buttons:
• Activity—Tap this button to see your Recent Activity feed. Tap any post to read it in full or see the poster’s profile. You can also use the Like and Comments buttons to respond to the posts in the feed.
• People—Tap this button to see lists of people you follow and people who follow you.
• My Profile—View your own Recent Activity by tapping this button. On the page that opens, tap My Info to view your profile.
Turning Off Ping
If you decide that Ping isn’t for you, you can turn it off from your iTunes Store account. When you turn off Ping, iTunes removes your profile, comments, and Recent Activity list from Ping immediately, but the information hangs around on Apple’s servers for a week. So if you change your mind and turn on Ping again, your information is still there. If you don’t come back after seven days, though, iTunes permanently deletes your profile information.
![]() LET ME TRY IT
LET ME TRY IT
Turn Off Ping
To turn off Ping and remove your profile information, follow these steps:
- In iTunes, click iTunes Store in the source list.
- In the iTunes Store, click your email address at the upper-right to open your account.
- Type in the password for your iTunes Store account and click View Account.
- In the Ping section of your account page, click the Turn Off button.
- If you’re sure that you want to stop using Ping, click Turn Off again to confirm.