
Chapter 47. Coding Attributes
Executables produced by .NET languages are different from classic (Win32) executables. Other than the Intermediate Language (IL), they store additional information on types defined in the assembly, on members, and on data. The information is referred to as metadata. Assemblies’ metadata also contains information about attributes, which are declarative programming elements that enable annotating types with custom information and that can condition types’ behavior according to the information provided. They are pieces of information for types and therefore are part of the application metadata. You can find attributes in a lot of different scenarios in .NET development. For example, you saw attributes in Chapter 26, “Introducing ADO.NET Entity Framework,” when discussing how the Entity Framework defines entities. Chapter 41, “Serialization,” discussed serialization and the Serializable attribute. In this chapter, you reach two objectives. First, you get information on applying attributes, which is a specific recap of information you should already know. The second objective is to learn to create custom attributes and provide additional information to your applications by using metadata.
Applying Attributes
So far, you have seen a lot of examples about applying attributes, but for the sake of completeness we provide information here. When applying attributes to your own types or members, you enclose the attribute name between angle brackets, as in the following example:
<Serializable()>
Public Class Person
End Class
In this case, the Serializable attribute is parameterless (and in this case you can omit round parentheses).
When you apply an attribute, your object is decorated with that attribute. Another common description utilized when applying attributes is that an object is marked. Referring to the previous example, you can say that the Person class is decorated with the Serializable attribute or that it is marked as Serializable. Attributes can receive arguments. The following example shows how to pass arguments to the CLSCompliant attribute:
<CLSCompliant(True)>
Public Class Person
End Class
Attributes’ arguments are separated by commas according to the number of arguments required. As explained when discussing custom attributes, optional parameters are also allowed. You apply multiple attributes and separate them with commas or write each attribute after the other one. Both the following modes are perfectly legal:
<Serializable()>
<CLSCompliant(True)>
Public Class Person
End Class
<Serializable(), CLSCompliant(True)>
Public Class Person
End Class
Implicit-Line Continuation
In the first code snippet, notice how attributes no longer require the underscore character when written on multiple lines. This is one of the allowed scenarios for the implicit-line continuation features in Visual Basic starting from version 2010.
Attributes can be applied to the following programming elements:
• Classes
• Structures
• Methods (including constructors)
• Fields
• Properties
• Interfaces
• Delegates and events
• Parameters and return values
• Enumerations
As mentioned at the beginning of this chapter, attributes are information that is stored in the assembly metadata. Figure 47.1 represents how such information is stored within the assembly, including type information and member information.
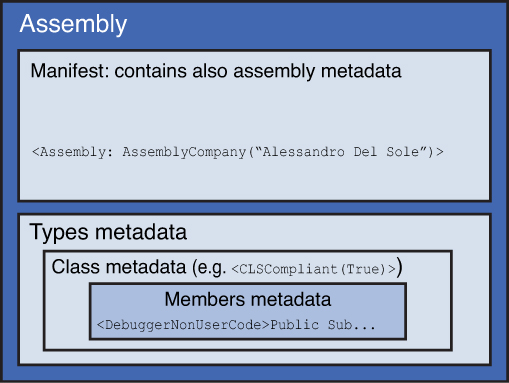
Figure 47.1. Attribute information stored in the assembly metadata.
Considering the representation shown in Figure 47.1, you might notice the description about assembly metadata. You can apply attributes at the assembly level, in the AssemblyInformation.vb file. Assembly-level attributes are set at design time with the My Project window’s tabs (refer to Chapter 3, “The Anatomy of a Visual Basic Project,” and Chapter 19, “The My Namespace,” for details). This means that each application property has a related assembly-level attribute. There is just one attribute named Assembly that requires the specification of nested attributes setting particular properties. For example, the following attributes’ specifications set the title, description, and company name properties for the application:
<Assembly: AssemblyTitle("CodingAttribute")>
<Assembly: AssemblyDescription("Demo for Chapter 48")>
<Assembly: AssemblyCompany("Alessandro Del Sole")>
In the preceding code, Assembly is the main attribute, and AssemblyTitle, AssemblyDescription, and AssemblyCompany are other attributes that are nested into the Assembly declaration. Examining AssemblyInfo.vb you can see available assembly-level attributes, and you discover how each attribute is related to an application property settable in My Project. So far, you have seen how to apply existing attributes, but these special objects provide great flexibility over your object development and provide the ability to deeply enhance your types, especially if you create custom attributes, as you will better understand in the next section.
Coding Custom Attributes
A custom attribute is a class that inherits, directly or indirectly, from System.Attribute. When coding custom attributes, the class name should end with the Attribute word. This is not mandatory but—besides being required by Microsoft’s Common Language Specification (CLS)—it provides a better way for identifying attributes in code. When applying attributes, you can shorten the attribute names by excluding the Attribute word. For example, imagine you have a Document class representing a simple text document. You might want to provide further information on the document, such as the author, reviewer, or last edit date. This information can be provided and stored in the assembly metadata using a custom attribute. Code in Listing 47.1 shows the implementation of a custom attribute that exposes document properties, which is explained next.
Listing 47.1. Writing a Custom Attribute
<AttributeUsage(AttributeTargets.Class Or AttributeTargets.Property)>
Public Class DocumentPropertiesAttribute
Inherits Attribute
'Attributes can be inherited
'therefore private fields are Protected
Protected _author As String
Protected _reviewer As String
Public Overridable ReadOnly Property Author As String
Get
Return Me._author
End Get
End Property
Public Overridable ReadOnly Property Reviewer As String
Get
Return Me._reviewer
End Get
End Property
Public Overridable Property LastEdit As String
Public Sub New(ByVal author As String, ByVal reviewer As String)
Me._author = author
Me._reviewer = reviewer
Me._lastEdit = CStr(Date.Today)
End Sub
End Class
In Visual Basic, every custom attribute is a class with Public or Friend access level and decorated with the AttributeUsage attribute that enables you to specify which programming elements can be targeted by the custom attribute. Programming elements are specified via the System.AttributeTargets enumeration; the enumeration exposes a number of elements, each of them self-explanatory about the targeted programming element. For example, AttributeTargets.Class enables you to apply the attribute to reference types, and AttributeTargets.Methods enables you to apply the attribute to methods. IntelliSense shows the full list of the enumeration members, which is straightforward. An available member for each element is described in the previous section for targetable programming elements. AttributeTargets members support bitwise operators so that you combine multiple targets using Or. Actual metadata is exposed to the external world via properties that can be either read-only or read/write. Attributes can receive arguments, although this is not mandatory. For arguments, it is important to understand how you can ask for required parameters and optional ones. This is not something that you define as you would usually do in other programming elements such as methods. Required parameters are specified in the class constructor. Continuing with the example of Listing 47.1, our custom attribute requires the specification of the author and the reviewer of the document, and the last edit date is optional and is still available via a specific property. Optional parameters initialization is not required; in the mentioned example a default value for the LastEdit property is supplied. As explained in the next subsection, optional arguments are invoked with named parameters.
Types for Attributes Parameters
You should have noticed that the LastEdit property in the custom attribute is of type String instead of type Date. There are some limitations in the applicable data types for attributes parameters. For example, Decimal and Date are not supported (like structured types as well). Supported types are instead numeric types (Bytes, Short, Integer, Long, Single, and Double), string types (String and Char), enumerations, and the Boolean type. Take care of these limitations because they can result in exceptions when passing arguments.
There are several other ways to customize attributes, but before discovering them here’s how to apply custom attributes to complete the discussion on parameters.
Applying Custom Attributes
The previous subsection discussed the definition of a custom attribute for assigning metadata to a class representing a basic text document. The code in Listing 47.2 implements the related Document class that is decorated with the DocumentPropertiesAttribute.
Listing 47.2. Applying Custom Attributes
<DocumentProperties("Alessandro Del Sole",
"Robert White",
LastEdit:="06/05/2012")>
Public Class Document
Public Property Text As String
Public ReadOnly Property Length As Integer
Get
Return Text.Length
End Get
End Property
<DocumentProperties("Alessandro Del Sole",
"Stephen Green")>
Public Property DocumentName As String
Public Sub SaveDocument(ByVal fileName As String)
'...
End Sub
Public Sub LoadDocument(ByVal filneName As String)
'...
End Sub
End Class
When you apply an attribute, you can shorten its name by excluding the Attribute word in the identifier. For example, DocumentPropertiesAttribute can be shortened to DocumentProperties. The Visual Basic compiler correctly recognizes the identifier of an attribute. Then you must provide required arguments, respecting the data type. Such arguments are defined in the constructor of the attribute definition (see the previous subsection). If you want to also specify an optional argument, such as the LastEdit one in the previous example, you need to perform it via a named parameter. Named parameters are literals followed by the := symbols and by information of the required type. This is the only way to provide optional arguments. Notice also how the custom attribute is applied at both class and property level; this is allowed by the attribute definition. Attributes are therefore useful for providing additional information that will be stored in the assembly metadata, to custom objects. Attributes are flexible for other reasons that are covered in the next sections.
Applying Attributes Multiple Times
According to the particular nature of your custom attributes, you can decide whether multiple instances can be applied to programming elements. This is accomplished by setting the AllowMultiple property as True in the AttributeUsage. The following is an example:
<AttributeUsage(AttributeTargets.Class Or AttributeTargets.Property,
AllowMultiple:=True)>
Public Class DocumentPropertiesAttribute
Inherits Attribute
AllowMultiple is optional and thus is invoked as a named parameter. The following is an example of how you apply multiple instances of an attribute:
<DocumentProperties("Alessandro Del Sole",
"Stephen Green")>
<DocumentProperties("Alessandro", "Stephen",
LastEdit:="07/10/2012")>
Public Property DocumentName As String
In the particular example of the DocumentProperties attribute, multiple instances probably do not make much sense, but this is the way to apply them.
Defining Inheritance
In some situations you create classes that inherit from other classes that are decorated with attributes. Attribute inheritance is not automatic in that you can establish whether your attributes are inheritable. You establish this behavior by setting the Inherited property at AttributeUsage level. By default, if you do not explicitly set Inherited, it is considered as True. The following example shows how you enable attribute inheritance:
'Attribute is also inherited
<AttributeUsage(AttributeTargets.Class Or AttributeTargets.Property,
Inherited:=True)>
Public Class DocumentPropertiesAttribute
The following snippet shows instead how to make an attribute not inheritable:
'Attribute is not inherited
<AttributeUsage(AttributeTargets.Class Or AttributeTargets.Property,
Inherited:=False)>
Public Class DocumentPropertiesAttribute
Inheritance is enabled by default because, if a base class is decorated with attributes, derived classes probably also need them. Because of this, you should be careful when disabling inheritance. The code in Listing 47.3 shows an example of declaring two attributes with inheritance definitions and how a derived type is influenced by attribute inheritance.
Listing 47.3. Conditioning Attribute Inheritance
<AttributeUsage(AttributeTargets.Class Or AttributeTargets.Method,
Inherited:=False)>
Public Class FirstAttribute
Inherits Attribute
'Implement your code here..
End Class
<AttributeUsage(AttributeTargets.Class Or AttributeTargets.Method)>
Public Class SecondAttribute
Inherits Attribute
'Implement your code here..
End Class
Public Class Person
Public Property LastName As String
Public Property FirstName As String
'The base class takes both attributes
<First(), Second()> Public Overridable Function FullName() As String
Return String.Concat(LastName, " ", FirstName)
End Function
End Class
Public Class Contact
Inherits Person
'This derived class takes only the Second attribute
'because First is marked as Inherited:=False
Public Overrides Function FullName() As String
Return MyBase.FullName()
End Function
End Class
Notice how the FullName method in the Contact class inherits just the Second attribute appliance, but the First attribute is not applied because of inheritance settings.
Reflecting Attributes
Attributes are about applications’ metadata. Because of this, you can use Reflection (refer to Chapter 46, “Reflection,” for details) to check whether a type recurs to custom attributes and investigate metadata (that is, application information). To accomplish this, you invoke the System.Reflection.MemberInfo.GetCustomAttributes and System.Reflection.Attributes.GetCustomAttributes shared methods. The first one returns all attributes applied to the specified type; the second one returns an array of custom attributes applied to an assembly, a type or its members, and method parameters. The following is the most basic example for retrieving information about attributes applied to members of the Document class:
'Requires an Imports System.Reflection directive
Public Sub GetMyAttributes()
'About members in the Document class
Dim info As System.Reflection.MemberInfo = GetType(Document)
'Retrieves an array of attributes
Dim attributesList() As Object = info.GetCustomAttributes(True)
'Enumerates applied attributes
For i As Integer = 0 To attributesList.Length - 1
Console.WriteLine(attributesList(i))
Next (i)
End Sub
The following example is a little bit more complex and shows how you can perform actions on each attribute instance through Attribute.GetCustomAttributes:
Public Sub GetMyAttributesComplex()
Dim typeToInvestigate As Type = GetType(Document)
' Get the type information for the DocumentName property.
Dim member_Info As PropertyInfo =
typeToInvestigate.GetProperty("DocumentName")
If Not (member_Info Is Nothing) Then
'Iterate through all the attributes of the property.
Dim attr As Attribute
For Each attr In Attribute.GetCustomAttributes(member_Info)
' Check for the DocumentPropertiesAttribute attribute.
If attr.GetType().
Equals(GetType(DocumentPropertiesAttribute)) Then
Console.WriteLine("Author: {0}", CType(attr,
DocumentPropertiesAttribute).Author)
'Additional ElseIf conditions here for other attributes..
End If
Next attr
End If
End Sub
In this particular scenario, the code is used to iterate applied attributes. Do not forget the simplicity of Caller Information described in the previous chapter, which enables you to retrieve specific information on the current assembly without iterating the assembly’s attributes.
Summary
Attributes provide great flexibility in .NET development by giving you the ability to decorate your types and members with custom additional information that is stored in the assembly metadata. All custom attributes are public classes deriving from System.Attribute and can be applied to various programming elements, such as assemblies, classes, modules, methods, properties, and so on. For this, the Visual Basic language requires you to decorate your custom attributes with the AttributeUsage attribute that provides specifications on targeted elements. When defining custom attributes, you can provide both required and optional parameters; the first ones are established in the constructor. All parameters refer to attribute information that is exposed to the external world via properties. Remember that you need to provide a named parameter when invoking optional arguments. You can also decide to make your attributes inheritable (Inherited property) and to make them applicable more than once (AllowMultiple). Finally, you can investigate assemblies’ and types’ attributes via Reflection.