
Chapter 56. Testing Code with Unit Tests, Test-Driven Development, and Code Contracts
In This Chapter
• Testing Code with Unit Tests
• Introducing Test Driven Development
• Understanding Code Contracts
When you purchase new software, you expect that such software works. I’m pretty sure you don’t like applications you buy to cause unexpected crashes or errors due to apparently unhandled situations. The same is true for users purchasing your software or for colleagues in your company performing their daily work through your applications, so you need to pay particular attention to how your code works. Although implementing error handling routines is fundamental, another important step in application development is testing code. Testing enables you to check for code blocks’ correct behavior under different situations, and it should be as deep as possible. In big development teams, testers play an important role, so they need to have good tools for successfully completing their work. In this chapter, you learn about the Visual Studio tools for testing code, starting from unit tests until the new Code Contracts library, passing through the Test Driven Development approach. You also see how such tooling can be successfully used even if you are a single developer.
Testing Code with Unit Tests
Unit tests enable you to test code portions outside the application context to check whether they work correctly so that testing is abstracted from the application. Typically, you create a test project in which classes and methods encapsulate and isolate the original code so that you can test it in a kind of isolated sandbox without editing the source project. Visual Studio 2012 is the ideal environment for performing unit tests, so this section explains how you can accomplish this important task. In this section, you learn how to create unit tests for existing code. This is necessary to give you the basics for learning Test Driven Development in the next section of this chapter, where you instead learn how to start from writing unit tests to moving the code to the actual project.
Unit Tests and Windows 8 Development
In this chapter we discuss unit testing with desktop applications, but you can use unit testing to test the code you write in developing Windows 8-style apps. For this particular scenario, the MSDN documentation has a specific page available at http://msdn.microsoft.com/en-us/library/windows/apps/hh441482(v=vs.110).aspx
Creating Unit Tests
First, you need some code to test. If you already have experience with unit testing in Visual Studio 2010, you will notice some differences in Visual Studio 2012. In particular, you can no longer right-click a method name to create a unit test via the Create unit test command, which has been removed. Now you need some manual work, as you discover soon. Imagine you have a Rectangle class that exposes methods for math calculations on rectangles perimeter and area. Thus, create a new class library and name it UnitTestDemo; then rename Class1.vb as Rectangle.vb and write the following code:
Class Rectangle
Shared Function CalculatePerimeter(ByVal sideA As Double,
ByVal sideB As Double) As Double
Return (sideA * 2) + (sideB * 2)
End Function
Shared Function CalculateArea(ByVal sideA As Double,
ByVal sideB As Double) As Double
Return sideA * sideB
End Function
End Class
Imagine you want to test both methods to check if they work correctly but inside an isolated environment, abstracted from the original project. The first thing you need to do is add to the solution a so-called Test Project, which enables the Visual Studio’s testing framework. To accomplish this, follow these steps:
1. Select File, Add, New Project.
2. In the New Project dialog box, expand the Visual Basic node and then select the Test element. See Figure 56.1 for a reference.
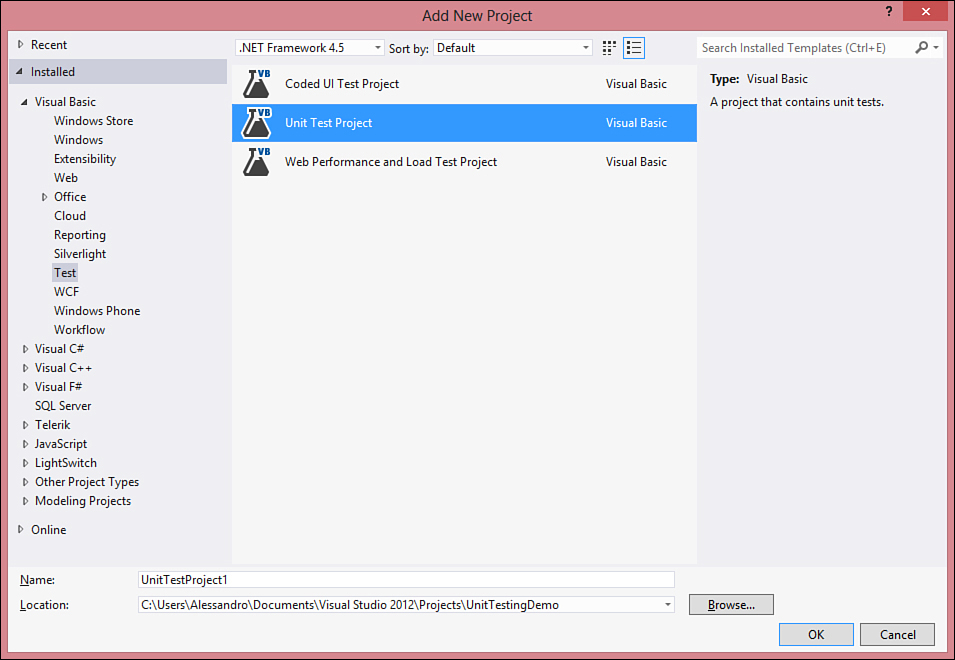
Figure 56.1. Creating a new test project.
3. Select the Unit Test Project template and then specify a name for the test project; finally click OK (for the current example, you can leave the default name unchanged).
Coded UI Tests and Web Performance and Load Tests
As you can see from Figure 56.1, Visual Studio 2012 also offers support for Coded UI tests and the Web performance and Load tests. The first kind of test enables you to test portions of the user interface to determine whether it behaves correctly and validate user interface controls. The second kind simulates an environment in which multiple users concurrently access a web application to determine if this responds correctly to various levels of usage. Both are related to specific development scenarios so they will not be covered in this chapter—the goal is providing information on writing unit tests that are independent from the technology. The MSDN documentation provides detailed information that you can check out for further studies. The documentation for Coded UI Tests is available at http://msdn.microsoft.com/en-us/library/dd286726.aspx, and the documentation for web performance and Load tests is available at http://msdn.microsoft.com/en-us/library/dd293540.aspx.
When Visual Studio finishes generating the new project, you notice a simple test class called UnitTest1 and that looks like the following code:
Imports System.Text
Imports Microsoft.VisualStudio.TestTools.UnitTesting
<TestClass()> Public Class UnitTest1
<TestMethod()> Public Sub TestMethod1()
End Sub
End Class
The Microsoft.VisualStudio.TestTools.UnitTesting imported namespace provides support for the built-in unit test framework. Unit tests are methods contained inside a test class. Such a class must be decorated with the TestClass attribute, and all the unit tests contained in the class must be decorated with the TestMethod attribute. Both attributes make code recognizable by the IDE as code that must be tested. Now copy the code of the Rectangle class into the current code editor window (to avoid adding a reference to the first project), and then rename the UnitTest1 class RectangleTest. You must now write the test logic and create a test method for each original method you want to test. Listing 56.1 shows an example of how you can write a simple test logic.
Listing 56.1. Writing a Test Class with Test Methods
<TestClass()> Public Class RectangleTest
'''<summary>
'''A test for CalculateArea
'''</summary>
<TestMethod()> _
Public Sub CalculateAreaTest()
Dim sideA As Double = 10
Dim sideB As Double = 20
Dim expected As Double = 2000
Dim actual As Double
actual = Rectangle.CalculateArea(sideA, sideB)
Assert.AreEqual(expected, actual)
End Sub
'''<summary>
'''A test for CalculatePerimeter
'''</summary>
<TestMethod()> _
Public Sub CalculatePerimeterTest()
Dim sideA As Double = 10
Dim sideB As Double = 20
Dim expected As Double = 60
Dim actual As Double
actual = Rectangle.CalculatePerimeter(sideA, sideB)
Assert.AreEqual(expected, actual)
End Sub
End Class
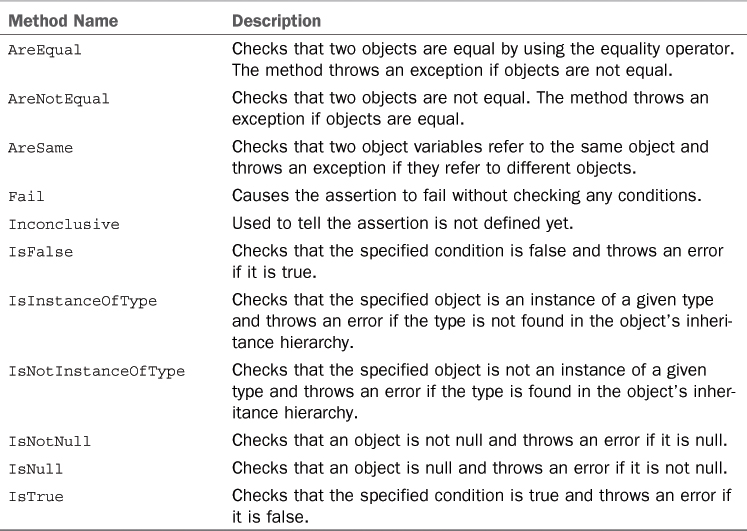
Test methods cannot be shared, and they must be public, accept no parameter, and return no value. This is the reason values must be initialized within method bodies. The idea of unit testing is comparing the expected result with the actual result of an action, and this can be done through static methods of the Microsoft.VisualStudio.TestTools.UnitTesting.Assert class. Table 56.1 summarizes the most important methods from the Assert class (if you examine the class with the Object Browser tool and the IntelliSense, you can get further information, such as about the available overloads and method parameters). Notice that the first method voluntarily causes an error, to demonstrate how unit testing works. The expected value is in fact greater than it should be. You are now ready to run both unit tests.
Table 56.1. Methods from the Assert Class
Running Unit Tests
Visual Studio 2012 introduces the Test Explorer tool window, which is the environment where you run and analyze unit tests’ execution. This window is automatically shown if you run unit tests through one of the commands from the Test menu or when you right-click the code editor and select Run tests. It can also be launched manually by selecting Test, Windows, Test Explorer. To see such a tool window in action, right-click the code editor and select Run tests. This command runs all unit tests in the project, but you can make a different choice with commands in the Test menu. When all the unit tests are completed, the Test Explorer tool window shows a report about test success or failures. Figure 56.2 shows how such a window looks for the current example.

Figure 56.2. Viewing unit test results.
Notice how the CalculateAreaTest method failed while CalculatePerimeterTest succeeded. You can click the failed method to get details on the error so that you can fix it. In this case, the equality check failed because the method returned a result different from the expected one.
Note on Fixing Errors
In a typical real-life scenario, you will not edit the expected result to make a unit test work; you will instead fix errors in the code. The example proposed in this chapter is a demo scenario, and its purpose is explaining how unit tests work. This is why here you are about to fix the expected result, but in real-world applications the expected result will remain unvaried.
In the CalculateAreaTest method, replace the expected declaration as follows:
Dim expected As Double = 200
Now run both unit tests again. At this point, both tests pass because in both cases the expected value and actual value are equal, as demonstrated in Figure 56.3.
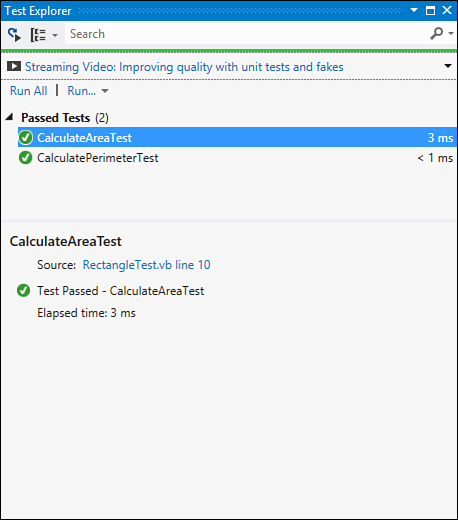
Figure 56.3. Both unit tests passed.
Enabling Code Coverage
Visual Studio enables you to get information on the amount of code that was subject to the actual test. This can be accomplished by using a feature known as Code Coverage. To see code coverage results, double-click a method name in Test Explorer. The Code Coverage Results window will show information on collected results. Figure 56.4 shows such results.
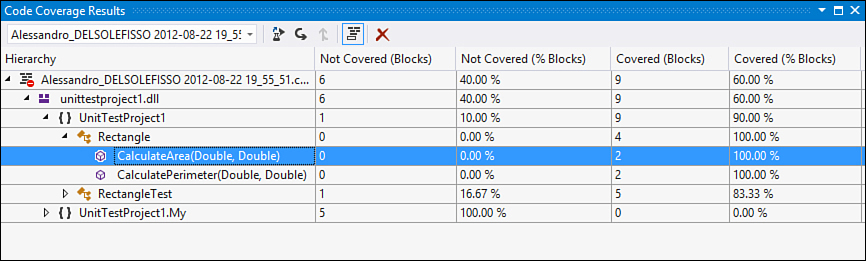
Figure 56.4. Examining Code Coverage Results.
You can expand the results to get information on the code coverage percentage for single members. For example, both test methods have a 100% coverage against a total 60% for the entire project. If you switch to the test code file, you see that Visual Studio automatically highlights lines of code that were subject to test.
Introducing Test Driven Development
Test Driven Development (TDD, or Test Driven Design) is a programming approach in which developers create applications by first writing unit tests and then writing the actual code after the unit test passes. This particular approach improves code writing because you ensure that it will work via unit tests, but it is also a life philosophy so that you need a change of mind when approaching TDD. TDD is structured into three main moments:
• Red—The developer generates a new unit test from scratch, so that it will typically fail. This is the reason it’s called Red.
• Green—The developer focuses on writing code that makes the unit test work and pass. As you saw in the previous section, passing unit tests return a green result.
• Refactor—This is the moment in which the developer reorganizes code, moving it from the unit test to the actual code system in the application project, making the code clearer, and fixing it where necessary.
This chapter is not intended to be a deep discussion on TDD, but it is instead intended to be a guide to Visual Studio 2012 instrumentation for Test Driven Development. Particularly, you see how the Generate from Usage feature discussed in Chapter 17, “Creating Objects: Visual Tools and Portable Libraries,” together with unit tests, is the main help you have in TDD with Visual Basic 2012.
Creating a Test Project
The first step in the Test Driven Development approach is creating a Test Project (close any currently opened projects) related to a project you are working on. By remembering the lesson learned in the previous section, follow these steps:
1. Create a new class library named RectangleLibrary and remove the Class1.vb default file.
2. Add a new test project to the solution. To accomplish this, select File, Add, New project, and then in the Visual Basic, Test folder, select the Unit Test Project template.
3. Rename the default class RectangleTest.vb. This is the place where you write and run unit tests.
Now imagine you want to test a Rectangle class exposing Width and Height properties and methods for math calculations such as the perimeter. Such class will be exposed by the actual project at the end of the TDD approach. You now need to test class and methods in the test project. As you already know, Visual Studio generates a test class and a test method for you; the code looks like the following:
Imports System.Text
Imports Microsoft.VisualStudio.TestTools.UnitTesting
<TestClass()> Public Class RectangleTest
<TestMethod()> Public Sub TestMethod1()
End Sub
End Class
You can delete the TestMethod1 method, as unit tests are created from scratch in the next subsection. As a recap, it is worth mentioning that a test class is marked with the Microsoft.VisualStudio.TestTools.UnitTesting.TestClass attribute. Now you have a place where you can write your unit tests.
Creating Unit Tests
As you can recap from the “Testing Code with Unit Testing” section, unit tests are methods enabling tests against small, isolated portions of code. To be recognized as unit tests, such methods must be decorated with the Microsoft.VisualStudio.TestTools.UnitTesting.TestMethod attribute. Continuing our example and having the requirement of implementing a method for calculating the perimeter for rectangles, this is how the method stub appears:
<TestMethod()>
Sub CalculatePerimeter()
End Sub
Now go into the method body and write the following line:
Dim rect As New Rectangle
The Rectangle type is not defined yet, so Visual Studio underlines the declaration by throwing an error. Click the error option’s pop-up button and click Generate new type, as shown in Figure 56.5.
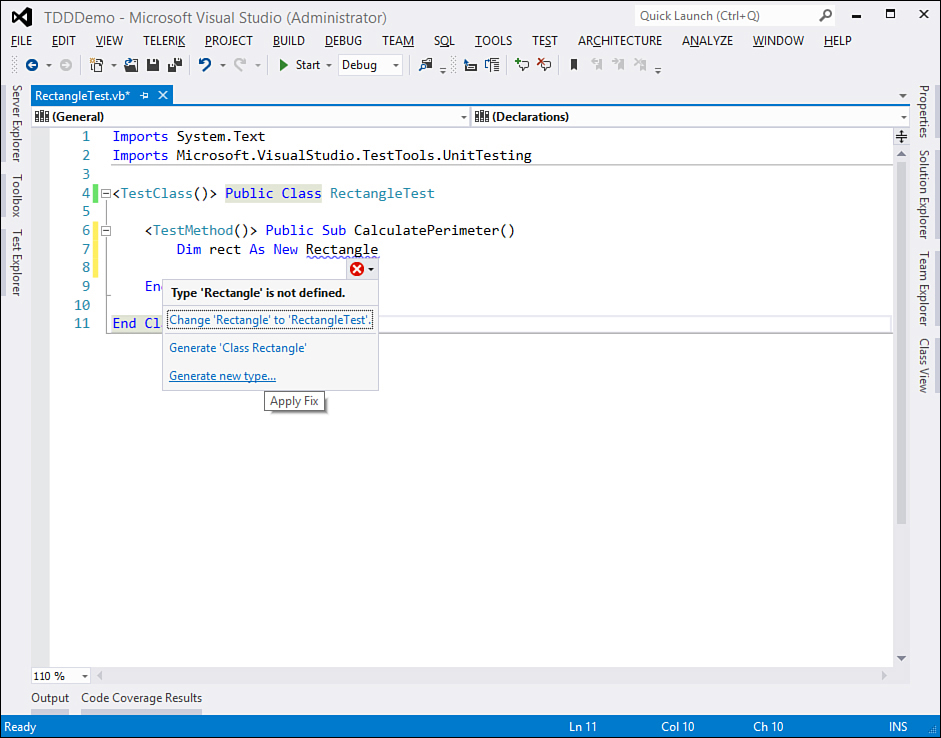
Figure 56.5. Choosing a correction option.
This launches the Generate New Type dialog box, where you can select the Rectangle project in the Location combo box. See Figure 56.6 for details.
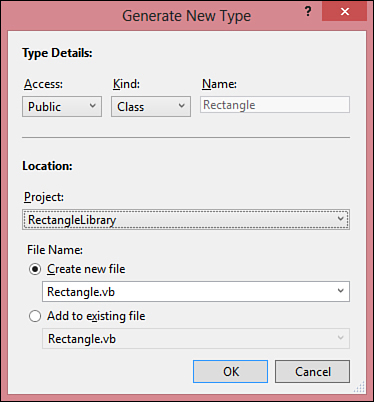
Figure 56.6. Generating a new Rectangle type.
Why Generate a Type in the Production Project?
You might ask why the preceding example showed how to add the new type to the actual project instead of the test one. In a demo scenario like this, adding a new type to the test project would be useful, but in real life you might have dozens of new types to add. This can make moving all types from one project to another, including code edits, less productive. The illustrated approach keeps the benefits of TDD and offers a way of implementing types directly in the project that will actually use them.
Next, Visual Studio 2012 automatically imports the RectangleLibrary namespace so that you do not need to add it to the instance declaration. Now type the following line of code:
rect.Width = 150
The Width property is not exposed yet by the Rectangle class, so Visual Studio underlines it as an error. As for the class generation, click the error correction options and select the Generate Property Stub for ‘Width’ choice, as shown in Figure 56.7.
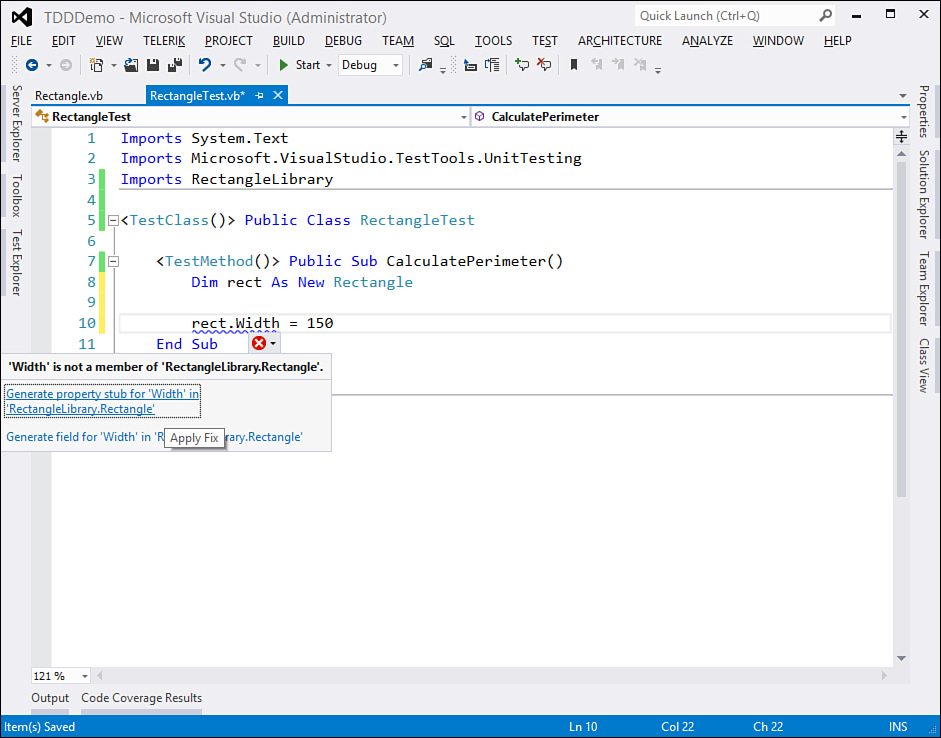
Figure 56.7. Generating a property stub.
This adds a property to the Rectangle class. Now write the following line of code and repeat the steps previously shown:
rect.Height = 100
Complete the method body by writing the following lines:
Dim expected = 500
Dim result = rect.CalculatePerimeter
Assert.AreEqual(expected, result)
You have an expected result (notice I’m using type inference) and an actual result returned by the CalculatePerimeter method. This method does not exist yet, so use the Generate from Usage Feature to add a new method stub to the Rectangle class. Run the unit test and it will fail as expected, being in the Red moment of TDD, as demonstrated in Figure 56.8.
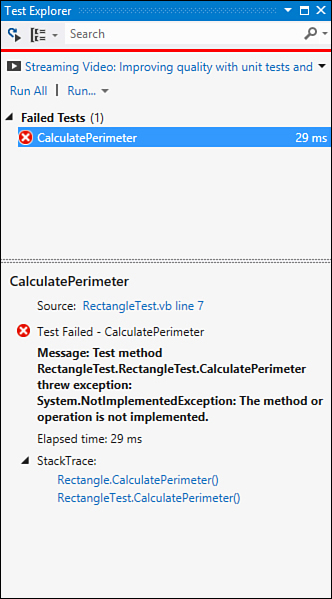
Figure 56.8. Running the new unit test fails due to an exception.
The unit test fails because the current method definition for CalculatePerimeter is the following:
Function CalculatePerimeter() As Object
Throw New NotImplementedException
End Function
So edit the method as follows, to make it return a more appropriate type and perform the required calculation:
Function CalculatePerimeter() As Integer
Return (Width * 2) + (Height * 2)
End Function
Now run the unit test again and it will pass. You have thus successfully completed the Green phase of TDD, and you can now move to the final step—Refactor.
Refactoring Code
When your unit tests all pass, it is time to reorganize code. For example, if you take a look at the Rectangle class, you notice that the Generate from Usage Feature generated objects of type Integer. This is also why the CalculatePerimeter method has been forced to return Integer. Although correct, the most appropriate type for math calculations is Double. Moreover, you might want to consider writing a more readable code in the method body. After these considerations, the Rectangle class could be reorganized as follows:
Public Class Rectangle
Public Property Width As Double
Public Property Height As Double
Public Function CalculatePerimeter() As Double
Dim perimeter As Double = (Me.Height + Me.Width) * 2
Return perimeter
End Function
End Class
In this way you have working code that uses more appropriate types and is more readable. Before you run the unit test again, you need to make a slight modification to the CalculatePerimeter method body in the RectangleTest test class. In fact, because the code uses local type inference with numbers, the following line of code assumes that the return type is Integer:
Dim expected = 500
Actually, you refactored the code in the Rectangle class to return Double, so you need to explicitly declare this in the test method as follows:
Dim expected As Double = 500
Now you can run the unit test again and see that it passes. TDD is useful when you have a large number of unit tests, but in the current example you saw how to start from unit test and move code to production, instead of performing unit tests after you already wrote some code.
Understanding Code Contracts
Code Contracts is a library that was first introduced with the .NET Framework 4.0 and is offered by the System.Diagnostics.Contract namespace. It enables you to check, both at runtime and compile time, whether the code is respecting specified requirements. This is something that you will often hear about as Design by contracts. The idea is that code needs to respect specified contracts to be considered valid. There are different kinds of contracts, known as preconditions (what the application expects), post-conditions (what the application needs to guarantee), and object invariants (what the application needs to maintain). We cover all of them in the next subsections. It is important to understand some other concepts. Code contracts are a useful way for testing code behavior, and this can be accomplished both at runtime (runtime checking) and compile time (static checking). Runtime checking needs the code to be executed and is useful when you cannot predict some code values; for example, say the application needs the user to enter some values that will be then validated. You can use contracts for implementing validation rules. Static checking can be useful if you have hard-coded variable values and need to check if they are contract-compliant. Both types of checking can be also used together and can be set in the Visual Studio IDE as explained in the next subsections.
Setting Up the Environment
The Code Contracts library is part of the .NET Framework 4.5, so you do not need to install anything more to use it in code. Some components need to be installed separately to access contracts settings in the Visual Studio IDE. So, before continuing to read this chapter, go to the following address: http://msdn.microsoft.com/en-us/devlabs/dd491992.aspx. From the DevLab site, download the Code Contracts tools and proceed with the installation. When installed, you can access design-time settings for code contracts as now explained.
Setting Contracts Properties
You set code contracts properties by first opening My Project and then clicking the Code Contracts tab, as shown in Figure 56.9.
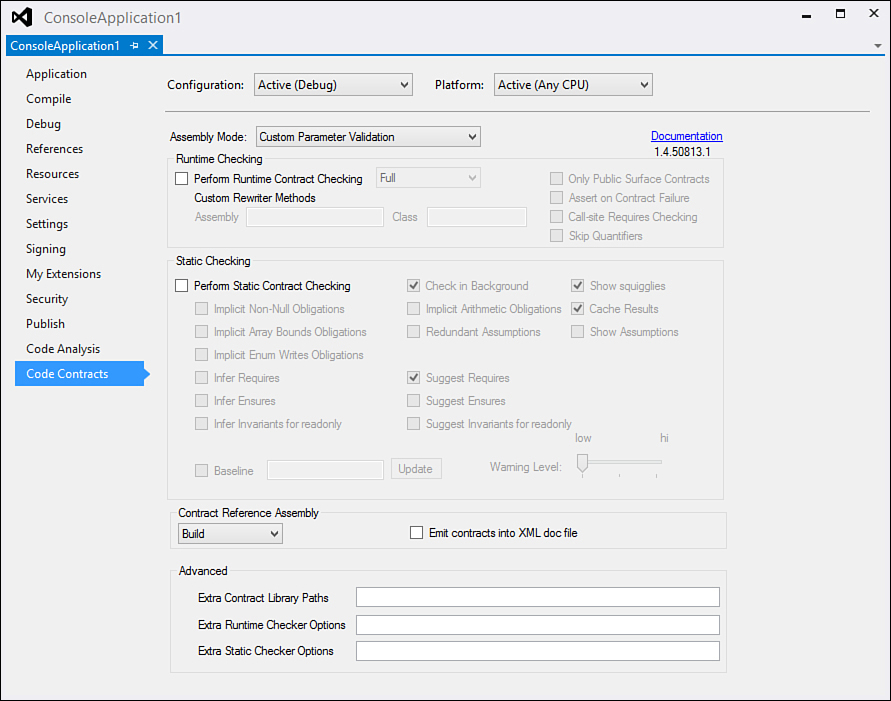
Figure 56.9. Accessing code contracts settings.
Notice how you can enable general settings, such as runtime checking and static checking, and specific settings for both profiles. Particularly, for runtime checking you should leave the default Full selection if you have both preconditions and post-conditions. If you want to enable static checking, too, for compile time contracts checking, by default the Check in background option is also selected. This enables the background compiler to check for contracts violations and send error messages to the Errors tool window. If this option is unselected, eventual error messages will be listed at the end of the build process.
Tip
If you remove the flag on Assert on Contract Failure, instead of an error dialog box showing details about the violation, the control will be returned to the Visual Studio code editor that will break at the line of code that violated the contract.
The next examples show both preconditions and post-conditions, so leave the default settings unchanged. Before getting hands on the code, let’s examine the tools that enable Visual Studio to integrate and work with contracts.
Tools for Code Contracts
When you use code contracts, the first requirement is the System.Diagnostics.Contracts namespace, exposed by the Mscorlib.dll assembly. This is not enough to make your code use contracts. Although you never see this, Visual Studio invokes some command-line tools behind the scenes. This subsection provides basic information on these tools and their purpose.
The Binary Rewriter
As you know, when you compile a .NET executable, the file is made of metadata and Intermediate Language. When you use contracts, especially for runtime checking, the Intermediate Language within an executable needs to be modified to recognize contracts. Such edits are performed by the CCrewrite.exe tool that injects the appropriate code for contracts in the appropriate place into your assembly.
The Static Checker
The static checker is represented by the CCCheck.exe tool and provides Visual Studio the capability of performing static analyses and checking for contracts violations without the need of executing code; a typical scenario is the compilation process.
Now that you have basic knowledge of the code contracts system, it is time to write code and understand how contracts work.
Understanding Preconditions
You add preconditions contracts to tell the compiler that the code can be executed only if it respects the specified contract. Preconditions are useful replacements for custom parameters validation rules. For example, consider the following simple method that multiplies two numbers:
Function Multiply(ByVal first As Double,
ByVal second As Double) As Double
If first < 0 Or second < 0 Then
Throw New ArgumentNullException
Else
Return first * second
End If
End Function
Inside the method body, the code checks for valid parameters; otherwise, it throws an exception. This is common, but code contracts provide a good way, too. The preceding method could be rewritten with code contracts as follows:
Function Multiply(ByVal first As Double,
ByVal second As Double) As Double
Contract.Requires(first > 0)
Contract.Requires(second > 0)
Return first * second
End Function
So, you just invoke the Contract.Requires method for evaluating a Boolean condition that will be accepted only when evaluated as True. Now consider the following Rectangle class:
Class Rectangle
Property Width As Double
Property Height As Double
Function CalculatePerimeter() As Double
Dim result = (Width * 2) + (Height * 2)
Return result
End Function
Sub New(ByVal width As Double, ByVal height As Double)
Me.Width = width
Me.Height = height
End Sub
End Class
The CalculatePerimeter instance method takes no arguments and performs calculations on instance properties, but it does not check for valid values. With regard to this, you can use the Contract.Requires method that specifies a condition enabling the code to be considered valid if such condition is evaluated as True. For example, consider the following reimplementation of the method:
Function CalculatePerimeter() As Double
Contract.Requires(Me.Height > 0)
Contract.Requires(Of ArgumentOutOfRangeException) _
(Me.Width > 0)
Dim result = (Width * 2) + (Height * 2)
Return result
End Function
In this case the contract requires that the Height property is greater than zero; otherwise, a runtime error is thrown. You instead use Contract.Requires(Of T) when you want to throw a specific exception when the contract is violated. The previous example throws an ArgumentOutOfRangeException if the Width property is less than zero. Consider the following code that creates an instance of Rectangle but violates the contract:
Dim r As New Rectangle(0, 80)
Console.WriteLine(r.CalculatePerimeter)
When you run this code, the runtime throws an ArgumentOutOfRageException, as shown in Figure 56.10, due to an invalid Width value.
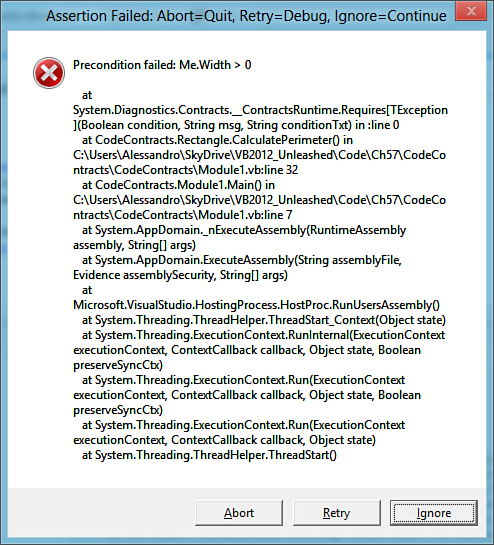
Figure 56.10. The exception thrown when the code violates a precondition.
Preconditions are thus useful when you want to validate code elements before they are invoked or executed. The next subsection discusses post-conditions instead.
Post-Conditions
A post-condition is a contract that is checked after code is executed and is used to check the result of some code execution. Continuing with the previous example, you might want to check that the CalculatePerimeter method produces a value greater than zero before returning such result. This kind of post-condition is accomplished via the Contracts.Ensures method, as demonstrated in the following snippet:
Function CalculatePerimeter() As Double
Contract.Ensures(Contract.Result(Of Double)() > 0)
Dim result = (Width * 2) + (Height * 2)
Return result
End Function
Ensures invokes Contract.Result(Of T). This is the representation of the code result, and T is nothing but the expected type, which in this case is Double. This line of code must be placed before the code is executed and the compiler can link the actual result with the contract evaluation.
Exceptional Post-Conditions
The Contract class also provides an EnsuresOnThrow(Of TException) method that checks for the condition only when the specified exception is thrown. This approach is discouraged, and you should use it only when you have complete understanding of what kinds of exceptions your method could encounter.
Old Values
You can refer to values as they existed at the beginning of a method by using the Contract.OldValue(Of T) method. For example, the following code ensures that a hypothetical value variable has been updated:
Contract.Ensures(value) = Contract.OldValue(value) + 1)
Invariants
Invariants are special contract that ensure an object is considered valid during all its lifetime. Invariant contracts are provided inside one method decorated with the ContractInvariantMethod attribute that affects all members in the enclosing class. Only one invariant method can be declared inside a class, and typically it should be marked as Protected to avoid risk of calls from clients. This method is by convention named ObjectInvariant (although not mandatory) and is used instead of preconditions and post-conditions. The following code snippet provides an example:
<ContractInvariantMethod()>
Protected Sub ObjectInvariant()
Contract.Invariant(Me.Width > 0)
Contract.Invariant(Me.Height > 0)
End Sub
This code establishes that during the entire lifetime of the Rectangle object, both the Width and Height properties must be greater than zero so that they can be considered in a valid state.
Assertions and Assumptions
The Contract class provides an Assert method that is used for verifying a condition at a particular point in the program execution. Typically, you use it as follows:
Contract.Assert(Width > 0)
Another method, named Assume, works exactly like Assert but is used when static verification is not sufficient to prove the condition you are attempting to check.
Contract Events
The Contract class exposes a ContractFailed event that is raised when a condition is violated and that you can handle to get detailed information. The following sample event handler shows how to collect violation information:
Private Sub Contract_ContractFailed(ByVal sender As Object,
ByVal e As ContractFailedEventArgs)
Console.WriteLine("The following contract failed: {0}, {1}",
e.Condition, e.FailureKind.ToString)
End Sub
The ContractFailedEventArgs.Condition property is a string storing the condition, and the ContractFailedEventArgs.FailureKind is an enumeration offering the failure kind (for example, Precondition, Invariant, and so on).
Summary
This chapter illustrated the Visual Studio instrumentation and libraries about testing applications. The first discussion was about unit testing, a technique used for checking whether code blocks work outside the application context, inside a sandbox. For this, you saw how test projects work and how to enable Code Coverage. The second discussion of the chapter was about Test Driven Development, a programming approach in which developers write their software by first writing unit tests. You saw Visual Studio 2012’s support for TDD, with special regard of the Generate from usage feature. The final part of this chapter was dedicated to Code Contracts, a library inherited from the .NET Framework 4 that enables writing code in the design-by-contract fashion and that is supported by the System.Diagnostics.Contracts namespace and the Contract class.