
In this recipe, we shall learn how to use the SQLite Studio for creating, editing, and querying an embedded SQLite database file.
First, let's download SQLite Studio, a free tool available online at http://sqlitestudio.one.pl/. SQLite Studio has a simple graphical user interface that helps in creating, inserting, and updating tables. Save the SQLite Studio .exe file to your local drive and then launch it.
In this recipe, we are going to create a database using SQLite Studio, and then create a table and add different columns. Once the table schema is created, we then add a couple of test records using the insert query statements.
- Launch SQLite Studio and navigate to Databases | Add Database. Pick the folder you want to create this database in and select the option Type name in field below: and then type MyDatabase. You can also pick the version of SQLite you want to create. Click on OK to create and add the database file.

- Once you open the database you have to right-click and connect it to open it.

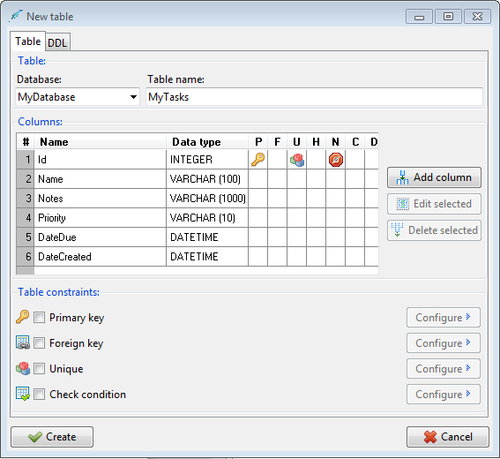
- Add a table called
MyTasksand add Primary Key column Id. Select the constraints Primary Key, Unique, and Not NULL checkboxes as shown in the following screenshot:
- Repeat the steps to add all the columns so it looks like the following screenshot:
- Once the table is created, we can now add two rows of test data using the following insert statements. Open the SQL query window and copy the
insertstatements as shown in the following code snippet:insert into MyTasks values (1,'Task Name 1', 'Task Note 1', 'High','9/1/2011',date('now')); insert into MyTasks values (2,'Task Name 2', 'Task Note 2', 'High','9/1/2011',date('now')); - Run the
selectquery to return all the rows from the tableMyTasks:Select * from MyTasks

We first created a local database file called MyDatabase. This file has an extension .sqlite. Then we created the MyTasks table with all the columns we needed for our MyTasks app. This is like creating tables in SQL Server Management Studio. Finally, we used simple SQL scripts to insert and query the test data.
In this recipe, we learned how to create a SQLite file with tables and data. In the next couple of recipes, we shall explore how to use this file as a local database.
In this recipe, we will explore how to use the SQLite Client CodePlex—an open source database API (application programming interface)—to open, save, delete, update, and close the SQLite file.
Download SQLite Client from the following address: http://sqlitewindowsphone.codeplex.com/releases. At the time of writing this book, the latest stable version was Rel 2. Ver 0.6.1. Download the zipped file and unzip it to a local folder.

In this recipe, we will explore the test sample that comes with the SQLite Client SDK download. This sample demonstrates pretty much all the different features of SQLite embedded database.
- Open the
Community.CsharpSqlite.WPsolution.
- Press F5 to see the results as shown in the following screenshot. The main page has different buttons to showcase SQLite's capabilities. This test application can be used to open and close the database. Once the database is open, we can create as well as drop the table using the Create Table and Drop Table buttons, respectively. You can use the Generate Data button to generate some random data, which you can see as results. Finally, you can delete the data you generated in the database.

The Community.CsharpSqlite.WP project basically has SqliteWrapper classes for the entire SQLite software library. The SQLiteClient.cs file has different functions such as ExecuteNonQuery, ExecuteQuery, ExecuteScalar, SQLiteCommand, and so on. SQLiteConnection is used to open the database and the Dispose() method is called to close the database file.
CreateCommand and ExecuteNonQuery are used for creating the table along with simple SQL statements such as Create table <table name> and Drop table <table name>. We used insert query insert into <table name> () values () to insert the data and then we used the delete query delete <table name> where <conditional statement> to delete the records in the table.
In this recipe, we learned different aspects of operating and maintaining SQLite database files. SQLite is a powerful solution for saving the data locally and for using simple SQL queries. You can learn more about this by studying the samples included in the download folder WP7SQLiteClient.