
4
Managing Active Directory
This chapter covers the following recipes:
- Installing a Forest Root Domain
- Testing an AD Installation
- Installing a Replica Domain Controller
- Installing a Child Domain
- Creating and Managing AD Users and Groups
- Managing AD Computers
- Adding/Removing Users Using a CSV Files
- Creating Group Policy Objects
- Reporting on AD Computers
- Reporting on AD Users
- Managing AD Replication
Introduction
A core component of almost all organizations’ IT infrastructure is Active Directory (AD). AD provides access control, user and system customization, and a wealth of directory and other services. Microsoft first introduced AD with Windows 2000 and has improved and expanded the product with each successive release of Windows Server.
At the core is Active Directory Domain Services (AD DS). Over the years, Microsoft has made “AD” more of a brand than a single feature. There are four additional Windows Server features under the AD brand:
- AD Certificate Services (AD-CS) – this allows you to issue X.509 certificates for your organization. For an overview of AD-CS, see https://learn.microsoft.com/previous-versions/windows/it-pro/windows-server-2012-r2-and-2012/hh831740(v=ws.11).
- AD Federation Services (AD-FS) – this feature enables you to federate identity with other organizations to facilitate interworking. You can find an overview of AD-FS at https://learn.microsoft.com/previous-versions/windows/it-pro/windows-server-2012-r2-and-2012/hh831502(v=ws.11).
- AD Lightweight Directory Services (AD-LDS) – this provides rich directory services for use by applications. You can find an overview of AD-LDS at https://learn.microsoft.com/previous-versions/windows/it-pro/windows-server-2012-r2-and-2012/hh831593(v=ws.11).
- AD Rights Management Services (AD-RMS) – RMS enables you to control the rights to document access to limit information leakage. For an overview of RMS, see https://learn.microsoft.com/previous-versions/windows/it-pro/windows-server-2012-r2-and-2012/hh831364(v=ws.11).
Note that the overview documents above are older documents based on Windows Server 2012. The documentation teams have not updated them fully to reflect the latest Windows Server version at the time of writing. The overview and the essential operation of these features remain mostly unchanged, and the documents remain a good reference for each AD feature.
Active Directory’s domain service is complex, and there are a lot of moving parts. With AD, you have a logical structure consisting of Forests, Domains, Domain Trees, and Organizational Units. You also have the physical structure, including Domain Controllers and Global Catalog Servers. There is also a replication mechanism to replicate objects across your domain. For a deeper look at the architecture of AD, see https://activereach.net/support/knowledge-base/connectivity-networking/understanding-active-directory-its-architecture/.
A forest is a top-level container that houses one or more domains. A forest is a security boundary. If you need to operate between forests, you can set up cross-forest trusts to enable interworking between multiple forests. AD uses DNS names as the basis for forest and domain names, and both AD domain controllers and AD clients use DNS to find the IP address of domain controllers. For this reason, DNS is a critical part of your AD infrastructure.
A domain is a collection of objects, including users, computers, policies, etc. You create a forest by installing the forest’s first domain controller. In AD domains, trees are collections of domains that you group in a hierarchical structure. Most organizations use a single domain (and thus a single domain tree) within a single forest.
For very large organizations, another common approach is to have a single (empty) forest root domain and multiple child domains (typically based on geography). AD supports having multiple non-contiguous domain trees with a forest, but the best practice is to avoid them.
A domain controller (DC) is a Windows Server running AD and holding the objects for a given domain. ALL domains must have at least one DC, although best practice is always to have at least two. You install the AD DS service onto your server, then promote the server to be a DC. You can also have DCs within a forest running older versions of Windows Server.
The global catalog (GC) is a partial replica of objects from every domain in an object to enable searching. Microsoft Exchange, for example, uses the GC heavily. You can have the GC service on some or all DCs in your forest. Generally, you install the GC facility while promoting a Windows server to be a DC, but fewer GCs might be preferable to reduce replication traffic for very large domains.
Using AD Domain Services (or AD) and PowerShell, you can deploy your domain controllers throughout your organization. Use the Installing Active Directory and forest root domain recipe to install a forest root domain controller and establish an AD Forest. That recipe converts DC1 as a workgroup server into a DC – the first DC in the Reskit.Org forest.
You can install Windows features and manage services using PowerShell in a domain environment using PowerShell remoting, which requires authentication. From one machine, you use PowerShell remoting to perform operations on other systems, and for that, you need the correct credentials for the remote machine. Sometimes, you may encounter the well-understood Kerberos double hop problem for which the Credential Security Subsystem Provider can be a solution. For a better explanation of this issue, see https://learn.microsoft.com/powershell/scripting/learn/remoting/ps-remoting-second-hop.
In this book, you use a domain, Reskit.Org, for most of the recipes. In this chapter, you establish the forest root domain and a child domain. You also create users, groups, and Organizational units, which you rely on in later chapters.
Once you have the first DC in your Reskit.Org forest, you should add a replica DC to ensure reliable domain operations. In Installing a Replica Domain Controller, you add a second DC to your domain. In Installing a Child Domain, you extend the forest and add a child domain to your forest.
The AD service uses a database of objects, including users, computers, and Groups. In the Creating and Managing AD Users and Groups recipe, you create, move, and remove user and group objects, and create and use Organizational Units (OUs).
In Managing Active Directory computers, you manage the computers in your Active Directory, including joining workgroup systems to the domain. In the Adding/Removing Users Using a CSV Files recipe, you add users to your AD using a comma-separated value file containing users’ details.
Group Policy is another important feature of Active Directory. With Group Policy, you can define policies for users and computers that Windows applies automatically to the user and/or computer. In the Creating Group Policy Objects recipe, you create a simple GPO and apply that policy.
Active Directory can use multiple DCs for both load balancing and fault tolerance. These DCs must be synchronized across the forest whenever you change any AD object. AD replication performs that function. In Managing AD Replication, you examine tools to help you manage and troubleshoot replication. For a fuller look at AD replication, see https://social.technet.microsoft.com/wiki/contents/articles/4592.how-active-directory-replication-works.aspx.
In the recipes Reporting on AD Computers and Reporting on AD Users, you examine AD to find details on computers that have not started up or logged onto the domain. You also look at user accounts for users who are members of special security groups (such as enterprise administrators). These two recipes help keep your AD free of stale objects and reduce potential security risks.
The systems used in the chapter
The recipes in this chapter create the Reskit.Org forest with a parent and a child domain and a total of three DCs as follows:

Figure 4.1: Host in use for this chapter
In later chapters, you will use additional servers and will promote SRV1 to be a domain-based server rather than being in a workgroup.
Installing a Forest Root Domain
Installing Active Directory and DNS has always been reasonably straightforward. You can always use the Server Manager GUI, but using PowerShell is easier to automate. You create an AD forest by creating your first domain controller.
To create a DC, you start with a system running Windows Server. You then add the AD DS services Windows feature to the server and the management tools. Then you use the management tools to promote DC1 to be your first DC (aka DC1.Reskit.Org) within the Reskit.Org domain.
Getting ready
You run this recipe on DC1 after installing PowerShell 7 and VS Code.
How to do it...
- Installing the AD Domain Services feature and management tools
Install-WindowsFeature -Name AD-Domain-Services -IncludeManagementTools - Importing the
ADDSDeploymentmoduleImport-Module -Name ADDSDeployment - Examining the commands in the
ADDSDeploymentmoduleGet-Command -Module ADDSDeployment - Create a secure password for the Administrator
$PasswordHT = @{ String = 'Pa$$w0rd' AsPlainText = $true Force = $true } $PSS = ConvertTo-SecureString @PasswordHT - Test the DC Forest installation starting on
DC1$ForestHT= @{ DomainName = 'Reskit.Org' InstallDNS = $true NoRebootOnCompletion = $true SafeModeAdministratorPassword = $PSS ForestMode = 'WinThreshold' DomainMOde = 'WinThreshold' } Test-ADDSForestInstallation @ForestHT -WarningAction SilentlyContinue - Create theforest root DC on
DC1$NewActiveDirectoryParameterHashTable = @{ DomainName = 'Reskit.Org' SafeModeAdministratorPassword = $PSS InstallDNS = $true DomainMode = 'WinThreshold' ForestMode = 'WinThreshold' Force = $true NoRebootOnCompletion = $true WarningAction = 'SilentlyContinue' } Install-ADDSForest @NewActiveDirectoryParameterHashTble - Check the key AD and related services
Get-Service -Name DNS, Netlogon - Check DNS zones
Get-DnsServerZone - Restart
DC1to complete promotionRestart-Computer -Force
How it works...
In step 1, you install the AD Domain Services feature. This feature enables you to deploy a server as a domain controller. The output of this command looks like this:

Figure 4.2: Installing the ADDS feature and management tools
In step 2, you manually import the ADDSDeployment module. Since PowerShell does not support this module natively, this step loads the module using the Windows PowerShell compatibility feature, which is why you see a warning message in the output of this command, which looks like this:

Figure 4.3: Importing the ADDSDeployment module
In step 3, you use the Get-Command cmdlet to discover the commands contained in the ADDSDeployment module, which looks like this:

Figure 4.4: Discovering the commands within the ADDSDeployment module
With step 4, you create a secure string password to use as the Administrator password in the domain you are creating. This step produces no output.
Before you promote a server to be a DC, it can be useful to test to ensure that a promotion would be successful as far as possible. In step 5, you use the Test-ADDSForestInstallation command to check whether you can promote DC1 to be a DC in the Reskit.Org domain. The output of this command looks like this:

Figure 4.5: Testing DC forest installation
In step 6, you promote DC1 as the first domain controller in a new domain, Reskit.Org. The output looks like this:

Figure 4.6: Testing DC forest installation - part two
With the promotion complete, you can check the critical services required for Active Directory. Checking the Netlogon and DNS services, which you do in step 7, should look like this:

Figure 4.7: Checking the DNS and Netlogon services
In step 8, you use the Get-DnsServerZone cmdlet to see the zones currently available on DC1 and their status. Before rebooting after the DC promotion, the output from this step looks like this:

Figure 4.8: Checking the DNS zones available
In step 9, you run the Restart-Computer command, which generates no actual output. To complete the promotion process, you need to reboot DC1. After the reboot, you should be able to log in to the Reskit.Org domain as the Domain Administrator (using the password specified in this recipe).
There’s more...
In step 1, you install the AD DS feature and the management tools, including the ADDSDeployment module. In step 2, you load the module, which, as you can see, PowerShell loads using the Windows PowerShell compatibility feature. Although the modules’ commands work, the output does not appear as nicely formatted as you might observe running these commands within Windows PowerShell. The Import-Module command does not import the module’s display XML, but you can do that manually should you need to. As shown, you can always import the XML manually. The key thing to look at is the success or failure of the key deployment steps, so this is probably not a major problem (and there is a workaround!).
Throughout the recipes in this book, you use the string Pa$$w0rd as a password for each host and for most core AD users you create. The book uses these steps and this password for simplicity – since Reskit.Org is not a real production domain, the risks are minimal. The steps that contain a plain text version of a weak password, as you see in step 4, are not best practice for production.
In step 5, you test whether Windows can promote DC1 to be a DC. As you can see from the message, the command completed the test successfully. This success means that you can proceed to install AD on this host. And in step 8, you run Install-ADDSForest to promote DC1. By default, this step would cause the host to reboot after completing the promotion process, but in this case, you do not reboot. This approach allows you to examine the results of the step before rebooting.
In step 7, you can see that the DNS service is available and running. The Netlogon service, which is the service that implements AD, runs on each DC.
In step 8, you see the zones available on DC1's DNS service. You installed this service when you promoted DC1. As you can see, before the reboot, the DNS service is running, but the Reskit.Org zone is not AD integrated because there is no AD service running. After the reboot, this property should change.
Testing an AD installation
In Installing an Active Directory forest root domain, you installed AD on DC1. In that recipe, you installed AD initially without rebooting, then did some basic testing, followed by a reboot. After the required reboot, it is useful to check to ensure that your domain and domain controller are fully up, running, and working correctly. In this recipe, you examine core aspects of the AD infrastructure on your first DC.
Getting ready
You run this recipe on DC1, the first domain controller in the Reskit.Org domain, after you have promoted it to be a DC. You promoted DC1 as a domain controller in the Reskit.Org domain in Installing an Active Directory forest root domain. Log on as ReskitAdministrator using the password set in the previous recipe, Pa$$w0rd.
How to do it...
- Examine the Root Directory Service Entry (DSE)
Get-ADRootDSE -Server DC1.Reskit.Org - Viewing AD forest details
Get-ADForest - Viewing AD Domain details
Get-ADDomain -Current LocalComputer - Checking Netlogon, ADWS, and DNS services
Get-Service NetLogon, ADWS, DNS - Getting initial AD users
Get-ADUser -Filter * | Sort-Object -Property Name | Format-Table -Property Name, DistinguishedName - Getting initial AD groups
Get-ADGroup -Filter * | Sort-Object -Property GroupScope, Name | Format-Table -Property Name, GroupScope - Examining Enterprise Admins group membership
Get-ADGroupMember -Identity 'Enterprise Admins' - Checking DNS zones on
DC1Get-DnsServerZone -ComputerName DC1 - Testing domain name DNS resolution
Resolve-DnsName -Name Reskit.Org
How it works...
In step 1, after you complete the installation of AD and reboot DC1 (and log in), you examine the AD DSE, which looks like this:

Figure 4.9: Examining the Root DSE
In step 2, you use Get-ADForest to return core information about the Reskit.Org forest, with output like this:

Figure 4.10: Viewing AD Forest details
In step 3, you use the Get-ADDomain command to get details about the Reskit.Org domain, with output like this:

Figure 4.11: Viewing AD Domain details
In step 4, you check on three key services for AD: Active Directory Web Services, DNS, and Netlogon. You see output like this:
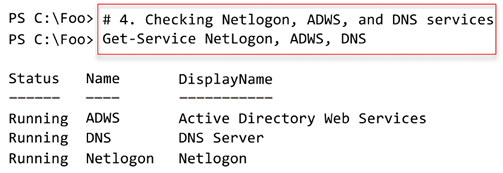
Figure 4.12: Viewing the status of key services
In step 5, you view the AD users created by the AD installation process, with output like this:

Figure 4.13: Viewing initial AD users
When you created the forest, the AD installer also created a large number of AD groups, which you view in step 6. The output of this step looks like this:

Figure 4.14: Viewing initial AD groups
The Enterprise Admins group is a very high-security group within AD. Membership of this group gives significant rights to systems and services within a domain. In step 7, you examine the initial membership of this group, with output like this:

Figure 4.15: Viewing Enterprise Admin group membership
In step 8, after you reboot your workgroup server to become a domain controller, you recheck the DNS zones available from DC1, with output like this:

Figure 4.16: Checking DNS zones
The final check, in step 9, is to test DNS to ensure that you can resolve the AD domain name. The output resembles this:

Figure 4.17: Checking DNS resolution
There’s more...
In step 1, you viewed the Root DSE for the Reskit.Org domain. Active Directory implements a Lightweight Directory Access Protocol (LDAP) directory service for domain activities. The DSE is a component of LDAP directories and contains information about your directory structure. Windows allows access to the Root DSE without requiring authentication.
The DSE includes much information about your AD forest, which might help an attacker. Thus, the best practice is never to expose an AD DC to the internet if you can possibly help it. For a more detailed look at the Root DSE, see https://learn.microsoft.com/windows/win32/adschema/rootdse.
The ADWS service, which you investigate in step 4, implements an important web service. The AD PowerShell commands use this web service to get information and make changes to your AD. If this service is not running, AD commands do not work. You should always check to ensure the service has started before using the AD cmdlets.
In step 6, you saw the groups created by the promotion process. These groups have permissions associated and thus are useful. Before adding users to these groups, consider reviewing the groups and determining (and possibly changing) the permissions and rights assigned to them.
In step 8, you examine the DNS zones available from DC1. As you can see, the Reskit.Org domain is now AD integrated. After creating the AD forest, Windows integrates this zone into AD as part of the reboot.
In step 9, you check the resolution of the domain name. In this case, you see both IPv6 and IPv4 addresses.
Installing a Replica Domain Controller
In Installing an Active Directory forest root domain, you installed AD on DC1. If you have just one DC, then that DC is a single point of failure. If the DC goes down with a single domain controller, you cannot manage or log in to the domain. It is always a best practice to install at least two DCs. If you are using VMs for your DCs, you should also ensure that each DC VM is on a separate virtualization host – otherwise, the VM host is a single point of failure.
To add a second DC to your domain, you run Install-ADDSDomainController on another host, that is DC2. This cmdlet is similar to Install-ADDSForest in terms of parameters. It is useful to conduct tests to ensure the second DC’s promotion can succeed as with creating your first DC.
In this recipe, you promote a host, DC2, to be the second DC in the Reskit.Org domain. Like creating your first DC, after you promote DC2 to be a DC, you need to reboot the server before processing. And after the reboot, it is useful to ensure the promotion process was successful.
Getting ready
You run this recipe on DC2, a domain-joined server on which you have installed PowerShell 7 and VS Code. You should log in to DC2 as ReskitAdministrator, a member of the Enterprise Admins group.
Note that if you are using the Reskit.Org build scripts from GitHub, make sure you build the DC2 M after you have created DC1 and promoted it to be a domain controller.
How to do it...
- Importing the
ServerManagermoduleImport-Module -Name ServerManager -WarningAction SilentlyContinue - Checking
DC1can be resolvedResolve-DnsName -Name DC1.Reskit.Org -Type A - Testing the network connection to
DC1Test-NetConnection -ComputerName DC1.Reskit.Org -Port 445 Test-NetConnection -ComputerName DC1.Reskit.Org -Port 389 - Adding the AD DS features on
DC2Install-WindowsFeature -Name AD-Domain-Services -IncludeManagementTools - Promoting DC2 to be a DC
Import-Module -Name ADDSDeployment -WarningAction SilentlyContinue $User = "[email protected]" $Password = 'Pa$$w0rd' $PWSString = ConvertTo-SecureString -String $Password -AsPlainText -Force $CredRK = [PSCredential]::New($User,$PWSString) $INSTALLHT = @{ DomainName = 'Reskit.Org' SafeModeAdministratorPassword = $PSS SiteName = 'Default-First-Site-Name' NoRebootOnCompletion = $true InstallDNS = $false Credential = $CredRK Force = $true } Install-ADDSDomainController @INSTALLHT | Out-Null - Checking the computer objects in AD
Get-ADComputer -Filter * | Format-Table DNSHostName, DistinguishedName - Rebooting
DC2manuallyRestart-Computer -Force - Checking DCs in
Reskit.Org$SearchBase = 'OU=Domain Controllers,DC=Reskit,DC=Org' Get-ADComputer -Filter * -SearchBase $SearchBase -Properties * | Format-Tale -Property DNSHostName, Enabled - Viewing
Reskit.Orgdomain DCsGet-ADDomain | Format-Table -Property Forest, Name, ReplicaDirectoryServers
How it works...
In step 1, you import the ServerManager module, which creates no output. With step 2, you ensure that you can resolve your DC’s address, which is, at this point, the only DC in the Reskit.Org domain. The output looks like this:

Figure 4.18: Resolving DC1’s DNS entry
After confirming that you can resolve the IP address of DC1, in step 3, you check if you can connect to two key ports on DC1 (445 and 389). The output looks like this:

Figure 4.19: Checking key ports are available on DC1
As you saw, when promoting DC1 to be your first DC, you need to add the ADDSDeployment Windows feature to DC2 before you can promote the DC. You add this feature in step 4, with output that looks like this:

Figure 4.20: Adding AD Domain Sevices to DC2
In step 5, you promote DC2 to be a DC and ensure that the DC does not reboot after this step completes. There is no output from this step.
Before rebooting DC2 to complete the DC promotion process, in step 6, you check to see the computer objects now in the AD, including your new replica DC. This step ensures that DC2 is now in the correct place in AD. The output of this step is like this:
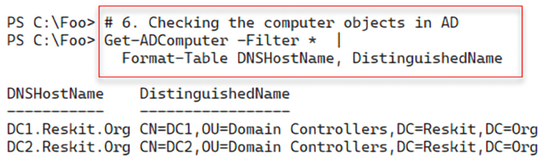
Figure 4.21: Adding AD Domain Sevices to DC2 - part two
In step 7, you reboot DC2, which produces no console output, to complete the promotion of this host to be a replica DC.
After DC2 completes the reboot process, you log in as the domain administrator (ReskitAdministrator). After you log in, in step 8, you use Get-ADComputer to check the hosts in the Domain Controllers OU. You can see that the OU contains both DC1 and DC2. You see output like this:

Figure 4.22: Viewing AD Computers in the Domain Controllers OU
In the final step in this recipe, step 9, you use the Get-ADDomain command to view the details of the forest, the domain, and the replica DCs, with output like this:

Figure 4.23: Viewing forest, domain, and replica DC information
There’s more...
In step 1, you import the ServerManager module manually. This step loads the module using the Windows PowerShell compatibility solution described earlier. As you have seen in earlier recipes, this module is not supported natively with PowerShell 7.
In step 3, you check to ensure DC2 can connect to DC1 over ports 445 and 389. Windows uses TCP port 445 for SMB file sharing. The Group Policy Agent on each domain-joined host uses this port to retrieve Group Policy details from the SYSVOL share on DC1. LDAP uses port 389 to perform actions against a DC, such as adding a new user or checking group membership. Both ports need to be open and contactable if the promotion of DC2 is to be successful.
In step 6, you retrieve all computer accounts currently in your AD. The AD DC promotion process ensures that this host’s computer account is now in the Domain Controllers OU by default. The location of a DC in an OU is essential as it enables your new DC to apply the group policy settings on this OU. If DC2 is a workgroup computer and not joined to the domain, the promotion process creates this account in the appropriate Domain Controllers OU. If DC2 were a domain member, then the promotion process would move the computer account into the Domain Controllers OU.
Mistakes are easy to make, but also (usually) easy to correct. In this recipe, before promoting DC2 to be a DC, you check to ensure that the prerequisites are in place before the promotion. Then you confirm that you have configured your forest, domain, and domain controllers correctly. Likewise, the checks in the last two steps are not strictly necessary. If nothing else, they’re just more evidence of the successful creation of a replica DC.
These steps are probably redundant since most AD promotions “just work.” Nevertheless, the additional checks ensure you discover and resolve any issues that might affect the promotion or cause the AD to not work correctly after a not fully successful promotion (for whatever reason).
Installing a Child Domain
In Installing a Replica Domain Controller, you added a DC to an existing domain. With all the prerequisites like DNS in place, the promotion process is simple and quick.
An AD forest can contain more than one domain, with one domain having zero, one, or more child domains. This architecture provides for delegated administration and reduction in replication traffic across a global network. Like creating a replica DC, creating a new child domain is simple, as you can see in this recipe.
Best practice calls for a contiguous namespace of domains, where the additional domain is a child of another existing domain. In this recipe, you create a child domain, UK.Reskit.Org. You begin with the domain joined server UKDC1 and with this recipe, convert it to be the first DC in a new child domain, UK.Reskit.Org. In doing so, the hostname changes from UKDC1.Reskit.Org to UKDC1.UK.Reskit.Org.
The steps in this recipe are very similar to those in Installing a replica directory domain controller.
Getting ready
You run this recipe on SRV1 after you have installed PowerShell 7.
How to do it...
- Importing the
ServerManagermoduleImport-Module -Name ServerManager -WarningAction SilentlyContinue - Checking
DC1can be resolvedResolve-DnsName -Name DC1.Reskit.Org -Type A - Checking network connection to
DC1Test-NetConnection -ComputerName DC1.Reskit.Org -Port 445 Test-NetConnection -ComputerName DC1.Reskit.Org -Port 389 - Adding the AD DS features on
UKDC1$Features = 'AD-Domain-Services' Install-WindowsFeature -Name $Features -IncludeManagementTools - Creating a credential and installation hash table
Import-Module -Name ADDSDeployment -WarningAction SilentlyContinue $URK = "[email protected]" $PW = 'Pa$$w0rd' $PSS = ConvertTo-SecureString -String $PW -AsPlainText -Force $CredRK = [PSCredential]::New($URK,$PSS) $INSTALLHT = @{ NewDomainName = 'UK' ParentDomainName = 'Reskit.Org' DomainType = 'ChildDomain' SafeModeAdministratorPassword = $PSS ReplicationSourceDC = 'DC1.Reskit.Org' Credential = $CredRK SiteName = 'Default-First-Site-Name' InstallDNS = $false Force = $true } - Installing child domain
Install-ADDSDomain @INSTALLHT - Looking at the AD forest
Get-ADForest -Server UKDC1.UK.Reskit.Org - Looking at the UK domain
Get-ADDomain -Server UKDC1.UK.Reskit.Org - Checking on user accounts in UK domain
Get-ADUser -Filter * | Format-Table -Property SamAccountName, DistinguishedName - Checking on user accounts in parent domain
Get-ADUser -Filter * -Server DC1.Reskit.Org |
  Format-Table -Property SamAccountName, DistinguishedName
How it works...
In step 1, you load the ServerManager module. As discussed in earlier recipes, this module is not natively supported by PowerShell 7. This step, which produces no output, loads the module using the Windows PowerShell compatibility solution.
When you create a new domain and new domain controller (using UKDC1, for example), the server needs to contact the holder of the Domain Naming FSMO role, the DC responsible for the forest’s changes. In step 2, you check to ensure you can resolve this host, DC1, which looks like this:

Figure 4.24: Viewing forest, domain, and replica DC information - part two
In step 3, you check that you can connect to ports 445 and 389 on DC1. These two ports are fundamental to AD operations. The output looks like this:

Figure 4.25: Testing network connection to DC1
In step 4, you add the AD DS feature to UKDC1, with output like this:

Figure 4.26: Adding the AD DS feature to UKDC1
In step 5, you create a hash table of the parameters to create your child domain. This step creates no output. In step 6, you make UKDC1 the first DC in the UK.Reskit.Org domain, creating no console output. After this step, the host reboots, and you can log in as UKAdministrator for the remainder of this recipe.
After rebooting, in step 7, you use Get-ADForest to view the details of the forest, including the GC servers in the forest. The output of this step looks like this:

Figure 4.27: Viewing AD forest details
In step 8, you examine the details of the UK domain using Get-ADDomain, with output like this:

Figure 4.28: Viewing details of the UK domain
In step 9, you check the user account objects contained in the new UK domain, with output like this:

Figure 4.29: Viewing user accounts in the UK domain
In step 10, you check on the user accounts in the parent domain, Reskit.Org, with output like this:

Figure 4.30: Viewing user accounts in the Reskit.Org domain
There’s more...
In step 2, you check that you can resolve the IP address for DC1, the Domain Naming FSMO role holder. You could call Get-ADForest and obtain the hostname from the DomainNamingMaster property.
In step 5, you promote UKDC1 to be the first DC in a new child domain, UK.Reskit.Org. Unlike in the two previous DC promotions (that is, promoting DC1 and DC2), in this step, you allow Windows to reboot after Windows completes the DC promotion. This step can take quite a while – potentially 10 minutes or more, so be patient.
In step 7, you use Get-ADForest to examine details of the forest as stored on UKDC1. As you can see in the figure, these details now show your new domain (UK.Reskit.Org) in the Domains property. Also, by default, you can see that UKDC1.UK.Reskit.Org is also a Global Catalog server.
Creating and Managing AD Users and Groups
After you have created your forest/domain and your domain controllers, you can begin to manage the core objects in AD, namely, users, groups, computers, and OUs. User and computer accounts identify a specific user or computer. Windows uses these objects to enable the computer and the user to log on securely using passwords held in AD.
AD Groups enable you to collect users and computers into a single (group) account that simplifies setting access controls on resources such as files or file shares. As you saw in Testing an AD installation, the AD promotion process creates many potentially useful groups when you create a new forest.
Organizational Units enable you to partition users, computers, and groups into separate container OUs. OUs provide you with essential roles in your AD. The first is role delegation. You can delegate the management of any OU (and child OUs) to be carried out by different groups.
For example, you could create a top-level OU called UK in the Reskit.Org domain. You could then delegate permissions to the objects in this OU to a group, such as UKAdmins, enabling any group member to manage AD objects in and below the UK OU. You can delegate permissions to another group, such as the North America Admins group.
The second role played by OUs is to act as a target for Group Policy Objects. You could create a group policy object for the IT team and apply it to the IT OU. You could create a separate OU and GPOs that apply to only the computer and user objects in that OU. Thus, each user and computer in a given OU are configured based on the GPO.
In this recipe, you examine AD users and group objects. In a later recipe, Managing AD Computers, you explore managing AD computers. And in Creating Group Policy Objects, you assign a Group Policy to an OU you create in this recipe.
Getting ready
You run this recipe on DC1, a domain controller in the Reskit.Org domain. You have previously installed PowerShell 7 and VS Code on this DC.
How to do it...
- Createing a hash table for general user attributes
$PW = 'Pa$$w0rd' $PSS = ConvertTo-SecureString -String $PW -AsPlainText -Force $NewUserHT = @{} $NewUserHT.AccountPassword = $PSS $NewUserHT.Enabled = $true $NewUserHT.PasswordNeverExpires = $true $NewUserHT.ChangePasswordAtLogon = $false - Creating two new users
# First user $NewUserHT.SamAccountName = 'ThomasL' $NewUserHT.UserPrincipalName = '[email protected]' $NewUserHT.Name = 'ThomasL' $NewUserHT.DisplayName = 'Thomas Lee (IT)' New-ADUser @NewUserHT # Second user $NewUserHT.SamAccountName = 'RLT' $NewUserHT.UserPrincipalName = '[email protected]' $NewUserHT.Name = 'Rebecca Tanner' $NewUserHT.DisplayName = 'Rebecca Tanner (IT)' New-ADUser @NewUserHT - Creating an OU for IT
$OUHT = @{ Name = 'IT' DisplayName = 'Reskit IT Team' Path = 'DC=Reskit,DC=Org' } New-ADOrganizationalUnit @OUHT - Moving users into the OU
$MHT1 = @{ Identity = 'CN=ThomasL,CN=Users,DC=Reskit,DC=ORG' TargetPath = 'OU=IT,DC=Reskit,DC=Org' } Move-ADObject @MHT1 $MHT2 = @{ Identity = 'CN=Rebecca Tanner,CN=Users,DC=Reskit,DC=ORG' TargetPath = 'OU=IT,DC=Reskit,DC=Org' } Move-ADObject @MHT2 - Creating a third user directly in the IT OU
$NewUserHT.SamAccountName = 'JerryG' $NewUserHT.UserPrincipalName = '[email protected]' $NewUserHT.Description = 'Virtualization Team' $NewUserHT.Name = 'Jerry Garcia' $NewUserHT.DisplayName = 'Jerry Garcia (IT)' $NewUserHT.Path = 'OU=IT,DC=Reskit,DC=Org' New-ADUser @NewUserHT - Adding two users who get removed later
# First user to be removed $NewUserHT.SamAccountName = 'TBR1' $NewUserHT.UserPrincipalName = '[email protected]' $NewUserHT.Name = 'TBR1' $NewUserHT.DisplayName = 'User to be removed' $NewUserHT.Path = 'OU=IT,DC=Reskit,DC=Org' New-ADUser @NewUserHT # Second user to be removed $NewUserHT.SamAccountName = 'TBR2' $NewUserHT.UserPrincipalName = '[email protected]' $NewUserHT.Name = 'TBR2' New-ADUser @NewUserHT - Viewing existing AD users
Get-ADUser -Filter * -Property *| Format-Table -Property Name, Displayname, SamAccountName - Removing via a Get | Remove pattern
Get-ADUser -Identity 'CN=TBR1,OU=IT,DC=Reskit,DC=Org' | Remove-ADUser -Confirm:$false - Removing a user directly
$RUHT = @{ Identity = 'CN=TBR2,OU=IT,DC=Reskit,DC=Org' Confirm = $false} Remove-ADUser @RUHT - Updating a user object
$TLHT =@{ Identity = 'ThomasL' OfficePhone = '4416835420' Office = 'Cookham HQ' EmailAddress = '[email protected]' GivenName = 'Thomas' Surname = 'Lee' HomePage = 'Https://tfl09.blogspot.com' } Set-ADUser @TLHT - Viewing updated user
Get-ADUser -Identity ThomasL -Properties * | Format-Table -Property DisplayName,Name,Office, OfficePhone,EmailAddress - Creating a new domain local group
$NGHT = @{ Name = 'IT Team' Path = 'OU=IT,DC=Reskit,DC=org' Description = 'All members of the IT Team' GroupScope = 'DomainLocal' } New-ADGroup @NGHT - Adding all the users in the IT OU into the IT Team group
$SB = 'OU=IT,DC=Reskit,DC=Org' $ItUsers = Get-ADUser -Filter * -SearchBase $SB Add-ADGroupMember -Identity 'IT Team' -Members $ItUsers - Display members of the IT Team group
Get-ADGroupMember -Identity 'IT Team' |
  Format-Table SamAccountName, DistinguishedName
How it works...
You use the New-ADUser cmdlet to create a new AD user. Due to the amount of information you wish to hold for any user you create, the number of parameters you might need to pass to New-ADUser can make for very long code lines. To get around that, you create a hash table of parameters and parameter values and then use it to create the user. In step 1, you create such a hash table, which produces no output.
In step 2, you add to the hash table you created in the previous step and create two new AD users. This step creates no output.
With step 3, you create a new OU, IT, which produces no output. Next, in step 4, which also creates no output, you move the two previously created users into the IT OU. You use this OU to collect user and computer objects for the IT department of Reskit.Org.
Rather than creating a user (which, by default, places the new user object in the Users container in your AD) and later moving it to an OU, you can create a new user object directly in an OU. In step 5, you create a third new user directly in the IT OU, which creates no output.
In step 6, which generates no output, you create two additional users, which you use later in the recipe.
In step 7, you retrieve all the AD users and display their Name, DisplayName, and SamAccountName properties, with output like this:

Figure 4.31: Viewing user accounts in the Reskit.Org domain
There are two broad patterns for removing a user. The first pattern (known as Get | Remove) has you find the AD user(s) you wish to remove and pipe them to the Remove-ADuser cmdlet. In step 8, you use this pattern to find, then remove the TBR1 user. This step produces no output.
With step 9, you remove a user by specifying the full distinguished name of the TBR2 user. This step also produces no output.
In step 10, you use Set-ADUser to update the properties of a user, such as an email address, office, and home page. This step also produces no console output. After updating the user, in step 11, you view details about the user, as you can see here:

Figure 4.32: Viewing user accounts in the Reskit.Org domain - part two
In step 12, you create a new Domain Local Group called IT Team within the IT OU. In step 13, you add all the users within the IT OU to this new group. These two steps produce no output.
In step 14, you use Get-ADGroupMember to display details of the members of the group, with output like this:

Figure 4.33: Viewing group members
There’s more...
In step 7, you see the users in the Reskit.Org domain. Note the user UK$. This user relates to the child domain (UK.Reskit.Org). It is not, as such, an actual user. The $ character at the end of the username indicates it’s a hidden user but fundamental to supporting the child domain. Don’t be tempted to tidy up and remove this user account – that would break the child domain structure.
As you see in this recipe, the cmdlets you use to add or modify a user, group, or OU create no output, which cuts down on the output you have to wade through. Some cmdlets and cmdlet sets would output details of the objects created, updated, or possibly deleted. Consider the lack of output for AD cmdlets as a feature!
Managing AD Computers
Before you can log in to a host as a domain user, such as ReskitJerryG, that host computer must be a domain member. In AD, computer objects represent domain-joined computers that can use the domain to authenticate user login. When a domain-joined computer starts up, it contacts a domain controller to authenticate itself. The computer logs into the domain and creates a secure channel to the DC. Once Windows establishes this secure channel, Windows can log a user on. Under the covers, Windows uses the secure channel to negotiate the user logon.
In terms of managing AD, computer objects are similar to user objects, albeit with different properties. The cmdlets to manage AD computer objects are similar to those used to manage AD user accounts.
You created and configured SRV1, a workgroup computer, in the recipes in earlier chapters. In this recipe, you work with AD computers and add SRV1 to the Reskit.Org domain. For the remainder of the chapters in this book, SRV1 is a member server, so you need to add this host to the Reskit.Org domain.
Getting ready
You run this recipe on DC1, a domain controller in the Reskit.Org domain. This recipe also uses SRV1, which, as noted above, starts as a non-domain joined Windows Server 2022 host. The recipe also uses UKDC1, the child domain’s DC. You have previously installed PowerShell 7 and VS Code on each host and log in as ReskitAdministrator.
How to do it...
- Getting computers in the
ReskitDomainGet-ADComputer -Filter * | Format-Table -Property Name, DistinguishedName - Getting computers in the
UKDomainGet-ADComputer -Filter * -Server UKDC1.UK.Reskit.Org | Format-Table -Property Name, DistinguishedName - Creating a new computer in the
Reskit.Orgdomain$NCHT = @{ Name = 'Wolf' DNSHostName = 'Wolf.Reskit.Org' Description = 'One for Jerry' Path = 'OU=IT,DC=Reskit,DC=Org' } New-ADComputer @NCHT - Creating credential object for
SRV1$ASRV1 = 'SRV1Administrator' $PSRV1 = 'Pa$$w0rd' $PSSRV1 = ConvertTo-SecureString -String $PSRV1 -AsPlainText -Force $CredSRV1 = [pscredential]::New($ASRV1, $PSSRV1) - Creating a script block to join
SRV1to theReskitdomain$SB = { $ARK = 'ReskitAdministrator' $PRK = 'Pa$$w0rd' $PSRK = ConvertTo-SecureString -String $PRK -AsPlainText -Force $CredRK = [pscredential]::New($ARK, $PSRK) $DJHT = @{ DomainName = 'Reskit.Org' OUPath = 'OU=IT,DC=Reskit,DC=Org' Credential = $CredRK Restart = $false } Add-Computer @DJHT } - Testing to ensure
SRV1is onlineTest-NetConnection -ComputerName SRV1 Test-NetConnection -ComputerName SRV1 -port 5985 - Joining the computer to the domain
Set-Item -Path WSMan:localhostClientTrustedHosts -Value '*' -Force Invoke-Command -ComputerName SRV1 -Credential $CredSRV1 -ScriptBlock $SB - Restarting
SRV1Restart-Computer -ComputerName SRV1 -Credential $CredSRV1 -Force - Viewing the resulting computer accounts for
Reskit.OrgGet-ADComputer -Filter * -Properties DNSHostName | Format-Table
How it works...
In step 1, you use Get-ADComputer to check the computers that you have added to the Reskit domain, with output like this:

Figure 4.34: Viewing computers in the Reskit domain
In step 2, you use Get-ADComputer to get the computer accounts in the UK.Reskit.Org domain, with output like this:

Figure 4.35: Viewing computers in the UK child domain
To demonstrate creating a compute account in AD, in step 3, you create a new computer object, Wolf, for the Reskit domain. This step creates no console output.
In step 4, you create a credential object you use in the next step. Step 5 creates a script block you run on SRV1 to make the host a domain member. These two steps produce no console output.
In step 6, you use Test-NetConnection to check that SRV1 is online, and you can make a connection to the WinRM port, which produces output like this:

Figure 4.36: Testing the connection to SRV2
In step 7, you invoke the script block ($SB) on SRV1 to join that host to the Reskit domain. This step produces no output. In step 8, you restart SRV1 with no console output. If you are running SRV1 as a VM and connecting to the server using tools such as VMconnect, you should see the VM reboot. After the reboot – log in as ReskitAdministrator.
In step 9, you use Get-ADComputer to check on the computers in the Reskit domain, which has output like this:

Figure 4.37: Viewing Reskit AD computer objects
There’s more...
There are two broad ways of adding a Windows computer to an AD domain. The first is to log on to the computer to be added and join the domain using Add-Computer. You must have logged in with credentials that have the permissions needed to add a computer to a domain (i.e., the domain administrator).
You also need the credentials that enable you to log on to the system itself. Alternatively, you can create a computer object in AD in advance. This approach is known as pre-staging. You need administrator credentials to add the computer object to the domain, but once you have pre-staged the account, any user can join the computer to the domain.
In step 1 and step 2, you use Get-ADComputer to get the computer accounts in the Reskit and the UK (child) domain. Note that in parent domains (Reskit), you have a computer account related to the child domain (UK), and in the child domain, you can see a computer account for the parent domain. These accounts are fundamental to the operation of a multi-domain forest – do NOT touch them unless you want to experiment with domain recovery!
In step 3, you pre-stage the Wolf computer. A user able to log on to Wolf could then use Add-Computer (or the GUI) to add the host to the domain. In step 4, you add a computer to a domain using domain administrator credentials.
Adding/Removing Users Using a CSV Files
Adding users (or computers) is straightforward, as you saw in the two previous recipes. These methods are great for adding one or two users/computers, but if you have a larger number of users or computers to add, this can become long-winded.
Spiceworks (https://www.spiceworks.com/) is an excellent site for IT professionals to learn more and get their problems solved. Spiceworks has a busy PowerShell support forum, which you can access at https://community.spiceworks.com/programming/powershell. A frequently asked (and answered) question at Spiceworks is: How do I add multiple users using an input file? This recipe does just that.
You start by creating a CSV file containing details of the users you want to add. In production, you would add additional fields to the rows in the CSV and amend the recipe script to add these property values to each user you create.
This recipe uses a CSV file of users to add to AD, with a limited set of properties and values. In production, you would most likely extend the information contained in the CSV based on your business needs and the information you want to store in AD. You can extend this method to add computers to AD and to create/populate AD groups.
Getting ready
You run this recipe on DC1, a domain controller in the Reskit domain on which you have installed PowerShell 7 and VS Code. Log in to DC1 as ReskitAdministrator. You should also have DC1 and DC2 up and running.
This recipe creates and uses a CSV file. As an alternative to using step 1 in the recipe, you can also download the CSV from this book’s GitHub repository at https://github.com/doctordns/PacktPS72/blob/main/Scripts/Goodies/Users.Csv. If you download it from GitHub, make sure you store it in C:FooUsers.csv.
How to do it...
- Creating a CSV file
$CSVData = @' FirstName,Initials,LastName,UserPrincipalName,Alias,Description,Password P, D, Rowley, PDR, Peter, Data Team, Christmas42 C, F, Smith, CFS, Claire, Receptionist, Christmas42 Billy, Bob, JoeBob, BBJB, BillyBob, One of the Bobs, Christmas42 Malcolm, D, Duewrong, Malcolm, Malcolm, Mr. Danger, Christmas42 '@ $CSVData | Out-File -FilePath C:FooUsers.Csv - Importing and displaying the CSV
$Users = Import-CSV -Path C:FooUsers.Csv | Sort-Object -Property Alias $Users | Format-Table - Adding the users using the CSV
$Users | ForEach-Object -Parallel { $User = $_ # Create a hash table of properties to set on created user $Prop = @{} # Fill in values $Prop.GivenName = $User.FirstName $Prop.Initials = $User.Initials $Prop.Surname = $User.LastName $Prop.UserPrincipalName = $User.UserPrincipalName + "@Reskit.Org" $Prop.Displayname = $User.FirstName.Trim() + " " + $User.LastName.Trim() $Prop.Description = $User.Description $Prop.Name = $User.Alias $PW = ConvertTo-SecureString -AsPlainText $User.Password -Force $Prop.AccountPassword = $PW $Prop.ChangePasswordAtLogon = $true $Prop.Path = 'OU=IT,DC=Reskit,DC=ORG' $Prop.Enabled = $true # Now Create the User New-ADUser @Prop # Finally, Display User Created "Created $($Prop.Name)" } - Showing all users in AD (
Reskit.Org)Get-ADUser -Filter * -Property Description | Format-Table -Property Name, UserPrincipalName, Description
How it works...
In step 1, which produces no output, you create a simple CSV file, which you save to C:FooUsers.CSV.
In step 2, you import this newly created CSV file and display the information it contains, which looks like this:

Figure 4.38: Viewing CSV contents
In step 3, you add each user contained in the CSV into AD. You add the users using New-ADUser, which itself produces no output. This step also displays additional output to show the users you added, which looks like this:

Figure 4.39: Adding new users to the Reskit domain
In step 4, you view the AD users in the Reskit domain, with output like this:

Figure 4.40: Adding new users to the Reskit domain
There’s more...
In step 3, you add users based on the CSV. You add these users explicitly to the IT OU, using the parameter -Path (as specified in the $Prop hash table). In production, when adding users that could reside in different OUs, you should extend the CSV to include the distinguished name of the OU into which you wish to add each user.
Also in step 3, you use the Foreach-Object–Parallel command. Since it takes AD a bit of time to add each user, you can add users in parallel, thus speeding up the total time to add all the users.
Creating Group Policy Objects
In Windows AD, GPO allows you to define computer and user configuration settings that AD applies to each system/user. GPOs ensure a system remains configured per policy. Each time a domain-joined computer starts up or a domain user logs in, the local Group Policy agent on your computer obtains the group policy settings from AD and ensures they are applied. Additionally, the group policy client re-applies policies at regular intervals.
In this recipe, you start by creating a group policy object within Active Directory. You then configure the GPO, enabling computers in the IT organizational unit to use PowerShell scripts on those systems or set a specific screen saver.
You can configure thousands of settings for a user or computer through group policy. Microsoft has created a spreadsheet that lists the policy settings, which you can download from https://www.microsoft.com/en-us/download/101451. At the time of writing, the spreadsheet covers the Group Policy template files delivered with the Windows 10 May 2020 update (aka Windows 10 2004).
Once you create and configure your GPO object, you link the policy object to the OU you want to configure. You can apply a GPO to the domain, to a specific AD site, or to an OU (or child OU). You can also assign any GPO to multiple OUs, simplifying your OU design.
The configuration of a GPO typically results in Windows generating information that a host’s group policy agent (the code that applies the GPO objects) can access. This information tells the agent how to work. Settings made through administrative templates use registry settings inside Registry.POL files. The group policy agent obtains the policy details from the SYSVOL share on a domain controller and applies them whenever a user logs on or off or when a computer starts up or shuts down.
The group policy module also produces nice-looking reports describing the group policy objects on your system. There are default HTML reports that give you a quick look at the GPOs on your system.
You can also get that same information as XML and create your own more customized reports.
Getting ready
You run this recipe on DC1, a domain controller in the Reskit.Org domain. You created this DC in Installing an Active Directory forest root domain and after creating and populating the IT OU.
How to do it...
- Creating a new Group Policy object
$Pol = New-GPO -Name ITPolicy -Comment "IT GPO" -Domain Reskit.Org - Ensuring just computer settings are enabled
$Pol.GpoStatus = 'UserSettingsDisabled' - Configuring the policy with two registry-based settings
$EPHT1= @{ Name = 'ITPolicy' Key = 'HKLMSoftwarePoliciesMicrosoftWindowsPowerShell' ValueName = 'ExecutionPolicy' Value = 'Unrestricted' Type = 'String' } Set-GPRegistryValue @EPHT1 | Out-Null $EPHT2= @{ Name = 'ITPolicy' Key = 'HKLMSoftwarePoliciesMicrosoftWindowsPowerShell' ValueName = 'EnableScripts' Type = 'DWord' Value = 1 } Set-GPRegistryValue @EPHT2 | Out-Null - Creating a screen saver GPO
$Pol2 = New-GPO -Name 'Screen Saver Time Out' $Pol2.GpoStatus = 'ComputerSettingsDisabled' $Pol2.Description = '15 minute timeout' - Setting a Group Policy enforced registry value
$EPHT3= @{ Name = 'Screen Saver Time Out' Key = 'HKCUSoftwarePoliciesMicrosoftWindows'+ 'Control PanelDesktop' ValueName = 'ScreenSaveTimeOut' Value = 900 Type = 'DWord' } Set-GPRegistryValue @EPHT3 | Out-Null - Linking both GPOs to the IT OU
$GPLHT1 = @{ Name = 'ITPolicy' Target = 'OU=IT,DC=Reskit,DC=org' } New-GPLink @GPLHT1 | Out-Null $GPLHT2 = @{ Name = 'Screen Saver Time Out' Target = 'OU=IT,DC=Reskit,DC=org' } New-GPLink @GPLHT2 | Out-Null - Displaying the GPOs in the domain
Get-GPO -All -Domain Reskit.Org | Sort-Object -Property DisplayName | Format-Table -Property Displayname, Description, GpoStatus - Creating and viewing a GPO Report
$RPath = 'C:FooGPOReport1.HTML' Get-GPOReport -All -ReportType Html -Path $RPath Invoke-Item -Path $RPath - Getting report in XML format
$RPath2 = 'C:FooGPOReport2.XML' Get-GPOReport -All -ReportType XML -Path $RPath2 $XML = [xml] (Get-Content -Path $RPath2) - Create a simple GPO report
$RPath2 = 'C:FooGPOReport2.XML'
$FMTS = "{0,-33}  {1,-30} {2,-10} {3}"
$FMTS -f 'Name','Linked To', 'Enabled', 'No Override'
$FMTS -f '----','---------', '-------', '-----------'
$XML.report.GPO |
  Sort-Object -Property Name |
    ForEach-Object {
     $Gname = $_.Name
     $SOM = $_.linksto.SomPath
     $ENA = $_.linksto.enabled
     $NOO = $_.linksto.nooverride
     $FMTS -f $Gname, $SOM, $ENA, $NOO
   }
How it works...
Like many AD-related cmdlets, the cmdlets you use to manage Group Policy objects do not produce much output.
In step 1, you create a new GPO in the Reskit.Org domain. This step creates an empty GPO in the domain that is not yet linked to any OU and thus does not apply to any computer or user.
In step 2, you disable user settings, which allows the GPO client to ignore any user settings. Doing so can make the client’s GPO processing a bit faster.
In step 3, you set this GPO to have two specific registry-based values. When a computer starts up, the GPO processing on that client computer ensures that these two registry values are set on the client. During Group Policy refresh (which happens approximately every 2 hours), the group policy agent enforces the value contained in the policy.
In step 4 and step 5, you create a new GPO and set a screen saver timeout of 900 seconds.
In step 6, you link the two GPOs to the IT Organizational unit. GPO processing ignores the GPO until you link the GPOs to an OU (or to the domain or a domain site).
In this recipe, step 1 through step 6 produces no output.
In step 7, you use Get-GPO to get and display the details of the GPOs in the domain, which looks like this:

Figure 4.41: Adding new users to the Reskit domain - part two
In step 8, you use the Get-GPOReport cmdlet to generate an HTML report on policy objects in the domain. This step displays the results, creating a nicely formatted report, which looks like this:

Figure 4.42: Viewing a GPO report
In step 9, you use the Get-GPOReport cmdlet to get information about the GPOs on your system and return this information as XML. This step produces no console output.
Then, in step 10, you use PowerShell to produce a nicely formatted report customized for your needs, which looks like this:

Figure 4.43: Creating a customized GPO report
There’s more...
In step 8, you see the output from the Get-GPOReport cmdlet from Internet Explorer. At the time of writing, the Edge browser does not render the output as nicely as you might want. What may look like a bug in the graphic is just how Edge (again at the time of writing) renders this HTML document.
In step 9, you use the Get-GPOReport command to obtain a report of all GPOs in the domain returned as XML. The XML returned contains details of the GPO links as a property which includes many sub-properties. To create nice-looking output, you create a format string you use to display each row of your report, including report header lines. You first use this format string to make the two report header lines for the report. In practice, you might need to adjust the composite formatting strings ($FMTS) to ensure the widths of each column are appropriate for your environment.
In step 10, you report on the GPOs in the Reskit domain using .NET composite string formatting using the -f operator. Using .NET composite formatting enables you to create nice-looking customized output when the objects returned by a cmdlet are not in a form to be used directly with Format-Table.
The Format-Table and Format-List cmdlets are of the most use when each object has simple properties. When an object has properties that are objects which also have properties, the format commands do not surface these (sub) properties. In this case, you must obtain the details manually of the GPO links for each GPO and generate your report lines based on those results. While the report layout works well for this specific set of GPOs, should you have GPOs with longer names, or linked to deeper organizational units, you may need to adjust the format string you set in step 10.
Reporting on AD Users
Monitoring Active Directory is a necessary, albeit time-consuming, task. With larger numbers of users and computers to manage, you need all the help you can get, and PowerShell makes it easy to keep track of things.
If a user has not logged on for a reasonable period, the account could be a security risk. Likewise, a user with membership in a privileged account (for example, Enterprise Admins) could be used by an attacker. IT professionals know how easy it is to put someone in a high privilege group rather than set up more fine-grained permissions using something like Just Enough Administration (see Implementing JEA in Chapter 8).
Regular reporting can help focus on accounts that could be usefully deactivated, removed from a security group, or possibly removed altogether.
In this recipe, you obtain all the accounts in AD and examine potential security risks.
Getting ready
After running the recipes in this chapter, you run this recipe on DC1, a DC in the Reskit.Org domain. You should also have installed PowerShell 7 and VS Code on this host.
How to do it...
- Defining a function
Get-ReskitUserto return objects related to users in theReskit.OrgdomainFunction Get-ReskitUser { # Get PDC Emulator DC $PrimaryDC = Get-ADDomainController -Discover -Service PrimaryDC # Get Users $ADUsers = Get-ADUser -Filter * -Properties * -Server $PrimaryDC # Iterate through them and create $Userinfo hash table: Foreach ($ADUser in $ADUsers) { # Create a userinfo HT $UserInfo = [Ordered] @{} $UserInfo.SamAccountname = $ADUser.SamAccountName $UserInfo.DisplayName = $ADUser.DisplayName $UserInfo.Office = $ADUser.Office $UserInfo.Enabled = $ADUser.Enabled $UserInfo.LastLogonDate = $ADUser.LastLogonDate $UserInfo.ProfilePath = $ADUser.ProfilePath $UserInfo.ScriptPath = $ADUser.ScriptPath $UserInfo.BadPWDCount = $ADUser.badPwdCount New-Object -TypeName PSObject -Property $UserInfo } } # end of function - Getting the users
$RKUsers = Get-ReskitUser - Building the report header
$RKReport = '' # first line of the report $RkReport += "*** Reskit.Org AD Report'n" $RKReport += "*** Generated [$(Get-Date)]'n" $RKReport += "*******************************'n'n" - Reporting on disabled users
$RkReport += "*** Disabled Users'n" $RKReport += $RKUsers | Where-Object {$_.Enabled -NE $true} | Format-Table -Property SamAccountName, Displayname | Out-String - Reporting on users who have not recently logged on
$OneWeekAgo = (Get-Date).AddDays(-7) $RKReport += "'n*** Users Not logged in since $OneWeekAgo'n" $RkReport += $RKUsers | Where-Object {$_.Enabled -and $_.LastLogonDate -le $OneWeekAgo} | Sort-Object -Property LastlogonDate | Format-Table -Property SamAccountName,lastlogondate | Out-String - Discovering users with a high number of invalid password attempts
$RKReport += "'n*** High Number of Bad Password Attempts'n" $RKReport += $RKUsers | Where-Object BadPwdCount -ge 5 | Format-Table -Property SamAccountName, BadPwdCount | Out-String - Adding another report header line for this part of the report and creating an empty array of privileged users
$RKReport += "'n*** Privileged User Report'n" $PUsers = @() - Querying the Enterprise Admins/Domain Admins/Scheme Admins groups for members and adding them to the
$Pusersarray# Get Enterprise Admins group members $Members = Get-ADGroupMember -Identity 'Enterprise Admins' -Recursive | Sort-Object -Property Name $PUsers += foreach ($Member in $Members) { Get-ADUser -Identity $Member.SID -Properties * | Select-Object -Property Name, @{Name='Group';expression={'Enterprise Admins'}}, whenCreated,LastLogonDate } # Get Domain Admins group members $Members = Get-ADGroupMember -Identity 'Domain Admins' -Recursive | Sort-Object -Property Name $PUsers += Foreach ($Member in $Members) {Get-ADUser -Identity $member.SID -Properties * | Select-Object -Property Name, @{Name='Group';expression={'Domain Admins'}}, WhenCreated, Lastlogondate,SamAccountName } # Get Schema Admins members $Members = Get-ADGroupMember -Identity 'Schema Admins' -Recursive | Sort-Object Name $PUsers += Foreach ($Member in $Members) { Get-ADUser -Identity $member.SID -Properties * | Select-Object -Property Name, @{Name='Group';expression={'Schema Admins'}}, WhenCreated, LastLogonDate,SamAccountName } - Adding the special users to the report
$RKReport += $PUsers | Out-String - Displaying the final report
$RKReport
How it works...
All the steps except the last one produce no output in this recipe. The first steps create a report, which you view in the final step.
In step 1, you create a function, Get-ReskitUser, which creates a set of user objects related to each user in your AD. In step 2, you use the function to populate an array, $RKUsers, containing users and necessary details for your report.
In step 3, you build the header for the report, and then in step 4, you build a report section on disabled users, adding details of disabled user accounts. In step 5, you add details of users that have not logged on within the last seven days. In step 6, you add details of users who have had more than five unsuccessful login attempts.
The final section of the report lists members of crucial AD groups. With step 7, you create a header for this section. Then, with step 8 and step 9, you add details of members of these groups.
Once these steps are complete, in step 10, you can view the output of the report, which looks like this:
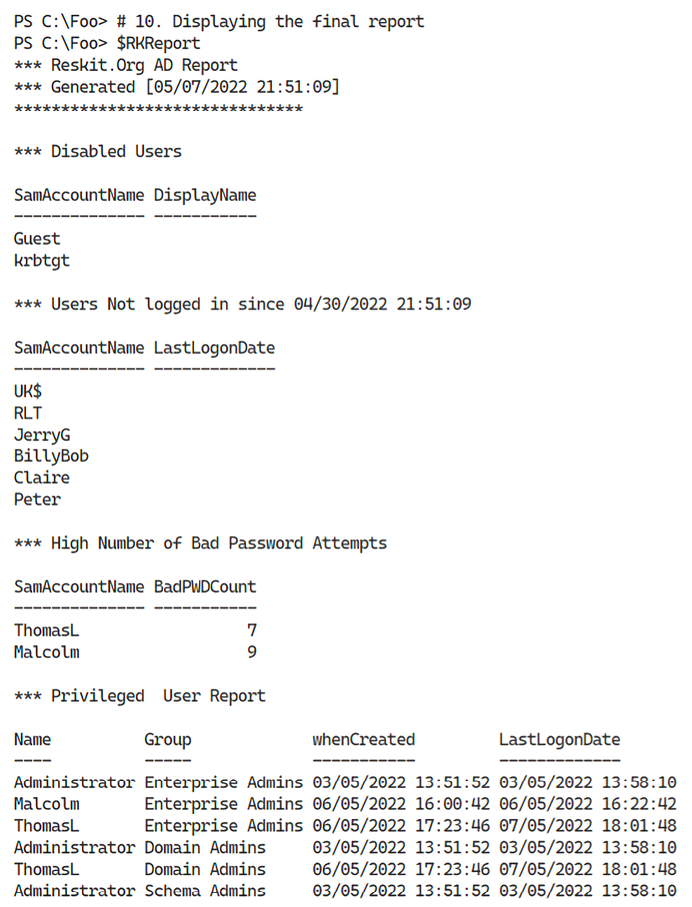
Figure 4.44: Viewing the final Users report
There’s more...
In step 1, you create a function to retrieve users. This function allows you to reformat the properties as needed, improving the output in your report.
In step 3 through step 9, you build the report contents by adding to a variable holding the report. These steps show you how to create highly customized reports for your domain.
In step 10, you see the final report. Note that the users Malcolm and ThomasL have a high number of failed login attempts but logged in at some point successfully. If you log in using a domain account and an incorrect password, AD rejects the login and increases the bad attempt count. However, AD zeros the bad logon count once you log in successfully. You might also ask why both those users are members of the Enterprise Admins group!
In this recipe, you use simple arrays or strings to create parts of and the entire report. These objects are of the type System.Array. This type of array in PowerShell has some performance issues if you add a large number of items to an array. A more performant approach would be to use the System.Collections.ArrayList object but that would mean the steps changing to use the .ADD method and be more complex code. For this particular case, the performance implications are not significant. Should the reports start to increase in size (e.g. thousands of lines), you might wish to make the change. For more details on the array list, see https://pipe.how/new-arraylist/.
Reporting on AD Computers
Monitoring AD user accounts is an important task, and as you saw in Reporting on AD Users, you can automate monitoring with PowerShell. Monitoring computer accounts can also be useful. And with larger numbers of computers to manage, you need all the help you can get.
A computer that has not logged on for an extended period could represent a security risk or could be a lost/stolen computer. It could also be a system you have not rebooted after applying patches and updates.
This recipe creates a report of computers that have not logged on or that you have not rebooted for a while.
One challenge in developing scripts like this is creating meaningful test data. If you wish to generate a test report showing a system that has not logged on for over 6 months, you might have to wait for 6 months to get the necessary data. This recipe offers a way around that, if only for testing purposes.
Getting ready
You run this recipe on SRV1 after you have installed PowerShell 7. You should also have DC1, a domain controller in the domain, up and running.
How to do it...
- Creating example computer accounts in the AD
$NCHT1 = @{ Name = 'NLIComputer1_1week' Description = 'Computer last logged in 1 week ago' } New-ADComputer @NCHT1 $NCHT2 = @{ Name = 'NLIComputer2_1month' Description = 'Computer last logged in 1 week ago' } New-ADComputer @NCHT2 $NCHT3 = @{ Name = 'NLIComputer3_6month' Description = 'Computer last logged in 1 week ago' } New-ADComputer @NCHT3 - Creating some constants for later comparison
$OneWeekAgo = (Get-Date).AddDays(-7) $OneMonthAgo = (Get-Date).AddMonths(-1) $SixMonthsAgo = (Get-Date).AddMonths(-6) - Defining a function to create sample data
Function Get-RKComputers { $ADComputers = Get-ADComputer -Filter * -Properties LastLogonDate $Computers = @() foreach ($ADComputer in $ADComputers) { $Name = $ADComputer.Name # Real computers and last logon date if ($adComputer.name -NotMatch "^NLI") { $LLD = $ADComputer.LastLogonDate } Elseif ($ADComputer.Name -eq "NLIComputer1_1week") { $LLD = $OneWeekAgo.AddMinutes(-30) } Elseif ($ADComputer.Name -eq "NLIComputer2_1month") { $LLD = $OneMonthAgo.AddMinutes(-30) } Elseif ($ADComputer.Name -eq "NLIComputer3_6month") { $LLD = $SixMonthsAgo.AddMinutes(-30) } $Computers += [pscustomobject] @{ Name = $Name LastLogonDate = $LLD } } $Computers } - Building the report header
$RKReport = '' # Start of report $RKReport += "*** Reskit.Org AD Daily AD Computer Report'n" $RKReport += "*** Generated [$(Get-Date)]'n" $RKReport += "***********************************'n'n" - Getting Computers in RK AD using
Get-RKComputers$Computers = Get-RKComputers - Getting computers that have never logged on
$RKReport += "Computers that have never logged on'n" $RkReport += "Name LastLogonDate'n" $RkReport += "---- -------------'n" $RKReport += Foreach($Computer in $Computers) { If ($null -eq $Computer.LastLogonDate) { "{0,-22} {1} 'n" -f $Computer.Name, "Never" } } - Reporting on computers who have not logged on in over 6 months
$RKReport += "'nComputers that have not logged in over 6 months'n" $RkReport += "Name LastLogonDate'n" $RkReport += "---- -------------'n" $RKReport += foreach($Computer in $Computers) { If (($Computer.LastLogonDate -lt $SixMonthsAgo) -and ($null -ne $Computer.LastLogonDate)) { ("'n{0,-23} {1} 'n" -f $Computer.Name, $Computer.LastLogonDate) } } - Reporting on computer accounts that have not logged for 1-6 months
$RKReport += "'n'nComputers that have not logged in 1-6 months'n" $RkReport += "Name LastLogonDate'n" $RkReport += "---- -------------" $RKReport += foreach($Computer in $Computers) { If (($Computer.LastLogonDate -ge $SixMonthsAgo) -and ($Computer.LastLogonDate -lt $OneMonthAgo) -and ($null -ne $Computer.LastLogonDate)) { "'n{0,-22} {1} " -f $Computer.Name, $Computer.LastLogonDate } } - Reporting on computer accounts that have not logged in the past 1 week to one month ago
$RKReport += "'n'nComputers that have between one week " $RKReport += "and one month ago'n" $RkReport += "Name LastLogonDate'n" $RkReport += "---- -------------" $RKReport += foreach($Computer in $Computers) { If (($Computer.LastLogonDate -ge $OneMonthAgo) -and ($Computer.LastLogonDate -lt $OneWeekAgo) -and ($null -ne $Computer.LastLogonDate)) { "'n{0,-22} {1} " -f $Computer.Name, $Computer.LastLogonDate } } - Displaying the report
$RKReport
How it works...
In this recipe, all but the final step produce no output. Some of the steps exist to enable you to test the report that this recipe generates. Some of these steps might not be necessary for real life, as you already have enough real-life data to create a complete report.
In step 1, you create three AD computer accounts. You use these accounts to simulate computers that have not logged on for a while, thus enabling you to view a complete report. If you re-run this recipe or this step, adding these accounts produces errors since the accounts already exist. You could modify this step to check to see if the accounts exist before creating them.
In step 2, you create three time constants, representing the time 7 days ago, 1 month ago, and 6 months ago. This step lets you test if a given user account has not longed on in that period.
In step 3, you create a new function, Get-RKComputers. This function returns a list of all the computer accounts in AD along with their last logon time.
In step 4, you begin the report by creating a report header.
In step 5, you call the Get-RKComputers function and populate the $Computers array (all the computers available).
In step 6 through step 9, you add details to the report of computers who have never logged on, have not logged on for over 6 months, have not logged on in 1-6 months, and computers that have not logged on in 1 week-1 month.
In the final step, step 10, you display the report created by the earlier steps. The output of this step looks like this:

Figure 4.45: Viewing the final computer report
There’s more...
In step 3, you create a function to get the computer accounts in AD. This function returns an array of computer names and the last login date and includes values for the three test computer accounts’ previous logon dates. In production, you might amend this function to return computer accounts from just certain OUs. You could also extend this function to test whether each computer is online by testing a network connection or checking to see if there is a DNS A record for the computer to detect stale computer accounts.
In step 5 through step 9, you create a report by adding text lines to the $RKReport variable. You need to add CRLF characters before or after each line of text when you add each line to the report. Ensuring each report line begins in the right place can be challenging in creating reports using the technique shown by this recipe.
Managing AD Replication
Active Directory uses a special database to support its operations. The database is a distributed, multi-master database with convergence – every DC in every domain stores this database in the file C:WindowsNTDS
tds.dit.
Every DC in any domain holds a complete copy of this database. If you add a new user or change a user’s office, that change occurs on just one DC (initially). AD replication makes the change in all database copies. In this way, the database remains consistent over time and across all DCs.
AD replication is based on partitions – a slice of the overall database. AD can replicate each partition separately. There are several partitions in AD:
- Schema partition – This holds the AD schema that defines each object that AD stores in the database. The schema also defines the properties of all these objects.
- Configuration partition – This holds the details of the structure of the domain.
- Domain partition – This partition, also known as the domain naming context, contains the objects relating to a domain (users, groups, OUs, etc.). The objects in this partition are defined based on the schema.
- Application partition – Some applications, such as DNS, store objects in your AD and rely on AD replication to replicate the values.
There are two types of replication: intra-site replication and inter-site replication. Intra-site replication happens between DCs in a given AD site, while inter-site replication occurs between different AD sites.
You can create different topologies for replication, including:
- Ring – Each DC in a site has at least two inbound replication partners. When any change is made to any DC, that DC notifies its replication partners that it has a change. Those DCs can then replicate that change (if they have not seen it before). AD by default ensures there are not more than three hops within the replication topology. If you have a large number of DCs (more than 7), AD automatically creates additional replication links to keep the hop count below 3.
- Full mesh – With this topology, all DCs replicate to all other DCs. Full mesh replication keeps the database in sync with a minimum replication delay, but can be more expensive in terms of bandwidth (and DC utilization). It is not scalable.
- Hub and spoke – You might use this approach in enormous organizations where a ‘‘spoke’’ DC replicates with a central hub DC. The hub DC then replicates the change to all other spoke DCs in your organization. Hub and spoke can reduce replication for widely dispersed implementations.
- Hybrid – Here, you can combine any of these based on business needs.
By default, AD replication uses a ring topology. If your business needs dictate, you can adopt different topologies requiring additional configuration.
In most smaller organizations (such as Reskit.Org), replication is set up and operates automagically. But for large and distributed organizations, replication can be quite complicated as you attempt to balance being totally up to date against the cost of geographical bandwidth. If you have DCs on several continents, you want to collect those changes and make them simultaneously, say every 4 hours. But that means the remote DC would have out-of-date information for a period. As a general rule of thumb, you should design replication to happen faster than a person can fly between your AD sites served by a DC. If you change your password, say in London, then as long as the changes occur within 16 hours when you fly to Brisbane, Australia, the Australian DCs contain the replicated password. Thus, you can log in with the new password immediately upon landing in Brisbane.
For more information on AD replication concepts, see https://learn.microsoft.com/windows-server/identity/ad-ds/get-started/replication/active-directory-replication-concepts.
For any sizeable organization, the design and planning of AD is vital – see https://docs.microsoft.com/windows-server/identity/ad-ds/plan/ad-ds-design-and-planning for more information on the planning and design work necessary.
Traditionally, you use many Win32 console applications to manage and troubleshoot replication, including repadmin.exe, which broadly replaces an earlier command, replmon.exe. See the following for details on the repadmin.exe command (and replication): https://techcommunity.microsoft.com/t5/ask-the-directory-services-team/getting-over-replmon/ba-p/396687.
With the advent of PowerShell and the PowerShell Active Directory module, you can now perform many of the functions of repadmin.exe using PowerShell cmdlets.
In this recipe, you examine replication details and see it in action.
Getting ready
You run this recipe on DC1, a domain controller in the Reskit.Org domain. You should also have DC2 and UKDC1 available and online at the start of testing this recipe. You must have installed PowerShell 7 and VS Code on all these hosts.
How to do it…
- Checking replication partners for
DC1Get-ADReplicationPartnerMetadata -Target DC1.Reskit.Org | Format-List -Property Server, PartnerType, Partner, Partition, LastRep* - Checking AD replication partner metadata in the domain
Get-ADReplicationPartnerMetadata -Target Reskit.Org -Scope Domain | Format-Table -Property Server, P*Type, Last* - Investigating group membership metadata
$REPLHT = @{ Object = (Get-ADGroup -Identity 'IT Team') Attribute = 'Member' ShowAllLinkedValues = $true Server = (Get-ADDomainController) } Get-ADReplicationAttributeMetadata @REPLHT | Format-Table -Property A*NAME, A*VALUE, *TIME - Adding two users to the group and removing one
Add-ADGroupMember -Identity 'IT Team' -members Malcolm Add-ADGroupMember -Identity 'IT Team' -members Claire Remove-ADGroupMember -Identity 'IT Team' -members Claire -Confirm:$False - Checking updated metadata
# From DC1 Get-ADReplicationAttributeMetadata @REPLHT | Format-Table -Property A*NAME,A*VALUE, *TIME # From DC2 Get-ADReplicationAttributeMetadata -Server DC2 @REPLHT | Format-Table -Property A*NAME,A*VALUE, *TIME - Make a change to a user
$User = 'Malcolm' Get-ADUser -Identity $User | Set-ADUser -Office 'Marin Office' - Checking updated metadata
$O = Get-ADUser -Identity $User # From DC1 Get-ADReplicationAttributeMetadata -Object $O -Server DC1 | Where-Object AttributeName -match 'Office' # From DC2 Get-ADReplicationAttributeMetadata -Object $O -Server DC2 | Where-Object AttributeName -match 'Office' - Examine Replication partners for both
DC1,UKDC1Get-ADReplicationConnection | Format-List -Property Name,ReplicateFromDirectoryServer Get-ADReplicationConnection -Server UKDC1 | Format-List -Property Name,ReplicateFromDirectoryServer - Use repadmin to check the replication summary
repadmin /replsummary
How it works…
In step 1, you check to discover replication partners for DC1. With only two DCs in the Reskit domain (DC1 and DC2), the output of this step looks like this:

Figure 4.46: Viewing DC1 replication partners (for the Reskit.Org domain)
In step 2, you get the AD replication partner metadata in the Reskit domain, with output like this:

Figure 4.47: Viewing DC1 replication metadata
In step 3, you view the AD replication metadata for the group membership for a group (IT Team), with output like this:

Figure 4.48: Viewing group membership metadata
In step 4, you add two users to a group, then remove one, creating no console output. In step 5, you look again at the group metadata, which reflects the change to group status, as you can see here:

Figure 4.49: Viewing group membership metadata after group changes
In step 6, you update the details of a given user, generating no output. In step 7, you check the replication metadata for this user to see what was changed. You view the replication data from both DC1 and DC2 with output that looks like this:

Figure 4.50: Viewing user change details
In step 8, you view the details of replication partners for both DC1 and the child DC, UKDC1, with output like this:

Figure 4.51: Viewing replication partners for DC1 and UKDC1
In the final step in this recipe, step 9, you use the repadmin console application to view an overview of replication in the forest, with output like this:

Figure 4.52: Viewing replication status for the Reskit forest
There’s more…
In step 1, you view the replication partner(s) for the Reskit domain. With just two DCs in the Reskit domain, you would expect DC1 and DC2 to be replication partners for each other. And in step 2, you can see that replication for the domain is up to date.
In step 3, you view the metadata related to the group membership of the IT Team group. So far, you can see that AD records three changes to the membership of this group (which happened when you added these three users to the group in an earlier recipe). In step 4, you add two users to the group and remove one. In step 5, you again view the metadata to see you (or someone!) added Malcolm and Claire to the group and immediately removed Claire.
Also note that, in step 4, you use wild cards to pull out properties. This approach saves space in published works, but you may wish to spell out the full property names in production code.
As another example of replication, in step 6, you change a user’s Office property, then in step 7, you examine the replication metadata. You can see that someone made a change to this user, changing their office name.
In step 9, you use the repadmin tool and verify that there are currently no replication issues in the forest.
Join our community on Discord
Join our community’s Discord space for discussions with the author and other readers:
