
Chapter 4: Windows Passwords on the Network
Few technologies have molded modern information security quite like the Windows password. The sheer popularity of the Windows operating system (OS) has resulted in intense scrutiny of its methods and their security. When more eyes are examining the security of an authentication system, there are more lessons to inform growth and improvement. On the other hand, a major goal of Windows implementations is backward compatibility. What this means in practice is that older and weaker methods are often found in today’s IT environments, even when a more secure version is available, and even when that more secure version is enabled in the same environment. In this chapter, we’ll be discussing some technology that’s literally more than two decades old, and you might wonder, do we really need to be looking at this anymore? The answer is, sadly, yes. Your clients will have their reasons for configuring their systems to support security methods that can literally be broken in seconds, but it’s not likely that they’ve truly grasped the impact of these decisions. That’s why you are there, and it’s why I’ve included this chapter in this book.
In this chapter, we will cover the following topics:
- A quick overview of Windows password hashes and design flaws
- An introduction to Metasploit by using an authentication capture auxiliary module
- A demonstration of Link-Local Multicast Name Resolution (LLMNR)/NetBIOS Name Service (NetBIOS NS) spoofing to capture Windows credentials
- An introduction to John the Ripper and Hashcat, two popular password crackers, and modifying parameters
Technical requirements
The following technical requirements are needed in this chapter:
- A laptop running Kali Linux
- A laptop or desktop running Windows
Understanding Windows passwords
Imagine you sit down at your Windows computer. You punch in your password and the computer logs you in. Windows has to have some means of knowing that your entry is correct. Naturally, we’d assume the password is stored on the computer, but, interestingly enough, the password is stored nowhere on the computer. A unique representation of your password is used instead, and the same type of representation of your entry during the logon process is simply compared to it. If they match, Windows assumes your entry is the same as the password. This representation of Windows passwords is called a hash.
A crash course on hash algorithms
A hash is a one-way function; you can’t take a hash value and work backward to an input. The hash value is a fixed length defined by the algorithm, whereas the input is a variable length. You can create a SHA-256 hash value (256 bits long) for a single letter or for the entire works of Shakespeare.
Some hash examples using SHA-256 include the following:
- The ASCII letter a (lowercase):
ca978112ca1bbdcafac231b39a23dc4da786eff8147c4e72b9807
785afee48bb
- The ASCII letter A (uppercase):
559aead08264d5795d3909718cdd05abd49572e84fe55590eef
31a88a08fdffd
- Shakespeare’s The Tragedy of Titus Andronicus (the entire play):
02b8d381c9e39d6189efbc9a42511bbcb2d423803bb86c28ae
248e31918c3b9a
- Shakespeare’s The Tragedy of Titus Andronicus (but with a single word misspelled):
4487eba46b2327cfb59622a6b8984a74f1e1734285e4f8093fe
242c885b4aadb
With these examples, you can see the fundamental nature of a hash algorithm at work. The output is fixed length. In these examples, the output is 64 hexadecimal characters long (a single hexadecimal character is 4 bits long; 256 divided by 4 yields 64 characters). An SHA-256 hash is always 64 characters, no matter the length of the input – even if the length is zero! Yes, there’s even a hash value for literally nothing. It’s 64 characters even for massive inputs, like Shakespeare’s Titus Andronicus – that’s 1.19 million characters. When it comes to the security application of hashing, one critical feature is the fact that changing a single character in a Shakespeare play radically changed the hash value. This is due to a principle in cryptography called the avalanche effect, and it’s a core feature of secure algorithms.
Let’s suppose that a bad guy has captured a hash representing my password. Thanks to the avalanche effect, he has no way of knowing by merely hashing his guesses that he was getting close to the actual value. He could be a single character off and the hash would look radically different. I know what the hacker in you is thinking: “Mathematically speaking, as long as the fixed-length, one-way function will accept inputs of arbitrarily longer lengths, there will always be some pair of values that will hash to the same output.” Brilliant point, and you’re right. This is called a collision. The primary goal of any secure hashing algorithm design is to reduce the risk of collisions. Mathematically speaking, you can’t eliminate them – you can just make them extremely hard to find so that you may as well just try to find the target input.
Now, it’s best to not go too deep down the rabbit hole of hashing when discussing Windows security because, in classic Microsoft form, they just had to do things their way. A Windows hash, from any point in the history of the operating system, is no ordinary hash.
Password hashing methods in Windows
We start our journey way back in the distant past. It was a time after the dinosaurs, though not by much. I’m talking about, of course, the age of the LAN Manager (LM) hash.
There’s an ancient concept in operating systems called the network operating system (NOS). When you say these words today, you’ll probably be understood as referencing the operating systems on networking devices such as routers (think Cisco IOS). But back in the day, it was an operating system optimized for networking tasks such as client-server communications. The concept was born when personal computing went from being a single user and computer in isolation to one of many users sharing information on a network. One such NOS is Microsoft’s LM. LM was successful, but quickly found to be suffering from significant security issues. Microsoft then took the authentication mechanism and beefed it up in a new suite of protocols called NT LAN Manager (NTLM).
As we explore these authentication mechanisms, you need to know that there are two ways you’ll get your hands on credentials – over the network, or by stealing the hashes straight from the Security Account Manager (SAM). Hashes stored in the SAM are just plain representations of passwords, but authentication over the network is more complicated by virtue of using a challenge-response mechanism, which we’ll discuss next.
If it ends with 1404EE, then it’s easy for me – understanding LM hash flaws
Let’s take a look at the LM hashes for a few passwords and see whether there are any immediately noticeable patterns:

Table 4.1 – LM hash representations for different inputs
We can already tell that this isn’t an ordinary hashing algorithm.
The first two passwords have the same LM hash. The third and fourth passwords have the same second half. And finally, the last password has the same previous half repeated twice. Without pulling out any hacking tools, we’ve already figured out two important facts: the LM password is not case-sensitive, and the LM hash is two smaller hashes concatenated together! A Windows password that’s protected with the LM hash is actually two seven-character passwords hashed separately.
Why are we concerned with an old and deprecated algorithm anyway? It’s very common for enterprise systems to require backward compatibility. The LM hash was stored by default, even on systems using the newer and stronger methods, until Vista. With Vista and beyond, it is possible to enable it. Many organizations enable storage of the LM hash to allow a legacy application to function.
To demonstrate this tremendous problem mathematically, let’s calculate the total number of possible 14-character passwords with only letters and numbers, and compare it to the total number of pairs of seven-character passwords:
- The total possible number of 14-character passwords: 36^14 = 6.1409422 * 10^21 (about 6.1 sextillion passwords)
- The total possible number of seven-character pairs: (36^7) + (36^7) = 156,728,328,192 (about 156.7 billion passwords)
The second number is only 0.00000000255% as large as the first number.
With the advent of Windows NT, the LM hash was replaced with the NT hash. Whereas the LM hash is DES-based and only works on a non-case-sensitive version of a 14-character maximum password split in half, the NT hash is MD4-based and calculates the hash from the UTF-16 representation of the password. The results are 128 bits long in either case, and they’re both easy as pie to attack.
Authenticating over the network – a different game altogether
So far, we’ve discussed Windows hashes as password equivalents, and we’ve also discussed what I like to call naked hashes. Those hashes never hit the network, though. The hash becomes the shared secret in an encrypted challenge-response mechanism. In NTLMv1, once the client connects to the server, a random 8-byte number is sent to the client – this is the challenge. The client takes the naked hash, and after adding some padding to the end, splits it into three pieces and DES encrypts these three pieces, separately, with the challenge – this forms a 24-byte response. As the response is created with the challenge and a shared secret (the hash), the server can authenticate the client. NTLMv2 adds a client-side challenge to the process. Password crackers are aware of these protocol differences, so you can simply import the results of a capture and get straight to cracking it. As a rule of thumb, the more sophisticated algorithms require more time to crack their passwords.
So, you can either steal passwords from the SAM within Windows, or you can listen for encrypted network authentication attempts. The first option gets you naked hashes, but it requires a compromise of the target. We’ll be looking at post-exploitation later in this book, so for now, let’s see what happens when we attack network authentication.
Capturing Windows passwords on the network
In the Kali Linux world, there is more than one way to set up an SMB listener, but now’s a good time to bring out the framework that needs no introduction: Metasploit. The Metasploit framework will play a major role in attacks covered throughout this book, but here, we’ll simply set up a quick and easy way for any Windows box on the network to attempt a file-sharing connection.
We start up the Metasploit console with the following command:
# msfconsole
The Metasploit framework comes with auxiliary modules – these aren’t exploiters with payloads designed to get your shell, but they are wonderful sidekicks on a pen test because they can perform things such as fuzzing or, in our case, server authentication captures. You can take the output from here and pass it right along to a cracker or to an exploit module to progress further in your attack. To get a feel for the auxiliary modules available to you, you can type this command in the MSF prompt:
show auxiliary
We’ll be using the SMB capture auxiliary module. Before we configure the listener, let’s consider a real-world pen test scenario where this attack can be particularly useful.
A real-world pen test scenario – the chatty printer
Imagine you have physical access to a facility by looking the part: suit, tie, and a fake ID badge. Walking around the office, you notice a multifunction printer and scanner. During the course of the day, you see employees walk up to the device with papers in hand, punch something into the user interface, scan the documents, and then walk back to their desks. What is likely happening here is that the scanner is taking the images and storing them in a file share so that the user can access them from their computer. In order to do this, the printer must authenticate to the file share. Printers are often left with default administrator credentials, allowing us to change the configuration. The accounts used are often domain administrators, or at the very least, have permissions to access highly sensitive data. How you modify the printer’s settings will depend on the specific model. Searching online for the user guide for the specific model is a no-brainer.
The idea is to temporarily change the destination share to the UNC path of your Kali box. When I did this, I kept a close eye on the screen; once I captured the authentication attempts, I changed the settings back as quickly as I could to minimize any suspicion. The user’s documents never make it to the file share; they’ll likely assume a temporary glitch and think nothing of it if it only happens once. But, if multiple users are finding they consistently can’t get documents onto the file share, IT will be called.
Configuring our SMB listener
We have the MSF console up and running, so let’s set up our SMB listener. We run this command at the MSF prompt:
use server/capture/smb
As with any Metasploit module, we can review the options available in this SMB capture module with the following command:
show options
The following screenshot illustrates the output of the preceding command:
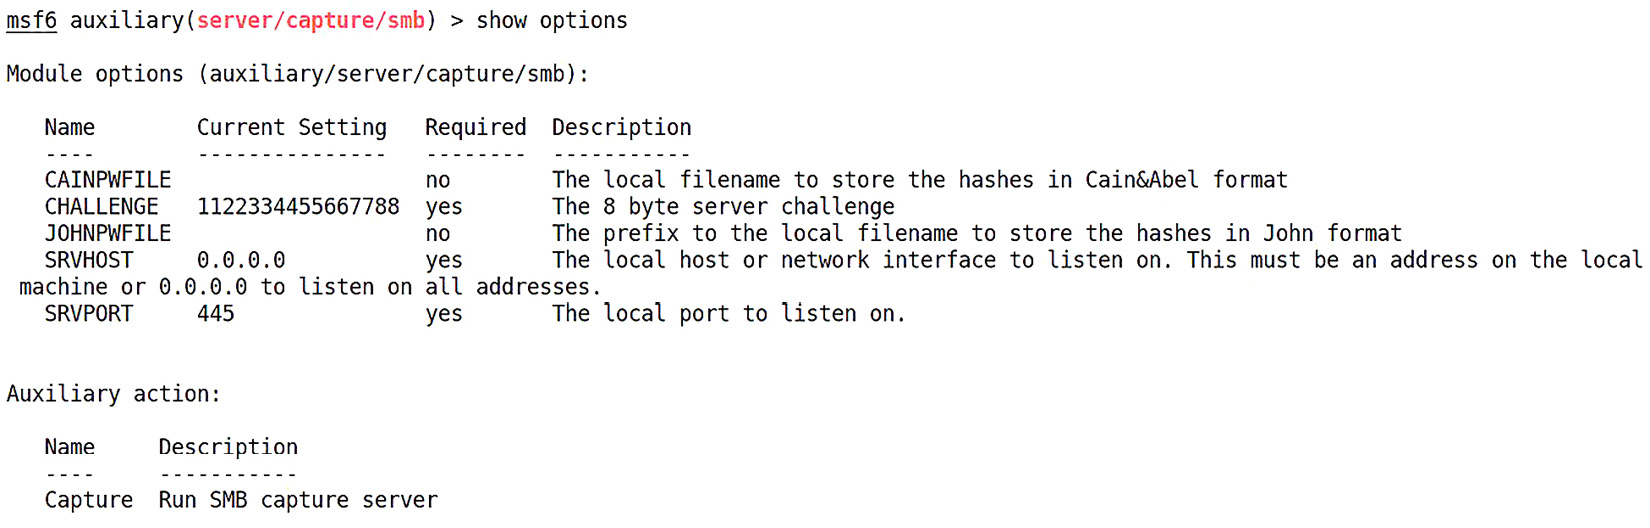
Figure 4.1 – The options menu for the SMB capture auxiliary module
Let’s take a look at these settings in more detail:
- CAINPWFILE defines where captured hashes will be stored, but in the Cain format. Cain (the powerful sniffing and cracking suite written for Windows) will capture hashes as it does its job, and then you have the option to save the data for later. The file that’s created puts the hashes in a format Cain recognizes. You can point Cain to the file that’s created here, using this flag. We aren’t using Cain, so we leave this blank.
- CHALLENGE defines the server challenge that is sent at the start of the authentication process. You’ll recall that hashes captured off the network are not naked hashes like you’d find in the SAM, as they’re password equivalents. They are encrypted as part of a challenge-response mechanism. What this means for us is we need to crack the captured hash with the same challenge (that is, a number that’s normally randomly generated) – so we define it, making it a known value. Why 1122334455667788? This is simply a common default used in password crackers. The only key factor here is that we can predict the challenge, so, in theory, you can make this number whatever you want. I’m leaving it as the default so I don’t have to toy around with the cracker configuration later, but something to consider is whether an observant administrator would notice predictable challenges being used. Seeing a server challenge of 1122334455667788 during an SMB authentication is a dead giveaway that you’re playing shenanigans on the network.
- JOHNPWFILE is the same setting as CAINPWFILE, but for John the Ripper. I know what the 19th-century British historian in you is saying: “His name was Jack the Ripper.” I’m referring to the password cracker, usually called John for short. We will be exploring John later, as it is probably the most popular cracker out there. For now, I’ll define something here, as the John format is fairly universal, and it will make my cracking job easier.
- SRVHOST defines the IP address of the listening host. It has to point to your attacking box. The default of 0.0.0.0 should be fine for most cases, but this can be helpful to define when we are attached via multiple interfaces with different assignments.
- SRVPORT defines the local listening port, and as you can imagine, we’d only change this in special situations. This should usually stay as the default of 445 (SMB over IP).
The challenge/response process described here is NTLMv1. NTLMv2 has the added element of a client-side challenge. Crackers are aware of this, and our SMB capture module will show you the client challenge when it captures an authentication attempt.
Let’s define SRVHOST to the IP address assigned to our interface. First, I’ll run ifconfig and grep out inet to see my IP address, as shown in the following screenshot:

Figure 4.2 – Using grep to conveniently display eth0’s IP address assignment
Using the set command, we define SRVHOST with our IP address – that’s it. Even though this isn’t technically an exploit, we use the same command to fire off our module, as shown in the following screenshot:
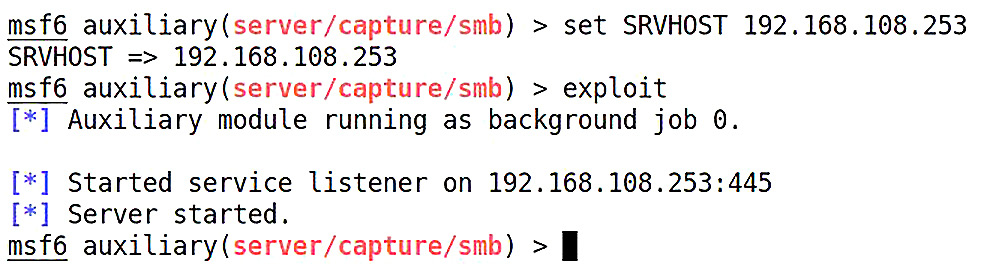
Figure 4.3 – Configuring and then starting the SMB listener
And there you have it. The SMB listener runs in the background so you can keep working. The listener is running and all you need is to point a target at your IP address.
Check out the HTTP method for capturing NTLM authentication. Follow the same steps, except issue the following command at the MSF console prompt instead:
use auxiliary/server/capture/http_ntlm
This will create an HTTP link so the user will authenticate within their browser, which is potentially useful in certain social engineering scenarios. You can even SSL-encrypt the session.
Authentication capture
By Jove, we have a hit! The screen lights up with the captured authentication attempts:

Figure 4.4 – Capturing the network credentials with our listener
We can open up our John capture file in nano to see the output formatted for cracking. Keep in mind, the module will name your John file with the name you specified as JOHNPWFILE and will concatenate the detected hashing algorithm. It does this so you can attack any different captured sets independently without sorting them first:

Figure 4.5 – John-formatted credentials
In this example, the target is sending us NTLMv2 credentials. Later in the book, we’ll discuss downgrading the security during post-exploitation on the compromised host so that we can nab weak hashes.
This attack worked, but there’s one nagging problem with it: we had to trick the device into trying to authenticate with our Kali machine. With the printer, we had to modify its configuration, and a successful attack means lost data for the unsuspecting user, requiring our timing to be impeccable if we want the anomaly to be ignored. Let’s examine another way to capture Windows authentication attempts, except this time, we’re going to capture credentials while a system is looking for local shares.
Hash capture with LLMNR/NetBIOS NS spoofing
Windows machines are brothers, always willing to help out when a fellow host is feeling lost and lonely. We’re already used to relying on DNS for name resolution. We’re looking for a name, we query our DNS server, and if the DNS server doesn’t have the record matching the request, it passes it along to the next DNS server in line. It’s a hierarchical structure and it can go all the way up to the highest name authorities of the entire internet. Local Windows networks, on the other hand, are part of a special club. When you share the same local link as another Windows computer, you can broadcast your name request and the other Windows boxes will hear it and reply with the name if they have it. Packets of this protocol even have a DNS-like structure. The main difference is it isn’t hierarchical; it is only link-local, and it can’t traverse routers (can you imagine the large-scale distributed denial of service (DDoS) attacks if it could?) This special Windows treat is called LLMNR, which has a predecessor called NetBIOS NS. It doesn’t have to be ON, and secure networks should be disabling it via group policy to let DNS do its job. However, it’s very commonly overlooked.
I know what the hacker in you is saying: “Since LLMNR and NetBIOS NS are broadcast protocols and rely on responses from machines sharing the link, we should be able to forge replies that point a requestor to an arbitrary local host.” An excellent point! And since we’re talking about local Windows resources, redirecting a request for a file share to our listener is going to cause the victim to authenticate, except this time we wait for the target to initiate the communication – no social engineering tricks required here.
Let’s get straight to it. There are a few ways to do this, including with Metasploit. But I’ll show you the real quick-and-dirty way of doing this in Kali: with Responder, a straightforward Python tool that will simply listen for these specially formatted broadcasts and kick back a spoofed answer. Remember, we’re listening for broadcasts – no promiscuous sniffing, no ARP spoofing, no man-in-the-middle at all. We’re just listening for messages that are actually intended for everyone on the subnet, by design.
Fire up Responder’s help page to review its features with the following command:
# responder -h
Set your interface and Responder does the rest. However, take a look at the –-lm option. It lets us do the following: “Force LM hashing downgrade for Windows XP/2003 and earlier.” You’re probably thinking, “my targets are going to be running Windows 10 or 7 – surely, that won't work anymore?” I wish this was entirely correct, but there are two considerations here. For one, remember the backward compatibility needs that are still surprisingly common; but also, keep in mind that this flag often forces a downgrade to some aspect of the communication. For example, in the first edition of this book, we showed how this feature forced a downgrade to NTLMv1. Today, using Windows 10 in our lab, we found that Responder was successful in downgrading from SMBv2 to the older (and less secure) SMBv1. One of the most important hacking life lessons is that most of our successes are just the culmination of many tiny successes.
With that in mind, I’m going to set up my listener with the following command:
# responder –I eth0 --lm
The first thing we see is a summary of the enabled and disabled features. If you like the look of some of these, take some time to play with them. For example, Responder makes a great quick-and-dirty plain HTTP credentials harvester. Let’s see what it looks like when we start capturing events:

Figure 4.6 – Poisoning events captured live by Responder
Meanwhile, back at our target PC – oh, dagnabbit! I fat-fingered the name of the printer file share I need to access. Oh well, I guess I’ll try again.

Figure 4.7 – What our victim sees
Meanwhile, back at our attacking Kali box – excellent, we have ourselves an NTLMv2 authentication attempt. The only downside to this tool is it doesn’t take the time to gift-wrap the goodies for our dear friend John, so prepare this input for your cracker accordingly. Here’s what Responder presents to us. Note that we can just copy and paste out of this window:

Figure 4.8 – LLMNR poisoned answer grabbing credentials
You probably noticed that we did not define a server challenge! That’s right, we didn’t. The challenge was randomly generated, and you’ll want to make sure your cracker is using the right challenge value.
We’ve looked at nabbing Windows hashes off the network. Now, we have some juicy-looking credentials to break open and hopefully leverage to log in to all kinds of services, as we know how insidious password reuse is, no matter how good your pen test client’s training might be. Let’s move on to the art of password cracking.
Let it rip – cracking Windows hashes
Password cracking was always one of my favorite parts of any assessment. It’s not just the thrill of watching tens of thousands of accounts succumb to the sheer power of even a modest PC – it is among the most useful things you can do for a client. Sure, you can conduct a pen test and hand over a really nice-looking report, but it’s the impact of the results that can mean the difference between bare-minimum compliance and an actual effort to effect some change in the organization. Nothing says “impact” quite like showing the executives of a bank their personal passwords.
There are some fundamentals we need to understand before we look at the tools. We need to understand what the hash cracking effort really is and apply some human psychology to our strategy. This is another aspect of password cracking that makes it so fun: the science and art of understanding how people think.
The two philosophies of password cracking
You’ll see two primary methodologies for password cracking – dictionary and brute-force. The distinction is somewhat of a misnomer; a hash function is a one-way function, so we can’t actually defeat the algorithm to find an original text – we can only find collisions (one of which will be the original text). There is no way around this needle-in-a-haystack effort, so really, any tactic is technically a use of brute-force computing speed. So, in this context:
- Dictionary attack: This employs a predefined list of values to hash. This list is often called a dictionary or a wordlist. Wordlists can be employed as defined, where every single entry is tried until the wordlist is exhausted, or it can be modified with rules, making the attack a hybrid attack. Rules apply specific modifications to the wordlist to search for variants of the original word. For example, imagine the wordlist entry is password. A rule may tell the cracker to try capitalizing the initial letter and then adding a number, 0-9, to the end. This will increase the actual wordlist being searched to include password1, password2, and so on. When we consider password-creating habits and human-friendly adaptations to corporate password policy, rulesets tend to be our golden ticket to success in cracking. Be careful with the word dictionary, as this isn’t the same concept as the English dictionary sitting on your shelf. Suppose, for example, that a popular sitcom on TV has a joke that uses a made-up word like shnerfles. People watch the show, love the gag, and start incorporating the word into their passwords to make them memorable. Though you won’t see shnerfles in the English dictionary, any smart password cracker has already incorporated the word into their wordlist.
- Brute-force attack: This puts together the full list of all possible combinations of a given character set. By its nature, a plain brute-force attack can take a very long time to complete. Whereas. with dictionary attacks, we used rulesets to enhance the attacks, we can modify the guesses of a brute-force attack with masking. Masking allows us to define different character sets to be used for certain positions in the password, greatly narrowing down the search space. For example, let’s say we want to search for any combination of letters, not just words that may be found in a wordlist, but we assume the user capitalized the first letter, and then added a couple of numbers to the end. In this example, the mask would set a capital letter character set for the first character position, followed by both uppercase and lowercase for the remaining letters, and then only digits for the last two character positions. To get an idea of what this can do to a search, let’s suppose we’re looking for a 10-character password, and the available characters are a-z, A-Z, 0-9, and the 13 symbols along the top of the keyboard. Then, let’s apply a mask that only searches for a capital initial letter, and only numbers for the last two characters:
- Without mask: ((26 * 2) + 10 + 13) ^ 10 = 5.6313515 * 10^18 (about 5.63 quintillion passwords)
- With mask: 26 * (75^7) * (10^2) = 3.4705811 * 10^16 (about 34.7 quadrillion passwords)
You might be looking at that and thinking, “those are both enormous numbers.” But with a very simple mask – a single capital letter at the front and two digits at the end – we reduced the search space by more than 99.3%. If we had the processing power that would crunch the unmasked space in four days, our mask would reduce that to about 36 minutes. As you can see, masking is to brute-force cracking what rulesets are to dictionary attacks: essentially a golden ticket to success when you dump hashes from a domain controller on your client’s network.
The key point with both modification methods is to target the psychological factors of password selection. With known words, not many people will use a word without changing some character in a memorable way (and, in fact, many corporate password policies simply won’t allow unmodified dictionary words). With brute-force attacks, very few people will choose kQM6R#ah*p as a password, but our unmasked 10-character search described just now will check it as well as quadrillions of other unlikely choices.
Whereas rules increase the search space of a dictionary attack, masks are designed to reduce the search space of a brute-force attack.
John the Ripper cracking with a wordlist
Finding the right wordlist and building your own is a hefty topic in its own right. Thankfully, Kali has some wordlists built in. For our demonstration, we’ll work with the rockyou wordlist – it’s popular and it’s quite large. I recommend, however, that you always consider it a general-purpose wordlist. Carrying around rockyou by itself and expecting to be a password cracker is like carrying around a single screwdriver and expecting to be a repairman. Sure, you’ll encounter the occasional job where it works fine, but you’ll come across screws of different sizes, and you’ll need the right tool for the job. When I was working with clients, I had many lists, and it wasn’t unusual for me to build new ones on the road. When I was working with businesses in Ohio, I made sure buckeyes was in my wordlist. Similarly, when I was working with businesses in Michigan, I made sure spartans was in my wordlist. These words are the names of sports teams – midwestern Americans love their football, and while policy won’t let them get away with just those words by themselves, cracking on those two words and then hybridizing the attack with a ruleset yielded me a lot of passwords. Of course, rockyou and any other wordlist is nothing more than a glorified text file. So, add stuff whenever it occurs to you!
Kali keeps wordlists in /usr/share/wordlists, so let’s head over there and unzip rockyou:
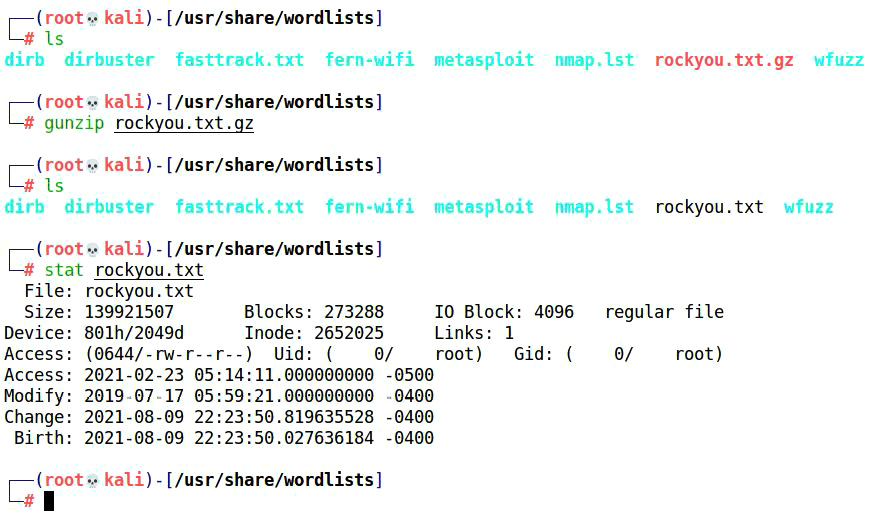
Figure 4.9 – Extracting the rockyou wordlist
Now that we have a wordlist, it’s time to check out where all the magic is defined for John – in his configuration file. Run this command to open it up in nano, keeping in mind that it’s a very large file:
# nano /etc/john/john.conf
There’s a lot going on here, and I encourage you to read the fine manual – but the juicy stuff is near the bottom, where the rulesets are defined. The convention is: [list.rules:NAME], where NAME is the ruleset name you’d define in the command line. You can even nest rulesets inside other rulesets with .include. This will save you time when you want to define custom rules but need the basics included as well:

Figure 4.10 – Reviewing the John configuration file
Let’s be honest, the rules syntax looks Martian when you first encounter it. Expertise in John rules syntax is out of scope for this discussion, but I recommend checking out the comments in the configuration file and experimenting with some basics. The Single ruleset does some useful modifications for us and doesn’t take too long to run on a fast CPU, so let’s give it a shot with the hash we nabbed from the network:

Figure 4.11 – Running John against our captured hash
- --wordlist defines the dictionary file (that is, rockyou, in our demonstration).
- --rules defines the ruleset, which is itself defined in john.conf.
- --format is the hash type that’s being imported (in our case, it’s NetNTLMv2).
Cracked passwords appear on the left and their corresponding usernames are in parentheses to the right. You can tap any key (except for q, which will quit) to see a cracking status, complete with the percentage of completion and the estimated local time of completion.
John the Ripper cracking with masking
We can use masking to target specific patterns without a wordlist. Masks follow a simple syntax where each character pattern type is defined with either a range or a placeholder with a question mark. For example, an uppercase (ASCII) letter would be defined with ?u, which would then be placed in the desired character position.
Let’s look at some examples:

Table 4.2 – Masking examples
A special type of masking is stacking, where we hybridize dictionary cracking with masking. The syntax is like ordinary masking, except our ?w placeholder defines the individual word in the list. For example, defining a wordlist with --wordlist= and then defining a mask with ?w?d?d?d?d would take an individual word from the wordlist and look for all combinations of that word with four digits on the end.
Reviewing your progress with the show flag
Although John shows us plenty of data during the cracking effort, it’s nice to know that our results are automatically being saved somewhere so we can review them in a nice clean format. John makes management of large input files a snap by putting aside cracked hashes when we start up John again.
For example, let’s say we’re working on 25 hashes, and we only have 5 hours today to crack them, but we can continue tomorrow for several more hours. We can set up our attack, let John run for 5 hours, and then abort with q or Ctrl + C. Suppose we recovered 10 passwords in that time. When we fire up John tomorrow, the 10 passwords are already set aside, and John goes to work on the remaining 15.
Instead of having an output file that we would review separately, John is designed to let us review results with the --show flag:

Figure 4.12 – The John show flag
Export this data into an Excel spreadsheet as colon-delimited data, and you have a head start on managing even massive cracking projects.
Here, kitty kitty – getting started with Hashcat
Despite all of our work with John, I have to be honest – I don’t even use it anymore. By far the best all-purpose password cracker is Hashcat, and it’s included with Kali. You might wonder why I didn’t just open with Hashcat if it’s the best. Well, today’s best stand on the shoulders of yesterday’s champions, and John is the perfect introduction to understanding how cracking works. Hashcat is there for you when you’re ready to take it to the next level.
What’s so special about Hashcat? The primary advantage is raw speed – Hashcat is just faster thanks to its hardware optimizations. If you have slower hardware and you’re trying to eke out every last hash-per-second it has to offer, Hashcat is for you. On the other hand, for those of you with powerhouse PCs, Hashcat’s ability to leverage GPU power will blow you away. If you have Kali installed on a gaming laptop, fasten your seatbelt.
First, we’ll fire off the help page – this cracker is beastly:
# hashcat –-help
Yeah, that’s a wall of information. Don’t be intimidated – it’s very logical, and when you get used to it, the flexibility of this feature set is amazing. The primary concepts you need to be aware of are as follows:
- Attack mode
- Hash mode
- Wordlist/charset/rules
The hash mode refers to the type of hash you’re cracking. Hashcat accepts a truly impressive number of hash types, so make sure you review the help page for the full range. You’ll quickly discover that it isn’t just hashes – you can even try a locked PDF or a locked 7-Zip file. We’ve been studying Net-NTLMv2 in our preceding example, so we’ll be using hash mode 5600 today.
Hashcat has two kinds of dictionary attack – straight and combination. Combination attack mode allows you to specify one or two wordlists, and it will combine the words found in each. For example, suppose someone’s password contains hardlypickled. You probably won’t find that in a wordlist (now that I have written it in this book, maybe it’ll appear in an updated one, but I digress). However, you will find hardly and pickled in wordlists for the English language, and the combination attack mode is what will find their combination in the password.
Brute-force attack mode is self-explanatory, but Hashcat does it exceptionally well. You’ll specify your charset and use a placeholder with a question mark (like we did with John) to specify the length. The placeholder code is intuitive – ?l is all lowercase, ?u is all uppercase, ?d is digits, and ?s is symbols. The ?a means all, and it’s a combination of those four charsets. Straight and combination attacks are great, but this fine-tuned brute-force attack, coupled with the speed of a solid GPU, was how I cracked most of the passwords I encountered in my professional experience. As we discussed, human memory plays a primary role when it comes to cracking passwords. Let’s look at an example.
Let’s imagine that we want to capture as many 10-character passwords as possible with a brute-force attack. We know that the password policy requires at least one symbol, one number, and one capital letter. Though plenty of people will put the required symbol at any random position, memorable passwords are more likely to have it after a word or at the very end of the password. When it comes to numbers, there could be any number of digits – but memorable passwords will often have two or four digits to represent a meaningful year. And of course, that capital letter is likely to be the first character of the password. Knowing and assuming these things, let’s look at some possible commands:
- # hashcat -m 5600 –a 3 ntlm.txt ?u?a?a?a?a?s?d?d?d?d
- # hashcat -m 5600 –a 3 ntlm.txt ?u?a?a?a?a?d?d?d?d?s
- # hashcat –m 5600 –a 3 ntlm.txt ?u?a?a?a?a?a?a?d?d?s
All three will have an uppercase letter at the starting position. The first one will have a symbol after the word (which could be made up of letters, numbers, or symbols) followed by four digits. The second one puts the symbol after the four digits. The last one uses two digits.
Of course, these commands are only looking for passwords that are exactly 10 characters long. With the –i flag set, you enable increment mode, which will search all of the lengths up to your mask length. If you use this, keep in mind that the Status window will show you the time estimates for the current length.
Once you get your attack started, hit the s key for a status update:

Figure 4.13 – Hashcat wrapping up its attack
As a proper treatment of password cracking could be an entire book on its own, we aren’t finished with the topic here. We’ll look at raiding compromised hosts for hashes in Chapter 16, Escalating Privileges, so we’ll revisit cracking against large inputs.
Summary
In this chapter, we covered the fundamental theory behind Windows passwords and their hashed representations. We looked at both raw hashes as they’re stored in the SAM and encrypted network hashes. We then reviewed the fundamental design flaws that make Windows hashes such a lucrative target for the pen tester. The Metasploit framework was introduced for the first time to demonstrate auxiliary modules. We used the SMB listener module to capture authentication attempts from misled Windows targets on the network. We then demonstrated a type of link-local name service spoofing that can trick a target into authenticating against our machine. With the captured credentials from our demonstration, we moved on to practical password cracking with John the Ripper and Hashcat. We covered the two primary methodologies of password cracking with John and demonstrated ways to fine-tune attacks concentrating on human factors.
In the next chapter, we will move on to more sophisticated network attacks. We’ll dive into the finer details of Nmap for recon and evasion. We’ll look at routing attacks and software upgrade attacks, and we’ll cover a crash course in IPv6 from a pen tester’s perspective.
Questions
Answer the following questions to test your knowledge of this chapter.
- A null input to a hash function produces a null output. True or false?
- The ____ effect refers to the cryptographic property where a small change to the input value causes a radical change in the output value.
- What two design flaws would cause a 14-character password stored as an LM hash to be significantly easier to crack?
- Why do we need to define the server challenge when capturing Net-NTLMv1?
- What is the predecessor to LLMNR?
- Dictionary rulesets decrease the search space, whereas masks increase the brute-force search space. True or false?
- What mask would you use to find a five-character password that starts with two digits, then has a symbol, and the remaining two characters are uppercase or lowercase letters after Q (inclusive) in the alphabet?
- Jack the Ripper is the most popular password cracker. True or false?
Further reading
For more information regarding the topics that were covered in this chapter, take a look at the following resources:
- Masking syntax for John the Ripper:
https://github.com/magnumripper/JohnTheRipper/blob/bleeding-jumbo/doc/MASK
- Rules syntax for John the Ripper:
http://www.openwall.com/john/doc/RULES.shtml
- Overview of the capture auxiliary modules in Metasploit:
https://www.offensive-security.com/metasploit-unleashed/server-capture-auxiliary-modules/