
Complete XML documents
XML search results
Web services
Automatic event-based updates
Word can access external data and insert it in your XML documents. You can accomplish tasks such as looking up an address in an external XML document, importing canned text, or getting information about a ZIP code from a Web service.
This chapter will show you how to:
Access XML document sources from a file system or with a URL
Get data from Web services using a SOAP interface
We’ll also explain how to refresh external data automatically when changes are made to the document.
Skills required

Some knowledge of Visual Basic for Applications (VBA) and the Word object model. The section on Web services assumes a basic knowledge of Web services. For more information on Web services, see Chapter 19, “Web services introduction”, on page 414 and Chapter 23, “Web services technologies”, on page 484.
Worldwide Widget Corporation is known for its award-winning customer service. It responds to all customer complaints with a sincere personalized form letter. Thanks to XML, the letter is largely computer-generated.
Figure 6-1 shows how a typical letter looks when rendered by Word.
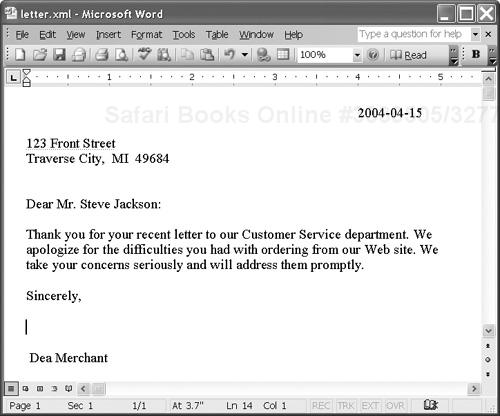
The XML representation is shown in Example 6-1 and its schema in Example 6-2.
Example 6-1. Typical customer letter (letter.xml)
<?xml version="1.0" encoding="UTF-8"?>
<customerLetter xmlns="http://xmlinoffice.com/letter">
  <date>2004-04-15</date>
  <address>
    <line>123 Front Street</line>
    <city>Traverse City</city>
    <state>Michigan</state>
    <zip>49684</zip>
  </address>
  <greeting> Dear <salutation>Mr.</salutation> <customer id=
     "C12266">Steve Jackson</customer>:</greeting>
  <body type="problem">
<p>Thank you for your recent <format>letter</format> to our
Customer Service department. We apologize for the difficulties
you had with <problem>ordering from our Web site</problem>.
We take your concerns seriously and will address them
promptly.</p>
<p>We appreciate your business and hope to retain you as a
customer.</p>
 </body>
 <footer>Sincerely,
    <emp id="E18234">Denise Dorning</emp>
 </footer>
</customerLetter>
Example 6-2. Customer letter schema (letter.xsd)
<?xml version="1.0"?>
<xs:schema targetNamespace="http://xmlinoffice.com/letter"
           xmlns="http://xmlinoffice.com/letter"
           xmlns:xs="http://www.w3.org/2001/XMLSchema"
           elementFormDefault="qualified">
 <xs:element name="letter" type="LetterType"/>
 <xs:complexType name="LetterType">
  <xs:sequence>
   <xs:element name="date" type="xs:date"/>
   <xs:element name="address" type="AddressType"/>
   <xs:element name="greeting" type="GreetingType"/>
   <xs:element name="body" type="BodyType"/>
   <xs:element name="footer" type="FooterType"/>
  </xs:sequence>
  <xs:attribute name="id" type="xs:ID"/>
  <xs:attribute name="type" type="xs:string"/>
 </xs:complexType>
 <xs:complexType name="AddressType"><xs:sequence>
   <xs:element name="line" type="xs:string" maxOccurs="unbounded"/>
   <xs:element name="city" type="xs:string"/>
   <xs:element name="state" type="xs:string"/>
   <xs:element name="zip" type="xs:string"/>
 </xs:sequence></xs:complexType>
 <xs:complexType name="GreetingType" mixed="true"><xs:sequence>
    <xs:element name="salutation" type="xs:string"/>
    <xs:element name="customer" type="IdentifiedType"/>
 </xs:sequence></xs:complexType>
 <xs:complexType name="BodyType">
  <xs:sequence>
   <xs:element name="p" type="ParaType" maxOccurs="unbounded"/>
  </xs:sequence>
  <xs:attribute name="type" type="xs:string"/>
 </xs:complexType>
 <xs:complexType name="ParaType" mixed="true">
  <xs:choice minOccurs="0" maxOccurs="unbounded">
   <xs:element name="format" type="xs:string"/>
   <xs:element name="problem" type="xs:string"/>
  </xs:choice>
 </xs:complexType>
 <xs:complexType name="FooterType" mixed="true"><xs:sequence>
   <xs:element name="emp" type="IdentifiedType"/>
 </xs:sequence></xs:complexType>
 <xs:complexType name="IdentifiedType">
  <xs:simpleContent><xs:extension base="xs:string">
   <xs:attribute name="id" type="xs:string"/>
   </xs:extension></xs:simpleContent>
  </xs:complexType>
</xs:schema>
The letter has XML elements representing the customer’s name and address, the nature of the problem, the name of the employee who generated the letter, and so on. Because of the self-describing markup, these data elements can easily be manipulated, validated or completed from an external data source.
For example, Worldwide’s system automatically fills in a customer’s address based on its name, imports canned text from an external document, and automatically fills in the city and state based on the ZIP code.
Note from Example 6-1 that the body element has a type attribute:
<body type="problem">
The plan is that the letter reply system will eventually support a variety of body types. For each type there would be a separate XML file with appropriate canned text.
For now there is just the XML document shown in Example 6-3, which is to be included in every customer “problem” letter. It contains a paragraph to be embedded directly in the body of the letter, with placeholder text for the format and problem elements to be replaced by the human sending the letter.
Example 6-3. Canned letter paragraph (problem_para.xml)
<?xml version="1.0" encoding="UTF-8" standalone="yes"?>
<p xmlns="http://xmlinoffice.com/letter">Thank you for your recent
<format>ENTER FORMAT</format> to our Customer Service department.
We apologize for the difficulties you had with <problem>ENTER
PROBLEM</problem>. We take your concerns seriously and will
address them promptly.</p>
You can set up your Word document so that when a body element is inserted, it is automatically populated with the contents of the problem_para.xml document. The VBA function shown in Example 6-4 accomplishes this.[1]
Example 6-4. Function to automatically insert external XML document
Private Sub Document_XMLAfterInsert(ByVal NewXMLNode
As XMLNode, ByVal InUndoRedo As Boolean)
    If NewXMLNode Is Nothing Then
        'do nothing
    ElseIf NewXMLNode.BaseName = "body" Then
        Dim theRange As Word.Range
        Set theRange = NewXMLNode.Range
        theRange.InsertFile "C:problem_para.xml"
    End If

End Sub
This function is automatically executed in response to the event XMLAfterInsert, which occurs every time an XML element is added to the letter document. On line 5 it checks whether the newly inserted element is of type body. If so, it creates a range variable theRange and assigns it the range of the newly inserted body element. It then inserts the contents of problem_para.xml into the range. (In the future, it will test the value of the type attribute to determine which external XML document to insert.)
A working version of this code can be found in the example file letter insert.doc.
Tip
The inserted canned text need not be an XML document in a file system. It could also be returned from a URL reference. For example, Worldwide Widget has a customer information application that returns a customer’s address from, for example: http://xmlinoffice.com/customerlookup?id=123456. The returned XML can be inserted exactly as if it was a local file. The important thing is the XML; any means of addressing it will work the same way.
On the other hand, suppose you do not want to insert an entire XML document, but want to look up a value in an external XML document. For example, you might have some customer names and addresses stored in an XML document that looks like the one in Example 6-5.
Example 6-5. External customer address file (customers.xml)
<?xml version="1.0" encoding="UTF-8"?>
<customers>
  <customer>
    <name>Steve Jackson</name>
    <salutation>Mr.</salutation>
    <address>123 Front Street</address>
    <city>Traverse City</city>
    <state>Michigan</state>
    <zip>49684</zip>
 </customer>
  <customer>
    <name>Brenda Smith</name>
    <salutation>Ms.</salutation>
    <address>5 Wilson Boulevard</address>
    <city>Arlington</city>
    <state>Virginia</state>
    <zip>22203</zip>
 </customer>
 <!-- etc. -->
</customers>
When a document author enters the customer name in the customer element, the document should automatically look up the customer’s address in the customers.xml file and complete it in the letter. The function shown in Example 6-6 will do this.
Example 6-6. Function to automatically update address based on customer name
Sub GetAddress()

    Const xmlnsLetter = "xmlns:let='http://xmlinoffice.com/letter'"
    Dim str_customer, str_line, str_city, str_state, str_zip
      As String
    Dim cust_node, line_node, city_node, state_node, zip_node
      As XMLNode

    Set line_node =
      ActiveDocument.SelectSingleNode("//let:line", xmlnsLetter)
    Set city_node =
      ActiveDocument.SelectSingleNode("//let:city", xmlnsLetter)
    Set state_node =
      ActiveDocument.SelectSingleNode("//let:state", xmlnsLetter)
    Set zip_node =
      ActiveDocument.SelectSingleNode("//let:zip", xmlnsLetter)

    'Open the customers document
    Dim custXML As MSXML2.DOMDocument50
    Set custXML = New MSXML2.DOMDocument50
    custXML.async = False
    custXML.Load ("c:customers.xml")

    'Find the appropriate customer element
    str_customer = ActiveDocument.
      SelectSingleNode("//let:customer", xmlnsLetter).Text
    Set cust_node = custXML.
      SelectSingleNode("//customer[name='" & str_customer & "']")

    'Assign values from customer.xml to letter.xml
    If cust_node Is Nothing Then
        MsgBox ("Invalid customer name " + str_customer)
        line_node.Text = "UNKNOWN"
        city_node.Text = "UNKNOWN"
        state_node.Text = "UNKNOWN"
        zip_node.Text = "UNKNOWN"
    Else
        line_node.Text = cust_node.SelectSingleNode("address").Text
        city_node.Text = cust_node.SelectSingleNode("city").Text
        state_node.Text = cust_node.SelectSingleNode("state").Text
        zip_node.Text = cust_node.SelectSingleNode("zip").Text
    End If

End Sub
Lines 9 through 16 assign the relevant nodes of the letter document to variables.
Lines 19 through 22 then access the
customers.xmldocument and assign it to the variablecustXML.Lines 25 to 28 retrieve the customer name from the letter document and attempt to find a match in the customer document.
If the customer node is found, lines 38 through 41 assign the selected values to the relevant nodes in the letter document.
This function assumes that the line, city, state and zip elements already exist in the document. A more sophisticated function could be written to check for their existence and insert them if necessary.
Rather than requiring the user to take some action to update the address, perhaps you want this function to be executed every time the user changes the customer name. To do this, you need to write a function that responds to the XMLSelectionChange event, which occurs every time the user changes the selection to a different element.
The desired function is shown in Example 6-7. It determines whether the changed XML is the content of the customer element and, if so, it calls the GetAddress function.
Example 6-7. Responding to the XMLSelectionChange event
Dim WithEvents oApp As Word.Application
Private Sub Document_Open()
    Set oApp = Application
End Sub
Private Sub oApp_XMLSelectionChange
  (ByVal Sel As Word.Selection,
   ByVal OldXMLNode As Word.XMLNode,
   ByVal NewXMLNode As Word.XMLNode,
   Reason As Long)

    If OldXMLNode Is Nothing Then
        'do nothing
    ElseIf OldXMLNode.BaseName = "customer" Then
        GetAddress
    End If

End Sub
A working version of this code can be found in the example file letter query.doc.
In this section, we will see how the letter document utilizes a Web service that, given a U.S. ZIP code, returns the city and state. To do this, we will make use of a separate toolkit provided by Microsoft for dealing with the SOAP interface.
First, let’s take a look at the Web service we will be using for this example. This Web service has several operations related to United States ZIP codes. The one we are going to use is called GetInfoByZIP. Given a ZIP code, this operation returns the city, state, area code and time zone.
The WSDL description of this Web service can be found at: http://www.webservicex.net/uszip.asmx?WSDL
Within the WSDL document, we can see the operation we want. It is shown in Example 6-8.
Example 6-8. WSDL description of a Web service operation
<operation name="GetInfoByZIP">
  <documentation>Get State Code, City, Area Code, Time Zone,
Zip Code by Zip Code</documentation>
  <input message="s0:GetInfoByZIPSoapIn" />
  <output message="s0:GetInfoByZIPSoapOut" />
</operation>
The operation definition references the input and output messages that are shown in Example 6-9.
Example 6-9. Web service input and output messages
<message name="GetInfoByZIPSoapIn">
  <part name="parameters" element="s0:GetInfoByZIP" />
</message>
<message name="GetInfoByZIPSoapOut">
  <part name="parameters" element="s0:GetInfoByZIPResponse" />
</message>
The input and output messages, in turn, refer to the types of element that are sent to and returned from the Web service. An excerpt from the schema definition that declares them is shown in Example 6-10.
Example 6-10. Declarations of message element types
<s:element name="GetInfoByZIP">
  <s:complexType>
    <s:sequence>
      <s:element minOccurs="0" maxOccurs="1"
                 name="USZip" type="s:string" />
    </s:sequence>
  </s:complexType>
</s:element>
<s:element name="GetInfoByZIPResponse">
  <s:complexType>
    <s:sequence>
      <s:element minOccurs="0" maxOccurs="1"
                 name="GetInfoByZIPResult">
        <s:complexType mixed="true">
          <s:sequence>
            <s:any />
          </s:sequence>
        </s:complexType>
      </s:element>
    </s:sequence>
  </s:complexType>
</s:element>
According to the schema for the input message, the operation expects to receive a GetInfoByZIP element, which in turn contains a USZip element that contains a string: the ZIP code.
The structure of the output message is unknown, since the schema for the output message does not constrain the content of the GetInfoByZIPResult element. However, by running a test we find that the output looks like Example 6-11.
Example 6-11. XML document returned by ZIP code Web service
<ws:GetInfoByZIPResponse xmlns:ws="http://www.webserviceX.NET">
  <ws:GetInfoByZIPResult>
    <NewDataSet>
      <Table>
        <CITY>Traverse City</CITY>
        <STATE>MI</STATE>
        <ZIP>49684</ZIP>
        <AREA_CODE>616</AREA_CODE>
        <TIME_ZONE>E</TIME_ZONE>
      </Table>
    </NewDataSet>
  </ws:GetInfoByZIPResult>
</ws:GetInfoByZIPResponse>
Both the input and output messages are contained in SOAP wrappers when transmitted. Parsing and generating SOAP is best left to specialized software, which is available for the Office products.
To simplify the use of SOAP Web services with Office, Microsoft provides a separate, downloadable toolkit. The Office Web Services Toolkit frees the developer from generating and parsing SOAP messages, and even from constructing the XML fragments that contain the data sent to and received from the Web service.
For each service, the toolkit generates a class (or classes) that has a method for each of the service’s operations. Application code can then be written to access these simplified classes.
At the time of writing, the current version of the toolkit is called Office XP Web Services Toolkit 2.0. It can be downloaded from http://msdn.microsoft.com/library/default.asp?url=/library/en-us/dnxpwst/html/odc_wstoolkitoverview.asp.[2]
The toolkit contains documentation and examples, and a tool called the Web Services Reference Tool that is integrated with the Visual Basic Editor.[3]
The Web Services Reference Tool allows you to generate classes that you can use to access a particular Web service. You can search for a Web service based on keywords, or specify a Web service by its URL.
To launch the Web Services Reference Tool, first open the document from which you will be calling the Web service. To use our form letter example:
Open the document
letter.xml.On the Tools menu, point to Macro, then click Visual Basic Editor. This will open the Visual Basic Editor.
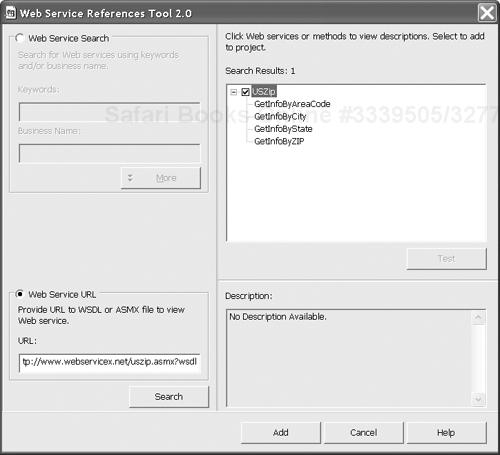
Launch the Web Services Reference Tool by clicking Web Services References on the Tools menu. This brings up the main dialog shown in Figure 6-2.
In our case, we already know the particular Web service we want to use, so we can go directly to it. Click Web Service URL on the left side of the dialog.
Type the Web service location
http://www.webservicex.net/uszip.asmx?WSDLinto the URL box and click Search.This will bring up the name of the Web service and its operations on the right side of the dialog, as shown in Figure 6-3.
Select the
USZipservice by checking the box next to it and click Add. This will generate the necessary class in the Visual Basic Editor.

The generated class named clsws_USZip represents the Web service. It has a method called wsm_GetInfoByZIP, which corresponds to the GetInfoByZIP operation of the Web service. You can write a GetCityState method that calls the wsm_GetInfoByZIP method, as shown in Example 6-12.
Example 6-12. GetCityState method
Sub GetCityState()

Const xmlnsLetter =
  "xmlns:let='http://xmlinoffice.com/letter'"
Dim objResolver As clsws_USZip
Set objResolver = New clsws_USZip
Dim returnedNodes As MSXML2.IXMLDOMNodeList
Dim str_city As String
Dim str_state As String
Dim city_node As XMLNode
Dim state_node As XMLNode
Dim zip_node As XMLNode

Set city_node =
  ActiveDocument.SelectSingleNode("//let:city", xmlnsLetter)
Set state_node =
  ActiveDocument.SelectSingleNode("//let:state", xmlnsLetter)
Set zip_node =
  ActiveDocument.SelectSingleNode("//let:zip", xmlnsLetter)

Set returnedNodes = objResolver.wsm_GetInfoByZIP(zip_node.Text)

str_city = returnedNodes.Item(0).SelectSingleNode("//CITY").Text
str_state = returnedNodes.Item(0).SelectSingleNode("//STATE").Text
city_node.Text = str_city
state_node.Text = str_state

End Sub
Lines 3 through 12 define all the constants and variables used.
Lines 14 through 19 locate the city, state and ZIP nodes in our letter document, which are relevant to the Web service.
Line 21 calls the
wsm_GetInfoByZIPmethod, passing it the ZIP code. Rather than returning the whole SOAP message that contains the document shown in Example 6-11, the method extracts the relevant returned data, namely theNewDataSetelement. This is represented as a variable calledreturnedNodes, which is a list of nodes of typeIXMLDOMNodeList.Lines 23 and 24 assign the values of the
CITYandSTATEelements to two string variables.Lines 25 and 26 then assign these string values to the appropriate nodes in our letter document.
Warning
The Office Web Services toolkit is very useful for simple examples like this one. It has a number of limitations that prevent it from working without modifications on all Web services. For example, it can’t handle element-type names that are also Visual Basic reserved words, and it doesn’t support extensions in the XML Schema types defined in the WSDL. However, it can generate a starting point, which you can tweak for your Web service.
In 6.1.3, “Responding to an event”, on page 121 we saw how external data could be updated automatically when a corresponding field in the document was changed. The technique works the same way when the external data is provided by a Web service.
In fact, you can use the same code as we did in Example 6-15. The only difference is that you would replace:
with:
If you wanted automatic updates for both situations, you could use both tests at once, as shown in Example 6-15.
Example 6-15. Responding to two kinds of XMLSelectionChange event
Dim WithEvents oApp As Word.Application
Private Sub Document_Open()
Set oApp = Application
End Sub
Private Sub oApp_XMLSelectionChange
(ByVal Sel As Word.Selection,
ByVal OldXMLNode As Word.XMLNode,
ByVal NewXMLNode As Word.XMLNode,
Reason As Long)
If OldXMLNode Is Nothing Then
'do nothing
ElseIf OldXMLNode.baseName = "customer" Then
GetAddress
ElseIf OldXMLNode.BaseName = "zip" Then
    GetCityState
End If
End Sub
After saving this project and closing and reopening the letter.xml document, you will find that every time you change the ZIP code, the city and state will automatically be updated. Similarly, every time you change the customer its address will be updated.
[1] All of the examples in this chapter are written in Visual Basic for Applications (VBA).
[2] Although the name of the toolkit implies that it is only for Office XP, it also works with Office 2003 and its name may be changed to reflect this fact.
[3] Installation of the toolkit is in two parts. You must first install the toolkit itself, from the downloaded compressed file. The Web Services Reference Tool is then installed separately from the setup.exe executable file in the directory where you installed the toolkit.