Chapter 12: Advanced Zabbix Database Management
Whether you've been using Zabbix for a while or you are looking toward setting up your first production instance, database management is important right from the start. A lot of the time, people set up their Zabbix database and don't know yet that it will be a big database. The Zabbix housekeeper just can't keep up when your database grows beyond a certain size and that's where we need to look toward different options.
In this chapter, we'll look into keeping our Zabbix database from using up 100% disk space when the Zabbix housekeeper is not keeping up. For MySQL users, we'll look into using database partitioning to keep our database in check. For PostgreSQL users, we'll look toward the brand-new TimescaleDB support. Last but not least, we'll also check out how to secure our connection between the Zabbix server and database.
We'll do all this in the following recipes:
- Setting up MySQL partitioning for your Zabbix database
- Using the PostgreSQL TimescaleDB functionality
- Securing your Zabbix MySQL database
Without further ado, let's get started on these recipes and learn all about managing our database.
Technical requirements
We are going to need some new servers for these recipes. One Linux server needs to run Zabbix server 6 with MySQL (MariaDB) set up; we'll call this host lar-book-mysql- mgmt. We will also need a Linux server running Zabbix server 6 with PostgreSQL, which we'll call lar-book-postgresql-mgmt.
We'll also need two servers for creating a secure Zabbix database setup. One server will be running the MySQL (MariaDB) database; let's call this server lar-book-secure-db. Then, connecting externally to a Zabbix database, we'll have our Zabbix server, which we'll call lar-book-secure-zbx.
The code files can also be accessed from the GitHub repository here:
Setting up MySQL partitioning for your Zabbix database
When working with a MySQL database, the biggest issue we face is how MySQL stores its data by default. There is no real order to the data that we can use if we want to drop large chunks of data. MySQL partitioning solves this issue; let's see how we can configure it to use for our Zabbix database.
Important Note
Here at Opensource ICT Solutions, we have fixed the script to work with MySQL 8. The script should work for any MySQL setup once more. Check out the link for more information: https://github.com/OpensourceICTSolutions/zabbix-mysql-partitioning-perl.
Getting ready
For this recipe, we are going to need a running Zabbix server with a MySQL database. I'll be using MariaDB in my example, but any MySQL flavor should be the same. The Linux host I'll be using is called lar-book-mysql-mgmt, which already meets the requirements.
If you are running these steps in a production environment, make sure to create your database backups first as things can always go wrong.
How to do it…
- First things first, let's log in to our Linux CLI to execute our commands.
- It's a good idea to use TMUX because partitioning can take several days for big databases. If TMUX is not installed, install it first before proceeding.
The RHEL-based command is as follows:
dnf install tmux
The Ubuntu command is as follows:
apt install tmux
- Open a new tmux session by issuing the following command:
tmux
Important Note
It's not required to run partitioning in a tmux window, but definitely smart. Partitioning a big database can take a long time. You could move your database to another machine with ample resources (CPU, memory, disk speed) to partition, or if that's not a possibility stop the Zabbix server process for the duration of the partitioning process.
- Now, let's log in to the MySQL application as the root user with the following command:
mysql -u root -p
- Now, move to use the Zabbix database with the following command:
USE zabbix;
- We are going to need to partition some tables here, but to do this, we need to know the UNIX timestamp on our tables:
SELECT FROM_UNIXTIME(MIN(clock)) FROM 'history';
You will receive an output like this:

Figure 12.1 – MySQL returning a timestamp on the table history
- This timestamp should be about the same for every single table we are going to partition. Verify this by running the same query for the remaining history tables:
SELECT FROM_UNIXTIME(MIN(clock)) FROM 'history';
SELECT FROM_UNIXTIME(MIN(clock)) FROM 'history_uint';
SELECT FROM_UNIXTIME(MIN(clock)) FROM 'history_str';
SELECT FROM_UNIXTIME(MIN(clock)) FROM 'history_text';
SELECT FROM_UNIXTIME(MIN(clock)) FROM 'history_log';
- A table might return a different value or even no value at all. We need to take this into account when creating our partitions. A partition showing NULL has no data, but an earlier date means we need an earlier partition:

Figure 12.2 – MySQL returning a timestamp on the history_log table
- Let's start with the history table. We are going to partition this table by day, and we are going to do this up until the date it is today; for me, it is 11-11-2020. Let's prepare the following MySQL query (for example, in a notepad):
ALTER TABLE 'history' PARTITION BY RANGE ( clock)
(PARTITION p2020_11_05 VALUES LESS THAN (UNIX_TIMESTAMP("2020-11-06 00:00:00")) ENGINE = InnoDB,
PARTITION p2020_11_06 VALUES LESS THAN (UNIX_TIMESTAMP("2020-11-07 00:00:00")) ENGINE = InnoDB,
PARTITION p2020_11_07 VALUES LESS THAN (UNIX_TIMESTAMP("2020-11-08 00:00:00")) ENGINE = InnoDB,
PARTITION p2020_11_08 VALUES LESS THAN (UNIX_TIMESTAMP("2020-11-09 00:00:00")) ENGINE = InnoDB,
PARTITION p2020_11_09 VALUES LESS THAN (UNIX_TIMESTAMP("2020-11-10 00:00:00")) ENGINE = InnoDB,
PARTITION p2020_11_10 VALUES LESS THAN (UNIX_TIMESTAMP("2020-11-11 00:00:00")) ENGINE = InnoDB,
PARTITION p2020_11_11 VALUES LESS THAN (UNIX_TIMESTAMP("2020-11-12 00:00:00")) ENGINE = InnoDB);
Tip
If we only have 7 days of history data, creating this list by hand is not that hard. If we want to do it on a big existing database, it can be a big list to edit by hand. It's easy to create a big list using software like Excel or by creating a small script.
- Make sure that the oldest partition here matches the timestamp we collected in Step 9. In my case, the oldest data was from November 5, so this is my oldest partition. Also, make sure that your newest partition matches the date you are partitioning on.
- Copy and paste the prepared MySQL query from Step 9 and press Enter. This might take a while, as your table might be quite large. After you're done, you will see the following:

Figure 12.3 – MySQL returning a successful query result for the history table
- Do the same partitioning for the remaining history tables; make sure to use the other UNIX timestamps for the earliest partition:
- history_uint
- history_str
- history_text
- history_log
- Once you've partitioned all the history tables, let's partition the trends tables. We have two of these called trends and trends_uint.
- We are going to check the timestamps again with the following:
SELECT FROM_UNIXTIME(MIN(clock)) FROM 'trends';
SELECT FROM_UNIXTIME(MIN(clock)) FROM 'trends_uint';
- For these tables, it's important to focus on what the earliest month is. For my tables, this is month 11 of the year 2020.
- Now, let's prepare and execute the partitioning for this table. Let's do three extra partitions starting from the earliest date seen in the timestamp at Step 14:
ALTER TABLE 'trends' PARTITION BY RANGE ( clock)
(PARTITION p2020_11 VALUES LESS THAN (UNIX_TIMESTAMP("2020-12-01 00:00:00")) ENGINE = InnoDB,
PARTITION p2020_12 VALUES LESS THAN (UNIX_TIMESTAMP("2021-01-01 00:00:00")) ENGINE = InnoDB,
PARTITION p2021_01 VALUES LESS THAN (UNIX_TIMESTAMP("2021-02-01 00:00:00")) ENGINE = InnoDB);
- Again, we partition from the earliest collected UNIX timestamp, up until the current month. But there's no harm in creating some new partitions for future data:

Figure 12.4 – MySQL returning a successful query result for the trends table
- Do the same thing for the trends_uint table.
- That concludes the actual partitioning of the database. Let's make sure our partitions remain managed. On your Linux host, download the partitioning script with the following command:
wget https://raw.githubusercontent.com/OpensourceICTSolutions/zabbix-mysql-partitioning-perl/main/mysql_zbx_part.pl
- If you can't use wget, simply download the script from the following link: https://github.com/OpensourceICTSolutions/zabbix-mysql-partitioning-perl/blob/main/mysql_zbx_part.pl.
Alternatively, you can download the partitioning script using the Packt GitHub here:
- Now, create the directory and move the script to the /usr/lib/zabbix/ folder with the following command:
mkdir /usr/lib/zabbix/
mv mysql_zbx_part.pl /usr/lib/zabbix/
- We are going to customize some details in the script. Edit the script with the following:
vim /usr/lib/zabbix/mysql_zbx_part.pl
We need to edit some text at the following part:

Figure 12.5 – MySQL Zabbix partitioning script user parameters
- Edit $db_schema to match your Zabbix database name.
- Edit $db_user_name to match your Zabbix database username.
- Edit $db_password to match your Zabbix database password.
- Now, at the $tables variable, we are going to add some of the most important details. This is where we'll add how many days of history data we want to keep and how many months of trends data. Add your values; the default settings keep 30 days of history data and 12 months of trends data.
- Also, make sure to edit the my $curr_tz = 'Europe/Amsterdam'; line to match your own time zone.
Tip
If you are using a version of Zabbix before 2.2 or a MySQL version before 5.6 or if you are running MySQL 8, then there are some extra lines of configuration that need to be commented and uncommented in the script. If this applies to you, read the comments in the mysql_zbx_part.pl script file and edit it. Additionally, check out the GitHub repo mentioned in the introduction of this recipe.
- Before executing the script, we are going to need to install some Perl dependencies. On RHEL 8, we will need the PowerTools repo. Install the dependencies with the following.
The RHEL-based commands are as follows:
dnf config-manager --set-enabled PowerTools
dnf update
dnf install perl-Sys-Syslog
dnf install perl-DateTime
The Ubuntu commands are as follows:
apt install liblogger-syslog-perl
apt install libdatetime-perl
- Make the script executable with the following command:
chmod +x /usr/lib/zabbix/mysql_zbx_part.pl
- Then, this is the moment where we should be ready to execute the script to see whether it is working. Let's execute it:
/usr/lib/zabbix/mysql_zbx_part.pl
- Once your script has finished running, let's see whether it was successful with the following command:
journalctl -t mysql_zbx_part
- You should see an output like this:

Figure 12.6 – MySQL Zabbix partitioning script results
- Now, execute the following command:
crontab -e
- To automate the execution of the script, add the following line to the file:
0 0 * * * /usr/lib/zabbix/mysql_zbx_part.pl
- The last thing we are going to need to do is to go to the Zabbix frontend. Navigate to Administration | General.
- Now, use the drop-down menu to go to Housekeeping:

Figure 12.7 – Zabbix Administration | General drop-down menu, Housekeeping option
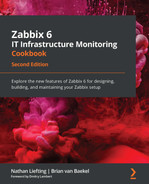
- As the script will take over database History and Trend deletion, the housekeeping for the History and Trends tables must be disabled. It will look like the following:
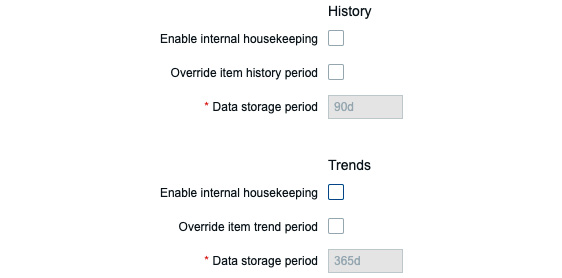
Figure 12.8 – Zabbix Administration | General | Housekeeping disabled for History and Trends
That concludes our Zabbix database partitioning setup.
How it works…
Database partitioning seems like a daring task at first, but once you break it down into chunks, it is not that hard to do. It is simply the process of breaking down our most important Zabbix database tables into time-based partitions. Once these partitions are set up, we simply need to manage these tables with a script and we're ready.
Look at the following figure and let's say today is 07-11-2020. We have a lot of partitions managed by the script. All of our History data today is going to be written to the partition for this day and all of our Trends data is going to be written into the partition for this month:

Figure 12.9 – Zabbix partitioning illustration
The actual script does only two things. It creates new partitions and it deletes old partitions.
For deleting partitions, once a partition reaches an age older than specified in the $tables variable, it drops the entire partition.
For creating partitions, every time the script is run, it creates 10 partitions in the future starting from today. Except of course when a partition already exists.
This is better than using the housekeeper for one clear reason. It's simply faster! The Zabbix housekeeper goes through our database data line by line to check the UNIX timestamp and then it deletes that line when it reaches data older than specified. This takes time and resources. Dropping a partition, though, is almost instant.
One downside of partitioning a Zabbix database, though, is that we can no longer use the frontend item history and trend configuration. This means we can't specify different history and trends for different items; it's all global now.
See also
When I first started using Zabbix, I did not have a book like this one. Instead, I relied heavily on the resources available online and my own skillset. There are loads of great guides for partitioning and other stuff available on the internet. If something isn't mentioned in this book, make sure to Google it and see if there's something available online. You might also want to check out some amazing books written by our Zabbix peers, and of course, if you've figured out something by yourself, sharing is caring!
Using the PostgreSQL TimescaleDB functionality
TimescaleDB is an open source relational PostgreSQL database extension for time-based series data. Using PostgreSQL TimescaleDB is a solid way to work around using the Zabbix housekeeper to manage your PostgreSQL database. In this recipe, we will go over the installation of PostgreSQL TimescaleDB on a new server and how to set it up with Zabbix.
Getting ready
We will need an empty Linux server. I'll be using my server called lar-book- postgresql-mgmt.
How to do it…
We have a bit of a different process for RHEL-based and Ubuntu systems, which is why we have split this How to do it… section in two. We will start with Ubuntu systems.
Ubuntu installation
- Let's log in to our Linux CLI and add the PostgreSQL repo with the following commands:
echo "deb http://apt.postgresql.org/pub/repos/apt/ $(lsb_release -c -s)-pgdg main" | tee /etc/apt/sources.list.d/pgdg.list
wget --quiet -O -https://www.postgresql.org/media/keys/ ACCC4CF8.asc | apt-key add -
apt update
- Now, add the TimescaleDB repository:
add-apt-repository ppa:timescale/timescaledb-ppa
apt update
- Now, install TimescaleDB with the installation command:
apt install timescaledb-postgresql
- Start and enable PostgreSQL 12:
systemctl enable postgresql
systemctl start postgresql
- Now, continue with the TimescaleDB configuration section of this recipe.
RHEL-based installation
- Let's start by logging in to our Linux CLI. We will need PostgreSQL version 11 or higher. Let's install version 12; first, disable AppStream:
dnf -qy module disable postgresql
- Add the correct repository:
dnf install https://download.postgresql.org/pub/repos/yum/reporpms/EL-8-x86_64/pgdg-redhat-repo-latest.noarch.rpm
- Then, install PostgreSQL:
dnf install postgresql13 postgresql13-server
- Make sure to initialize the database:
/usr/pgsql-13/bin/postgresql-13-setup initdb
- Now, edit the following file:
vim /etc/yum.repos.d/timescale_timescaledb.repo
- Add the repo information to the file and save it:
[timescale_timescaledb]
name=timescale_timescaledb
baseurl=https://packagecloud.io/timescale/timescaledb/el/7/$basearch
repo_gpgcheck=1
gpgcheck=0
enabled=1
gpgkey=https://packagecloud.io/timescale/timescaledb/gpgkey
sslverify=1
sslcacert=/etc/pki/tls/certs/ca-bundle.crt
metadata_expire=300
- Install TimescaleDB with the installation command:
dnf install timescaledb-postgresql-12
- Now, continue with the TimescaleDB configuration section of this recipe.
TimescaleDB configuration
In this section, we'll go over how to set up TimescaleDB after finishing the installation process. There's a lot more to configure, so let's check it out:
- Let's start by running the following command:
timescaledb-tune
- Sometimes this does not work, and you want to specify the PostgreSQL location like this:
timescaledb-tune --pg-config=/usr/pgsql-12/bin/pg_config
- Go through the steps and answer the questions with yes or no accordingly. For a first-time setup, yes on everything is good.
- Now, restart PostgreSQL:
systemctl restart postgresql
- If you haven't already, download and install Zabbix with the following. The RHEL-based commands are as follows:
rpm -Uvh https://repo.zabbix.com/zabbix/6.0/rhel/8/ x86_64/zabbix-release-6.0-1.el8.noarch.rpm
dnf clean all
dnf install zabbix-server-pgsql zabbix-web-pgsql zabbix-apache-conf zabbix-agent2
The Ubuntu commands are as follows:
wget https://repo.zabbix.com/zabbix/6.0/ubuntu/pool/main/z/zabbix-release/zabbix-release_6.0-1+ubuntu20.04_all.deb
dpkg -i zabbix-release_6.0-1+ubuntu20.04_all.deb
apt update
apt install zabbix-server-pgsql zabbix-frontend-phpphp-pgsql zabbix-apache-conf zabbix-agent
- Create the initial database with the following:
sudo -u postgres createuser --pwprompt zabbix
sudo -u postgres createdb -O zabbix zabbix
- Import the database schema for PostgreSQL:
zcat /usr/share/doc/zabbix-server-pgsql*/create.sql.gz | sudo -u zabbix psql zabbix
- Add the database password to the Zabbix configuration file by editing it:
vim /etc/zabbix/zabbix_server.conf
- Add the following lines, where password is your password as set in Step 6 and DBHost is empty:
DBHost=
DBPassword=password
- Now, enable the TimescaleDB extension with the following command:
echo "CREATE EXTENSION IF NOT EXISTS timescaledb CASCADE;" | sudo -u postgres psql zabbix
- Unpack the timescale.sql script located in your Zabbix share folder:
gunzip /usr/share/doc/zabbix-sql-scripts/postgresql/timescaledb.sql.gz
- Now, let's run timescale.sql:
cat /usr/share/doc/zabbix-sql-scripts/postgresql/timescaledb.sql| sudo -u zabbix psql zabbix
- One more thing before moving to the frontend. We need to edit the pg_hba.conf file to allow our Zabbix frontend to connect. Edit the following file:
vim /var/lib/pgsql/12/data/pg_hba.conf
- Make sure the following lines match in your file; they need to end with md5:
# "local" is for Unix domain socket connections only
local all all
md5
# IPv4 local connections:
host all all 127.0.0.1/32
md5
# IPv6 local connections:
host all all ::1/128
md5
- Now, start Zabbix and finish the frontend setup using the following commands:
On RHEL-based systems:
systemctl restart zabbix-server zabbix-agent2 httpd php-fpm
systemctl enable zabbix-server zabbix-agent2 httpd php-fpm
On Ubuntu systems:
systemctl restart zabbix-server zabbix-agent2 apache2 php-fpm
systemctl enable zabbix-server zabbix-agent2 apache2 php-fpm
- Once we navigate to the frontend and we've logged in to our setup, navigate to Administration | General. Use the drop-down menu to select Housekeeping.
- We can now edit the following parameters to match our preferences and TimescaleDB will take care of maintaining the data retention period:
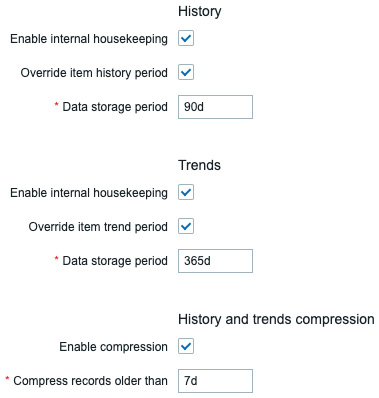
Figure 12.10 – Zabbix Administration | General | Housekeeping, TimescaleDB-specific options
How it works…
Using the TimescaleDB functionality with your Zabbix setup is a solid integration with your PostgreSQL database. The extension is supported by Zabbix and you can expect it to only get better in the near future.
Now, how TimescaleDB works is by dividing up your PostgreSQL hypertable into time-based chunks. If we look at the following figure, we can see how that looks:

Figure 12.11 – TimescaleDB hypertable chunks diagram
These time-based chunks are a lot faster to drop from the database than using the Zabbix housekeeper. The Zabbix housekeeper goes through our database data line by line to check the UNIX timestamp and then it drops the line when it reaches data older than specified. This takes time and resources. Dropping a chunk though is almost instant.
Another great thing about using TimescaleDB with a Zabbix database is that we can still use the frontend item history and trend configuration. On top of that, TimescaleDB can compress our data, to keep databases smaller.
The downside is that we can't specify different history and trends for different items; it's all global now.
See also
This recipe details the installation of PostgreSQL TimescaleDB. As this process is constantly changing, you might need to include some new information from the official TimescaleDB documentation. Check out their documentation here:
https://docs.timescale.com/latest/getting-started/installation/rhel-centos/installation-yum
Securing your Zabbix MySQL database
Another great added feature for the Zabbix server is the ability to encrypt data between the database and Zabbix components. This is particularly useful when you are running a split database and the Zabbix server over the network. A Man in the Middle (MITM) or other attacks can be executed on the network to gain access to your monitoring data.
In this recipe, we'll set up MySQL encryption between Zabbix components and the database to add another layer of security.
Getting ready
We are going to need a Zabbix setup that uses an external database. I'll be using the Linux lar-book-secure-db and lar-book-secure-zbx hosts.
The new server called lar-book-secure-zbx will be used to connect externally to the lar-book-secure-db database server. The database servers won't run our Zabbix server; this process will run on lar-book-secure-zbx.
Make sure that MariaDB is already installed on the lar-book-secure-db host and that you are running a recent supported version that is able to use encryption. If you don't know how to upgrade your database, check out, in Chapter 11, Maintaining Your Zabbix Setup, the recipe named Upgrading Zabbix database from older MariaDB versions to MariaDB 10.5, or check the documentation online.
How to do it…
- Make sure your host files on both hosts from the Getting ready section contain the hostname and IP for your Linux hosts and edit the file with the following:
vim /etc/hosts
- Then, fill in the file with your hostnames and IPs. It will look like this:
10.16.16.170 lar-book-secure-db
10.16.16.171 lar-book-secure-zbx
- On the lar-book-secure-db MySQL server, if you haven't already, create the Zabbix database by logging in to MySQL:
mysql -u root -p
- Then, issue the following command to create the database:
create database zabbix character set utf8mb4 collate utf8mb4_ bin;
- Also, make sure to create a user that will be able to access the database securely. Make sure the IP matches the IP from the Zabbix server (and one for the Zabbix frontend if separated):
create user 'zabbix'@'10.16.16.171' identified BY 'password';
grant all privileges on zabbix.* to 'zabbix'@'10.16.16.171';
flush privileges;
- Quit MySQL and then make sure to run the secure mysql script with the following:
mariadb_secure_installation
- Log in to lar-book-secure-zbx and install the Zabbix server repo with the following command:
rpm -Uvh https://repo.zabbix.com/zabbix/6.0/rhel/8/x86_64/zabbix-release-6.0-1.el8.noarch.rpm
dnf clean all
- Let's add the MariaDB repository on our server:
wget https://downloads.mariadb.com/MariaDB/mariadb_repo_setup
chmod +x mariadb_repo_setup
./mariadb_repo_setup
- Then, install the Zabbix server and its required components. Use the following RHEL-based command:
dnf install zabbix-server-mysql zabbix-web-mysql zabbix-apache-conf zabbix-agent2 zabbix-sql-scripts mariadb-client
Use the following Ubuntu command:
apt install zabbix-server-mysql zabbix-frontend-php zabbix-apache-conf zabbix-agent2 mariadb-client
- From the Zabbix server, connect to the remote database server and import the database schema and default data with the following command:
zcat /usr/share/doc/zabbix-sql-scripts/mysql/server.sql.gz | mysql -h 10.16.16.170 -uzabbix -p zabbix
- Now we are going to open the file called openssl.cnf and edit it by issuing the following command:
vim /etc/pki/tls/openssl.cnf
- In this file, we need to edit the following lines:
countryName_default = XX
stateOrProvinceName_default = Default Province
localityName_default = Default City
0.organizationName_default = Default Company Ltd
organizationalUnitName_default.=
- It will look like this filled out completely:

Figure 12.12 – OpenSSL config file with our personal defaults
- We can also see this line:
dir = /etc/pki/CA # Where everything is kept
- This means the default directory is /etc/pki/CA; if yours is different, act accordingly. Close the file by saving and continue.
- Let's create a new folder for our private certificates using the following command:
mkdir -p /etc/pki/CA/private
- Now, let's create our key pair in the new folder. Issue the following command:
openssl req -new -x509 -keyout /etc/pki/CA/private/cakey.pem -out /etc/pki/CA/cacert.pem -days 3650 -newkey rsa:4096
- You will be prompted for a password now:

Figure 12.13 – Certificate generation response asking for a password
- You might also be promoted to enter some information about your company. It will use the default we filled in earlier, so you can just press Enter up until Common Name.
- Fill in Root CA for Common Name and add your email address like this:

Figure 12.14 – Certificate generation response asking for information, Root CA
- Next up is creating the actual signed certificates that our Zabbix server will use. Let's make sure that OpenSSL has the right files to keep track of signed certificates:
touch /etc/pki/CA/index.txt
echo 01 > /etc/pki/CA/serial
- Then, create the folders to keep our certificates in:
mkdir /etc/pki/CA/unsigned
mkdir /etc/pki/CA/newcerts
mkdir /etc/pki/CA/certs
- Now, let's create our certificate signing request for the lar-book-secure-zbx Zabbix server with the following command:
openssl req -nodes -new -keyout /etc/pki/CA/private/zbx-srv_key.pem -out /etc/pki/CA/unsigned/zbx-srv_req.pem -newkey rsa:2048
- You will be prompted to add a password and your company information again. Use the default up until Common Name. We will fill out our Common Name, which will be the server hostname, and we'll add our email address like this:

Figure 12.15 – Certificate generation response asking for information, lar-book-secure-zbx
- Let's do the same for our lar-book-secure-db server:
openssl req -nodes -new -keyout /etc/pki/CA/private/mysql-srv_key.pem -out /etc/pki/CA/unsigned/mysql-srv_req.pem -newkey rsa:2048
The response will look like this:

Figure 12.16 – Certificate generation response asking for information, lar-book-secure-db
Important Note
Our certificates need to be created without a password; otherwise, our MariaDB and Zabbix applications won't be able to use them. Make sure to specify the -nodes option.
- Now, sign the certificate for lar-book-secure-zbx with the following command:
openssl ca -policy policy_anything -days 365 -out /etc/pki/CA/certs/zbx-srv_crt.pem -infiles /etc/pki/CA/unsigned/zbx-srv_req.pem
- You will be prompted with the question Sign the certificate? [y/n]. Answer this and all the following questions with Y.
- Now, let's do the same thing for the lar-book-secure-db certificate:
openssl ca -policy policy_anything -days 365 -out/etc/ pki/CA/certs/mysql-srv_crt.pem -infiles/etc/pki/CA/ unsigned/mysql-srv_req.pem
- Let's log in to the lar-book-secure-db MySQL server and create a directory for our newly created certificates:
mkdir /etc/my.cnf.d/certificates/
- Add the right permissions to the folder:
chown -R mysql. /etc/my.cnf.d/certificates/
- Now, back at the new lar-book-secure-zbx Zabbix server, copy over the files to the database server with the following commands:
scp /etc/pki/CA/private/mysql-srv_key.pem [email protected]:/etc/my.cnf.d/certificates/mysql-srv.key
scp /etc/pki/CA/certs/mysql-srv_crt.pem [email protected]:/etc/my.cnf.d/certificates/mysql-srv.crt
scp /etc/pki/CA/cacert.pem [email protected]:/etc/my.cnf.d/certificates/cacert.crt
- Now, back at the lar-book-secure-db MySQL server, add the right permissions to the files:
chown -R mysql:mysql /etc/my.cnf.d/certificates/
chmod 400 /etc/my.cnf.d/certificates/mysql-srv.key
chmod 444 /etc/my.cnf.d/certificates/mysql-srv.crt
chmod 444 /etc/my.cnf.d/certificates/cacert.crt
- Edit the MariaDB configuration file with the following command:
vim /etc/my.cnf.d/server.cnf
- Add the following lines to the configuration file under the [mysqld] block:
bind-address=lar-book-secure-db
ssl-ca=/etc/my.cnf.d/certificates/cacert.crt
ssl-cert=/etc/my.cnf.d/certificates/mysql-srv.crt
ssl-key=/etc/my.cnf.d/certificates/mysql-srv.key
- Log in to MySQL with the following command:
mysql -u root -p
- Make sure our Zabbix MySQL user requires SSL encryption with the following:
alter user 'zabbix'@'10.16.16.152' require ssl;
flush privileges;
Make sure the IP matches the IP from the Zabbix server (and one for the Zabbix frontend, if separated), just like we did in Step 2.
- Quit out of the MariaDB CLI and then restart MariaDB with the following command:
systemctl restart mariadb
- Now, back on the lar-book-secure-zbx Zabbix server, create a new folder for our certificates:
mkdir -p /var/lib/zabbix/ssl/
- Copy the certificates over to this folder with the following:
cp /etc/pki/CA/cacert.pem /var/lib/zabbix/ssl/
cp /etc/pki/CA/certs/zbx-srv_crt.pem/var/lib/zabbix/ssl/zbx-srv.crt
cp /etc/pki/CA/private/zbx-srv_key.pem/var/lib/zabbix/ssl/zbx-srv.key
- Edit the Zabbix server configuration file to use these certificates:
vim /etc/zabbix/zabbix_server.conf
- Make sure the following lines match our lar-book-secure-db database server's setup:
DBHost=lar-book-secure-db
DBName=zabbix
DBUser=zabbix
DBPassword=password
- Now, make sure our SSL-related configuration matches our new files:
DBTLSConnect=verify_full
DBTLSCAFile=/var/lib/zabbix/ssl/cacert.pem
DBTLSCertFile=/var/lib/zabbix/ssl/zbx-srv.crt
DBTLSKeyFile=/var/lib/zabbix/ssl/zbx-srv.key
- Also, make sure to add the right permissions to the SSL-related files:
chown -R zabbix:zabbix /var/lib/zabbix/ssl/
chmod 400 /var/lib/zabbix/ssl/zbx-srv.key
chmod 444 /var/lib/zabbix/ssl/zbx-srv.crt
chmod 444 /var/lib/zabbix/ssl/cacert.pem
- Start and enable the Zabbix server with the following:
RHEL-based systems:
systemctl restart zabbix-server zabbix-agent2 httpd php-fpm
systemctl enable zabbix-server zabbix-agent2 httpd php-fpm
Ubuntu systems:
systemctl restart zabbix-server zabbix-agent2 apache2 php-fpm
systemctl enable zabbix-server zabbix-agent2 apache2 php-fpm
- Then, navigate to the Zabbix frontend and fill in the right information as shown in the following screenshot:
Figure 12.17 – Zabbix frontend configuration, database step

Figure 12.18 – Zabbix frontend configuration, server details step
- Then, after clicking Next step, Next step, and Finish, the frontend should now be configured and working.
How it works…
This was quite a long recipe, so let's break it down quickly:
- In Steps 1 through 9, we prepared our servers
- In Steps 10 through 37, we executed everything needed to create our certificates
- In Steps 38 through 47, we set up our Zabbix frontend for encryption
Going through all these steps, setting up your Zabbix database securely can seem like quite a daunting task, and it can be. Certificates, login procedures, loads of settings, and more can all add up to become very complicated, which is why I'd always recommend diving deeper into encryption methods before trying to set this up yourself.
If your setup requires encryption, though, this recipe is a solid starting point for your first-time setup. It works very well in an internal setting, as we are using private certificates.
Make sure to renew them yearly, as they are only valid for 365 days.
All Zabbix components, except for communication between the Zabbix server and Zabbix frontend, can be encrypted as shown in the following diagram:

Figure 12.19 – Zabbix encryption scheme possibilities
We've set up encryption between the following:
- The Zabbix server and MariaDB
- The Zabbix frontend and MariaDB
This means that when our Zabbix server or frontend requests or writes data to our database, it will be encrypted. Because our Zabbix applications are running on a different server than our Zabbix database, this might be important. For example, our setup might look like this:

Figure 12.20 – Zabbix setup with an external network diagram
Let's say the cloud is called Some company in a network that isn't managed by us. There are several switches and routers in this network that are used for numerous clients with their own VLANs. If one of these devices gets compromised somehow, all of our Zabbix data could be seen by others.
Even if the network equipment is ours, there might still be a compromised device in the network and our data can be seen. This is why you might want to add encryption, to add that extra layer of security. Whether it's breaches in other companies and their network that you want to secure against or whether it's against your own breaches, securing your database as we did in this recipe might just save you from leaking all that data.