Chapter 19. iPhone SDK enhancements
This chapter covers
- Creating custom keyboard accessories
- Creating custom keyboards
- An overview of iPhone OS 4.0
In this last chapter, we’ll explore some of the APIs related to custom keyboard views as well as discuss some of the new SDK features going forward. The SDK is evolving yearly, so it’s almost impossible to keep up with every change that’s made.
The custom keyboard and keyboard accessories are simple concepts that are a good indication that Apple is loosening up its platform and giving developers greater control. The company is fostering innovation while still maintaining high quality for its devices.
In addition to custom keyboard input, we’ll also talk about the iPhone 4.0 SDK. The 4.0 SDK boasts new features such as multitasking, local notifications, and direct access to the media stored on the device, which will make for much more interesting and robust applications moving forward.
19.1. Custom keyboard accessories
As you’ll see as we dive in, most of the functionality we’ll discuss has existed for some time in the iPhone SDK, but it’s been simplified for you by Apple. This is because the task of creating custom keyboard accessories is common in many applications. We’ll start by discussing how to implement custom keyboard accessories.
Custom keyboard accessories are views that are attached to the top of a keyboard. These views are bound to the keyboard’s animations and animate up and down as the keyboard is shown and hidden.
You can see an example of a keyboard accessory by looking at the Messages application on your iPhone, as shown in figure 19.1. Notice that when you tap inside the text box, the entire toolbar animates up as the keyboard comes into view. The toolbar with the text box and buttons is a custom keyboard accessory.
Figure 19.1. Custom keyboard accessory in the Messages application

Prior to the iPhone OS 3.2, achieving such custom functionality was a little difficult and often unintuitive. It required that you subscribe to the keyboard notifications keyboardWillShow: and keyboardWillHide:. These methods passed in a notification object containing information about the keyboard’s frame and animation. You then used these properties to figure out how to animate and display your custom view.
Even though the aforementioned method works perfectly, Apple has greatly simplified this common task by allowing developers to overwrite a property of UITextField and UITextView called inputAccessoryView.
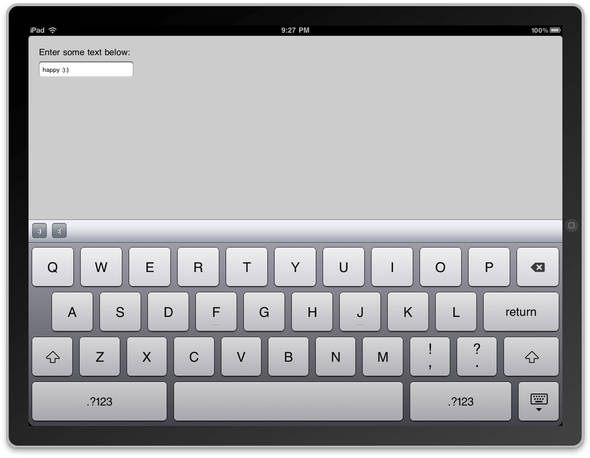
In this section, you’ll see how to add a basic UIToolbar as a custom inputAccessoryView of a UITextField. This toolbar will contain buttons allowing you to perform certain actions when they’re pressed. Although the code works for both the iPhone and the iPad, the example app uses an iPad. Figure 19.2 shows what the example application looks like; the custom keyboard accessory is the toolbar with the two buttons on top.
Figure 19.2. The sample application with a custom inputAccessoryView, as it appears on an iPad
Because the process for creating a custom accessory on a UITextField and UITextView is the same, we’ll only reference UITextField going forward. But keep in mind that you can apply the same technique to a UITextView.
19.1.1. Extending UITextField
To gain access to the inputAccessoryView of a UITextField, you must create a subclass of UITextField and implement the getter method of inputAccessoryView. By default, the inputAccessoryView property of a UITextField is set to nil. Note that when you use this method, you must build against the iPhone SDK 3.2 or higher.
Start by creating a new class in Xcode. Use the subclass of NSObject, because it’s the most bare-bone. For the example, call the class MyCustomAccessoryTextField.m.
Notice that you don’t need to overwrite the inputAccessoryView property. You only need to implement the getter method of the property so that it returns a UIView.
Open MyCustomAccessoryTextField.m, and add the code from listing 19.1.
Listing 19.1. Overwriting the getter for inputAccessoryView
- (UIView *)inputAccessoryView {
    CGRect accessFrame = CGRectMake(0.0, 0.0, 768.0, 44.0);
    UIToolbar *toolbar = [[[UIToolbar alloc] initWithFrame:accessFrame]
                             autorelease];

    UIBarButtonItem *buttonSmile =
        [[[UIBarButtonItem alloc] initWithTitle:@":)"
        style:UIBarButtonItemStyleBordered
           target:self
           action:@selector(sendSmile:)] autorelease];

    UIBarButtonItem *buttonSad =
       [[[UIBarButtonItem alloc] initWithTitle:@":("
        style:UIBarButtonItemStyleBordered
              target:self
              action:@selector(sendSad:)] autorelease];

    [toolbar setItems:[
           NSArray arrayWithObjects:buttonSmile,buttonSad,nil]];

return toolbar;
}
The first thing you need to do in this method is create the frame for the accessory view as we did in the second line. The x and y coordinates, and the width of this view, are completely ignored. The only value that matters is the height, because the rest are figured out for you. If you try to modify any of the values besides the height, it will have no effect on the view. One great thing is that you get rotation for free. The view is always in the correct place when the user rotates the device without any interventions on your part.
Next, you declare the UIToolbar that’s the accessory view for this UITextField. To be good stewards of memory, you set this view to autorelease because you have no reason to hang on to it after it’s returned.
The code declares the UIBarButtonItems that are added to the toolbar, and this is where user interaction comes in. You set each of these to call its own methods when the user taps it. In a bit, you’ll see how you can use these methods to update the text in the UITextField. These items are then added to the toolbar. Finally, you return the toolbar.
As the last part of this implementation, you need to write the sendSmile: and sendSad: methods. Although these methods are specific to the example, you’ll most likely be responding to actions in this view to alter the text in some way. Adding the following code to the MyCustomAccessoryTextField.m file adds the functionality for these methods:
- (void) sendSmile:(id) sender
{
    self.text = [self.text stringByAppendingString:@":)"];
}

- (void) sendSad:(id) sender
{
    self.text = [self.text stringByAppendingString:@":("];
}
The code to update the UITextField’s text is straightforward. You append the text string. In the case of these methods, you insert a corresponding emoticon face based on which button the user pressed.
Although this example is trivial, there are many uses for having a view on top of the keyboard. A more interesting example might display a list of words that autocomplete what the user is currently typing. You could write a system that tries to predict what the user is typing and creates buttons on the toolbar from the top five results. When the user tapped the button, it would complete the word with the word the user tapped. This would greatly improve the speed of text input on the device.
19.1.2. Implementing the custom UITextField
Now that you’ve created the UITextField subclass with a custom accessory view, you need to use it in the code. Just as with any other view, you can use two approaches for implementation. You can either initialize the custom text field programmatically, adding it as a subview, or you can implement it using Interface Builder. We’ll discuss the latter.
Start by opening a .xib file that you wish to contain your custom UITextField. In this case, you’ll use CustomAccessoryViewViewController.xib. This will open Interface Builder.
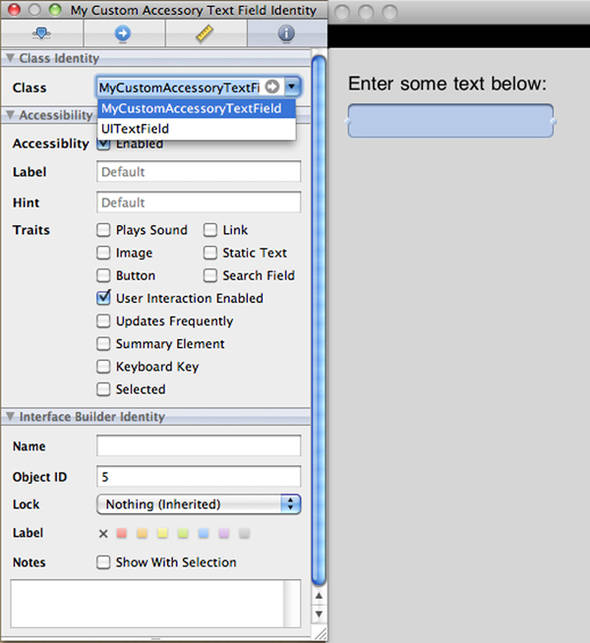
Because the view is just a subclass of a UITextField, you can drag a standard UITextField onto the view. To set it as a MyCustomAccessoryTextField, you must select it and open the Identity Inspector from the Tools menu. When the inspector is open, select MyCustomAccessoryTextField from the Class drop-down menu, as shown in figure 19.3.
Figure 19.3. Setting a custom class in the Identity Inspector
When you have completed this step, run the project. Tap inside your UITextField, and the keyboard will animate up along with your custom UIToolbar of emoticons. Next, you’ll see how to modify this code slightly so that the keyboard is completely replaced by the UIToolbar of emoticons.
19.1.3. Custom keyboards
Replacing the default keyboard on the device is something developers have requested for quite some time. Many hacky solutions existed, but as of iPhone OS 3.2, it couldn’t be easier.
You’ve already seen how to implement a custom input accessory by returning a UIView from UITextView’s inputAccessoryView method. Creating a custom keyboard isn’t much different. Instead of overwriting inputAccessoryView, you must overwrite the inputView method of UITextField. Listing 19.2 shows how you can replace the iPhone’s default keyboard within the application with the UIToolbar of emoticons.
Listing 19.2. Implementing a custom keyboard
- (UIView *)inputView {
    CGRect accessFrame = CGRectMake(0.0, 0.0, 768.0, 44.0);
    UIToolbar *toolbar = [[[UIToolbar alloc] initWithFrame:accessFrame]
                             autorelease];

    UIBarButtonItem *buttonSmile =
        [[[UIBarButtonItem alloc] initWithTitle:@":)"
        style:UIBarButtonItemStyleBordered
           target:self
           action:@selector(sendSmile:)] autorelease];

UIBarButtonItem *buttonSad =
       [[[UIBarButtonItem alloc] initWithTitle:@":("
        style:UIBarButtonItemStyleBordered
              target:self
              action:@selector(sendSad:)] autorelease];

    [toolbar setItems:[
           NSArray arrayWithObjects:buttonSmile,buttonSad,nil]];

return toolbar;
}
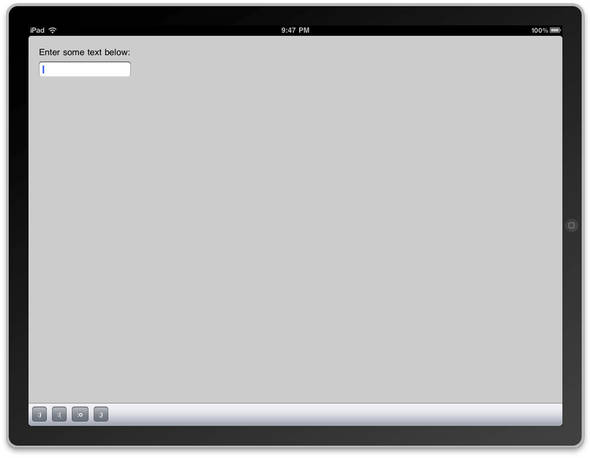
Because the code is almost identical to the code in listing 19.1, we won’t discuss it in detail. The main thing to notice is that you overwrite the inputView method. Just as you did for the custom accessory, you create the toolbar, add the items, and return it. Figure 19.4 shows what this looks like on the device with some additional emoticons.
Figure 19.4. Replacing the iPad’s keyboard with a UIToolbar
The ability to add a custom keyboard is useful and opens up a range of interesting possibilities. For example, an application could use a custom input view to enter characters from a previously unsupported alphabet type. Note that you don’t even have to stick to a traditional view for a keyboard—because the custom keyboard can be any view, it can look however you want.
In the next section, we’ll wrap up by discussing some of the up-and-coming SDK improvements brought on by the iPhone 4.0 OS.
19.2. Going forward: the iPhone 4.0 SDK
As of this writing, the iPhone 4.0 SDK is in the beta stage. It was recently announced and isn’t scheduled to release for another six months. That being said, we chose to omit its contents from this book until it has had some time to mature into a full release. This will be some time in the summer of 2010 for the iPhone and in the fall for the iPad.
Although we won’t be going into detail about the 4.0 SDKs, we’ll touch briefly on some of the major features, including the addition of multitasking and a Game Center, and enhancements to multimedia frameworks and the overall user experience. All the information we’ll present is readily available on Apple’s developer website at http://developer.apple.com/iphone.
19.2.1. Multitasking
Multitasking is a feature that has been requested on the iPhone since it was first released. It’s basically the ability to let the device run more than one program at once. For example, you may want to listen to music using the Pandora application while performing other tasks such as checking your email.
In the past, Apple has had a few arguments in opposition to multitasking on the iPhone; the primary one was that it slows down the device and makes for an overall poor user experience. If you allow the user to run too many applications at once, the device will eventually run out of memory and start killing those applications. Another argument was that running applications drains battery life much more quickly. Because running an app requires processing power, the constant strain on the processor will quickly result in a drained battery.
With the release of the iPhone SDK 3.0 Apple aimed to solve many users’ gripes about the lack of multitasking through the use of push notifications, as we discussed in chapter 16. This solved the problem for apps such as instant messengers but still didn’t let users multitask on their device.
Finally, in the iPhone OS 4.0, Apple has implemented the ability for programs to run in the background. This isn’t true multitasking per se, but it’s getting closer and addresses most of users’ other gripes.
Applications that wish to run in the background are restricted to certain tasks, which include the following:
- Requesting a set amount of time to finish a task.
- Implementing specific services allowed by Apple, including location tracking, audio playback, and voice over IP services.
- Publishing local notifications to the user’s device. This is similar to the Calendar application.
By default, all applications that are compiled for iPhone 4.0 SDK support multitasking. But after the user exits your application, the app will go into a suspended state unless you do some additional work.
Because most applications don’t require constant usage, the system automatically puts them in a suspended state when the user exits them. Upon resuming the application, it should load in the last state it was in when the user exited it. This is more of a fast application-switching model than multitasking.
For more information about multitasking, including how to run the Apple-approved services in the background, read the developer document “Executing Code in the Background.”
19.2.2. User experience enhancements
The 4.0 SDK provides many enhancements to the user experience. Many of them were already in of the default Apple applications and are now available to all developers.
The first enhancement is local notifications. These can be found in applications such as the Calendar when you schedule an alert for a given event. Local notifications are just like push notifications except they’re handled completely on the iPhone client side. Unlike push, no server is required to schedule these; your application doesn’t even have to be running. All you must do is schedule a notification through the system scheduler, and it will be delivered to the user at a specified time.
One highly requested development feature on the iPhone OS has been the ability to communicate directly with the Calendar application. This is useful in apps that sync calendars on other platforms (such as Google) with your device’s calendar. This is now possible through the Event Kit and Event Kit UI frameworks. You now have direct access to the Calendar, including a system user interface for creating and viewing events.
Finally, Apple has decided to throw its hat in the advertising ring via its iAd platform. Since the original SDK was released, developers have been coming up with various solutions for in-application advertising. Many companies, such as AdMob, have created public platforms for integrating ad networks into applications.
With the release of the iAd platform, all of your advertising can be handled through Apple. The company has provided an elegant solution to advertising by creating ads that display modally when the user taps them. The goal is for ads to be more than just text and links but to include rich content such as games and videos.
19.2.3. Multimedia framework enhancements
Quite a few enhancements have been made to the multimedia frameworks in the 4.0 SDK. Although all of them are interesting, one of the more useful is the addition of the Assets Library framework.
The Assets Library framework gives you direct access to the user’s photos and videos in their media library. In previous versions of the iPhone OS, you only had access to these assets through the UIImagePickerController, and this access was limited. For example, this framework only allowed you to pick one image at a time.
With the addition of the Assets Library, you can now make custom interfaces to the iPhone’s media. A great example is a picker to upload multiple photos at a time to a given web service.
19.2.4. Game Center
If you’ve ever used a centralized gaming system such as Xbox Live, then you’ll appreciate the addition of Game Center to the Game Kit framework. Throughout the past couple of years, many centralized gaming networks have emerged, including Open Feint and the Plus gaming network. They provide much of the functionality of Apple’s Game Center, but each requires a different account on its system.
With Game Center, Apple has created a unified place for all game developers to host a variety of features. These features include the following:
- Alias for every user
- One login for all games using your Apple ID
- Leader boards for tracking high scores
- Achievements similar to Xbox Live
- Matchmaking to connect players
Most of these features are fairly common to other gaming platforms, except for matchmaking. This is a really interesting feature that brings mobile gaming on the Apple devices to a new level. Matchmaking lets you connect multiple players using sockets over the gaming network so they can play online together. It works similarly to the Pong Game Kit code in chapter 15, but players can be connected over the internet.
19.3. Summary
We feel that custom keyboards will improve the user experience in applications that require custom user input. Developers will have greater control and spawn more applications that aren’t so cookie-cutter in style.
Custom keyboard accessories have greatly simplified a process that is common to applications that require user input. They allow for much more flexibility and utilization of precious screen real estate.
Although we didn’t cover many of the new features of the iPhone 4.0 SDK, we encourage you to explore the developer documentation and learn about them for yourselves. You can now create your own iPhone apps, stay ahead of the curve, and learn about unfamiliar topics on your own.
With the final roadmap in hand, you now have all the tools necessary to create a successful application. But read on (if you haven’t already) for some helpful appendixes that list numerous SDK objects, talk more about getting your projects ready for market, and point toward other resources.