In this section, we will discuss the who is who and what is what of the ASP.NET Core 2.0 application that we created in the Creating a simple running code section of Chapter 1, Getting Started. The idea is to understand the purpose and use of each file that comes with the MVC template when creating the application, so that we can make the best possible use of them when needed.
The following screenshot shows what our application structure looks like:

For ease of understanding, the items are numbered from 1 to 12. We will walk through each item and understand what they bring to the table:
-
Connected Services: This doesn't present itself as a physical file in the project template created by .NET Core 2.0 tooling, and is only visible when the project is opened from Visual Studio 2017 IDE; that is, it's a Visual Studio 2017 feature. The intent is to make it easier for developers to add connected services to their application. The services may be deployed on-premises or in the cloud. Earlier, this used be available as Add Connected Service in the project's, right-click context menu; now it's available as a node in Solution Explorer for web and mobile projects. One of the services that every ASP.NET Core web app can leverage is Application Insights. The entire comprehensive list of services can be found at https://docs.microsoft.com/en-us/azure/#pivot=services&panel=all. If we click on the Connected Services node in Solution Explorer, we will see a new full page window in Visual Studio which has three tabs:

-
- Overview: This tab is in the GettingStarted section of the ASP.NET Core app. It lists Microsoft's official documentation links for ASP.NET Core app development, adding services, and deploying it to the cloud.
- Connected Services: This is the section that enables us to add connected services to the application. Right-click on the Connected Services node in Solution Explorer; we see a context menu item, Add Connected Service. If we click this item, it also navigates to the same place. We will add connected services in subsequent chapters, when we discuss Azure:

-
- Publish: To publish the web app in the cloud or on-premises. We will discuss this further in a later chapter, when we publish our app in Azure.
- Dependencies: This node has been around in Visual Studio for a while now. Again, this isn't present as a physical file in the system. There is a tooling update in Visual Studio 2017, which categorizes the dependencies and groups them into the following:
- Analyzers: The analyzers are included in the project by default, as shown here:

-
- NuGet: The NuGet packages referred by the project are listed here. In the default ASP.NET Core 2.0 MVC template, we will see just one NuGet package called Microsoft.AspNetCore.All and that's awesome, as we no longer need to worry about versioning different packages and plumbing them to use in our app. Microsoft.AspNetCore.All is a metapackage; that is, it only references other packages. It references all ASP.NET Core packages and their dependencies, and all Entity Framework Core packages and their dependencies. The version of this package represents the ASP.NET Core and Entity Framework Core version. And the best part is that even though it's just one package, you can still go ahead and visualize all the packages that come with it alongside their dependencies:
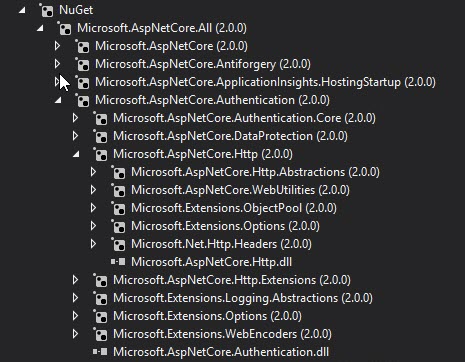
-
- SDK: Displays the target SDK. For the default ASP.NET Core 2.0 app, it would be Microsoft.NETCore.App.
- Bower: This is the package manager for the web. It helps manage all the client-related stuff, such as HTML, CSS, JavaScript, fonts, and images. All the client-side packages are listed here. In the default project template, we can see stuff such as bootstrap, jquery, and so on.
These are the four types of dependency that come with the default ASP.NET Core 2.0 MVC template. But we are not limited to these dependencies alone. Based on the package manager of choice, we may also have node package manager (npm) or other package managers as the dependency listed here. In this chapter, we will use npm to install the SignalR client package, as it is available through npm.
- Properties: Double-clicking on the Properties node of the project in Solution Explorer takes us to the project properties page and, on expanding this, displays the launchSettings.json file, where all the launch/startup-related configurations are serialized and saved as JSON. The following is the default code:
 "iisSettings": {
     "windowsAuthentication": false,
     "anonymousAuthentication": true,
     "iisExpress": {
         "applicationUrl": "http://localhost:52845/",
         "sslPort": 0
     }
 },
 "profiles": {
     "IIS Express": {
     "commandName": "IISExpress",
     "launchBrowser": true,
     "environmentVariables": {
     "ASPNETCORE_ENVIRONMENT": "Development"
     }
 },
 "GettingStarted": {
     "commandName": "Project",
     "launchBrowser": true,
     "environmentVariables": {
         "ASPNETCORE_ENVIRONMENT": "Development"
     },
     "applicationUrl": "http://localhost:52846/"
     }
   }
}
It's evident that the values in the preceding code match the Debug section of the properties page of the project:

- wwwroot: All client-side packages and images are part of this folder. Files in this folder are served as static content and can be bundled and minified to reduce payloads and page rendering by using bundleconfig.json. A few of the common folders are:
- css: Contains cascading style sheets
- images: Contains the image assets that are needed in the app
- js: Contains JavaScript files
- lib: Contains the client-side packages
- Controllers: Contains the controllers as per the Model-View-Controller (MVC) architecture.
- Models: Contains the models as per the MVC architecture.
- Views: Contains the views as per the MVC architecture.
- appsettings.json: The application settings for the application. It contains the key and value-based settings in JSON format. If you are an old school ASP.NET web developer, you can think of it as the appSettings section defined inside web.config. The following is the sample configuration for Logging, which comes with the default template:
  {
     "Logging": {
     "IncludeScopes": false,
     "LogLevel": {
     "Default": "Warning"
     }
 }
}
- bower.json: The Bower package manager is part of Visual Studio, as mentioned previously. This client-side package manager is one of the most widely-used package managers in the open source community for managing packages. bower.json is used by Bower to download and manage the client-side packages. This is very similar to the packages.config file that is used for managing NuGet packages. Just specify the package name that you want in the JSON file and Bower will do the rest. In case you do not see the packages, just right-click on the file in Solution Explorer and click Restore Packages. The following is the code snippet from bower.json, which lists the dependencies as bootstrap, jquery, and so on:
{
 "name": "asp.net",
 "private": true,
 "dependencies": {
     "bootstrap": "3.3.7",
     "jquery": "2.2.0",
     "jquery-validation": "1.14.0",
     "jquery-validation-unobtrusive": "3.2.6"
     }
}
In case you do not like this approach of adding the client-side dependency in the bower.json file, right-click on the bower.json file and click on Manage Bower Packages. This has a very similar user interface to the NuGet package manager and can be used in the same way. Just search the package and click Install. The following image shows the installed Bower packages in the project:

- bundleconfig.json: This JSON file used to store the project bundling and minification configuration for the static content of the site, that is, scripts and styles. The following is what the default MVC project template, bundleconfig.json, looks like. The names and comments are intuitive to understand:
[
     {
        // The name and relative path of output minified css file.
        "outputFileName": "wwwroot/css/site.min.css",
         // An array of relative input file paths. Globbing patterns
            supported
         "inputFiles": [
             "wwwroot/css/site.css"
         ]
     },
     {
         // The name and relative path of output minified JavaScript
            file.
         "outputFileName": "wwwroot/js/site.min.js",
         // The array of relative input file paths.
         "inputFiles": [
             "wwwroot/js/site.js"
         ],
         // Optionally specify minification options
         "minify": {
             "enabled": true,
             "renameLocals": true
         },
         // Optionally generate .map file
         "sourceMap": false
     }
 ]
- Bundling improves load time by reducing the number of requests sent to the server by the client to fetch static content; that is, CSS, JavaScript. Most major modern browsers limit the number of simultaneous connections for each hostname to six; that is to say, if six requests are being processed, any additional requests from the client for assets on the same hostname would be queued by the browser. With bundling, this issue is avoided, as all CSS files can be bundled as one file and, likewise, one file for JavaScript. This improves the first-time load performance. For subsequent requests, it's not much of an improvement, as the browser caches the files.
- Minification improves performance by reducing the size of the requested assets, that is, CSS and JavaScript, by removing unnecessary white spaces and comments, and shortening the variable names to one character. We have all seen the jquery.min.js file while doing web development. The min in the name is to help the user identify that it is the minified version of the file.
- Program.cs: This is the main entry point to the ASP.NET Core 2.0 app. It has the minimum code needed to get the app up and running with the default configurations:
public class Program
{
     public static void Main(string[] args)
     {
         BuildWebHost(args).Run();
     }

     public static IWebHost BuildWebHost(string[] args) =>
        WebHost.CreateDefaultBuilder(args)
        .UseStartup<Startup>()
        .Build();
}
As we can see, this looks more like a console application and, actually, that is what it is—a console app. In its entry point Main method, it creates a web server, hosts the application, and starts listening to HTTP requests. Notice here that BuildWebHost is a method which returns an object that implements IWebHost, accepting a string array argument. This method is implemented as an expression bodied member, just to make the developers aware that the sole purpose of this method is to build the web host and no other code should be put here. The method follows the builder pattern to build the host. There are several methods that we can hook up, one after another, as needed, and they would be added to the object incrementally, one after the other. The CreateDefaultBuilder method builds the web host with the default configuration wired up from various configuration providers (such as JSON and environment variables, to name a few), sets the logging configuration, and sets up a Kestrel web server with IIS integration, which is good enough for the app to run. The Build method builds the object and returns. Notice the UseStartup<Startup> method call, which actually specifies the Startup class for the app. We will discuss this class next.
- Startup.cs: This is the class, where we define the request handling pipeline and configure the services needed by the application. Let's look at the code and then discuss it in depth:
 public class Startup
 {
    public Startup(IConfiguration configuration)
    {
        Configuration = configuration;
    }

    public IConfiguration Configuration { get; }

    // This method gets called by the runtime. Use this method to
       add services to the container.
    public void ConfigureServices(IServiceCollection services)
    {
        services.AddMvc();
    }

    // This method gets called by the runtime. Use this method to
       configure the HTTP request pipeline.
    public void Configure(IApplicationBuilder app,
    IHostingEnvironment env)
    {
        if (env.IsDevelopment())
        {
            app.UseDeveloperExceptionPage();
            app.UseBrowserLink();
        }
        else
        {
            app.UseExceptionHandler("/Home/Error");
        }
        app.UseStaticFiles();
        app.UseMvc(routes =>
        {
            routes.MapRoute(
                name: "default",
                template: "{controller=Home}/{action=Index}/{id?}");
        });
    }
}
The key takeaways from the class code are:
- The class should be public.
- The constructor has a dependency on IConfiguration, which is injected as the core service and assigned to the public property Configuration of type IConfiguration.
- This makes Configuration a first class citizen of the ASP.NET Core application and can be easily used to read the appSettings value just by using this code: Configuration["<KeyName>"].
- There are only two public methods in the class:
- ConfigureServices: This method is called by the runtime. This method is the place to add services to the container, such as MVC, antiforgery, application insight telemetry, authentication, authorization, localization, identity, and so on. There is a huge list of services available, which can be seen through IntelliSense. In the preceding code, we are c files, such as css, js, images, HTjust adding the MVC service, so that we can leverage all the MVC goodness in our app.
- Configure: As the comment in the code explains, this method is called by the runtime and is used to configure the HTTP request pipeline. In this method, we have access to the application builder and the hosting environment, which is another first class citizen of the .NET Core 2.0 app and is available in the container for injection into the objects that we construct. In the preceding code, which comes with the default MVC template, we can see the following:
- First, it checks whether the environment is for development or not. This is determined by the environment variable, ASPNETCORE_ENVIRONMENT. If its value is Development, it will detect the host environment to be Development; otherwise, it will be Production. If this environment variable is not available, it defaults the environment to Production. The variable can be set in the project properties page in the Debug section. The screenshot of the preceding properties section displays the Environment variable clearly.
- If the environment is Development, it tells the app to use the developer exception page by calling the UseDeveloperExceptionPage() method. The developer exception page gives a detailed error message with the exception stack trace to help the developer pinpoint the issue and resolve it. This should not be used in Production, as the exception information may be used by a hacker to attack your site. Also, your end user may not be a technical person, and may prefer to see a more user-friendly message than a .NET stack trace, so in production we use a custom error page, which is specified by calling the UseExceptionHandler("/Home/Error"); method.
- During the development phase, you may want to test your web app against multiple browsers, and hence may want to open multiple browsers and browse the page to check for compatibility issues and refresh them when you make a fix. The UseBrowserLink() method helps you do just that. Browser Link is a feature in Visual Studio that creates a communication channel between the Development environment and one or more web browsers. We can use Browser Link to refresh the web application in several browsers at once.
- Static files, such as css, js, images, HTML, and so on, which are placed in the wwwroot folder, are not servable by default. To make them servable, we need to call the UseStaticFiles() method.
- Finally, the last piece of the code configures the MVC service (added in the Configure method) by specifying the default route.
- To sum up, in this method we just configure the HTTP request pipeline using middleware. We will look at middleware in the next chapter, but for the time being, just think of them as HTTP modules in the earlier versions of ASP.NET. We added the services and then configured them as per our requirements using middleware. We will find three types of middleware configuration in the code samples:
- app.Run(): The first app.Run delegate terminates the HTTP request pipeline. If you use Run, it expects the handler and hence the request is served back to the client. No further middleware will be called in the request path.
- app.Map*: This extension is used as a convention for branching the pipeline. Map branches the request pipeline based on matches of the given request path. If the request path starts with the given path, the branch is executed.
- app.Use[Middleware]: Use can be used to chain the middleware; that is, we can arrange them to execute one after another. Use can also be used to short-circuit the request pipeline as needed.
If this sounds scary, don't worry! We will discuss middleware, dependency injection, and containers in detail in the next chapter while developing our Let's Chat application.
Last but not least, the .csproj file has major and long-anticipated enhancements. The .xproj from .NET Core 1.0 is now gone and we have our familiar .csproj back in business with ASP.NET Core 2.0. It's better than earlier, as it is lightweight and easier to manage. Visual Studio 2017 also has a tooling update, which enables us to edit the .csproj file without having to unload the project and edit. This is super awesome. Just right-click on the project in Solution Explorer and then click Edit <Project Name>.csproj:

We will have the .csproj file opened as an XML file in the code editor, with the entire project still loaded. The following is the .csproj file code:
<Project Sdk="Microsoft.NET.Sdk.Web">
     <PropertyGroup>
         <TargetFramework>netcoreapp2.0</TargetFramework>
     </PropertyGroup>
     <ItemGroup>
         <PackageReference Include="Microsoft.AspNetCore.All"
         Version="2.0.0" />
     </ItemGroup>
     <ItemGroup>
         <DotNetCliToolReference
         Include="Microsoft.VisualStudio.Web.CodeGeneration.Tools"
         Version="2.0.0"           />
     </ItemGroup>
</Project>
It's very lean, with just TargetFramework, which is netcoreapp2.0; PackageReference, which has just one metapackage, Microsoft.AspNetCore.All; and DotNetCliToolReference included as part of ItemGroup. This is much better than the conventional .csproj file, where we had different build configurations, property groups, all the projects, DLL, NuGet package references, and all the files and folders that need to be included in the project, making it really hard to manage.
This concludes our basic anatomy of an ASP.NET Core 2.0 app. Let's get started with our game development in ASP.NET Core 2.0.