
2
Creating a Reusable Backend with Quart
In the preceding chapter, we installed the tooling we need to develop our app, which means we can start building the backend. The backend runs on the server as opposed to the frontend, which runs in the client’s web browser. In our setup, the backend will need to be the interface between the database and the frontend, providing an API to access and edit the to-dos (see Figure 2.1):
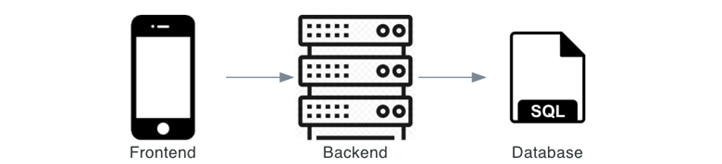
Figure 2.1: A schematic overview of the desired setup
Alongside providing an API, the backend will also need to connect to the database, manage user sessions, protect itself against heavy and incorrect usage, and send emails to users. In this chapter, we will build a backend with these features. At the end of the chapter, we will have built a reusable backend that any API can be built with. Alternatively, the features can be taken in parts to add to your own app.
So, in this chapter, we will cover the following topics:
- Creating a basic Quart app
- Including user accounts
- Protecting the app
- Connecting to the database
- Sending emails
Technical requirements
The following additional folders are required in this chapter and should be created:
tozo
└── backend
    ├── src
    │   └── backend
    │       ├── blueprints
    │       ├── lib
    │       └── templates
    └── tests
        ├── blueprints
        └── lib
Empty backend/src/backend/__init__.py, backend/src/backend/blueprints/__init__.py, backend/src/backend/lib/__init__.py, backend/tests/__init__.py, backend/tests/blueprints/__init__.py, and backend/tests/lib/__init__.py files should be created.
To follow the development in this chapter, use the companion repository at https://github.com/pgjones/tozo and see the commits between the tags r1-ch2-start and r1-ch2-end.
Creating a basic Quart app
To begin, we can make a basic API that responds to requests with a simple response. This is something I like to term a ping-pong route as the request is the ping and the response is the pong. To do this, I’ve chosen to use the Quart framework. Quart is a web microframework with an ecosystem of extensions that we will use to add additional functionality.
Using Flask as an alternative
Quart is the async version of the very popular Flask framework, which allows us to use modern async libraries. However, if you are already familiar with Flask, you can adapt the code in this book without too much difficulty; see https://quart.palletsprojects.com/en/latest/how_to_guides/flask_migration.html for more information.
To use Quart, we must first add it with pdm by running the following command in the backend directory:
pdm add quart
We can now create a Quart app by adding the following code to backend/src/backend/run.py:
from quart import Quart
app = Quart(__name__)
This allows us to add functions, called route handlers, which are called when a request matches the given HTTP method and path and returns the response. For our basic app, we want requests to GET /control/ping/ to be responded to. This is achieved by adding the following code to backend/src/backend/run.py:
from quart import ResponseReturnValue
@app.get("/control/ping/")
async def ping() -> ResponseReturnValue:
    return {"ping": "pong"}
Now that there is code to create the app with a ping route, we should set up the tooling so that the server starts locally and serves requests. As with the backend tooling, we need to add a new script name to backend/pyproject.toml as follows:
[tool.pdm.scripts]
start = "quart --app src/backend/run.py run --port 5050"
The preceding code allows the following command to start the backend app when it is run in the backend directory, as follows:
pdm run start
With this command running, we can check whether the ping route works by running the following command in any directory:
curl localhost:5050/control/ping/
Alternatively, you could enter http://localhost:5050/control/ping/ in your browser, as shown in Figure 2.2:
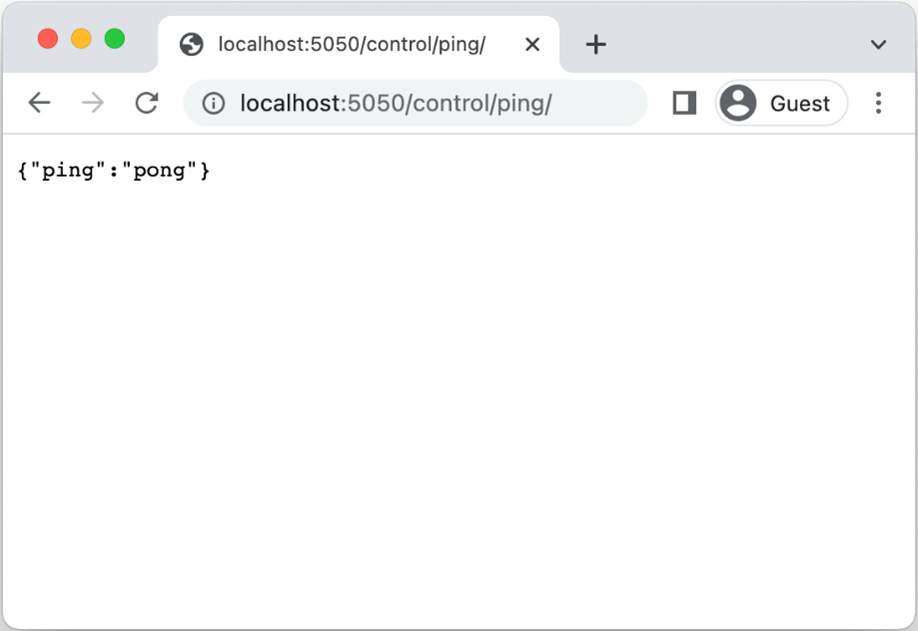
Figure 2.2: The control ping route when visited in the browser
Using curl
curl (https://curl.se/docs/manpage.html) is an excellent command-line tool to make HTTP requests. curl is installed on most systems by default, but if you find that you don’t have it, you can use the system package manager to install it (brew install curl or scoop install curl).
Without any options, curl makes a GET request, and you can switch to a POST request using the -X POST option, or you can send JSON data using the --json ‘{“tool”: “curl”}’ option.
This is all that is required for a basic backend; however, we need more functionality and more certainty that the code works. We’ll achieve this by adding testing, using blueprints, adding configuration, and ensuring a consistent JSON error response.
Testing the ping route
It is good practice to test whether the route works as expected. To do this, we can add the following test to backend/tests/test_run.py:
from backend.run import app
async def test_control() -> None:
    test_client = app.test_client()
    response = await test_client.get("/control/ping/")
    assert (await response.get_json())["ping"] == "pong"
With the test code in place, we can run pdm run test and see whether it both runs and passes.
Warning about a common await error
I’ve found it common to incorrectly await the wrong thing in Python, and it seems common with others as well. The issue is often seen with code such as:
await response.get_json()[“ping”].
This will fail with the couroutine cannot be indexed error, as the coroutine returned by response.get_json() must be awaited before it is indexed. This issue is fixed by adding parenthesis in the right place, which in this case is as follows:
(await response.get_json())[“ping”].
Now that we have a working ping-pong route, we need to consider how to add many more routes, which, for clarity, is best done using blueprints.
Using blueprints for clearer code
We added the ping route handler to the same file as the app (backend/src/backend/run.py) as it is the easiest way to start; however, as we add more route handlers, the file will quickly become unclear and difficult to update. Quart provides blueprints to help structure code as the app gets bigger. As we will be adding more route handlers, we’ll convert what we have so far into blueprints.
We can now move the ping route handler to a control blueprint by adding the following code to backend/src/backend/blueprints/control.py:
from quart import Blueprint, ResponseReturnValue

blueprint = Blueprint("control", __name__)
@blueprint.get("/control/ping/")
async def ping() -> ResponseReturnValue:
    return {"ping": "pong"}
We can then register it with the app by changing backend/src/backend/run.py to the following:
from quart import Quart
from backend.blueprints.control import blueprint as control_blueprint

app = Quart(__name__)
app.register_blueprint(control_blueprint)
The existing tests will continue to work; however, I think the location of the test should shadow the location of the code it is testing. This makes it easier to understand where the tests are, and what the tests should be testing. Therefore, we need to move backend/tests/test_run.py to backend/tests/blueprints/test_control.py.
You should now have the following backend files and structure:
tozo
└── backend
    ├── pdm.lock
    ├── pyproject.toml
    ├── setup.cfg
    ├── src
    │   └── backend
    │       ├── blueprints
    │       │   ├── __init__.py
    │       │   └── control.py
    │       ├── __init__.py
    │       └── run.py
    └── tests
        ├── blueprints
        │   ├── __init__.py
        │   └── test_control.py
        └── __init__.py
We’ll use a blueprint for each logical collection of features in our app and follow this structure throughout. We can now focus on configuring the app to run in the various environments we will use.
Configuring the app
We need to run our app in multiple environments, notably development, testing, CI, and production. To do so, we’ll need to change some settings in each; for example, the database connection. Configuration allows us to change these settings without having to alter the code. It also allows secrets to be managed separately from the code, and hence more securely.
I find environment variables to be the best way to provide configuration, with each environment having different values for the same variable. We can instruct Quart to load the configuration from prefixed environment variables. The prefix ensures that only relevant environment variables are considered; by default, the prefix is QUART_, but we’ll change it to TOZO_. To do so, we’ll need to add the following change to backend/src/backend/run.py so that the config is loaded immediately after the app is created:
app = Quart(__name__)
app.config.from_prefixed_env(prefix="TOZO")
The highlighted line of code should already be present.
In production, we’ll define the environment variables using a Terraform script, whereas locally, we will load environment variables from a file. First, for development, we need to add the following to backend/development.env:
TOZO_BASE_URL="localhost:5050"
TOZO_DEBUG=true
TOZO_SECRET_KEY="secret key"
Second, for testing, we need to add the following to backend/testing.env:
TOZO_BASE_URL="localhost:5050"
TOZO_DEBUG=true
TOZO_SECRET_KEY="secret key"
TOZO_TESTING=true
Now that the files exist, we can adapt the PDM scripts to load them when starting the app or running tests by making the following change to backend/pyproject.toml:
[tool.pdm.scripts]
start = {cmd = "quart --app src/backend/run.py run --port   5050", env_file = "development.env"}
test = {cmd = "pytest tests/", env_file = "testing.env"}
These small modifications to the scripts will ensure that the environment is automatically loaded when using the pdm run start and pdm run test commands. We’ll now look at an often-overlooked feature, which is consistent error responses.
Ensuring error responses are JSON
As we are writing a backend API that serves JSON, it is important that all responses use JSON, including error responses. Therefore, rather than using the Quart built-in error responses, we will use our own that explicitly result in a JSON response.
Error responses are usually signified by a status code in the 400-500 range. However, the status code alone cannot always convey enough information. For example, when registering a new member, a status code of 400 is expected for a request with an invalid email address and a request with a weak password. Hence, there is a need to return an additional code to separate these cases. We can do so by adding the following code to backend/src/backend/lib/api_error.py:
class APIError(Exception):
    def __init__(self, status_code: int, code: str) -> None:
        self.status_code = status_code
        self.code = code
With APIError available, we can now inform Quart how to handle it by adding the following code to backend/src/backend/run.py:
from quart import ResponseReturnValue
from backend.lib.api_error import APIError

@app.errorhandler(APIError)  # type: ignore
async def handle_api_error(error: APIError) -> ResponseReturnValue:
    return {"code": error.code}, error.status_code
We should also inform Quart how to handle any other unexpected errors, such as those that would result in a 500 “Internal Server Error” response, as follows:
@app.errorhandler(500)
async def handle_generic_error(
    error: Exception
) -> ResponseReturnValue:
    return {"code": "INTERNAL_SERVER_ERROR"}, 500
We now have a basic Quart app setup to allow us to add all of the features we need for our actual app, starting with the ability to manage user accounts.
Including user accounts
As we want users to be able to log into our app, we will need to authenticate that the client is who they claim to be. Thereafter, we need to ensure that each user only gets to see their own to-dos. This is typically achieved by the user entering a username and password, which are then checked against stored versions.
We will need to authenticate every request the user makes to the backend; however, we ideally only want the user to enter their username and password once (until they log out). We can achieve this by saving information to a cookie when the user logs in, as the browser will then send us the cookie with every request.
We will need to save a piece of identifying information to the cookie when the user logs in and starts the session; for example, their user ID. We can then read the cookie on every request and identify which user it is. However, cookies can be edited, or faked, by the client so we need to ensure that the information in the cookie hasn’t been tampered with.
We can prevent tampering by signing the information in the cookie. Signing is where a cryptographic function is applied to the data using a secret key to create a signature. This signature is then stored with the data, allowing the stored signature to be checked against a recalculated version.
Quart-Auth is a Quart extension that does this for us by managing cookies and the data stored in them. Quart-Auth is installed by running the following command in the backend directory:
pdm add quart-auth
Then, you need to activate AuthManager when creating the app in backend/src/backend/run.py, as follows:
from quart_auth import AuthManager
auth_manager = AuthManager(app)
While Quart-Auth comes with a sensible set of defaults for securing the cookie, our usage allows us to be more secure. Specifically, we can utilize the Strict SameSite setting, rather than the Lax setting that Quart-Auth defaults to. This is because we only need to authenticate non-navigation requests to the API routes.
SameSite
The SameSite setting ensures that cookie data is only sent with requests that originate from the given domain. This prevents other websites from initiating requests with the cookie data. To find out more information about SameSite, you can follow this link: https://developer.mozilla.org/en-US/docs/Web/HTTP/Headers/Set-Cookie/SameSite.
To add the Strict SameSite setting, add the following to backend/development.env and backend/testing.env:
TOZO_QUART_AUTH_COOKIE_SAMESITE="Strict"
However, we will need to disable the secure cookie flag in development as we aren’t using HTTPS. This is done by adding the following to backend/development.env and backend/testing.env:
TOZO_QUART_AUTH_COOKIE_SECURE=false
With Quart-Auth managing the session, we now need to store the passwords, ensure that they are strong, and allow for passwordless authentication.
Securely storing passwords
While we can now manage a user’s session, in order to start it, the user needs to log in by providing an email and password. While the emails are fine to store directly in the database, extra care must be taken with the passwords. This is because users often use the same password across many websites/services, and if it were to leak from our app, we could have potentially leaked access to many other websites as well. Therefore, instead of storing the password directly, we will hash the password and store that.
A password hash is the result of applying a hashing operation to the plain-text password. A good hashing operation should ensure that the resultant hash cannot be turned back into the plain-text password and that each distinct plain-text password produces a different hash result.
I like to use bcrypt as the hashing operation as it meets both of these requirements and is easy to use. bcrypt is installed by running the following command in the backend directory:
pdm add bcrypt
With bcrypt installed, we can hash passwords with generated salt per password as follows:
import bcrypt
hashed = bcrypt.hashpw(password, bcrypt.gensalt(rounds=14))
Checking whether a supplied password matches the hashed password is then done via the following code:
match = bcrypt.checkpw(password, hashed)
We will use bcrypt in the login and registration functionality we’ll add in Chapter 3, Building the API. Next, we need to check whether the passwords are strong enough.
Salting the password
When hashing passwords, it is best practice to salt them as well. This means that an additional string (salt) is added to the password before the hash is calculated. As the salt is meant to be different for every stored password, it ensures that the same password hashed in two different implementations has a different hash. Hence, adding salt is an additional security measure that we do via the bcrypt.gensalt function.
Ensuring passwords are strong
Users often choose weak passwords, which leave their account vulnerable. To protect against this, we should ensure that our users choose strong passwords. To do this, I like to use zxcvbn as it gives a score indicating the strength of the password. It is installed by running the following command in the backend directory:
pdm add zxcvbn
It is then used to give a score, as follows:
from zxcvbn import zxcvbn
score = zxcvbn(password).score
The score is a value between 0 and 4, of which I usually consider scores of 3 or 4 good. Therefore, we will prevent passwords with lower scores from being used.
We will make use of zxcvbn when adding registration and change password functionality in the following chapter. Next, we need to consider how the user authenticates without a password; for example, when they have forgotten it.
Allowing password-less authentication
There are a few circumstances where users are unable to provide a password but can prove that they have access to the account’s email address. A prime example of this is when a user forgets their password and wishes to reset it. In these situations, we need to email the user a token that they can provide back to us, thereby authenticating them as the user in charge of the email. For this to work, the token must identify the user, and malicious users must not be able to tamper with the token or create their own tokens.
To create a token, we can sign the user’s ID using a cryptographic hash function, secret key, and salt. This will ensure that a malicious user cannot alter the token without generating a correct signature, which requires our secret key. To do this, we can use itsdangerous, which is also what Quart-Auth uses for the cookies. itsdangerous is installed by running the following command in the backend directory:
pdm add itsdangerous
As this approach does not encrypt the signed data, it is important to remember that users will be able to read anything we place in the token. Therefore, we must not put anything sensitive in the token (the user ID is not sensitive).
We will also add a timestamp to our tokens; this way we can ensure that they expire after a specific period of time. In addition, as we want to be able to use the token in links, we need to use the URLSafeTimedSerializer. We can create a token with the user's ID as follows:
from itsdangerous import URLSafeTimedSerializer
from quart import current_app
serializer = URLSafeTimedSerializer(
    current_app.secret_key, salt="salt"
)
token = serializer.dumps(user_id)
The token can then be read and checked as follows:
from itsdangerous import BadSignature, SignatureExpired
from backend.lib.api_error import APIError
signer = URLSafeTimedSerializer(
    current_app.secret_key, salt="salt"
)
try:
    user_id = signer.loads(token, max_age=ONE_DAY)
except (SignatureExpired):
    raise APIError(403, "TOKEN_EXPIRED")
except (BadSignature):
    raise APIError(400, "TOKEN_INVALID")
else:
    # Use the user_id safely
As we are using timed tokens, we will need to control time when we are testing. For example, if we want to test an expired token, we will need to create the token at a time whereby it will be expired when checked. To do this, we can use freezegun, which is installed by running the following command in the backend directory:
pdm add --dev freezegun
Then, we can use the following code in our tests to create an old token:
from freezegun import freeze_time
with freeze_time("2020-01-01"):
    signer = URLSafeTimedSerializer(        app.secret_key, salt="salt"    )
    token = signer.dumps(1)
This token can then be used to test how a route handler responds to a token that is out of date.
We will use itsdangerous and freezegun in the forgotten password functionality we’ll add in the following chapter.
Next, as there are malicious users that will attempt to attack our app, we’ll need to protect it.
Protecting the app
Shortly after you deploy your app in production, users will at best, misuse it, and at worst, attack it. It is therefore worthwhile being defensive from the outset by adding rate limiting and request validation.
Rate limiting limits the rate at which a remote client can make requests to the app. This prevents a user from overloading the app with their requests, thereby preventing other users from using the app.
Validation ensures that the JSON data received (or replied) matches an expected structure. This is helpful as it means an error message is displayed if the JSON data is structurally incorrect. It also mitigates against users sending structures that result in errors or issues in the app.
Adding rate limiting
We’ll use the Quart extension called Quart-Rate-Limiter to enforce rate limits, which is installed by running the following command in the backend directory:
pdm add quart-rate-limiter
We can now activate RateLimiter by adding the following code to backend/src/backend/run.py:
from quart_rate_limiter import RateLimiter
rate_limiter = RateLimiter(app)
With the RateLimiter activated, any route in the app can be given rate limit protection, for example, to limit to six requests per minute, as follows:
from datetime import timedelta

from quart_rate_limiter import rate_limit

@app.get("/")
@rate_limit(6, timedelta(minutes=1))
async def handler():
    ...
As with other errors, it is important to provide a JSON response if the client exceeds the rate limit; we can do this by adding the following code to backend/src/backend/run.py:
from quart_rate_limiter import RateLimitExceeded

@app.errorhandler(RateLimitExceeded)  # type: ignore
async def handle_rate_limit_exceeded_error(
    error: RateLimitExceeded,
) -> ResponseReturnValue:
    return {}, error.get_headers(), 429
Now that we can add rate limits, it is best practice to add them to all of the routes. To ensure that we do so, let’s add a test that checks for us.
Ensuring all routes have rate limits
Malicious attackers often search for paths with missing rate limits as a weakness they can then attack. To mitigate against this, I like to check that all routes have rate limits or are marked as exempt using the rate_exempt decorator. To do this, I add the following code to tests/test_rate_limits.py:
from quart_rate_limiter import (
    QUART_RATE_LIMITER_EXEMPT_ATTRIBUTE,
    QUART_RATE_LIMITER_LIMITS_ATTRIBUTE,
)
from backend.run import app
IGNORED_ENDPOINTS = {"static"}

def test_routes_have_rate_limits() -> None:
    for rule in app.url_map.iter_rules():
        endpoint = rule.endpoint

        exempt = getattr(
            app.view_functions[endpoint],
            QUART_RATE_LIMITER_EXEMPT_ATTRIBUTE,
            False,
        )
        if not exempt and endpoint not in IGNORED_ENDPOINTS:
            rate_limits = getattr(
                app.view_functions[endpoint],
                QUART_RATE_LIMITER_LIMITS_ATTRIBUTE,
                [],
            )
            assert rate_limits != []
In a Quart app, the rules are the method-path combinations that the app will respond to. Each rule has an endpoint that indicates which function should handle the request. The static endpoint is added by Quart, and hence we ignore it in this test.
This test will check that all of the routes in the app have a rate limit or are exempt. This means that we also need to add the rate_exempt decorator to the control ping endpoint we added when setting up the basic app. This is done by adding the highlighted decorator to the ping route handler in backend/src/backend/blueprints/control.py as follows:
from quart_rate_limiter import rate_exempt
@blueprint.get("/control/ping/")
@rate_exempt
async def ping() -> ResponseReturnValue:
    return {"ping": "pong"}
Alongside rate limiting routes, we can also protect the routes by validating the request and response data.
Adding request and response validation
Malicious users will often try to send malformed and invalid data in order to find mistakes in our code. To mitigate against this, we’ll use the Quart extension called Quart-Schema to validate requests and responses. It is installed by running the following command in the backend directory:
pdm add "pydantic[email]"
pdm add quart-schema
By convention, JSON (Javascript/TypeScript) and Python use different naming conventions, with the former using camelCase and the latter snake_case. This means that we will need to convert between the two when receiving or replying. Fortunately, Quart-Schema can do this automatically for us, without any additional thought, via the convert_casing option.
We can activate QuartSchema, including setting the convert_casing option, by adding the following code to backend/src/backend/run.py:
from quart_schema import QuartSchema
schema = QuartSchema(app, convert_casing=True)
With this setup, we can use dataclass to define and validate the data the route expects to receive and to validate that it sends the correct data back, as follows:
from quart_schema import validate_request, validate_response
@dataclass
class Todo:
    task: str
    due: Optional[datetime]
@app.post("/")
@validate_request(Todo)
@validate_response(Todo)
async def create_todo(data: Todo) -> Todo:
    ...
    return data
As with other errors, it is important to provide a JSON response to the client with an informative message if the client sends the wrong data. We can do this by adding the following error handler to backend/src/backend/run.py:
from quart_schema import RequestSchemaValidationError
@app.errorhandler(RequestSchemaValidationError)  # type: ignore
async def handle_request_validation_error(
    error: RequestSchemaValidationError,
) -> ResponseReturnValue:
    if isinstance(error.validation_error, TypeError):
        return {"errors": str(error.validation_error)}, 400
    else:
        return {"errors": error.validation_error.json()}, 400
Checking the type of validation_error allows for useful information to be returned in the response, thereby helping correct the issue.
As Quart-Schema adds routes to our app that are not rate limited, we will need to change the IGNORED_ENDPOINTS line in backend/tests/test_rate_limits.py as follows:
IGNORED_ENDPOINTS = {"static", "openapi", "redoc_ui", "swagger_ui"}
As we can validate the structure of the data sent and received by the backend, we can now turn to how we store the data in the database. For that, we will need to be able to connect to it and execute queries.
Connecting to the database
We have chosen to store the data the app needs in a PostgreSQL database, which we will need to connect to. To do this, I like to use the Quart extension called Quart-DB, which is a great wrapper around fast lower-level PostgreSQL drivers. It is installed by running the following command in the backend directory:
pdm add quart-db
We can activate QuartDB by adding the following code to backend/src/backend/run.py:
from quart_db import QuartDB
quart_db = QuartDB(app)
We also need to configure which database QuartDB should connect to. This is achieved by adding a TOZO_QUART_DB_DATABASE_URL environment variable, the value of which is constructed as follows, with the highlighted parts being configurable:
postgresql://username:password@0.0.0.0:5432/db_name
We’ll use tozo for the username, password, and database name in development as they are very obvious and easy to remember. To do this, add the following to backend/development.env:
TOZO_QUART_DB_DATABASE_URL="postgresql://tozo:[email protected]:5432/tozo"
When testing, we’ll use tozo_test for the username, password, and database name so that test and development data are kept separate. To do this, add the following to backend/testing.env:
TOZO_QUART_DB_DATABASE_URL="postgresql://tozo_test:[email protected]:5432/tozo_test"
As we develop, we will need to reset the database to a known state after making and testing changes. We’ll also want to reset the database before running the tests to ensure the tests don’t fail because the database is in a different state. To do this, we’ll start by adding a Quart CLI command to recreate the database by adding the following code to backend/src/backend/run.py:
import os
from subprocess import call  # nosec
from urllib.parse import urlparse
@app.cli.command("recreate_db")
def recreate_db() -> None:
    db_url = urlparse(os.environ["TOZO_QUART_DB_DATABASE_URL"])
    call(  # nosec
        ["psql", "-U", "postgres", "-c", f"DROP DATABASE IF           EXISTS {db_url.path.removeprefix('/')}"],
    )
    call(  # nosec
        ["psql", "-U", "postgres", "-c", f"DROP USER IF EXISTS           {db_url.username}"],
    )
    call(  # nosec
        ["psql", "-U", "postgres", "-c", f"CREATE USER {db_url.       username} LOGIN PASSWORD '{db_url.password}' CREATEDB"],
    )
    call(  # nosec
        ["psql", "-U", "postgres", "-c", f"CREATE DATABASE {db_          url.path.removeprefix('/')}"],
    )
This command calls out to psql using the call function. The first two calls will drop the database and user if they already exist using the DROP DATABASE and DROP USER SQL commands. After they’ve been dropped, the next calls create the user and then the database using the CREATE USER and CREATE DATABASE SQL commands.
We can now utilize this command in the pdm run test script and add a new pdm run recreate-db script to reset the database on demand by making the following change to backend/pyproject.toml:
[tool.pdm.scripts]
recreate-db-base = "quart --app src/backend/run.py recreate_db"
recreate-db = {composite = ["recreate-db-base"], env_file =  "development.env"}
test = {composite = ["recreate-db-base", "pytest tests/"], env_  file = "testing.env"}
The highlighted line indicates that the test script has been changed, whereas the recreate-db and recreate-db-base scripts have been added.
To check whether this works, we can now create the development database by running the following command in the backend directory:
pdm run recreate-db
Then, to check that it has worked, we can open a psql shell to the database with the following command:
psql –U tozo
The preceding command should give an output similar to that in Figure 2.3:

Figure 2.3: The output from psql when running the dt command to describe the empty database
PSQL
PSQL is a command-line tool that can connect to a PostgreSQL database and allows queries and other commands to be run. This means you can test SQL queries from the command line and inspect the structure of the database. I’d recommend you try the dt command that lists all of the tables in the database, and the d tbl command that describes the structure of the table called tbl.
When testing, we’ll need to run our tests in the Quart test app context as this ensures that the database connection is established. To do so, we need to add the following code to backend/tests/conftest.py:
from typing import AsyncGenerator

import pytest
from quart import Quart

from backend.run import app

@pytest.fixture(name="app", scope="function")
async def _app() -> AsyncGenerator[Quart, None]:
    async with app.test_app():
        yield app
The pytest fixtures can be injected into tests, which means that we can use this fixture in our tests by declaring it as an argument. This means that backend/tests/blueprints/test_control.py must be rewritten as follows:
from quart import Quart
async def test_control(app: Quart) -> None:
    test_client = app.test_client()
    response = await test_client.get("/control/ping/")
    assert (await response.get_json())["ping"] == "pong"
Another useful feature would be a direct connection to the database to use in the tests. This fixture is provided by adding the following code to backend/conftest.py:
from quart_db import Connection
from backend.run import quart_db
@pytest.fixture(name="connection", scope="function")
async def _connection(app: Quart) -> AsyncGenerator[Connection, None]:
    async with quart_db.connection() as connection:
        async with connection.transaction():
            yield connection
With this in place, all of our tests can use the app fixture and run tests against the testing database.
Alongside connecting to the database, we will also need the backend to connect to an email server to send emails to the users.
Sending emails
We will want to send users of our app emails, with the first being a confirmation email when they register. Another will be sent if the user forgets their password, as we can send them a password reset email. These targeted emails are transactional rather than marketing in nature, which is an important distinction as marketing emails are rarely sent via the app code.
With transactional emails, the aim is usually to convey a task to the user as clearly as possible. For this reason, the emails are usually text-based with minimal imagery. However, we should ensure the email is branded and has space for any required legal text. This means that we need to render the emails so that the transactional text is clear and surrounded by relevant branding and text.
Rendering emails
We will consider an email as consisting of a header where we will place branding (such as a logo), content where the specifics of the email (for example, a link to our app’s password reset page) are placed, and a footer where any legal information is placed. As only the content changes between emails, we can consider rendering the header and footer separately to the content.
As most email clients support HTML, we can style our emails to make them more engaging and pleasant to read. This means that we will need a HTML header/footer into which we can render the content of the specific email. This is best done using Quart’s built-in render_template function, which utilizes Jinja2 to render template documents.
To start with the header and footer, we need to place the following code in backend/src/backend/templates/email.html:
<!DOCTYPE html>
<html>
  <head>
    <title>Tozo - email</title>
    <meta http-equiv="Content-Type" content="text/html;      charset=UTF-8">
    <meta name="viewport" content="width=device-width, initial-      scale=1.0">
  </head>
  <body style="font-family: Arial, 'Helvetica Neue', Helvetica,    sans-serif; font-size: 14px; font-style: normal; margin: 0">
    <table width="100%" height="100%" cellpadding="0"       cellspacing="0" border="0">
      <tr>
        <td align="center">
          <table height="100%" cellpadding="20" cellspacing="0"            border="0" style="max-width: 540px;">
            <tr>
              <td align="left" width="540">
                {% block welcome %}
                  Hello,
                {% endblock %}
              </td>
            </tr>
            <tr>
              <td align="left" width="540">
                {% block content %}
                  Example content
                {% endblock %}
              </td>
            </tr>
            <tr>
              <td align="center" width="540">
                The Tozo team
              </td>
            </tr>
          </table>
        </td>
      </tr>
    </table>
  </body>
</html>
As email clients only support limited parts of HTML and CSS, we are using a table to lay out the email. The layout we are aiming for is where the content is kept within a width of 540 px in the center of the viewport. This should support the majority of email clients while still looking good.
The highlighted block directives show only the contents within them when rendered, as shown in Figure 2.4. It allows any template that extends this base email to replace the contents of the blocks, hence we’ll use this as a base for all our emails.

Figure 2.4: The rendered email when viewed in a browser
caniemail.com
The caniemail.com website is an invaluable resource for checking which HTML and CSS features are supported by the various email clients in existence. I would recommend checking this site for any features added to the HTML email.
Now that we have nice-looking emails, we can add code to send them to the user’s email address.
Sending emails
While it is possible to send emails directly from the app using a SMTP server, I find that it is better practice to use a third-party service such as Postmark (https://postmarkapp.com). This is because Postmark will ensure that our emails are sent reliably from a setup that helps ensure a low spam score, which is hard to achieve from a new SMTP server.
In development and testing, I prefer not to send emails but rather just log them out. I find this makes development easier and quicker (no checking any email inboxes). We can do this by starting with a send_email function that logs the email to the console by adding the following code to backend/src/backend/lib/email.py:
import logging
from typing import Any
from quart import render_template

log = logging.getLogger(__name__)
async def send_email(
    to: str,
    subject: str,
    template: str,
    ctx: dict[str, Any],
) -> None:
    content = await render_template(template, **ctx)
    log.info("Sending %s to %s
%s", template, to, content)
We’ll also need to configure the logging, which we can do with a basic setup by adding the following code to backend/src/backend/run.py:
import logging

logging.basicConfig(level=logging.INFO)
To send emails with the third-party Postmark, we will need to send HTTP requests to their API. To do so, we can use httpx, which is installed by running the following command in the backend directory:
pdm add httpx
We can then adjust the send_email function to send via Postmark if a token is available in the configuration by changing the code in backend/src/backend/lib/email.py as follows:
import logging
from typing import Any, cast

import httpx
from quart import current_app, render_template
log = logging.getLogger(__name__)

class PostmarkError(Exception):
    def __init__(self, error_code: int, message: str) -> None:
        self.error_code = error_code
        self.message = message
async def send_email(
    to: str,
    subject: str,
    template: str,
    ctx: dict[str, Any],
) -> None:
    content = await render_template(template, **ctx)
    log.info("Sending %s to %s
%s", template, to, content)
    token = current_app.config.get("POSTMARK_TOKEN")
    if token is not None:
        async with httpx.AsyncClient() as client:
            response = await client.post(
                "https://api.postmarkapp.com/email",
                json={
                    "From": "Tozo <[email protected]>",
                    "To": to,
                    "Subject": subject,
                    "Tag": template,
                    "HtmlBody": content,
                },
                headers={"X-Postmark-Server-Token": token},
            )
        data = cast(dict, response.json())
        if response.status_code != 200:
            raise PostmarkError(                data["ErrorCode"], data["Message"]            )
The send_email function now uses httpx to send a post request to Postmark, including the required token as a header and the email content in the request JSON body. Any errors returned by Postmark are raised as an easily identified PostmarkError. We can now focus on how we can use emails in the tests.
Testing that emails are sent
When testing functionality in the backend, we’ll often want to check that an email was sent. We can do this by testing the send_email function by adding the following code to backend/tests/lib/test_email.py:
from pytest import LogCaptureFixture
from quart import Quart
from backend.lib.email import send_email
async def test_send_email(
    app: Quart, caplog: LogCaptureFixture
) -> None:
    async with app.app_context():
        await send_email(
            "[email protected]", "Welcome", "email.html", {}
        )
    assert "Sending email.html to [email protected]" in caplog.text
caplog is a pytest fixture that captures everything that is logged during the test. This allows us to check that our email was logged by looking for the specific text.
With the backend now set up, we have everything we need in place to start developing our app’s API. The folder structure at this stage is as follows:
tozo
├── .github
│   └── workflows
├── backend
│   ├── src
│   │   └── backend
│   │       └── blueprints
│   │       └── lib
│   │       └── templates
│   └── tests
│       └── backend
│           └── blueprints
│           └── lib
├── frontend
│   ├── public
│   └── src
└── infrastructure
Summary
In this chapter, we’ve built a backend app in Quart that we can build our specific API on. It can connect to the database, manage user sessions, protect itself against heavy and incorrect usage, and send emails to the users.
The features we’ve built in this chapter are common to many apps, and hence they will be useful for the app you are trying to build. In addition, the backend built in this chapter is generic and can be adapted for your specific use.
In the following chapter, we’ll add an API to manage the users, allow users to log in, and support the to-do functionality we are building in this book.
Further reading
We’ve chosen to send only HTML emails for simplicity in this book; however, it is better practice to send multipart emails with HTML and plain-text parts. You can read an advocacy for this at https://useplaintext.email.