
8 Working with data
- Understanding the value of Entity Framework Core and how it works
- Managing the database schema with Entity Framework Core
- Using Entity Framework Core to query and manage data
- Scaffolding Razor Pages that work with Entity Framework Core and improving the output
So far we have concentrated our efforts on exploring features of the Razor Pages framework and how they work to generate HTML. This chapter takes a slight departure from that, focusing instead on a different framework known as Entity Framework Core (EF Core).
All but the simplest interactive web applications rely on the persistence and retrieval of data to support their dynamic content. That data is most often stored in and retrieved from a relational database of some kind. In the bad old days, the code required to manage these data access tasks was very repetitive. You would establish a connection to the database in code each time you wanted to communicate with the database, define the SQL query you wanted to execute, execute it, and capture the returned data in a low-level container, such as a Recordset, DataTable, or DataReader, and then process the data into some form your application could work with. The primary role of EF Core is to abstract that away, so you can concentrate on writing code to work with the data instead of code to retrieve it from a database. This chapter performs the basic CRUD operations with EF Core via its context, an object that derives from DbContext, which is central to working with EF Core.
EF Core is a lot more powerful than just replacing the boilerplate code required to execute commands against a database. We will explore how it can be used to generate a database from your application model and then keep your database schema in sync with the model with a feature called migrations. We will also look at the conventions EF Core uses to map your model to the database and how you can use configuration to customize those mappings if needed.
This chapter will also cover a feature known as scaffolding. This feature combines your application model and database knowledge to quickly generate working CRUD pages for specific objects within the model. You’ll understand the limitations of the code generated by the scaffolding tools and see how to improve them to comply with some of the software engineering principles we looked at in the last chapter.
By the end of this chapter, you will understand the role of EF Core and how to use it to execute commands against a relational database, manage that database’s schema, and generate CRUD pages. EF Core is, however, a massive topic; we’ll only scratch the surface of its capabilities and use in this book. To get the best out of this fantastic tool, you should obtain a copy of the excellent Entity Framework Core in Action (2nd ed.) by Jon P. Smith (http://mng.bz/vXr4) and refer to the official documentation (https://docs.microsoft.com/en-us/ef/core/).
8.1 What is Entity Framework Core?
EF Core is an object-relational mapping (ORM) tool. Its role is to map between objects (your application model) and the relational world (your database). EF Core works with many databases, including the popular Microsoft SQL Server and MySQL database systems. This book will use EF Core with SQLite, an open source, cross-platform, file-based database. While lacking many advanced features you find in more powerful server-based systems, SQLite is easy to use, requiring no installation or configuration, and will suffice for the EF Core features we will explore in this chapter.
8.1.1 Why choose EF Core?
You could use low-level, old-school ADO.NET APIs to manage communication with the database, but the code required is repetitive (did I say that already?) and boring to write. One solution would be to write your own library of helpers to reduce the repetition. But then you would have to maintain that code yourself. Data access libraries are abundant, and unless you can see ways to improve on existing offerings, writing your own is likely to be a waste of time if you just need to get on with producing a web application.
You are free to use any library you like for managing data access in Razor Pages applications, so of all the abundant existing libraries, why choose EF Core? Being part of .NET, it is well supported and tested and enjoys a significant amount of official documentation. On top of the official docs, there are a huge number of community contributions, such as books, blog posts, and tutorial sites, that explore the more esoteric features of EF Core along with its most common workflows. If all else fails and you struggle to get something to work, you can post an issue to the EF Core GitHub repo (https://github.com/dotnet/efcore), where you might even get a response from one of the developers on the EF Core team.
EF Core enjoys tooling support within Visual Studio that can help you quickly generate CRUD pages based on your application model. While the results are not perfect, they provide a significant head start to developing the more mundane parts of your application. The scaffolding support is also available to non-Visual Studio users from the command line. You will see this in action later.
8.1.2 How does EF Core work?
At a fundamental level, EF Core creates a conceptual model of how your domain objects and their properties—your application model—map to tables and columns in a database. It also understands the associations between domain objects and can map those to database relationships. It is a drop-in data layer for your application, sitting between the domain (on the left-hand side of figure 8.1) and the data store (on the right-hand side of figure 8.1).

Figure 8.1 EF Core sits between the domain objects on the left and the database on the right and maps objects and their properties and associations to database tables, columns, and relationships.
EF Core manages communication between your business objects and the data store. Language-Integrated Query (LINQ) will help you create query specifications within your application code and provide those to EF Core. Your LINQ queries are translated into SQL commands by EF Core, which executes them against the database, as illustrated in figure 8.2. The SQL EF core generates is parameterized, meaning it is protected against potential SQL injection attacks (http://mng.bz/49qj). You will study SQL injection attacks in more detail in chapter 13 when you focus on securing your application against external threats.

Figure 8.2 EF Core workflow, taking your LINQ query, converting it to SQL to execute against the database, and returning the results in a form you can work with in your application
If your query is designed to return data, EF Core takes care of converting the data from the database into your domain objects. If you are familiar with software design patterns, you may well recognize this as an implementation of the Repository pattern (http://mng.bz/QnYv).
The SQL generated by EF Core depends on the provider you use. Each database system has its own provider, so in theory, the generated SQL should be optimized for the specific database. EF Core hides all of this away from your application code, so your LINQ query will work without amendment if you need to change the provider at some point. While migrations from one actual database system to another are rare in the real world, this capability is more useful if you want to replace your physical database with an in-memory database for testing purposes.
The approach you take when working with EF Core is known as code first (as opposed to database first), meaning you concentrate your efforts on developing the application model and allow EF Core to use the model as the basis for maintaining the database schema, using a concept known as migrations. EF Core can also create the database itself if it doesn’t exist. EF Core relies on several conventions to map objects and their properties to database tables and columns and create relationships. You will explore the most important conventions as you refine your domain model to work with EF Core. In addition to the conventions that “just work,” EF Core provides extensive configuration options that enable you to control how your model maps to tables and columns in the database.
8.1.3 Managing relationships
Relational database systems exist solely to facilitate working with sets of data that relate to each other. Within the database, relationships between different entities are represented by the presence of foreign keys. In figure 8.3, Country and City are related in a one-to-many relationship by the CountryId foreign key on the City table.
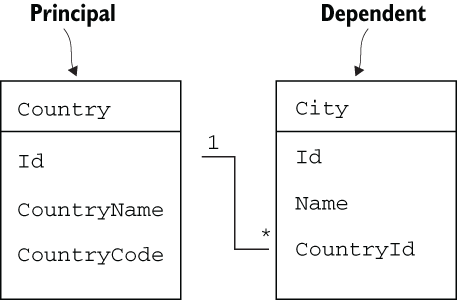
Figure 8.3 A one-to-many relationship exists between Country and City, where one country can have many cities.
By convention, relationships in an EF Core model are represented by navigational properties. These are properties in a class that cannot be mapped to a primitive or scalar value, such as a string, Boolean, integer, or datetime type. Your existing City class (see the next listing) already has a Country property that fits the description of a navigational property.
Listing 8.1 The City class with the Country navigational property
public class City
{
    public int Id { get; set; }
    public string Name { get; set; }
    public Country Country { get; set; }    ❶
}
❶ Country is a navigational property.
This is all that is needed for EF Core to infer a one-to-many relationship between the Country and City entities, where the Country is the principal in the relationship and the City is the dependent. In this example, the Country property is referred to as a reference navigation property, which has a multiplicity (the potential number of items at one end of a relationship) of zero or one. More commonly, EF Core relationships are fully defined, having properties representing each end of the relationship and a property representing the foreign key value. In listing 8.2, you add a property representing the CountryId foreign key to the City class and a collection navigation property to the Country class representing all the cities that could belong to a single country. As a best practice, you should always instantiate collection navigation properties as part of their declaration, so you can avoid having to test for null when accessing them in code.
Listing 8.2 Fully defined one-to-many relationship between Country and City
public class City
{
    public int Id { get; set; }
    public string Name { get; set; }
    public int CountryId { get; set; }                          ❶
    public Country Country { get; set; }                        ❷
}

public class Country
{
    public int Id { get; set; }
    public string CountryName { get; set; }
    public string CountryCode { get; set; }
    public List<City> Cities { get; set; } = new List<City>();  ❸
}❷ Reference navigation property representing the one country a city belongs to
❸ Collection navigation property representing the many cities that can belong to a country, instantiated to ensure that it can never be null
Object-oriented purists are generally not keen on the idea of including foreign key properties in domain classes because they see this as an example of the relational database world “bleeding” into the domain. If you omit the foreign key property, EF Core will create a shadow foreign key property (http://mng.bz/Xawa) as part of its conceptual model.
By convention, a property named Id or <entity_name>Id is seen as the primary key value, and EF Core will map it to an IDENTITY column. Both of your domain classes have an Id property, but EF Core will also see CityId in the city class or CountryId in the country class as representing the primary key. Foreign key properties should use the name of the reference navigation property followed by Id—CountryId, in our example.
You have yet to create a class in your model representing properties vacationers can rent. So using the information above to create a one-to-many relationship between cities and properties, the following listing shows the Property class that should be added to the Models folder.
Listing 8.3 The Property class
public class Property
{
    public int Id { get; set; }                  ❶
    public string Name { get; set; }
    public string Address { get; set; }
    public int CityId { get; set; }              ❷
    public City City { get; set; }               ❷
    public int MaxNumberOfGuests { get; set; }
    public decimal DayRate { get; set; }
    public bool SmokingPermitted { get; set; }
    public DateTime AvailableFrom { get; set; }
}❷ The foreign key and reference navigation property
You also need to amend the City class to include a collection navigation property representing the properties that belong to a city, bolded in the following listing.
Listing 8.4 Updating the City class to include a collection of Properties
public class City
{
    public int Id { get; set; }
    public string Name { get; set; }
    public int CountryId { get; set; }
    public Country Country { get; set; }
    public List<Property> Properties { get; set; } = new List<Property>();
}
Now that the model has been configured so that EF Core will recognize its relationships, you can start working with EF Core.
8.1.4 Installing Entity Framework Core
EF Core is not included in a web application project by default. You need to install it as an additional package from NuGet. The simplest way to install packages that doesn’t depend on which IDE you are using is adding a new package reference to your project file: the CityBreaks.csproj file in the root of your application folder. The project file is visible in the explorer and is easily accessible if you are using VS Code. It is not visible in the Visual Studio Solution Explorer. You need to right-click the project name and choose Edit Project File from the context menu that appears. Once you have the file open, add a new PackageReference entry to an existing ItemGroup, or create a new ItemGroup node:
<ItemGroup>
   <PackageReference Include="Microsoft.EntityFrameworkCore.Sqlite"
    ➥ Version="6.0.0" />
</ItemGroup>
Visual Studio users should notice that when you add a package this way, VS automatically runs the restore command and fetches the required libraries from NuGet. Using VS Code, you need to execute the dotnet restore command yourself from the terminal. The C# extension should prompt you to do this.
Alternatively, you can use the dotnet add command to add a package in VS Code. The command is:
dotnet add package Microsoft.EntityFrameworkCore.Sqlite
VS Code will automatically restore all packages after that command has been executed.
Visual Studio users have built-in tools for managing packages. Go to Tools > NuGet Package Manager, and from there, you can choose to Manage NuGet Packages for Solution. This brings up a dashboard UI that allows you to manage previously installed packages as well as search for and install additional ones. Or you can invoke the Package Manager Console (PMC) and execute commands for managing packages. To add a package, you use the install-package command:
install-package Microsoft.EntityFrameworkCore.Sqlite
Once again, VS will automatically restore your packages after the package has been resolved.
8.1.5 Create the context
The entry point to working with EF Core in code is the context—an object derived from DbContext. It represents a session with a database and provides an API for communicating with the database to perform data operations, such as querying and data persistence. It also supports more advanced features, such as model building and data mapping, which we will touch on later, as well as transaction management, object caching, and change tracking, which aren’t be covered in this book.
The steps required to deliver a working context to the application are
Starting at step 1, add a new folder to the project named Data, and within that, add a new class file named CityBreaksContext.cs with the following code.
Listing 8.5 The CityBreaksContext
using Microsoft.EntityFrameworkCore;

namespace CityBreaks.Data
{
    public class CityBreaksContext : DbContext
    {
        public CityBreaksContext(DbContextOptions options) : base(options)
        {

        }
    }
}
The class has a constructor that takes a DbContextOptions object as a parameter. You will configure this object when registering the context as a service, providing a connection string. First, you need to add a connection string to the application. You will use the main configuration file for this purpose. If you recall from chapter 2, this is the appSettings.json file. You will add a property called ConnectionStrings. The naming of this property, or section, is important because it is a convention the configuration API relies on to locate connection strings. Then you will provide a name for the connection string and its value.
Listing 8.6 Adding a connection string to appSettings.json
{
  "Logging": {
    "LogLevel": {
      "Default": "Information",
      "Microsoft": "Warning",
      "Microsoft.Hosting.Lifetime": "Information"
    }
  },
  "AllowedHosts": "*",
  "ConnectionStrings": {
    "CityBreaksContext": "Data source=Data/CityBreaks.db"   ❶
  }
}
❶ The connections strings section and the actual connection string
SQLite connection strings are nice and simple, representing the path to the database file. In your application, you will house the database file in the Data folder alongside the context. The file will be created by EF Core when you run your first migration a bit later.
The final step is to register the context with the service container. As you learned from the last chapter, you do this in the Program.cs file. You need to add some using directives to bring in Microsoft.EntityFrameworkCore and CityBreaks.Data before adding the following code.
Listing 8.7 Configuring the CityBreaksContext
builder.Services.AddDbContext<CityBreaksContext>(options =>
{
    options.UseSqlite(builder.Configuration.GetConnectionString
    ➥ ("CityBreaksContext"));
});
The GetConnectionString method locates the specified connection string within the ConnectionStrings section of appSettings.json, while the UseSqlite method sets up the correct database provider for EF Core to use.
You have your context and have registered it as a service. At the moment, it’s pretty useless; it’s like having an empty database. You will need some database tables represented in the context by DbSet<TEntity> properties, where TEntity is the entity you want the table to represent. Figure 8.4 illustrates the relationship between entities, DbSets and the database.
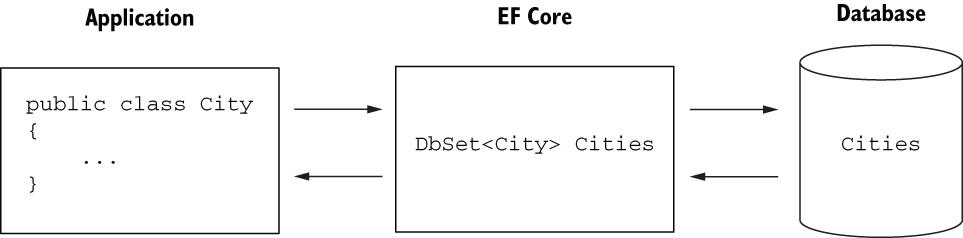
Figure 8.4 Each entity is represented by a DbSet, which is mapped to a table in the database.
8.1.6 Adding DbSets
First you will add a DbSet to the context for each entity you want to map to a database table. By convention, the table will take the name of the DbSet property. The next listing shows the three classes you have created in your model so far, each represented as a DbSet<TEntity>.
Listing 8.8 DbSet properties mapping to tables in a database
public class CityBreaksContext : DbContext
{
    public CityBreaksContext(DbContextOptions options) : base(options)
    {

    }
    public DbSet<City> Cities { get; set; }
    public DbSet<Country> Countries { get; set; }
    public DbSet<Property> Properties { get; set; }
}
8.1.7 Configuring the model
If you were to create a migration at this stage, it would generate a database with three tables, one for each DbSet, and it would use conventions to create columns based on the properties for each of the types represented by the DbSet type parameter. In most real-world applications, the default conventions will be acceptable for most of your model, especially if you are starting from scratch. For those cases in which the conventions aren’t suitable or EF Core needs help understanding your intentions, EF Core provides configuration APIs that allow you to override the conventions.
Configuration targets three levels: the model, types, and properties. You can configure the schema EF Core uses for objects at the model level. Type configuration options enable you to configure the table’s name that a type maps to or how relationships should be specified between types. Property configuration provides extensive options for managing how individual properties map to columns, including their name, data type, default values, and so on.
Configuration can be applied in two ways: by decorating classes and properties with attributes or by using a fluent API that consists of a collection of extension methods that can be chained together. Attributes only provide a subset of configuration options. Therefore, for any reasonably complex model, you are likely to need to rely on the fluent API for some configuration. Consequently, it makes sense to use the fluent API for all configurations, keeping your configuration code consistent, and therefore easier to reason about, and in one place.
So where should you put your fluent API configuration code? You have two options: you can override the DbContext OnModelCreating method in your own context class and place the configuration code there, or you can place configuration code in separate classes for each entity and then reference those classes in the OnModelCreating method. You will adopt the latter approach, since it is the recommended way to manage this aspect of your application.
Configuration classes derive from IEntityTypeConfiguration<TEntity>, which implements one method, Configure, which takes an EntityTypeBuilder<TEntity> as a parameter. It is in this method that you will place your configuration code.
Start by creating a new folder in the Data folder, naming it Configurations. Add a C# class file to the new folder, named CountryConfiguration, with the following code.
Listing 8.9 The CountryConfiguration class
using CityBreaks.Models;
using Microsoft.EntityFrameworkCore;
using Microsoft.EntityFrameworkCore.Metadata.Builders;

namespace CityBreaks.Data.Configuration;
public class CountryConfiguration : IEntityTypeConfiguration<Country>   ❶
{
    public void Configure(EntityTypeBuilder<Country> builder)           ❷
    {
        builder.Property(x => x.CountryName)
            .HasMaxLength(50);                                          ❸
        builder.Property(x => x.CountryCode)
            .HasColumnName("ISO 3166 code")                             ❹
            .HasMaxLength(2);                                           ❹
    }
}
❶ The class implements IEntityTypeConfiguration<TEntity>.
❷ Implement the Configure method, as required by the interface.
❸ Use the HasMaxLength method to constrain the length of the text field for the CountryName property.
❹ Map the CountryCode property to a column named "ISO 3166 Code" and constrain its size.
String properties conventionally map to nvarchar(max) datatypes in SQL Server. You have used the HasMaxLength method to apply a limit to the size of a text-based column in databases that support it. SQLite doesn’t support this method, so unless you are working with SQL Server instead, this configuration will have no effect. Nevertheless, the HasColumnName method will work in any database and map the CountryCode property to the "ISO 3166 code" column. You can see the fluent API with the HasMaxLength method chained to the HasColumnName method when configuring the CountryCode property.
8.2 Migrations
You are almost at the point where you can create a migration that keeps the database schema in sync with the model. The migration tooling examines the DbSet properties of the context and compares them to a snapshot generated by the previous migration if there was one. Any differences result in C# code being generated, which, when executed, is translated into SQL that applies changes to the actual database. The first migration will result in the database being created if it doesn’t already exist. It is also possible to generate the migration SQL scripts on demand, so you can apply them to the database yourself. This is particularly useful for making the changes to your live database, where it is often difficult, if not impossible, to execute C# code.
One other aspect of configuration that can be very useful is the capability to specify seed data, which is used to populate the database during a migration. This feature has obvious uses in that it can get you started with a set of data without manually entering it. In the next section, you will look at using this feature with some country data, followed by some city data.
The migration download that comes with this chapter (http://mng.bz/jAra) also includes seed data for the Property type as well as some images (courtesy of https://unsplash.com/) for cities. I recommend you obtain the relevant code and images from the GitHub repo and use that for your migration, so your database content matches the examples going forward.
8.2.1 Seed data
You will use the Fluent API HasData method to specify seed data for an entity as part of its configuration. You must specify primary and foreign key values, so the migration can determine if any changes have been made to data outside of migrations. Such changes will be overwritten, so the seeding feature is most suitable for static data that will not change. If data is likely to change once it has been added using the seeding feature, you can comment out the relevant code, so it is not called in subsequent migrations. The following listing shows the Configure method in the CountryConfiguration class amended to include the HasData method call, which takes a collection of the relevant types.
Listing 8.10 Country seed data
public void Configure(EntityTypeBuilder<Country> builder)
{
    builder.Property(x => x.CountryName)
        .HasMaxLength(50);
    builder.Property(x => x.CountryCode)
        .HasColumnName("ISO 3166 code")
        .HasMaxLength(2);
    builder.HasData(new List<Country>
    {
        new Country {Id = 1, CountryName = "Croatia", CountryCode="hr" },
        new Country {Id = 2, CountryName = "Denmark", CountryCode =  "dk" },
        new Country {Id = 3, CountryName = "France", CountryCode = "fr" },
        new Country {Id = 4, CountryName = "Germany", CountryCode = "de" },
        new Country {Id = 5, CountryName = "Holland", CountryCode = "nl" },
        new Country {Id = 6, CountryName = "Italy", CountryCode = "it" },
        new Country {Id = 7, CountryName = "Spain", CountryCode = "es" },
        new Country {Id = 8, CountryName = "United Kingdom",
        ➥ CountryCode = "gb" },
        new Country {Id = 9, CountryName = "United States",
        ➥ CountryCode = "us" }
    });
}
To add seed data for cities, you first need to add a property to the City class to represent an image. I will call this property Photo, but you will configure it to map to a column named Image.
Listing 8.11 Adding the Photo property to the City class
public class City
{
    public int Id { get; set; }
    public string Name { get; set; }
    public string Photo { get; set; }
    public int CountryId { get; set; }
    public Country Country { get; set; }
    public List<Property> Properties {  get; set; } = new List<Property>();
}
Now you need to add another IEntityTypeConfiguration class to the Configuration folder, this time named CityConfiguration, with the following code.
Listing 8.12 The City configuration class
using CityBreaks.Models;
using Microsoft.EntityFrameworkCore;
using Microsoft.EntityFrameworkCore.Metadata.Builders;

namespace CityBreaks.Data.Configuration;
public class CityConfiguration : IEntityTypeConfiguration<City>
{
    public void Configure(EntityTypeBuilder<City> builder)
    {
        builder.Property(x => x.Photo).HasColumnName("Image");
        builder.HasData(new List<City>
        {
            new City { Id = 1, Name = "Amsterdam", CountryId = 5,
            ➥ Photo = "amsterdam.jpg" },
            new City { Id = 2, Name = "Barcelona", CountryId = 7,
            ➥ Photo ="barcelona.jpg" },
            new City { Id = 3, Name = "Berlin", CountryId = 4,
            ➥ Photo ="berlin.jpg" },
            new City { Id = 4, Name = "Copenhagen", CountryId = 2,
            ➥ Photo ="copenhagen.jpg" },
            new City { Id = 5, Name = "Dubrovnik", CountryId = 1,
            ➥ Photo ="dubrovnik.jpg" },
            new City { Id = 6, Name = "Edinburgh", CountryId = 8,
            ➥ Photo ="edinburgh.jpg" },
            new City { Id = 7, Name = "London", CountryId = 8,
            ➥ Photo ="london.jpg" },
            new City { Id = 8, Name = "Madrid", CountryId = 7,
            ➥ Photo ="madrid.jpg" },
            new City { Id = 9, Name = "New York", CountryId = 9,
            ➥ Photo ="new-york.jpg" },
            new City { Id = 10, Name = "Paris", CountryId = 3,
            ➥ Photo ="paris.jpg" },
            new City { Id = 11, Name = "Rome", CountryId = 6,
            ➥ Photo ="rome.jpg" },
            new City { Id = 12, Name = "Venice", CountryId = 6,
            ➥ Photo ="venice.jpg" }
        });
    }
}
Note that you have used the HasColumnName method to map the Photo property to a column named Image.
The final configuration is for the Property type. This configuration consists purely of seed data, and the example in the book’s downloads includes 50 fictitious property details. You can either generate your seed data based on what you have learned so far or copy the configuration file’s contents from the book’s GitHub repo: http://mng.bz/yaBd.
Once the configuration classes are done, you will need to register them with the DbContext. You can do this by overriding the OnModelCreating method in the CityBreaksContext class and then using the ModelBuilder ApplyConfiguration method to register each type. Since the ApplyConfiguration method returns a ModelBuilder, you can chain these calls.
Listing 8.13 Registering configurations in the OnModelCreating method
protected override void OnModelCreating (ModelBuilder builder)
{
    builder
        .ApplyConfiguration(new CityConfiguration())
        .ApplyConfiguration(new CountryConfiguration())
        .ApplyConfiguration(new PropertyConfiguration());
}
8.2.2 Adding migration tools
Before creating a migration, you need to add the necessary package to the project that contains the commands for managing them. Two packages are available, each one having a different set of commands. The one you use will depend on what tool you want to use to execute the migration commands.
If you are a Visual Studio user, you can use the Package Manager Console; in that case you will want the PowerShell commands contained in the Microsoft.EntityFrameworkCore.Tools package. Alternatively, you can use the cross-platform CLI commands available in the Microsoft.EntityFrameworkCore.Design package instead. Once you have selected your package, you can use whichever method you prefer from those covered earlier to add the package to your project. If you are using the CLI commands, you must also ensure that the dotnet-ef tools are installed globally, which you can do using the following command:
dotnet tool install --global dotnet-ef
8.2.3 Creating and applying a migration
Once the tools and relevant package are installed, you can create your first migration. You will use one of the following commands:
[Powershell]                       ❶
add-migration Create               ❶
[CLI]                              ❷
dotnet ef migrations ad Create     ❷
❶ The PowerShell command to be executed from within the Package Manager Console in Visual Studio
❷ The CLI command to be executed from a command prompt located within the directory containing the csproj file
The migration is named Create. Successful execution of whichever command you used has resulted in a new folder being added to the project, named Migrations. Figure 8.5 shows the Migrations folder and its contents in the Visual Studio Code file explorer.

Figure 8.5 The generated Migrations folder, containing three files
The new folder contains three files:
-
[Timestamp]_Create.cs—Contains a class named Create with two methods: Up and Down. The Up method applies changes to the database, while the Down method reverts them.
-
[Timestamp]_Create.Designer.cs—Contains metadata used by EF Core.
-
CityBreaksContextModelSnapshot.cs—A snapshot of the model as it is currently. When you add another migration, this snapshot is used as the baseline to determine what has changed.
The first two files are specific to the migration. New ones will be added for additional migrations. The model snapshot file will be updated for each new migration. If you look at the contents of the Up method in the first file, the C# code should be self-explanatory. You are free to amend this as you see fit prior to applying the migration to the database. For example, in later migrations, you may want to be able to execute some custom SQL as part of the procedure, such as bringing in non-seed data. I don’t cover that in this book, but it is useful to know that the capability is available should you need it. However, I usually take a look at the migration code to ensure that the changes I intend to apply are reflected there. More than once, I’ve realized by looking at the migration code that I have not configured a property correctly. When that is the case, you can adjust the model configuration and then use the remove-migration (PowerShell) or dotnet ef migrations remove (CLI) commands to remove the existing migration before adding it back again, using the same command as before.
Having generated the migration and checked that it does what you want, you will apply it using one of the following commands:
[Powershell]
update-database
[CLI]
dotnet ef database update
Once you have executed one of these commands, you should see that a SQLite database file has been created in the Data folder: CityBreaks.db. Using whichever tool you prefer (I use the cross-platform DB Browser for SQLite; https://sqlitebrowser.org/), take a look at the schema (figure 8.6). In addition to tables for each of your model classes, the database includes a table named __EFMigrationsHistory.
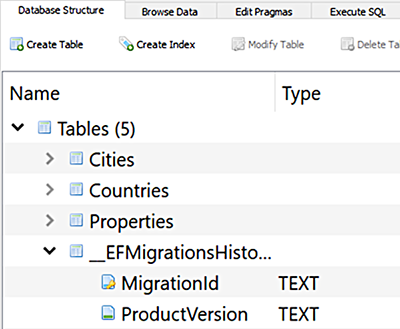
Figure 8.6 The new database includes a table named __EFMigrationsHistory.
This table keeps track of which migrations have been applied to the database. At the moment, it contains one record consisting of the name of the migration you just applied as well as the version of EF Core that was used.
8.3 Querying data
Your database is populated with the seed data, and it is about time you started working with it. You will use LINQ to express the commands you want EF Core to execute against the database. LINQ comprises a set of extension methods on the IEnumerable type that enable selection and filtering operations against collections. The collections you operate on are the DbSet objects in your context.
EF Core is responsible for translating the LINQ query into SQL to be executed against the database. The SQL generated is dependent on the provider used, taking into account database-specific features.
You can take one of two approaches when writing LINQ queries. You can use query syntax or method syntax. Query syntax looks similar to SQL statements, and some folk feel more comfortable with it. The following example shows query syntax being used to obtain all cities that belong to a country having a primary key value of 1:
var data = from c in _context.Cities where c.CountryId == 1 select c;
However, much like how data annotation attributes only provide a subset of model configuration options, query syntax is not always enough. Some queries can only be expressed using method calls.
My preference is for method syntax, which consists of chaining calls to extension methods on the IEnumerable type (http://mng.bz/M0RB). Using query syntax, your code is translated to method calls when it is compiled, so there is no performance difference between the two approaches. We only use method syntax in this book. If you are interested in learning more about query syntax, the official LINQ documentation provides many examples: http://mng.bz/aPNm.
8.3.1 Retrieving multiple records
The first thing you will do is to create a new service for cities that will use the database as a source for their data. Add a new class file to the Services folder, calling this one CityService.cs. This class will implement the ICityService interface you created in the last chapter, and it will take the CityBreaksContext as a dependency. The initial code for the class is shown in the following listing.
Listing 8.14 The CityService class
using CityBreaks.Data;
using CityBreaks.Models;
using Microsoft.EntityFrameworkCore;

namespace CityBreaks.Services;
public class CityService : ICityService
{
    private readonly CityBreaksContext _context;
    public CityService(CityBreaksContext context) => _context = context;
    public async Task<List<City>> GetAllAsync()
    {
        var cities = _context.Cities             ❶
            .Include(c => c.Country)             ❷
            .Include(c => c.Properties);         ❷
        return await cities.ToListAsync();       ❸
    }
}
❶ The entry point to a query is the DbSet.
❷ Use the Include method to specify related data you want included in the query.
❸ The ToListAsync method call causes query execution.
LINQ queries consist of two phases: the specification phase and the execution phase. In our example, the specification of the query takes place in the first three lines of the GetAllAsync method. The execution is deferred until the last line, where you call the ToListAsync method. It is only at that point that a call to the database is made. This ability to defer execution enables you to continue to compose the specification by adding additional criteria. For example, you might want to filter the query to only return cities in France, which you can do within a Where method call that takes a predicate representing the filter condition(s):
var cities = _context.Cities
    .Where(c => c.Country.CountryName == "France")
    .Include(c => c.Country)
    .Include(c => c.Properties);
You want to return all cities, including their related country and properties, so you can display details on the home page of the application. However, you only want to include currently available properties, so you apply the filter to the Include method:
var cities = _context.Cities
    .Include(c => c.Country)
    .Include(c => c.Properties.Where(p => p.AvailableFrom < DateTime.Now));
The next step is updating the Index.cshtml.cs file content and replacing the existing content with the following code, which injects the ICityService into the constructor and uses it to obtain city data.
Listing 8.15 Revised IndexModel code for the home page
using CityBreaks.Models;
using CityBreaks.Services;
using Microsoft.AspNetCore.Mvc.RazorPages;

namespace CityBreaks.Pages
{
    public class IndexModel : PageModel
    {
        private readonly ICityService _cityService;

        public IndexModel(ICityService cityService)
        {
           _cityService = cityService;
        }

        public List<City> Cities { get; set; }
        public async Task OnGetAsync() => Cities =
        ➥ await _cityService.GetAllAsync();
    }
}
Then you remove the list box from the home page (if it is still there from chapter 5) and replace it with the following.
Listing 8.16 Updated Razor code for the home page
<h1>City Breaks</h1>
<div class="container">
    <div class="row">

        @foreach (var city in Model.Cities)                                  ❶
        {
            <div class="col-4 p-3" style="text-shadow: rgb(0, 0, 0) 1px 1px
             ➥ 1px">
                <div class="card p-3 shadow"                                 ❷
                ➥ style="background:url(/images/cities/@city.Photo)         ❷
                ➥ no-repeat center;background-size: cover;height:240px;">   ❷
                    <h3>
                        <a class="text-white text-decoration-none"           ❸
                        ➥ asp-page="/City" asp-route-name="@city.Name">     ❸
                        ➥ @city.Name</a>                                    ❸
                       <img                                                  ❹
                       ➥ src="/images/flags/@(city.Country.CountryCode).png"❹
                       ➥ aria-label="@($"{city.Name},                       ❹
                       ➥ {city.Country.CountryName}")">                     ❹
                    </h3>
                    <h6 class="text-white">                                  ❺
                     ➥ @city.Properties.Count()properties</h6>              ❺
                </div>
            </div>
        }
    </div>
</div>
❶ Loop through all of the cities.
❷ Use the Photo property of each city to set a background image.
❸ Output the name of the city.
❹ Reference the city’s Country property and use its CountryCode to render the appropriate flag icon.
❺ Use the Count() method to render the total number of properties associated with each city.
Now you just need to replace the existing SimpleCityService registration in Program.cs with one that specifies the new CityService as the implementation to use for ICityService:
builder.Services.AddScoped<ICityService, CityService>();
Once this has been done, you can run the application and enjoy the new home page (figure 8.7).

Figure 8.7 The home page displays data from the database.
Before you move on, navigate to /property-manager /create to ensure the select-city list is populated. Previously, that data came from the SimpleCityService, and now it originates from the database. Not only do you have a working database connected to your application, but you also have a great example of how loose coupling enables changes to be made to the application with a minimum of fuss. You haven’t had to touch the code in either of the Create page’s files to get it to work with a database. All you had to do was change the service registration.
8.3.2 Selecting single records
Now that you have a good working example of selecting multiple records, you will amend the City page to retrieve a single record based on a value passed in the URL. First, you need to update the ICityService to include a new method called GetByNameAsync, which takes a string as a parameter and returns a Task<City>.
Listing 8.17 Adding new method to the ICityService
public interface ICityService
{
    Task<List<City>> GetAllAsync();
    Task<City> GetByNameAsync(string name);
}
You have two services that implement this interface; you won’t be using the SimpleCityService again, so you can safely delete it or use the NotImplementedException to create a stub for the method that satisfies the interface contract as far as the compiler is concerned:
public Task<City> GetByNameAsync(string name) => throw new
➥ NotImplementedException();
If you choose to take the latter route, you will need to remember to do the same for all other methods you add to the ICityService interface going forward. Next you will provide a working implementation in the CityService class.
Listing 8.18 Query that returns a single city using the name as the criteria
public async Task<City> GetByNameAsync(string name)
{
    return await _context.Cities
        .Include(c => c.Country)
        .Include(c => c.Properties.Where(p => p.AvailableFrom <
         ➥ DateTime.Now))
        .SingleOrDefaultAsync(c => c.Name == name);
}
The query differs from the previous one only in the method used to cause execution. This time, you use the SingleOrDefaultAsync method. This method expects there to be zero or one matching records in the database. If no records match, the method returns the default value, which is null in this case. If more than one record matches the criteria, an exception will be raised. If you expect there to be only one matching record, you can use the SingleAsync method, which returns an exception in the event of no matches. If you believe more than one record might match the criteria, you should use the FirstAsync or FirstOrDefaultAsync method, depending on whether there is a possibility of no matches. This will return the first match based on the default order of the database or the order you specify via an OrderBy method. For example:
return _context.Cities.OrderBy(c => c.Name).FirstAsync(c => c.Name == name);
You use the SingleOrDefaultAsync method here because you don’t have total control over the value being passed in to the method. You may think you do because your code generates the links from data that comes from the database. However, you are exposing that data to the outside world when you include it as part of a URL and cannot trust it will not be changed, innocently or otherwise. Next you need to change the code for the CityModel class, so replace the content of PagesCity.cshtml.cs with the following code.
Listing 8.19 Revised CityModel code
using CityBreaks.Models;
using CityBreaks.Services;
using Microsoft.AspNetCore.Mvc;
using Microsoft.AspNetCore.Mvc.RazorPages;

namespace CityBreaks.Pages;

public class CityModel : PageModel
{
    private readonly ICityService _cityService;
    public CityModel(ICityService cityService)
    {
        _cityService = cityService;
    }

    [BindProperty(SupportsGet = true)]
    public string Name { get; set; }
    public City City { get; set; }

    public async Task<IActionResult> OnGetAsync()
    {
        City = await _cityService.GetByNameAsync(Name);
        if(City == null)
        {
            return NotFound();
        }
        return Page();
    }
}
You inject the ICityService and use it to retrieve a city matching the name passed to the page in the URL. You should anticipate the result may be null, in which case, you will let the user know there is no matching page. All that remains now is displaying the details of the matching record if one is found.
To add some visual interest to the details, you are going to incorporate some free icons from Font Awesome (https://fontawesome.com). You will need to add a link to a CDN version of their icons in the PagesShared _Layout.cshtml file. Add the following line of code just before the closing </head> tag:
<link rel="stylesheet" href="https://cdnjs.cloudflare.com/ajax/libs/font-
➥ awesome/5.15.4/css/all.min.css" />
Now change the content of the PagesCity.cshtml file to the following.
Listing 8.20 Rendering details of the specified City
@page "{name}"
@model CityBreaks.Pages.CityModel
@{
    ViewData["Title"] = $"{Model.City.Name} Details";
}
<h3>@Model.City.Name</h3>
@foreach (var property in Model.City.Properties)
{
    <div class="mb-3">
        <h5>@property.Name</h5>
        <p class="mb-1">@property.Address</p>
        <i class="fas fa-euro-sign text-muted"></i>
        ➥ @property.DayRate.ToString("F2")<br>
        @if (!property.SmokingPermitted)
        {
            <i class="fas fa-smoking-ban text-danger"></i>
        }
        @for (var i = 1; i <= property.MaxNumberOfGuests; i++)
        {
            <i class="fas fa-bed text-info"></i>
        }
    </div>
}
The code loops through all the properties available in the city and renders their details, using Font Awesome icons to show a no smoking sign if smoking is not permitted and several bed icons representing the maximum allowed guests. You have also used the euro icon to represent a currency. All you have to do now is spin up the application and click one of the cities on the home page (figure 8.8).

Figure 8.8 The City page returns a 404 Not Found.
Oh! What happened there? Well, chances are if you are using SQL Server instead of SQLite, you can see details of the selected city. The problem with SQLite is that, by default, string comparisons are case sensitive. You are passing a lowercase value from the URL to the service method, which compares it to a mixed case value in the database. To get around this, you can use the EF.Functions.Collate method to specify the collation SQLite should use for this comparison. EF.Functions contain a collection of useful methods that translate to database functions and only apply to LINQ queries used within EF Core. The documentation provides a comprehensive list of them (http://mng.bz/gRrv). Open up the CityService, and change the GetByNameAsync method as follows.
Listing 8.21 Specifying the collation to be used for the query
public async Task<City> GetByNameAsync(string name)
{
    name = name.Replace("-"," ");                             ❶
    return await _context.Cities
        .Include(c => c.Country)
        .Include(c => c.Properties.Where(p =>
        ➥ p.AvailableFrom < DateTime.Now))
        .SingleOrDefaultAsync(c =>
        ➥ EF.Functions.Collate(c.Name, "NOCASE") == name);   ❷
}
❶ Replace the hyphens added by the page route parameter transformer with spaces, so they match database entries.
❷ Use EF.Functions.Collate to specify a collation of NOCASE for SQLite.
Once this correction is in place, you should be able to view details of your selected city (figure 8.9).

Figure 8.9 Details of the selected city are displayed.
Great! At this point, you have retrieved single instances of data as well as collections. You have also retrieved related data. Next we will concentrate on the other aspects of CRUD: creating new records, updating them, and deleting them. At the same time, we will look at another feature that will speed up the development of these examples: scaffolding.
8.4 Scaffolding CRUD pages
Scaffolding is a technique used to generate code at design time to support several common application scenarios when working with EF Core. The scaffolding tool supports the generation of Razor pages that interact with the database using the templates in table 8.1.
Table 8.1 The templates available to the scaffolding tool
In addition, the scaffolding tool supports an empty template, which is the equivalent of what you have seen whenever you’ve added a new Razor page to your application from either the Visual Studio dialog or the command line. The code that is generated by the scaffolding tool is rarely production ready. It provides a starting point only. You will use the tool to generate all CRUD pages for the Property class and then review the generated code to understand its shortcomings and what you will need to do to resolve any issues.
Before using the scaffolding tools, you must install a NuGet package that contains the templates: Microsoft.VisualStudio.Web.CodeGeneration.Design. If you are using Visual Studio, the IDE will attempt to add a reference to the latest stable version of this package when you use scaffolding. However, in my experience, Visual Studio reports an error after it has installed the package, requiring you to specify your scaffolding selection again. For that reason, I usually add the package reference manually. Suppose you want to use the command line for scaffolding. In that case, you will need to add the package manually anyway, using any available methods we have already covered for managing NuGet.
8.4.1 Visual Studio scaffold instructions
Scaffolding is built into Visual Studio and is accessible from the Add dialog. Right-click the PagesPropertyManager folder, and choose Add from the context menu. Then choose New Scaffolded Item... from the second menu group. Select Razor Pages from the dialog that appears, and then select Razor Pages using Entity Framework (CRUD). Next click the Add button. In the next dialog, select Property (CityBreaks.Models) as the Model class and CityBreaksContext as the Data context class. Leave the other options as their defaults; that is, Reference Script Libraries and Use a Layout Page should both be selected. Leave the layout page input empty. Refer to figure 8.10.
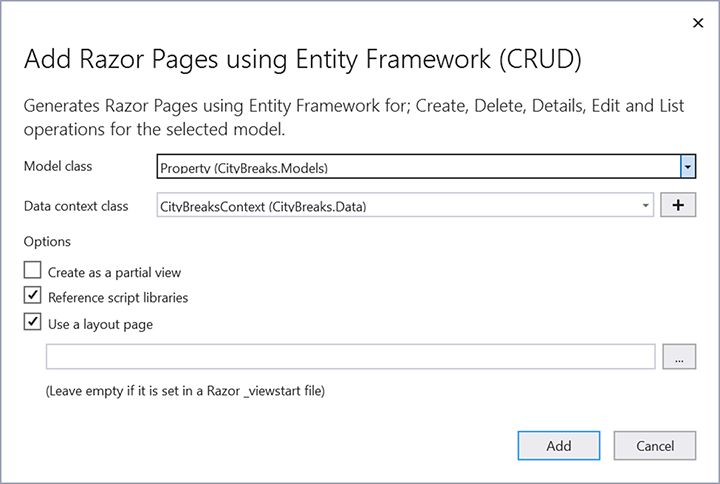
Figure 8.10 The scaffolding dialog in Visual Studio
Click the Add button. You will be prompted to replace the existing files related to the Create page. Click Yes. Then the code generator should run. You may find that the scaffolding tool adds a reference to the Microsoft.EntityFrameworkCore.SqlServer package. This is not needed for your application while using the SQLite database; only the scaffolding tools require it. Once you have completed scaffolding, you can remove this reference if you prefer. If you are working with SQL Server, this reference will already exist and is required by your application.
8.4.2 Scaffolding from the command line
To scaffold items from the command line, you must install the dotnet-aspnet-codegenerator tool first. This is a global tool, similar to the dotnet-ef tool you installed earlier. The tool is installed using the following command:
dotnet tool install --global dotnet-aspnet-codegenerator
Once the tool is installed, you can use it. The command name is the same as the tool: dotnet-aspnet-codegenerator. The command requires the name of the generator you want to use, followed by the options you want to apply. The name of the Razor Pages generator is razorpage. The Razor Pages generator options are detailed in table 8.2.
Table 8.2 Razor Pages generator options
You can scaffold individual pages based on the existing templates by specifying a name for the Razor page as well as the name of the template to use, which is one of the following options: Empty, Create, Edit, Delete, Details, or List. Or you can omit the name and template; in which case, the generator will scaffold all except the empty template.
You want to scaffold all CRUD pages for the Property class, and you want to use the CityBreaksContext as the data context. You also want the generated files to be placed in the PagesPropertyManager folder, and you want them to use the default layout page for that folder. You won’t specify a namespace for the pages; instead the scaffolder will generate one based on the project name and the folder path: CityBreaks.Pages.PropertyManager. You want the unobtrusive validation scripts to be included, and you want to specify that your context uses SQLite. Putting all that together, your command is as follows:
dotnet aspnet-codegenerator razorpage -m Property
➥ -dc CityBreaksContext -outDir
➥ PagesPropertyManager -udl -scripts -sqlite
This command must be executed within the folder that houses the project file. Once it has been completed, the pages appear in the specified folder shown in figure 8.11.
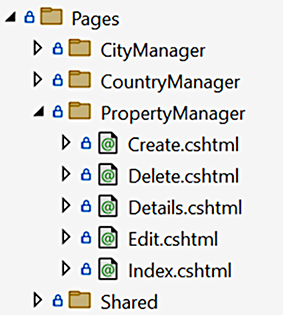
Figure 8.11 The scaffolded CRUD pages
8.4.3 Working with the scaffolded pages
Whichever approach you took to scaffolding the CRUD pages, you should now have the same results. The first thing you may notice is that they fail to build. At the time of writing, there is a bug in the scaffolding tool that results in the @ character (which cannot be used as a valid C# identifier) being applied as a parameter in the Include methods in the Edit, Delete, Details, and Index PageModel classes:
Property = await _context.Properties
    .Include(@ => @.City).FirstOrDefaultAsync(m => m.Id == id);
This needs to be replaced with another character—say, p:
Property = await _context.Properties
    .Include(p => p.City).FirstOrDefaultAsync(m => m.Id == id);
Once that change has been made, you can examine the code in the various pages and look to improve it. In this chapter, I focus on the files for the Edit page. Once you understand the range of issues that need to be addressed in this page, you will be in a good position to apply appropriate changes to the other pages.
I’ll start by showing the first few lines of the EditModel code. The first thing you will notice is that EditModel takes a dependency on the EF Core context.
Listing 8.22 The scaffolded EditModel constructor
private readonly CityBreaks.Data.CityBreaksContext _context;

public EditModel(CityBreaks.Data.CityBreaksContext context)
{
    _context = context;
}
Referring to the previous chapter, this breaches the dependency inversion principle because the context is not an abstraction. Your PageModel class is tightly coupled to the data access technology you have chosen, and if you instantiate an instance of this class in a unit test, for example, it will call into whatever database is defined in the context’s connection string. That’s not a unit test. It’s an integration test. Ideally, you should replace the context with a service or, rather, its abstraction.
The next major issue with the generated code opens up a potential attack vector. The generated code makes the entire Property class a binding target:
[BindProperty]
public Property Property { get; set; }
If you recall from chapter 5, you should limit the scope of the binding targets on your page to just those properties you want your users to set. If you expose more, your application is susceptible to overposting attacks. You do actually want to expose all the current properties of the Property class to the model binder, but that may not always be the case. In the future, you might add more properties to the class. They will be exposed to model binding by default because you decorated the entire class with the BindProperty attribute. So as a best practice, you should start by explicitly exposing properties individually or through an InputModel. The next listing shows the scaffolded OnGetAsync handler method.
Listing 8.23 The scaffolded EditModel OnGetAsync handler
public async Task<IActionResult> OnGetAsync(int? id)
{
    if (id == null)
    {
        return NotFound();
    }

    Property = await _context.Properties
        .Include(p => p.City).FirstOrDefaultAsync(m => m.Id == id);

    if (Property == null)
    {
        return NotFound();
    }
    ViewData["CityId"] = new SelectList(_context.Cities, "Id", "Id");
    return Page();
}
I’m not a fan of code that serves no purpose, and there is a great example of that at the beginning of this handler. The method takes a nullable parameter representing the identity of the item you want to edit. Then a block of code checks to see if a value has been passed, and it returns a 404 if not. You have a mechanism that ensures this page can only be reached if a number is provided. It’s called route constraints, which you learned about in chapter 4. Instead, you can make the id a required route parameter of this page and constrain it to a number type, negating the need for the first code block because the framework will return a 404 if no number is provided.
This code block creates a SelectList populated with City data. The SelectList is assigned to ViewData, which, as you might recall from chapter 3, is a weakly typed dictionary. Objects retrieved from ViewData need to be cast to their correct type to be used again in code. Ideally, the SelectList should be a property of the PageModel, so you do not need to use casting when you use the object in the Razor page.
The code that obtains the city data is not asynchronous. As a performance best practice, you should always aim to use asynchronous APIs in an ASP.NET Core web application when they are available (http://mng.bz/epwV). Most libraries that make out of process, or I/O, calls, such as those that enable communication with databases, sending email, file handling, and so on, offer asynchronous APIs.
The next major issue with the generated code may not be obvious at first glance, but it soon becomes clear when you run the application and navigate to /property-manager/ edit?id=1, as figure 8.12 illustrates. The values appearing in the city select list are the key values, not the city names.

Figure 8.12 The key values appear in the select list, not the city names.
Your remediation plan will be to do the following:
-
Exchange the injected context for a service, enabling loose coupling.
-
Bind to individual properties to mitigate the security risk.
8.5 Creating, modifying, and deleting data
In this section, you will create a PropertyService to meet the requirements of the scenarios handled by the scaffolded pages. You will add methods to create and edit Property entities and retrieve single instances based on their key value. You won’t generate a method for deleting entities just yet. You will take a quick look at the code required to remove an item from the database later, but for this application, you will use a soft delete, marking an item as deleted without actually removing it.
In EF Core, operations that result in adding, updating, or deleting data can be performed directly against the DbContext, using its Add, Update, and Remove methods, respectively. Each of these methods takes the entity to be operated on as a parameter and sets its state to one of Added, Modified, or Deleted. You will call the asynchronous SaveChangesAsync method of the DbContext to commit the changes to the database. The context will generate the appropriate SQL based on the state of the entity. This workflow is illustrated in figure 8.13.
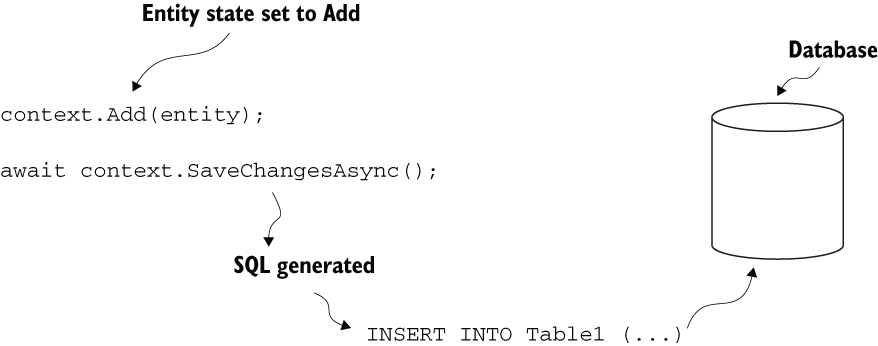
Figure 8.13 The Add method sets the state of the entity to Added. When SaveChangesAsync is called, EF Core generates an SQL INSERT statement and executes it against the database.
So let’s begin by creating the service class for the Property entity that encapsulates these operations. The first step is adding a new interface named IPropertyService with the following code to the Services folder.
Listing 8.24 The IPropertyService interface with CRUD methods
using CityBreaks.Models;

namespace CityBreaks.Services
{
    public interface IPropertyService
    {
        Task<Property> CreateAsync(Property property);
        Task<List<Property>> GetAllAsync();
        Task<Property> FindAsync(int id);
        Task<Property> UpdateAsync(Property property);
        Task DeleteAsync(int id);
    }
}
Now add a new class to the Services folder named PropertyService that implements the interface.
Listing 8.25 Implementing the CRUD methods in the PropertyService
using CityBreaks.Data;
using CityBreaks.Models;
using Microsoft.EntityFrameworkCore;

namespace CityBreaks.Services;
public class PropertyService : IPropertyService
{
    private readonly CityBreaksContext _context;

    public PropertyService(CityBreaksContext context) =>
        _context = context;

    public async Task<Property> FindAsync(int id) =>
        await _context.Properties
        .FindAsync(id);

    public async Task<List<Property>> GetAllAsync() =>
        await _context.Properties
        .Include(x => x.City)
        .ToListAsync();

    public async Task<Property> CreateAsync(Property property)
    {
        _context.Add(property);
        await _context.SaveChangesAsync();
        return property;
    }

    public async Task<Property> UpdateAsync(Property property)
    {
        _context.Update(property);
        await _context.SaveChangesAsync();
        return property;
    }
}
The first method uses the FindAsync method to retrieve a single entity. This method is different from the methods that begin with First and Single you have looked at so far. It takes a value representing the key of the entity to retrieve, but you cannot use it with the Include method. When you edit an item, you don’t necessarily need its associated data; you only need the foreign key values. The FindAsync method is perfect for this purpose.
The CreateAsync method uses the DbContext.Add method to get the context to begin tracking the property entity. An EntityState is applied to all entities tracked by the context, which is an enumeration specifying the entity’s current state. When you use the Add method, the EntityState.Added value is assigned. This tells the context that the entity should be added as a new record, and the generated SQL is an INSERT statement.
The DbContext.Add method was introduced in EF Core. In previous versions of EF, data operations were performed against the relevant DbSet, with the equivalent being
_context.Properties.Add(property)
The UpdateAsync method uses the DbContext.Update method, which tells the context to begin tracking the entity in the EntityState.Modified state. The DbContext .Update method is also new in EF Core. In previous versions of EF, you had to attach a modified entity to the context and explicitly set its state to EntityState.Modified, which is similar to the pattern that has been applied to the existing OnPostAsync handler in the scaffolded code:
_context.Attach(Property).State = EntityState.Modified;
When an entity is in the Modified state, EF Core generates an SQL UPDATE statement that results in all the entity’s non-key values being modified. We will look at how to control the SQL, so it only updates individual property values when you implement the soft delete later.
Both the CreateAsync and UpdateAsync method include the same line:
await _context.SaveChangesAsync();
The SaveChangesAsync method causes all the pending changes to data to be written to the database. It returns an int, representing the number of rows affected by the operation. When you use the Add method to create a new record, the generated SQL retrieves the primary key value of the newly created record, and EF Core assigns that to the tracked entity. Your database operations are very simple and only involve one command. It is possible to set up multiple operations and have them all committed at the same time with one call to SaveChangesAsync. By default, EF Core uses a transaction to perform these operations, so if any of them fail, all the others are rolled back, thereby leaving the database unmodified.
The service is almost ready to replace the DbContext operations in the PageModel. Before you can use the service in code, you must register it with the service container. Go to Program.cs, and add the following registration:
builder.Services.AddScoped<IPropertyService, PropertyService>();
8.5.1 Modifying data
Turning to the scaffolded EditModel class, you will make the following alteration to replace the existing private field with new ones for an IPropertyService and an ICityService. The injected context is replaced with the services. You also need to add a using directive to reference CityBreaks.Services.
Listing 8.26 Injecting the IPropertyService in place of the DbContext
private readonly IPropertyService _propertyService;
private readonly ICityService _cityService;

public EditModel(IPropertyService propertyService, ICityService cityService)
{
    _propertyService = propertyService;
    _cityService = cityService;
}
In the step shown in listing 8.27, you replace the Property binding target with individual binding targets representing the values you want to expose to the user. You also add a public SelectList property to replace the ViewData approach currently being taken for the city dropdown. Finally, you replace the OnGet handler parameter (id) with a public property that enables you to use the value in both handler methods, and you will ensure it can be bound to when the request uses the GET method.
Listing 8.27 Replacing binding to entity with binding to properties
public SelectList Cities { get; set; }
[BindProperty(SupportsGet = true)]
public int Id { get; set; }
[BindProperty, Display(Name = "City")]
public int CityId { get; set; }
[BindProperty, Required]
public string Name { get; set; }
[BindProperty, Required]
public string Address { get; set; }
[BindProperty, Display(Name = "Maximum Number Of Guests")]
public int MaxNumberOfGuests { get; set; }
[BindProperty, Display(Name = "Daily Rate")]
public decimal DayRate { get; set; }
[BindProperty, Display(Name = "Smoking?")]
public bool SmokingPermitted { get; set; }
[BindProperty, Display(Name = "Available From")]
public DateTime AvailableFrom { get; set; }
You need to populate the Cities SelectList property in the OnGetAsync handler and again in the OnPostAsync handler if there are ModelState errors. You have already established a pattern for this that reduces duplication. In listing 8.28, you add a private method that returns a SelectList that uses asynchronous code to the end of the PageModel class.
Listing 8.28 The reusable private method for populating SelectList objects
private async Task<SelectList> GetCityOptions()
{
    var cities = await _cityService.GetAllAsync();
    return new SelectList(cities, nameof(City.Id), nameof(City.Name));
}
You will have lots of squiggly red lines indicating compiler errors now. You tackle those in the OnGetAsync method first by replacing the entire method block with the following code, which uses the service to obtain the Property instance to be edited and assigns its values to the public PageModel properties.
Listing 8.29 The amended OnGetAsync method
public async Task<IActionResult> OnGetAsync()
{
    var property = await _propertyService.FindAsync(Id);

    if (property == null)
    {
        return NotFound();
    }
    Address = property.Address;
    AvailableFrom = property.AvailableFrom;
    CityId = property.CityId;
    DayRate = property.DayRate;
    MaxNumberOfGuests = property.MaxNumberOfGuests;
    Name = property.Name;
    SmokingPermitted = property.SmokingPermitted;

    Cities = await GetCityOptions();
    return Page();
}
The code that maps values from the entity you retrieved from the database to PageModel properties is manageable for your relatively simple entity. You can imagine this type of code will be laborious to write and maintain for entities with more properties. Tools that can help reduce this code significantly—to a single line, in many cases—are available, such as the popular AutoMapper (https://automapper.org/), which is my preferred option. You won’t be using such a tool in this book, but I recommend exploring this massive time saver for your own applications.
That just leaves the OnPostAsync method to tidy before moving the Razor part of the page. The scaffolded code catches a DbUpdateConcurrencyException if one is raised, which indicates the item you are editing no longer exists; someone else has deleted it between the time you retrieved it from the database and submitted your amendments. That is not a scenario you need to worry about because you won’t be removing entries from the database. So your task is straightforward. You check ModelState, and if it is valid, you will pass the posted values as a Property instance to the service’s UpdateAsync method.
Listing 8.30 The updated OnPostAsync method
public async Task<IActionResult> OnPostAsync()
{
    if (!ModelState.IsValid)
    {
        Cities = await GetCityOptions();
        return Page();
    }

    var property = new Property
    {
        Address = Address,
        AvailableFrom = AvailableFrom,
        CityId = CityId,
        DayRate = DayRate,Id = Id,
        MaxNumberOfGuests = MaxNumberOfGuests,
        Name = Name,
        SmokingPermitted = SmokingPermitted
    };
    await _propertyService.UpdateAsync(property);

    return RedirectToPage("./Index");
}
You’ve reached the final part of the transformation: the Razor page itself. There aren’t many changes required here. All you need to do is
You don’t want this page to be reachable unless a number is passed in the URL, so the route template must include a constraint. So you add the following template to the @page directive:
@page "{id:int}"You have the id in the URL, and you have enabled binding to the route parameter in the PageModel, so you no longer need the hidden field in the form:
<input type="hidden" asp-for="Property.Id" />
You can comment it out or remove it altogether. Next locate the section of HTML for the cities select list, shown in the following listing.
Listing 8.31 The scaffolded select list HTML
<div class="form-group">
    <label asp-for="Property.CityId" class="control-label"></label>
    <select asp-for="Property.CityId" class="form-control"
     ➥ asp-items="ViewBag.CityId"></select>
    <span asp-validation-for="Property.CityId" class="text-danger"></span>
</div>
All of the references to Property should have red squiggly lines under them, indicating a compiler error. You need to remove them all, as well as those in other tag helpers in the page. You also need to update the asp-items attribute to reference Model.Cities instead of ViewBag.CityId. The modified version is shown in the following listing.
Listing 8.32 The modified select list
<div class="form-group">
    <label asp-for="CityId" class="control-label"></label>
    <select asp-for="CityId" class="form-control"
     ➥ asp-items="Model.Cities"></select>
    <span asp-validation-for="CityId" class="text-danger"></span>
</div>
Now you are ready to test the revisions. Run the application, and navigate to /property-manager. You will be taken to the scaffolded Index page, which lists all properties (figure 8.14).

Figure 8.14 The original scaffolded Index page
Remember, this is the unmodified scaffolded version, so it displays the key values in the City column, not the Name column. The key values are also displayed in the select list on the Create page, which you can reach by clicking the Create New link just below the page heading. They are also displayed on the Details page for each property. Click the Edit link of one of the properties to see how it differs from the scaffolded Create page. The names of the cities appear in the select list, and the form labels are user friendly (figure 8.15).

Figure 8.15 The amended Edit page
Make a change to the property by setting its Available From date to one in the future. Submit those changes, and confirm that your revisions work when you are redirected to the Index page, which should show the revised date. Then navigate to the home page, and confirm that the number of properties for the specified city has dropped by one.
8.5.2 Deleting data
The scaffolded pages include one that enables you to delete an entity. The OnPostAysnc method in the DeleteModel class contains the code that actually removes the entry from the database. It is important to understand how it works because it is suboptimal.
Listing 8.33 The scaffolded OnPostAsync method in the DeleteModel
public async Task<IActionResult> OnPostAsync(int? id)
{
    if (id == null)                                         ❶
    {                                                       ❶
        return NotFound();                                  ❶
    }                                                       ❶

    Property = await _context.Properties.FindAsync(id);     ❷

    if (Property != null)
    {
        _context.Properties.Remove(Property);               ❸
        await _context.SaveChangesAsync();                  ❹
    }

    return RedirectToPage("./Index");
}
❶ Checks that a key value was passed to the method
❷ This retrieves the matching entry from the database. The context starts tracking it.
❸ The DbSet.Remove method sets the entity’s state to Deleted.
❹ SaveChangesAsync commits the changes to the database.
We have already discussed how to use route constraints to replace the null check at the beginning of this method. The other suboptimal feature of the scaffolded code is that it results in two commands being executed against the database. The first command retrieves the item from the database, so the context can start tracking it. The code uses the DbSet.Remove method to set the entity’s state as Deleted. The second command, executed when SaveChangesAsync is called, consists of an SQL DELETE statement that deletes it from the database.
There is actually no need to retrieve the entity at all. You can use what is known as a stub to represent the entity to be removed. A stub is an entity that only has its key value assigned. Assume you have already modified this page to work with a constrained route parameter representing the key value, instead of a nullable handler parameter. The next listing shows how to use a stub to represent the entity to be deleted in the OnPostAsync method.
Listing 8.34 Deleting an entity represented by a stub
public async Task<IActionResult> OnPostAsync()
{
    var property = new Property { Id = Id };     ❶
    _context.Remove(property );                  ❷
    await _context.SaveChangesAsync();

    return RedirectToPage("./Index");
}
❶ Create a stub, only assigning its key value.
❷ Pass the stub to the DbContext.Remove method, which marks the entity as Deleted.
Taking this approach, you significantly reduce the complexity of the code and halve the number of database calls required to achieve your objective. Note that you have also used the DbContext.Remove method instead of the DbSet.Remove method the scaffolder generates. Like the DbContext Add and Update methods, the Remove method is new to EF Core and helps you reduce code.
When you delete an entity, all dependent data is either lost or orphaned. Depending on how your foreign keys are set up, the delete operation cascades to all dependent data, and it is either also removed, or its foreign key values are updated to null, resulting in orphaned data. If the dependent data is business critical, such as orders, this is not desirable. You would clearly want to retain historical data about bookings at a property, despite the fact that it has since been bulldozed, for example. You may even need to restore it if it has been deleted accidentally. For this reason, you will more often employ a soft delete, whereby a record is flagged in some way as deleted, rather than removing the record entirely, which is what the DbContext.Remove method results in. In the final section of this chapter, you will add a new property to the Property class representing the date and time an entity was marked as deleted. You will add a new migration to update the database schema, and then modify the Delete pages to accommodate your revised strategy for managing deletes.
The first step is to add a nullable DateTime property to the Property class:
public DateTime? Deleted { get; set; }I usually use a DateTime, rather than a bool, for this purpose because someone will inevitably ask when the item was deleted. In the absence of more sophisticated logging, at least this can help me answer that question.
I’ll take this opportunity to reinforce the point about overposting attacks. You have just added a new property to your class that you do not want users to set directly. If you allow the model binder to bind directly to an instance of the class, you will expose this property to users. By specifying only individual properties as binding targets, you prevent the user from being able to set the Deleted property’s value.
Having added the Deleted property, you can add a new migration using either the package manager console or the command line, which will detect the changes you have made to the model and will reflect those changes by amending the database schema accordingly. Both the Powershell and command-line options are shown in the following listing.
[Powershell]                                      ❶
add-migration AddedDeleteToProperty               ❶
[CLI]                                             ❷
dotnet ef migrations add AddedDeleteToProperty    ❷
❶ The Powershell command to be executed from within the Package Manager Console in Visual Studio
❷ The CLI command to be executed from a command prompt located within the directory containing the csproj file
Once executed, you can check the Up method in the migration code to ensure it will add a nullable Delete column. In SQLite, this will be a TEXT type.
Listing 8.36 The Up method of your new migration
protected override void Up(MigrationBuilder migrationBuilder)
{
    migrationBuilder.AddColumn<DateTime>(
        name: "Deleted",
        table: "Properties",
        type: "TEXT",
        nullable: true);
}
Now you can apply the migration using one of the following commands:
[Powershell]
update-database
[CLI]
dotnet ef database update
Once that has completed, add a new method to the IPropertyService interface:
Task DeleteAsync(int id);
Then add an implementation to the PropertyService class.
Listing 8.37 The Delete method implementation
public async Task DeleteAsync(int id)
{
    var property = new Property { Id = id, Deleted = DateTime.Now };      ❶
    _context.Attach(property).Property(p => p.Deleted).IsModified = true; ❷
    await _context.SaveChangesAsync();                                    ❸
}
❶ Create a stub to represent the item to be modified.
❷ Attach the entity to the context, and specify which property should be modified.
This method provides another example where stubs are useful. You only want to update the Deleted column in the database for this entity. If you pass the entire entity to the Update method, all properties are included in the generated SQL UPDATE statement. To avoid this, you can use Attach to tell the context to start tracking your entity with its state set to Unchanged. Then you explicitly set the Deleted property as modified. When you set individual properties as modified, only those properties are included in the UPDATE statement. You utilize this method by replacing the injected context in the DeleteModel with the IPropertyService.
Listing 8.38 Modified DeleteModel takes a dependency on IPropertyService
public class DeleteModel : PageModel
{
    private readonly IPropertyService _propertyService;      ❶

    public DeleteModel(IPropertyService propertyService)     ❶
    {                                                        ❶
        _propertyService = propertyService;                  ❶
    }                                                        ❶

    public Property Property { get; set; }                   ❷

    [BindProperty(SupportsGet = true)]                       ❸
    public int Id { get; set; }                              ❸

    public async Task<IActionResult> OnGetAsync()            ❹
    {                                                        ❹
        Property = await _propertyService.FindAsync(Id);     ❹

        if (Property == null)                                ❹
        {                                                    ❹
            return NotFound();                               ❹
        }                                                    ❹
        return Page();                                       ❹
    }                                                        ❹

    public async Task<IActionResult> OnPostAsync()           ❺
    {                                                        ❺
        await _propertyService.DeleteAsync(Id);              ❺
        return RedirectToPage("./Index");                    ❺
    }                                                        ❺
}
❶ The injected context is replaced with the IPropertyService.
❷ Remove the unnecessary BindProperty attribute from the Property property.
❸ Add a bound property for the key value, replacing the handler parameters.
❹ Remove the null check against the key value because you will use a route constraint instead.
❺ Use the service to “delete” the entity.
Just as with the Edit page, you only want the Delete page to be reached if an integer value is included in the URL, so you turn to the Delete.cshtml and add a route constraint as part of a route template:
@page "{id:int}"There are two more things to do before you can test this out. The first is altering the GetAllAsync method in the PropertyService to exclude properties that have a value assigned to their Deleted property.
Listing 8.39 Excluding deleted properties from the result set
public async Task<List<Property>> GetAllAsync() =>
    await _context.Properties
    .Where(p => !p.Deleted.HasValue)
    .Include(x => x.City)
    .ToListAsync();
Then you alter the IndexModel class in the PropertyManagerIndex.cshtml.cs file to take a dependency on IPropertyService instead of the context, so you can use your new method to populate the page.
Listing 8.40 The revised PropertyManager IndexModel
public class IndexModel : PageModel
{
    private readonly IPropertyService _propertyService;

    public IndexModel(IPropertyService propertyService)
    {
        _propertyService = propertyService;
    }

    public IList<Property> Property { get;set; }

    public async Task OnGetAsync()
    {
        Property = await _propertyService.GetAllAsync();
    }
}
Now run the application, and navigate to /property-manager. Observe the first property in the list. If you are using the seed data provided with the last chapter’s downloads, the first property in the listing should be Hotel Paris. Clicking the Delete link should take you to the Delete page, which asks for confirmation that you want to delete this item (figure 8.16).
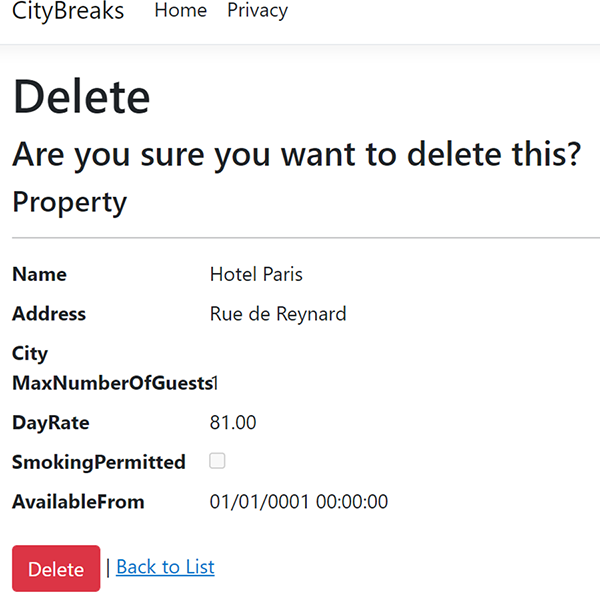
Click the Delete button, and then observe that Hotel Paris is no longer in the list. As a final check, use whichever database tool you are comfortable with to look at the data in the Properties table to confirm the relevant record still exists—albeit now with a value in the Deleted column (figure 8.17).
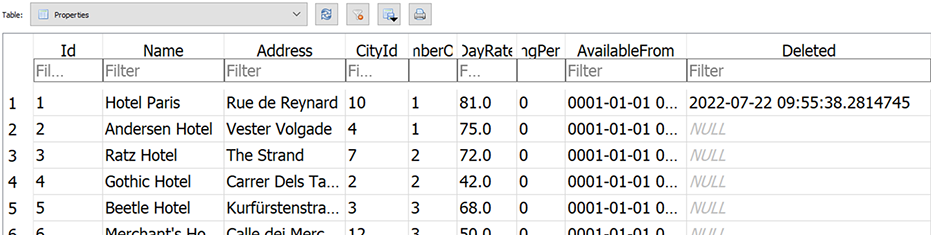
Figure 8.17 The database view shows that the “deleted” record still exists.
This has been a long chapter, but we have only really scratched the surface of what EF Core can do. I’ll once again recommend Jon P. Smith’s Entity Framework Core in Action (2nd ed.; http://mng.bz/WMeg) as an excellent resource for learning more about how to use EF Core, as well as the official documentation (https://docs.microsoft.com/en-us/ef/).
You have moved your application forward in that it can now interact with a database. However, anyone visiting the site can add and modify data if they know the URLs for the CRUD pages. Over the next two chapters, we will look at authenticating users, so you know who they are, and then protecting access to those pages from unauthorized users.
Summary
-
Entity Framework Core is an object-relational mapping (ORM) tool from Microsoft, which acts as a drop-in data layer, abstracting away the boilerplate code required to work with a relational database.
-
The main entry point to working with EF Core is via a context, an object that derives from DbContext.
-
The EF Core context tracks objects and generates SQL based on their state.
-
EF Core translates LINQ queries to SQL, which it executes against a database.
-
Conventions drive EF Core mappings between objects and the database.
-
EF Core migrations enable you to keep your model and database schema in sync with each other.
-
You can use seeding to add data to the database as part of a migration.
-
Scaffolding enables you to quickly generate CRUD pages based on EF Core’s mappings.