
2 Building your first application
- Creating a Razor Pages application
- Adding your first page
- Exploring the project files and the roles they play
- Configuring the application pipeline with middleware
In the last chapter, you learned how the Razor Pages web development framework, as part of ASP.NET Core, fits within the overall .NET Framework. You have discovered the types of applications you can build with Razor Pages and also, importantly, when it is not the best solution to use. You have been introduced to the tools you need to be productive with Razor Pages and, hopefully, downloaded and installed Visual Studio or VS Code along with the latest version of the .NET SDK. Now that you have your development environment set up, it’s time to start working with code.
In this chapter, you will create your first Razor Pages application, using both Visual Studio and the CLI, so you can follow along on the operating system of your choice. Most web development frameworks provide a starter kit or project—a simple application that forms the starting point for your own application. Razor Pages is no different. The application that forms the starter kit only has three pages, but it includes a basic configuration that you can build on to create your own more complex application.
Once you have created your application and managed to launch it in a browser, you will add a new page to the application and include some dynamic content, so you can begin to understand what a Razor page actually is. Once you have tested the page to ensure that it works, you will use the site’s master template file to add the page to the site navigation.
Then, I discuss the application files generated by the tooling to understand the role each of the generated files plays within your Razor Pages application. This walkthrough will help you understand the basics behind all ASP.NET Core applications.
At the end of the walk-through, we will take a closer look at the primary application configuration: the request pipeline. This is the core of your application. It defines how your application handles requests and delivers responses to clients. You will learn how it is constructed from middleware components and how you can extend it by adding your own middleware.
By the end of this chapter, you should have a good high-level understanding of how a Razor Pages application works, from receiving a request to finally sending HTML back to the client. Then you will be ready to take a deep dive into working with a Razor page and its companion, the PageModel class, in chapter 3.
2.1 Creating your first website
This section will cover using the available tools to generate a fully working Razor Pages application rapidly. You will use Visual Studio 2022 Community Edition on Windows 10 and the CLI for non-Windows readers. I discuss using the CLI within Visual Studio Code, although you can use any terminal application to execute CLI commands. So the following sections assume you have your environment installed and working, along with a version of the SDK that supports .NET 6 development. You can test to see whether you have a suitable version of the SDK installed on your machine by opening a command shell and executing the following command:
dotnet --list-sdks
You should see one or more versions listed, each with its own installation path. At least one of the versions should begin with 6. At this stage, if you are a first-time user, you will also need to trust the self-signed certificate that is required for hassle-free browsing of your site over HTTPS on your local system (covered in more detail in chapter 14). To do this, execute the following command:
dotnet dev-certs https --trust
The certificate itself is installed as part of the SDK installation.
2.1.1 Creating a website using Visual Studio
As described in chapter 1, Visual Studio is the primary IDE for .NET developers working on Windows. It includes simple menu-driven workflows for performing the most common tasks. Razor Pages applications are created as projects within Visual Studio, so your starting point, having opened Visual Studio, is to create a new project. You can do this either by clicking the Create a New Project button on the startup splash screen or going to File > New Project... in the main menu bar.
On the next screen, you can select the type of project you want to create from a list of templates. Before you do, I recommend selecting C# from the languages selector at the top of the right-hand pane to filter out some of the noise. Choose the ASP.NET Core Web App template—the one without (Model-View-Controller) as part of its name, taking care also to avoid selecting the very similarly named ASP.NET Core Web API template. The correct template carries the following description: “A project template for creating an ASP.NET Core application with example, ASP.NET Razor Pages content.”
Once you have chosen a suitable location for your application files and moved to the next screen, ensure that your Target Framework selection is .NET 6, leaving all other options at their defaults. Authentication Type should be set to None, Configure for HTTPS should be checked, and you should leave the Enable Docker option unchecked (figure 2.1). Once you are happy with the selections, click the Create button. At this point, Visual Studio should open, showing your new application in Solution Explorer (figure 2.2).
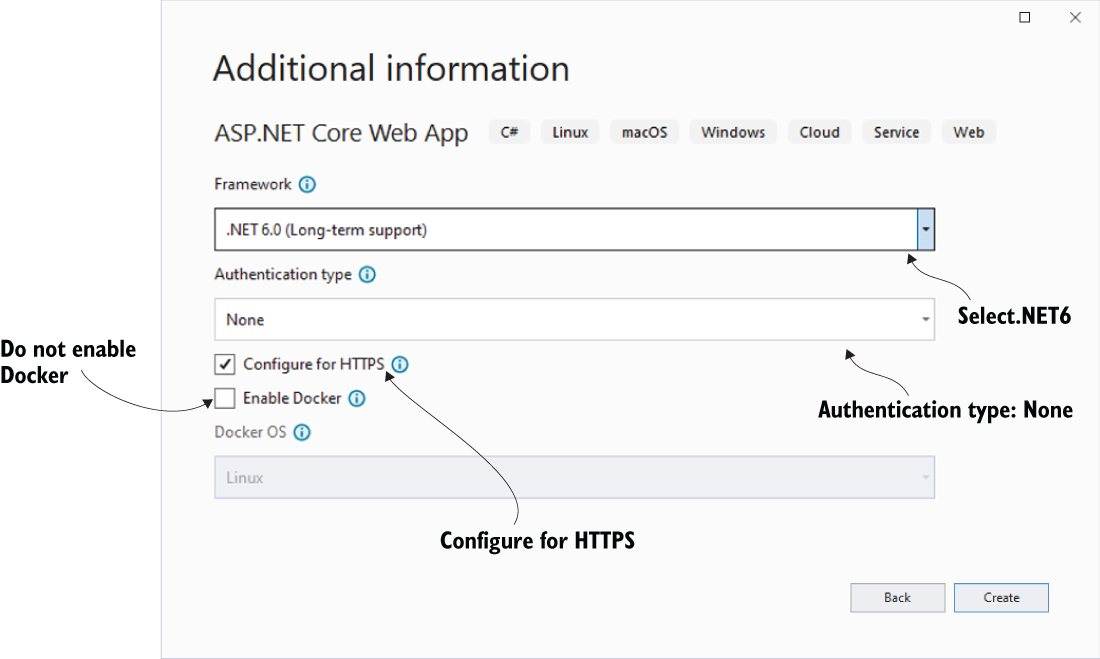
Figure 2.1 Check that you have applied these settings before clicking the Create button.
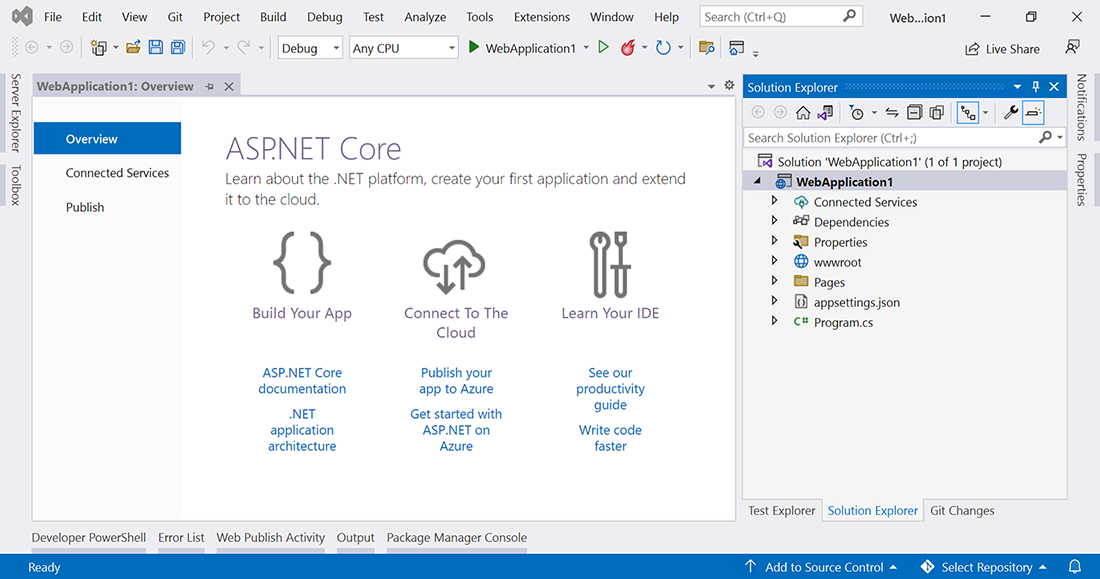
Figure 2.2 Your new application opens in Visual Studio with an overview page and the Solution Explorer window open on the right, showing the structure and contents of your WebApplication1 solution and its single project, also named WebApplication1.
Although the contents of Solution Explorer look like a file structure, not all the items that you see are actually files. We will take a closer look at these items later in the chapter.
2.1.2 Creating a website using the command-line interface
If you have already built your application using Visual Studio, you may feel like skipping this step. However, I recommend that you try this approach to creating your application too because the process reveals one or two exciting things hidden from you by the new project creation wizard within Visual Studio.
The CLI is a text-based tool for executing commands against the dotnet.exe tool, both of which were installed as part of the SDK. The entry point to the CLI is the dotnet command, which is used to execute .NET SDK commands and run a .NET application. You will be using it for its first purpose in the section that follows. The default installation of the SDK adds the dotnet tool to your PATH variable, so you can execute commands against it from anywhere on your system.
The CLI tools can be invoked using any command shell you like, including the Windows Command Prompt, Bash, Terminal, or PowerShell (for which there is a cross-platform version). I will refer to the shell as the terminal from now on, mainly because it is named within VS Code. The following steps do not assume you are using VS Code to execute the commands, but you can do so using the integrated terminal VS Code provides.
First, create a folder named WebApplication1 in a suitable location on your system, then navigate to it using the terminal, or open the folder within VS Code. If you have chosen to use VS Code, you can access the terminal by pressing Ctrl-`. At the command prompt, type the following commands, pressing the Enter key after each one.
Listing 2.1 Creating Razor Pages application using the CLI
dotnet new sln                                           ❶
dotnet new webapp -o WebApplication1                     ❷
dotnet sln add WebApplication1WebApplication1.csproj    ❸
❷ Scaffolding a new Razor Pages application and placing the output into a subfolder named WebApplication1
❸ Adding the Razor Pages application to the solution
Once you execute the last command, all of the application files should be created successfully. You should also get some feedback from the terminal related to some “post-creation actions.” Your path to WebApplication1 may well differ from mine, shown in the following listing, but the rest of the feedback should be similar.
Listing 2.2 Notification of post-creation actions executed by the CLI
Processing post-creation actions...
Running 'dotnet restore' on WebApplication1WebApplication1.csproj...
  Determining projects to restore...
  Restored D:MyAppsWebApplication1WebApplication1WebApplication1.csproj
(in 80 ms).
Restore succeeded.
The CLI executed the dotnet restore command on your application, ensuring all packages your application depends on are obtained and up to date. If you used Visual Studio to create your application, the same command will have been executed, but the indication that it took place is not so obvious. It is shown in the status bar at the bottom of the IDE (figure 2.3).

Figure 2.3 The status bar at the bottom of Visual Studio shows that the project was restored.
2.1.3 Running the application
Now that the application has been created using whichever means you chose, you can run and view it in a browser. To run the application from Visual Studio, you simply need to press Ctrl-F5 or click on the outlined green triangle (not the solid one) in the top menu bar. This will take care of building and starting the application as well as launching it in a browser. If you are using the CLI, execute the following command:
dotnet run --project WebApplication1WebApplication1.csproj
This command includes the --project switch to specify the location of the project file. If you execute the command from within the folder containing the csproj file, the --project switch is omitted. If you prefer to use the CLI while working in Visual Studio, press Ctrl-` to open the integrated terminal, and execute your commands from within.
You should receive feedback in the terminal that the application is being built before confirming that it is listening on two localhost ports—one of which uses HTTP and the other of which uses HTTPS. The actual port numbers vary from project to project:
info: Microsoft.Hosting.Lifetime[0]
      Now listening on: https://localhost:7235
info: Microsoft.Hosting.Lifetime[0]
      Now listening on: http://localhost:5235
Open a browser, and navigate to the URL that uses HTTPS. In the download that accompanies this example, that is https://localhost:7235. If your browser warns you that the site is not secure, you may have overlooked the command required to trust the self-signed certificate: dotnet dev-certs https --trust. If all goes well, you should see something similar to figure 2.4.
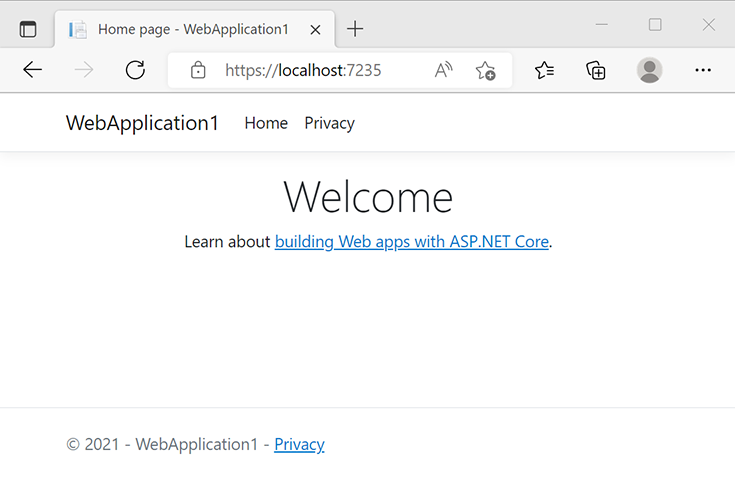
The application is elementary. The home page contains minimal styling and content. Navigate to the Privacy page, using either the navigation at the top of the page or the link in the footer. Notice that the same minimal styling has also been applied to the Privacy page (figure 2.5), and that navigation is present.
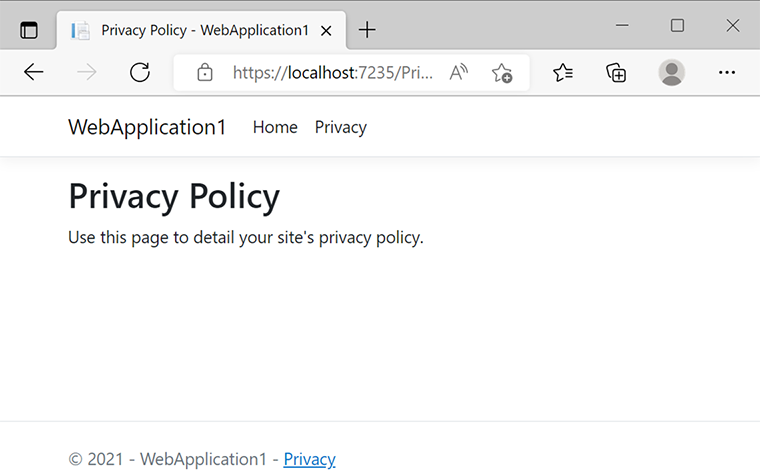
Figure 2.5 The privacy page includes the same header, footer, and styling as the home page.
There is not much else you can do with this application at present. There aren’t yet any interesting ways to interact with it, so it is time to add a page to the application.
2.1.4 Adding a new page
In this section, you will add a new page to the application. You will also explore a new feature that was added to .NET 6 called hot reload. This feature results in changes made to your code being reflected in the running application, without you having to relaunch it. This is activated automatically for Visual Studio users. VS Code users need to use a slightly different command to enable hot reload. This feature works for changes to existing files. Since you are adding a new file, you need to stop your application first. Visual Studio users can simply close the browser to stop the application. If you launched your application using the CLI command, you should press Ctrl-C in the terminal window to shut the application down.
Visual Studio users should right-click on the Pages folder in Solution Explorer and choose Add > Razor Page from the available options (figure 2.6). Name the file Welcome .cshtml.

Figure 2.6 To add a new page in Visual Studio, right-click on the Pages folder, and choose Add, then Razor Page.
VS Code users should make sure that their terminal is located in the project folder—the one containing the csproj file—and then execute the following command:
dotnet new page -n Welcome -o Pages -na WebApplication1.Pages The new page command adds a Razor page to the application. The -n (or --name) option specifies the name the page should be created with. The -o (or --output) option specifies the output location where the page will be placed. And the -na (or --namespace) option specifies the namespace that should be applied to generated C# code files. Alternatively, you could navigate to the Pages folder to create the page and omit the -o option. If you do that, you will have to remember to navigate back into the folder containing the csproj file to perform the run command without additional arguments.
Visual Studio users don’t need to specify a namespace. The default namespace applied to code files created with the Visual Studio wizard is automatically generated by concatenating the project name with their location within the project.
Now run the application. Remember, it’s Ctrl-F5 in Visual Studio, while CLI users (VS Code or Visual Studio) should execute dotnet watch run in the terminal this time (not dotnet run) and then open a browser and navigate to the first URL that is logged to the terminal. Navigate to /welcome. The page should appear without any content apart from the header and footer (figure 2.7).
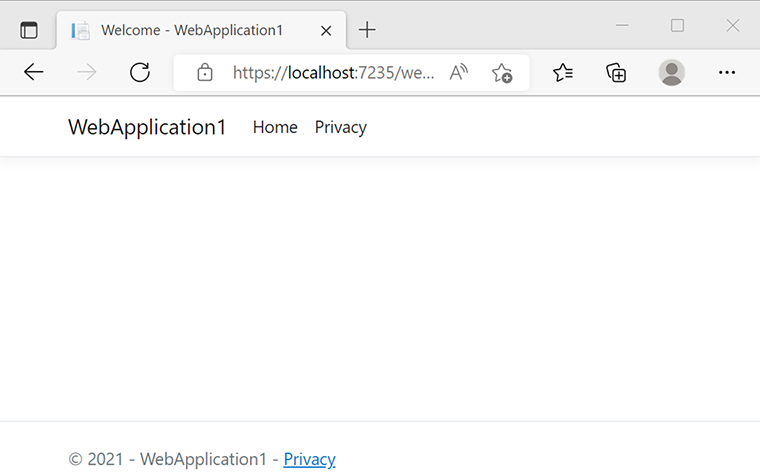
Figure 2.7 The new page is empty aside from the header and footer.
There are three interesting points to note here. The first is that you navigated to /welcome, and the Welcome page that you just added to the application was located and rendered. You didn’t have to perform any configuration to get that to happen. The part of the ASP.NET Core framework responsible for this is called routing. It automatically locates Razor pages based on their location within the project. Routing is covered in detail in chapter 4.
The second point to note is that the new page includes the navigation, footer, and styles you saw in the home and privacy pages. Your page inherited these from a layout file, a kind of master template. Again, this happened without you having to take any specific steps to make it happen. You will learn about layout files and how to configure them in the next chapter.
The final item to note is the title of the page, as displayed in the browser tab: WebApplication1. The layout page also provides this value.
Now it’s time to add some code to the page. Update the content of Welcome .cshtml, so it looks like the following.
Listing 2.3 Adding content to the Welcome page
@page
@model WebApplication1.Pages.WelcomeModel
@{
    ViewData["Title"] = "Welcome";
}
<h1>Welcome!</h1>
You don’t even need to refresh the browser for the changes you applied to appear as soon as you save them. This is the hot reload feature working. You should see a level-one heading, and the title in the browser tab has changed to include the value that you applied to ViewData[“Title”] (figure 2.8). ViewData is a mechanism for passing data from Razor pages to their layouts. You will see how ViewData works in the next chapter.
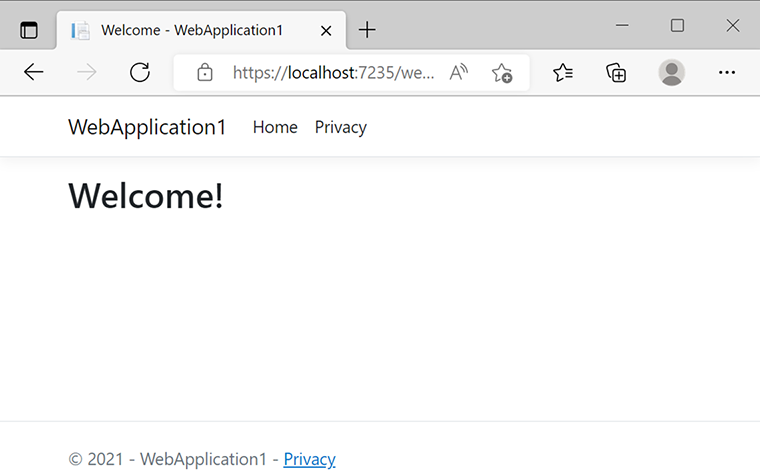
Figure 2.8 The changes that were made to the Razor page are visible without having to refresh the browser.
2.1.5 Modifying to include dynamic content
What you have added so far is static content. Every time you run this page, it will look the same. The whole point of using Razor Pages is to display dynamic content, so now it’s time to add some. Let’s imagine you need to include the name of the part of the day (e.g., morning, afternoon, or evening) in your output—perhaps, as part of delivery confirmation instructions (e.g., “Your package will be with you in the morning”). First, you need to calculate the part of the day from the time, and then you need to render it. The following listing shows how to obtain the part of the day from the current time and render that to the browser.
Listing 2.4 Adding dynamic content to the Razor page
@page
@model WebApplication1.Pages.WelcomeModel
@{
    ViewData["Title"] = "Welcome!";

    var partOfDay = "morning";                                        ❶
    if(DateTime.Now.Hour > 12){
        partOfDay= "afternoon";                                       ❷
    }
    if(DateTime.Now.Hour > 18){
        partOfDay= "evening";                                         ❸
    }
}
<h1>Welcome</h1>
<p>It is @partOfDay on @DateTime.Now.ToString(“dddd, dd MMMM”)</p>    ❹
❶ The partOfDay variable is declared and initialized with a value of "morning".
❷ If it is after midday, the variable is reassigned with a value of "afternoon".
❸ If it is after 6:00 p.m., the value is updated to "evening".
❹ The variable is rendered to the browser along with the current time of day.
The changes involve declaring a variable named partOfDay, which is instantiated with a value of "morning". Two if statements subsequently change the value depending on the time of day. If it is after midday, partOfDay is changed to "afternoon". It is changed again after 6:00 p.m. to "evening". All of this is pure C# code and is placed in a code block, which starts with @{ and ends with a closing }. Then you added an HTML paragraph element under the Welcome heading, including that text with two C# expressions, both prefixed with the @ sign. You have just written your first piece of Razor template syntax. The @ prefix tells Razor to render the value of the C# expressions. This time, depending on the time of day, you should see the new paragraph rendered to the browser under the heading, as shown in figure 2.9.
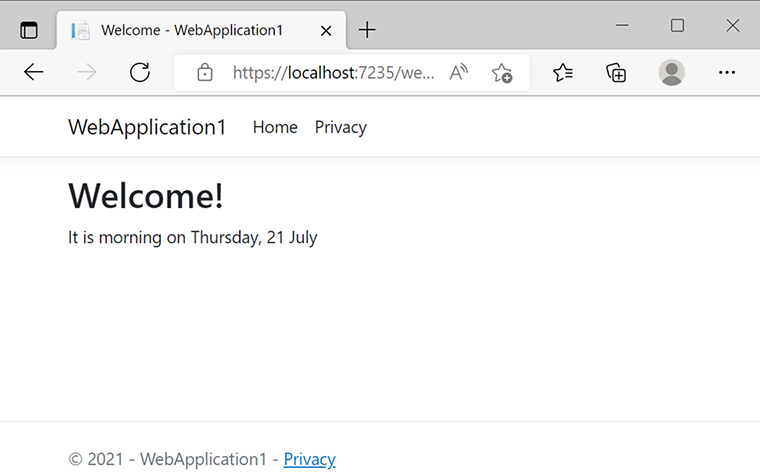
Figure 2.9 The revised Welcome page in the browser
2.1.6 Adding the page to the navigation
Next, you will add your new page to the site navigation, so you won’t have to type the address in the browser to locate it. Find the _Layout.cshtml file in the Pages/Shared, folder and open it. Identify the ul element with a CSS class of navbar-nav flex-grow-1, and add the bolded lines of code in the following listing.
Listing 2.5 Adding the Welcome page to the main navigation
<ul class="navbar-nav flex-grow-1">
    <li class="nav-item">
        <a class="nav-link text-dark" asp-area="" asp-page="/Index">Home</a>
    </li>
    <li class="nav-item">
        <a class="nav-link text-dark" asp-area="" asp-page="/Privacy">Privacy</a>
    </li>
    <li class="nav-item">
        <a class="nav-link text-dark" asp-area="" asp-page="/Welcome">Welcome</a>
    </li>
</ul>
Refresh the browser again; the navigation menu at the top of every page will now include a link to the Welcome page. The change you just made has been applied to every page in the application. That is because you changed the layout file, which is used by all pages in the application. The content of the Razor page is merged with the content in the layout page to produce the final output.
You may wonder why there is no href attribute on the anchor element you added to the layout page to create the link. This element is called an anchor tag helper. Tag helpers are components that target regular HTML elements and enable server-side code to influence how they are rendered to the browser via special attributes that usually start with asp-. For example, the asp-page attribute takes a value representing the name of the page you want to generate a link to. Tag helpers are covered in more detail in the next chapter.
So you have seen some ways C# and HTML work together in the Razor page to produce HTML. Generally, the best advice is to restrict the amount of C# code you include in the Razor page to only that required to influence the presentation. Application logic, including algorithms that determine the time, should be kept out of the Razor page file. The first level of separation between the Razor page file and application logic is the PageModel class, which forms the focus of the next chapter, along with other view-related technology I have already touched on, including layouts, partials, and tag helpers.
2.2 Exploring the project files
Now that you have created your first Razor Pages application and experimented with a little Razor syntax, it is time to explore the contents of each folder and file that forms the web application you just created in more detail to learn about the role each plays in the application. Along the way, you will gain a clearer understanding of how ASP.NET Core applications work. You will also learn about the difference between the physical files on disk and what you see in the Solution Explorer window in Visual Studio.
2.2.1 The WebApplication1.sln file
The SLN file is known as a solution file. Within Visual Studio, solutions act as containers for managing related projects, and the solution file contains details of each project, including the paths to the project files. Visual Studio uses this information to load all related projects when you open the solution.
Larger web applications usually consist of multiple projects: a web application project responsible for the UI and multiple class library projects, each responsible for a logical layer within the application, such as the data access layer or the business logic layer. There may also be some unit test projects. Then you might see additional projects added with suffixes that denote their purpose: WebApplication1.Tests, WebApplication1.Data, and so on.
This application consists of a single project. As such, it doesn’t actually need to be housed in a solution at all, but Visual Studio creates the solution file anyway. You created the solution file via the dotnet new sln command if you used the CLI to create your application. Then you added the WebApplication1 project to the solution explicitly via the dotnet sln add command. You could have skipped these steps, only creating a solution file if you needed to add additional projects to the application.
2.2.2 The WebApplication1.csproj file
The CSPROJ file is an XML-based file that contains information about the project for the build system, known as MSBuild, which is responsible for converting your source code files into a format that can be executed against the .NET runtime. To begin with, the project file contains information relating to the version of the .NET Framework the project targets and the SDK you are using. The Microsoft.NET.Sdk is the base SDK, which is used for, among other things, building console and class library projects. Web applications are built against the Microsoft.NET.Sdk.Web SDK.
The project file includes two additional properties: Nullable and ImplicitUsings. These enable you to toggle new C# features. The first sets the nullable annotations and warnings context for the project. In plain English, this controls the level of feedback you get from code analyzers that look for potential sources of the NullReferenceException in your code. This exception is the cause of more confusion and questions across .NET-focused technical communities than any other. The feature, known as nullable reference types, is enabled by default. You can switch it off by changing the value to disable.
The ImplicitUsings property is used to enable or disable a C# 10 feature that reduces the number of explicit using directives required in your code files. Instead, they are set globally within the SDK. The selection of using directives that have been enabled globally include the following commonly used APIs:
In addition, the list includes a range of ASP.NET Core-specific APIs. This feature is also enabled by default. You can disable it by setting the value to disable or by removing the property.
Over time, the project file will contain information about packages or external libraries the project depends on. You can either add packages manually to this file or, more commonly, use a tool to add packages (a package manager), which will update the contents of the project file for you. You can edit the contents of the file to customize elements of the build.
The project file is not visible in Solution Explorer within Visual Studio. You can access it by right-clicking the project within Solution Explorer and selecting Edit Project File. If you are using VS Code, the file is visible in the file explorer, and you can access and edit it just like any other file.
2.2.3 The bin and obj folders
The bin and obj folders are used in the build process. Both folders are subdivided into two further folders—Debug and Release—which correspond to the build configuration used when the project is built. Initially, the bin and obj folders only include the Debug folder. The Release folder is not created until you build in Release mode. Unless you changed any configuration settings when you pressed Ctrl-F5 in the last section, your application has only been built in Debug mode at the moment.
The obj folder contains the artifacts used during the build process, and the bin folder contains the final output of the build. You will explore this output in more detail when you publish your application in chapter 14. If you delete either the bin or obj folder, they are recreated the next time you build your project.
Neither of these folders is visible in Solution Explorer by default. However, if you click the option to Show All Files, you can see them represented with a dotted outline. This indicator denotes that the folders are not considered part of the project itself. Once again, they are not hidden from VS Code users.
2.2.4 The Properties folder
The Properties folder contains project-specific resources and settings. The only item within the folder currently is a launchSettings.json file, which contains details of the settings to be used when you run your application.
The first group of settings is related to the IIS Express web server configuration for running your application locally. IIS Express is a lightweight version of the full IIS web server and is installed along with Visual Studio.
The second group of settings represents different launch profiles. The IIS Express profile specifies that the application should be run on IIS Express. Notice that the applicationUrl includes a port number. A different port number is provided to the SSL port. These are generated on a per-project basis. You are free to change the port numbers if you like.
The second profile uses the project name to identify itself. If you select this profile to launch the application, it will run purely on its internal or in-process web server. The default server implementation is known as Kestrel. You will learn more about that later in this chapter. The final profile (WSL 2) relates to running the application within Windows Subsystem for Linux. This book doesn’t covering WSL, but the Microsoft documentation provides a good starting place if you would like to learn more: https://docs.microsoft.com/en-us/windows/wsl/.
2.2.5 The wwwroot folder
The wwwroot folder is a special folder within the web application. It has a globe icon in Solution Explorer. It is the web root directory and houses static files. By virtue of being the web root directory, wwwroot is configured to allow its contents to be browsed directly. It is the correct location for stylesheets, JavaScript files, images, and other content that doesn’t require any processing before it is downloaded to the browser. For this reason, you should not place any files in the wwwroot folder that you don’t want users to be able to access. It is possible to configure an alternative location as the web root directory, but your new location won’t get the special icon in Solution Explorer.
The project scaffolder has created three folders within the wwwroot folder: css, js, and lib. The css folder houses a site.css file, containing some basic style declarations for the template site. The js folder contains a file named site.js, which has nothing aside from some comments in it. The general idea is that you will place your own JavaScript files in this folder. The lib folder contains external style and script libraries. The libraries provided by the template are Bootstrap, a popular CSS framework; jQuery, a cross-browser JavaScript utility library; and two validation libraries based on jQuery. They are used for validating form submissions.
The folder structure within wwwroot is not set in stone. You can move things around as you like.
2.2.6 The Pages folder
By convention, the Pages folder is configured as the home of your Razor page files. It is where the framework expects to find your Razor pages.
The project template starts you off with three pages. You have already seen two of them—Index, or the home page, and the Privacy page. And of course, your example includes the Welcome page you created. The third page provided by the project template is Error. Looking at the actual folder on disk, you will notice that each page comprises two files—one with a .cshtml extension (a Razor file) and another that ends with .cshtml.cs (a C# code file). This might not be immediately obvious when you look at Solution Explorer. The files are nested by default (figure 2.10). You can see them by disabling file nesting in the toolbar at the top of Solution Explorer or by clicking the expander icon next to the page, which will reveal not just the nested file but a tree showing an outline of the C# class, including properties, fields, and methods.

Figure 2.10 Solution Explorer automatically nests related files. You can toggle file nesting using the menu command.
The top-level file (the .cshtml file) is the Razor page file. It is also referred to as the content page file or the view file. For consistency, I’ll refer to it as the Razor page (singular, with a lowercase p to differentiate from the Razor Pages framework) going forward. As you saw in the previous section, this file acts as the view template, containing Razor syntax, which is a mixture of C# and HTML—hence, the file extensions cs plus html. The second file is a C# code file containing a class that derives from PageModel. This class acts as a combined controller and view model for the Razor page. You will explore these files in detail in the next chapter.
Two other files sit in the Pages folder—one named _ViewStart.cshtml and another named _ViewImports.cshtml. Razor files named with a leading underscore are not intended to be rendered directly. These two files play an important role in the application, and they should not be renamed. The purpose of these files will be explained in the next chapter.
The Pages folder also contains a Shared folder. Within that are two further Razor files, both having leading underscores in their names. The _Layout.cshtml file acts as a master template for other files, containing common content, including the navigation you altered in the previous section. The other Razor file, _ValidationScriptsPartial .cshtml, is a partial file. Partial files are usually used to contain snippets of UI that you can plug into pages or layouts. They support HTML and Razor syntax. This particular partial file contains some script references to client-side validation libraries. You will work with these in chapter 5. The final file is a CSS stylesheet with an odd name: _Layout .cshtml.css. It contains style declarations that are applied to the _Layout.cshtml file. The naming convention is used by a new feature in .NET 6, called CSS Isolation. You will look at what this is and how it works in chapter 11.
2.2.7 The app-settings files
App-settings files are used as a place to store application-wide configuration settings information. The project template consists of two app-settings files: appSettings.json and appSettings.Development.json. The first, appSettings.json, is the production version that will be deployed with the published application. The other version is the one used when you are developing the application. The structure of the file contents is JSON.
Both versions contain a basic configuration for logging. The development version also contains a configuration entry named DetailErrors set to true. This enables full details of any errors that occur within the application to be rendered to the browser. Host filtering is configured in the production version. You can store pretty much any application configuration information in the app-settings files. Later, you will use them to store a database connection string and email settings.
App-settings files are not the only place you can store configuration information. Many other locations, including environment variables, are supported out of the box, and you can configure your own locations. You will learn more about configuration in chapter 14.
2.2.8 Program.cs
Readers who are familiar with C# programming know that Program.cs provides the entry point to a console application. By convention, it houses a static Main method that contains logic for executing the application. This file is no different, except that there is no Main method visible. The project template utilizes some newer C# language features, which are introduced in C# 10, one of which is top-level statements. This feature allows you to omit the class declaration and Main method in Program.cs and start writing executable code. The compiler will generate the class and Main method and call your executable code within the method.
The code within the Program.cs file is responsible for configuring, or bootstrapping, your web application and starting it. In .NET 5 and earlier, this code was split across two separate files. Much of the application configuration was delegated to a separate class named Startup. With the release of .NET 6, the developers behind ASP.NET have tried to reduce the amount of complexity that used to exist in basic application configuration. Rather than have code across two files, they have consolidated it into one file, taken advantage of some new C# features to further reduce the boilerplate, and then introduced what they refer to as a minimal hosting API to get the minimum code required to bootstrap and run a Razor Pages application down to 15 lines of code. It was nearer to 80 lines of code in the previous version, spread across the two files.
The first line of code creates a WebApplicationBuilder:
var builder = WebApplication.CreateBuilder(args);
Remember that this code will be executed within the compiler-generated Main method, so the args passed in to the CreateBuilder method are the standard args passed in to the Main method of any C# console application by whatever process invokes the application.
The WebApplicationBuilder is new in .NET 6 and forms part of the minimal hosting API together with another new type: the WebApplication, which you will look at shortly. The WebApplicationBuilder has several properties, each enabling configuration of various aspects of the application:
-
Environment—Provides information about the web-hosting environment the application is running in
-
Services—Represents the application’s service container (see chapter 7)
-
Configuration—Enables composition of the configuration providers (see chapter 14)
-
Logging—Enables logging configuration via the ILoggingBuilder
-
Host—Supports the configuration of application-host-specific services, including third-party DI containers
The application host is responsible for bootstrapping the application, starting it up, and shutting it down. The term bootstrapping refers to the initial configuration of the application itself. This configuration includes the following:
-
Setting the content root path, which is the absolute path to the directory that contains the application content files
-
Loading configuration information from any values passed in to the args parameter, app-settings files, and environment variables
All .NET applications are configured in this way, whether they are web applications, services, or console applications. On top of that, a web server is configured for web applications. The web server is configured through the WebHost property, which represents an implementation of the IWebHostBuilder type. The default web server is a lightweight and extremely fast web server named Kestrel. The Kestrel server is incorporated within your application. The IWebHostBuilder also configures host filtering and integration with Internet Information Services (IIS), which is the Windows web server.
The IWebHostBuilder object exposes several extension methods that enable further configuration of the application. For example, earlier I discussed configuring an alternative to the wwwroot folder as the web root path. The WebHost property enables you to do that if you really have a good reason to. In the following listing, the Content folder is configured as a replacement for wwwroot.
Listing 2.6 Configuring the static files location
builder.WebHost.UseWebRoot("content");The Services property provides the entry point to the dependency injection container, which is a centralized place for application services. You will explore dependency injection in more detail in chapter 7, but for the meantime, it is enough to know that the container is responsible for managing the lifetime of application services and providing instances to any part of the application, as needed. The default template includes the following line of code, which makes the essential services the Razor Pages infrastructure relies on available to the application:
builder.Services.AddRazorPages();
Those services include the Razor view engine, model binding, request validation, tag helpers, memory cache, and ViewData. Don’t worry if these terms seem unfamiliar. You will encounter them in much more detail as you work through the book. The important thing to note is that the Services property provides you with a place to register and configure additional services as you need them.
Sometimes these services will be parts of the framework that you choose to enable (like the Razor Pages example), and sometimes they represent services that you install as separate packages. Often, they will be services that you write yourself that hold the application logic, like getting and saving data.
The Build method returns the configured application as an instance of the WebApplication type. This type represents a merger of three other types:
-
IApplicationBuilder—Allows configuration of the application’s request, or middleware pipeline
-
IEndpointRouteBuilder—Enables the configuration of mapping incoming requests to specific pages
The WebApplication allows you to register middleware components to build and configure the application’s request pipeline. For now, let’s take a high-level look at the default configuration in the following listing. You will learn about the more interesting parts of the pipeline in detail later in the book.
Listing 2.7 The default request pipeline
if (!app.Environment.IsDevelopment())
{
    app.UseExceptionHandler("/Error");
    app.UseHsts();
}
app.UseHttpsRedirection();
app.UseStaticFiles();
app.UseRouting();
app.UseAuthorization();
app.MapRazorPages();
app.Run();
Each middleware is added to the pipeline via an extension method on the IApplicationBuilder type, which is implemented by WebApplication. An IWebHost- Environment is accessible via the Environment property, which holds information about the current environment. You will learn more about environments in chapter 14, but for the time being, it will suffice to say that this property is used to determine whether the application is currently running in Development mode, and if so, the UseException- Handler method is called, which adds middleware for catching errors and displaying their details in the browser. Otherwise, the error page you saw in the Pages folder is used to display a bland message that conceals any sensitive information about the specifics of the error to the user, such as database connection strings containing user credentials or information about file paths on the server. Middleware that adds an HTTP Strict Transport Security header is also registered (app.UseHsts()) but only if the application is not running in Development mode. This header tells the browser to only use HTTPS when accessing the website. I cover this in more detail in chapter 13.
The UseHttpsRedirection method adds middleware that ensures that any HTTP requests are redirected to HTTPS. Then, after this, the static files middleware is registered. By default, an ASP.NET Core application doesn’t support serving static files, such as images, stylesheets, and script files. You have to opt in for this feature, and you do so by adding the static files middleware. This middleware configures the wwwroot folder to allow static files to be requested directly and serves them to the client.
Routing middleware is responsible for selecting which endpoint should be executed, based on information included in the request. I discuss how routing works in Razor Pages in chapter 4. Then, authorization middleware is registered, which is responsible for determining if the current user is authorized to access the resource that is being requested. Authorization is covered in chapter 10.
Finally, the MapRazorPages method adds middleware to the pipeline that initially configures Razor Pages as endpoints. This middleware is also responsible thereafter for executing the request.
2.3 Understanding middleware
Wow. That was a lot of abstract terms! Endpoint, middleware, pipeline ... but what do they actually mean? What do they represent? In the next section, we will explore them in more detail.
Note ASP.NET Core middleware is quite a large topic. I will only cover the areas that are likely to be of use in the majority of Razor Pages applications. If you would like to explore more advanced middleware concepts, such as branching the pipeline, I recommend ASP.NET Core in Action, Second Edition, by Andrew Lock (Manning, 2021).
First, given that the purpose of a Razor Pages application is to provide responses to HTTP requests, it is appropriate to review and understand the nature of an HTTP request and how it is represented within a Razor Pages application. That will form the basis of your understanding of pipelines and endpoints.
2.3.1 An HTTP refresher
Hypertext Transfer Protocol (HTTP) is the foundation for the World Wide Web. It is a protocol for transferring information between systems in the client-server model. An HTTP transaction can be seen as consisting of two basic elements: a request and a response. The request is the input, and the response is the output. Clients initiate requests, and servers provide responses, as figure 2.11 demonstrates.

Figure 2.11 The client (browser) initiates the HTTP request, which is sent to the server. The server is responsible for routing the request to the configured application and returning an HTTP response.
An HTTP request comprises a number of pieces of data. The first line (start line) of the request message includes the following:
The method is represented by a verb (e.g., GET, POST, PUT, DELETE, TRACE, or CONNECT) or a noun (e.g., HEAD or OPTIONS). The most commonly used methods for requests to websites are GET and POST, where GET is primarily used to request data from the server and POST is primarily used to transmit data to the server, although the POST method may also result in data being sent back to the client. These are the only two methods that will be covered in this book.
The identifier is represented by a uniform resource identifier (URI). This particular piece of data is also commonly referred to as a uniform resource locator (URL), as if they represent the same thing. Technically, they differ. For the purposes of this book, it is enough to know that all URLs are URIs, but not all URIs are URLs. Section 1.1.3 of RFC3986 explains the differences in detail: https://www.ietf.org/rfc/rfc3986.txt. The type of URI I will use in examples will be a URL in all cases.
The request also includes a collection of headers—name-value pairs that can be used to provide additional information to the server that might affect its response. For example, the If-Modified-Since header specifies a datetime value. If the requested resource has not been modified since the specified time, the server should return a 304 Not Modified status code; otherwise, it should send the modified resource. Other headers might inform the server of the preferred language for the response or the types of content the requester can handle.
The request can also include cookies—snippets of information stored by the browser that may or may not be specific to the website’s user. The most common uses for cookies include the storage of the user’s authentication status, once they have logged in to a site, or a token, which uniquely identifies a visitor for analytics tracking purposes.
The request can also include a body. Typically, this applies to POST requests, where the body contains the form values being submitted to the server.
The response returned by the server is structured in a similar way. It features a status line, which specifies the protocol version being used, the HTTP status code, and some text to describe the result—officially known as a reason phrase. An example status line might look like this:
HTTP/1.1 200 OK
The response can also include headers, which might specify the content type of the data being sent, its size, and the method used to encode the response if it has been encoded, such as gzip. The response usually includes a body containing the data that has been requested.
2.3.2 The HttpContext
All of the information in an HTTP transaction needs to be made available to your Razor Pages application. The object used to encapsulate details of the current HTTP transaction—the request and the response—is the HttpContext class. The in-process web server that processes the request is responsible for creating an instance of HttpContext using details from the actual HTTP request. It provides you, the developer, with access to request data via a formal API, rather than forcing you to parse the HTTP request for this information yourself. The HttpContext also encapsulates the response for this particular request. Once the web server has created the HttpContext, it is made available to the request pipeline. The HttpContext is surfaced throughout the application in various guises, so you can work with its properties as required. Table 2.1 details the main properties of the HttpContext and what they represent.
Table 2.1 The HttpContext properties
The Request property is represented by the HttpRequest class. Table 2.2 details the main properties of this class and their purpose.
Table 2.2 Primary HttpRequest properties
The Response property is represented by the HttpResponse class. Table 2.3 details the main members of this class and their purpose.
Table 2.3 Primary HttpResponse members
The methods and properties detailed in the previous tables are useful when you are working directly with the request and response, which you will do when creating your own middleware, for example.
2.3.3 The application request pipeline
When the web server routes a request to your application, the application must decide how to handle it. A number of considerations need to be taken into account. Where should the request be directed or routed to? Should details of the request be logged? Should the application simply return the content of a file? Should it compress the response? What should happen if an exception is encountered while the request is being processed? Is the person making the request actually allowed to access the resource they have requested? How should cookies or other request-related data be handled?
This decision-making process is known as the request pipeline. In an ASP.NET Core application, the request pipeline comprises a series of software components, each with its own individual responsibility. Some of these components act on the request on its way into the application, and others operate on the response returned by the application. Some might do both. The individual components that perform these functions are known as middleware.
Figure 2.12 illustrates this concept, showing a request coming in from the web server and then being passed through a pipeline of several middleware components before reaching the actual application itself, labeled Razor Pages.

Figure 2.12 The request comes into the pipeline at the top and flows through all middlewares until it reaches Razor Pages, where it is processed and returned as a response.
This is how a request for the home page of your sample application might flow. Each middleware examines the request and determines whether it needs to do anything before passing the request on to the next middleware in the pipeline. Once the request has reached Razor Pages and has been processed, the response flows back to the server as the pipeline continues in the opposite direction. The pipeline itself begins and ends at the web server. In figure 2.13, the static file middleware makes a decision and either passes control on to the next middleware or short-circuits the process and returns a response.
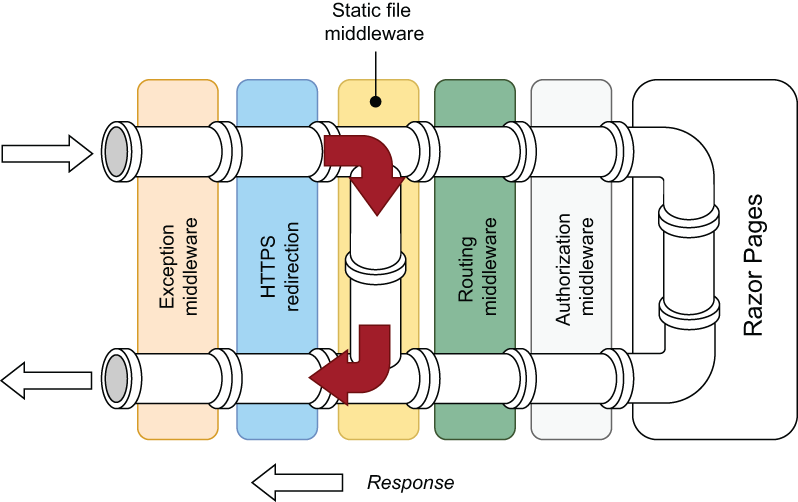
Figure 2.13 The middleware processes the request and returns the response when the request is for a known file.
The static file middleware inspects every request that reaches it to determine whether the request is for a known file—that is, one that resides in the wwwroot folder. If it is, the static file middleware simply returns the file, thereby short-circuiting the rest of the pipeline. Otherwise, the request is passed on to the next middleware in the pipeline.
2.3.4 Creating middleware
Now that you have a better understanding of the role middleware plays, you should understand how it is implemented, so you can provide your own custom functionality to the request pipeline. This section will cover creating your own middleware components and registering them with the pipeline.
Middleware components are implemented as RequestDelegates—that is, a .NET delegate that takes an HttpContext as a parameter and returns a Task, or, in other words, a method that represents an asynchronous operation on the HttpContext:
public delegate Task RequestDelegate(HttpContext context)
As you saw earlier, middleware is added to the pipeline via the WebApplication. Typically, middleware is created as separate classes that are registered via extension methods, but it is also possible to add RequestDelegates directly to the pipeline. Listing 2.8 shows a simple method that takes an HttpContext as a parameter and returns a Task, which means it meets the RequestDelegate type specification. You can add the method to Program.cs if you want to try this example out. You will also need to add a using directive to the Startup class to bring Microsoft.AspNetCore.Http into scope.
Listing 2.8 RequestDelegate takes HttpContext as parameter and returns Task
async Task TerminalMiddleware(HttpContext context)
{
    await context.Response.WriteAsync("That’s all, folks!");
}
This particular middleware writes a message to the response. Control is not passed on to any other middleware components, so this type of middleware is known as terminal middleware. It terminates further processing within the pipeline. Terminal middleware is registered via the WebApplication object’s Run method:
app.Run(TerminalMiddleware);
The RequestDelegate is a standard .NET delegate, so it can also be written inline as an anonymous function using a lambda expression, rather than as a named method.
Listing 2.9 Delegating bodies specified inline using a lambda expression
app.Run(async context =>
     await context.Response.WriteAsync("That’s all, folks!")
);
Try registering this middleware using either approach by placing the app.Run call at the beginning of the pipeline—before the condition that checks to see if the current environment is Development.
Listing 2.10 Adding the middleware to the start of the pipeline
app.Run(async context =>
     await context.Response.WriteAsync("That’s all, folks!")
);
if (app.Environment.IsDevelopment())
{
   ...
Then run the application. You should see the output shown in figure 2.14.
Figure 2.14 Shows output from the middleware
The next listing illustrates a middleware that conditionally passes processing on to the next middleware in the pipeline.
Listing 2.11 Middleware that conditionally passes control to the next middleware
async Task PassThroughMiddleware(HttpContext context, Func<Task> next)
{
    if (context.Request.Query.ContainsKey("stop"))
    {
        await context.Response.WriteAsync("Stop the world");
    }
    else
    {
         await next();
    }
}
This example takes the HttpContext as a parameter, but it also takes a Func that returns a Task, representing the next middleware in the pipeline. If the request includes a query string parameter named stop, the middleware short-circuits the pipeline and writes Stop the world! to the response. No other middleware is invoked. Otherwise, it invokes the Func<Task> that was passed in, passing control on to the next middleware. Middleware that passes control to the next component in the pipeline is registered with the Use method:
app.Use(PassThroughMiddleware);
Once again, this middleware can be written as an inline lambda.
Listing 2.12 Registering middleware inline with the Use method
app.Use(async (context, next) =>
{
    if (context.Request.Query.ContainsKey("stop"))
    {
        await context.Response.WriteAsync("Stop the world");
    }
    await next();
});
You can add code to run after control has been passed to the next middleware by placing it after await next(). Assuming that no other middleware short-circuits the pipeline, any logic you place there will be executed as the pipeline reverses its direction back to the web server. You might want to do this to include logging, for example.
Listing 2.13 Performing a function after other middleware has been invoked
app.Use(async (context, next) =>
{
    if (context.Request.Query.ContainsKey("stop"))
    {
        await context.Response.WriteAsync("Stop the world");
    }
    else
    {
        await next();
        logger.LogInformation("The world keeps turning");
    }
});
When registering middleware, the position is critical. If you were to place this middleware at the beginning of the pipeline, it would execute for every request and log the information message, unless the specified query string item is found. Suppose you were to register this middleware after the static files middleware. In that case, it would only execute and log requests for resources that are not static files, given that the static files middleware short-circuits the pipeline when returning a static file.
2.3.5 Middleware classes
All of the example middleware you have seen so far has been added as inline lambdas. This approach works for the simple middleware you have seen so far but falls short pretty quickly if your middleware involves any level of complexity, with both reusability and testability being adversely affected. At that point, you are likely to write your middleware in its own class.
There are two ways to implement middleware classes. The first option is to use a convention-based approach that has been part of ASP.NET Core since its beginning. The second option involves implementing the IMiddleware interface, which was introduced to ASP.NET Core 2.0 at the same time as Razor Pages.
Conventions are rules that must be applied to the design of certain components that are intended to work with a framework, so they behave in the expected manner. It might be that a class must be named in a particular way, so the framework can recognize it for what it is intended to be. This is the case, for example, with controller classes in MVC, which must have names that include Controller as the suffix. Or a convention might apply that specifies that a class designed for a specific use case must include a method that is named in a certain way and bears a predefined signature.
The two conventions that must be applied to a convention-based middleware class are (1) declaring a constructor that takes a RequestDelegate as a parameter representing the next middleware in the pipeline and (2) a method named Invoke or InvokeAsync that returns a Task and has at least one parameter—the first being an HttpContext.
To try this out, add a new class named IpAddressMiddleware to the application. The following example is added directly to the root of the project for simplicity. Replace the code with the next listing, which illustrates a middleware class that implements these conventions and logs the value of the visitor’s IP address.
Listing 2.14 Middleware class based on the convention-based approach
namespace WebApplication1
{
    public class IpAddressMiddleware
    {
        private readonly RequestDelegate _next;
        public IpAddressMiddleware(RequestDelegate next) => _next =
next;                                                               ❶

        public async Task InvokeAsync(HttpContext context,
        ➥ ILogger<IpAddressMiddleware> logger)                     ❷
        {
            var ipAddress = context.Connection.RemoteIpAddress;
            logger.LogInformation($"Visitor is from {ipAddress}");  ❸
            await _next(context);                                   ❹
        }
    }
}
❶ The constructor takes a RequestDelegate as a parameter.
❷ The InvokeAsync method returns a task and has an HttpContext as a first parameter. Any additional services are injected into the Invoke/InvokeAsync method.
❸ Performs the processing within the InvokeAsync method
❹ Passes control to the next middleware in the pipeline
Next, add a using directive to the top of the Program.cs file to bring the WebApplication1 namespace into scope:
using WebApplication1;
var builder = WebApplication.CreateBuilder(args);
The middleware class is added to the pipeline via the UseMiddleware method on the WebApplication. There are two versions of this method. The first takes a type as a parameter:
app.UseMiddleware(typeof(IpAddressMiddleware));
The second version takes a generic parameter, representing the middleware class. This version is the one you are more likely to encounter:
app.UseMiddleware<IpAddressMiddleware>();
Alternatively, it is recommended that you create your own extension method on IApplicationBuilder to register your middleware. This example, shown in the following listing, is placed in a class named Extensions, which has also been added to the root of the project.
Listing 2.15 Registering middleware with an extension method
namespace WebApplication1
{
    public static class Extensions
    {
        public static IApplicationBuilder UseIpAddressMiddleware(this IApplicationBuilder app)
        {
            return app.UseMiddleware<IpAddressMiddleware>();
        }
    }
}
Then the extension method is used in the same way as all the other extension methods you have encountered for registering framework middleware:
app.UseIpAddressMiddleware();
In this case, you will probably want to register this middleware after the static files middleware, so it doesn’t log the IP address for the same visitor for every requested file.
Middleware that follows the convention-based approach is created as a singleton when the application first starts up, which means there is only one instance created for the lifetime of the application. This instance is reused for every request that reaches it.
The recommended approach to writing new middleware classes involves implementing the IMiddleware interface, which exposes one method:
Task InvokeAsync(HttpContext context, RequestDelegate next)
The next listing shows the same IpAddressMiddleware you created using the convention-based approach, refactored to implement IMiddleware.
Listing 2.16 Refactoring IpAddressMiddleware to implement IMiddleware
public class IpAddressMiddleware : IMiddleware                             ❶
{
    private ILogger<IpAddressMiddleware> _logger;
    public IpAddressMiddleware(ILogger<IpAddressMiddleware> logger)
        => _logger = logger;                                               ❷

    public async Task InvokeAsync(HttpContext context, RequestDelegate next)❸
    {
        var ipAddress = context.Connection.RemoteIpAddress;
        _logger.LogInformation($"Visitor is from {ipAddress}");
        await next(context);
    }
}
❶ The middleware class implements the IMiddleware interface.
❷ Dependencies are injected into the constructor.
❸ InvokeAsync takes an HttpContext and a RequestDelegate as parameters.
The InvokeAsync is very similar to the one that was written using the conventions-based approach, except that this time the parameters are an HttpContext and a RequestDelegate. Any services the class depends on are injected via the middleware class’s constructor, so fields are required to hold instances of the injected service.
This middleware is registered in exactly the same way as the convention-based example: via the UseMiddleware methods or an extension method. But an additional step is also required for IMiddleware-based components: they must also be registered with the application’s service container. You will learn much more about services and dependency injection in chapter 7, but for the time being, it is enough to know that you need to add the bold line of code in the next listing to the Program class.
Listing 2.17 Registering IMiddleware as a service
builder.Services.AddRazorPages();
builder.Services.AddScoped<IpAddressMiddleware>();
So why are there two different ways to create middleware classes, and which one should you use? Well, the conventions-based approach requires that you learn the specific conventions and remember them. There is no compile-time checking to ensure your middleware implements the conventions correctly. This approach is known as weakly typed. Typically, the first time you discover that you forgot to name your method Invoke or InvokeAsync or that the first parameter should be an HttpContext will be when you try to run the application, and it falls over. If you are anything like me, you will often find that you have to refer back to the documentation to remind yourself of the convention details.
The second approach results in strongly typed middleware because you have to implement the members of the IMiddleware interface; otherwise, the compiler complains, and your application won’t even build. So the IMiddleware approach is less error prone and potentially quicker to implement, although you do have to take the extra step of registering the middleware with the service container.
There is another difference between the two approaches. I mentioned earlier that convention-based middleware is instantiated as a singleton when the pipeline is first built. IMiddleware components are instantiated for each request by a component that implements the IMiddlewareFactory interface, and this difference has ramifications for services the middleware depends on, based on their lifetime. I explain service lifetimes in greater detail in chapter 7. For now, understand that services with a lifetime other than a singleton should not be injected into the constructor of a singleton. That means nonsingleton services should not be injected into the constructor of convention-based middleware. However, they can be injected into the constructor of IMiddleware components. Note that it is possible to inject nonsingleton services safely into the Invoke/InvokeAsync method of convention-based middleware.
I should note that the majority of framework middleware is authored using the convention-based approach. This is mainly because most of it was written before IMiddleware was introduced. While there is no indication that the framework designers feel any need to migrate existing components to IMiddleware, they recommend that you should favor IMiddleware for any middleware you create yourself.
We have looked in detail at how middleware is used to construct the request pipeline but haven’t gone into any real detail on the middleware that has been added to the default project template. This will be covered in greater depth in forthcoming chapters. Specifically, we will look at how routing and endpoint middleware combine in chapter 4, how authorization works in chapter 10, and how to manage custom error pages in chapter 12.
Summary
-
The starting point of your Razor Pages application is based on a template.
-
Razor runtime compilation makes changes to Razor files visible by refreshing the browser.
-
Razor Pages applications are console applications with a Main method as an entry point. The Main method is hidden from view as part of the top-level statements feature in C# 10.
-
The WebApplicationBuilder is used to configure the application’s services and request pipeline.
-
The request pipeline determines the behavior of the application.
-
Middleware is implemented as a RequestDelegate—a function that takes an HttpContext as a parameter and returns a Task.
-
Middleware is added to the pipeline via the WebApplication object. Middleware can terminate the pipeline or pass control on to the next middleware.
-
Simple middleware can be added using inline lambda expressions.
-
Complex middleware can be created as a separate class and registered using extension methods on the IApplicationBuilder type.
-
Middleware classes should use conventions or implement the IMiddleware interface.
-
Convention-based middleware is instantiated as a singleton and should take dependencies via the Invoke/InvokeAsync method.
-
IMiddleware is instantiated per request and can take dependencies via its constructor.