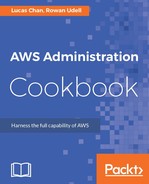
While cross-account roles are extremely useful for administering multiple AWS accounts, they're not the most intuitive thing to configure. Here's a diagram that illustrates the resources and their interactions:

The first few steps of this recipe are simply creating the Target IAM Role in a clear and repeatable way using CloudFormation.
You must explicitly call out the AWS account number that will be allowed to assume this role. If you want to allow multiple accounts to assume the role, simply add more statements to the AssumeRolePolicyDocument property of the role.
The sample policy created in this template gives full access to the target account (because the Action and Resource are both set to *). You should adjust this as appropriate for your needs.
Defining an output value that returns the IAM role's ARN will make it easier to get the generated ID later in the recipe.
We then launch the template in the target account. As this template creates IAM resources, you must supply the --capabilities CAPABILITY_IAM argument. If you don't have any existing IAM users that can launch it, use the AWS web console (after logging in with your root credentials). This means you don't need to bother creating IAM users in the target account.
Once you have deployed the template, you will no longer need to log in to the account manually—you can just assume the newly created role from the trusted (source) account. Using an IAM role in the target account means that your day-to-day access does not require multiple passwords, which takes work to manage and store securely. You only need to have one password—the password of your source IAM user.
After the stack has finished creating (which shouldn't take long, as it's only creating one resource), you can quickly extract the target role's ARN with a describe-stacks call, combined with a specifically-crafted --query argument. The JMESPath query Stacks[0].Outputs[0].OutputValue gets the OutputValue property of the first output in the first stack returned, which we know will be the target role ARN because there is only one output in the template.
Finally, the sample assume-role command will return the credentials for the target role (that is, ACCESS_KEY_ID and SECRET_ACCESS_KEY). You can then use this in an API call, via the CLI tool or one of the SDKs. Keep in mind that these tokens will be short-lived.
See the next section for a more convenient way to use the credentials with the CLI tool by creating profiles.