
10. Creating Interactive Navigation
Lesson overview
In this lesson, you’ll learn how to do the following:
Create button symbols.
Duplicate symbols.
Swap symbols and bitmaps.
Name button instances.
Understand how ActionScript 3.0 and JavaScript create interactive Animate documents.
Use the wizard in the Actions panel to quickly add JavaScript.
Create and use frame labels.
Create animated buttons.

This lesson will take about 2 hours to complete.
To get the lesson files used in this chapter, download them from the web page for this book at www.adobepress.com/AnimateCIB2023. For more information, see “Accessing the lesson files and Web Edition” in the Getting Started section at the beginning of this book.

Let your viewers explore your project and become active participants. Button symbols and code work together to create engaging, user-driven interactive experiences.
Getting started
![]() Note
Note
If you have not already downloaded the project files for this lesson to your computer from your Account page, make sure to do so now. See Getting Started at the beginning of the book.
To begin, view the interactive animated banner ad that you’ll create as you learn to make interactive projects in Animate. Banner ads are common advertisements that generate revenue for websites. They are often animated and eye-catching to attract attention and get users to click through to the advertiser’s site for the product. In this lesson, you’ll integrate interactivity with animation to create an engaging banner ad.
Double-click the 10End.fla file in the 10/10End folder to open the banner ad in Animate. Choose Control > Test to see the final project.
The project opens in your default browser. You can ignore any warnings that appear in the Output panel.
 Note
NoteThis project contains buttons and bitmaps that may generate security errors when you try to play the HTML file locally (from your own computer). Your browser may be blank or simply show a static picture when you double-click the HTML file to open it in a browser. Upload all required files to your server to test the project over the internet, or test the movie within Animate.

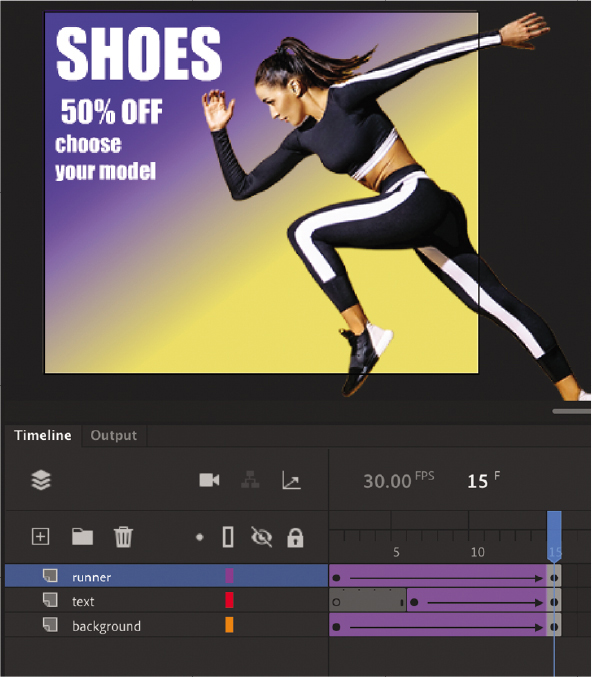
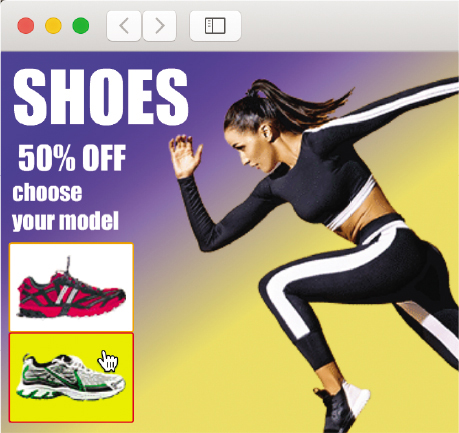
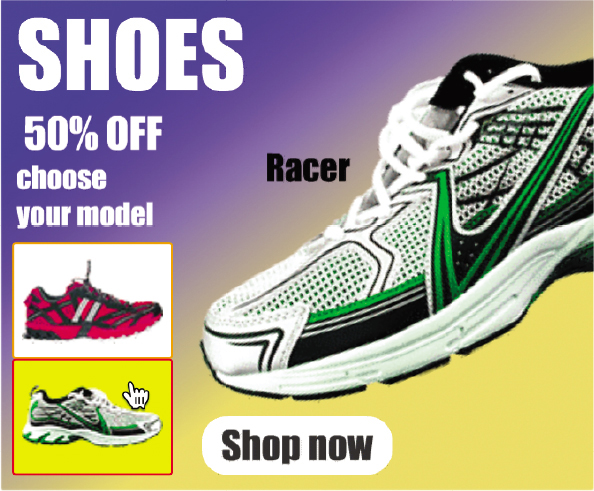
The project is a square banner ad for an imaginary store that sells running shoes. Viewers see a quick animated introduction, and then they can click either of the two buttons to see more information about a particular shoe. You can click the “Shop now” button to go directly to the product website, which in this case goes to the Adobe site.
In this lesson, you’ll be working in an HTML5 Canvas document to create interactive buttons and structure the timeline properly. You’ll learn to add JavaScript code to provide instructions for what each button will do.
Close the 10End.fla file.
Double-click the 10Start.fla file in the 10/10Start folder to open the initial project file in Animate. The file is an HTML5 Canvas document that will play in a browser. The document already contains the initial animation on the timeline with several assets already in the Library panel.
 Tip
TipAnimate may warn you if your computer doesn’t have the same fonts contained in a FLA file. Choose substitute fonts, or click Use Default to have Animate automatically make the substitutions.
 Note
NoteAnimate makes it easy to create new documents for banner ads. In the New Document panel, the Ads category contains preset HTML5 documents for the standard sizes of banner ads, such as leaderboards, skyscrapers, and mobile formats.
Choose File > Save As. Name the file 10_workingcopy.fla and save it in the 10Start folder.
Saving a working copy ensures that the original start file will be available if you want to start over.
About interactive movies
Interactive movies change based on the viewer’s actions. For example, when the viewer clicks or taps a button, a different graphic with more information is displayed. Interactivity can be simple, such as a button click, or it can be complex, receiving inputs from a variety of sources, such as the movements of the mouse, keystrokes from the keyboard, or even the tilting of a mobile device.
ActionScript and JavaScript
In Animate, you add interactivity with either ActionScript 3.0 or JavaScript, depending on the kind of document you’re working in.
You use ActionScript to achieve interactivity if you’re working in an ActionScript 3.0, AIR for Desktop, or AIR for iOS or Android document. The published file for an ActionScript 3.0 document containing ActionScript interactivity is a projector, which is a self-contained file that plays on a user’s computer. An AIR for Desktop document also publishes a file to play on a computer or an AIR-supported platform. An AIR for iOS or Android document publishes a mobile app.
ActionScript provides the instructions that enable an animation to respond to the user. Those instructions could be to play a sound, skip to a keyframe on the timeline where new graphics appear, or make a calculation.
In an HTML5 Canvas document like the one you’re working on for this banner ad, you use JavaScript, the same code that drives interactivity for web pages in a browser. The WebGL glTF, VR 360, and VR Panorama Animate documents also use JavaScript.
ActionScript 3.0 and JavaScript are very similar (in fact, both are based on an ECMA coding language standard), but there are slight differences in syntax and usage.
In this lesson, you’ll use JavaScript in an HTML5 Canvas document to learn to create nonlinear navigation—that is, the movie doesn’t have to play straight from the beginning of the timeline to the end. You’ll add JavaScript to tell the Animate playhead to jump around and go to different frames of the timeline based on which button the user clicks. Different frames on the timeline contain different content. The user doesn’t actually know that the playhead is jumping around the timeline; the user just sees (or hears) different content appear as the buttons are clicked on the Stage.
Don’t worry if you don’t think you’re good at programming! You don’t have to be a code ninja, because Animate provides an easy-to-use, menu-driven wizard in the Actions panel that allows you to add JavaScript quickly and simply.
Creating buttons
A button is a basic visual indicator of something users can interact with. Users often click a button with the mouse or tap a button with their finger, but many other types of interactions are possible. For example, something can happen when a user rolls the mouse pointer over a button.
A button is a kind of symbol that has four special states, or keyframes, that determine how the button appears. Buttons can look like virtually anything—an image, a graphic, or a bit of text. They don’t have to be those typical pill-shaped gray rectangles that you see on many websites.
Creating a button symbol
In this lesson, you’ll create buttons with small thumbnail images. Buttons are a special type of symbol that are stored in the Library panel.
Create a new layer above all the existing layers and name it buttons.

Lock the other layers so that you don’t accidentally move the other elements on the Stage.
Select the Rectangle tool with a white fill and an orange stroke, and create a rectangle on the buttons layer on the Stage about 90 pixels wide and 65 pixels high.

In the Library panel, drag the vapormax ultra thumbnail bitmap into the center of the rectangle you just drew.
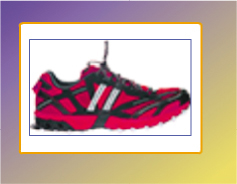
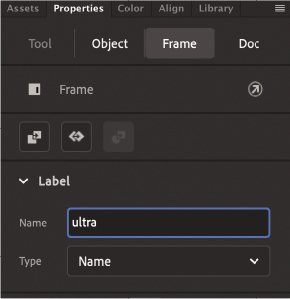
Select both the rectangle and the image of the running shoe and choose Modify > Convert To Symbol.
In the Convert To Symbol dialog box, choose Button from the Type menu and name the symbol ultra. Click OK.

Animate creates a button symbol from the selected graphics, which appears in your library.

Editing a button symbol
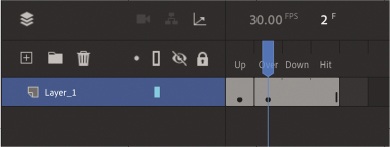
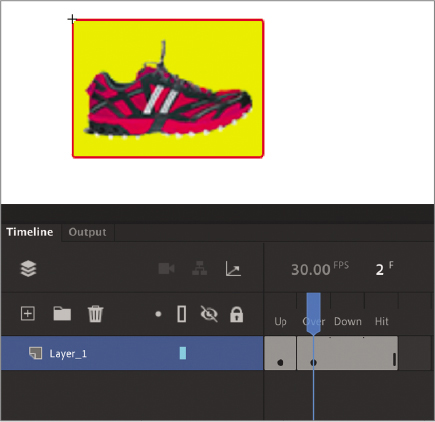
A button symbol contains four special states that are represented on the button’s timeline as frames, just like on the main timeline. The four frames include the following:
The Up state shows the button as it appears when the pointer is not interacting with it.
The Over state shows the button as it appears when the pointer is hovering over it.
The Down state shows the button as it appears when the pointer is hovering over it and the user presses the mouse button or trackpad, or taps it.
The Hit state indicates the clickable area of the button.
You’ll understand the relationship between these states and the button’s appearance as you work through this exercise.
In the Library panel, double-click the ultrabutton symbol.
You enter symbol editing mode for the button symbol where you see a timeline with the Up, Over, Down, and Hit frames. Only the Up frame contains a filled keyframe.

Select the Hit frame in the timeline and choose Insert > Timeline > Frame to extend the timeline.
The rectangle and shoe image now extends through the Up, Over, Down, and Hit states.
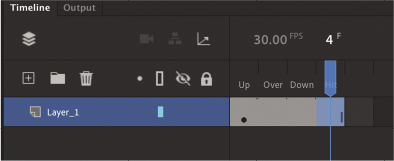
Create a keyframe in the Over frame.
The new keyframe will indicate a change in the graphics when the user’s mouse cursor hovers over the button.
Double-click the stroke around the rectangle to select it, and then change the color from orange to red.
Select the fill of the rectangle and change the color from white to yellow.
Now the Up keyframe and the Over keyframe are different. The button is normally white with an orange stroke, but whenever the mouse cursor rolls over the button, it will show the Over keyframe that has a yellow fill with a red stroke.
Click the left-facing arrow button in the Edit bar above the Stage to exit symbol editing mode and return to the main timeline. Your first button symbol is complete, but your button won’t react to your cursor yet. You’ll have to test your movie to see how your button changes its appearance depending on its Up, Over, and Down keyframe states.
Duplicating buttons
Now that you’ve created one button, you’ll be able to create the second button more easily by duplicating symbols.
In the Library panel, right-click the ultra button symbol and choose Duplicate. You can also choose Duplicate from the Library panel menu.
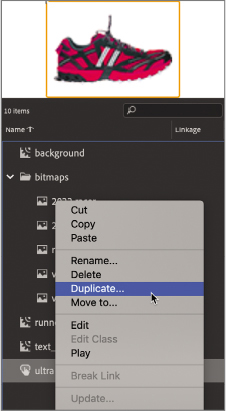
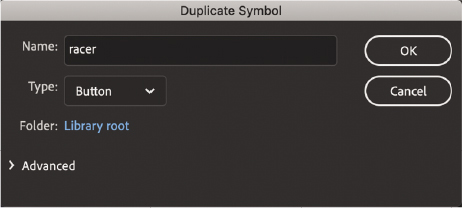
In the Duplicate Symbol dialog box, choose Button from the Type menu, and name the symbol racer.. Click OK.
Swapping bitmaps
Bitmaps and symbols are easy to swap on the Stage and can significantly speed up your workflow.
In the Library panel, double-click the icon for your newly duplicated symbol (the racer button) to edit it.
Select the shoe image on the Stage.
In the Properties panel, click the Swap symbol.
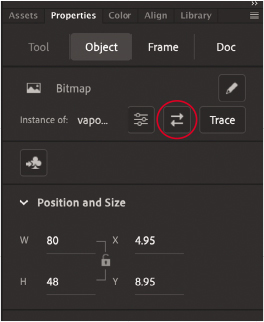
In the Swap Bitmap dialog box, select the other shoe thumbnail image, called racer thumbnail, and click OK.

The original thumbnail (shown with a dot next to the symbol name) is swapped out for the one you selected. Because they are both the same size, the replacement is seamless. Shift the new bitmap down a bit if you need to center it in the button.
Move to the Over keyframe and swap the ultra shoe thumbnail image with the racer shoe.
When you’re done, take a moment to create a folder in the Library panel, name it buttons, and organize your buttons in this folder.

Placing the button instances
Now you’ll put the buttons on the Stage and give them names in the Properties panel so that your code can identify them.
Drag the racer button from the Library panel to the Stage in the buttons layer, placing it under the ultra button that is already there.

Select both buttons and move them under the column of text. The X value should be about 7 and the Y value should be about 140.

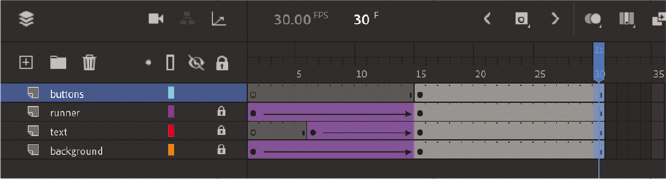
Select the keyframe on frame 1 of the buttons layer and move it to the very last frame (frame 15).
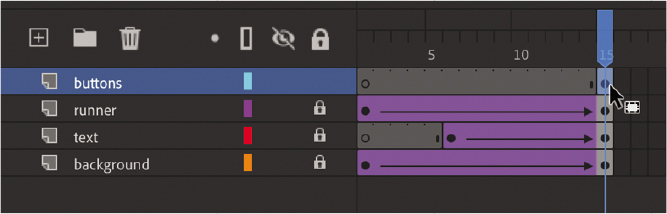
Now the buttons appear only after the animation plays.
At this point, you can test your movie to see how the buttons behave. Choose File > Publish Settings.
The Publish Settings panel appears.
In the Basic tab for the JavaScript/HTML option selected at the left, deselect the Loop Timeline checkbox.
NoteYou can also add JavaScript code to stop the timeline, which you will learn to do later in this lesson.
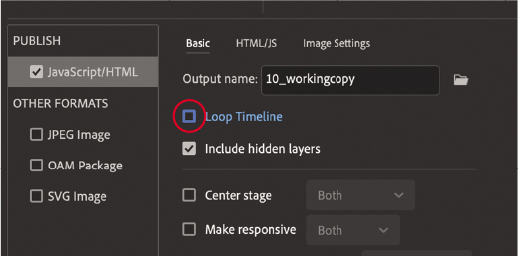
Normally, an Animate project will loop, but for this banner ad, you’ll want the animation to play just once and stop.
Choose Control > Test.
You can ignore any warnings that show up in the Output panel.
In the browser that opens, the animation plays, and your two buttons appear at the end. Note how the buttons change appearance as your mouse cursor interacts with them.
TipIf your browser displays a blank screen when you test your movie (Control > Test), make sure you’re connected to the internet. If you’re not, open the Publish settings (File > Publish Settings). Select the HTML/JS tab and deselect Hosted Libraries. The Hosted Libraries option links to external JavaScript code, so your published files don’t have to include them, but you need to be connected to the internet for your project to work.
At this point, however, you haven’t provided any instructions for the buttons to actually do anything. That part comes after you name the button instances and learn a little about coding.
Naming button instances
Next, you’ll name each button instance so that your code can reference it. Beginners often forget this crucial step.
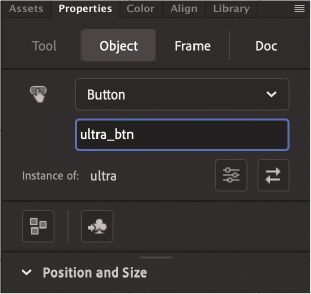
Click an empty part of the Stage to deselect all the buttons, and then select just the first button.
Type ultra_btn in the instance name field in the Properties panel.
Name the other button racer_btn..
Animate is very picky, and one typo will prevent your entire project from working correctly! See the sidebar “Naming rules” for information about instance names.
Preparing the timeline
To create room on the timeline to add more content, you’ll add more frames.
Select frame 30 for all your layers.

Choose Insert > Timeline > Frame (F5). You can also right-click and choose Insert Frame.
Animate adds frames in all the selected layers up to the selected point, frame 30.
Creating destination keyframes
When the user clicks each button, Animate will move the playhead to a new spot on the timeline according to code that you’ll insert. Before adding the code, you’ll create all the different options on the timeline that your user might choose.
Inserting keyframes with different content
You will create four keyframes in a new layer and place information about each of the running shoes in the new keyframes.
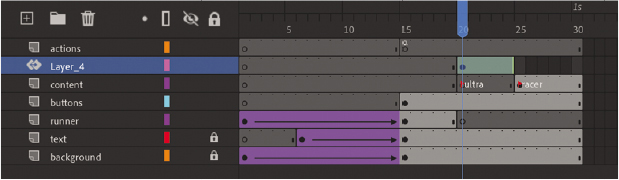
Insert a new layer at the top of the layer stack and name it content.

Select frame 20 of the content layer.
Insert a new keyframe at frame 20 (choose Insert > Timeline > Keyframe, or press F6, or press the Insert Keyframe button above the timeline).
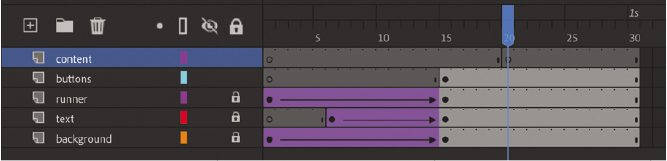
Insert a new keyframe at frame 25.
Your timeline has two new empty keyframes in the content layer.
Unlock the runner layer and select frame 20.
Choose Modify > Timeline > Convert To Blank Keyframes (F7).
An empty keyframe appears at frame 20 of the runner layer. This makes room on the Stage to show more details about the selected running shoe.

Select the empty keyframe at frame 20 of the content layer.
In the Library panel, drag the vapormax ultra bitmap to the Stage.
Position the bitmap where the runner used to be, and rotate it to give it a little more dynamism. In this example, the Transform panel shows a Rotation of –24 degrees and the Properties panel’s Position And Size section should show X=65 and Y=–52.

With the Text tool, add a description next to the shoe image. Add the text Vapormax Ultra in a font and size of your choosing.

Select the empty keyframe at frame 25 of the content layer.

Drag the racer bitmap from the Library panel to the Stage.
Position the bitmap and rotate it in a similar fashion as the previous shoe.

Add the word Racer next to this shoe.

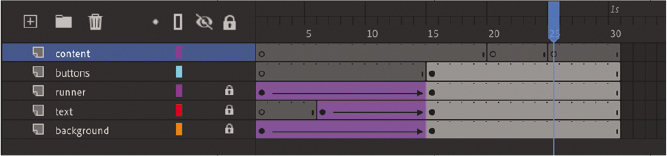
The content layer now contains three keyframes: the first keyframe at frame 1 is empty, the second contains the Vapormax Ultra shoe, and the third contains the Racer shoe.
Using labels on keyframes
Frame labels are names that you give to keyframes. Instead of referring to keyframes by their frame number, you refer to them by their label, which makes code easier to read, write, and edit.
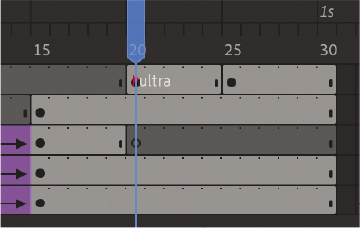
Select frame 20 on the content layer.
In the Label section of the Properties panel, enter ultra in the Name field.
A tiny flag icon appears on the keyframe.
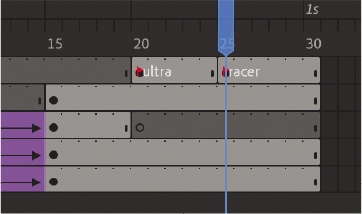
Select frame 25 on the content layer.
In the Label section of the Properties panel, enter racer in the Name field.
A tiny flag icon appears on the keyframe.
Navigating the Actions panel
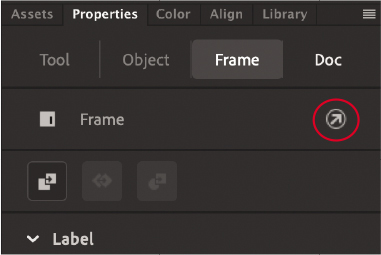
The Actions panel is where you enter all your code. If you’re using an HTML5 Canvas document, you enter JavaScript. If you’re using an ActionScript 3.0 document, you enter ActionScript. Open the Actions panel by choosing Window > Actions, or by selecting a keyframe on the timeline and clicking the ActionScript panel button at the top right of the Properties panel.
You can also right-click any keyframe and choose Actions.
The Actions panel gives you a flexible environment for entering code, as well as different options to help you write, edit, and view your code.

The Actions panel is divided into two parts. On the right of the Actions panel is the Script window—the blank slate where you can write code freely. You enter ActionScript or JavaScript in the Script window just as you would in a text editing application.
On the left is the Script navigator, which shows you where your code is located. Animate places code on keyframes on the timeline, so the Script navigator can be particularly useful if you have lots of code scattered in different keyframes and on different timelines.
At the bottom of the Actions panel, Animate displays the line number and column number (or character in the row) of the current position of the text insertion point.
The upper-right corner of the Actions panel contains options for finding, replacing, and inserting code. The Add Using Wizard button is also located there.
Adding JavaScript interactivity with the Actions panel wizard
Now that you have multiple keyframes on the timeline, your movie will play linearly from frame 1 to frame 30, showing all the shoe choices. However, with this interactive banner ad, you’ll want to pause the movie at frame 15 to wait for your viewers to choose a shoe model.
Stopping the timeline
Use a stop() action to pause your Animate movie. A stop() action simply stops the movie from continuing by halting the playhead.
Insert a new layer at the top and name it actions..

JavaScript and ActionScript code are generally placed on keyframes on the timeline.
Create a keyframe at frame 15 of the actions layer.

Select frame 15 and open the Actions panel (Window > Actions).
Click the Add Using Wizard button.

The wizard opens within the Actions panel. The wizard guides you step by step through the code writing process. The code that you generate with the wizard appears in the first field. The wizard is available for inserting JavaScript into HTML5 Canvas, WebGL glTF extended version, VR Panorama, and VR 360 documents. For ActionScript, you can use a different panel called the Code Snippets panel.
Step 1 asks you to choose the action, or the behavior that you want Animate to perform, from a list. Scroll down in the list under Select An Action and select Stop (the items are listed alphabetically).
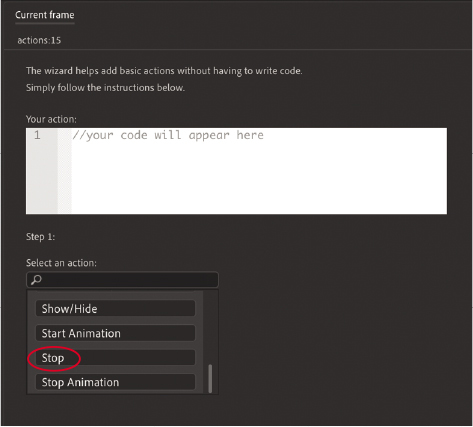
Another menu appears to the right.
In the next menu, choose This Timeline.

Code appears in the action window. The
stop()action will apply to the current timeline.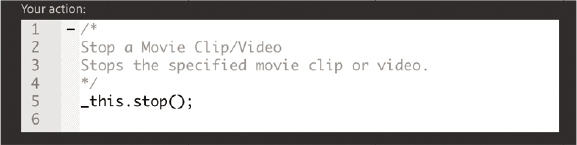
Click Next.
Step 2 appears in the wizard.
Step 2 asks you to select the trigger that will produce your selected action. Select With This Frame.

Additional code is added to make reference to the current timeline.
You want the
stop()action to be executed as soon as the timeline begins, so the appropriate trigger is when the playhead encounters the current frame.Click Finish And Add.
The finished code is added to the Script window in the Actions panel.
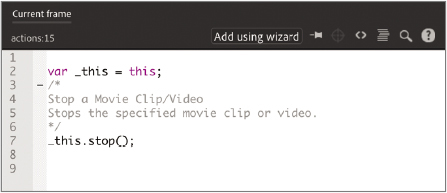
The code is
var _this = this;_this.stop();The first statement creates a variable, or a reference, called
_thisthat refers to the current timeline.The second statement points to the current timeline and applies the
stop()action. The semicolon at the end of each statement acts as a period and indicates the end of a command.The code in light gray that begins with
/*and ends with*/is called a multiline comment, and it is simply a description of what the code does. It acts as a reminder for you and for other developers. Well-commented code is essential. It will save you hours of headaches when you return to a project, and it is considered a best practice for coders.In the timeline, a tiny lowercase “a” is added to frame 15 in the actions layer to indicate that code has been added there.

Adding actions for a button click
So far, you have code that stops the timeline at frame 15. Now you’ll add an action for a button click. The button click is called a trigger in the wizard, but in JavaScript and ActionScript it is known as an event.
Events are occurrences in your movie that Animate can detect and respond to. For example, a mouse click (or a tap), a mouse movement, and a key press are all events. Pinch and swipe gestures on mobile devices are also events. These events are produced by the user, but some events can happen independently of the user, such as the successful loading of a piece of data or the completion of a sound.
Select frame 15 on the actions layer.
Open the Actions panel, if it’s not already open.
Place your text cursor in the last empty line of your Script window. You’ll add additional code to the code that’s already there.
Click the Add Using Wizard button.
The wizard opens within the Actions panel.
Step 1 asks for the action. Scroll down and select Go To Frame Label And Stop.

Another menu appears to the right.
In the next menu, choose This Timeline.

Code appears in the action window. The action will apply to the current timeline.

Replace the green highlighted letters in the action window with the name of the label you want the playhead to go to. Replace
enterFrameLabelwith ultra.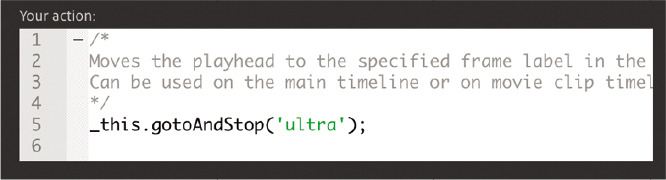
The frame label name appears in green and should be between a set of single quotes.
Click Next.
Step 2 appears in the wizard.
Step 2 asks for the trigger that will produce your selected action. Select On Mouse Click.
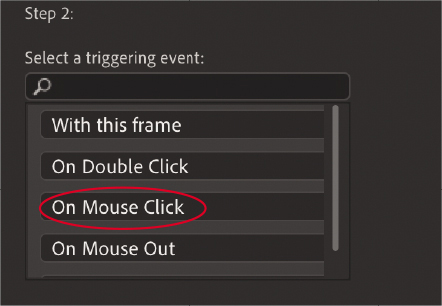
On Mouse Click is an event that happens when the on-screen button is pressed and then released. Another menu appears to the right.
The wizard asks for the object for the triggering event. Select ultra_btn, which is the button that corresponds to the first shoe, whose information is displayed in the keyframe labeled ultra.

Click Finish And Add.
The finished code is added to the Script window in the Actions panel. The code consists of the trigger
'click'and a function that groups all the code that is executed when the trigger happens. What’s important for you to identify are the opening and closing curly brackets of the function. This function has only one statement (agotoAndStop()action, which moves the playhead), but functions can contain many statements.
Choose Control > Test.
Animate opens your browser to show your project. Click the first button. Animate detects the click trigger on the button and moves the playhead to the ultra keyframe, where the Stage shows information about the Vapormax Ultra shoe.
TipIf you’re feeling confident, you can try to streamline the process of replicating the code for the other button. Copy the code in the Script window and then paste it. Change only the name of the button and the name of the frame label. It will be faster than going through the wizard, and it will be your first step in identifying and learning different parts of JavaScript code so that you can eventually write code yourself.

Close your browser and return to Animate.
Select frame 15 of the actions layer and open the Actions panel again.
Continue adding actions and triggers to the existing code for the other button. The next button should trigger a
gotoAndStop()action to the racer keyframe. TipIf you decide to use frame numbers instead of frame labels, be aware that the JavaScript library that Animate uses begins counting frames at 0, so the first frame of your timeline is 0 and not 1. ActionScript and JavaScript for WebGL glTF and VR documents, on the other hand, begin counting the timeline frames at 1. For this reason, it’s best to use frame labels whenever possible.
Creating the “Shop now” button
A crucial component of a banner ad is to direct interested users to the advertiser’s site. You’ll need to provide another button that will do that.
The “Shop now” button that you’ll create next will open a website into a new browser window or tab.
Adding another button instance
The sample lesson file provides a “Shop now” button for you in the Library panel.
Select frame 15 in the buttons layer and unlock it if it is locked.
Drag the button called “Shop now” from the Library panel to the Stage. Position the button instance under the runner, centered at the bottom edge of the Stage.
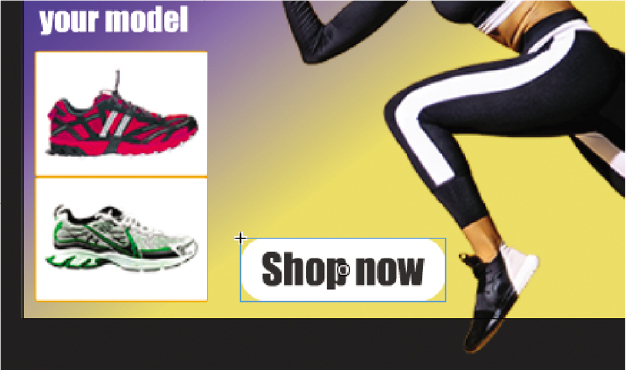
In the Properties panel, set the X value to 114 and the Y value to 238.
In the Properties panel, name the instance shopnow_btn..

Adding code for the “Shop now” button
The action will be Go To Web Page, and the trigger will be a button click/tap.
Select frame 15 of the actions layer.
Open the Actions panel, if it’s not already open.
Place your text cursor at a new line after the last line of code in your Script window. You’ll add code to the code that’s already there.
Click the Add Using Wizard button.
The wizard opens within the Actions panel.
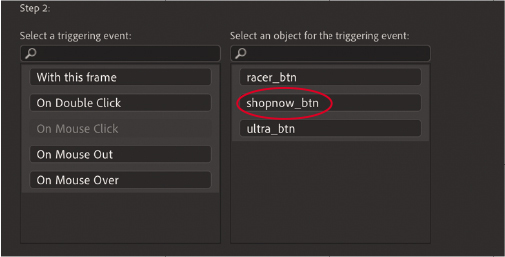
Step 1 asks for the action. Select Go To Web Page.

In a real project, you would replace the green highlighted text in the code preview window with the URL of the advertiser’s site. For this project, you can leave the default URL, which is Adobe’s website.

Click Next.
Step 2 appears in the wizard.
Step 2 asks for the trigger that will produce your selected action. Select On Mouse Click.

On Mouse Click is an event that happens when the user’s mouse is pressed and then released over the button, or if the user taps the button. Another menu appears to the right.
The wizard asks for the object for the triggering event. Select shopnow_btn.
Click Finish And Add.
The code to add the “Shop now” button is added to the script.

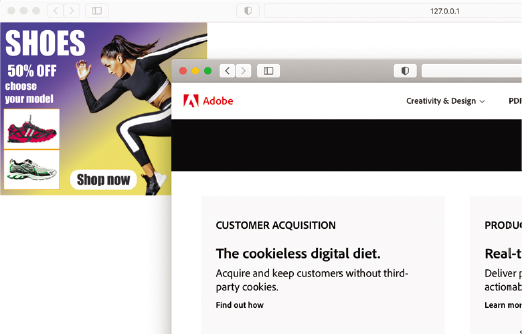
Test your movie.
When you click the “Shop now” button, the Adobe site loads in a browser tab or window.
The Code Snippets panel
Animate provides another panel, called the Code Snippets panel (Window > Code Snippets), that offers a way to add ActionScript 3.0 and JavaScript code. The panel is organized into folders for different kinds of interactivity. Simply expand the folder that you want and select the action. Animate guides you for any additional information.
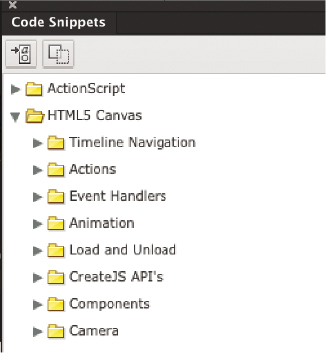
The Code Snippets panel also provides a way for you to save your own code and share it with other developers.
For beginners, it’s best to use the Add Using Wizard option in the Actions panel for JavaScript.
Playing animation at the destination
So far, this interactive banner ad works by using the gotoAndStop() action to show information in different keyframes along the timeline. But suppose you wanted the running shoe image to animate into the Stage rather than appear suddenly—how would you play an animation after a user clicks a button? One way is to use the action gotoAndPlay(), which moves the playhead to the frame number or frame label and plays from that point forward.
Creating transition animations
Next, you’ll create a short transition animation for each of the shoes. The transition animation will show the shoe moving onto the Stage from the right edge. Then you’ll change your code to direct Animate to go to each of the beginning keyframes and play the animation.
Move the playhead to the ultra frame label.
Right-click both the selected bitmap and text on the Stage and choose Create Motion Tween, or choose Create Motion Tween from the Create Tween menu above the timeline.

Animate asks whether you want to create a symbol for the selections for the motion tween. Click OK.

Animate creates a separate tween layer for the instance so that it can proceed with the motion tween.
Move the instance off the Stage and to the right so that it is no longer visible.

Move the playhead to the end of the tween span at frame 24.
Move the instance back onto the Stage where it was originally.

The motion tween from frame 20 to frame 24 produces a dramatic entrance.
Create a similar motion tween for the second shoe in the keyframe, labeled racer. Don’t try to test your movie just yet! You still have to tweak the JavaScript code in the next task to make this work.

Using the gotoAndPlay() action
![]() Tip
Tip
A fast and easy way to do multiple replacements is to use the Find And Replace command in the Actions panel. Click the Find button in the upper-right corner, select Find, and then choose Find And Replace from the menu to the right of the Find Text field.
The gotoAndPlay() action makes the Animate playhead move to a specific frame on the timeline and begin playing from that point.
Select frame 15 of the actions layer and open the Actions panel.
In your JavaScript code, change the first two
gotoAndStop()actions togotoAndPlay()actions, but leave the parameter unchanged:gotoAndStop('ultra');should be changed togotoAndPlay('ultra');.gotoAndStop('racer');should be changed togotoAndPlay('racer');.
For each of the buttons, the JavaScript code now directs the playhead to a particular frame label and begins playing at that point.
Make sure you keep the function for your “Shop now” button unchanged.
Stopping the animations
If you test your movie now (Control > Test), you’ll see that each button goes to its corresponding frame label and plays from that point, but it keeps playing, showing any remaining animations downstream in the timeline. The next step is to tell Animate when to stop.
Select frame 24 of the actions layer, the frame just before the racer labeled keyframe on the content layer.
Right-click the frame and choose Insert Keyframe.
A new keyframe is inserted in the actions layer. We’ll use the new keyframe to add a
stop()action just before the second animation starts to play.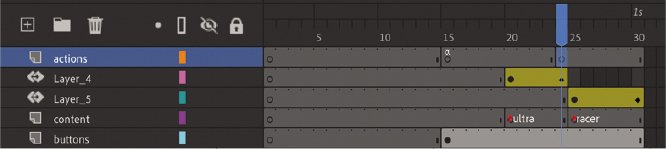
Open the Actions panel.
The Script window in the Actions panel is blank. Don’t panic! Your code has not disappeared. Your code for the event listeners is on the first keyframe of the actions layer. You have selected a new keyframe in which you will add a
stop()action.In the Script window, enter
this.stop();.
Animate will stop playing when it reaches frame 24.
Insert a keyframe at frame 30.
TipIf you want a quick and easy way to duplicate the keyframe containing the
stop()action, hold down the Option/Alt key while you drag it to a new location on the timeline.
In this keyframe, add another
stop()action in the Actions panel. TipIf you wish, you can use the Add Using Wizard panel to add the
stop()action for each of the keyframes.Test your movie by choosing Control > Test.
Each button takes you to a different keyframe and plays an animation of a running shoe sliding onto the Stage. At the end of the animation, the movie stops and waits for the viewer to click another button.
Pinning code in the Actions panel
When you have code scattered in multiple keyframes on the timeline, it’s sometimes difficult to go back and forth to edit or view your code. The Actions panel provides a way for you to keep the code from particular keyframes “pinned” to the Actions panel. Click the Pin Script button at the top of the Actions panel and Animate will create a separate tab for the code currently displayed in the Script window.
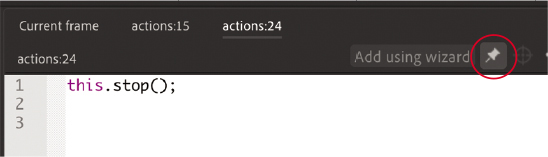
The tab will be labeled with the frame number where your code resides. You can pin multiple scripts, allowing you to navigate easily between them.
To continue with the rest of this lesson, unpin all the scripts so that you have only the Current frame tab displayed.
Animated buttons
Currently, when you hover your mouse cursor over one of the running shoe buttons, the red stroke and the yellow fill in the box suddenly appear. But imagine if the mouse hover provided an animated effect. It would give more life and sophistication to the interaction between the user and the button.
Animated buttons display an animation in the Up, Over, or Down keyframe. The key to creating an animated button is to nest a movie clip inside a button symbol. Create an animation inside a movie clip symbol and then place that movie clip symbol inside the Up, Over, or Down keyframe of a button symbol. When one of those button keyframes is displayed, the animation in the movie clip plays.
Creating the animation in a movie clip symbol
Your button symbols in this banner ad contain a bitmap of a shoe in their Over states. You will convert that bitmap into a movie clip symbol and then create an animation inside that movie clip.
In the Library panel, expand the buttons folder. Double-click the icon for the ultra button.
You enter symbol editing mode for the button symbol called ultra.

Select the shoe bitmap in the Over keyframe.
Right-click and choose Convert To Symbol.
The Convert To Symbol dialog box appears.
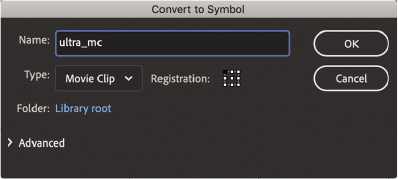
Choose Movie Clip as the Type and enter ultra_mc as the Name. Click OK.
You now have a movie clip instance inside the Over keyframe of your button symbol.
Double-click the movie clip instance to edit it in place. Notice how the Edit bar above the Stage shows you the nesting of symbols.

Right-click the shoe bitmap and choose Create Motion Tween.

In the dialog box that appears asking for confirmation to convert the selection to a symbol, click OK.
The shoe bitmap is converted to a symbol and placed in a motion tween layer. Animate adds 1 second’s worth of frames to the timeline.

Drag the end of the tween span back so that the timeline has only 10 frames.

Move the playhead to frame 10.
Choose the Free Transform tool and enlarge the shoe so that it fills, or even breaks, the box into which it is positioned.

Animate creates a smooth transition between the smaller and larger instances in the 10-frame tween span.
Insert a new layer and name it actions.
Insert a new keyframe in the last frame (frame 10) of the actions layer.
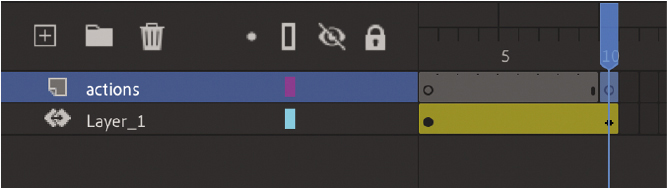
Open the Actions panel (Window > Actions) and enter
this.stop();in the Script window.Adding the
stop()action in the last frame ensures that the fade-in effect plays only once. The last keyframe on frame 10 of the actions layer shows a tiny “a,” indicating that code is attached there. TipIf you want an animated button to repeat its animation, leave out the
stop()action at the end of the movie clip’s timeline.
Exit symbol editing mode by clicking the Scene 1 button in the Edit bar above the Stage.
Choose Control > Test.
When your mouse cursor hovers over the first shoe button, the image of the shoe grows slightly, giving it more emphasis.
NoteNotice that you can add JavaScript code to either the main timeline or a movie clip’s timeline. Movie clips are the only symbols that support interactivity.

Create an identical motion tween for the racer button to animate its Over state, and add a
stop()action to the end of the tween.
Review questions
1 How and where do you add ActionScript or JavaScript code?
2 How do you name an instance, and why is it necessary?
3 How can you label frames, and when is it useful?
4 What does the stop() action do?
5 What is a trigger in the Actions panel wizard?
6 How do you create an animated button?
Review answers
1 ActionScript or JavaScript code is attached to keyframes on the timeline. Keyframes that contain code are indicated by a small lowercase “a.” You add code in the Actions panel. Choose Window > Actions, or select a keyframe and click the Actions panel icon in the Properties panel, or right-click and select Actions. You enter code directly in the Script window in the Actions panel, or you can add code through the Add Using Wizard option. You can also add code with the Code Snippets panel.
2 To name an instance, select it on the Stage and then type a name in the Instance Name field in the Properties panel. You need to name an instance so that ActionScript or JavaScript can identify it with code.
3 To label a frame, select a keyframe on the timeline, and then type a name in the Frame Label box in the Properties panel. You can label frames in Animate to make it easier to reference frames with code and to give you more flexibility.
4 In ActionScript or JavaScript, a stop() action halts the playhead from advancing.
5 A trigger is an event that Animate can respond to with an action. A typical trigger is button click, or the playhead entering a frame.
6 Animated buttons display an animation in the Up, Over, or Down keyframe. To create an animated button, make an animation inside a movie clip symbol and then place that movie clip symbol inside the Up, Over, or Down keyframe of a button symbol. When one of those button keyframes is displayed, the animation in the movie clip plays.
Next steps
You’ve made it through the last of 10 lessons. By now you’ve seen how Adobe Animate, in the right creative hands (yours!), has all the features you need to produce media-rich interactive projects and animations that publish to multiple platforms. You’ve completed these lessons—many of them from scratch—so you understand how the various tools, panels, and code work together for real-world applications.
But there’s always more to learn. Continue practicing your Animate skills by creating your own animation or interactive site. Get inspired by watching animations and seeking out multimedia projects. Expand your Animate knowledge by exploring the Adobe Animate Help resources and other fine Adobe Press publications.