Chapter Five. Working with InDesign
InDesign has matured rapidly since its debut ten years ago. Now in its seventh version, it’s as robust and powerful as applications like Photoshop and Illustrator that have been around twice as long. As publishing grows beyond the printed page, InDesign has grown in the same direction. Now, in addition to gorgeous printed pieces, you can generate interactive PDFs, Flash animations, and rich media documents that include video, interactivity, and navigation.
InDesign CS5 hasn’t forgotten its roots, however. It’s still a page-layout powerhouse, and many of its new features are geared toward simplifying how designers work on the printed page, boosting productivity, improving automation, reducing repetitive tasks, and working collaboratively. Let’s start with the print-centric techniques you’ll want to master in this version.
#37. Creating Multiple Page Sizes
InDesign CS5’s support for multiple page sizes in a single document offers many benefits to designers. When working on a stationery project, for example, it’s helpful to have the letterhead, business card, and envelope layouts in a single file where styles and swatches can be centralized. Projects like three-panel brochures and gatefolds typically require one “short” flap for proper folding, and creating pages at the proper size in a single document simplifies the production process.
You still create new documents at one fixed size in the New Document dialog—but within a document, you can modify the size of any page using the Page tool ![]() (Shift-P) in the Tools panel. When this tool is active, you can select pages either by clicking the page itself, or by clicking its thumbnail in the Pages panel.
(Shift-P) in the Tools panel. When this tool is active, you can select pages either by clicking the page itself, or by clicking its thumbnail in the Pages panel.
Tip
Shift-clicking pages or thumbnails with the Page tool selects a range of pages, and Command-clicking (Ctrl-clicking) selects multiple noncontiguous pages.
Once one or more pages are selected, the Control panel offers up options related to the size of the selected page(s) (Figure 37a). All resizing options and behaviors work the same for both document pages and master pages.
Figure 37a. The Control panel in Page mode.

Resizing occurs from any of the nine points on the proxy image in the Control panel, and the point chosen there determines how the resized page is positioned relative to other pages on the spread (Figure 37b). The y coordinate value determines the vertical position of a resized page relative to other pages on the spread. The x coordinate cannot be changed.
Figure 37b. From left to right, the results when pages are resized from the top, center, and bottom.

To change the position of pages relative to one another, select a page with the Page tool and drag it to the desired vertical position. To move both the page and the objects on it, click the Objects Move with Page check box (if you do not, the page items will remain where they are and only the page will move).
The new Multiple Page Size feature works in combination with InDesign’s existing Layout Adjustment feature. If that feature is off (which it is by default), select the Enable Layout Adjustment check box in the Control panel to activate it prior to resizing the page. With Layout Adjustment active, objects and guides (except those on master pages) will be repositioned, redistributed, and/or resized according to the new page dimensions.
Document pages of varying sizes can share a master page, regardless of its size. Master page margins are maintained on the resized document page, so a letter-sized master page with half-inch margins maintains a half-inch margin around any page using that master, regardless of the page size. Master page items and guides, however, do not adapt to resized document pages. Their position on the resized page is determined by the point selected on the Proxy icon when the page size was modified (Figure 37c).
Figure 37c. A letter-sized master page (left); a tabloid-sized page based on that master page (middle), resized from the top left corner; and a half-letter-sized page based on the same master page (right), resized from the center.
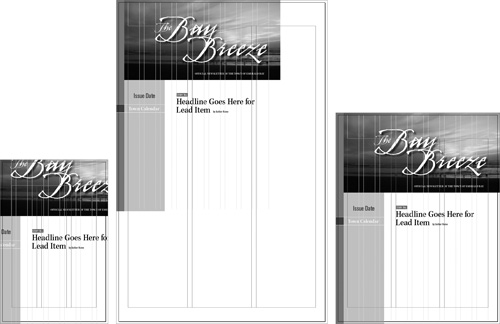
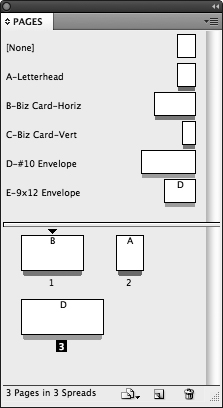
With the flexibility afforded by master pages that can be shared by many different page sizes, there’s no need to create a new master for every page size in every document. However, it may be easier to do so for some projects. For example, when creating a stationery package—typically consisting of letterhead, business card, and envelope—consider creating an InDesign template (.indt file) that includes master pages for an 8.5-by-11–inch letterhead, 3.5-by-2-inch business cards (in both horizontal and vertical orientations), a 4.125-by-9 inch #10 envelope, and a 9-by-12-inch envelope (Figure 37d). The next time you land a stationery project, you’ll be ready to dive right into it.
Figure 37d. Master pages for varying sizes of standard stationery components in one InDesign document.
#38. Using the Revamped Layers Panel
With each new version of InDesign, it seems that one feature gets the “extreme makeover” treatment by Adobe engineers. In CS5, it’s the Layers panel: In this latest version, it’s been torn down and rebuilt to look and work like Illustrator’s Layers panel. Each layer now sports a clickable disclosure triangle next to its name that reveals a complete, object-by-object hierarchy of everything in that layer (Figure 38a).
Figure 38a. The revamped InDesign CS5 Layers panel with hierarchies revealed.

The new Layers panel automatically assigns every object a generic name, such as “line,” “rectangle,” and “group.” Each set of grouped objects has its own nested hierarchy within the layer, which is revealed by clicking the disclosure triangle next to the group name. Placed images bear the original filename, and text frames are named with their first 32 characters. Default names are enclosed in angle brackets, and you can rename any object by triple-clicking its name in the panel.
The Layers panel can be a handy alternative to the Selection tool, especially in complex layouts where directly clicking a desired object might be difficult. You can use the Layers panel to select objects on the page by clicking the small, hollow square at the right of an object name, or Option-clicking (Alt-clicking) an object or layer name. Alternatively, you can select multiple object names in the Layers panel, then right-click and choose Select Item(s) from the context menu. Another option, available only for single-object selections, is Select Item and Fit, which selects the targeted object on the page and positions it in the center of the document window.
Tip
You can select a continuous range of object names by Shift-clicking; Command-click (Ctrl-click) each object name for noncontiguous selection.
Advantages to the New Layers Panel
• An at-a-glance understanding of the structure and stacking order of your entire layout, and the ability to re-arrange that order without selecting items on the page.
• Individual Hide/Show ![]() and Lock buttons
and Lock buttons ![]() for each object allow a granular level of control over visibility and editability. In previous versions, you could only hide, show, or lock an entire layer.
for each object allow a granular level of control over visibility and editability. In previous versions, you could only hide, show, or lock an entire layer.
• A means of naming every object on the page that’s recognized by other features like the new Animation panel. This also makes objects easy to target and refer to with scripts.
#39. Setting Up Span/Split Columns
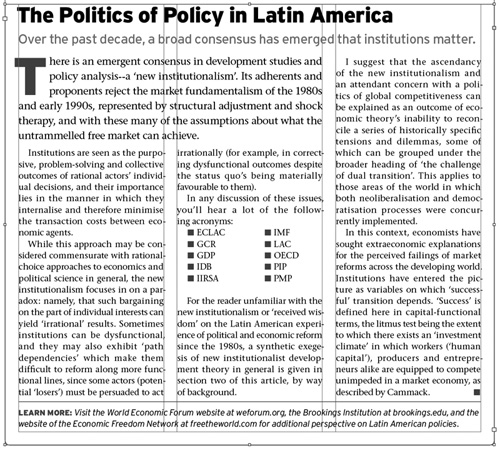
In previous versions of InDesign, creating a layout in which text spans multiple columns required an excessive number of threaded text frames, delicate balancing, numerous adjustments, and a lot of patience. Figure 39a illustrates just how complex even a relatively simple text flow can be. Achieving the desired look—a headline and deck that span three columns, an intro paragraph that spans two, a bulleted list split into two columns, and a footer that spans three columns—requires eight threaded text frames, three of which include text wrap settings.
Figure 39a. Multi-column paragraphs set up in InDesign CS4 or earlier.
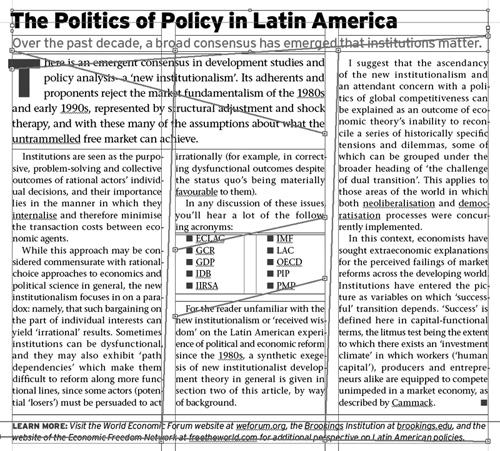
Not only is this cumbersome to set up, but it also offers no flexibility whatsoever when text is changed. Any significant copy changes require repositioning, resizing, and rebalancing every frame, often multiple times.
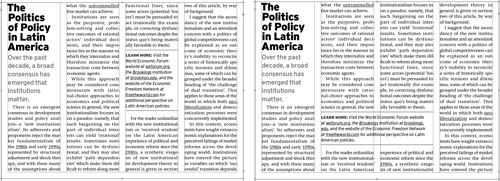
InDesign CS5 eliminates all of this toil with the new Span Columns dialog, which allows you to extend a paragraph across the columns in a multi-column frame. Span Columns also includes options that would have allowed the bulleted list in Figure 39a to stack in two columns within a single column. With Span Columns, the layout in Figure 39a could be achieved within a single frame. More than that, its text would re-flow perfectly if edited, with no frame adjustments required.
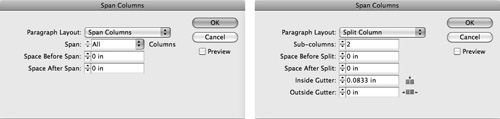
Access to Span Columns is available several ways. The Control panel (in Paragraph mode ![]() ) offers easy access to the basic settings. More settings are available in the Span Columns and Split Column Paragraph Layout options (Figure 39b), which are available from either the Paragraph panel menu or the Control panel menu when text is selected.
) offers easy access to the basic settings. More settings are available in the Span Columns and Split Column Paragraph Layout options (Figure 39b), which are available from either the Paragraph panel menu or the Control panel menu when text is selected.
Figure 39b. The Span Columns dialog’s span (left) and split (right) Paragraph Layout options.
When you compare the “old-fashioned” method in Figure 39a to the single-frame way it can now be done in InDesign CS5 (Figure 39c), there’s no denying this feature will simplify your work significantly.
Figure 39c. The same look as Figure 39a, using one text frame with Span Columns and Split Column settings.
There are a few limitations to be aware of. Span Columns does not work with footnotes, nor can you use span or split options within a table cell. Also, you can’t totally control the columns that text will span. For example, a two-column span applied to text in the third column of a four-column frame will span the second and third columns (Figure 39d), not the third and fourth, which might be more desirable. Spanning is initiated from the column in which the paragraph resides, and moves toward the columns to its left, when applied anywhere other than the first column. This can make the spanned text appear to be in the wrong reading order, since text from the column to its left is flowed around the spanned column.
Figure 39d. Spanning pushes to the left when applied anywhere except in the first column.
#40. Working Efficiently with Objects
Page layout applications have always followed certain conventions: Different tools are used for frames and content; guides and rulers are the go-to methods for aligning objects; and transformations are made via dialog boxes. InDesign CS5 shatters those conventions with a collection of new features that will transform and simplify how you work with objects on the page.
Let’s talk about switching tools. How often do you alternate between the Selection and Direct Selection tools to work with frames and their content, respectively? Too often, right? You may wonder what the Direct Selection tool was for once you start using the new Content Grabber—that ghosted “doughnut” at the center of all graphic frames in InDesign CS5.
Whenever you hover over an image, the Content Grabber appears. Because it’s semi-transparent, it’s visible over any image. Simply click and hold the Content Grabber, then start moving your image around in the frame. Once it’s where you want it, release the mouse button and you’re right back to the Selection tool, ready to keep working (Figure 40a).
Figure 40a. To use the Content Grabber, hover your pointer over the image (top left), click and hold (top right), drag the image to the desired position in the frame (bottom left), and release (bottom right). You’re done!

Tip
You can disable the Content Grabber by choosing View > Extras > Hide Content Grabber, if you just can’t get used to it. But it’s a useful new layout tool you should give a fair chance.
A useful new InDesign feature that borrows from Illustrator is a rotation cursor ![]() that automatically appears when you hover the cursor just beyond a corner point on any selected frame or object. This avoids a switch from the Selection tool to the Rotate tool. Once the object is rotated and you move your mouse from the corner, you’re back to the Selection tool again.
that automatically appears when you hover the cursor just beyond a corner point on any selected frame or object. This avoids a switch from the Selection tool to the Rotate tool. Once the object is rotated and you move your mouse from the corner, you’re back to the Selection tool again.
Speaking of rotating...you can also rotate multiple selected objects whether or not they’re grouped. When several objects are selected, there’s an overall selection border in addition to all of the selected frame edges (again, very much like Illustrator). The rotation cursor, under those conditions, rotates everything that’s selected (Figure 40b).
Figure 40b. Using the rotation cursor on a selection (left) to easily rotate one or more objects simultaneously (right) without grouping.

One of our favorite object transformation enhancements in InDesign CS5 is Live Distribute, which dynamically redistributes the space between multiple selected objects as you move them around. When more than one object is selected, you can activate Live Distribute by clicking any handle on the selection boundary, then holding down the spacebar before dragging. Moving the cursor toward the center of the selection reduces the spacing between all objects, and moving it away increases that spacing (Figure 40c). Holding down the Shift key as you drag proportionally distributes the space (along the x and y axes), and holding down Option (Alt) performs the redistribution from the center of the selection outward.
Figure 40c. Live Distribute moves multiple objects (left) closer to or farther away from (right) one another.
#41. Using the Gap Tool
Anyone with formal art or design training has had it drilled into them that the negative space (commonly called white space) on a page is just as important as the positive space (the text, images, shapes, and so on). Historically, however, the only way to work with the negative space in InDesign has been to select and move the objects that make up the positive space. InDesign CS5’s new Gap tool ![]() gives white space its due.
gives white space its due.
The Gap tool modifies the negative space (the gaps) between two or more items, or between any one or more items and a page edge (Figure 41a). The tool detects these gaps, highlighting them in gray as you move over them. Moving a gap modifies every page item that shares that gap. Drag to move a gap and resize all items aligned to the gap’s edges.
Figure 41a. The Gap tool’s gap detection and highlighting in action.

Enhancing the Gap Tool with Auto-Fit
As you transform objects by modifying the gaps they share, your placed images will get cropped by smaller frames or float within larger ones.
To dynamically resize those images, enable the new Auto-Fit feature for your frames before making your Gap tool adjustments. On wide monitors, the Control panel displays an Auto-Fit check box when one or more frames is selected. The option is also available in InDesign’s frame fitting options (Object > Fitting > Frame Fitting Options).
Auto-Fit is semi-intelligent image scaling that honors the cropped state of your image as its frame is resized. This lets you scale the frame vertically, for example, but maintain the image’s left and right horizontal cropping.
When combined with the other frame fitting options, the scaling gets even smarter. You can choose from which point an image scales when Auto-Fit resizes it. For example, choosing the lower-right corner on the alignment proxy ![]() sets Auto-Fit to scale from that point.
sets Auto-Fit to scale from that point.
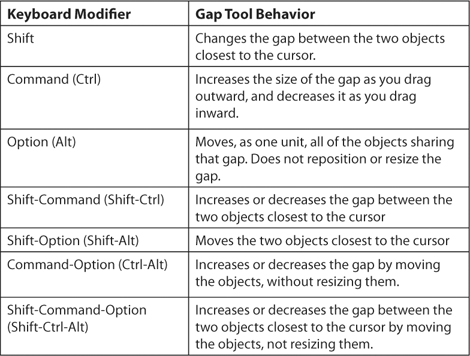
When used in combination with keyboard modifiers, the Gap tool’s power and flexibility increases dramatically (Table 41a), allowing for fast, consistent adjustment of the white space on a page.
Table 41a. Gap Tool Keyboard Modifiers
The Gap tool is a fantastic way to rapidly transform layouts and experiment without needing to select each object, draw guides, use the align panel, and painstakingly measure distances between page items. What once involved multiple tools and steps can now be accomplished entirely with the Gap tool in a fraction of the time (Figure 41b).
Figure 41b. With only the Gap tool, and in only seven clicks, the static, boxy layout on the left was modified to the more pleasing arrangement of frames on the right.

#42. Using the Gridified Tools and Super Step-and-Repeat
Many traditional designers adhere to a grid structure upon which they “hang” all of their page elements. InDesign has always provided tools to continue this tradition, including Document Grid, Margins and Columns, Baseline Grid, and Frame-based Grid. In InDesign CS5, frames, shapes, and lines have been “gridified” too.
When you draw any rectangle, ellipse, polygon, line, or text frame on a page, you can press an arrow key to create multiple instances of that object. The right arrow key adds objects in a horizontal row, and the up arrow key adds objects vertically. Conversely, the left arrow key reduces the number of horizontal objects, and the down arrow key removes vertical duplicates.
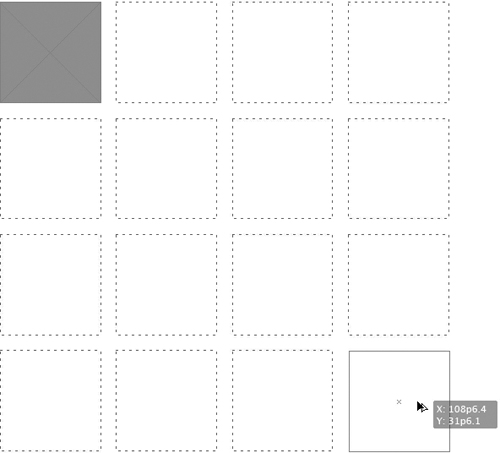
For some time, InDesign has allowed multiple file placing via the “place gun”; the new gridified behavior extends to the placing of multiple images on the page as well. With two or more images loaded in the place gun, you can create all of the frames for those incoming images—horizontally, vertically, or in a grid—as you place them (Figure 42a). You can put all objects on the page at the same time, in equally sized frames and at the same distance from one another (Figure 42b). You can even do this with a mix of file types including graphics, PDFs, text files, spreadsheets, and other InDesign documents.
Figure 42a. With three images loaded in the place gun (left), tapping the right arrow twice while dragging out a frame on the page creates two additional frames to receive all three incoming files.
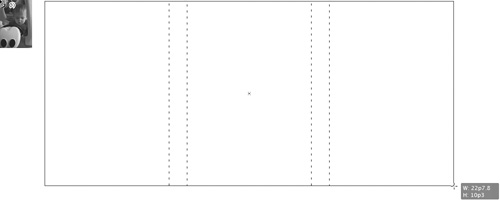
Figure 42b. The three images placed in separate frames.

If you’ve already got objects on your page and you want to take advantage of this gridified behavior to make duplicates of those objects (picture a high school yearbook page of standard-sized photos and captions), you don’t need to visit the Step and Repeat dialog to create those duplicate objects. Simply Option-drag (Alt-drag) the object you want to copy to its farthest position, then press either the right arrow key for horizontal duplicates or the up arrow key for vertical duplicates. Each press of an arrow key fills the space between the original and the copy with an additional duplicate (Figure 42c).
Figure 42c. Super Step and Repeat creates on-the-fly duplicates (left) as you hit the arrow key.
#43. Using Live Corner Effects
Rounded corners have always been a part of InDesign, but the feature never offered much in the way of choice. You could apply five different corner types, and only to every corner on the object at once. Anything more ambitious required using a script—Corner Effects—which helped, but it generated “drawn” corners, not “live” corners, so changing the size of the frame once you ran the script distorted the effect.
InDesign CS5 offers per-corner settings in the Corner Options dialog, so you can apply an effect to just one corner, use alternate corner effects (top left/bottom right, for example), or mix and match different corners on a single object (Figure 43a).
Figure 43a. Four different corner effects applied to a single frame.

This would be a positive improvement all by itself, but the engineers took it one step further. Now, the dialog box isn’t even necessary for rectangular frames. You can apply corner effects directly to any rectangular text or graphic frame right on the page. Every selected rectangular frame now sports a small yellow square on its top-right side. Click that, and the object’s corners display small yellow diamonds. Click, hold, and drag the diamonds? inward—rounded corners that span the distance you drag appear (Figure 43b).
Figure 43b. Applying live rounded corners (left, top-to-bottom): click the yellow square on the frame, click the yellow diamond that appears and drag to desired corner size.

It’s not all about rounded corners, though. There are five other corner types available: None, Inset, Bevel, Inverse Rounded, and Fancy. Rounded is by far the most common choice, so it’s the default, but you can toggle through all of the other options by Option-clicking (Alt-clicking) the yellow diamond (Figure 43c). Once you get to the corner you want, click off the object, and you’re done.
Figure 43c. Option-click (Alt-click) the live corner diamond to cycle through different choices.

#44. Creating an Interactive Slide Show
InDesign CS4 included some bare bones export-to-Flash/SWF capability, but a slew of new features and tools in expand InDesign CS5’s ability to produce interactive content. One such feature is the multi-state object, with which we’ll set up a basic image-based slide show with button navigation that can be previewed directly in InDesign without having to first export to SWF.
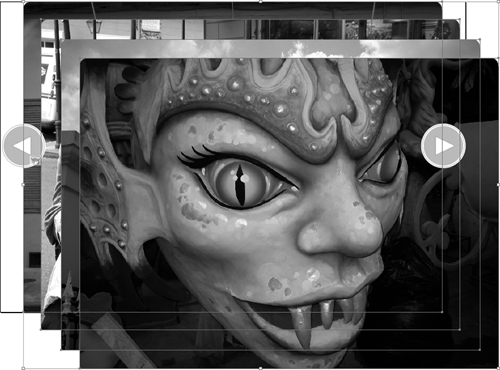
The document in Figure 44a includes four graphic frames containing the images for the slide show, and two grouped objects that will ultimately become buttons that will control the user’s navigation through the photos in the slide show.
Figure 44a. The building blocks of an interactive image slide show (the graphic frames are staggered to show their layering in the document).
The first thing we need to do is convert the four separate image frames into one multi-state object. We’ll select all of the graphic frames and use the Align panel (Window > Object & Layout > Align) to align the frames along the left and top edges, so they all sit directly atop one another. While they’re still selected, we’ll go to the Object States panel (Window > Interactive > Object States), and click the Convert Selection to Multi-state Object button ![]() at the bottom of the panel. This combines the four separate graphic frames into a single frame with four distinct “states” (Figure 44b). It’s a good idea to name both the object and its respective states right away so that each can be easily referred to later when setting up button actions.
at the bottom of the panel. This combines the four separate graphic frames into a single frame with four distinct “states” (Figure 44b). It’s a good idea to name both the object and its respective states right away so that each can be easily referred to later when setting up button actions.
Figure 44b. A new multi-state object created from four graphic frames with default names (left), and after customizing with appropriate names (right).

Now we need to turn the left and right arrow graphics in the layout into buttons that control the multi-state object. This is as simple as selecting one of the two graphics, opening the Buttons panel (Window > Interactive > Buttons), and clicking the Normal appearance in the panel (Figure 44c).
Figure 44c. Clicking the Normal appearance in the Buttons panel converts a selected object to a button.

To provide user feedback, we can add Rollover and Click appearances to the button. Clicking [Rollover] in the Appearance subpanel duplicates the appearance of the button’s Normal state. The rollover can be any variation of that appearance—a color change, drop shadow, and so on. In this example, a simple color change is enough. We can repeat the process for the Click state as well (Figure 44d). It’s a good idea to give the button a logical name like “Previous,” too.
Figure 44d. The button named “Previous” with Normal, Rollover, and Click appearances.
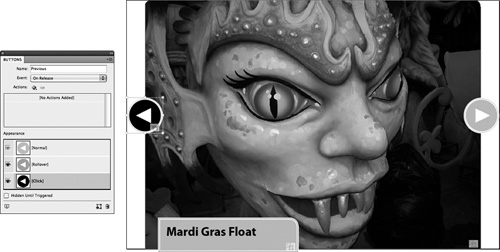
Now we’ve got to tell this button what to do. In the Button panel’s Event and Actions options, the default event is On Release, meaning the button carries out its action when the user has clicked, then released, the mouse. That’s exactly what we want. For the button named “Previous,” click the Add Action icon ![]() and choose Go to Previous State.
and choose Go to Previous State.
Since there’s only one multi-state object in this layout, it’s chosen by default from the Object pull-down menu that’s revealed in the Buttons panel. If there were more than one multi-state object in the document, they would all be listed as available targets for the button.
Follow the same steps to set up the right arrow button—select the graphic, convert it to a button, establish its appearances, and add the necessary action to control the same multi-state object. This button, however, should be named “Next,” and its Action should be set to Go To Next State (Figure 44e).
Figure 44e. The finished Next button options in the Buttons panel.

Want to see how this all looks? In CS4, looking at your Flash output from InDesign meant exporting the final SWF file, then viewing it in a browser. But CS5 adds in-document viewing of all interactive content from the new Preview panel (Window > Interactive > Preview), where you can view and interact with your slide show, including all rollover behavior and button functionality (Figure 44f).
Figure 44f. Viewing and testing interactive content in the new Preview panel. Note the rollover state of the Next button when the mouse is positioned over it.

If you’re happy with your slide show, all that remains is to export it to SWF. We’ll look at those options in tip 46, “Exporting to SWF and Flash Professional.”
#45. Creating an Animation for the Web
As we distribute content across print pages, computer screens, smart phones, and tablets, the definition of what a document is continues to change, and InDesign continues to keep up with that changing definition.
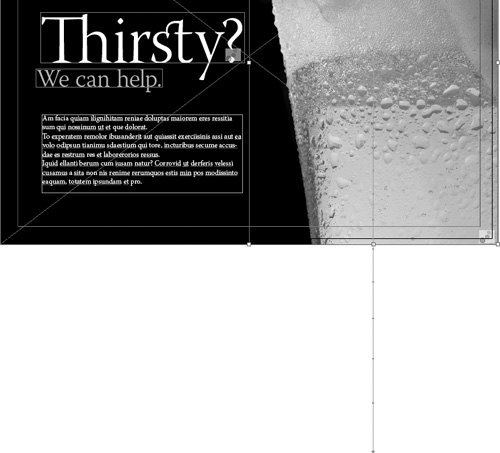
InDesign CS5 includes features that let you create animations quickly and easily right in your favorite page layout application. As an example, we’ll animate a simple ad (Figure 45a) that contains an image and a few text frames using built-in animation presets and absolutely no code.
Figure 45a. A simple, one-page layout ready to be animated.

InDesign’s animation interface is not timeline based, like Flash and Photoshop; the settings are instead distributed across several panels (Figure 45b). You use the Animations panel to create an animation in InDesign, and you give the animation a specific sequence in the Timing panel. You can see how your animation is coming along at any time using the Preview panel.
Figure 45b. Three separate panels—Animation (left), Timing (middle), and Preview (right)—share the animation tasks in InDesign CS5.

We’ll add a basic animation to the layout in Figure 45a: The beer glass will move from the bottom of the page to its final position in the layout. After that, the text frames (“Thirsty?” “We can help”), will fade in one after another.
When the beer glass frame is selected, the Animation panel (Window > Interactive > Animation) displays its object name in the Name field, but no animation is assigned. We’ll open the Preset menu and choose Fly in From Bottom; a butterfly proxy shows us what that animation will look like (Figure 45c).
Figure 45c. An animation preset applied to the beer glass in the layout.
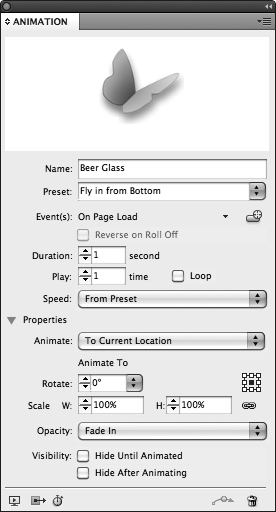
If we want to make that animation play a little longer, we can change the Duration, and if we don’t want it to fade in as it starts (which is the default for this preset), we can set the Opacity to None in the Properties area of the panel. This makes our preset now “Custom” since it no longer matches the original preset settings.
Motion presets include a motion path along which the animated object travels, which appears as a green line attached to the object (Figure 45d). To extend this motion path so that the beer glass begins its journey from the bottom of the page, just drag the bottom of the path down to a position well below the bottom edge of the page.
Figure 45d. An extended motion path on an animated frame. Note the small icon on the bottom right of the graphic frame, indicating that animation is applied to it.
Note:
Animations are automatically given the same name they have in the Layers panel. Before starting any animation work in InDesign, it pays to name your objects in the Layers panel. This makes objects and animations easy to identify in the Animation and Timing panels.
Next, we’ll animate the text frame for the headline, using the same steps, but with a simpler preset. With the “Thirsty?” headline frame selected, we’ll choose Fade In from the Preset menu in the Animation panel to have that frame fade in. To start the animation with the text frame already “invisible,” we’ll also select Hide Until Animated in the Visibility options. The “We can help” frame and the body copy text frame can be animated the same way, using the same preset and options.
Editing Motion Paths
Motion paths can be modified like any other path in InDesign. Select any point on the motion path with the Direct Selection tool to move it, or use the Pen tool to add points and convert corner points to Bezier curves, or vice versa. Any path you draw in InDesign can be converted to a motion path. Simply select the path and the object you want to apply it to, then click the Convert to Motion Path icon ![]() at the bottom of the Animation panel.
at the bottom of the Animation panel.
Next, it’s time to set the order in which the animations occur. By default, animations play in the order in which they were created, which is listed from top to bottom in the Timing panel (Figure 45e). But you can change that order by dragging any animation’s name above or below another. You can also set two animations to play simultaneously by selecting both in the Timing panel and clicking the Play Together icon ![]() at the bottom of the panel.
at the bottom of the panel.
Figure 45e. The finished animation’s timing sequence, with the first two animations set to play simultaneously, followed by the last two.

As a final adjustment, the “Thirsty?” animation can be set to a delay of 2 seconds in the Timing panel so that it doesn’t begin until the beer glass animation is two thirds of the way through its 3-second-long animation time. Figure 45f shows various stages of the completed animation.
Figure 45f. In the final animation, the beer glass animates up into the empty page, the “Thirsty?” headline fades in, followed by “We can help,” then the body copy.

#46. Exporting to SWF and Flash Professional
Once you’ve tested your interactive document or animation in the Preview panel and you’re satisfied with your work, it’s time to take it to the Web by exporting to either Flash Player (SWF) or Flash Professional (FLA). But which one? The answer is simple. If your interactive document or animation is 100 percent ready to debut on the Web, with no additional work required, export to SWF. If there’s more to be done—like linking the document up to dynamic online content, or adding functionality like ActionScript—then export to FLA.
Exporting to SWF
Assuming you’re ready to publish to the Web, choose File > Export, and select Flash Player (SWF) from the Format pull-down menu.
The General options in the Export SWF dialog box (Figure 46a) allow you to export a page, a range of pages, an entire document, or just the current selection on the page to SWF. If you select the Generate HTML File check box, InDesign will also produce the HTML file that will display your SWF file. Selecting the View SWF after Exporting check box (available only if Generate HTML File is checked) will also launch your browser once the export is complete and display the HTML file. If your interactive document includes video or sound files, or other SWFs placed in InDesign, all of those external assets will be gathered into a single folder named “yourexportedfilename_Resources” in the same directory as your exported SWF file.
Figure 46a. The options in the Export SWF dialog box.
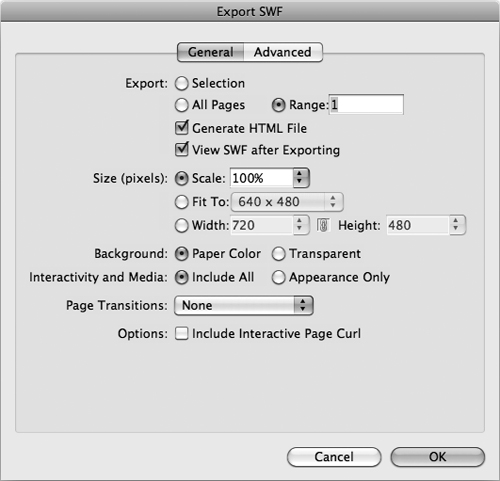
You can export at the same size as the InDesign document, set the exported SWF to fit to a standard resolution like 640 by 480, or customize the width and height to a specific size.
The Background option sets the color that appears behind nonrectangular objects on the page. It’s built into the SWF file, and does not affect the background color of the HTML file that InDesign generates (if you selected that option). When Paper Color is chosen, you can take advantage of any InDesign page transitions you may have set in the document, or activate the Interactive Page Curl feature, which creates an animated page-turning effect. If Transparent is chosen, your SWF will have a transparent background, allowing you to place it on an HTML page with a background color, but the options for page transitions and Interactive Page Curl are disabled.
The options in the Advanced panel (Figure 46b) offer more specific control over whether the layout’s text is converted to Flash Classic Text (meaning scalable, crisp, and with almost no impact on file size), converted to outlines (also scalable and crisp, but with more file overhead), or converted to pixels (neither scalable nor crisp, and with more image-based information adding to the size of the final SWF). You can also set the exported file’s frame rate, image compression format, quality, and resolution.
Figure 46b. Advanced SWF export options.

Exporting to FLA
If your file is going to be handed off to a developer—or if you want to work with it in Flash Professional—choose Flash Professional (FLA) from the Format menu when exporting your document.
Many of the options in the Export Flash CS5 Professional (FLA) dialog box (Figure 46c) echo those in the Export SWF dialog, with a few notable exceptions. You can opt to rasterize your pages, converting all text and images to pixels, but this will limit editability in Flash Professional. Similarly, you might choose to flatten transparency to reduce file size or improve compatibility with Flash, but this could limit your ability to manipulate those flattened objects when you open the file in Flash Professional.
Figure 46c. InDesign’s Flash CS5 Professional (FLA) export options.

There’s an additional text export option set by default for FLA export: Flash TLF Text, the new text engine built into Flash CS5 Professional. TLF supports typographic features previously unavailable in Flash, such as ligatures and threaded text frames.
The Interactivity and Media choices determine whether the actual media—video, audio, SWF—in the InDesign document get built into the exported FLA file, or if only a placeholder image with no media attributes is passed on to Flash.
#47. Exporting an Interactive PDF with Video
For some time now InDesign has made it possible to create interactive documents in the form of interactive PDFs complete with button navigation, audio, and video. InDesign CS5 supports more rich media formats (including SWF and FLV), and additional export options.
The example shown in Figure 47a is a layout in which an FLV video file was placed onto the page. Video and audio files are placed just as you would any image file, but legacy formats are initially displayed with no preview and show up in the frame as a pattern of diagonal lines. For newer video formats, like FLV, InDesign automatically generates a “poster frame” using the first frame of the placed video.
Figure 47a. A page layout with a placed video.

Note
InDesign CS5 supports the MOV video format, but the options for this format are less robust than for FLV.
All rich media placed in a document can be viewed, modified, and controlled via the new Media panel (Figure 47b). From here, you can watch the placed media, set its playback options, designate a poster frame, assign a controller, and add Navigation Points.
Figure 47b. The Media panel displaying a selected video.

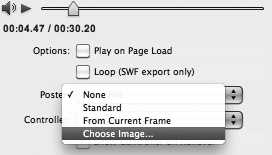
The Poster pull-down menu lets you assign a “poster” for the movie, meaning a static image that appears on the page until the movie is played. This can either be a frame from the movie, or you can select an external image file (Figure 47c).
Figure 47c. Selecting an image to use as a poster frame for a placed movie.
New to InDesign CS5 is the ability to add navigation points to a placed video (Figure 47d). Using a navigation point is like jumping to a particular scene in a DVD. Navigation points set in the Media panel can be called upon by InDesign-created buttons, offering segment-by-segment access to any placed video from within the exported PDF or SWF (Figure 47e).

When your layout is done, and your video controls are set up to your liking, it’s time to export your file as an interactive PDF. In reality, there’s little difference between an interactive PDF and any other PDF: An interactive PDF includes a number of options specific to the handling and display of media files and interactive elements like buttons. In InDesign CS5, Adobe added an Adobe PDF (Interactive) format choice to the Export options, consolidating the interactivity-related options into a single, simplified dialog box (Figure 47f) and eliminating the print-related PDF options.
Figure 47f. The Export to Interactive PDF dialog box.

The resulting interactive PDF, when displayed in Acrobat Professional or the free Adobe Reader (Figure 47g), will display all button interactivity and play any video or audio file included in the InDesign document. Note that all interactive PDFs from InDesign export as spreads, not single pages.
Figure 47g. A video playing in Adobe Reader 9, with its controller overlay visible.

#48. Exporting for EPUB
While EPUB export isn’t new to InDesign, many of the options in CS5 are new—and very welcome. This tip consists of a handful of must-dos and best practices for successfully exporting EPUB documents (or EPUBs) from InDesign CS5, starting with several features that have been around long before this version.
The Web may have taken the precision out of your design, but you lose even more control with EPUBs. Pagination becomes meaningless when readers can adjust the font size, and simply turning a device like Apple’s iPad changes the width and orientation of the “page” through which the text flows. With EPUBs, all you can lock in is the base formatting of the content and the markers for navigating through the document.
Preparing Your Document
If you’re exporting to EPUB, you need to perform several tasks to prepare your document.
Use Paragraph, Character, and Object styles. Once your InDesign file is exported as an EPUB, you can modify the CSS that’s generated to format the book. An EPUB exports as a collection of XHTML files plus a CSS template. Each of your InDesign styles generates a CSS class that you can easily customize and apply immediately document-wide.
Insert all images as inline graphics. EPUBs don’t structure pages to match how we design them for print. They’re “read” either in a left-to-right, top-to-bottom order, or according to the document’s XML structure. To ensure that images appear near related text content, all photos and graphics should be inserted as inline anchored objects, on their own lines.
Split up long documents and use the Book panel. Multiple documents are easier to manage and build a navigation scheme for than one very long file. The Book panel allows you to designate one file as the “style source” for all styles and other attributes (text variables, numbered lists, and so on) shared by documents in the book. The style source document holds all the metadata necessary for the exported EPUB.
Keep the cover separate. If the book’s cover is in its own document, it remains separate and doesn’t flow into the beginning text of the EPUB. Also, covers that are made up of images and text frames should be converted to a single image. Otherwise, the cover text will be considered part of the readable flow, not as a part of the cover design.
Build an automated table of contents. InDesign’s Table of Contents feature is 100 percent style-driven. Without paragraph styles, you can’t create an automatic TOC, which is the only navigation scheme that an exported EPUB will recognize. You must also save your TOC settings as a TOC Style.
Add metadata. EPUB readers and Web search engines rely on metadata for the book’s title, author, and description. Choose File > File Info to add the necessary metadata into your InDesign document (Figure 48a).
Figure 48a. This File Information dialog box contains the minimum metadata necessary for EPUB export.

EPUB Export Options
When you’re ready to generate your EPUB, choose File > Export for > EPUB. If you’re exporting from the Book panel, choose Export Book to EPUB from the Book panel menu. The export dialog is split into three panes—General, Images, and Contents—each dealing with a specific aspect of the export process.
General options. All CS5-generated assets are given a unique identifier, which is revealed in this dialog (Figure 48b). That identifier becomes part of the EPUB’s metadata, along with what you entered in the File Information dialog. If you use bullets or numbering in your book, be sure you map them to unordered and ordered lists, respectively. To see the results of your export in Adobe Digital Editions immediately, check View eBook after Exporting.
Figure 48b. EPUB General export options. The dialog still uses the Digital Editions name from CS4 and earlier versions.
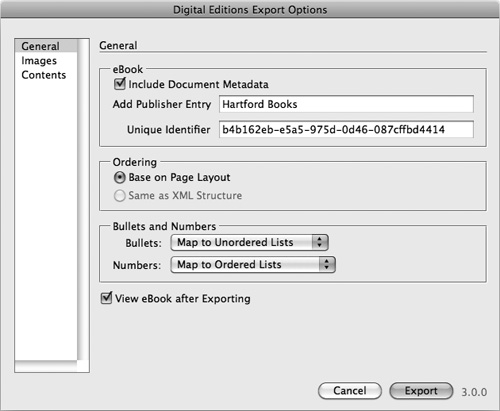
Image options. All images destined for an EPUB are converted to a resolution of 72 pixels per inch, in either JPEG or GIF format. Which of those formats is used can be up to you, or you can leave it up to InDesign by choosing Automatic Image Conversion. When setting your image export options, be sure to select the Formatted check box to preserve all cropping, rotation, borders, effects, and other InDesign-based modifications made in your layout. If Formatted is not selected, the full canvas (for Photoshop files) or Artboard area (for Illustrator files) is exported for use in the EPUB, and all borders, shadows, and other formatting are ignored.
Contents options. The most significant difference between previous EPUB export settings and those in CS5 is evident in the Contents panel (Figure 48c). Its expanded options produce an EPUB that’s much more “ready for prime time” than earlier versions.
Figure 48c. EPUB Contents export options.

Here’s where your work setting up both an InDesign TOC and a TOC Style pay off. The InDesign TOC builds the necessary bookmarks into the document, and choosing the appropriate TOC Style here converts your InDesign TOC into the EPUB’s TOC. Since page numbers are meaningless in a reflowable eBook, they’re dropped in the EPUB.
The Suppress Automatic Entries for Documents option prevents each section from being nested within a hierarchy that includes the document’s name. With this check box selected, you’ll see “Chapter 1” as a top-level navigation item, rather than “DocumentName” as a top-level item with “Chapter 1” nested within it. The Use First Level Entries as Chapter Breaks option also capitalizes on your InDesign TOC settings by using the level hierarchy established there to force each chapter to start on a new page in the final EPUB.
Finally, InDesign CS5 includes several options for handling the CSS used to format the EPUB, including the least desirable option: generating a CSS based on the styles in the InDesign document. Most of the fonts we use in our layouts aren’t supported by browsers, reading devices, or eBook software, so it’s best to choose either Style Names Only (which creates empty CSS declarations and relies entirely on the device’s defaults for presentation) or Use Existing CSS File. The former includes no formatting information, so you’ll need to open up the EPUB’s CSS after exporting your InDesign file and add formatting attributes to all CSS classes. The latter requires that you have an established CSS document with class names that match the style names in your document.
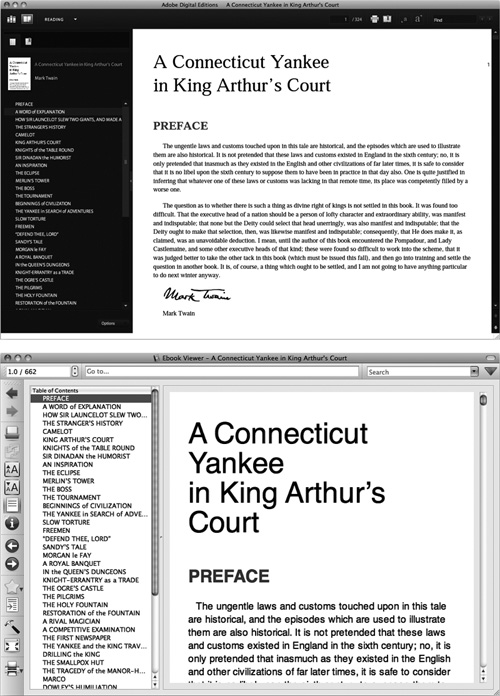
Once exported, you should view your eBook with more than one EPUB reading application (Figure 48d) and device to see if its appearance and navigation match your expectations.
Figure 48d. The same EPUB viewed with its TOC in Adobe Digital Editions (top) and Calibre (bottom).