
Chapter Ten. Automating Routine Tasks in CS5
As instructors we’re often amazed by how many people fail to take advantage of simple automation when using their computers. We’re not talking advanced programming here, but simple keyboard shortcuts for daily things like Open, Save, Copy, or Paste.
If you prefer clicking on a menu rather than using shortcuts, this chapter probably isn’t for you. As our friend Mordy Golding says, “Let’s hope you’re getting paid by the hour.”
But if doing something faster rather than slower is your preference, you’ve come to the right place. Faster may not always be better than slower but, let’s face it, there are many boring processes in Photoshop and Illustrator that are just as well handled by automation.
#91. Automating Illustrator and Photoshop with Actions
Actions are a series of recordable events that can be played back over one or many files. Not only do actions perform their tasks perfectly each time, but they also work much more quickly than you could. For example, an action could be created to open a folder of JPEG images, convert them from RGB to CMYK, and then save them into another folder as TIFFs.
Although actions can’t automate Photoshop functions like painting, dodging, burning, and spot removal, actions can include steps that let you perform such tasks before continuing. Actions can also be programmed to stop and let you enter values in a dialog box, then continue. Photoshop actions can also be used to create droplets, which are applets that automatically process files that are dragged onto an icon.
As a safety net, we suggest working with a copy of your file until you’re comfortable creating actions. At the start of your action—before you record other commands—be sure to direct the application to save a copy of the file. In Illustrator, you would record the File > Save A Copy command, and in Photoshop you’d record File > Save As and choose As A Copy. Another way to protect yourself in Photoshop is to click the New Snapshot button in the History panel before you record your action.
Recording a Basic Action
In the Actions panel, click the Create New Action button (Figure 91a). Enter an action name, select an action set, and set additional options.
Figure 91a. Creating a New Action can be done either by clicking this button at the bottom of the Layers panel or by selecting Create New Action from the panel menu in the upper-right corner.

Name your action and choose any additional settings like Function Key shortcuts or Button Mode colors (Figure 91b).
Figure 91b. These settings can be easily accessed from the panel menu. When you click Record, the New Action dialog box will close and recording of your action will begin.

Figure 91c. Click this button to stop recording the action. You can also choose Stop Recording from the Actions panel menu or tap the Esc key.

Click the Record button to start recording your action. The button will turn red, indicating your action is being recorded.
Unlike recording sound or video, recording an action records steps only when something happens. In other words, don’t feel pressured to quickly perform your action. Photoshop doesn’t care if you take two hours between steps; it only records the steps themselves.
To stop recording, click the Stop Playing/Recording button, choose Stop Recording from the Actions panel menu, or press the Esc key.
Playing Back an Action
Playing back an action executes the recorded commands in the active document. You can exclude specific commands from an action or play back only a single command. If the action includes a modal control, where the user must interact with the action via a dialog box, you can specify values in a dialog box when the action pauses.
To play back an entire action, select the action name and click the Play button in the Actions panel, or choose Play from the panel menu. If you assigned a key combination to the action, just press that combination. To play only part of an action, select the command from which you want to start playing, and click the Play button in the Actions panel, or choose Play from the panel menu. To play a single command, select the command, and then Command-click (Ctrl-click) the Play button in the Actions panel. You can also press Command (Ctrl) and double-click the command.
Undoing a Photoshop Action
Because actions involve multiple steps, undoing an action means applying Undo (Edit > Undo) followed by consecutive Step Backward commands (Edit > Step Backward) until you have returned to the original state just prior to running the action.
To simplify undoing an action, start by taking a snapshot in the History panel before you play the action. From the panel menu choose New Snapshot, or click the Create New Snapshot icon ![]() at the base of the panel. When you decide to undo the action, just click to select the snapshot.
at the base of the panel. When you decide to undo the action, just click to select the snapshot.
#92. Using the Image Processor in Photoshop or Adobe Bridge
Unlike the Batch command, the Image Processor in Adobe Bridge or Photoshop CS5 can convert, process, or batch process multiple files without requiring you to create an action first. To invoke the Image Processor in Photoshop, choose File > Scripts > Image Processor. To invoke the Image Processor in Bridge, choose Tools > Photoshop > Image Processor (Figure 92a).
Figure 92a. The beauty of the Image Processor dialog box lies in its simplicity. Here we see how its functions are divided into four discrete sections from top to bottom.

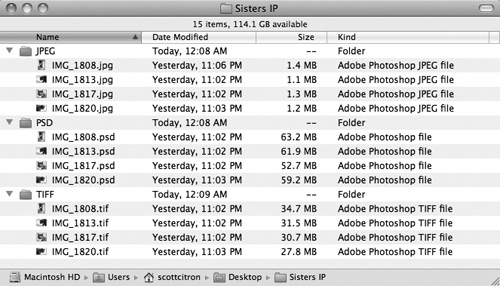
Figure 92b. Image Processor can process and save files into JPEG, PSD, or TIFF formats. Here we see a group of files that were saved as all three formats.
Starting at the top, Section 1 lets you select the images to be processed. The “Open first image to apply settings” option allows you to open the first image in Adobe Camera Raw so that its settings can be applied to all subsequent images.
Section 2 instructs Image Processor to return your processed images to their original folders or to a newly created folder upon completion.
Section 3 specifies which file format or formats (JPEG, PSD, or TIFF) to use when saving your files. Image Processor can also resize your files according to set dimensions.
Section 4 lets you run any custom actions you’ve saved, apply copyright information, or include an ICC color profile.
You can save these settings by clicking the Save button. To reuse previous settings, click the Load button, then navigate to a saved settings file.
Click Run to run the Image Processor.
#93. Taking Advantage of InDesign Scripts
One of InDesign’s lesser-known strengths is found in the Scripts panel (Window > Utilities > Scripts). Despite the number of weighty volumes devoted to the art of writing scripts, using scripts couldn’t be simpler.
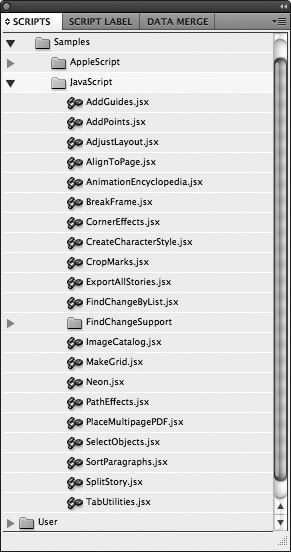
Start by familiarizing yourself with InDesign’s default scripts. When you open the Scripts panel you’ll find two folders. Mac OS users have a choice of AppleScripts or JavaScripts. Windows users can choose from VBScripts or JavaScripts. All the scripts are identical, regardless of format. We tend to favor the JavaScripts because of their cross-platform compatibility, but in truth they all function the same. Inside the JavaScript folder are 20 default scripts that come preinstalled with InDesign CS5 (Figure 93a).
Figure 93a. InDesign CS5 comes with these 20 scripts preinstalled.
To run a script, start by selecting something on your page. For example, Figure 93b shows a page of eight business cards. Before this file can go to the printer, the business cards must have individual crop marks applied. InDesign can produce crop marks per page, but not per item. Fortunately, there’s a wonderful script to handle this chore.
Figure 93b. The CropMarks script dialog box allows you to set various attributes for your crops.

After selecting the eight objects, double-click the Make Crop Marks script. In the dialog box that appears you can set preferences like the length of the crops, their distance from the object, line weight (in points), and more. Once everything is as you like it, click OK.
Not only will the script instantly draw the crop marks you specified, but it will create a new layer (myCropMarks) and assign the crops to that layer.
Using Keyboard Shortcuts to Trigger Scripts
If you find yourself using certain scripts frequently, you should consider assigning keyboard shortcuts to those scripts. (Fact is, if you find yourself doing anything frequently in InDesign, keyboard shortcuts are the way to go.) To create a keyboard shortcut, follow these steps:
- From the Edit menu, choose Keyboard Shortcuts.
- Click the New Set button and create and name your shortcut set, based on the Default set.
- Choose Product Area > Scripts.
- Click to highlight the script you wish to trigger. Make sure you select the proper script format, because the list will include both AppleScript and JavaScript (Mac OS) or VBScript and JavaScript (Windows) choices.
- Type the key combination for the script shortcut into the New Shortcut field. Check to make sure the shortcut is Unassigned, which means you’re free to use it. If the shortcut is previously assigned to another function, you can either continue to use the shortcut (thereby overwriting its previous assignment), or simply try using another key combination (Figure 93c).
Figure 93c. Start at the top of the Keyboard Shortcuts dialog box by creating a New Set. From there, select the Product Area where the command normally lives. In this case, Scripts are found on the sixth line from the bottom of the drop-down menu. Click in the New Shortcut field and type the keystrokes you’d like to use to trigger the script. Click the Assign button. If the key combination you type has not been previously assigned to another shortcut, click the OK button to confirm your choice.

- Leave Context selected to Default, and click the Assign button, which will move the shortcut into the Current Shortcuts area.
- Click OK to exit the dialog box.
Now you’re free to close the Scripts panel. Select an object on your page and give your keyboard shortcut a try. If the Script panel appears, you’re in business. If it doesn’t, reopen the Keyboard Shortcuts dialog box and try to figure out where you went wrong. Most often, users tend to forget to click the Assign button before clicking OK.
#94. Using Custom Stamps to Sign Forms in Acrobat Professional
Among the most significant inventions of the last 50 years, the Adobe Acrobat Electronic Form must surely rank. Gone are the days of squinting, hunchbacked, over tiny lines and boxes, trying to fill out complicated tax or credit applications, frozen with fear that one careless goof might ruin an otherwise perfect job.
Today, thanks to computers and the ubiquity of a strange file format called PDF, humankind can relax when filling out forms, confident in the knowledge that messy paperwork is a thing of the past.
But what about adding that final, all-important signature that graces your form before it’s sent on its merry way? If you’re like us, you hate having to print out a form, hand-sign it, jam it into a crummy envelope, find a stamp, and then snail-mail it to some town named Young America, Minnesota. Isn’t there a better way?
Fortunately, there is. And once you learn this valuable tip, your life, like ours, will never be the same. We promise.
Create Your Own Acrobat Stamp
Start by digitizing your signature. Use a black pen on white paper, then either scan the signature or photograph it with a digital camera. If you have a pressure-sensitive tablet, even better. Once you’ve created an image file with your signature in it, open it in Photoshop. Use Adjustments > Threshold to make your blacks black and your whites white.
The next objective is to put your John Hancock on a transparent layer. If your signature is on a layer named Background, it’s flat and lacks transparency. To convert it, hold down Option (Alt) and double-click the signature layer thumbnail. Your Background layer will now be named Layer 0, which means it can now support transparency.
Next, we need to delete the white background. Use the Magic Wand or Color Range command (Select > Color Range) to select all the white tones. Make sure to get inside letters that trap white, like a capital A, for example. After making an initial selection, use Select > Similar. This should pick up any other whites that were not originally selected. Press Delete or Backspace to remove white, leaving only the black signature. Photoshop’s gray-and-white checkerboard should be visible behind your signature, indicating transparency.
Next, we’ll check the size of your image. Too big is a pain to work with and too small is no good, either. Go to Image > Image Size. Make the file about three inches in width. 300 pixels per inch is the best, but don’t fret if your file has a lower ppi. Click OK.
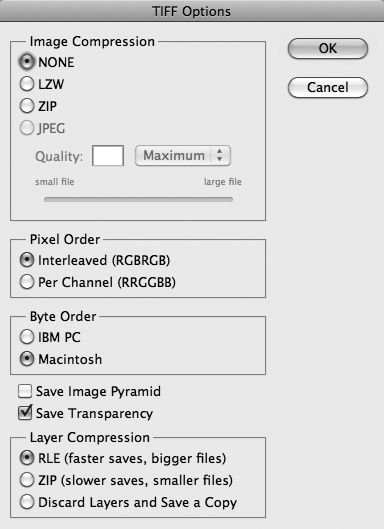
Now it’s time to save your work. Don’t forget to straighten and crop your signature. Acrobat Stamps can be almost any file format, but we want to choose one that will maintain the transparent background. We suggest saving the file as a TIFF and preserving transparency by selecting the Save Transparency check box (Figure 94a).
Figure 94a. Although we chose to save our file as a TIFF, custom stamps can use almost any format. When saving as TIFF, make sure to check the Preserve Transparency box.
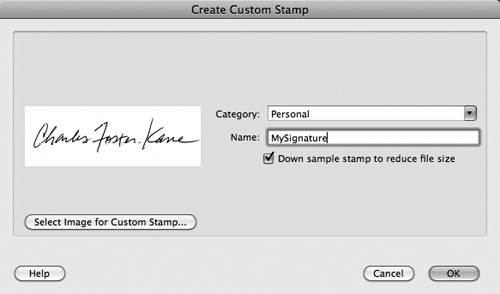
Back in Acrobat, choose Tools > Comment & Markup > Stamps > Create Custom Stamp. Choose a Category and name your Stamp. Also, select the “Down sample stamp to reduce file size” check box (Figure 94b). Click OK to close the Create Custom Stamp dialog box.
Figure 94b. Clearly identify and categorize your stamp so that it’s easy to find when you need it.
Now you’re ready to give your stamp a try. You’ll start by locating your custom signature stamp within Acrobat Pro. Depending on the software version you have, Stamps can generally be found under Tools > Comment & Markup > Stamps. Navigate to your custom signature stamp, click to select it, and then click once more where you want it applied.
Have a look at Figure 94c to see where we used it. Once you apply your stamp you can also resize it, if needed. With the stamp selected, grab one of the handles on the bounding box and drag with the Shift key to constrain its proportions. If everything works right, you’ll be in digital heaven.
Figure 94c. If signing forms by hand has annoyed you for years, be prepared for the joy afforded by this simple addition to your toolbox.

#95. Creating Flash Web Galleries in Bridge
On the Adobe Bridge list of greatest feats is its ability to create Web galleries that use Flash technology. Once the sole province of Photoshop (or Flash itself), Bridge has taken over this handy task so that those owning any CS5 product can now produce professional Web galleries by choosing from among a number of built-in choices.
To begin, open Bridge and go to Window > Workspace > Output, or click the Output button at the top of the main application window. In the top row of the Output drawer, click the Web Gallery button. Click Template > Lightroom Flash Gallery and Style > Flash gallery (default) (Figure 95a).
Figure 95a. The Output drawer is the first stop on your way to your very own Flash Web gallery.

Use the Folders drawer in the far-left column to navigate to the folder of images you want to use for your gallery. The images in the folder you select will populate the Content drawer at the bottom of the Bridge window. Click to select any or all of the images in this drawer for your Web gallery. The images you select will be displayed above in the Preview drawer (Figure 95b).
Figure 95b. The images selected in the Content drawer will be displayed temporarily in the Preview drawer. Clicking Refresh Preview in the Output drawer replaces the thumbnails with a preview of your Flash gallery.

The Site drawer provides fields for adding text to your gallery. These mostly self-explanatory fields can be filled out or not, as you wish. To see how and where this information is used, click the Refresh Preview button in the Output drawer, which generates a new drawer, named Output Preview (Figure 95c).
Figure 95c. Clicking the Refresh Preview button in the Output drawer displays your Web gallery in the Output Preview drawer.

The Color Palette Drawer and Beyond
Beneath the Site drawer is the Color Palette drawer. This drawer is where you specify colors for things like your text, your background, and your controls. Clicking the small color swatch displays the Colors dialog box (Mac OS) or the Color palette (Windows). Here you specify the colors you’d like applied to these various components of your Web gallery page. You can click either the Refresh Preview ![]() or Preview in Browser
or Preview in Browser ![]() buttons to see your color choices.
buttons to see your color choices.
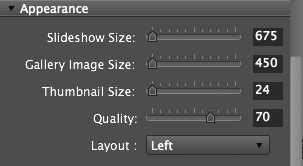
Beneath the Color Palette drawer is the Appearance drawer. This drawer is where you set the pixel size for slideshow images, gallery images, and thumbnails, and choose their respective image quality and layout (Figure 95d).
Figure 95d. Use the Appearance drawer to set how and where your gallery images and thumbnails display.
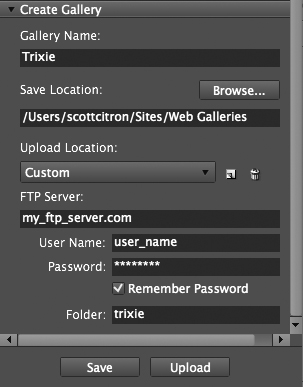
The last stop on the Web gallery tour is the Create Gallery drawer. This is where you tell Bridge how and where to save your gallery. Galleries can be saved locally on your computer or automatically uploaded to an appointed Web server for immediate Internet display. Settings files can be saved by clicking the Save Preset Name button found to the right of the Upload Location > Custom drop-down menu. To save your Web gallery or to upload it to a server, click the Save or Upload buttons at the very bottom of the Save Location drawer (Figure 95e).
Figure 95e. The Create Gallery drawer is your last stop before saving or uploading your Flash Web gallery.
#96. Creating PDF Contact Sheets with Bridge
If we had a dollar for every time we’ve been asked, “What happened to the Create InDesign Contact Sheet command in Bridge?” we’d be rich. Granted, ditching this feature seems like a goof to many, but at least Adobe had the decency not to ditch it completely. In the wake of its demise, Adobe generously left users with the next best thing: a Create PDF Contact Sheet command in Bridge. Sadly, most users are ignorant of its existence. As a public service to contact sheet aficionados everywhere, we offer this tip.
Start by clicking the PDF button in the Output drawer of the Output workspace. After highlighting the images you wish to use, click the Template drop-down menu to select from among the two available contact sheet configurations: 4 x 5 or 5 x 8. A word of explanation is in order here. The dimensions 4 x 5 and 5 x 8 refer to the number of vertical columns by the number of horizontal rows on your contact sheet. They do not refer to the size of the paper you’ll be printing to, as seen here in the Document drawer (Figure 96a).
Figure 96a. The Document drawer is used to tell Bridge how to configure the basics of your contact sheet.

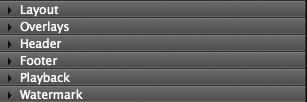
Once you’ve conquered the Document drawer, you’ll need to open and address the remaining six drawers found below. Those drawers are (in order displayed by default): Layout, Overlays, Header, Footer, Playback, and Watermark (Figure 96b).
Figure 96b. Fear not the remaining six drawers seen here. Most of the fields are easy to fill out without mussing your do.
Navigating these drawers is mostly self-explanatory. If there’s something you don’t understand, our advice is to give it your best shot, and then check it against either the PDF Preview or your final PDF document.
Before you know it you’ll have reached the final Save button and its corresponding View PDF After Save check box (Figure 96c). We think you’ll know what to do when you arrive here.
Figure 96c. The end of the road when it comes to creating PDF contact sheets in Bridge CS5. Have a cold one on us.
![]()
One last word of advice. Like with the Web galleries, if you’ve spent precious time customizing your PDF contact sheet template, it behooves you to create a preset of your settings to come back to in the future. To do this, click the tiny Save Template icon on the right side of the Output drawer.