
Chapter 4. Optimize Projects
This chapter examines how image data flows through an After Effects project in close detail. It’s full of the kind of information that will help you make the most of After Effects.
Sometimes you take the attitude of a master chef—you know what can be prepped and considered “done” before the guests are in the restaurant and it’s time to assemble the pièce de résistance. At other times, you’re more like a programmer, isolating and debugging elements of a project, even creating controlled tests to figure out how things are working. This chapter helps you both artistically and technically (as if it’s possible to separate the two).
Once you
• understand how to use multiple compositions
• know when to precomp (and when it’s safe to avoid it)
• know how to optimize rendering time
you may find the After Effects experience closer to what you might consider “real time.” This type of efficient rendering depends not only on optimized software and a speedy workstation, but on well-organized compositions and the ability to plan for bottlenecks and other complications.
Nested Comps, Multiple Projects
It’s easy to lose track of stuff when projects get complicated. This section demonstrates
• how and why to work with some kind of project template
• how to keep a complex, multiple-composition pipeline organized
• shortcuts to help maintain orientation within the project as a whole
These tips are especially useful if you’re someone who understands compositing but sometimes finds After Effects disorienting.
Precomping and Composition Nesting
Precomping is often regarded as the major downside of working in After Effects, because vital information is hidden from the current comp’s timeline in a nested comp. Artists may sometimes let a composition become unwieldy, with dozens of layers, rather than bite the bullet and send a set of those layers into a precomp. Yet precomping is both an effective way to organize the timeline and a key to problem solving and optimization in After Effects.
Notes
![]()
Precomping is the action of selecting a set of layers in a master composition and assigning it to a new subcomp, which becomes a layer in the master comp. Closely related to this is composition nesting, the act of placing one already created composition inside of another.
Typically, precomping is done by selecting the layers of a composition that can sensibly be grouped together, and choosing Precompose from the Layer menu (keyboard shortcut Ctrl+Shift+C/Cmd+Shift+C). Two options appear (the second option grayed out if multiple layers have been selected): to leave attributes (effects, transforms, masks, paint, blending modes) in place or transfer them into the new composition.
Why Precomp?
Precomping prevents a composition from containing too many layers to manage in one timeline, but it also lets you do the following:
• Reuse a set of elements and manage them from one place.
• Fix render order problems. For example, masks are always applied before effects in a given layer, but a precomp can contain an effect so that the mask in the master comp follows that effect in the render order.
• Organize a project by grouping elements that are interrelated.
• Specify an element or set of layers as completed (and even pre-render them, as discussed later in this chapter).
Many After Effects artists are already comfortable with the idea of precomping but miss that last point. As you read through this, think about the advantages of considering an element finished, even if only for the time being.
Script
![]()
rd: Pre-compose by Jeff Almasol (http://aescripts.com/rd-pre-compose/) displays a dialog box to precomp one or more layers, just like the regular After Effects dialog, but adds the ability to trim the precomp to the selected layer’s duration, including trim handles.
The Project Panel: Think of It as a File System
How do you like to keep your system organized—tidy folders for everything or files strewn across the desktop? Personally, I’m always happiest with a project that is well organized, even if I’m the only one likely ever to work on it. When sharing with others, however, good organization becomes essential. The Project panel mirrors your file system (whether it’s Explorer or Finder), and keeping it well organized and tidy can clarify your thought process regarding the project itself.
I know, I know, eat your vegetables, clean your room.
Figure 4.1 shows a couple of typical project templates containing multiple compositions to create one final shot, although these could certainly be adapted for a group of similar shots or a sequence. When you need to return to a project over the course of days or weeks, this level of organization can be a lifesaver.
Figure 4.1. A complex project such as a shot for a feature film might be generically organized (left) to include numbering that reflects pipeline order and multiple output comps with no actual edits, just the necessary settings. At minimum (right), you should have Source and Precomps folders, as well as a Reference folder, to keep things tidy.

Here are some ideas to help you create your own comp template:
• Create folders, such as Source, Precomps, and Reference, to group specific types of elements.
• Use numbering to reflect comp and sequence order so that it’s easy to see the order in the Project panel.
• Create a unique Final Output comp that has the format and length of the final shot, particularly if the format is at all different from what you’re using for work (because it’s scaled, cropped, or uses a different frame rate or color profile).
• Use guide layers and comments as needed to help artists set up the comp (Figure 4.2).
Figure 4.2. Here is a series of non-rendering guide layers to define action areas and color.

• Organize Source folders for all footage, broken down as is most logical for your project.
• Place each source footage clip into a precomp. Why? Unexpected changes to source footage—where it is replaced for some reason—are easier to handle without causing some sort of train wreck.
Tip

If nothing else, a locked, untouchable Final Output comp prevents losing a render to an incorrectly set work area (because you were editing it for RAM previews).
The basic organization of master comp, source comp, and render comp seems useful on a shot of just about any complexity, but the template can include a lot more than that: custom expressions, camera rigs, color management settings, and recurring effects setups.
Script
![]()
Arrange Project Items into Folders (http://aescripts.com/arrange-project-items-into-folders/) looks for project items with a matching prefix and groups them together in a folder. Load Project or Template at Startup (http://aescripts.com/load-project-at-startup/) loads a project or template each time you start After Effects—this can really help if you need several people in a studio to follow a certain organizational style. Both scripts are by Lloyd Alvarez.
Manage Multiple Comps from the Timeline
Ever had that “where am I?” feeling when working with a series of nested comps? That’s where Mini-Flowchart, or Miniflow, comes in. Access it via ![]() in the Timeline panel, or simply press the Shift key with the Timeline panel forward to enable it.
in the Timeline panel, or simply press the Shift key with the Timeline panel forward to enable it.
Miniflow shows only the nearest neighbor comps (Figure 4.3), but click on the flow arrows at either end and you navigate up or down one level in the hierarchy. Click on any arrows or items in between the ends and that level is brought forward. You’re even free to close compositions as you’re done editing them (Ctrl+Alt+W/Cmd+Opt+W) and reopen only the ones you need using this feature.
Figure 4.3. Mini-Flowchart view is a navigable pop-up showing dependent comps above and below (right and left of) the current comp in the hierarchy.

Tip
By default, the comp order is shown flowing right to left. The reason for this is probably that if you open subcomps from a master comp, the tabs open to the right; however, you may want to choose Flow Left to Right in Miniflow’s panel menu instead.
What about cases where you’d like to work in the Timeline panel of a subcomp while seeing the result in the master comp? The Lock icon ![]() at the upper left of the Composition viewer lets you keep that Composition viewer forward while you open another composition’s Timeline panel and close its view panel. Lock the master comp and double-click a nested comp to open its Timeline panel; as you make adjustments, they show up in the master comp.
at the upper left of the Composition viewer lets you keep that Composition viewer forward while you open another composition’s Timeline panel and close its view panel. Lock the master comp and double-click a nested comp to open its Timeline panel; as you make adjustments, they show up in the master comp.
Notes
![]()
The Always Preview This View toggle ![]() lets you work entirely in a precomp but switch automatically to the master comp (if this is toggled in that comp) when previewing. Use it if you’re only interested in how changes look in your final.
lets you work entirely in a precomp but switch automatically to the master comp (if this is toggled in that comp) when previewing. Use it if you’re only interested in how changes look in your final.
Ctrl+Alt+Shift+N (Cmd+Opt+Shift+N) creates two Composition viewers side by side, and locks one of them, for any artist with ample screen real estate who wants the best of both worlds.
To locate a comp in the Project panel, you can
• select an item in the Project panel; adjacent to its name by the thumbnail at the top of the panel is a small pull-down caret, along with the number of times, if any, the item is used in a comp (Figure 4.4)
Figure 4.4. Click the caret next to the total number of times an item is used to see a list of where it is used.

• context-click an item in the Project panel and choose Reveal in Composition; choose a composition and that comp is opened with the item selected (Figure 4.5)
Figure 4.5. Context-click any item, and under Reveal in Composition, choose from a list, if applicable; that timeline opens with the item selected.

• context-click a layer in the timeline and choose Reveal Layer Source in Project to highlight the item in the Project panel (Figure 4.6)
Figure 4.6. Context-click any footage item in the timeline and you can choose to reveal it either in the Project panel or in Flowchart view.

• context-click in the empty area of a timeline—and choose Reveal Composition in Project to highlight the comp in the Project panel (Figure 4.7)
Figure 4.7. Find the empty area below the layers in the timeline and context-click; you can reveal the current comp in the Project panel.

• type the name of the comp in the Project panel search field
Tip
You may already know that a double-click opens a nested comp, and Alt–double-click (Opt–double-click) reveals it in the Layer viewer.
Ways to Break the Pipeline
Precomping solves problems, but it can also create more problems—or at least inconveniences. Here are a few ways that render order can go wrong:
• Some but not all properties are to be precomped, others must stay in the master comp? With precomping it’s all-or-nothing, leaving you to rearrange properties manually.
• Changed your mind? Restoring precomped layers to the master composition is a manual (and thus error-prone) process, due to the difficulty of maintaining proper dependencies between the two (for example, if the nested comp has also been scaled, rotated, and retimed).
Script
![]()
The script preCompToLayerDur.jsx from Dan Ebberts (found on the book’s disc) starts a precomped layer at frame 1 even if the layer to be precomped is trimmed to a later time.
• Do the layers being precomped include blending modes or 3D layers, cameras, or lights? Their behavior changes depending on the Collapse Transformations setting (detailed below).
• Is there motion blur, frame blending, or vector artwork in the subcomp? Switches in the master composition affect their behavior, as do settings on each individual nested layer, and this relationship changes depending on whether Collapse Transformations is toggled.
• Layer timing (duration, In and Out points, frame rate) and dimensions can differ from the master comp. When this is unintentional, mishaps happen: Layers end too soon or are cropped inside the overall frame, or keyframes in the precomp fall between those of the master, wreaking havoc on, for example, tracking data.
• Are you duplicating a comp that contains subcomps? The comp itself is new and completely independent, but the nested comps are not (see Script at right).
Script
![]()
True Comp Duplicator (http://aescripts.com/true-comp-duplicator/) was created by Brennan Chapman to address the biggest bugbear of working with nested comps in After Effects—in a node-based app, you can duplicate an entire nested tree and all of the components are unique, but duplicate a comp in After Effects and its subcomps are the same as in the source. This script can reside in a panel ready to create an entire new hierarchy. Highly recommended.
No wonder people avoid precomping. But there is hope if you recognize any difficulty and know what to do, so that inconveniences don’t turn into deal-killers.
Boundaries of Time and Space
Each composition in After Effects contains its own fixed timing and pixel dimensions. This adds flexibility for animation but if anything reduces it for compositing; most other compositing applications such as Nuke and Shake have no built-in concept of frame dimensions or timing and assume that the elements match the plate, as is often the case in visual effects work.
Therefore it is helpful to take precautions:
• Make source compositions longer than the shot is ever anticipated to be, so that if it changes, timing is not inadvertently truncated.
• Enable Collapse Transformations for the nested composition to ignore its boundaries (Figure 4.8).
Figure 4.8. The nested comp has a blue background and the leg of the letter “p” extends outside its boundaries (top); a simple quick fix is to enable Collapse Transformations, and the boundaries of the nested comp are ignored (bottom).

• Add the Grow Bounds effect if Collapse Transformations isn’t an option (see sidebar on next page).
Collapse Transformations is the most difficult of these to get your head around, so it’s worth a closer look.
Collapse Transformations
In After Effects, when a comp is nested in another comp, effectively becoming a layer, the ordinary behavior is for the nested comp to render completely before the layer is animated, blended, or otherwise adjusted (with effects or masks) in the master comp.
Notes
![]()
The 04_collapse_transformations folder and project on the disc contain relevant example comps.
However, there are immediate exceptions. Keyframe interpolations, frame blending, and motion blur are all affected by the settings (including frame rate and timing) of the master comp—they are calculated according to its settings (which can become tricky; see the next section). 3D position data and blending modes, on the other hand, are not passed through unless Collapse Transformations is enabled. Enable the toggle and it is almost as if the precomposed layers reside in the master comp—but now any 3D camera or lighting in the subcomp is overridden by the camera and lights in the master comp.
Close-up: Grow Bounds
![]()
Sometimes enabling Collapse Transformations is not desirable—for example, if you set up 3D layers with a camera in a subcomp and don’t want their position to be changed by a camera in the master comp. The Grow Bounds effect overcomes one specific (and fairly rare) problem (in which the embedded layer is too small for an applied effect), but it is also useful in cases where other effects create a comp boundary that leads visual data to appear cropped.
Not only that, but layers with Collapse Transformations lose access to blending modes—presumably to avoid conflicts with those in the subcomp. Now here comes the trickiest part: Apply any effect to the layer (even Levels with the neutral defaults, which doesn’t affect the look of the layer) and you force After Effects to render the collapsed layer, making blending modes operable. It is now what the Adobe developers call a parenthesized comp. Such a nested comp is both collapsed and not: You can apply a blending mode, but 3D data is passed through (Figure 4.9).
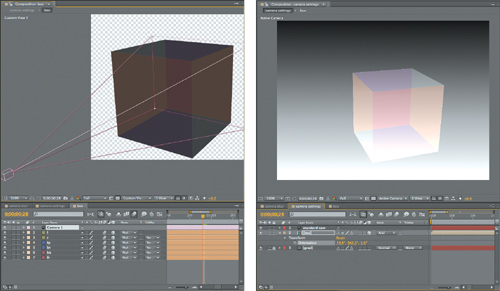
Figure 4.9. Shown is the simplest example I could devise of the most complicated precomping situation. The nested comp (left) is a 3D box made up of solids, each with a Multiply blending mode. In the master comp (right) a Levels (effect with no adjustment) is set, allowing an Add mode to be applied, yet the box can still be rotated in 3D—those values are passed through.
Thus, if you want to collapse transformations but not 3D data, applying any effect—even one of the Expression Controls effects that don’t by themselves do anything—will parenthesize the comp. It’s a good trick to keep in your pocket. Will you run into this exact situation? It may be a while before that ever happens, but it’s a case study to help you sort out exactly what is going on when you precomp and collapse transformations.
Nested Time
After Effects is not rigid about time, but digital video itself is. You can freely mix and change frame rates among compositions without changing the timing, as has been shown. However, because your source clips always have a very specific rate, pay close attention when you
• import an image sequence
• create a new composition
• mix comps with different frame rates
Tip
Annoyed to find sequences importing at the wrong frame rate? Change the default Sequence Footage Frames per Second under Preferences > Import.
In the first two cases you’re just watching out for careless errors. But you might want to maintain specific frame rates in subcomps, in which case you must set them deliberately on the Advanced tab of the Composition Settings dialog.
Advanced Composition Settings
In addition to the Motion Blur settings introduced in Chapter 2 and covered in detail in Chapter 8, Composition Settings > Advanced contains two Preserve toggles that influence how time and space are handled when one composition is nested into another.
Preserve Frame Rate maintains the frame rate of the composition wherever it goes—into another composition with a different frame rate or into the render queue with different frame rate settings. So if a simple animation cycle looks right at 4 frames per second (fps), it won’t be expanded across the higher frame rate, but will preserve the look of 4 fps.
Preserve Resolution When Nested controls what is called concatenation. Typically, if an element is scaled down in a precomp and the entire composition is nested into another comp and scaled up, the two operations are treated as one, so that no data loss occurs via quantization. This is concatenation, and it’s usually a good thing. If the data in the subcomp is to appear pixilated, as if it were scaled up from a lower-resolution element, this toggle preserves the chunky pixel look.
Adjustment and Guide Layers
Two special types of layers, adjustment and guide layers, offer extra benefits that might not be immediately apparent, and are thus underused by less-experienced After Effects artists.
Adjustment Layers
Adjustment layers are the most natural thing in the world to anyone working with nodal compositing; they are a way of saying “at this point in the compositing process, I want these effects applied to everything that has already rendered.” Because render order is not readily apparent in After Effects until you learn how it works, adjustment layers can seem trickier than they are.
The adjustment layer is itself invisible, but its effects are applied to all layers below it. It is a fundamentally simple feature with many uses. To create one, context-click in an empty area of the Timeline panel, and choose New > Adjustment Layer (Ctrl+Alt+Y/Cmd+Opt+Y) (Figure 4.10).
Figure 4.10. The highlighted column includes toggle switches, indicating an adjustment layer. Any layer can be toggled but the typical way to set it is to create a unique layer. An adjustment layer created under Layer > New > Adjustment Layer (or via the shortcuts) is a white, comp-sized solid.

Adjustment layers allow you to apply effects to an entire composition without precomping it. That by itself is pretty cool, but there’s more:
• Move the adjustment layer down the stack and any layers above it are unaffected, because the render order in After Effects goes from the lowest layer upward.
• Shorten the layer and the effects appear only on frames within the adjustment layer’s In/Out points.
• Use Opacity to attenuate any effect; most of them work naturally this way. Many effects do not themselves include such a direct control, even when it makes perfect sense to “dial it back 50%,” which you can do by setting Opacity to 50%.
• Apply a matte to an adjustment layer to hold out the effects to a specific area of the underlying image.
• Add a blending mode and the adjustment layer is first applied and then blended back into the result (Figure 4.11).
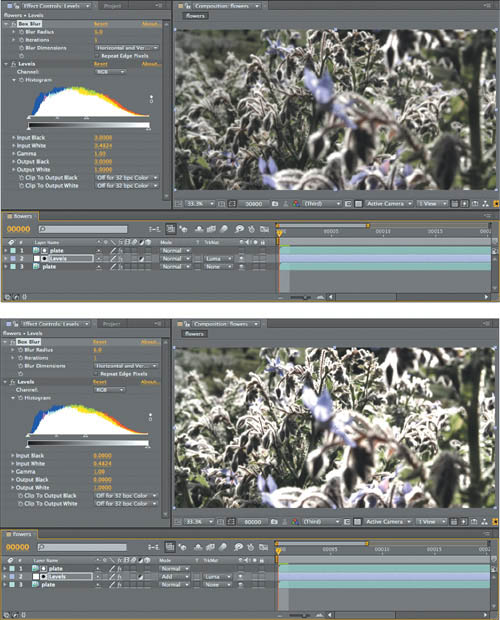
Figure 4.11. The basic setup in these two examples is identical: An adjustment layer uses the image itself as a luma matte so that it works only with the highlights, to which it applies a Box Blur (for a defocused look) and a Levels adjustment (to bring a glow to the highlights), as seen in the top figure. But applying Add mode to the adjustment layer (bottom) causes the adjusted image to be added to the original, giving it a subtle extra pop (that can be seen in the brighter highlights) in one simple step.
Notes
![]()
Alpha channel effects change the alphas of the layers below, not of the adjustment layer itself.
It’s a good idea 99% of the time to make sure that an adjustment layer remains 2D and at the size and length of the comp, as when applied. It’s rare that you would ever want to transform an adjustment layer in 2D or 3D, but it is possible, so don’t let it happen by accident. If you enlarge the composition, you must resize the adjustment layers as well.
Guide Layers
Like adjustment layers, guide layers are standard layers with special status. A guide layer appears in the current composition but not in any subsequent compositions or the final render (unless it is specifically overridden in Render Settings.) You can use this for
• foreground reference clips (picture-in-picture timing reference, aspect ratio crop reference)
• temporary backgrounds to check edges when creating a matte
• text notes to yourself
• adjustment layers that are used only to check images (described further in the next chapter); a layer can be both an adjustment and a guide layer
Any image layer can be converted to a guide layer either by context-clicking it or by choosing Guide Layer from the Layer menu. (Figure 4.12).
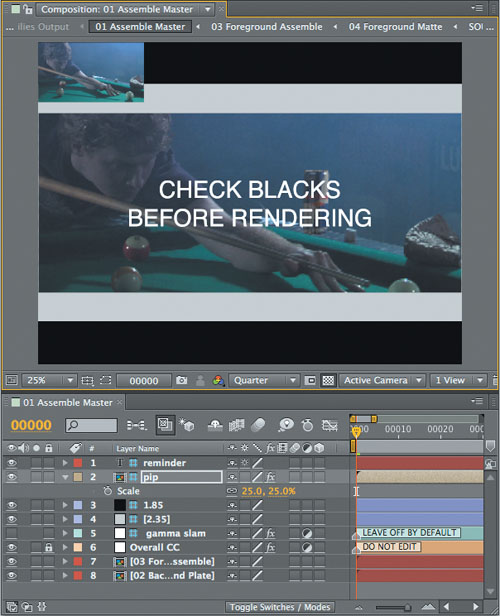
Figure 4.12. Check out all the guide layers that won’t render but help you work: One pushes up gamma to check blacks, and two provide crops for different aspects (1.85:1 and 2.35:1, the common cinematic formats). A picture-in-picture layer shows timing reference from the plate, along with a text reminder that does not render, either. None of this is visible in another composition, or in the render.

Faster! Control the Render Pipeline
The render pipeline is the order in which operations happen; by controlling it, you can solve problems and overcome bottlenecks. For the most part render order is plainly displayed in the timeline and follows consistent rules:
• 2D layers are calculated from the bottom to the top of the layer stack—the numbered layers in the timeline.
• Layer properties (masks, effects, transforms, paint, and type) are calculated in strict top-to-bottom order (twirl down the layer to see it).
• 3D layers are instead calculated based on distance from the camera; coplanar 3D layers respect stacking order and should behave like 2D layers relative to one another.
Tip
3D calculations are precise well below the decimal level but do round at some point. To avoid render errors, precomp them in a nested 2D layer.
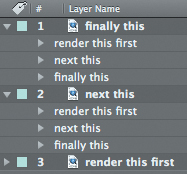
So to review: In a 2D composition, After Effects starts at the bottom layer and calculates any adjustments to it in the order that properties are shown, top to bottom. Then, it calculates adjustments to the layer above it, composites the two of them together, and moves up the stack in this manner (Figure 4.13).
Figure 4.13. 2D layers render starting with the bottom layer, rendering and compositing each layer above in order. Layer properties render in the order shown when twirled down; there is no direct way to change the order of these categories.
Tip
The Transform effect allows you to transform before other effects are applied in order to avoid precomping solely for this purpose.
Although effects within a given layer generally calculate prior to transforms (except in the case of continuously rasterized vector layers), an adjustment layer above a layer guarantees that its effects are rendered after the transforms of all layers below it.
Tip
Although the UI doesn’t prohibit you from doing so, don’t apply a track matte to another track matte and expect consistent results. Sometimes it works, but it’s not really supposed to work, and most often it doesn’t.
Track mattes and blending modes are applied last, after all other layer properties (masks, effects, and transforms) have been calculated, and after their own mask, effect, and transform data are applied. Therefore, you don’t generally need to pre-render a track matte simply because you’ve added masks and effects to it.
Faster!
Have you heard of a “real-time” compositing system? No such thing actually exists. The ones that claim to be real-time cleverly pre-render and cache elements so that they don’t have to be recalculated as each frame is displayed. You can do this in After Effects, too—you’re just left more to your own devices to set it up.
Tip
Preferences > Display > Show Rendering Progress in Info Panel and Flowchart shows what is happening on your system. It is disabled by default because it requires some extra processing power, but I would argue you get that time back from the ability to spot and solve an obvious bottleneck.
As I work, I try to organize any portions of my master comp that I consider finished into a subcomp, and if it is render-intensive, I pre-render it. Failure to commit to decisions—keeping options open—costs time and efficiency. It’s as true in After Effects as it is in life as a whole. Pre-rendering a subcomp does, however, lead to another decision about how it behaves after you render it.
Post-Render Options
Tucked away in the Render Queue panel, but easily visible if you twirl down the arrow next to Output Module, is a menu of three post-render actions. After the render is complete, you can use
• Import to simply bring the result back into the project
• Import & Replace Usage to replace the usage of the source comp in the project without blowing it away
• Set Proxy to add a proxy to the source (the most elegant solution, but the most high-maintenance)
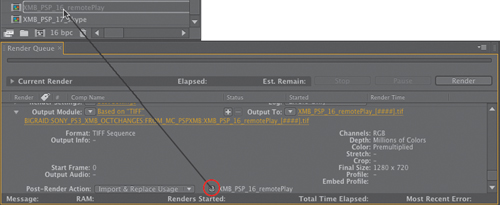
The latter two options even let you use the pick whip icon adjacent to the menu to connect whatever item in the Project panel needs replacement. If you’ve already created a pre-render or proxy, you can target that (Figure 4.14).
Figure 4.14. Virtually any project item can be the target for replacement or a proxy; click and drag the pick whip icon to choose the item to be replaced by the render.
Tip
If you choose Import & Replace Usage and then need to change back, Alt-drag (Opt-drag) the source comp over the replacement clip in the Project panel to globally replace its usage.
Proxies and Pre-Renders
Any image or clip in your Project panel can be set with a proxy, which is an imported image or sequence that stands in for that item. Its pixel dimensions, color space, compression, and even length can differ from the item it replaces. For example, you can use a low-resolution, JPEG-compressed still image to stand in for a full-resolution moving-image background.
To create a proxy, context-click an item in the Project panel and choose Create Proxy > Movie (or Still). A render queue item is created and automatically renders at Draft quality and half-resolution; the Output Module settings create a video file with alpha, so that transparency is preserved and Post-Render Action uses the Set Proxy setting.
Figure 4.15 shows how a proxy appears in the Project panel. Although the scale of the proxy differs from that of the source item, transform settings within the comps that use this item remain consistent with those of the source item so that it can be swapped in for the final at any time. This is what proxies were designed to do, to allow a low-resolution file to stand in, temporarily and nondestructively, for the high-resolution final.
Figure 4.15. The black square icon to the left of an item in the Project panel indicates that a proxy is enabled; a hollow square indicates that a proxy is assigned but not currently active. Both items are listed atop the Project panel, the active one in bold.

There’s another use for proxies. Instead of creating low-res temp versions, you can generate final quality pre-rendered elements. With a composition selected, choose Composition > Pre-render and change the settings to Best quality, full resolution, making certain that Import and Replace Usage is set for Output Module. If, for example, you’ve completed the greenscreen key on a source, pre-render it so that you don’t waste time continuing to redo a decision that is already finalized.
By default, the source file or composition is used to render unless specifically set otherwise in Render Settings > Proxy Use. Choosing Use Comp Proxies Only, Use All Proxies, or Current Settings options (Figure 4.16) allows proxies to be used in the final render. To remove them from a project, select items with proxies, context-click (or go to the File menu), and choose Set Proxy > None.
Figure 4.16. I typically set Proxy Use to Current Settings, but Use Comp Proxies Only lets you set low-res stand-ins for footage and full-res pre-renders for comps, saving gobs of time.

Background Renders
Rendering from the render queue ties up the application and most of the machine’s processing power for as long as is needed to output footage. On a modern system with multiple processors, you can do much better than that.
aerender
Background rendering allows a render to occur without the user interface, allowing you to continue working with it. The aerender application is found alongside the After Effects CS5 application itself on your system but runs via the command line (in Terminal Unix shell on a Mac, or the DOS shell in Windows). You can drag it into the shell window to run it, or press Enter (Return) to reveal its Unix manual pages (if you’re into that sort of thing). Shown are its arguments, the variables that can be added in quotes to the command aerender, and the location string of the project file.
But that’s all such geeky gobbledygook when there’s a panel to do it, thanks to the BG Render script, which is so good I almost never use the render queue anymore.
Script
![]()
BG Renderer by Lloyd Alvarez (http://aescripts.com/bg-renderer/) may be the most universally used After Effects script. Not only does it automatically set up a background render by creating the command line for you, but it offers you a user interface for extra variables you might miss that determine the priority and number of processors used to render (Figure 4.17).
Figure 4.17. BG Renderer uses ScriptUI, which means that it looks like it’s part of the interface, and can remain in an open panel as you work. When you’re ready to render, you can specify priority and number of processors; click the button and a terminal window opens that shows the render progress, line by line. You miss the progress bar of the render queue, but if you can live without that the benefit is that you can keep working while your machine renders.

Network Rendering
The aerender command is also used by third-party rendering solutions that go beyond what BG Render can do by distributing your render across multiple machines on a network. These programs run scripts that manage the process of running aerender on multiple machines and are capable of far more than just straight-ahead renders; you can, for example, have a render wait until a certain time or until another one completes before commencing, and you can automatically re-queue renders that fail for any reason. All of the third-party rendering options—Rush Render Queue, Qube!, Smedge, Muster—also support other terminal-friendly applications such as Maya and Nuke.
Be forewarned, however, that at this stage there is nothing like a one-button install for this type of software. Because of the need to coordinate resources across a network and make machines recognize one another and all file locations, a system administrator or equivalent technical expert is needed before those are up and running. However, if your facility is large enough to have dozens or hundreds of CPUs, it’s worth the investment to implement and maintain such a system.
There is increasing interest these days in letting someone else manage a render network remotely and permit what is known as remote or “cloud” rendering, where you upload your source files and rendered output is returned to you. This makes plenty of sense for 3D animations, which often have small source files but require a lot of processing power. Big comps, however, usually have too much source data to make it worthwhile to even contemplate uploading it all. Plenty of smart people are working on improving this method, and once gigabit connections to the Internet are widely available, this approach is bound to take off.
Watch Folder
The myopic and slightly dotty granddaddy of network rendering on After Effects is Watch Folder. File > Watch Folder looks in a given folder for projects ready to be rendered; these are set up using the Collect Files option. The Adobe help topic “Network rendering with watch folders and render engines” page includes everything you need to know.
Close-up: Multiple After Effects Versions
![]()
You can open more than one After Effects on Mac or Windows. This is memory intensive and not ideal for rendering, but it lets you work with two projects at once.
On a Mac, locate Adobe After Effects CS4.app and duplicate it (Cmd+D); both will run. On Windows, go to the Start menu, choose Run, type cmd, and click OK. In the DOS shell that opens, drag in AfterFX.exe from your Programs folder and then add “–m” (that’s a space, a dash, and m as in “multiple”). Voilà, a second version initializes. Write a .bat file, and you can do all of this with a double-click.
Watch Folder is OK on small, intimate networks, but it requires much more hands-on effort than dedicated render management software. With individual systems having become so powerful, it’s easy to become lazy about taking the trouble required to set up a Watch Folder render, but if you’re up against a deadline, don’t have the dedicated software, and want to maximize multiple machines, it will do the trick.
Adobe Media Encoder
Delivering to the web or a DVD? Adobe Media Encoder is a dedicated render application that helps render certain video formats—including Flash video (FLV and F4V), H.264, and MPEG-2—that don’t work well with the frame-by-frame rendering model of After Effects. For example, H.264 is a “long GOP” format that relies on keyframes with lots of image data surrounded by in-between frames with very little, and it requires all of the frames to be rendered before it can work its magic. Not only can Adobe Media Encoder collect frames to compress them, it can even render on multiple passes for higher quality.
Script
![]()
Suppose you just have one machine and a big render. You want it to keep running but shut down the system when it’s done, and even notify you remotely that the render was a success. Render, Email, Save, and Shutdown by Lloyd Alvarez (http://aescripts.com/render-email-incremental-save-and-shutdown/) exists for this purpose; just queue up your render and fire one of them off.
Owners of Adobe Production Premium or Master Collection have the maximum render options, since Premiere Pro can dynamically link to After Effects comps and render to Adobe Media Encoder. Even if you own just After Effects CS5, Media Encoder is still included with your installation.
Instead of rendering from After Effects in an uncompressed format and then importing the result to Adobe Media Encoder, you can drag and drop an After Effects project to the application. This launches Dynamic Link, which peeks inside the project for renderable comps (Figure 4.18).
Figure 4.18. Dynamic Link allows other Adobe applications to see your Project panel; Adobe Media Encoder uses this to let you render comps for heavily compressed video formats directly from the project.

Most of the options from the After Effects Render Queue are here, albeit in a different configuration, so why go to the trouble to render this way? If you’ve ever tried creating an H.264, FLV, F4V, or MPEG-2 directly from After Effects, you know that it’s virtually impossible to get a good-looking file at anything but the highest data rate, which defeats the purpose of using these formats. Adobe Media Encoder can hold more than one frame at a time prior to writing the output video file, and this can make all the difference with the right settings. Start with the presets and customize as needed.
Optimize a Project
To finish Section I of this book, let’s take a final look at preferences that haven’t come up previously, memory management settings, and what do to if After Effects crashes.
Setting Preferences and Project Settings
The preference defaults have changed in version CS5 and you may be happy with most of them. Here, however, are a few you might want to adjust that haven’t been mentioned yet:
• Preferences > General > Levels of Undo: The default is 32, which may be geared toward a system with less RAM than yours. Raise it to the maximum value of 99 unless you’re seriously short on RAM.
• Preferences General: Check the options Allow Scripts to Write Files and Access Network or certain scripts won’t work; these are unchecked to protect against malicious scripts, and I’ve never heard of one. Toggle Default Spatial Interpolation to Linear (Chapter 2).
• Preferences > Display: Check all three boxes on any up-to-date system. If you do this, you don’t need to wait for thumbnails to update from some network location each time you select a source file. I prefer it this way because I like to see rendering progress even though it costs processing time, and I have a good OpenGL card so I hardware-accelerate the UI.
• Preferences > Appearance: Toggle Cycle Mask Colors so that multiple masks applied to a layer vary automatically.
Tip
Press Alt+Ctrl+Shift (Opt+Cmd+Shift) immediately after launching After Effects to reset Preferences. Hold Alt (Opt) while clicking OK to delete the shortcuts file as well.
Hack Shortcuts, Text Preferences, or Projects
Some people are comfortable sorting through lines of code gibberish to find editable tidbits. If you’re one of those people, After Effects Shortcuts and Preferences are saved as text files that are fully editable and relatively easy to understand—although if you’re not comfortable with basic hacking (learning how code works by looking at other bits of code) I don’t recommend it. The files are located as follows:
• Windows: [drive]:Users[user name]AppDataRoamingAdobeAfter Effects10.0
• Mac: [drive]:/Users/[user profile]/Library/Preferences/Adobe/After Effects/10.0/
The names of the files are
• Adobe After Effects 10.0-x64 Prefs.txt
• Adobe After Effects 10.0 Shortcuts
These can be opened with any text editor that doesn’t add its own formatting and works with Unicode. Make a backup copy before editing by simply duplicating the file (any variation in the filename causes it not to be recognized by After Effects). Revert to the backup by giving it the original filename should anything start to go haywire after the edit.
The Shortcuts file includes a bunch of comments at the top (each line begins with a # sign). The shortcuts themselves are arranged in a specific order that must be preserved, and if you add anything, it must be added in the right place. For example, if you don’t like the fact that Go To Time was changed in CS3 (apparently to align it with other Adobe applications), search for GoToTime and make your changes to the shortcut in quotes after the = sign; "(Alt+Shift+J)" becomes "(Ctrl+G)" in Windows, "(Opt+Shift+J)" becomes "(Cmd+G)" on the Mac (and lose the Group shortcut until you change it to something else).
Be extra careful when editing Preferences—a stray character in this file can make After Effects unstable. Most of the contents should not be touched, but here’s one example of a simple and useful edit (for studios where a dot is preferred before the number prefix instead of the underscore): Change
"Sequence number prefix" = "_"
to
"Sequence number prefix" = "."
This is the format often preferred by Maya, for example.
In other cases, a simple and easily comprehensible numerical value can be changed:
"Eye Dropper Sample Size No Modifier" = "1"
"Eye Dropper Sample Size With Modifier" = "5"
In many cases the value after the = is a binary yes/no value, expressed as 0 for no or 1 for yes, so if you’re nostalgic for how the After Effects render chime sounded in its first several versions, find
"Play classic render chime" = "0"
and change the 0 to a 1. Save the file, restart After Effects, and invoke Proustian memories of renders past.
Script
![]()
A fantastic script for specifying your own modifier keys called KeyEd Up was developed specifically for After Effects by Jeff Almasol, author of other scripts included with this book. Find it on Adobe After Effects Exchange at http://tinyurl.com/6cu6nq
XML
After Effects CS4 and CS5 projects can be saved as .aepx files. These are identical to use but are written in plain Unicode text; you can edit them with an ordinary text editor. Most of what is in these files is untouchable. What can you do with this format? Mostly, you can use it to locate and change file paths to swap footage sources without having to do so manually in the UI. If you’re handy with scripting, or even text macros, you can automate the process when dozens or hundreds of files are involved.
Close-up: On the Mac: Force a Crash
![]()
When After Effects does crash, it attempts to do so gracefully, offering the option to save before it exits. The auto-save options, if used properly, further diminish the likelihood of losing project data. On OS X, an extra feature may come in handy when the application becomes unresponsive without crashing.
Open Activity Monitor and look for After Effects to get its PID number (Figure 4.19). Now open Terminal, and enter kill –SEGV ### where “###” is replaced by the After Effects PID value. This should cause the application to crash with a save opportunity.
Figure 4.19. The Process ID for the nonresponding application is shown in the left column.

This feature was added for one reason only: scriptability. Anyone capable of writing scripts to, say, swap source files procedurally (and you know who you are) has a method to edit this data without working in the application itself. We all look forward to gaining access to more editable stuff via XML in future versions of After Effects, but for now that’s about it.
Script
![]()
Batch Search-n-Replace Paths by Lloyd Alvarez (http://aescripts.com/batch-search-n-replace-paths/) may save you the need to dig around in an .AEPX file to change footage source locations; it also makes use of regular expressions to make the matching process more sophisticated than what is possible with an ordinary text editor.
Memory Management
Chapter 1 included advice about running After Effects with multiprocessing enabled on a system with multiple cores and a good deal of physical memory. Although more effective handing of memory is the number one addition to After Effects CS5, it doesn’t necessarily mean all of your memory troubles are over forever, particularly if your system is more limited.
If you see your system’s wait icon come up—the hourglass in Windows, the spinning ball on a Mac—that means there is a fight going on somewhere for system resources. In addition to following Chapter 1’s advice to leave memory available for outside applications, you may have to quit any application that is both resource intensive and outside the memory pool managed by After Effects (in other words, any app besides Premiere Pro, Encore, or Adobe Media Encoder).
Script
![]()
Although the RAM cache is less likely to become full or fragmented with 64-bit processing, Throttle-n-Purge by Lloyd Alvarez (http://aescripts.com/throttle-n-purge/) provides a UI panel with a one-button solution to clear all caches and get maximum efficiency out of a preview render (Figure 4.20). It also lets you switch bit depths, which while easily enough done in the Project panel is more obvious here, and it lets you turn multiprocessing on and off without opening Preferences.
Figure 4.20. Throttle-n-Purge exposes controls to help you manage memory usage as well as offering a one-button option to purge all caches (undos and image buffers) and start over.

But overall, the most effective way to improve memory handling on a 64-bit system is to provide the system with more physical memory, since it can be used so much more effectively. As a rule of thumb, 2 GB of RAM per processor core is not a bad guide; you can go below this to, say, 1.5 GB per core, but much lower and your system will be less efficient unless you also limit the number of cores being used (in Preferences > Memory & Multiprocessing).
Conclusion
You’ve reached the end of Section I (if you’re reading this book linearly, that is) and should now have a firm grasp on getting the most out of the After Effects workflow. Now it’s time to focus more specifically on the art of visual effects. Section II, “Effects Compositing Essentials,” will teach you the techniques, and Section III, “Creative Explorations,” will show you how they work in specific effects situations.
Here comes the fun part.