
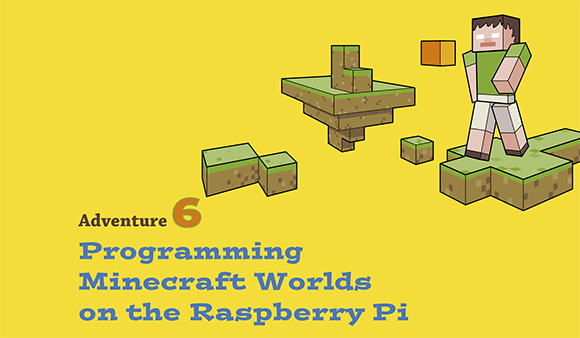
MINECRAFT IS A computer game that allows you to build any computer world you like, by using virtual building blocks (see Figure 6-1). You can let your imagination run riot—there are no limits! The game was created by Markus Persson (who also goes by the gamer tag Notch). Players collect (or mine) blocks from the world around them, using nothing but a trusty axe, while avoiding monsters who might be set on eliminating them. You can learn more about Minecraft and register to play an online demo version at https://minecraft.net.
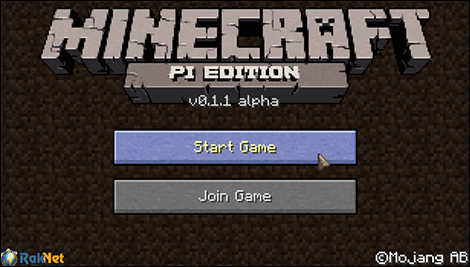
FIGURE 6-1 Minecraft
Getting Started with Minecraft Pi
Minecraft Pi is pre-installed on the Raspbian operating system. You can run it by using the menu system and navigating to Games and selecting Minecraft Pi, as shown in Figure 6-2. It is similar to the Minecraft Pocket Edition. If your version of Raspbian does not include Minecraft Pi, if you are running an older version for example, you will need to follow these steps to download and install it onto your Raspberry Pi.
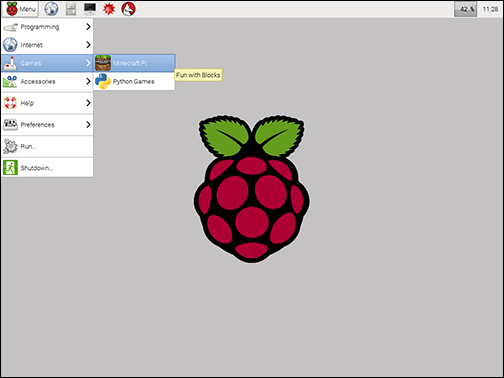
FIGURE 6-2 Opening Minecraft Pi from the Raspbian menu
- Open the LXTerminal by double-clicking the icon on the desktop.
- To download Minecraft, type:
cd ~
wget https://s3.amazonaws.com/assets.minecraft.net/pi
/minecraft-pi-0.1.1.tar.gz --no-check-certificateIt will take a few seconds, depending on your Internet connection speed, for the download to start. A progress bar will appear in the terminal window for you to check how long the download will take, as shown in Figure 6-3. When it has reached 100 percent you can move on to Step 3.
- The file that you have downloaded is a .tar.gz file, an archive file similar to a .zip file, so you need to extract the game files. Type the following code to extract the game files from the .tar.gz:
tar -zxvf minecraft-pi-0.1.1.tar.gz
This command will extract the Minecraft Pi files into your home directory on the Raspberry Pi. You will only need to do this once—to load Minecraft Pi in future, you only need to use Step 4.
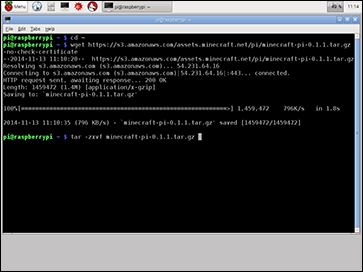
FIGURE 6-3 Minecraft Pi downloading and extraction commands via the LXTerminal on Raspberry Pi
- To run Minecraft Pi, type this line:
minecraft-pi
Run the command minecraft-pi to start the game. You’ll see a screen similar to Figure 6-1.
Minecraft Pi Controls
Clicking Start Game displays a list of Minecraft worlds that you can join. On your first go, however, this list will be empty. Click Create New to generate a Minecraft world in build mode. Minecraft has two modes, survival and build. In build mode, you are able to construct objects without having to avoid monsters who may end your life. Play around a bit and familiarize yourself with the controls for playing Minecraft in build mode, shown in Table 6-1.
|
Table 6-1 Minecraft Pi Controls |
|
|
Key press/mouse movement |
Action |
|
W |
Moves player forward. |
|
A |
Moves player left. |
|
S |
Moves player back. |
|
D |
Moves player right. |
|
Spacebar |
Makes player jump. Tap the spacebar twice to make the player fly. |
|
Tab |
Releases the mouse so you can click on other windows. |
|
Esc |
Returns you to the menu. |
|
Move the mouse |
Allows you to see around the player and point the player in a particular direction. |
|
Left mouse click |
Breaks the blocks around you. |
|
Right mouse click |
Places a block. |
Being able to play Minecraft is one fun aspect of Minecraft Pi, but what is more exciting is being able to use Python code to manipulate the Minecraft environment. Time to dive in.
Your First Minecraft Pi Python Program
Now that you have checked that Minecraft Pi is installed on your Raspberry Pi by running the game, it’s time to see what adventures you can have with code in the Minecraft world. In this project, you will run a Minecraft game and write a Python script from the command line in LXTerminal to test that your connection to the game works. You’ll do this by displaying a message in the game.
- Begin by opening LXTerminal and running Minecraft Pi—if it is not already open—by typing the following lines:
minecraft-pi
- When Minecraft Pi has loaded, click on Start Game and select a world from the list that is displayed. (If you have not yet created any worlds, click Create New to enter build mode, as instructed earlier.)
- Navigate back to the LXTerminal window with your mouse, and open a new tab by clicking FileNew Tab. You need an open tab so that you can type commands into LXTerminal while Minecraft Pi is running.
- To create your first Minecraft Pi program, open the nano text editor by typing this command:
nano testmcpi.py
This will open a text editor from the command line.
- Type the following code into the nano text editor file:
import mcpi.minecraft as minecraft
As in previous Python programs you have created, here you are importing a module that you will need in your program—in this case, the minecraft module. Now type the following command (being sure to use the correct capitalization):
mc = minecraft.Minecraft.create()
This line connects your program to Minecraft and allows you to start interacting with it. Remember, you must have Minecraft running and be in a game for your program to work.
- Next, create a message string using the following code:
msg = "I am starting my Minecraft Pi Adventures"
Then type the following line to post your message to the Minecraft chat window:
mc.postToChat(msg)
- Press CTRL+X to exit, and press Y (for yes) to save what you have written. The message File name to write: testmcpi.py will appear. Press Enter to confirm that you want to write to this file. You will then be returned to the command line in LXTerminal.
- Now run your script by typing the following line in the LXTerminal tab window:
python testmcpi.py
You will see your message displayed in the Minecraft game window open on your screen, as shown in Figure 6-4.

FIGURE 6-4 Your first Minecraft Pi Python program
Using Coordinates in Minecraft Pi
You can see how easy it is to make something interesting happen in the Minecraft game environment using Python code. Minecraft gives the appearance of three dimensions. To achieve this, Minecraft Pi uses x, y and z coordinates to generate a 3D environment, with x representing forward and back, y representing up and down and z representing left and right (see Figure 6-5).
Finding the Player’s Location
To understand coordinates within Minecraft, in this part of the adventure you will find out the current coordinates of your player and then transport her to a different location by changing the coordinates. Begin by writing a program to locate your player.
- In an LXTerminal window, type the following commands to create a new nano text editor file called location.py:
nano location.py

FIGURE 6-5 x, y and z coordinates
- In the new text file, first import the modules you will need in this program by typing the following code:
import mcpi.minecraft as minecraft
import time
mc = minecraft.Minecraft.create()
time.sleep(1)
pos = mc.player.getPos()In the last line, you use the command getPos or get position of your Minecraft player. Next, you want to display that information in the Minecraft chat window so you can see it in the game. To do that, type the following code:
mc.postToChat("You are located x=" +str(pos.x) + ", y="
+str(pos.y) +", z=" +str(pos.z))pos.x will give the x coordinate, pos.y will give the y coordinate, and pos.z will give the z coordinate.
- Press CTRL+X on the keyboard to exit the nano text editor, ensuring that you press y (for yes) and Enter to save your code.
- Run the program by typing the following command:
python location.py
The coordinates for the player’s location are displayed in the chat window (see Figure 6-6).
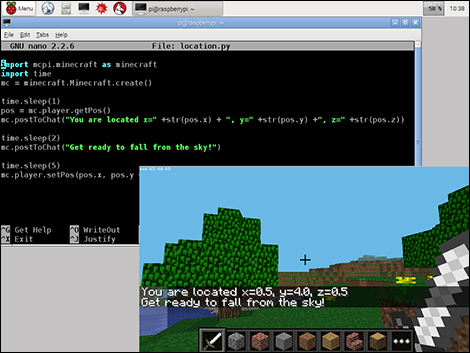
FIGURE 6-6 Using getPos and setPos to locate and move a player in Minecraft Pi
Changing the Player’s Location
Now that you can easily detect your player’s position within Minecraft, why not change her location? Amend location.py by typing nano location.py to open the file and adding the following lines of code at the end of your program:
time.sleep(2)
mc.postToChat("Get ready to fall from the sky!")
time.sleep(5)
mc.player.setPos(pos.x, pos.y + 60, pos.z)
When you run this code, the player will suddenly change position. The last line of code—mc.player.setPos(pos.x, pos.y + 60, pos.z)—adds 60 only to the y axis (up and down). The result is that the player is suddenly transported from her current position to the middle of the sky—and because the player has nothing to stand on, she starts to fall! In the next section, you’ll discover how to give your player something to stand on.
Placing a Block
Traditionally, Minecraft is played by building structures such as shelters, homes and other buildings. In fact, you can build whole cities if you are good at the game and have spent lots of time farming and creating the different levels of material blocks. However, if you use a version of Minecraft that you can manipulate with code, you don’t need to spend hours building a structure; you can simply program it to happen.
- In the LXTerminal window, type the following commands to create a new nano text editor file called placeblock.py:
nano placeblock.py
- You need to import the block module from Minecraft Pi that allows you to use the Minecraft block names. Type the following code into the nano text editor window:
import mcpi.minecraft as minecraft
import mcpi.block as block
mc = minecraft.Minecraft.create()
mc.setBlock(1, 10, 1, block.STONE)The three numbers in the last line refer to the x, y and z coordinates (see Figure 6-5). This is followed by the block type you wish to use—STONE in this example (Figure 6-7). The result in Minecraft Pi will be a single block of stone hanging in the sky above the player.
- Press CTRL+X to exit nano, ensuring that you press y and Enter to save your work. Test your code to see what happens.
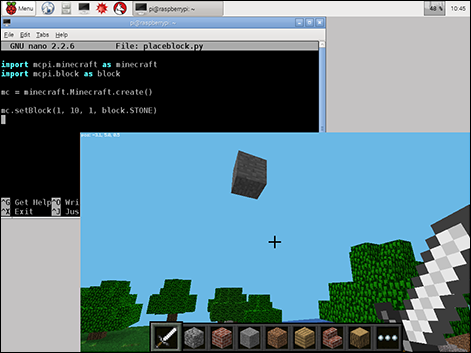
FIGURE 6-7 Using setBlock in Minecraft Pi
Placing Multiple Blocks
Placing one block at a time is still going to be time-consuming and not very helpful if you want to build a bigger structure. But with the addition of one letter, you can place more than one block at a time.
So far, with setBlock you have been using one set of coordinates to tell the game where to place a single block. The setBlocks command (note the added s at the end) works in much the same way as setBlock. You start with a set of x, y and z coordinates that indicate where in the Minecraft world you want the blocks to be placed. Then the second set of x, y and z coordinates represent the number of blocks needed to make the shape you want to create:
setBlocks(x1, y1, z1, x2, y2, z2, blocktype)
For example, to generate a cube you would type:
setBlocks(0, 0, 0, 10, 10, 10, block.MELON)
The first three numbers are the location for where the blocks should be placed. The last three are the number of blocks. So the preceding code would place 10 MELON type blocks on the x axis, 10 on the y axis and 10 on the z axis, forming a cube (see Figure 6-8).
However, if you try to use this script you may not be able to find your cube of melons, as Minecraft Pi will set the blocks from the center location (0, 0, 0) of the world. Depending on the terrain, this could be inside a mountain!
It makes more sense to place the blocks where the player is located, so that you can find a nice empty spot for your cube. To do this, you need to get the player’s position using the following code:
pos = mc.player.getTilePos()
You can then use setBlocks, adding the coordinates of the player’s location to indicate where you would like the blocks to be placed:
mc.setBlocks(pos.x, pos.y, pos.z, pos.x + 10, ![]()
pos.y + 10, pos.z + 10, block.MELON)
You may find that you end up inside this cube because the first set of coordinates is the player’s position! You could change the location coordinates in the same way:
mc.setBlocks(pos.x + 5, pos.y + 5, pos.z, pos.x + 10, ![]()
pos.y + 10, pos.z + 10, block.MELON)
Try this yourself by modifying your existing code, and see if you can get it to work.
Creating a Diamond Transporter
When you are playing Minecraft in build mode, it takes a lot of time to move from one side of the world to the other. You can speed things up by creating a diamond block transporter to whisk you from location to location. To do this, you will use setBlock, getPos and setPos.
- In the LXTerminal window, type the following code to create a new nano text editor file called transporter.py:
nano transporter.py
- Import the modules that you will need:
import mcpi.minecraft as minecraft
import mcpi.block as block
import time - Set up the connection to Minecraft, and post a message to the screen:
mc = minecraft.Minecraft.create()
mc.postToChat("A Transporter Adventure")
time.sleep(5)The time delays are important in this code, so that you can move the player around the Minecraft world before the transporter blocks are placed.
- Place a diamond block as the first transporter location, underneath the player’s position:
transporter1 = mc.player.getTilePos()
mc.setBlock(transporter1.x, transporter1.y - 1,
transporter1.z, block.DIAMOND_BLOCK)
mc.postToChat("1st Transporter created")
time.sleep(2) - Display a message on the screen to tell the player to move, and find the second location where he wants to be able to transport to and from:
mc.postToChat("Find another location in 30 seconds")
time.sleep(30)
transporter2 = mc.player.getTilePos()
mc.setBlock(transporter2.x, transporter2.y -1,
transporter2.z, block.DIAMOND_BLOCK)
mc.postToChat("2nd Transporter created")
time.sleep(2) - Create a while True loop to continually check the player’s position. If the player is positioned on the first transporter diamond block location, her location will be changed to where the second diamond block is located. If the player is positioned on the second transporter diamond block location, her location will be changed to where the first diamond block is located.
while True:
time.sleep(1)
pos = mc.player.getTilePos()
if(pos.x == transporter1.x) and (pos.y ==
transporter1.y) and (pos.z == transporter1.z):
mc.player.setPos(transporter2.x, transporter2.y,
transporter2.z)
if(pos.x == transporter2.x) and (pos.y ==
transporter2.y) and (pos.z == transporter2.z):
mc.player.setPos(transporter1.x, transporter1.y,
transporter1.z)
Figure 6-9 shows the code, and Figure 6-10 shows the diamond transporter in position.
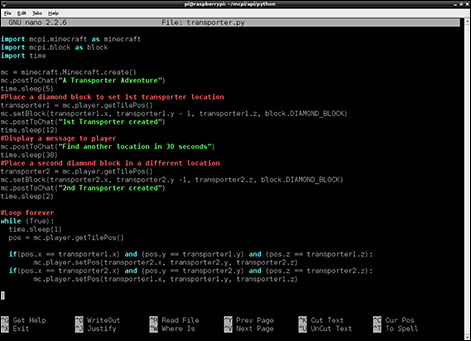
FIGURE 6-9 Code for the diamond transporter program for Minecraft Pi
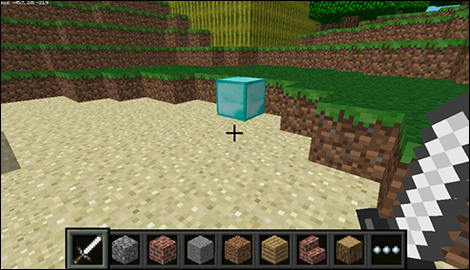
FIGURE 6-10 The diamond transporter, ready for action!
Sharing and Cloning Minecraft Pi Programs
When the Minecraft community meets the Raspberry Pi community, good things happen. Many people enjoy sharing the programs they have made for Minecraft Pi so that you can clone them or make copies of them to use on your own Raspberry Pi. You can find shared Minecraft Pi programs on the Minecraft Pi forum (www.minecraftforum.net/forum/216-minecraft-pi-edition) or the Raspberry Pi forum (www.raspberrypi.org). Many programmers who share their code use an online repository such as GitHub (https://github.com) so that you can easily download their code, try it out, and help improve it. Why not have a go at downloading Martin O’Hanlon’s Minecraft Cannon program? This program places a cannon where your player is positioned in Minecraft Pi. You use the LXTerminal command line to move the cannon up or down before firing blocks. Check out the video at www.youtube.com/watch?v=6NHorP5VuYQ to see it in action.
- Open an LXTerminal window. If your Raspbian image is not up to date you may not be able to install the required applications, so first update your application packages by typing the following command into the terminal:
sudo apt-get update
- Next, type the following line:
sudo apt-get install git-core
This command installs an application called git-core that lets you clone the code that Martin has placed on a repository called github.
- After git-core is installed, type the following code to have git-core create a clone of the Cannon program on your Raspberry Pi:
cd ~
git clone
https://github.com/martinohanlon/minecraft-cannon.git
cd minecraft-cannon - Once you have navigated to the minecraft-cannon directory, type the following command to start the Minecraft cannon program:
python minecraft-cannon.py
Now you’re ready to play with the cannon! To control the cannon, shown in Figure 6-11, you can use the following commands in LXTerminal window:
- start—Start up the cannon
- rotate [0-360 degrees]—Rotate the cannon between 0 and 360 degrees
- tilt [0-90 degrees]—Tilt the cannon upwards between 0 and 90 degrees
- fire—Fire the cannon
- exit—Exit and clear the cannon

FIGURE 6-11 Minecraft Pi cannon
Further Adventures with Minecraft Pi
Minecraft Pi allows you to be really creative. As well as finding programs created by other people, you can find online tutorials to generate things like rainbows, bridges and other games like Snake inside your Minecraft world. Here’s a list to get you started:
- Make a colourful rainbow with this tutorial: www.minecraftforum.net/topic/1638036-my-first-script-for-minecraft-pi-api-a-rainbow
- You can’t go wrong following Martin O’Hanlon’s Minecraft Pi tutorials on his website, Stuff about=“code”: www.stuffaboutcode.com/p/minecraft.html
- Advance your programming skills using Craig Richardson ‘s Python Minecraft Pi Book (http://arghbox.files.wordpress.com/2013/06/minecraftbook.pdf) and API cheat sheet (http://arghbox.files.wordpress.com/2013/06/table.pdf)
- Further develop your Python skills with Adventures in Minecraft by David Whale and Martin O'Hanlon: (www.wiley.com/go/adventuresinminecraft)
|
Minecraft Pi Command Quick Reference Table |
|
|
Command |
Description |
|
cd mcpi |
Changes directory to mcpi. |
|
import mcpi.minecraft as minecraft |
Imports the Minecraft modules. |
|
mc = minecraft.Minecraft.create() |
Connects to Minecraft Pi by creating the Minecraft object. |
|
./minecraft-pi |
Opens Minecraft Pi from the LXTerminal or command line. |
|
pos = mc.player.getPos() |
Returns the players position with floats. |
|
pos = mc.player.getTilePos() |
Returns the players position with integers. |
|
postToChat(msg) |
Posts a message to chat in Minecraft Pi. |
|
setBlock |
Sets a block at coordinates. |
|
setBlocks |
Sets blocks between two sets of coordinates. |
|
setPos |
Sets the position of a player. |
|
wget |
Used to get content, such as an archive file (.tar) from a web server where it is stored. |

Achievement Unlocked: Why dig when you can code with Minecraft Pi?