

THE RASPBERRY PI can be many things—a standalone computer, a games machine and even a music synthesizer. The way we as humans interact with computers has changed over the years. Computers are no longer just devices on which to create text files or play computer games. They are also communication devices, transporters and musical instruments!
Creating music using computers is not a new idea. Computer music has its roots in electronics, and a growing number of musicians are turning to code to create new sounds. Chiptune is a style of music that uses sound chips from old computers and consoles from the 1980s and 1990s, like the Nintendo Game Boy. Pixelh8 (www.pixelh8.co.uk/music/) and 2xAA (http://brkbrkbrk.com) are chiptune artists and computer programmers, who program their music before it is performed. Other computer music programmers prefer to code their music live, feeling the atmosphere around them and responding to it with sound. They are called live coders. The band Meta-eX (http://meta-ex.com) are an example of a live coding group who perform at events, creating their code live on a big screen so the audience can see it as it happens (see Figure 7-1).
Your Raspberry Pi has a headphone/speaker jack port so that you can listen to sounds. You also have a keyboard and mouse that allow you to type code. In this adventure, you will put those features to good use by creating music with code using an application called Sonic Pi (http://sonic-pi.net). You will become a computer music programmer!
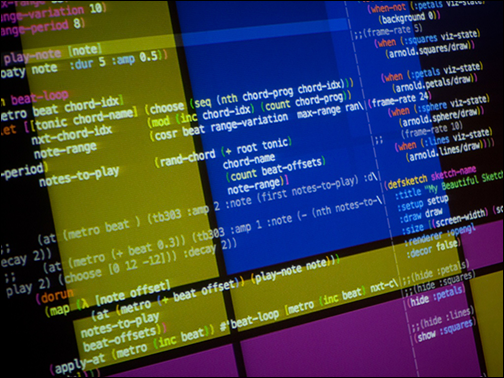
FIGURE 7-1 Live coding band Meta-eX’s screen during a performance
Getting Started with Sonic Pi
To create music in this adventure you will use an application designed to be used on the Raspberry Pi called Sonic Pi 2. Sonic Pi was created by Dr Sam Aaron, a live coder of music, and is based on his more complex music system called Overtone. Sonic Pi is already installed automatically as part of the operating system, Raspbian. However, improvements are always being made to Sonic Pi, meaning that you may want to update and upgrade to the latest version before you begin the tutorials in this chapter.
- In an LXTerminal window, first type the following command to update your application packages:
sudo apt-get update
- Next, type the following command to download and install Sonic Pi.
sudo apt-get install sonic-pi
Once Sonic Pi is installed, it will appear on the main menu under Education. If it does not, simply reboot your Raspberry Pi and it will appear. Figure 7-2 shows the installation command being executed.
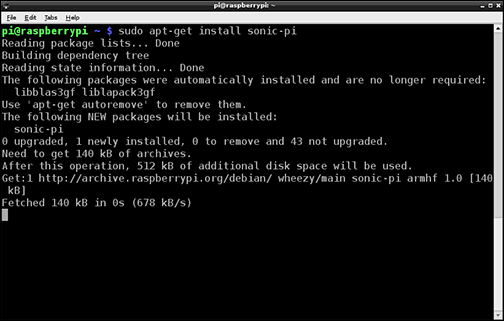
FIGURE 7-2 Using apt-get install to update and install Sonic Pi
The Sonic Pi Interface
Once Sonic Pi is installed, it will appear on the main menu under Programming (see Figure 7-3). Sonic Pi is an application designed and created especially for the Raspberry Pi, which you may not have encountered before. You’ll find it helpful to get to know the interface and what each panel is used for first, before creating your music. You may need to resize the application window to see the whole interface.
The elements of the Sonic Pi interface are identified in Figure 7-3:
- The programming panel—The main panel in Sonic Pi, on the left side. This is where you type your code to make music.
- The output panel—The upper panel on the right side. This is where you will see information about your program as it runs.
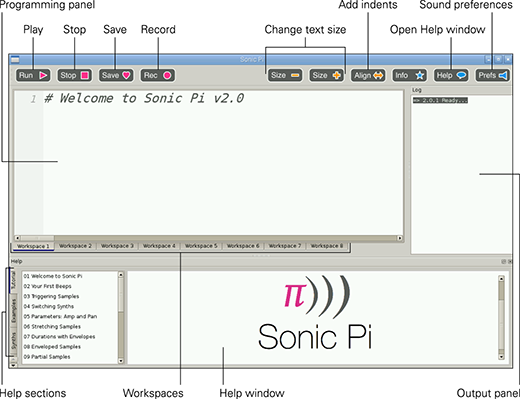
FIGURE 7-3 The Sonic Pi interface
- Workspaces—You can use different workspaces to create and save your code. In this adventure, you will use a different workspace for each exercise. You can move between workspaces using the tabs along the top of the programming panel.
- Play and Stop buttons—Click these buttons to start and stop your music scripts.
- Save button—Sonic Pi will automatically save what you write in the programming panel. However, if you want to save your code into a text file to store it elsewhere, you can use the Save button at the top of the application to do so.
- Record button—This button allows you to create a sound file recording of your coded music for playback on a media player.
- Size and alignment buttons—You can change the size of the text to make it bigger or smaller, and also align your code automatically to make it easier to read and spot any errors.
- Help—Sonic Pi 2 has built-in information about the code that you can use. It also has some example programs that you can play with.
- Preferences—You are able to change the level of volume with this button and force the sound to go to your headphones rather than your monitor or vice versa.
Creating Your First Sounds with Sonic Pi
Now that you are familiar with the Sonic Pi interface, it’s time to start making some noise! In this first project you’ll learn how to play single notes, chords, how to add timings, and play Twinkle Twinkle Little Star.
- To play your first note, open Workspace 1 and type the following:
play 60
Now click the Play button in the top left hand side of the application. Not only will you hear your note playing, but you will see the following information displayed in the output panel, as shown in Figure 7-4:
synth :beep, {note: 60}
- Change your line of code so that it looks like this:
pley 60
Click the Play button. You will not hear anything, as Sonic Pi found a syntax error in your code because you misspelled play. You will see an error has appeared (as in Figure 7-5). Sonic Pi is letting you know there is an error.

FIGURE 7-4 Creating sounds using Sonic Pi
- Fix the error by changing pley to play. Now try playing a few notes one after the other in sequence by typing the following underneath your first note:
play 67
play 69Click the Play button. It will sound like the notes are being played almost at the same time, like a chord. This is no good if you want to play Twinkle Twinkle Little Star, as all music is played to a beat. You need to introduce delays between each of the notes in the sequence.
- Add delays to your code by typing sleep 0.5 in between each of the play instructions like this:
play 60
sleep 0.5
play 67
sleep 0.5
play 69Click the Play button. You will hear the notes play with half a second delay between them.
The numbers used after play in Sonic Pi represent notes. Each note is a key on a piano (http://computermusicresource.com/midikeys.html). The play 60 is actually a C, and play 69 is a G. These numbers are MIDI keyboard note numbers.
The numbers used after sleep represent timings: 1 is a second, and 0.5 is half a second.
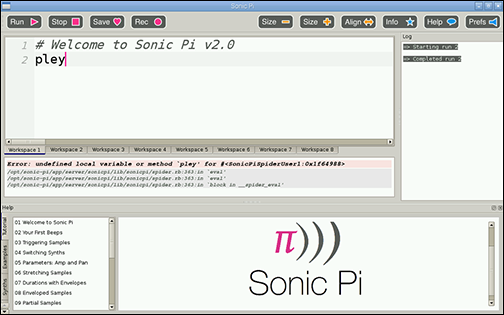
FIGURE 7-5 A syntax error in Sonic Pi
Twinkle Twinkle Little Star
You have the building blocks to generate a simple tune with notes C, G and A—or in this case 60, 67 and 69—along with delays in between those notes using sleep (see Figure 7-6).
Amend your code so that it looks like the following, and click Play:
play 60
sleep 0.5
play 60
sleep 0.5
play 67
sleep 0.5
play 67
sleep 0.5
play 69
sleep 0.5
play 69
sleep 0.5
play 67
Remember that Sonic Pi will run through each line in your code in sequence. You could go on and write the next part of the tune, but you will end up with a long list of play and sleep, which could get confusing to read, especially if you mistype a line and create a bug.
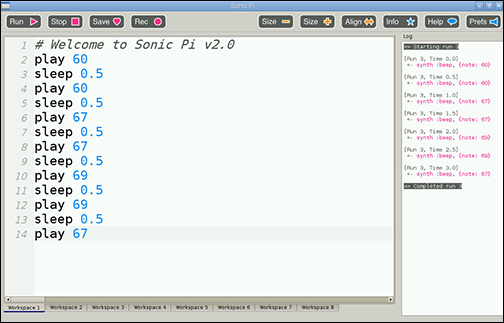
FIGURE 7-6 Using play and sleep to play Twinkle Twinkle Little Star in Sonic Pi
It makes more sense to rewrite this code using a data structure. In this case you can use a list like the ones you created in Python in Adventures 4 and 5. To create a list in Ruby, you use square brackets and separate the items in the list with commas in much the same way as in Python.
Type the following example list into Workspace 2 and click Play:
play_pattern []
You will notice that the same tune will play, but the delays between the notes are quite slow. To speed up the timing you can set the beats per minute (BPM). At the top of Workspace 2, above the line of code you have just written, type this line:
use_bpm 150
Click Play and the delay between the notes will decrease, giving the effect of speeding up the tune. The value 150 in this code is the beats per minute (BPM).
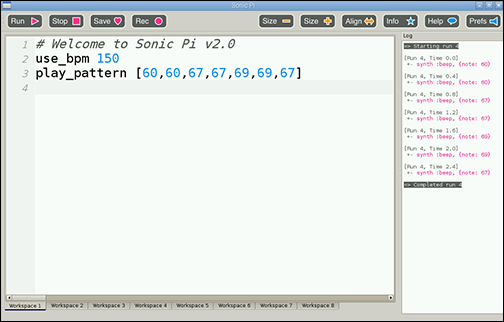
FIGURE 7-7 Using a list in Sonic Pi to play notes
Repeating Lines in a Loop
Musical tunes are sometimes made up of repeating notes or phrases. For example, in Twinkle Twinkle Little Star, the third and fourth lines, “up above the world so high” and “like a diamond in the sky”, use the same notes. In your Sonic Pi code you could type these lines out twice, like this:
play_pattern [67,67,65,65,64,64,62]
sleep 0.5
play_pattern [67,67,65,65,64,64,62]
Or instead you could use a loop:
2.times do
play_pattern [67,67,65,65,64,64,62]
sleep 0.5
end
All the code between do and end is repeated; in this case, 2.times tells the program to play it twice. You will see that the colour of the words do and end have automatically changed to gold and are bold, as in Figure 7-8. Programs that use colours for syntax highlighting in this way make it easier for you to read your code. In this example it is important that the code you want to repeat is between do and end, so Sonic Pi highlights those words to show you this.
You could change the value 2 to make the loop repeat more times. For example, if you wanted to play the line five times you would type 5.times do, followed by the code you want repeated, and then end. If you want to loop sections of code forever, then you would type loop do, followed by the code, and then end.
Your Twinkle, Twinkle tune might not sound the way you expect it to sound. Can you figure out what you may need to add to improve it?
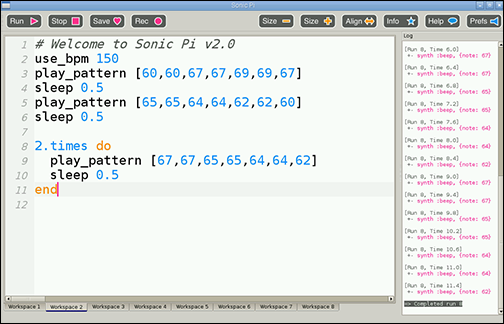
FIGURE 7-8 Using repeating loops in Sonic Pi
First Electronic Track
It’s time to take a step up from nursery rhymes and start making some cool-sounding electronic beats using Sonic Pi. In this project you will create a complete track in the style of the electronic artists mentioned earlier. Use a new Workspace to try the following exercises and adapt them to create a cool tune.
Using Different Synthesizer Sounds
So far you have used the default Sonic Pi synthesizer sound, called beep. You can change the sound by using the use_synth command, followed by the name of the synth (fm, in this example) after a colon symbol:
use_synth :fm
This line of code must be placed above the instructions to play a note, a pattern or a sleep, like this:
use_synth :fm
5.times do
play 49
sleep 1
end
use_bpm 150
use_synth :beep
2.times do
play_pattern [67,67,65,65,64,64,62]
sleep 0.5
end
Figure 7-9 shows the use of different synths in Sonic Pi.
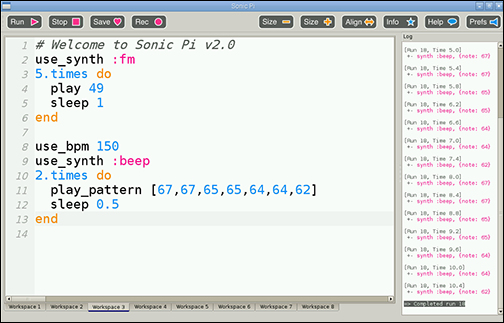
FIGURE 7-9 Using different synthesizer sounds in Sonic Pi
In this example, you would hear the MIDI note 49 play five times using the fm sound, and then the list of notes played twice using the beep sound.
For a list of all the different synths in Sonic Pi 2 that you can try out, click on the Help button and then select Synths from the side menu.
More sounds will be added to the Sonic Pi application in time, so be sure to watch for them and keep your Pi application packages updated using sudo apt-get update.
Using Prerecorded Samples
Not only can you create music in Sonic Pi using single notes, you can also create music with samples. Samples are pre-recorded sounds or tunes that you can bring into your code. This is a really simple way to make your music track sound amazing!
To use a sample, you need to add the code sample :name of sample in the sequence of your music program where you want it to play.
In this example, misc_burp is the name of the sample:
loop do
sample :misc_burp
sleep 1
end
There are lots of samples included with Sonic Pi to try. To find the names of them, click on Help in the top menu, followed by Samples on the left hand side of the Help window (see Figure 7-10).
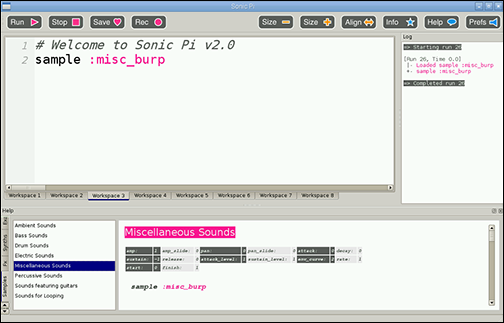
FIGURE 7-10 Finding samples from the Help window
There are lots of fun ways in which you can use samples. For example, you can change how the burp sounds. Add the following bold code to your code:
n = 2
loop do
n = n – 0.2
sample :misc_burp, rate: n
sleep 1
end
Now click Play to hear how the burp sounds now.
In this example, to begin with a variable has been used to store a value of 2, which is then modified inside the loop each time it is played. This value affects the rate at which the sample is played. The default rate at which samples play is 1. Each time around the loop, 0.2 is subtracted from the sample rate, changing the way it sounds. You can do this with any of the Sonic Pi samples.
Creating a Surprising Tune
So far, you have run your music program in sequence and then using a repeating loop. To add an element of fun, you could add a junction using a conditional. You used conditionals in Adventures 3 and 5 in both Scratch and Python. Setting conditions allows different paths to be followed, as if you were at a junction.
Type the following example script into your current Workspace to try it out (see Figure 7-11):
10.times do
if rand < 0.5
play 42
else
play 30
end
sleep 0.25
end
The first line is the start of the repeating loop. Everything after do and before end will be played 10 times. The second line is the start of the conditional statement. The condition used here is like flipping a coin: rand stands for random, and it will return a random value between 0 and 1. If the value returned is less than 0.5 then this statement is true and the midi note 42 will be played. If the value returned is not less than 0.5, then the statement is false and MIDI note 30 will be played instead. Only one of the play steps will be run. To complete the condition, end is used. Each time the loop plays, a new value for rand is generated.
Using “rand” to Play Random Notes
You can use rand in other interesting ways outside of a conditional too. For example, you could use it to play a random note in a sequence.
Underneath the conditional sequence, after the final end line, type the following:
3.times do
play 60 + rand(10)
sleep 0.5
end
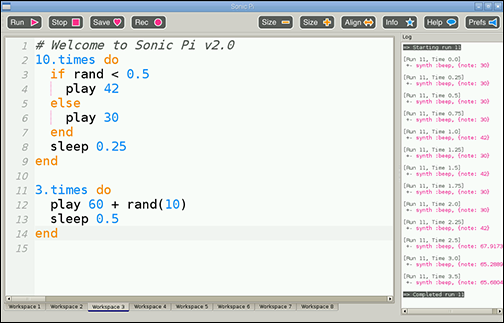
FIGURE 7-11 Using conditionals and random in Sonic Pi
The first line is the start of the repeating loop. Everything after do and before end will be played three times. The next line uses a calculation to determine what note it will play. The code play 60 + rand(10) will play a random note between 60 and 69 because you are adding a random number between 0 and 10 to 60 to make a random note each time; for example, 61, 68, 63. Changing the value of play 60 sets the lowest note, whilst changing the value of rand(10)changes the range of the highest note.
This will make the music sound more interesting, especially if it is inside a loop, as each time it is played a different note could be heard between the MIDI note numbers you specify.
Using Algorithms
You don’t always need to write brand new lines of code to add functionality to your programs. You can use built-in algorithms instead, as in this code:
play_pattern [60,72,65,80].sort
This code is an example of a sorting algorithm you can use in Sonic Pi. When the program is run, the algorithm will sort the numbers in the list into ascending order from lowest to highest.
You can also use .reverse to reverse the numbers in a list and .shuffle to randomly shuffle the numbers in a list as shown in the following code:
use_bpm 150
loop do
if rand < 0.5
play_pattern [60,62,65]
else
play_pattern [60,62,65].reverse
end
sleep 0.125
end
In this code, shown in the Sonic Pi interface in Figure 7-12, .reverse has been used inside a conditional, so that if the random value returned by rand is less than 0.5 then the notes 60, 62 and 65 will play in order. If any other value is returned then the notes will be played in reverse.
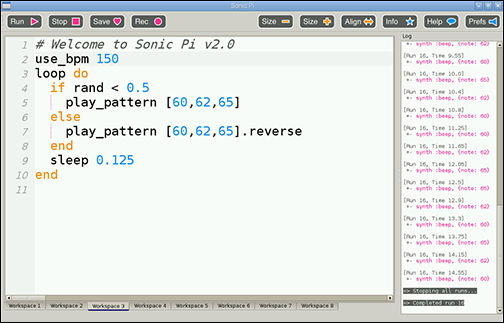
FIGURE 7-12 Using algorithms to change the order of notes in lists
Running Two Scripts at the Same Time
Electronic synthesized music usually has a repeating beat that you can nod your head or dance along to, with a tuneful melody playing at the same time. This is similar to the way pianists typically play with two hands on a piano. One hand plays one set of notes of a song, usually in a lower octave, while the other hand plays a different set of notes.
In Sonic Pi you can use threads to run more than one script simultaneously, in much the same way as you can do in Scratch. To run multiple tunes at the same time, encase the first tune between in_thread do and end. For example:
in_thread do
loop do
sample :drum_heavy_kick
sleep 0.5
end
end
Underneath, write a second tune, as in Figure 7-13. Although this section of code is beneath the first in sequence, it will be played at the same time as the first thread, just as two hands can play the piano simultaneously.
use_synth :tb303
20.times do
play_pattern [49,69,60]
end
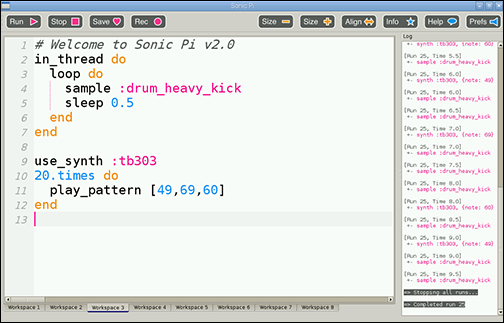
FIGURE 7-13 Playing multiple tunes at the same time using threads
Adding Effects
Modern synthesizers have the ability to add effects to sounds. Sonic Pi is no different in that you are able to add studio effects such as reverb, echo, and distortion to your code.
To use an effect on your code, or section of your code, wrap it with with_fx :name of effect do at the start and end at the bottom like this:
with_fx :reverb do
sample :guit_e_fifths
end
You are also able to add effects on top of effects, as long as you wrap with do and end. Here is an example:
with_fx :reverb do
with_fx :distortion do
sample :guit_e_fifths
end
end
Play around with some effects and add them to your music track. A list of effects that you can use can be found in the Help window, under the subheading fx.
Make a Recording of Your Music
By now you will have a music track that you want to listen to on other devices, or that you want to share with friends and family. You could save your code in a text file by clicking on the Save button and then sending it to other people for them to copy into Sonic Pi and play. Alternatively, you can create a recording of how the music sounds.
With a workspace open displaying the code that you have written to make your music track, click on the Record button, quickly followed by the Play button. Once your music has finished, press the Record button again to stop the recording. You will then be asked to name your recording and save it. It will be saved as a .wav file, which is a type of sound file that you can play on computing devices (see Figure 7-14).
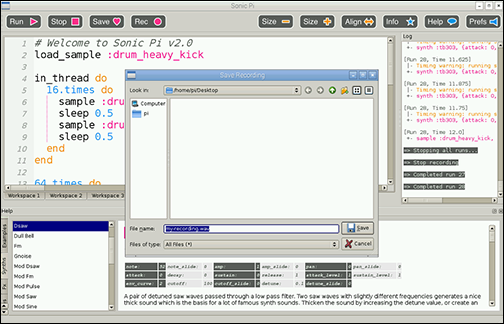
FIGURE 7-14 Saving your coded music as a sound file
Further Adventures with Sonic Pi
If you have enjoyed learning how to make music using Sonic Pi and the programming language Ruby, you can continue having fun with it by looking at these resources:
- Sonic Pi website (http://sonic-pi.net)
- Kids Ruby (www.kidsruby.com)
- Live Coding Music (http://toplap.org/category/music)
- Official Ruby Documentation (www.ruby-lang.org/en)
- Sonic Pi: Live & Coding (http://www.sonicpiliveandcoding.com)
|
Sonic Pi Command Quick Reference Table |
|
|
Command |
Description |
|
in_thread do |
Runs any code between do and end at the same time as another in_thread block. |
|
play x |
Plays note x. |
|
play_pattern [60,60,67,67,69,69,67] |
Plays a pattern of notes inside a list. |
|
rand |
Returns a random number. |
|
.reverse |
An algorithm that reverses the order of notes in a list. |
|
.shuffle |
An algorithm that shuffles the order of notes in a list. |
|
sudo apt-get install sonic-pi |
Downloads and installs the Sonic Pi application from the Raspberry Pi command line. |
|
with_synth "fm" |
Sets the synth sound; in this example, the fm sound. |
|
use_bpm |
Sets the speed at which notes inside a list will be played. |
|
x.times do |
Runs any code between do and end x number of times. |

Achievement Unlocked: Head bopping, toe tapping, creator of coded computer music with Sonic Pi!