
SUPPOSE YOU COULD pick up a turtle, dip his tail into coloured ink, place him on a piece of paper and make him walk around so that his tail paints a spiral shape, a pentagon or a noughts and crosses grid? This adventure introduces you to different ways that you can create shapes or line drawings using code.
You’ll use a module called Turtle Graphics that works by directing a cursor (or turtle) around the screen using movement instructions; see an example of the result in Figure 4-1. This movement leaves a colour trail like a pen, which means you are able to program a computer to draw. Turtle Graphics was originally a feature of the programming language LOGO (Logic Oriented Graphic Oriented), which was designed to teach young people how to program using a logical sequence of steps by means of an onscreen cursor called a turtle. LOGO continues to be a very popular way to learn logic and sequencing in computer programming. Both Scratch and Python include turtle modules that can be used to create shapes, drawings and patterns.
This adventure draws on many of the computing concepts you have already used in previous tutorials in this book, such as sequencing, variables and loops, to create shapes and spirals in both Scratch and Python programming environments on the Raspberry Pi.
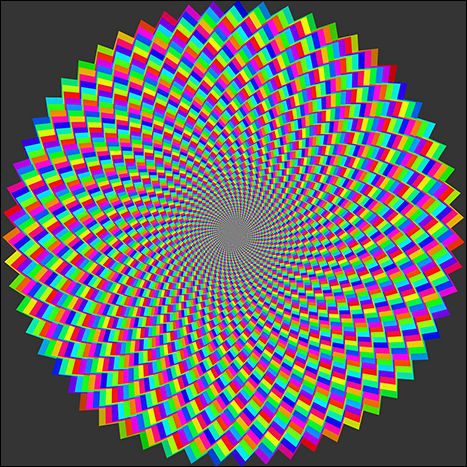
FIGURE 4-1 An example of programming art on the Raspberry Pi
Scratch Turtle Graphics
In this part of the adventure, you learn to use the basic features of Turtle Graphics in Scratch by writing a script that turns any sprite into a “pen” to draw lines and shapes on your stage.
Using Pen Down and Pen Up
The pen down and pen up blocks instruct the sprite to start and stop drawing, in the same way as you touch your pen to paper to draw a line and then lift it.
- Open Scratch as you did in Adventure 3 by using the main menu to select Programming
 Scratch. Once the application has loaded, maximise the size of the stage by clicking the Switch to Full Stage icon above the stage on the right hand side of the screen.
 - You can use the default Scratch Cat sprite as your “turtle”. However, you may find it easier to give directions to the sprite if you have a bird’s-eye (top-down) view. To change the sprite to a bird’s-eye view of the Scratch Cat, right-click the Scratch Cat sprite in the Sprites palette and select Delete from the menu. Next, click Import New Sprite and browse to select Cat2 inside the Animals directory. (Refer to Figure 3-3 from Adventure 3 for a reminder of how the Scratch interface is set up.)
- Remember when starting any script in Scratch you need a trigger, so select the When
 clicked control block and drag it onto the Scripts tab of the turtle sprite.
 - Next add the pen down block from the Pen blocks palette. This will begin the drawing.
- Add the motion block Move 0 steps and change the value to 100.
- Finally add the pen up block to end the line drawing. Figure 4-2 shows the result.
- Select FileSave As to name and save your file.
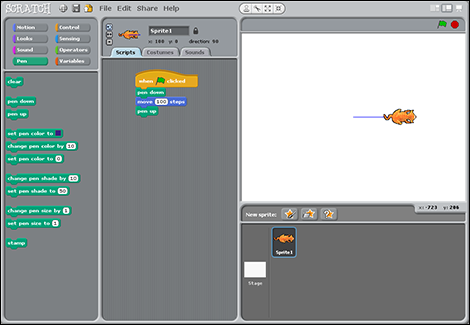
FIGURE 4-2 Using pen down and pen up to draw a line in Scratch
Drawing Simple Shapes
Now draw a pentagon using the script that you already created, by using the following steps.
- Add the motion block turn 15 degrees underneath the move 100 steps block and change the value from 15 to 72.
- So far, the script will have drawn only one side of the five-sided pentagon shape. You could add five more move and turn blocks to the sequence, or you could just add a loop to repeat, or iterate, the instruction five times. Add the control block repeat under the pen down block to contain the motion blocks and change the value to 5 (see Figure 4-3).
- Click the green flag to test that your turtle will draw a pentagon.
- Click FileSave As to save your changes.
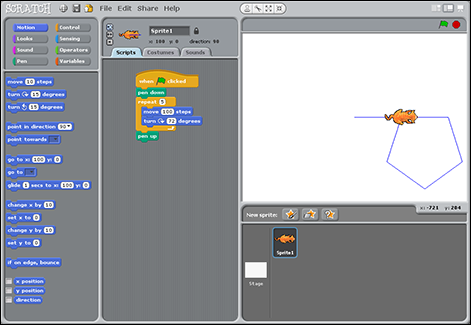
FIGURE 4-3 The Turtle pentagon script in Scratch
Using “clear” and Setting a Start Point
You may have noticed that every time you press the ![]() button, the image you have just drawn remains on the screen. This can be frustrating when you are testing scripts. To ensure you have a clear stage every time you run a script, add the clear block from the pen palette underneath the starting control block When
button, the image you have just drawn remains on the screen. This can be frustrating when you are testing scripts. To ensure you have a clear stage every time you run a script, add the clear block from the pen palette underneath the starting control block When ![]() clicked, as shown in Figure 4-4. This block tells the program to remove the previous action before proceeding.
clicked, as shown in Figure 4-4. This block tells the program to remove the previous action before proceeding.
You will also notice that the turtle begins its drawing wherever it is located. This can affect your drawing, and part of it may end up offscreen if the turtle is positioned too close to the edge of the stage. To avoid this, you can add the motion block go to x: 0 y:0 to set the start point of the pen, just like you did in Adventure 3 for the Adventurer sprite in the final game project. Remember that Scratch uses x and y coordinates, with x:0 and y:0 being the middle of the stage. You can also set the direction that the sprite faces before it draws your shape by using the motion block point in direction 90 after the start coordinates. Figure 4-4 shows these blocks added to the script.
Using Variables Instead of Values
It is more logical to set variables for values that you wish to use several times in programming. In your pentagon drawing, you used values for the length of the side of the shape (100 steps), the angle of the turn (72 degrees) and the number of sides (repeat 5). In this part of the project, you create variables that will make it easier to create similar shapes in the future.
- In the blocks palette, click VariablesMake a Variable. You need to make three variables, called Number_Sides, Angle and Side_Length.
- Drag the three new variable blocks onto the script and set the value of Number_Sides to 5, Angle to 72, and Side_Length to 100.
- Underneath the variables blocks, add your simple shape script, but now instead of the values that you typed into the boxes, add the variable names (see Figure 4-4).
- Now that you are using variables, you no longer need to calculate the angle of rotation. Instead, you can set the Angle variable to divide 360 (the number of degrees in a circle) by the number of sides that you set. To do this, drag the operators block 0 / 0 and replace the value 72 with it. Then type 360 into the left hand box, and drag the variable block Number_Sides into the right box.
- If you change the number of sides to 6, the script will draw a hexagon; if you change the number of sides to 4, it will draw a square, and so on.
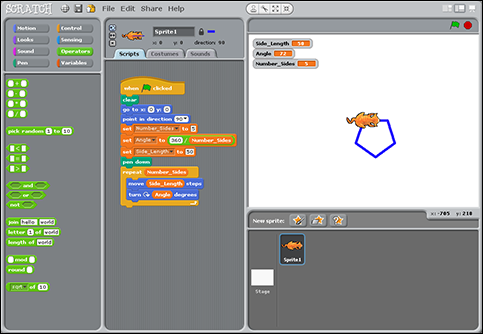
FIGURE 4-4 Using variables instead of values in Scratch
Changing the Size and Colour of
the Pen
To make your drawings look more interesting, you can also change the colour of the pen and the thickness of the line.
- Add the pen block set pen colour to to your pentagon script, after the point in direction 90 block and before the repeat block.
- Click on the coloured square and use the eyedropper tool to select the shade you want to use from the colour palette.
- You can also use the set pen size to block to change the thickness of the line. The higher the value you set, the thicker the line will be. Add this block to the script under the set pen colour to block and before the repeat block, and change the thickness of the pen line used in the pentagon script to 5.
- Click the green flag to run the script. Figure 4-5 shows the results.
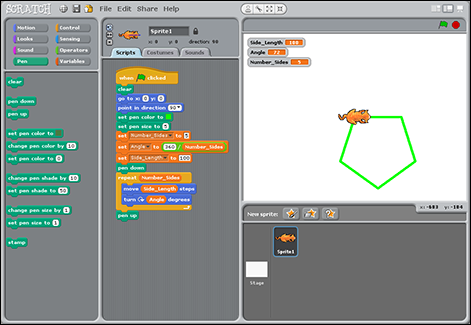
FIGURE 4-5 Setting the colour and size of the pen in Scratch
Creating Spiral Patterns
Once you have mastered drawing a single shape, you can start to think of ways to repeat the shape over and over to make a spiral pattern.
Add to the pentagon script a repeat control block and a turn degrees block, so that it looks like Figure 4-6.
To make your spiral look more colourful, you can add the pen block Change pen shade by 10 underneath the motion block turn 15 degrees. This will change the colour of the pen after each pentagon shape has been drawn. Figure 4-7 shows the final script and the result.
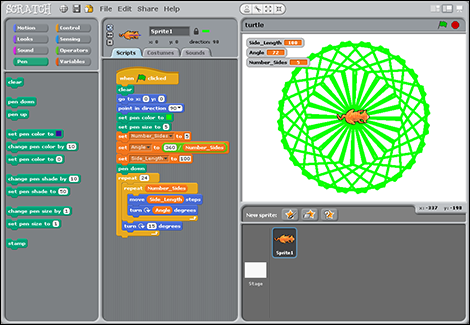
FIGURE 4-6 Creating repeating pentagon spirals
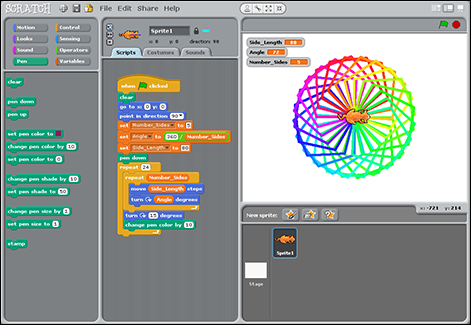
FIGURE 4-7 The results of adding the Change pen shade by 10 block
Using User Input to Determine the Number of Sides
It is always more fun to allow a user to interact with a program you have created. In your turtle script, you can ask a user to set the value for the number of sides a shape in the spiral can have.
- Add the sensing block ask What’s your name? And wait underneath the start point blocks and before the set variable blocks.
- Change the question to “How many sides would you like your shape to have?”
- Add the sensing block answer to the set Number_Sides block, where you normally type the value. Your script should look like the one shown in Figure 4-8.
- Now run your script. It will ask the user how many sides she wants before it draws the spiral.

FIGURE 4-8 Adding user input to a turtle spiral script in Scratch
Python Turtle Graphics
This section gives you a quick taste of the Python programming language. Python includes a turtle module that you can use to create shapes and spirals in a similar way to Scratch. In this tutorial, you use the turtle module as an introduction to writing code in Python.
In Adventure 5, you will get a more thorough introduction to the Python programming language, the IDLE programming environment, and Python functions and modules. In this adventure, you can just follow along with the instructions, and you will begin to see how the Scratch blocks correspond to Python coding.
Introducing Python Modules
As you learn more about programming and continue to write code, you will discover that many of the programs you write include similar tasks and require similar blocks of code. To avoid the necessity of rewriting the same code over and over, most programming languages include reusable blocks of code, called modules. Python has a large number of modules containing useful code that you can reuse. You will learn more about modules in Adventure 5.
In this adventure, you use the Python turtle module to create graphics.
The IDLE Environment and the Interpreter Window
To use Python, you need access to the programming environment IDLE 3. To open IDLE 3, click on the main menu and select Programming![]() Python 3, as shown in Figure 4-9. You can type commands directly into the IDLE window after the prompt, which is represented by three >>> characters. You type a line of code and then press Enter to run it. This window is referred to as an interpreter (or a shell), as it understands the language you are using, in this case Python, and interprets the code one line at a time.
Python 3, as shown in Figure 4-9. You can type commands directly into the IDLE window after the prompt, which is represented by three >>> characters. You type a line of code and then press Enter to run it. This window is referred to as an interpreter (or a shell), as it understands the language you are using, in this case Python, and interprets the code one line at a time.
You will learn more about the IDLE and IDLE 3 programming environments in the next adventure.
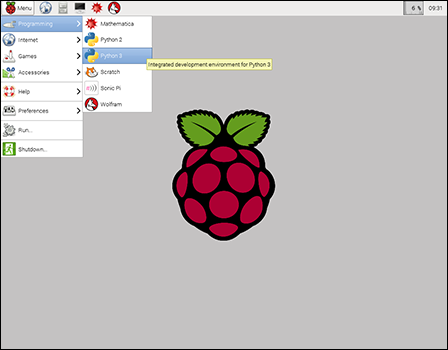
FIGURE 4-9 Opening IDLE 3 from the application launcher on the Raspberry Pi
Using the Turtle Module in Python
In the first part of this project, you will use the IDLE 3 interpreter, or shell, to add the turtle module for use in Python, and write the code to create a shape.
- To use a module within a Python program, use the Python key word import followed by the name of the module. In the window, type the following line after the >>> prompt to import the turtle module:
import turtle
Now press Enter on your keyboard to get a new prompt.
- At the new prompt, type the following command, and then press Enter again:
alex = turtle.Turtle()
This command opens the Turtle Graphics window, with an arrow cursor in the centre. The arrow cursor represents the turtle, whose movements will create your drawing.
The = symbol in Python assigns a name on the left side to whatever is on the right side. This makes it easier to refer to it when writing lots of code. I have used the name alex but you can use any name.
You can change the arrow to a turtle shape, as shown in Figure 4-10, by typing the following code at the prompt:
alex.shape("turtle")
- Just like in Scratch, you can create a pentagon shape by moving so many steps and turning so many degrees. Type in the following code, pressing Enter after each line:
alex.forward(100)
alex.left(72)
These lines tell the turtle to move forward 100 steps and then turn 72 degrees to the left. How many times would you need to type these two lines of instructions or code into the Python shell to draw a pentagon? Continue repeating these lines until you have created the pentagon. Figure 4-10 shows the final code and the completed shape.

FIGURE 4-10 Drawing a pentagon in Python Turtle Graphics
You cannot save this code because you wrote it directly into the Python interpreter window or shell so that you could see it working instantly. In the following sections, you will type your sequence of steps for the turtle to follow in a text editor window.
Using a Text Editor
As you begin to create more complex programs, it will become tiresome to type the commands straight into the Python interpreter or shell window. It makes more sense to type all your code into a text file before running it, using Python 3.
To open the text editor, click File![]() New Window from the menu at the top of the Python 3 interpreter or shell. Type in all the code that you typed into the interpreter in the preceding section, and save the new file to your Documents directory on your Raspberry Pi as FirstTurtle.py (see Figure 4-11). You can run the script by clicking Run
New Window from the menu at the top of the Python 3 interpreter or shell. Type in all the code that you typed into the interpreter in the preceding section, and save the new file to your Documents directory on your Raspberry Pi as FirstTurtle.py (see Figure 4-11). You can run the script by clicking Run![]() Run Module from the text editor toolbar.
Run Module from the text editor toolbar.

FIGURE 4-11 Using the text editor to create and save files
You should use the text editor for the remainder of this adventure.
Using “for” Loops and Lists
In your Python code so far, you have repeated the length of the line and the angle to make a pentagon shape by writing them in sequence. Repeating sequences is a common practice in computer science. You can make this code more efficient by writing the sequence once and then looping it five times. You have used looping before in Scratch, when you used the forever block to make an action continue repeating. As you learned in Adventure 3, each repeated instance of the looping code lines is called an iteration.
To practice looping code, open a new text editor window and type the following code, saving the file as FirstTurtle2.py.
import turtle
alex = turtle.Turtle()
alex.shape(“turtle”)
Next add a for loop:
for i in [0,1,2,3,4,]:
alex.forward(100)
alex.left(72)
This code says, “for each instance (i) in the following list, move alex forward 100 steps and then turn left 72 degrees”.
When you have finished typing the code, run it by selecting Run![]() Run Module.
Run Module.
The for statement will repeat forward and left five times, one time for each value in the list. A list is represented in Python by square brackets. Numbered lists begin at 0 rather than 1. If you had written 0,1,2,3, inside the square brackets to form a list, then only four sides of the pentagon shape would be drawn. Likewise if you had written 0,1,2,3,4,5, then six sides of the pentagon shape would be drawn, which is one side too many! Have a go yourself to see how numbering inside Python lists work.
By using a loop to repeat a sequence of code, you have saved yourself a number of lines of code. By using iteration in your program you are thinking like a computer scientist.
Lists can contain more than numbers or integers. For example, they can contain information to change the colour of the turtle pen.
Amend your Python pentagon code to look like the following, making sure to include the letter a before color:
import turtle
alex = turtle.Turtle()
alex.shape("turtle")
for aColor in ["red", "blue", "yellow", "green", "purple"]:
alex.color(aColor)
alex.forward(100)
alex.left(72)
Save the file as FirstTurtle3.py and run the module. You will now have a more colourful pentagon shape, as shown in Figure 4-12.
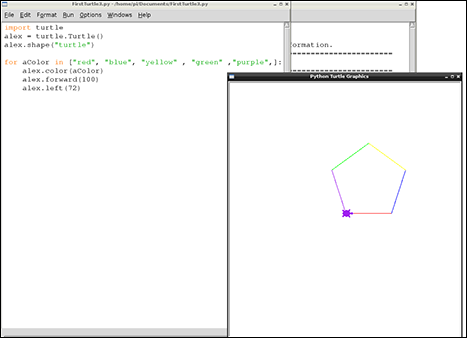
FIGURE 4-12 Using loops and lists to create turtle shapes in Python
The “range” Function
In the last few steps you used a list of numbers or integers and then colours to loop the turtle sequence in Python. Using lists is a very common coding task, especially if you are looping steps a number of times. It is so common that there is a Python function that you can use instead, the range function.
In a new text editor window, type the following code and save it as FirstTurtle4.py. When you have finished typing the code, select Run![]() Run Module to see the code in action (see Figure 4-13).
Run Module to see the code in action (see Figure 4-13).
import turtle
alex = turtle.Turtle()
alex.shape("turtle")
for i in range(5):
alex.forward(100)
alex.left(72)
The range function in this program creates a list of numbers or integers in the same way as the list you used before, [0,1,2,3,4,].
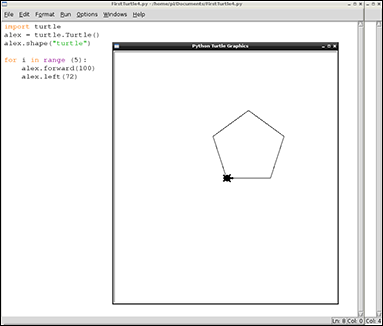
FIGURE 4-13 Using the range function to loop in Python
Other Python Turtle Module Commands
Once you have mastered some Python Turtle basics to create simple shapes, you can start to add extra lines of code to make your computer drawings more interesting.
Pen Up and Pen Down
Just as in Scratch, the Python turtle module includes code for the pen up and pen down commands so that you can move the turtle cursor around the page without leaving a line, just as if you were drawing a shape on a piece of paper with a pen. The code is written as follows, surrounding the directional code.
alex.pendown()
alex.forward(100)
alex.penup()
Setting the Pen Colour and Size
You can set the colour of the turtle using .color followed by the name of the colour you wish to use inside brackets:
alex.color("blue")
Similarly, you can set the size of the pen by using .pensize followed by the number of pixels you wish to use inside brackets:
alex.pensize(5)
Stamping
You can use .stamp to leave an imprint of the turtle cursor on the screen to form a pattern instead of, or as well as, using a pen line:
alex.stamp()
You will see the stamp in action in Figure 4-15.
Some Super Spirals
You can put together combinations of the Python Turtle code you have learned, in order to make some interesting shapes. Have a go yourself by typing the following two sequences into new text editor windows and saving them as SpiralTurtle1.py (shown in Figure 4-14) and SpiralTurtle2.py (Figure 4-15). You can change the pensize and color arguments to make your own creations.
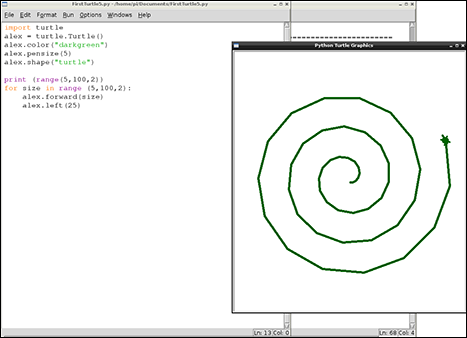
FIGURE 4-14 Using pensize and color to create SpiralTurtle1.py

FIGURE 4-15 Using penup and stamp to create SpiralTurtle2.py
Further Adventures with Python Turtle
If you wish to continue creating graphics using Turtle in Python, it’s worth checking out the official Python Turtle online documentation at http://docs.python.org/2/library/turtle.html. It includes all the Python Turtle commands that you could use. Why not experiment and see what programming art you can create?
|
Turtle Graphics Command Quick Reference Table |
|
|
See also the Scratch Quick Reference Table in Adventure 3 |
|
|
Commands |
Description |
|
Pen Blocks (Scratch) |
|
|
change pen color by x |
Changes pen’s colour by x amount. |
|
change pen shade by x |
Changes the pen’s shade by x amount. |
|
clear |
Clears all pen marks and stamps from the stage. |
|
pen down |
Puts down a sprite’s pen so that it will draw. |
|
pen up |
Lifts a sprite’s pen so it does not draw. |
|
set pen color to x |
Sets a pen’s colour to your choice. |
|
set pen shade to x |
Sets the pen’s shade by x amount. |
|
set pen size x |
Set’s a pen’s line thickness to x. |
|
stamp |
Stamps a sprite’s image on to the stage. |
|
Turtle Module in Python |
|
|
import turtle |
Imports the turtle module into Python. Should be at the start of any Python Turtle program. |
|
Creating and Naming the “turtle” |
|
|
alex = turtle.Turtle() |
Opens the Turtle Graphics window, with an arrow cursor in the centre, named alex. The arrow cursor represents the turtle, whose movements will create your drawing. |
|
Move and Draw |
|
|
forward(x) |
Moves the turtle forward by the specified distance x, in the direction the turtle is headed. |
|
left(x) |
Turns turtle left by x units. |
|
right(x) |
Turns turtle right by x units. |
|
stamp() |
Stamps a copy of the turtle shape onto the canvas at the current turtle position. |
|
Drawing State |
|
|
pendown() |
Puts the pen down and draws when it moves. |
|
penup() |
Picks the pen up and stops drawing. |
|
pensize(x) |
Sets the thickness of the line drawn to x pixels. |
|
Turtle State |
|
|
shape(“turtle”) |
Sets the cursor icon. Possible values for the shape are: arrow, turtle, circle, square, triangle, classic. |
|
Colour Control |
|
|
color(“brown”) |
Sets pen colour. |
|
Additional Commands |
|
|
for |
for loops are traditionally used when you have a piece of code that you want to repeat x number of times. Example: for i in [0,1,2,3,4,]: |
|
for i in range(): |
A for loop using the range() function that creates a list containing numbers. |
|
range() |
The range() function generates a list of numbers in progression. |
Achievement Unlocked: You can create Turtle Graphics on your Raspberry Pi!