

PROGRAMMING WITH SCRATCH can be a lot of fun, but as you become more skillful at creating games and graphics using this application, you may notice that there are limits to what you can achieve with Scratch. Most computer programmers use text-based languages to create computer programs, including games, desktop applications and mobile apps. Although text-based programming may seem more complicated at first, you will soon find that it is easier to achieve your goals by using code. The Python code language is used by millions of programmers worldwide, including developers at organisations like NASA, Google and CERN.
In this adventure, you’ll discover what you need in order to set up Python on your Raspberry Pi. You’ll write a short program, and learn to use a text editor. After that, you’ll delve deeper into Python, learning about modules and their applications, how to get user input and how to use conditionals. Finally, you’ll put all your new knowledge to use, creating a text-based adventure game in which your user (player) will answer questions and your game will respond based on the answers.
Although this may seem like a major departure from the graphical world of Scratch programming, the good news is that all of the programming concepts you learned in Scratch apply to other languages as well, even those that seem very different. Concepts such as using a sequence of instructions to make something happen, loops, conditionals and variables are common throughout all programming languages. By the end of this adventure, you’ll be able to write some basic Python programs on your Raspberry Pi!
Getting Set Up for Python
The Raspbian operating system includes the programming environment called Python IDLE. This section introduces you to the programming language and environment used to create Python files and execute them.
Python Programming Language
The Raspberry Pi operating system Raspbian comes with a text-based computer programming language, Python, already installed. The Pi in Raspberry Pi is a nod towards this programming language, as it is considered an easy language to pick up and is used by coders all over the world.
To work with Python, you use the IDLE programming environment, or integrated development environment (IDE).
The IDLE Environment
In order to create programs on the Raspberry Pi using Python, you use the Python programming environment, which is called IDLE. Notice that there are two versions in the menu system: Python 2 and Python 3 (see Figure 5-1). The projects in this book require Python 3, which you will remember you used in Adventure 4. Just like the English language, Python has evolved through different versions and some of the commands you will learn in this adventure will not work in older versions of IDLE like Python 2 on the Raspbian.

FIGURE 5-1 The Raspberry Pi main menu, with Python’s IDLE and IDLE 3 programming environments (Python 2 and Python 3) both available
Programming in Python: Using a Function
To begin working with Python, open the main menu, navigate to Programming and select Python 3. You will be using Python 3 throughout this book rather than earlier versions, which use a different syntax. The Python shell, or command-line interface, opens and a prompt of three angle symbols (>>>) appears to indicate where you should type your code, as shown in Figure 5-2.
For your first Python program, you’ll write only one line of code, using a function, a piece of code that tells the computer to perform a specific task. For this program, you use the print() function to tell the computer to print some text on the screen. Place the string of text you want the computer to display inside the brackets, with quotation marks around it.

FIGURE 5-2 The Python 3 IDLE Shell
Place your cursor directly after the >>> prompt and type the following line:
print("I am an Adventurer")
Press Enter and see what happens (see Figure 5-3).

FIGURE 5-3 The print() function in action
Using a Text Editor to Create a Code File
You used a text editor to create code files in Python in Adventure 4 when using the turtle module. As you learned in Adventure 4, it makes sense to type all your code into a text file using a text editor and save it, before you test that it works by running it using IDLE. Using a text editor has the added bonus of syntax highlighting, which works by adding colour to different words in your code to make it easier to read. If you use a command-line editor like nano (which you used in Adventure 2) that does not have syntax highlighting, you may find it hard to read a long program. For the projects in this adventure, you use the Python 3 IDLE text editor as you did in Adventure 4.
In the Python programming language, you can create lists to store data—for example, you might want a list of names of the students in your class to use in a program that sends out invitations, or a list of favourite restaurants that your program could suggest when you need an idea for dinner.
The following steps walk you through using a text editor to create a list of objects that you will use later in your adventure game. In this exercise, you will create a new file, add the code to create an inventory, and then save the file.
- Open Python 3 and click File from the menu at the top. Select New Window to open an untitled text file (see Figure 5-4). Notice that this creates a new text editor file, not a shell window, and therefore does not contain a prompt.
- To save the file, click File
 Save As. Navigate to your Documents directory and name the file Inventory before clicking Save. If you open your Documents directory, you can see the file is now saved there and Python has added a .py to the end of your file, so the complete filename is Inventory.py.
 - In the new file, type the following:
inventory = ["Torch", "Pencil", "Rubber Band", "Catapult"]
This code creates a list named inventory. Each string, or piece of text data, represents an item on that list.
- Underneath the list, type the following:
print(inventory)

FIGURE 5-4 The Python 3 IDLE text editor and menu
- Click FileSave to save the file, and then run your small program by clicking RunRun Module. Your list is printed to the screen, as shown in Figure 5-5.

FIGURE 5-5 Creating an inventory list in Python and using the print() function to display its contents
- Now adapt the last line of code to read:
print(inventory[3])
- Save the file using FileSave and then run the program again.
Using the Python time and random Modules
As you learned in Adventure 4, Python has a large number of modules—useful blocks of code that you can reuse to avoid having to rewrite the same code over and over each time you need a program that performs the same task. For example, each time you need a program that selects objects from a list randomly, you could write a new function or you could simply use the Python random module and save yourself a lot of time.
In order to use a module within a Python program, you use the Python word import followed by the name of the module. You can then access functions of that module in your program.
In this section, you use the random module along with the inventory list you created in Python to make a program that will select an item from the list randomly.
Starting with the Python file Inventory.py that you created earlier, you will adapt the code to create a new, interactive program that requests user input and responds appropriately.
As you write the code, you will include comments. Comments are notes within your code that explain what a line or section of code in intended to do. Each comment line begins with the # symbol, which tells the computer running the program to ignore that line. If a comment wraps over several lines you need to include a # sign at the beginning of each line so that it is passed over by the IDE.
There are many good reasons for including comments inside your code. Comments can help you remember what each part of the code is doing, should you leave it unfinished for a while. In school, you may use comments to explain to your teacher what each part of your code is doing. If you are working with others, comments help them see what you have done already.
- Begin your code with a comment line to indicate the code’s purpose. Open the Inventory.py file that you created earlier and type the following line at the top (above the inventory list that is already in the file):
# Adventures in Raspberry Pi Python – Inventory
Note the # symbol at the start of the line, identifying it as a comment.
- Next, use the import command to import the two Python modules you need, time and random. You can add a comment to explain this step if you like, as shown in the following code:
# You will need the random module and the time module.
import random
import time - Press Enter to leave a blank line so that your code will be easier to read and then use the print() function to display two strings of text on the screen:
# Enter a blank line here
print("You have reached the opening of a cave")
print ("you decide to arm yourself with a ") - Next, use the sleep() function from the time module to make the program wait for two seconds before asking the player a question by adding the argument (2) as shown.
time.sleep(2)
- Now you want the player to think of any item and type it in as her answer. The following code will display the line Think of an object and wait for the player to input an answer. The player can type anything for her answer; for example, she might type banana. The program will then use the print() function to display You look in your backpack for banana (or whatever object the player typed).
quest_item = input("Think of an object ")
print("You look in your backpack for ", quest_item)
time.sleep(2)
print("You could not find ", quest_item)
print("You select any item that comes to hand from the
backpack instead ")
time.sleep(3)The at the end of the string in the first line doesn’t get printed to the screen; instead, an extra new line is printed. This is helpful for breaking up the text and making it easier to read.
- Next comes the inventory list. You created this line earlier, so just leave it as written:
inventory = ["Torch", "Pencil", "Rubber band", "Catapult"]
- In the last part of the inventory program code, you use the choice() function from the random module to pick an object from the inventory list and display it to the user of the program. Type the following line below your inventory list:
print(random.choice(inventory))
Functions can take a number of arguments and return a result. Here you pass an argument to the time.sleep() function, to tell the program how many seconds to wait, and then print the result of random.choice.
Figure 5-6 shows the completed code.

FIGURE 5-6 Using modules in Python 3 to create an Inventory program
Check that your program works by saving the file as inventory1.py in the Documents folder on the Raspberry Pi and then clicking Run![]() Run Module from the toolbar. Enter input when the program prompts for it. You should see results similar to those shown in Figure 5-7.
Run Module from the toolbar. Enter input when the program prompts for it. You should see results similar to those shown in Figure 5-7.

FIGURE 5-7 Getting a random item from the inventory list, using modules
Python Text Adventure Game
Text adventure games are fun to create because they are stories written by yourself that your friends and families can interact with. All you need is a bit of imagination and, of course, some programming skills.
In this tutorial, you will create your own adventure game that uses text to direct the player through the game. The program will ask the player to make decisions on what to do next. This may be as simple as finding out the direction in which she wants to turn next.
Getting User Input
As the text adventure game relies on the player (user) to interact with the game to make decisions, you will need to use the input() function.
direction1 = input("Do you want to go left or right? ")
This line of code asks the player to answer the question, “Do you want to go left or right?” The program will wait for the player to type in an acceptable response—one that the program can understand.
Using Conditionals
Once the player has responded, you want something to happen based on her answer. You therefore need to use conditionals. You used conditionals in your Scratch adventure game in Adventure 3 to control the movement of the adventurer sprite, using the forever if control block.
Remember that creating a conditional is like asking a question where there are two or more outcomes. For example, you could ask the question “Is it raining?” If the answer is yes, you should put on a raincoat; if the answer is no, you should go out without a jacket. The key word used here is “if”.
You will use if in Python 3 to create your game conditions. Open a new Python IDLE 3 text editor window and save the file as AdventureGame.py.
- The first step is to import the modules that you will need for the program. As in the inventory program, you will need the sleep() function from the time module, so import that module with the following code:
import time
- Later in this game, you may wish to give your player health points that could go up or down depending on which directions she takes in the adventure. The number of remaining health points is stored in a variable. To include that feature, type the following line:
hp = 30
- Now use the print() function to tell your player where she is located in the game, and then use the sleep() function to wait one second before moving on.
print("You are standing on a path at the edge of a
jungle. There is a cave to your left and a beach
to your right.")
time.sleep(1) - As in the inventory program, you will want to get input from the player of your game. In this case, you want to know if she wishes to turn left or right, and the player’s answer is then labelled as direction1.
direction1 = input("Do you want to go left or right? ")
- Next, create conditions depending on the player’s answer. You will need one condition if the player chooses left and another if she chooses right. You may remember using conditionals in Scratch in Adventure 3. In Python, you use if, elif (else if) and else to check conditions:
if direction1 == "left":
print("You walk to the cave and notice there is an
opening.")
elif direction1 == "right":
print("You walk to the beach but remember you do
not have any swimwear.")
else:
print("You think for a while")if, elif and else are the Python words used to check conditions. In the preceding code, if the player types left, the program prints the statement, “You walk to the cave and notice there is an opening”; else if (elif) the player types in right, the program prints a different piece of text. Finally, if the player types in any answer that is not left or right (else), the program prints, “You think for a while”. Figure 5-8 shows this code in the text editor.

FIGURE 5-8 Using conditionals in a Python adventure game
- Test to see if your code works by first saving the file as AdventureGame.py in Documents on the Raspberry Pi, and then running it by selecting RunRun Module. You should see a display similar to Figure 5-10.
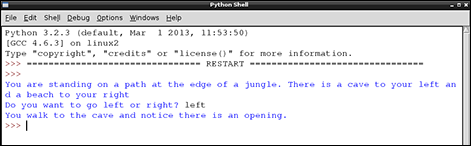
FIGURE 5-10 Using Run Module to test conditionals in Python adventure game
Using a while Loop
So far, the player has not been required to input specific answers in order for the game to move on. If the player does not input anything at all, the game simply stalls; and if the player types an unrecognized answer, the game says, “You think for a while”. You want the player to input one of the responses that you have defined, left or right, to move on to the next location. You can ensure she inputs one of the desired responses by adding a while loop to your code. This will loop the user input question until the player types in a response that you were looking for—left or right—to move on. For example:
# Loop until we get a recognised response
while True:
direction1 = input("Do you want to go left or right? ")
direction1 = direction1.lower()
if direction1 == "left":
print("You walk to the cave and notice there is an ![]()
opening.")
break # leave the loop
elif direction1 == "right":
print("You walk to the beach but remember you do not ![]()
have any swimwear.")
break # leave the loop
else:
print("You think for a while")
In this code, shown also in Figure 5-11, you can see in bold text the Python words while True: added before the user input question, and break added within the conditionals for left and right. The while True: condition will loop the question over and over until the player enters either left or right so that the game does not end if the player types anything else.

FIGURE 5-11 Using a while loop in the Python adventure game
Using a Variable for Health Points
In the text adventure game so far, you have created a variable for health points (hp = 30), like the variable you created in the Scratch adventure game in Adventure 3. Here you have given an initial value that will change as the player plays the game. The value you have given is 30, but this could be any value of your choosing.
Now code can be added that will change the hp value based on the decisions made by the player. You name a variable using the form name = value, as in the following example:
hp = 30
Here are two ways to change the value of the hp variable in Python 3:
To subtract 10, use hp = hp – 10 or hp -= 10
To add 10, use hp = hp + 10 or hp += 10
To make the game more interesting for the player, you can add some code to the end of what you have already written to tell her how many health points she has after each move:
# Check health points after the player has made a move
print("You now have ", hp, "health points")
if hp <= 0:
print("You are dead. I am sorry.")
The last two lines add a conditional so that if the value of the hp variable is less than or equal to 0, the statement “You are dead. I am sorry.” is displayed and the game ends.
Putting It All Together
Now put all the elements together in your text adventure game by typing the following program into a new Python 3 IDLE text editor window:
Test to see if your code works by saving the file as AdventureGame1.py in your Documents directory on the Raspberry Pi and then running it (see Figure 5-12). (Be sure to add the 1 in the filename to keep this file separate from your original AdventureGame.py file.)

FIGURE 5-12 Using Run Module in Python to play AdventureGame1.py
Defining Functions
Although the game works, you will find it difficult to scale it up to include more locations and directions, such as going into the cave and then deeper into the cave, especially if the game relies on input from players to make decisions. You could add more conditionals by copying and pasting those you have already created but your code will get messy and out of control very quickly. It will also be difficult to locate any bugs, or make changes without introducing even more bugs!
The best solution is to create your own functions. Until now you have been using pre-existing functions from other Python modules such as time and random, but you can also create your own. Writing your own functions is easy; for example, this is how you would write a function called multiply that multiplies its two arguments and returns the result:
def multiply(m, n):
return m * n
Just like the functions you used earlier in this adventure, these can take a number of arguments and return a result. They are a very useful way of organising your code. You can use various ways to reorganise your code into different functions. This process is called refactoring and is a logical process when developing computer programs. One way of reorganising the adventure game you have created so far is to create and use two functions: get_input() and handle_room().These functions are described in the following sections.
The get_input Function
The get_input() function will keep asking the player to enter input (using the text in the prompt argument) until it matches one of the accepted inputs. For example:
get_input("Do you want to go left or right? ", ["left", "right"])
This function will keep asking the player the same question until she types one of the accepted inputs, which in this case are left and right.
The handle_room Function
The handle_room() function will contain the main logic for changing locations in the adventure game. The function will take the current location as its argument, and then use conditionals to decide what to do based on that location. For most locations, the function will ask the player to input a direction. The specific input determines which location the player will move to next.
Creating a Main Game Loop
Up to this point, you wrote all of your game logic in the while loop. With the following code, you move most of the logic into separate functions, avoiding repetitive code. The new loop calls the handle_room() function to perform a task appropriate for the current room, and then updates the location variable with the new room. This is a little more advanced than the code you have written so far. It will require you to check and double-check that your indentation is correct and you have not made any syntax errors!
Open a new text editor window and save the file as AdventureGame2.py in your Documents directory. Follow the steps below to add functions to your adventure game.
- Begin by creating the health point variable as before; it is important to do this at the start as it is a global variable, meaning it can be accessed by the functions you will define:
# Create health points variable
hp = 30 - Next, define the first of the functions, get_input(). The word def introduces a function definition. This function will ask for input from the player with the given prompt, and as it contains a while loop it will keep retrying until the player types one of the words in the accepted list, left or right. The in keyword allows you to check easily whether a value is in a list or not.
def get_input(prompt, accepted):
while True:
value = input(prompt).lower()
if value in accepted:
return value
else:
print("That is not a recognised answer,
must be one of ", accepted) - Now define the function handle_room(), which takes the current location, performs an action based on that location, and then returns the new location. For example, if the location is start, the game will ask which direction the player wants to go and use that answer to move the user to a new room.
def handle_room(location):
global hp
if location == "start":
print("You are standing on a path at the edge of a ↩
jungle. There is a cave to your left and a beach to ↩
your right.")
direction = get_input("Do you want to go left or right? ",
["left", "right"])
if direction == "left":
return "cave"
elif direction == "right":
return "beach"
elif location == "cave":
print("You walk to the cave and notice there is an ↩
opening.")
print("A small snake bites you, and you lose 20 ↩
health points.")
hp = hp - 20
answer = get_input("Do you want to go deeper?",
["yes", "no"])
if answer == "yes":
return "deep_cave"
else:
return "start"
elif location == "beach":
print("You walk to the beach but remember you do
not have any swimwear.")
print("The cool water revitalizes you. You have never
felt more alive, gain 70 health points.")
hp += 70
return "end"
else:
print("Programmer error, room ", location, " is
unknown")
return "end" - Now add a loop to the game that loops until the player reaches the special end location that ends the game.
location = "start"
# Loop until we reach the special "end" location
while location != "end":
location = handle_room(location) # update location - As the game also relies on the player having health points, at each turn the program needs to check how many health points the player has and determine that the player is not dead, because this would end the game.
# Check we are not dead each turn
print("You now have ", hp, "health points.")
if hp <= 0:
print("You are dead. I am sorry.")
break
print("Your adventure has ended, goodbye.")
Each time around, the loop checks that the health points are greater than or equal to zero (checking that the player is not dead!) so that the game can continue. The loop will also end if the location returned by handle_room is end, a special room name indicating the end of the game. Figure 5-13 shows the refactored code using functions in the Python adventure game.

FIGURE 5-13 The Python Adventure Game in action, using the newly defined functions
Continuing Your Python Adventure
If you want to learn more about programming in Python on your Raspberry Pi, you can find a wide assortment of resources. Here are a few to try:
- For more detailed information on Python basics, I recommend Python Basics by Chris Roffey (Cambridge University Press, 2012).
- The official Python documentation is available at http://docs.python.org/3.
- Visit http://inventwithpython.com for links to online PDFs that teach you how to invent your own computer game with Python.
|
Python Command Quick Reference Table |
|
|
Command |
Description |
|
# |
The # symbol is used at the beginning of a code line to indicate the line is a comment, not part of the program’s instructions to the computer. |
|
|
Returns a new line in a string. |
|
break |
Breaks out of a for or while loop. |
|
def |
Allows you to define a function of your creation. |
|
elif |
Short for ‘else if’, the elif syntax allows you to create multiple conditions that make something happen when they return a value of true. |
|
for |
for loops are traditionally used when you have a piece of code which that you want to repeat x number of times. |
|
if |
Sets a condition which, if true, makes something happen. |
|
if…else |
Sets a condition which, if true, makes one set of things happen, or if false makes a different set of things happen. |
|
import |
Imports modules and libraries to add more functionality to your code. |
|
input() |
A function that asks for user input and converts it into a string. |
|
inventory = ["Torch", "Pencil", "Rubber Band", "Catapult"] |
An example of a list in python. Lists can contain values or strings that are separated by commas and encased in square brackets. |
|
name = value |
An example of a variable. |
|
print() |
A function that prints anything inside the brackets. |
|
print(inventory[3]) |
An example of using the print() function to print item number 3 in the inventory list. |
|
random |
A Python module that returns a random value. |
|
return |
The return keyword is used when a function is ready to return a value. |
|
time |
Python module that provides various time-related functions, such as sleep. |
|
while |
A while loop continually repeats if a given condition is true. |
Achievement Unlocked: You can program in Python on your Raspberry Pi!