
Load balancing with Apache web server
Apache web server, with its mod_jk plugin, can be used to load balance clustered applications deployed in Geronimo, by using the AJP Network connectors. In this section, we will see how to configure the Apache web server for load balancing and high availability.
Installing the Apache web server
The Apache web server can be downloaded from the website http://httpd.apache.org/. We have used version 2.2.11 on Windows XP to run our sample applications. You may use any 2.2.x or 2.0.x version of Apache web server. Download the binary for your operating system, and install the Apache web server. We will refer to this installation directory as <HTTPD_HOME>.
Web app in Geronimo served through Apache web server
We have provided a simple web application, helloworld-cluster, with one static page and one servlet, to demonstrate how a web application running in Geronimo can be served using Apache web server. The HelloWorldServlet stores a counter in the HTTP session and increments the counter with each request received from the same browser session. We will first demonstrate serving this application through the Apache web server and then move on to clustering this application. Deploy the application by using the Deploy New portlet. The application is available in Geronimo at the link http://localhost:8080/helloworld-cluster/. We will now configure access to this application through Apache Web Server.
Apache HTTP portlet
The Apache HTTP portlet in the Administration Console walks you through the process of configuring access to Geronimo through the Apache HTTP server by using mod_jk. The tool will generate the necessary configuration information based on the inputs provided by you in a step-by-step process. After completing the steps, you will have the configuration text to use with workers.properties and httpd.conf. Follow the steps below:
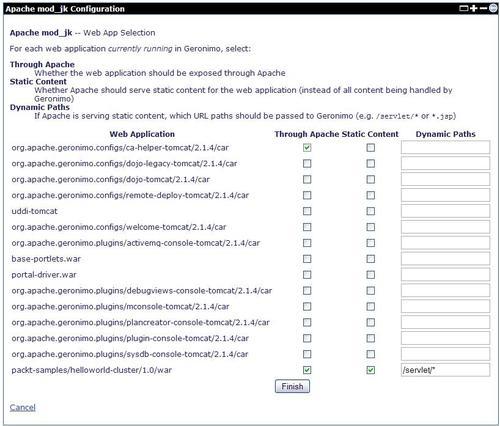
Launch the Apache HTTP portlet by clicking on the Apache HTTP link under Server in the Console Navigation pane. The portlet screen is shown next:

For all of the web applications that you want to be accessible through the Apache web server, select the checkbox under the Through Apache column. If you want the Apache web server to serve the static content for an application, then select the checkbox under the Static Content column. In Dynamic Paths, enter the URL paths that should be passed on to Geronimo if the static content is served by the Apache web server. Click on Finish to see the screen with the configuration results, as shown next:


This screen provides step-by-step instructions on configuring the Apache web server with the mod_jk plugin. Let us go over each of the steps:
In Step 1: Configure Geronimo for AJP, if there is an AJP connector configured already, you do not need to do anything. Otherwise, you will need to create an AJP connector. See Chapter 10, Administration, for details of how to do this. The AJP host and port will be used in Step3.
In Step 2: Install mod_jk, you will need to download and install the mod_jk plugin. The mod_jk plugin can be downloaded from the Apache Tomcat website, at http://tomcat.apache.org/download-connectors.cgi. You may either download the source and build the plugin yourself or download the binaries from http://www.apache.org/dist/tomcat/tomcat-connectors/jk/binaries/. Download the binary version relevant to your Operating System and your version of Apache web server, and save it to the <HTTPD_HOME>/modules directory. Add the following lines of code to the httpd.conf file, which is located under the <HTTPD_HOME>/conf directory:
LoadModule jk_module modules/mod_jk.so
Make sure that the name under which the mod_jk module file is saved under the modules directory appears in the LoadModule directive.
In Step 3: Create a workers.properties file, you create the workers.properties file. The configuration generated for workers.properties is as follows:
worker.list=geronimo_ajp13
worker.geronimo_ajp13.port=8009
worker.geronimo_ajp13.host=localhost
worker.geronimo_ajp13.type=ajp13
The complete path of the file will be used in the JkWorkersFile directive, as we will see in the next step.
In Step 4: Apache Configuration, you add additional configuration to the httpd.conf file. The configuration generated for httpd.conf is as follows:
<IfModule mod_jk.c>
JkWorkersFile C:geronimo-tomcat6-javaee5-2.1.4varconfig workers.properties
JkLogFile C:geronimo-tomcat6-javaee5-2.1.4varlog apache_mod_jk.log
JkLogLevel error
JkMount /CAHelper/* geronimo_ajp13
JkMount /helloworld-cluster/* geronimo_ajp13
Alias /helloworld-cluster "/C:/geronimo-tomcat6-javaee5-2.1.4/ repository/packt-samples/helloworld-cluster/1.0/ helloworld-cluster-1.0.war/"
<Directory "/C:/geronimo-tomcat6-javaee5-2.1.4/repository/packt- samples/helloworld-cluster/1.0/helloworld-cluster-1.0.war/">
Options Indexes FollowSymLinks
allow from all
</Directory>
<Location "/helloworld-cluster/WEB-INF/">
AllowOverride None
deny from all
</Location>
</IfModule>
The JkWorkersFile directive loads the workers defined in workers.properties. The JkLogFile directive configures the logfile for mod_jk module. The JkMount directive specifies the path and the worker to which the requests will be routed. Note that the worker geronimo_ajp13 is defined in workers.properties.
In Step 5: Restart Apache, you restart the Apache web server so that the configuration changes take effect.
Accessing the sample app through Apache web server
We have now configured access to the helloworld-cluster web application through Apache web server by using the mod_jk module and AJP connector provided by Geronimo. Access the application at http://localhost/helloworld-cluster/. Enter a name in the form displayed, and click on getGreeting. The next page displays a greeting message along with the request information and the counter value from the session. Notice that the counter value displayed for the first access of the HelloWorldServlet is 1 and the new session value is true. Now access the application at http://localhost:8080/helloworld-cluster/ in the same browser window. Enter a name in the form displayed, and click on getGreeting. Notice that the counter value displayed on the next page is 2 and the new session value is false. The server.name indicates the server instance serving the request. Notice that the server.name value is default. This means the same application is served at both the URLs and the requests are forwarded by Apache web server to Geronimo. We will now see how this application can be clustered using Geronimo.