Creating a server-wide database pool
In order to set up connectivity with any RDBMS from Apache Geronimo, you first need to obtain the JDBC drivers for that particular RDBMS. These drivers can be obtained from the database vendor or from a third party having a license to provide JDBC drivers for that RDBMS. Once you obtain the JDBC driver, you need to install it into Apache Geronimo's server repository. You can then set up a database pool using the TranQL resource adapters and the JDBC drivers.
There are four ways in which you can set up a server-wide database pool, as we will see now.
Using the Administration Console Wizard
The steps for downloading and installing JDBC drivers and setting up a database pool using the Administration Console Wizard are given in the next example. We will create a database pool with the name TestDBPool for the HSQLDB embedded database.
Start the Apache Geronimo server instance and bring up the Administration Console in your favorite web browser, by using the URL http://localhost:8080/console.
Log in with the username system and password manager.
On the left-hand side of the Console Navigation pane under Services, click on the Database Pools link, as shown in the following screenshot:

This will bring up the Database Pools portlet, as shown in the next screenshot. The Database Pools portlet shows the list of pools that are already deployed on this Geronimo server instance. It provides three links to create a database pool in three ways, namely, by using the database pool wizard, by importing the database pool from JBoss 4, or by importing the database pool from Weblogic 8.1.

Click on Using the Geronimo database pool wizard. This brings up the first screen of a sequence of screens that will guide you through the process of creating a database pool. This is shown in the following screenshot:
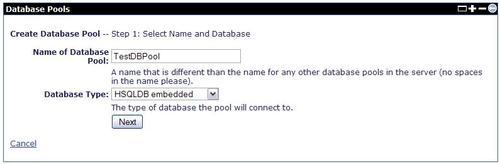
Enter the Name of Database Pool that you want to create, select the Database Type from the drop-down list, and then click on Next. For our example, enter the name TestDBPool and select HLSQLDB embedded as the Database Type. Click on Next to bring up the next screen, as shown in the following screenshot:

In this screen you need to enter values for the following fields:
Driver JAR: The JAR file(s) that contain the database driver
DB User Name: The username used to connect to the database
DB Password: The password that is required to connect to the database
Confirm Password: The same as the DB Password, entered once more for confirmation
Database: The name of the database
We can see that the Driver JAR select box is empty, which means that the HSQLDB embedded driver is not present in the server repository. We can download and install this driver from the Administration Console. To do this, click on the Download a Driver button. If the select box is not empty, then you can select the corresponding driver if it is available.
This brings us to the next screen, where we can select the driver that we want from the Select Driver drop-down list, and then click on Next. For our example, select HSQLDB 1.7.3, and then click on Next. This will bring up the next screen with a progress bar that shows the download progress of the driver, as shown in the next screenshot:

See the topic Installing unlisted drivers, for steps to manually download and install JAR files in the repository.
Enter values for the other fields, and then click on Next. The values we are entering are DB User Name: system, DB Password: manager, and Database: TestDB. The value entered for the Confirm Password field should be the same as the value for the DB Password field. Click on Next to go to the next screen, as shown in the following screenshot:

In this screen, fill in the values for the following configuration properties:
Transaction Type: The type of transactions that this connection pool supports
Pool Min Size: The minimum number of connections in the pool
Pool Max Size: The maximum number of connections in the pool
Blocking Timeout: The time period, in milliseconds, for which a caller will wait to obtain a connection from the pool
Idle Timeout: The amount of time, in minutes, after which an idle connection will be closed
In order to test connectivity to the database instance that you specified in the database pool configuration, you can use the Test Connection button.
If you want to skip the test and deploy then click on the Skip Test and Deploy button.
In case you want to see the Geronimo-specific plan for this database pool, you can use the Skip Test and Show Plan button.
If you want to skip the test and deploy the connection pool, then click on the Skip Test and Deploy button.
If you want to see the Geronimo-specific plan for this database pool, then you can use the Skip Test and Show Plan button.
Clicking on the Skip Test and Deploy button will deploy and create the connection pool, and you will be taken back to the first screen of the Database Pools portlet that lists all the active database pools.
Installing unlisted drivers
If you want to download and install a driver that is not available in the list of downloadable drivers shown in the Administration Console, you will need to go to the download site for that particular RDBMS or database driver vendor and manually download the driver to a temporary location on your hard disk. From that location, you can install the driver into the server repository by using the Repository portlet.
In order to open the Repository portlet, you need to click on the Repository link in the Services section of the Console Navigation pane. The Repository portlet is shown in the following screenshot:

You need to use the Browse button to select the File on the disk that you downloaded and then complete the Group, Artifact, Version, and Type fields.
This will result in the file being copied to the path. Actually, in most cases, the Artifact, Version, and Type are automatically detected by the portlet.
Consider the case shown in this example. The name of the driver file is postgresql-8.3-604.jdbc3.jar. On selecting the file by using the file viewer that pops up on clicking on the Browse button, the Artifact, Version, and Type fields are completed with the values shown in the screenshot. If we enter the Group as org.jdbc.postgresql, then the archive will be installed as org.jdbc.postgresql/postgresql-8.3/604.jdbc3/jar. The actual JAR file will be present in the repository in the org/jdbc/postgresql/postgresql-8.3/604.jdbc3 directory, and will be named postgresql-8.3-604.jdbc3.jar.
You can also manually copy JAR files to the repository. However, while doing this, the directory structure and the name of the JAR file should be the same as shown, that is, the JAR file should be present in the repository at <GroupId>/<ArtifactId>/<Version>/<ArtifactId>-<Version>.jar.
Once the driver has been installed in the server repository, it can be referred to as a dependency inside a Geronimo deployment plan for the TranQL connector for that database. The generic TranQL connector can be used for wrapping the drivers of any JDBC database driver.
Using the Deploy New portlet
The Administration Console has a Deploy New portlet for deploying artifacts to the server. You can deploy new applications as well as new database pools or JMS connectors. In order to deploy a database pool using this portlet, you need to provide the portlet with the required TranQL connector and the corresponding deployment plan. You can use the Browse button to locate the required TranQL RAR file from the server repository, as well as to locate the deployment plan. Deployment plans can be generated through the Administration Console Wizard as follows:
Enter the Name of Database Pool, say DerbyTestPool, and select the Database Type, say Derby embedded XA. Click on Next to bring up the next screen, as shown in the following screenshot:

Select the Driver JAR file, as shown in the previous screenshot. For our example, it should be org.apache.geronimo.configs/system-database/2.1.4/car. We select a car for an embedded Derby database because Geronimo already has an embedded Derby instance running for the system database. Therefore, by choosing a dependency on that configuration, the Derby classes are not loaded again and a new embedded Derby instance is not created. Instead a new Derby database is created using the same embedded Derby instance.
Complete the Database Name field with the value DerbyTestDB.
Set the Create Database flag to true. This will result in a new Derby database being created if one does not already exist.
Complete the User Name and Password fields with system and manager, respectively.
Select a Transaction Type of XA.
Click on the Show Plan button to show the deployment plan, as shown in the following screenshot:

Copy the plan from the text area and paste it in a new file called plan.xml. The contents of the plan.xml file are shown in the following listing:
<?xml version="1.0" encoding="UTF-8"?>
<connector xmlns="http://geronimo.apache.org/xml/ns/j2ee/ connector-1.2">
<dep:environment xmlns:dep="http://geronimo.apache.org/xml/ns/ deployment-1.2">
<dep:moduleId>
<dep:groupId>console.dbpool</dep:groupId>
<dep:artifactId>DerbyTestPool</dep:artifactId>
<dep:version>1.0</dep:version>
<dep:type>rar</dep:type>
</dep:moduleId>
<dep:dependencies>
<dep:dependency>
<dep:groupId>org.apache.geronimo.configs </dep:groupId>
<dep:artifactId>system-database</dep:artifactId>
<dep:version>2.1.4</dep:version>
<dep:type>car</dep:type>
</dep:dependency>
</dep:dependencies>
</dep:environment>
<resourceadapter>
<outbound-resourceadapter>
<connection-definition>
<connectionfactory-interface>javax.sql.DataSource</connectionfactory-interface>
<connectiondefinition-instance>
<name>DerbyTestPool</name>
<config-property-setting name="Password">manager</config-property-setting>
<config-property-setting name="LoginTimeout"/>
<config-property-setting name="DatabaseName">DerbyTestDB</config-property-setting>
<config-property-setting name="UserName">system</config-property-setting>
<connectionmanager>
<xa-transaction>
<transaction-caching/>
</xa-transaction>
<single-pool>
<max-size>10</max-size>
<min-size>0</min-size>
<blocking-timeout-milliseconds>5000</blocking-timeout-milliseconds>
<idle-timeout-minutes>15</idle-timeout-minutes>
<match-one/>
</single-pool>
</connectionmanager>
</connectiondefinition-instance>
</connection-definition>
</outbound-resourceadapter>
</resourceadapter>
</connector>
We will now go through the significance of the major elements in the plan:
connectionfactory-interface: This should be javax.jms.ConnectionFactory.
name: The name that is used by other modules to refer to this resource. The name should be unique across the scope (server or application) in which these resources are deployed. It is a good practice to have names that are unique across scopes.
config-property-setting: This element is used to define properties that are specific to the resource adapter. The name of the property will be specified as the value of the name attribute and the value of the property will be given as the value of this element.
connectionfactory-interface: The interface that is implemented by the connection factory. This should be javax.sql.DataSource.
xa-transaction: Indicates that the resource adapter can participate in XA transactions.
transaction-caching: Indicates that connection sharing must be enabled for resources in the same transaction.
single-pool: This specifies the connection pooling type, and means that a single connection pool will be used to pool all connections to this resource.
match-one: This is a connection pool match setting that will select one connection from the pool and test whether it matches the connection request. If it does, then the connection is used. Otherwise, an error is thrown.
Deploy the pool by using the connector <GERONIMO_HOME> epositoryorg ranql ranql-connector-derby-embed-xa1.4 ranql-connector-derby-embed-xa-1.4.rar and the path of the plan that is, in the Deploy New portlet enter the path of the TranQL RAR file in the Archive textbox and the path of the plan in the Plan textbox.

Using the command-line deployer
In some distributions of Apache Geronimo, such as Little-G, the Administration Console is not present. You can also assemble a custom server without the Administration Console. In such an environment, you can still use the command-line deployer or GShell for deploying the database pools. Another instance where this is useful is when you have multiple servers on which you want to deploy the database pool. In this case, you can use the Administration Console Wizard to configure the database pool and generate a deployment plan on one server and use this deployment plan repeatedly on different servers, in order to deploy the database pool. In case you want to deploy your database pool from the command-line deployer, you need to follow the steps as follows:
Open the command line in Windows, or the shell in a Unix based OS, and change the directory to the <GERONIMO_HOME>/bin directory.
Next, invoke the deploy script from the bin directory. You need to provide the deploy script with the path to the TranQL RAR file and the deployment plan.
Assuming we are deploying the same database pool as the one in the previous section, the command will be deploy deploy <archive-path> <plan-path> where <archive-path> is the path to the TranQL RAR archive and the <plan-path> is the path to the deployment plan for that database pool. Assuming the plan file is saved to DerbyTestPool-plan.xml, the command would look like the following:
deploy deploy <GERONIMO_HOME>
epositoryorg	ranql	ranql-connector-derby-embed-xa1.4	ranql-connector-derby-embed-xa-1.4.rar DerbyTestPool-plan.xml
The JAVA_HOME or JRE_HOME should be pointing to a valid JDK or JRE in order to make the deployer scripts work.
Using GShell
You can also use Geronimo's command shell, 'GShell', for deploying the database pools. For doing this, you should first boot up GShell by running the gsh script ( gsh.sh for a Unix-based OS, or gsh.bat for Windows). This will bring up the GShell prompt:
<user>@<host>:/>
where <user> is the username you use to log in and, <host> is the hostname of the system. The command to deploy the database pool is
deploy/deploy <path to the rar> <path to the plan>
GShell supports file separators of '/' and '', but if the separator is '', it should be escaped as ''. For example, C: esthello should be represented as C:\test\hello.