Web Server administration
The Web Server portlet in the Server portlet group allows you to manage the network connectors for the web container, and view web server statistics. In this section, we will see how the Web Server portlet can be used to perform various web server administration tasks. The Web Server portlet screen is shown in the next screenshot:

The portlet lists the existing network connectors for the web container. The Protocol column displays the protocol used by the connector. The links provided in the Actions column allow you to manage the connectors. To stop a running connector, click on the Stop link under Actions. To start a stopped connector, click on the Start link under Actions. To stop and start a running connector, click on the Restart link under Actions. The Restart link is particularly useful when you want to restart a connector that is listening on the same port as the one on which you are accessing the Administration Console application. To edit the settings of a connector, click on the Edit link under actions. The next screen will show the connector attributes. Edit the attributes as necessary, and then click on Save to return to the Network Listeners screen. Note that any changes to a network connector will not take effect until the connector is started again, either by using Restart, or Stop and then Start. To delete an existing connector, click on the Delete link under Actions, and confirm the deletion in the pop-up dialogbox.
For a Tomcat web container, you can add blocking IO(BIO), non-blocking IO (NIO), and Apache Portable Runtime (APR) connectors for the HTTP and HTTPS protocols. To add new connectors to the Tomcat web container, use the links provided under Add new section.
HTTP connectors
To add a new BIO HTTP connector, click on the Tomcat BIO HTTP Connector link. This will show a screen similar to the one shown in the next screenshot:

The Attribute column shows the name of the attribute. The Type column shows the attribute type. The Value column provides a field in which you can enter a value for the attribute. The Description column gives a detailed description of the attribute. Required attributes are indicated by an asterisk. For a BIO HTTP connector, the following attributes are required:
uniqueName: A name to identify the connector. This name has to be different from the name of any other web connectors on the server.
address: Host name or IP address to bind the connector to. Common values are 0.0.0.0 (all interfaces) or localhost (local connections only).
Enter the values for these required attributes. The remaining fields are optional, and most fields are populated with the default values. You may edit or enter values for the optional fields, as necessary. Once that is done, click on Save to create a new BIO HTTP connector and return to the list of connectors. The newly-added connector will be started automatically.
To add a new NIO HTTP connector, click on the Tomcat NIO HTTP Connector link under the Add new section. Enter the required attributes: uniqueName, address, and port. The remaining attributes are optional and most of them are populated with default values. Edit or enter the values for these optional attributes as necessary. Once that is done, click on Save to create a new NIO HTTP connector, and return to the list of connectors. The newly-added connector will be started automatically.
To use APR connectors for a Tomcat web container, you will need to install the APR native components. See the Tomcat documentation, available at http://tomcat.apache.org/tomcat-6.0-doc/apr.html, for details on installing the components required for APR. Once the APR components are installed, you can create APR connectors.
In order to add a new APR HTTP connector, click on the Tomcat APR HTTP Connector link under the Add new section. This will show a screen, similar to the one shown in the next screenshot:

Enter the required attributes: uniqueName, address, pollTime, pollerSize, port, sendfileSize, and useSendfile. Here, the attributes pollTime, pollerSize, sendfileSize, and useSendfile are APR-related attributes. The default values of attributes are populated automatically. Edit or enter the values for all of the attributes. When finished, click on Save to create a new APR HTTP connector, and return to the list of connectors. The newly-added connector will be started automatically.
HTTPS connectors
For HTTPS connectors, you will need to configure the SSL-related attributes in addition to the attributes for an HTTP connector. To create a BIO HTTPS connector, click on the Tomcat BIO HTTPS Connector link under the Add new section. This will show a screen similar to the one shown in the screenshot below:

The additional attributes related to SSL configuration are:
keystoreFile: The file that holds the keystore. The value for this attribute is the path of the file relative to the <GERONIMO_HOME> directory.
algorithm: The certificate encoding algorithm to be used. Set this to Default so that the connector does not need to be reconfigured if the server is started with a different JVM.
ciphers: A comma-separated list of the encryption ciphers that may be used. If not specified, then any available cipher may be used.
clientAuth: Set to true if you want SSL to require a valid certificate chain from the client before accepting a connection.
keyAlias: The alias used for the server certificate in the keystore. If not specified, then the first key read in the keystore will be used.
keyStorePass: Set the password used to access the keystore file. This is also the password used to access the server private key within the keystore (so the two passwords must be set to be the same on the keystore).
keyStoreType: Set the keystore type. Normally, this is set to the default JKS.
sslProtocol: This should normally be set to TLS, although some (IBM) JVMs don't work properly with popular browsers unless this attribute is set to SSL.
trustStoreFile: The trust store file used to validate client certificates. The value for this attribute is the path of the file relative to the <GERONIMO_HOME> directory.
truststoreType: Set the keystore type of the trust store file. Normally, this is set to the default JKS.
The truststoreFile, truststorePass, and truststoreType attributes are only required if clientAuth attribute is set to true.
In addition to the uniqueName, address, and port attributes, enter the values for the SSL-related attributes as well as the attributes required for an HTTP connector. When you have finished, click on Save to create a new BIO HTTPS connector, and return to the list of connectors. The newly-added connector will be started automatically.
An NIO HTTPS connector can be created in a similar manner by completing the above SSL-related attributes in addition to the normal connector attributes.
AJP connectors
To create a new AJP connector, click on the Tomcat AJP Connector link under the Add new section. This will show a screen similar to the one shown in the next screenshot:
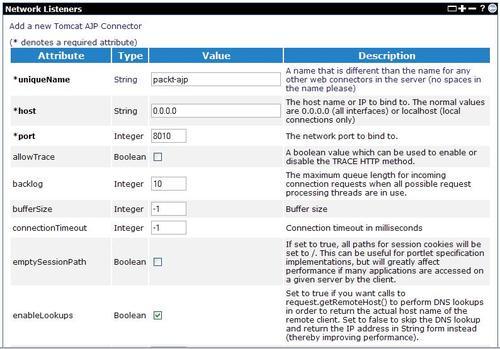
For an AJP connector, the following attributes are required:
uniqueName: A name to identify the connector. This name has to be different from the name of any other web connectors on the server.
address: Hostname or IP address to bind the connector to. Common values are 0.0.0.0 (all interfaces) or localhost (local connections only).
Enter the values for these required attributes. The remaining fields are optional, and most fields are populated with default values. You may edit or enter values for the optional fields as necessary. When finished, click on Save to create a new AJP connector and return to the list of connectors. The newly-added connector will be started automatically.
Web Server Logs
The Server Logs portlet in the Server portlet group provides a Web Access Log Viewer. The portlet screen is shown below:
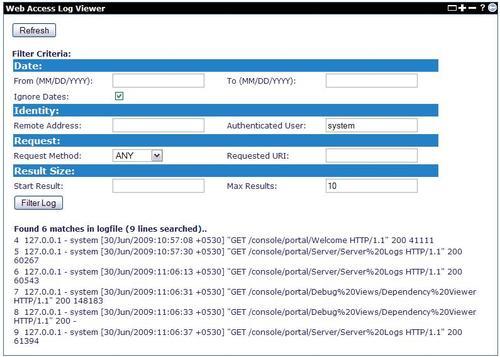
You can filter the access logs by date range, the identity of the user accessing the web container, the request method and URI, and can also limit number of results to display. The following is a description of each of the fields:
From (MM/DD/YYYY): The start date of the log entries to search for.
To (MM/DD/YYYY): The end date of the log entries to search for.
Ignore Dates: Select this to ignore the dates in the search criteria.
Remote Address: The remote address from which the web request is received.
Authenticated User: The authenticated username from which the web request is received.
Request Method: The HTTP request method for the web request. Supported values are GET, PUT, POST, DELETE, and ANY. Select ANY to ignore the request method in the search.
Requested URI: The URI of the resource requested. The value entered here will be mapped to the start of requested URIs in the web request.
Start Result: The line number in the logfile from which the log entries are to be searched.
Max Results: The maximum number of log entries to be displayed.
Enter the values for the required fields, and then click on Filter Log to activate the filter criteria for the first time. To search for the logs once again with the same criteria, click on Refresh.