
In this chapter, we will look at how to create a pair of LED glasses. In essence, these glasses are an LED matrix. A matrix is an arrangement of LEDs in columns and rows, where we take advantage of the polarity of the LEDs so we can control 30 LEDs separately using only 15 pins on the Arduino board. The LED matrix has been around for many years and is still used today in some screen technologies. For example, digital bus signs are usually made by implementing an LED matrix, where each individual LED acts like a pixel.
In this chapter you will also learn a little bit about how to create your own glasses and soldering techniques. We will also have a look at some more advanced programming, where we will be implementing some simple animation for you to build upon.
The materials needed are:
- 30 LEDs (5 mm) in any color
- A trinket board or an Arduino micro board
- An FTDI to USB converter
- Wires
- A soldering iron
- A 3-5V lithium battery (the smaller the better)
- A JST female connector
- 3 mm MDF
- 220Ω resistors
You can make your glasses out of anything you like and it might even be possible to modify a pair of existing sunglasses if they are big enough. My good friend Roger Persson was nice enough to design a pair of glasses for this book. In Figure 3.1 you will find the design of the glasses with measurements. Remember that these measurements might need to be modified so that the glasses fit your particular head size.
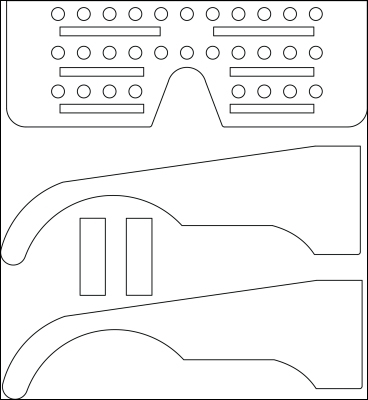
Figure 3.1: The glasses design
The design of the glasses is very simple yet fits the purpose. The design consists of three main pieces, the front and two side frames. The two smaller pieces are used for added support when connecting the frames to the front panel. The frames can be simply glued to the corners of the front panel, while the two small pieces are glued to the inside corners on each end, as shown in Figure 3.2. The design template can be used to cut the pieces out from any material you like, but I recommend a sturdy material of at least 3 mm thickness. Plastic materials would also work for this project, or you could even make the frames out of cardboard, which can easily be cut by hand.
The glasses presented in this chapter were cut from 3 mm MDF using a laser cutter. I don't expect most readers to have their own laser cutter, but many bigger cities today have something called hacker spaces or Fab Labs, and some even have them in their city's libraries. The concept of Fab Labs was developed by the Massachusetts Institute of Technology, building on the idea of hacker spaces, which are locations that offer access to different fabrication tools and equipment where different people come to work on projects. Hacker spaces are usually a place where people interested in electronics and programming meet to share ideas and work on projects. Fab Labs are more oriented toward fabrication, not just digital entity, and are open to the public. If you haven't checked already, I suggest you investigate whether there is a hacker space or Fab Labs close by since you now have the perfect excuse to head over for a visit.
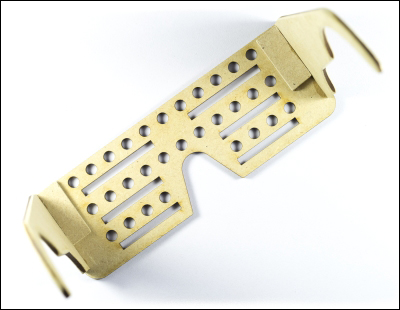
Figure 3.2: The laser-cut pieces
If you choose to modify the design, remember to keep the size of the holes at 5 mm since this is the size of the LEDs we will be using. You can swap these LEDs for the smaller 3 mm ones if you like, but I would not recommend LEDs bigger than 5 mm since these might complicate the design.