To demonstrate the basic materials available in Away3D, we will create a new demo called MaterialsDemo.
package
{
Some primitives show off a material better than others. To accommodate this, we will apply the various materials to the sphere, torus, cube, and plane primitive 3D objects in this demo. All primitives extend the Mesh class, which makes it the logical choice for the type of the variable that will reference instances of all four primitives.
import away3d.core.base.Mesh;
The Cast class provides a number of handy functions that deal with the casting of objects between types.
import away3d.core.utils.Cast;
As we saw previously, those materials that can be illuminated support point or directional light sources (and sometimes both). To show off materials that can be illuminated, one of these types of lights will be added to the scene.
  import away3d.lights.DirectionalLight3D;
  import away3d.lights.PointLight3D;
In order to load textures from external image files, we need to import the TextureLoadQueue and TextureLoader classes.
  import away3d.loaders.utils.TextureLoadQueue;
  import away3d.loaders.utils.TextureLoader;
The various material classes demonstrated by the MaterialsDemo class are imported from the away3d.materials package.
  import away3d.materials.AnimatedBitmapMaterial;
  import away3d.materials.BitmapFileMaterial;
  import away3d.materials.BitmapMaterial;
  import away3d.materials.ColorMaterial;
  import away3d.materials.CubicEnvMapPBMaterial;
  import away3d.materials.DepthBitmapMaterial;
  import away3d.materials.Dot3BitmapMaterial;
  import away3d.materials.Dot3BitmapMaterialF10;
  import away3d.materials.EnviroBitmapMaterial;
  import away3d.materials.EnviroColorMaterial;
  import away3d.materials.FresnelPBMaterial;
  import away3d.materials.MovieMaterial;
  import away3d.materials.PhongBitmapMaterial;
  import away3d.materials.PhongColorMaterial;
  import away3d.materials.PhongMovieMaterial;
  import away3d.materials.PhongMultiPassMaterial;
  import away3d.materials.PhongPBMaterial;
  import away3d.materials.ShadingColorMaterial;
  import away3d.materials.TransformBitmapMaterial;
  import away3d.materials.WhiteShadingBitmapMaterial;
  import away3d.materials.WireColorMaterial;
  import away3d.materials.WireframeMaterial;
These materials will all be applied to a number of primitive types, which are all imported from the away3d.primitives package.
  import away3d.primitives.Cube;
  import away3d.primitives.Plane;
  import away3d.primitives.Sphere;
  import away3d.primitives.Torus;
The CubFaces class defines a number of constants that identify each of the six sides of a cube.
import away3d.primitives.utils.CubeFaces;
The following Flash classes are used when loading textures from external image files, to handle events, to display a textfield on the screen, and to define a position or vector within the scene.
  import flash.geom.Vector3D;
  import flash.net.URLRequest;
  import flash.display.BitmapData;
  import flash.events.Event;
  import flash.events.KeyboardEvent;
  import flash.text.TextField;
The MaterialsDemo class extends the Away3DTemplate class that was presented in Chapter 1, Building Your First Away3D Application.
  public class MaterialsDemo extends Away3DTemplate
  {
One of the ways to manage resources that was discussed in the Resource management section was to embed them. Here, we see how an external JPG image file, referenced by the source parameter, has been embedded using the Embed keyword. Embedding an image file in this way means that instantiating the EarthDiffuse class will result in a Bitmap object populated with the image data contained in the earth_diffuse.jpg file.
    [Embed(source = "earth_diffuse.jpg")]
    protected var EarthDiffuse:Class;
A number of additional images have been embedded in the same way.
    [Embed(source = "earth_normal.jpg")]
    protected var EarthNormal:Class;
    [Embed(source = "earth_specular.jpg")]
    protected var EarthSpecular:Class;
    [Embed(source = "checkerboard.jpg")]
    protected var Checkerboard:Class;
    [Embed(source = "bricks.jpg")]
    protected var Bricks:Class;
    [Embed(source = "marble.jpg")]
    protected var Marble:Class;
    [Embed(source = "water.jpg")]
    protected var Water:Class;
    [Embed(source = "waternormal.jpg")]
    protected var WaterNormal:Class;
    [Embed(source = "spheremap.gif")]
    protected var SphereMap:Class;
    [Embed(source = "skyleft.jpg")]
    protected var Skyleft:Class;
    [Embed(source = "skyfront.jpg")]
    protected var Skyfront:Class;
    [Embed(source = "skyright.jpg")]
    protected var Skyright:Class;
    [Embed(source = "skyback.jpg")]
    protected var Skyback:Class;
    [Embed(source = "skyup.jpg")]
    protected var Skyup:Class;
    [Embed(source = "skydown.jpg")]
    protected var Skydown:Class;
Here we are embedding three SWF files. These are embedded just like the preceding images.
    [Embed(source = "Butterfly.swf")]
    protected var Butterfly:Class;
    [Embed(source = "InteractiveTexture.swf")]
    private var InteractiveTexture:Class;
    [Embed(source = "Bear.swf")]
    private var Bear:Class;
A TextField object is used to display the name of the current material on the screen.
protected var materialText:TextField;
The currentPrimitive property is used to reference the primitive to which we will apply the various materials.
protected var currentPrimitive:Mesh;
The directionalLight and pointLight properties each reference a light that is added to the scene to illuminate certain materials.
    protected var directionalLight:DirectionalLight3D;
    protected var pointLight:PointLight3D;
The
bounce property is set to true when we want the sphere to bounce along the Z-axis. This bouncing motion will be used to show off the effect of the DepthBitmapMaterial class.
protected var bounce:Boolean;
The frameCount property maintains a count of the frames that have been rendered while bounce property is set to true.
protected var frameCount:int;
The constructor calls the Away3DTemplate constructor, which will initialize the Away3D engine.
    public function MaterialsDemo()
    {
      super();
    }
The removePrimitive() function removes the current primitive 3D object from the scene, in preparation for a new primitive to be created.
    protected function removePrimitive():void
    {
      if (currentPrimitive != null)
      {
        scene.removeChild(currentPrimitive);
        currentPrimitive = null;
      }
    }
The initSphere() function first removes the existing primitive from the scene by calling the removePrimitive() function, and then creates a new sphere primitive and adds it to the scene. Optionally, it can set the bounce property to true, which indicates that the primitive should bounce along the Z-axis.
    protected function initSphere(bounce:Boolean = false):void
    {
      removePrimitive();
      currentPrimitive = new Sphere();
      scene.addChild(currentPrimitive);
      this.bounce = bounce;
    }
The
initTorus(), initCube(), and initPlane() functions all work like the initSphere() function to add a specific type of primitive to the scene. These functions all set the bounce property to false, as none of the materials that will be applied to these primitives gain anything by having the primitive bounce within the scene.
    protected function initTorus():void
    {
      removePrimitive();
      currentPrimitive = new Torus();
      scene.addChild(currentPrimitive);
      this.bounce = false;
    }

    protected function initCube():void
    {
      removePrimitive();
      currentPrimitive = new Cube(
        {
          width: 200,
          height: 200,
          depth: 200
        }
      );
      scene.addChild(currentPrimitive);
      this.bounce = false;
      }

    protected function initPlane():void
    {
      	removePrimitive();
      currentPrimitive = new Plane(
        {
          bothsides: true,
          width: 200,
          height: 200,
          yUp: false
        }
      );
      scene.addChild(currentPrimitive);
      this.bounce = false;
    }
The removeLights() function will remove any lights that have been added to the scene in preparation for a new light to be created.
   protected function removeLights():void
   {
      if (directionalLight != null)
      {
        scene.removeLight(directionalLight);
        directionalLight = null;
      }

      if (pointLight != null)
      {
        scene.removeLight(pointLight);
        pointLight = null;
      }
    }
The initPointLight() and initDirectionalLight() functions each remove any existing lights in the scene by calling the removeLights() function, and then add their specific type of light to the scene.
    protected function initPointLight():void
    {
      removeLights();

      pointLight = new PointLight3D(
        {
          x: -300,
          y: -300,
          radius: 1000
        }
      );
      scene.addLight(pointLight);
    }

    protected function initDirectionalLight():void
    {
      removeLights();

      directionalLight = new DirectionalLight3D(
        {
          x: 300,
          y: 300,
The direction that the light is pointing is set to (0, 0, 0) by default, which effectively means the light is not pointing anywhere. If you have a directional light that is not being reflected off the surface of a lit material, leaving the direction property to this default value may be the cause. Here we override the default to make the light point back to the origin.
          direction: new Vector3D(-1, -1, 0)
        }
      );
      scene.addLight(directionalLight);
    }
The initScene() function has been overridden to call the applyWireColorMaterial() function, which will display a sphere with the WireColorMaterial material applied to it. We also set the position of the camera back to the origin.
    protected override function initScene():void
    {
      super.initScene();
      this.camera.z = 0;
      applyWireColorMaterial();
    }
The initUI() function adds a textfield to the stage. This textfield will be used to display the name of the currently applied material.
    protected override function initUI():void
    {
      materialText = new TextField();
      materialText.x = 10;
      materialText.y = 10;
      materialText.width = 300;
      this.addChild(materialText);
    }
The initListeners() function has been overridden to register the onKeyUp() function to be called when a key on the keyboard has been released.
    protected override function initListeners():void
    {
      super.initListeners();
      stage.addEventListener(KeyboardEvent.KEY_UP, onKeyUp);
    }
The onEnterFrame() function is overridden to animate the current primitive.
    protected override function onEnterFrame(event:Event):void
    {
      super.onEnterFrame(event);
If bounce property is true the current primitive will bounce along the Z-axis between 400 and 600 units from the origin. This is used to show off the effect produced by the DepthBitmapMaterial class.
      if (bounce)
      {
        ++frameCount;
        currentPrimitive.z =
        500 + Math.sin(frameCount / 10) * 100;
      }
If bounce is false, the current primitive will be fixed at a position of 500 units along the Z-axis.
      else
      {
        frameCount = 0;
        currentPrimitive.z = 500;
      }
The current primitive will also be slowly rotated around the X and Y axes.
      currentPrimitive.rotationX += 1;
      currentPrimitive.rotationY += 1;
    }
The onKeyUp() function uses a switch statement to call a function in response to certain keyboard keys being released. The comment next to each case statement shows the key that the keyCode property relates to.
    protected function onKeyUp(event:KeyboardEvent):void
    {
      switch (event.keyCode)
      {
        case 49: // 1
          applyWireColorMaterial();
          break;
        case 50: // 2
          applyWireframeMaterial();
          break;
        case 51: // 3
          applyColorMaterial();
          break;
        case 52: // 4
          applyBitmapMaterial();
          break;
        case 53: // 5
          applyDepthBitmapMaterial();
          break;
        case 54: // 6
          applyMovieMaterial();
          break;
        case 55: // 7
          applyInteractiveMovieMaterial();
          break;
        case 56: // 8
          applyAnimatedBitmapMaterial();
          break;
        case 57: // 9
          applyDot3BitmapMaterialF10();
          break;
        case 48: // 0
          applyDot3BitmapMaterial();
          break;
        case 81: // Q
          applyEnviroBitmapMaterial();
          break;
        case 87: // W
          applyEnviroColorMaterial();
          break;
        case 69: // E
          applyFresnelPBMaterial();
          break;
        case 82: // R
          applyPhongBitmapMaterial();
          break;
        case 84: // T
          applyPhongColorMaterial();
          break;
        case 89: // Y
          applyPhongMovieMaterial();
          break;
        case 85: // U
          applyPhongPBMaterial();
          break;
        case 73: // I
          applyPhongMultiPassMaterial();
          break;
        case 79: // O
          applyShadingColorMaterial();
          break;
        case 80: // P
          applyWhiteShadingBitmapMaterial();
          break;
        case 65: // A
          applyTransformBitmapMaterial();
          break;
        case 83: // S
          applyCubicEnvMapPBMaterial();
          break;
        case 68: // D
          applyBitmapFileMaterial();
          break;
        case 70: // F
          applyExternalDot3BitmapMaterial();
          break;
      }
    }
The remainder of the MaterialsDemo class is made up of the functions called by the onKeyUp() function that create a primitive 3D object, apply a material to it, and create a light if one is needed. The materials that are applied by these functions, the function itself, and a table showing the parameters that the materials accept are listed in the coming sections.
Tip
Unlike the classes used to create the primitive 3D objects in Chapter 2, Creating and Displaying Primitives, which usually accepted a single init object as the constructor parameter, the Away3D material classes have constructors that accept a combination of regular parameters and an init object. To distinguish between the two, the regular parameters will be shown in bold in the following tables.
The basic materials don't rely on a texture, and so can be used without having to load or embed any external resources. This makes them easy to use, and they are great for quickly prototyping an application.
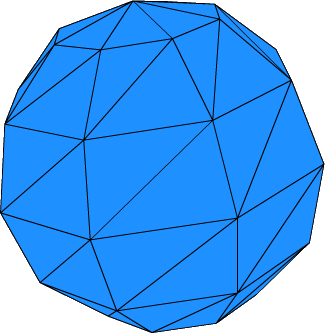
For most of the previous demos, we have not specifically applied any particular material to the 3D objects. When no material is specified, Away3D will apply the WireColorMaterial material, which shades the 3D object with a solid color (this color is randomly selected at runtime unless a specific color is supplied) and draws the outline of the 3D objects triangle faces.
Here we will specifically create a new instance of the WireColorMaterial class and apply it to the 3D object. The color of the material has been specified by a String representing the color's name.
    protected function applyWireColorMaterial():void
    {
The initSphere() function is called to add a sphere primitive to the scene.
initSphere();
The name of the material is assigned to the TextField text property, which will display the material name on the screen.
materialText.text = "WireColorMaterial";
The material itself is then created and assigned to the local newMaterial variable. Here we have defined the solid color to be dodgerblue (using a String to define the color), while the color of the wireframe will be white (defined by the int 0xFFFFFF) with a width of two pixels.
      var newMaterial:WireColorMaterial =
        new WireColorMaterial("dodgerblue",
        {
          wirecolor: 0xFFFFFF,
          width: 2
        }
      );
The new material is then assigned to the primitive via the Mesh material property.
      currentPrimitive.material = newMaterial;
    }
The following table lists the parameters accepted by the WireColorMaterial constructor. Those in bold are passed directly to the constructor, while the remaining parameters are passed in via an init object.
The WireColorMaterial class extends the WireframeMaterial class, which means the init object parameters listed for the WireframeMaterial class also apply to the WireColorMaterial class.
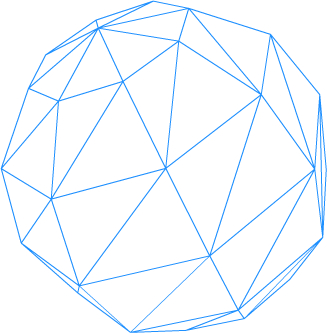
The WireframeMaterial only draws the outline of the triangle faces that make up the 3D object. In this example, the wireframe color has been specified using an int. This int value is equivalent to the dodgerblue color used in the
applyWireColorMaterial() function.
    protected function applyWireframeMaterial():void
    {
      initSphere();
      materialText.text = "WireframeMaterial";
      var newMaterial:WireframeMaterial =
        new WireframeMaterial(0x1E90FF,
        {
          width: 2
        }
      );
      currentPrimitive.material = newMaterial;
    }
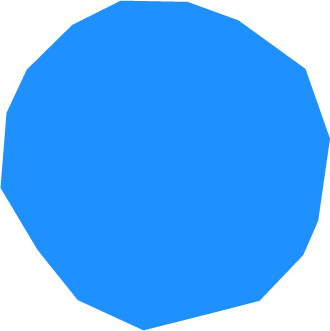
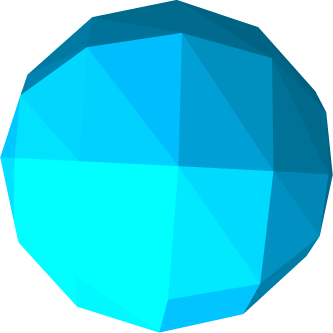
The ColorMaterial applies a solid color to the surface of a 3D object. This example shows the color being supplied as the string version of the dodgerblue hexadecimal representation.
    protected function applyColorMaterial():void
    {
      initSphere();
      materialText.text = "ColorMaterial";
      var newMaterial:ColorMaterial =
        new ColorMaterial("1E90FF");

      currentPrimitive.material = newMaterial;
    }
The ColorMaterial class extends the WireColorMaterial class, which means the init object parameters listed for the WireColorMaterial class also apply to the ColorMaterial class.
If the debug init object parameter is set to true, an instance of the ColorMaterial class will be drawn just like the WireColorMaterial class.
Bitmap materials display a texture on the surface of a 3D object. These textures are usually defined in external PNG, JPG, or GIF files created with an image editing application like Photoshop.
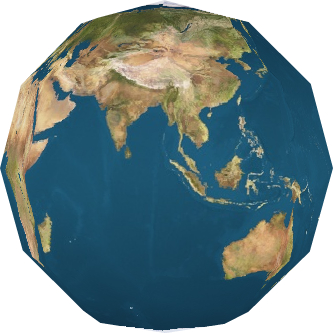
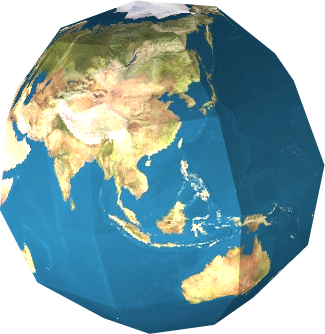
The BitmapMaterial class applies a bitmap texture to the surface of a 3D object. In this example, the bitmap is created from the embedded image contained in the EarthDiffuse class.
    protected function applyBitmapMaterial():void
    {
      initSphere();
      materialText.text = "BitmapMaterial";
Here we use the static bitmap() function from the Cast class to cast the EarthDiffuse class into a BitmapData object as required by the BitmapMaterial constructor.
      var newMaterial:BitmapMaterial =
        new BitmapMaterial(Cast.bitmap(EarthDiffuse));
      currentPrimitive.material = newMaterial;
    }
Tip
The Cast class offers a number of convenient functions to cast between types, but using these functions is not a requirement. A new instance of the BitmapMaterial class could also have been created using the following code:
var newMaterial:BitmapMaterial = new BitmapMaterial(new EarthDiffuse().bitmapData);
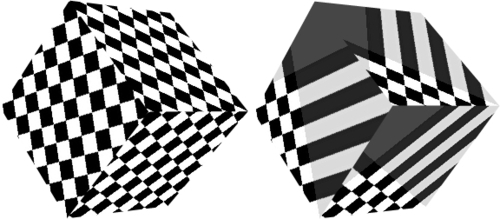
A bitmap material is usually applied to the surface of a 3D object based on its UV coordinates. The TransformBitmapMaterial material has a number of properties that allow its appearance to be scaled, offset, and rotated within the UV coordinates space.
Here we have used the rotation init object parameter to rotate the material by 45 degrees. This rotation shows up quite clearly on the cube, thanks to the checkerboard texture.
When transforming the material you will most likely want to set the repeat init object parameter to true. This ensures that the texture is repeated across the surface of the 3D object. If repeat is set to false (which it is, by default), the texture will be transformed and applied once, with the edge of the transformed texture then stretched across any remaining surface area. The screenshot on the left shows the result, if repeat is set to true. The screenshot on the right shows the result if repeat is set to false.
    protected function applyTransformBitmapMaterial():void
    {
      initCube();
      materialText.text = "TransformBitmapMaterial";
      var newMaterial:TransformBitmapMaterial =
        new TransformBitmapMaterial(Cast.bitmap(Checkerboard),
        {
          repeat: true,
          rotation: 45
        }
          );

      currentPrimitive.material = newMaterial;
    }
The TransformBitmapMaterial class extends the BitmapMaterial class. This means that in addition to those parameters in the following list, the init object parameters listed for the BitmapMaterial class are also valid for the TransformBitmapMaterial class.
A number of materials can be used to display animations on the surface of a 3D object. These animations are usually movies that have been encoded into a SWF file. You can also display an interactive SWF file, like a form, on the surface of a 3D object.
The MovieMaterial displays the output of a Sprite object, which can be animated. The sprite usually originates from another SWF file, which in this case we have embedded and referenced via the Bear class. A new instance of the Bear class is then passed to the MovieMaterial constructor.
    protected function applyMovieMaterial():void
    {
      initCube();
      materialText.text = "MovieMaterial";
      var newMaterial:MovieMaterial =
      new MovieMaterial(new Bear());
      currentPrimitive.material = newMaterial;
    }
The MovieMaterial class extends the TransformBitmapMaterial class. This means that in addition to those parameters in the following list, the init object parameters listed for the TransformBitmapMaterial are also valid for the MovieMaterial.
The AnimatedBitmapMaterial class displays the frames from a MovieClip object. In order to increase performance, it will first render each frame of the supplied MovieClip into a bitmap. These bitmaps are stored in a cache, which increases playback performance at the cost of using additional memory.
Because of the memory overhead resulting from this cache, the AnimatedBitmapMaterial cannot be used to display movie clips longer than two seconds. If you pass a movie clip longer than two seconds an exception will be thrown.
The MovieClip object, passed to the AnimatedBitmapMaterial constructor, usually originates from another SWF file. This source SWF file needs to be implemented in the ActionScript Virtual Machine 2 (AVM2) format, which is the format used by Flash Player 9 and above. This is an important point, because a large number of video conversion tools will output AVM1 SWF files.
If you try to use an AVM1 SWF file with the AnimatedBitmapMaterial class, an exception similar to the following will be thrown:
TypeError: Error #1034: Type Coercion failed: cannot convert flash.display::AVM1Movie@51e8e51 to flash.display.MovieClip.
Tip
FFmapeg is a free, cross-platform tool that can be used to convert video files into AVM2 SWF files. It can be downloaded from http://ffmpeg.org/, and precompiled Windows binaries can be downloaded from http://sourceforge.net/projects/mplayer-win32/files/FFmpeg/. The following command will convert a WMV video into a two second AVM2 SWF file with a resolution of 320 x 240 without any audio.
ffmpeg -i Butterfly.wmv -t 2 -s 320x240 -an -f avm2 Butterfly.SWF
    protected function applyAnimatedBitmapMaterial():void
    {
      initCube();
      materialText.text = "AnimatedBitmapMaterial";
      var newMaterial:AnimatedBitmapMaterial =
        new AnimatedBitmapMaterial(new Butterfly());
      currentPrimitive.material = newMaterial;
   }
The AnimatedBitmapMaterial class extends the TransformBitmapMaterial class. This means that in addition to those parameters in the following list, the init object parameters listed for the TransformBitmapMaterial are also valid for the AnimatedBitmapMaterial.
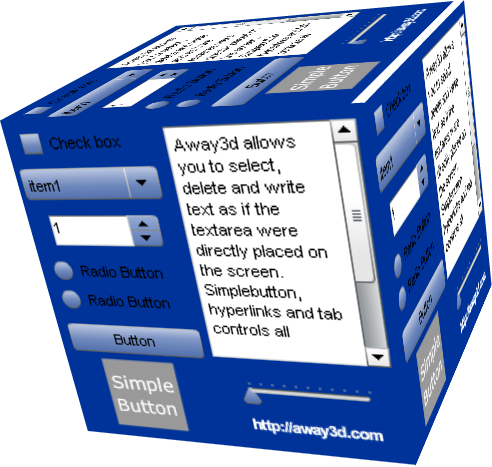
By setting the interactive parameter to true, a MovieMaterial object can pass mouse events to the Sprite object it is displaying. This allows you to interact with the material as if it were added directly to the Flash stage while it is wrapped around a 3D object.
    protected function applyInteractiveMovieMaterial():void
    {
      initCube();
      materialText.text = "MovieMaterial - Interactive";
      var newMaterial:MovieMaterial =
        new MovieMaterial(new InteractiveTexture(),
        {
          interactive: true,
          smooth: true
        }
      );
      currentPrimitive.material = newMaterial;
} 
Refer to the previous table for the MovieMaterial class for the list of constructor parameters.
Composite materials combine two or more base materials to achieve their final appearance. Composite materials are used to display a number of effects like shading, bump mapping, environment mapping, and lighting.
The DepthBitmapMaterial is similar to the BitmapMaterial in that it applies a bitmap texture to the surface of a 3D object. In addition, the DepthBitmapMaterial will shade the surface according to its distance from the camera. This can be used to apply a fog-like effect.
    protected function applyDepthBitmapMaterial():void
    {
The effect produced by the DepthBitmapMaterial class is best demonstrated on a 3D object that is moving relative to the camera. Setting the bounce parameter to true for the initShpere() function will cause the onEnterFrame() function to bounce the sphere along the Z-axis.
      initSphere(true);
      materialText.text = "DepthBitmapMaterial";
      var newMaterial:DepthBitmapMaterial =
        new DepthBitmapMaterial(Cast.bitmap(EarthDiffuse),
        {
Here, we define the distances from the camera over which the base bitmap texture is shaded. When the material is closer to the camera than the minZ parameter, it takes on the color defined by the minColor parameter. When it is further from the camera than the maxZ parameter, it should take on the color defined by the maxColor parameter.
Tip
There is a bug in Away3D 3.6 that causes the DepthBitmapMaterial class to interpret the maxColor parameter incorrectly. As it stands, supplying any color other than 0 to the maxColor parameter is required for the DepthBitmapMaterial object to apply a shade of black to its underlying bitmap material as it moves further from the camera. Leaving the maxColor parameter as its default value of 0x000000 (which is the same as 0) will cause the DepthBitmapMaterial object to completely ignore the base bitmap texture and only display the black shading.
As you can see in the following example, we supply a black color with the alpha component defined. This value does not equal zero, and so it is sufficient to work around this bug.
The actual value assigned to the maxColor parameter is incorrectly consumed by one of the classes contained in the DepthBitmapMaterial class. See the topic The problem with init and Init objects in Chapter 6, Models and Animations, for a more in depth explanation of this process.
The fix for this is quite simple. Change line 122 in the DepthBitmapMaterial.as file from:
_depthShader = new DepthShader({minZ:_minZ, maxZ:_maxZ, color:_maxColor});
to:
_depthShader = new DepthShader({minZ:_minZ, maxZ:_maxZ, shadingColor:_maxColor});
Also change line 208 of the DepthShader.as file from:
color = ini.getNumber("color", 0x000000);
to:
color = ini.getNumber("shadingColor", 0x000000);
          minZ: 400,
          maxZ: 500,
          maxColor: 0xFF000000
        }
      );
      currentPrimitive.material = newMaterial;
    }
DepthBitmapMaterial is a composite material, meaning it uses two or more base materials to achieve its final appearance. One of the base materials is the BitmapMaterial, and the init object supplied to the DepthBitmapMaterial is also passed along to the BitmapMaterial constructor. This means that in addition to those parameters in the following list, the init object parameters listed for the BitmapMaterial are also valid for the DepthBitmapMaterial.
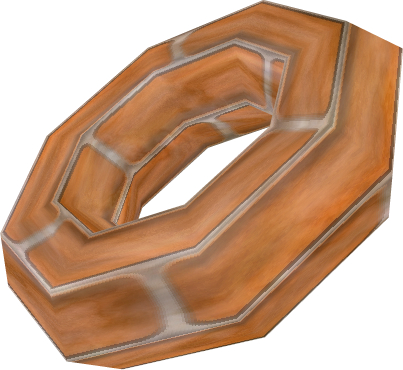
The EnviroBitmapMaterial class achieves the appearance of a reflective surface by applying a second bitmap as an environment map over a base BitmapMaterial.
    protected function applyEnviroBitmapMaterial():void
    {
      initTorus();
      materialText.text = "EnviroBitmapMaterial";
      var newMaterial:EnviroBitmapMaterial =
        new EnviroBitmapMaterial(
          Cast.bitmap(Bricks),
          Cast.bitmap(Marble)
        );
      currentPrimitive.material = newMaterial;
    }
Like the DepthBitmapMaterial material, EnviroBitmapMaterial is a composite material that passes the init object to a contained instance of the BitmapMaterial class. This means that in addition to those parameters in the following list, the init object parameters listed for the BitmapMaterial are also valid for the DepthBitmapMaterial.
The EnviroColorMaterial is similar to EnviroBitmapMaterial, with the exception that it uses a solid color instead of a bitmap as the base texture.
    protected function applyEnviroColorMaterial():void
    {
      initTorus();
      materialText.text = "EnviroColorMaterial";
      var newMaterial:EnviroColorMaterial =
        new EnviroColorMaterial(
          "sandybrown",
          Cast.bitmap(Marble)
        );
      currentPrimitive.material = newMaterial;
    }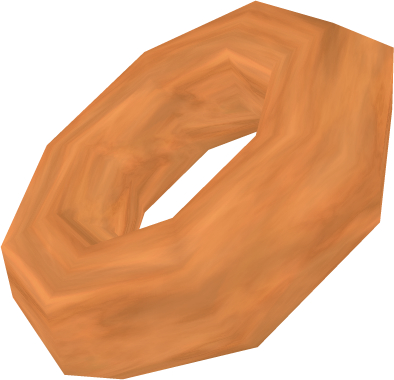
The EnviroColorMaterial class indirectly extends the ColorMaterial class, which means the init object parameters listed for the ColorMaterial class also apply to the EnviroColorMaterial class.
Light materials can be illuminated by an external light source. As was mentioned earlier, there are three different types of lights that can be applied to these materials: ambient, point, and directional. Also, remember that these materials will not necessarily recognize each type of light, or more than one light source. The table under the Lights and materials section lists which light sources can be applied to which materials.
The WhiteShadingBitmapMaterial class uses flat shading to apply lighting over a bitmap texture. As the class name suggests, the lighting is always white in color, ignoring the color of the source light.
    protected function applyWhiteShadingBitmapMaterial():void
    {
      initSphere();
      initPointLight();
      materialText.text = "WhiteShadingBitmapMaterial";
      var newMaterial:WhiteShadingBitmapMaterial =
        new WhiteShadingBitmapMaterial(
          Cast.bitmap(EarthDiffuse)
        );
      currentPrimitive.material = newMaterial;
    }
The WhiteShadingBitmapMaterial class extends the BitmapMaterial class. This means that in addition to those parameters in the following list, the init object parameters listed for the BitmapMaterial are also valid for the WhiteShadingBitmapMaterial.
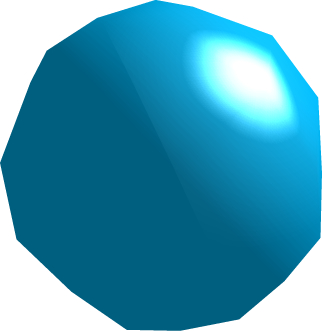
The ShadingColorMaterial class uses flat shading to apply lighting over a solid base color.
    protected function applyShadingColorMaterial():void
    {
      initSphere();
      initPointLight();
       materialText.text = "ShadingColorMaterial";
      var newMaterial:ShadingColorMaterial =
        new ShadingColorMaterial(
          Cast.trycolor("deepskyblue")
        );
      currentPrimitive.material = newMaterial;
    }
The ShadingColorMaterial class extends the ColorMaterial class. This means that in addition to those parameters in the following list, the init object parameters listed for the ColorMaterial class are also valid for the ShadingColorMaterial class.
Tip
The color parameter can accept an int or String value. However, due to a bug in the ColorMaterial class, only an int value will work correctly. In the previous example, we have manually converted the color represented by the string deepskyblue into an int with the trycolor() function from the Cast class.
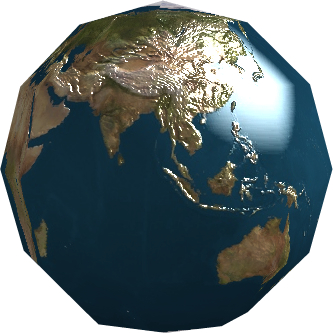
The PhongBitmapMaterial uses phong shading to apply lighting over a TransformBitmapMaterial base material.
    protected function applyPhongBitmapMaterial():void
    {
      initSphere();
      initDirectionalLight();
      materialText.text = "PhongBitmapMaterial";
      var newMaterial:PhongBitmapMaterial =
        new PhongBitmapMaterial(Cast.bitmap(EarthDiffuse));
      currentPrimitive.material = newMaterial;
    }
PhongBitmapMaterial is a composite material that passes the init object to a contained instance of the TransformBitmapMaterial class. This means that in addition to those parameters in the following list, the init object parameters listed for the TransformBitmapMaterial are also valid for the PhongBitmapMaterial.
The PhongColorMaterial uses phong shading to apply lighting over a solid color base material.
    protected function applyPhongColorMaterial():void
    {
      initSphere();
      initDirectionalLight();
      materialText.text = "PhongColorMaterial";
      var newMaterial:PhongColorMaterial =
      new PhongColorMaterial("deepskyblue");
      currentPrimitive.material = newMaterial;
    }
The PhongMovieMaterial uses phong shading to apply lighting over an animated MovieMaterial base material.
    protected function applyPhongMovieMaterial():void
    {
      initSphere();
      initDirectionalLight();
      materialText.text = "PhongMovieMaterial";
      var newMaterial:PhongMovieMaterial =
        new PhongMovieMaterial(new Bear());
      currentPrimitive.material = newMaterial;
    }
PhongMovieMaterial is a composite material that passes the init object to a contained instance of the MovieMaterial class. This means that in addition to those parameters in the following list, the init object parameters listed for the PhongMovieMaterial are also valid for the MovieMaterial.
The Dot3BitmapMaterial uses normal mapping to add depth to a 3D object.
    protected function applyDot3BitmapMaterial():void
    {
      initSphere();
      initDirectionalLight();
      materialText.text = "Dot3BitmapMaterial";
      var newMaterial:Dot3BitmapMaterial =
        new Dot3BitmapMaterial(
          Cast.bitmap(EarthDiffuse),
          Cast.bitmap(EarthNormal)
        );
      currentPrimitive.material = newMaterial;
    }
Dot3BitmapMaterial is a composite material that passes the init object to a contained instance of the BitmapMaterial class. This means that in addition to those parameters in the following list, the init object parameters listed for the BitmapMaterial are also valid for the Dot3BitmapMaterial.
Away3D includes a number of materials that make use of Pixel Bender shaders. These materials will quite often produce effects of a much higher detail than is possible with the materials listed so far. The ability to use Pixel Bender shaders is one of the advantages Away3D version 3.x has over Away3D version 2.x. This is due to the fact that Away3D 3.x targets Flash Player 10, whereas Away3D 2.x targets Flash Player 9.
The Dot3BitmapMaterialF10 class is a Pixel Bender version of the Dot3BitmapMaterial class.
    protected function applyDot3BitmapMaterialF10():void
    {
      initSphere();
      initDirectionalLight();
      materialText.text = "Dot3BitmapMaterialF10";
      var newMaterial:Dot3BitmapMaterialF10 =
        new Dot3BitmapMaterialF10(
          Cast.bitmap(EarthDiffuse),
          Cast.bitmap(EarthNormal)
        );
      currentPrimitive.material = newMaterial;
    }
The Dot3BitmapMaterialF10 class extends the BitmapMaterial class, which means the init object parameters listed for the BitmapMaterial class also apply to the Dot3BitmapMaterialF10 class.
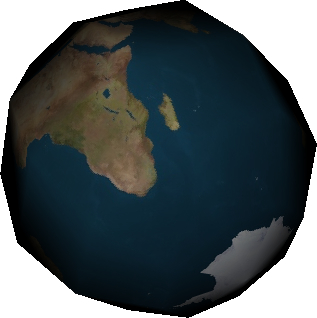
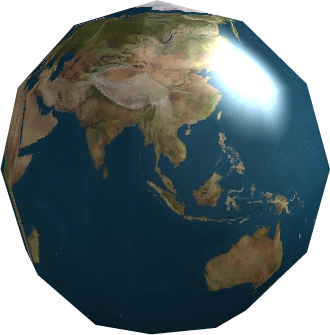
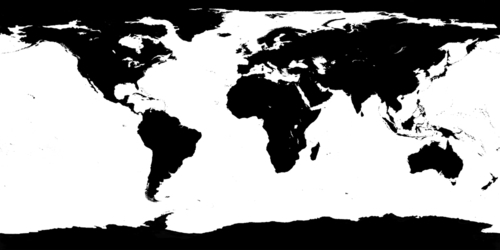
The PhongPBMaterial class uses phong shading and normal mapping to add depth and illuminate a 3D object. In addition, it uses a specular map to define the strength of the reflected light, with brighter areas reflecting more light than darker areas.
In the following image, which is embedded in the application as the class EarthSpecular, the oceans are shown in white, meaning that light will be reflected off those areas. The land masses are shown in black, which prevents light from being reflected off those areas.
    protected function applyPhongPBMaterial():void
    {
      initSphere();
      initPointLight();
      materialText.text = "PhongPBMaterial";
      var newMaterial:PhongPBMaterial = new PhongPBMaterial(
        Cast.bitmap(EarthDiffuse),
        Cast.bitmap(EarthNormal),
        currentPrimitive,
        Cast.bitmap(EarthSpecular));
      currentPrimitive.material = newMaterial;
    }
The PhongPBMaterial class indirectly extends the TransformBitmapMaterial class, which means the init object parameters listed for the TransformBitmapMaterial class also apply to the PhongPBMaterial class.
The PhongMultiPassMaterial class is like the PhongPBMaterial class, except that it can be illuminated from multiple light sources.
    protected function applyPhongMultiPassMaterial():void
    {
      initSphere();
      initPointLight();
      materialText.text = "PhongMultiPassMaterial";
      var newMaterial:PhongMultiPassMaterial =
        new PhongMultiPassMaterial(
          Cast.bitmap(EarthDiffuse),
          Cast.bitmap(EarthNormal),
          currentPrimitive,
          Cast.bitmap(EarthSpecular)
        );
      currentPrimitive.material = newMaterial;
    }
The PhongMultiPassMaterial class indirectly extends the TransformBitmapMaterial class, which means the init object parameters listed for the TransformBitmapMaterial class also apply to the PhongMultiPassMaterial class.
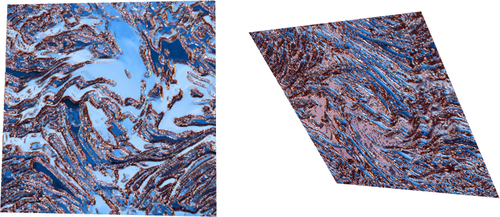
The Fresnel effect refers to the phenomenon where the amount of reflectance seen on a surface depends on the viewing angle. The most common example of this is seen on the surface of a body of water. If you look down directly at a pool of water you will be able to see down through the water without much reflected light. But if you look at the water's surface from an angle you will see much more reflected light.
The FresnelPBMaterial class replicates this effect by reflecting a sphere map that represents the surrounding environment by a varying degree according to the viewing angle of the surface.
    protected function applyFresnelPBMaterial():void
    {
      initPlane();
      materialText.text = "FresnelPBMaterial";
The reflected image comes from a sphere map, which is a texture that displays the surroundings of an object as if it were reflected off the surface of a sphere. This texture has been embedded as the SphereMap class.
      var newMaterial:FresnelPBMaterial = new FresnelPBMaterial(
        Cast.bitmap(Water),
        Cast.bitmap(WaterNormal),
        Cast.bitmap(SphereMap),
        currentPrimitive,
          {
            smooth: true
          }
      );
      currentPrimitive.material = newMaterial;
    }
You can see how the Fresnel reflection works in the following images. In the image on the left, the flat areas reflect the base blue water material. When looking at the surface from a more side on angle, the orange environment material is now reflected.
The FresnelPBMaterial class indirectly extends the TransformBitmapMaterial class, which means that the init object parameters listed for the TransformBitmapMaterial class also apply to the FresnelPBMaterial class.
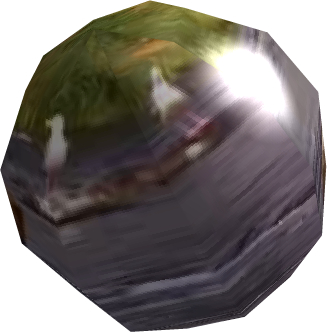
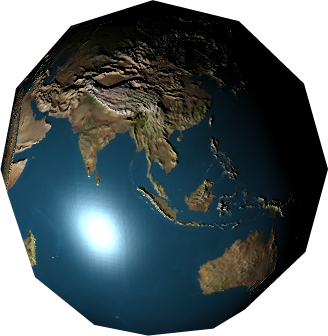
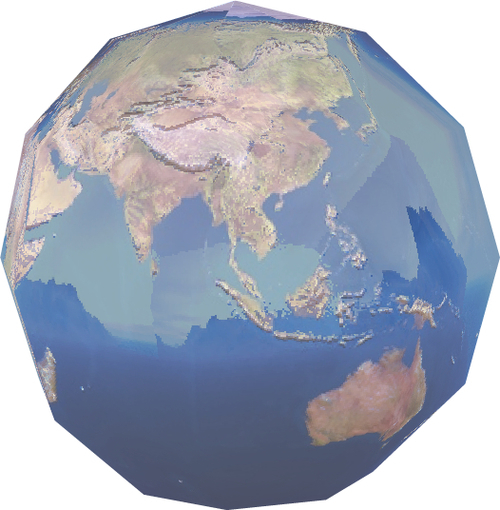
The CubicEnvMapPBMaterial uses environment mapping to add the reflection of a cube of textures to a base-normal mapped texture.
    protected function applyCubicEnvMapPBMaterial():void
    {
      initSphere();
      materialText.text = "CubicEnvMapPBMaterial";
The reflections shown by the CubicEnvMapPBMaterial class come from six textures that form a cube that appears to surround the 3D object. These six textures are placed into the sky Array.
      var sky:Array = new Array();
      sky[CubeFaces.LEFT] = Cast.bitmap(Skyleft);
      sky[CubeFaces.FRONT] = Cast.bitmap(Skyfront);
      sky[CubeFaces.RIGHT] = Cast.bitmap(Skyright);
      sky[CubeFaces.BACK] = Cast.bitmap(Skyback);
      sky[CubeFaces.TOP] = Cast.bitmap(Skyup);
      sky[CubeFaces.BOTTOM] = Cast.bitmap(Skydown);

      var newMaterial:CubicEnvMapPBMaterial =
      new CubicEnvMapPBMaterial(
          Cast.bitmap(EarthDiffuse),
          Cast.bitmap(EarthNormal),
          sky,
          currentPrimitive,
            {
              envMapAlpha: 0.5
            }
          );

      currentPrimitive.material = newMaterial;
    }
The CubicEnvMapPBMaterial class indirectly extends the TransformBitmapMaterial class, which means the init object parameters listed for the TransformBitmapMaterial class also apply to the CubicEnvMapPBMaterial class.