The DirectionalSprite class provides a way to display one of a selection of materials depending on the relative position of the camera to the sprite. By providing a number of snapshots of a complex 3D object over a range of angles, it is possible to fake the look of a complex 3D object using much less processing power than it would take to render the actual 3D object in real time. This process was popular with a number of older games like Wolfenstein 3D and Doom.
Before we can implement the DirectionalSprite class, we first need a number of images taken or drawn of an object at various angles.
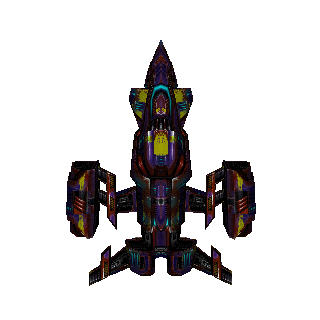
Here is a shot taken of a 3D model. In this image, the camera is lying on the positive end of the Z-axis looking back at the 3D object, which is situated at the origin. So the unit vector (a vector with a length of 1 unit) pointing from the 3D object back to the camera is (0, 0, 1). This vector is important, and will be used later on.
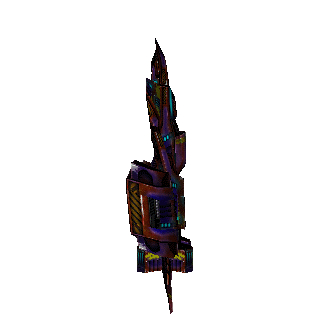
Here is a shot taken from the side of the 3D model. In this image, the camera is lying on the positive end of the X-axis looking at the 3D object at the origin. The unit vector from the 3D object back to the camera for this shot is (1, 0, 0).
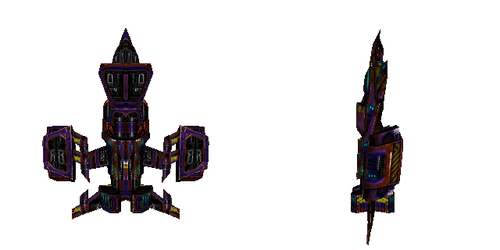
Here are two more shots of the 3D object. They are taken from the opposite sides to the two first shots, so the unit vector from the 3D object back to the camera for these shots is (0, 0, -1) and (0, -1, 0) respectively.
Now that we have some images of the 3D object from different angles, let's create an application called SimpleDirectionalSpriteDemo that displays them using a DirectionalSprite object.
package
{
  import away3d.core.base.Mesh;
  import away3d.core.base.Vertex;
  import away3d.core.utils.Cast;
  import away3d.core.utils.Init;
  import away3d.materials.BitmapMaterial;
  import away3d.sprites.DirectionalSprite;
  import flash.geom.Vector3D;

  import flash.events.Event;

  public class SimpleDirectionalSpriteDemo extends Away3DTemplate
  {
The four shots of the 3D object are embedded.
    [Embed(source = "front.png")]
    protected var FrontImage:Class;
    [Embed(source = "right.png")]
    protected var RightImage:Class;
    [Embed(source = "back.png")]
    protected var BackImage:Class;
    [Embed(source = "left.png")]
    protected var LeftImage:Class;

    protected var sprite:DirectionalSprite;
    protected var parentMesh:Mesh;

    public function SimpleDirectionalSpriteDemo()
    {
      super();
    }

    protected override function initScene():void
    {
      super.initScene();
Here we create a new instance of the DirectionalSprite class.
sprite = new DirectionalSprite();
The DirectionalSprite object will display the four images shown previously. Each of these images is added via the addDirectionalMaterial() function.
The first parameter defines the direction from the DirectionalSprite object to the camera from which the image will be viewed. This is the same direction that was described against the images shown above.
The second parameter is the material that will be displayed. Here, we use a BitmapMaterial object that displays one of the embedded images.
      sprite.addDirectionalMaterial(
        new Vertex(0, 0, 1),
        new BitmapMaterial(
          Cast.bitmap(FrontImage),
          { smooth: true }
        )
      );
      sprite.addDirectionalMaterial(
        new Vertex(1, 0, 0),
        new BitmapMaterial(
          Cast.bitmap(RightImage),
          { smooth: true }
        )
      );
      sprite.addDirectionalMaterial(
        new Vertex(0, 0, -1),
        new BitmapMaterial(
          Cast.bitmap(BackImage),
          { smooth: true }
        )
      );
      sprite.addDirectionalMaterial(
        new Vertex( -1, 0, 0),
        new BitmapMaterial(
          Cast.bitmap(LeftImage),
          { smooth: true }
        )
      );
To display the DirectionalSprite object, we need to add it to a Mesh object, which we create here.
parentMesh = new Mesh();
The DirectionalSprite object is then added to the Mesh object.
parentMesh.addSprite(sprite);
Finally, the Mesh object is added to the scene.
      scene.addChild(parentMesh);
    }
In the onEnterFrame() function, we rotate the DirectionalSprite object around its Y-axis, just like we could rotate any other 3D object. It is important to note that rotating the DirectionalSprite object in this way does not actually change its orientation within the scene: all Away3D sprites orient themselves to face the camera at all times. But this rotation does change the material that is displayed by the DirectionalSprite object .
To begin with, the rotationY property will be 0. This means that the local Z-axis of the DirectionalSprite object is pointing down towards the positive end of the global Z-axis. Remember that the DirectionalSprite object has been placed in front of the camera. This means that initially the camera is viewing the DirectionalSprite object from behind. Thus, the unit vector pointing from the 3D object to the camera is (0, 0, -1).
Looking back to the materials we assigned via the addDirectionalMaterial() function, we can see that the image represented by the BackImage class is the one that most closely matches the relative position of the camera. This means that when the application is first run, the DirectionalSprite object will display the texture showing the 3D object from the back.
Increasing the rotationY property has the effect of turning the DirectionalSprite object to the right. When the rotation property approaches 90 degrees, the DirectionalSprite object will display the RightImage texture because the relative angle between the camera and the DirectionalSprite object will be smallest when compared with the angle defined for the RightImage texture.
As the rotationY property increases even more, the DirectionalSprite object will display the FrontImage and LeftImage textures, before going back to display the BackImage texture.
    protected override function onEnterFrame(event:Event):void
    {
      super.onEnterFrame(event);
      parentMesh.rotationY += 5;
    }
  }
}While this application only shows four images, you can use many more images to achieve smoother transition between angles. The DirectionalSpriteDemo application available on the Packt website uses 72 images to show the 3D object from angles 5 degrees apart. This produces quite a smooth appearance as the DirectionalSprite object is rotated, and does so at a high frame rate. However, while the DirectionalSprite class can use many individual images to display highly detailed 3D objects while maintaining a high frame rate, quite often the memory required by the individual images is much greater than if you were to add a 3D object to the scene directly.