In the preceding examples, we have manually created and transformed the sprite objects. In the Sprite3D demo, we created an effect that looked like a field of rising balloons, and in the DepthOfFieldSpriteDemo demo we created an effect that looked like a collection of particles suspended in a clear, rotating liquid. We could create an almost endless variety of effects, like smoke, fire, water, firework, in much the same way, but defining the properties of each of these effects individually every time would be time consuming. This is where a particle system comes in handy. A particle system provides a collection of common classes that allow you to quickly build up effects using particles (or sprites, as is the case with Away3D).
Away3D does not include a particle system, but there are a number of particle system libraries available that can be integrated with Away3D. Flint, which can be downloaded from http://flintparticles.org/, is a particle system that natively supports Away3D. Flint includes a number of demos that show how it can be used with Away3D.
Stardust, which can be downloaded from http://code.google.com/p/stardust-particle-engine/, is another particle system with support for Flash 3D engines. At the time of writing, Stardust version 1.2.163 does not have any native support for Away3D, but it is fairly easy to integrate the two libraries.
The following code uses Stardust version 1.2.163, which relies on the CJsignals library that can be downloaded from http://code.google.com/p/cjsignals/.
We need to create two classes to integrate Stardust and Away3D. The first is an initializer class. The purpose of this class is to provide a way to construct new Away3D sprite objects by calling the constructor of an Away3D sprite class with some specified arguments. In essence, this initializer class provides a flexible mechanism by which new sprite objects can be created at runtime.
We will create this initializer class in the stardust.initializers package, which is in keeping with the format used by the Stardust library itself.
package stardust.initializers
{
  import away3d.sprites.Sprite3D;

  import idv.cjcat.stardust.common.particles.Particle;
  import idv.cjcat.stardust.common.utils.construct;
  import idv.cjcat.stardust.threeD.initializers.Initializer3D;
We will call this class Away3DParticle, to indicate that it initializes an Away3D sprite to be attached to a Stardust particle. We extend the Stardust Initializer3D class, which will allow this class to initialize a 3D Stardust particle.
  public class Away3DParticle extends Initializer3D
  {
The _constructorParams collection will hold the values that will be passed to the Sprite3D constructor.
private var _constructorParams:Array;
The constructor takes an Array and assigns it to the _constructorParams property.
    public function Away3DParticle(constructorParams:Array = null)
    {
      this.constructorParams = constructorParams;
    }
A pair of get() and set() functions are defined to allow the constructor parameters to be retrieved and set after the Away3DParticle object has been created.
    public function get constructorParams():Array { return _constructorParams; }
    public function set constructorParams(value:Array):void
    {
      if (!value) value = [];
      _constructorParams = value;
    }
The initialize() function is called by the Stardust library to attach a new Away3D sprite to a particle.
    override public function initialize(particle:Particle):void
    {
The construct() function, provided by the Stardust library, provides a way to pass an arbitrary number of parameters to the constructor of a given class, which is the Sprite3D class in this case. The resulting Sprite3D object is then assigned to the Stardust particle object's target property. This allows us to retrieve a reference to the Sprite3D object from the Stardust particle object later on.
      particle.target = construct(Sprite3D, _constructorParams);
    }
  }
}The second class we need to create is the particle renderer. This class provides a way for the Stardust library to add and remove sprites from the scene, as well as transfer the properties of the Stardust particles (like position, rotation, and scale) to the Away3D sprites that will be visually representing them.
We will create this particle renderer class in the stardust.renderers package. Again, this is in keeping with the format used by the Stardust library itself.
package stardust.renderers
{
  import away3d.core.base.Mesh;
  import away3d.sprites.Sprite3D;
  import idv.cjcat.stardust.common.emitters.Emitter;
  import idv.cjcat.stardust.common.particles.ParticleCollection;

  import idv.cjcat.stardust.common.events.EmitterEvent;
  import idv.cjcat.stardust.common.particles.ParticleIterator;
  import idv.cjcat.stardust.common.renderers.Renderer;
  import idv.cjcat.stardust.common.xml.XMLBuilder;
  import idv.cjcat.stardust.threeD.particles.Particle3D;
The class is called Away3DParticleRenderer, to indicate that it is used to render Away3D particles. We extend the Stardust Renderer class, which provides the functions used by the Stardust library to manage its particles.
  public class Away3DParticleRenderer extends Renderer
  {
The particleContainer property will maintain a reference to the parent Mesh object that will hold our Sprite3D objects.
private var particleContainer:Mesh;
The constructor takes a Mesh parameter, and assigns it to the particleContainer property.
    public function Away3DParticleRenderer(particleContainer:Mesh = null)
    {
      super();
      this.particleContainer = particleContainer;
    }
The render() function is used to transfer the properties of the Stardust particles to the Away3D sprites that represent them.
    protected override function render(emitter:Emitter, particles:ParticleCollection, time:Number):void
    {
Here we loop over all the particles provided by the particles parameter.
      var particle:Particle3D;
      var iter:ParticleIterator =
        particles.particles.getIterator();
      while (particle = Particle3D(iter.particle))
      {
If you look back at the Away3DParticle initialize() function, you will see that we assigned the Sprite3D objects to the target property of the Stardust particle object. Here we do the reverse, using the target property to get access to the Sprite3D object.
var p:Sprite3D = particle.target as Sprite3D;
The Stardust Particle3D class maintains its own set of properties, which are used to define the appearance of the particle. However, the Stardust particle itself is not visible; it simply holds the properties that define how the particle should appear. It is the job of the particle renderer class to map the properties of the Stardust particle to the object that is being used to represent the particle on the screen. In our case, the object that is being used to represent the particle on the screen is a Sprite3D. Here we take the position and scale of the Stardust particle and assign those values to the Sprite3D object.
        p.x = particle.x;
        p.y = particle.y;
        p.z = particle.z;
        p.scaling = particle.scale;


        iter.next();
      }
}The particlesAdded() function is used to add the Sprite3D objects attached to Stardust particles to the parent Mesh object, referenced by the particleContainer property.
    protected override function particlesAdded(emitter:Emitter, particles:ParticleCollection):void
    {
      if (!particleContainer) return;
      var particle:Particle3D;
      var iter:ParticleIterator =
        particles.particles.getIterator();
      while (particle = Particle3D(iter.particle))
      {
        var p:Sprite3D = particle.target as Sprite3D;
        particleContainer.addSprite(p);
        iter.next();
      }
    }
The particlesRemoved() function is used to remove the Sprite3D objects attached to Stardust particles from the parent Mesh object.
    protected override function particlesRemoved(emitter:Emitter, particles:ParticleCollection):void
    {
      if (!particleContainer) return;
      var particle:Particle3D;
      var iter:ParticleIterator =
        particles.particles.getIterator();
      while (particle = Particle3D(iter.particle))
      {
        var p:Sprite3D = particle.target as Sprite3D;
        particleContainer.removeSprite(p);
        iter.next();
      }
    }
The getXMLTagName() function should return the name of the class. This function is used by the Stardust library to load particle effects from an XML file.
    //XML

    public override function getXMLTagName():String
    {
      return "Away3DParticleRenderer";
    }

    //end of XML
  }
}Now that we have created the classes that will allow Away3D to be used with Stardust, we can create a simple emitter. An emitter combines initializers, which define the initial properties of a particle, and actions, which define how a particle will be modified over time. The Stardust library comes with a large selection of initializers and actions, which allow us to create some interesting effects with a minimum of code.
package
{
  import away3d.core.utils.Cast;
  import away3d.materials.BitmapMaterial;

  import idv.cjcat.stardust.common.actions.Age;
  import idv.cjcat.stardust.common.actions.DeathLife;
  import idv.cjcat.stardust.common.actions.ScaleCurve;
  import idv.cjcat.stardust.common.clocks.SteadyClock;
  import idv.cjcat.stardust.common.initializers.Life;
  import idv.cjcat.stardust.common.math.UniformRandom;
  import idv.cjcat.stardust.threeD.actions.Damping3D;
  import idv.cjcat.stardust.threeD.actions.Move3D;
  import idv.cjcat.stardust.threeD.actions.Spin3D;
  import idv.cjcat.stardust.threeD.emitters.Emitter3D;
  import idv.cjcat.stardust.threeD.fields.UniformField3D;
  import idv.cjcat.stardust.threeD.initializers.Omega3D;
  import idv.cjcat.stardust.threeD.initializers.Position3D;
  import idv.cjcat.stardust.threeD.initializers.Rotation3D;
  import idv.cjcat.stardust.threeD.initializers.Velocity3D;
  import idv.cjcat.stardust.threeD.zones.SinglePoint3D;
  import idv.cjcat.stardust.threeD.zones.SphereShell;

  import stardust.initializers.Away3DParticle;
The emitter class, called StarDustSparksEmitter, extends the Stardust Emitter3D class. This will allow us to define a 3D particle system.
  public class StarDustSparksEmitter extends Emitter3D
  {
The Away3D Sprite3D objects will display a BitmapMaterial that displays the embedded star.png image as a texture.
    [Embed(source="star.png")]
    protected var Star:Class;

    public function StarDustSparksEmitter()
    {
The base Emitter3D class constructor takes a clock object as a parameter. This clock object defines how many particles will be created per frame. Here we have used the SteadyClock class. By passing in 0.3 to the ticksPerCall constructor parameter, we have given this emitter a 30 percent chance of creating a new particle every frame.
super(new SteadyClock(0.3));
Now we define the initial properties of the particles. This is done by passing initializer classes to the emitter using the addInitializer() function.
First up, we use the Away3DParticle initializer, which we created above, to assign a Sprite3D object to each new particle. We have passed in an Array that contains a new BitmapMaterial object as the first parameter of the Away3DParticle constructor. This BitmapMaterial object will then be passed to the Sprite3D constructor as new Sprite3D objects are created by the Away3DParticle initialize() function. The second object in the Array is an init object, which sets the smooth init object parameter to true. This init object will be passed as the second parameter to the Sprite3D constructor.
      addInitializer(
        new Away3DParticle(
        [
          new BitmapMaterial(Cast.bitmap(Star),
            {smooth: true})
        ]
        )
);The Life initializer uses the UniformRandom class to set the initial lifespan of each new particle to between 10 and 50 frames.
addInitializer(new Life(new UniformRandom(50, 10)));
The Position3D initializer uses the SinglePoint3D class to set the initial position of each new particle to (0, 0, 2500).
      addInitializer(
new Position3D(new SinglePoint3D(0, 0, 2500)));
The Velocity3D initializer uses the SphereShell class to define the initial velocity of the new particles. This velocity is defined as a vector pointing from the origin to a random point on a sphere centered on the origin (defined by the first three parameters passed to the SphereShell constructor) that is between 30 and 40 units in radius (defined by the last two parameters passed to the SphereShell constructor). You can see in the following image how some of these random vectors might be created:
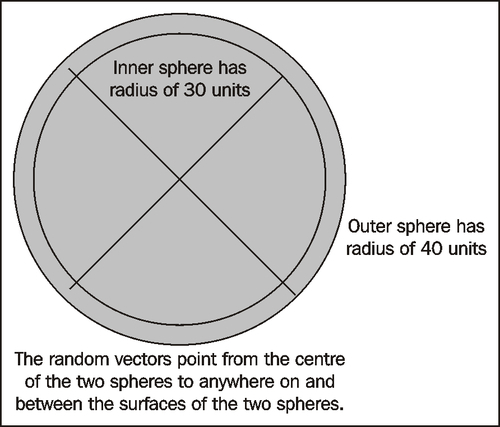
      addInitializer(
        new Velocity3D(new SphereShell(0, 0, 0, 30, 40)));
The Rotation3D initializer is used here to set the initial rotation of the new particles to between 0 and 180 degrees around the Z-axis. Because of a bug in Away3D 3.6, the Sprite3D objects won't actually be rotated. However, if you use the version of Away3D from the SVN repository, and include the line of code motioned in the tip for the Away3DParticleRenderer render() function, you can implement rotations for Sprite3D objects.
      addInitializer(
        new Rotation3D(
        null,
        null,
        new UniformRandom(0, 180)
        )
      );
Finally, we use the Omega3D initializer to set the rotational velocity of the new particles to between 0 and 5 degrees per frame around the Z-axis.
      addInitializer(
        new Omega3D(null, null, new UniformRandom(0, 5))
      );
Now that we have defined the initial properties that will be assigned to new particles, we need to define how the particles will be modified over time. New action classes are added to the emitter using the addAction() function.
The Age action will decrease the life of each particle by one each frame.
addAction(new Age());
The DeathLife action will remove a particle from the system when its age reaches zero.
addAction(new DeathLife());
The Move3D action will move a particle according to its velocity in three dimensions each frame.
addAction(new Move3D());
The Spin3D action will rotate a particle according to its rotational velocity each frame.
addAction(new Spin3D());
The Damping3D action will reduce the velocity of the particles by the supplied fraction each frame. By supplying 0.05 to the Damping3D constructor, we will decrease the velocity of each particle by 5 percent each frame.
addAction(new Damping3D(0.05));
The ScaleCurve action is used to scale the particle from nothing up to its native size, and then back down to nothing. Because we have supplied 0 to the first ScaleCurve constructor parameter, the particles will not be scaled up, and instead will be created at their native size. Setting the second parameter to 10 indicates that the particles will scale down to nothing over the last 10 frames of their life.
      addAction(new ScaleCurve(0, 10));
    }
  }
}With the emitter created, we can now initialize the Away3D engine, the Away3D particle renderer, and the emitter itself. This is done by a class called StarDustDemo.
package
{
  import away3d.core.base.Mesh;
  import flash.geom.Vector3D;

  import flash.events.Event;

  import idv.cjcat.stardust.threeD.emitters.Emitter3D;

  import stardust.renderers.Away3DParticleRenderer;
We create a new class that extends the Away3DTemplate class, just as we have done for all the other applications presented in this book so far.
  public class StarDustDemo extends Away3DTemplate
  {
The emitter will be referenced by the emitter property.
    protected var emitter:Emitter3D;

    public function StarDustDemo()
    {
      super();
    }

    protected override function initScene():void
    {
      super.initScene();
The position of the camera is set to the origin of the scene.
this.camera.position = new Vector3D();
We need to create a new instance of the emitter class.
emitter = new StarDustSparksEmitter();
We also need to create a new instance of the Away3D particle renderer class. We pass in the scene property to the Away3DParticleRenderer constructor. This means that all the new Sprite3D objects will be directly added to the scene.
      var renderer:Away3DParticleRenderer =
        new Away3DParticleRenderer(this.scene);
The emitter is then added to the Away3D particle renderer.
      renderer.addEmitter(emitter);
    }

    protected override function onEnterFrame(event:Event):void
    {
      super.onEnterFrame(event);
To update the particle system, we need to call the emitter's step() function. This will update the particle effect by one frame.
emitter.step();
}
}
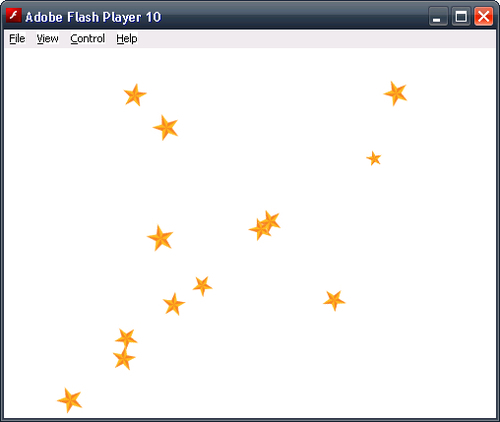
}Although we had to do some work creating the classes that glue the Stardust library to the Away3D engine, once that was done we could create a reasonably complicated particle effect (including movement, rotation, and scaling) with just a dozen or so lines of code (if you exclude the boilerplate code for the import statements and the class and function declarations). This is why a library like Stardust is so useful.
You can see the final result of the StarDustDemo application in the following screenshot: