
Chapter 5
A Bit About Eclipse
Eclipse is an extremely popular integrated development environment (IDE), particularly for Java development. It is also designed to be extensible via an add-in system. To top it off, Eclipse is open source, thanks to the beneficence of IBM many years back in its decision to release Eclipse to the wide world. That combination made it an ideal choice of IDE for the core Android developer team.
Specifically, to go alongside the Android SDK, Google has published some add-ins for the Eclipse environment. Primary among these is the Android Developer Tools (ADT) add-in, which gives Eclipse it core awareness of Android.
What the ADT Gives You
The ADT add-in, in essence, takes regular Eclipse operations and extends them to work with Android projects. For example, with Eclipse, you get the following features (among others):
- New project wizards to create regular Android projects, Android test projects, and so forth
- The ability to run an Android project just like you might run a regular Java application—via the green Run button in the toolbar—despite the fact that this really involves pushing the Android application over to an emulator or device, possibly even starting up the emulator if it is not running
- Tooltip support for Android classes and methods
In addition, the latest version of the ADT provides you with preliminary support for drag-and-drop GUI editing. While this book will focus on the XML files that Eclipse generates, Eclipse now lets you assemble those XML files by dragging GUI components around on the screen, adjusting properties as you go. Drag-and-drop GUI editing is fairly new, so there may be a few rough edges for a while as the community and Google identify the problems and limitations with the current implementation.
Coping with Eclipse
Eclipse is a powerful tool. Like many powerful tools, Eclipse is sometimes confounding. Determining how to solve some specific development problem can be a challenge, exacerbated by the newness of Android itself.
This section offers some tips for handling some common issues in using Eclipse with Android.
How to Import a Non-Eclipse Project
Not all Android projects ship with Eclipse project files, such as the sample projects associated with this book. However, you can easily add them to your Eclipse workspace, if you wish. Here's how to do it!
First, choose File ![]()
![]()
New ![]()
![]()
Project from the Eclipse main menu, as shown in Figure 5–1.
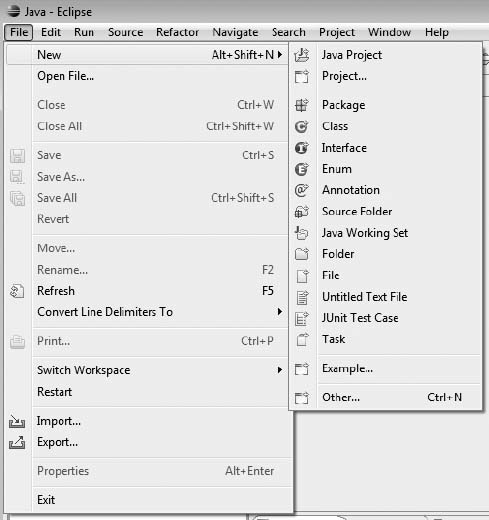
Figure 5–1. File menu in Eclipse
Then, choose Android ![]()
![]()
Android Project from the tree of available project types, as shown in Figure 5–2, and click Next.
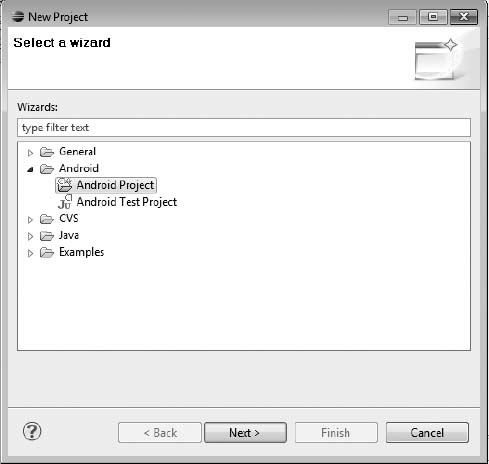
Figure 5–2. New Project wizard in Eclipse
NOTE: If you do not see this option, you have not installed Android Developer Tools.
Then, on the first page of the New Android Project wizard, choose the “Create project from existing source” radio button, click the Browse button, and open the directory containing your project's AndroidManifest.xml file. This will populate most of the rest of the wizard page, though you may need to also specify a build target from the table, as shown in Figure 5–3.
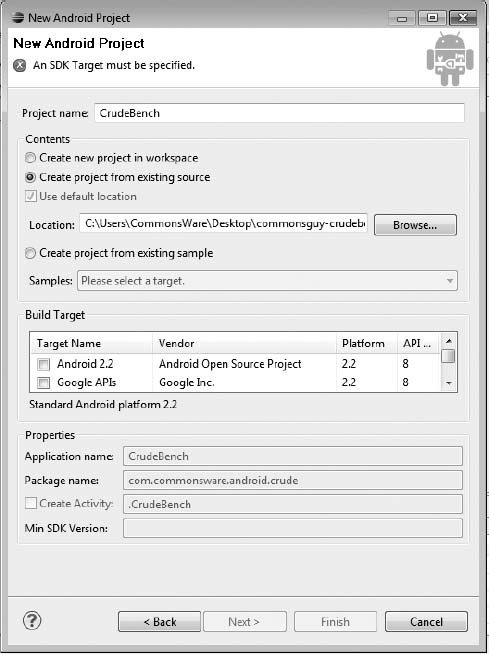
Figure 5–3. New Android Project wizard in Eclipse
Then, click Finish. This will return you to Eclipse, with the imported project in your workspace, as shown in Figure 5–4.
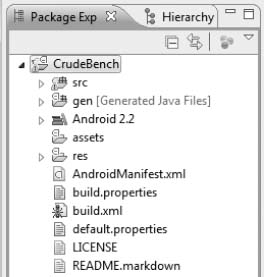
Figure 5–4. Android project tree in Eclipse
Next, right-click the project name and choose Build Path ![]()
![]()
Configure Build Path from the context menu, as shown in Figure 5–5.
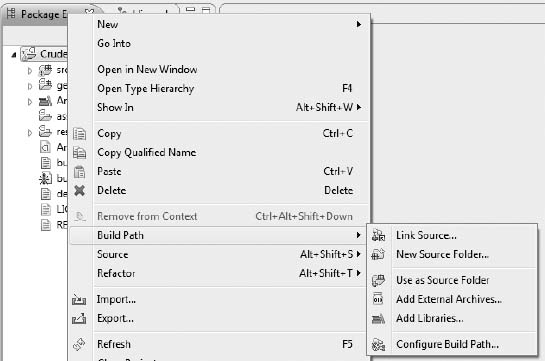
Figure 5–5. Project context menu in Eclipse
This brings up the Java Build Path portion of the project Properties window, as shown in Figure 5–6.
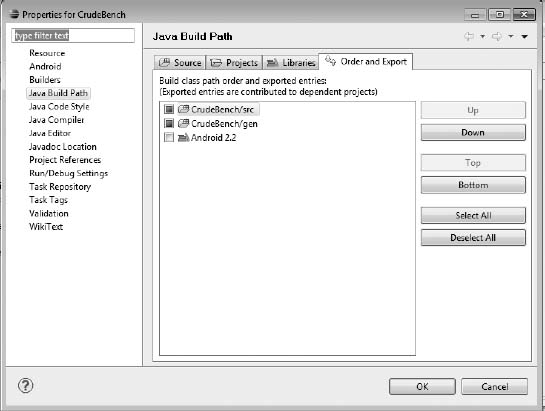
Figure 5–6. Project Properties window in Eclipse
If the Android JAR is not checked (the Android 2.2 entry in Figure 5–6), check it, and then click OK to close the Properties window. At this point, your project should be ready for use.
How to Get to DDMS
Many times, you will be told to take a look at something in DDMS, such as the LogCat tab to examine Java stack traces. In Eclipse, DDMS is a perspective. To open this perspective in your workspace, choose Window ![]()
![]()
Open Perspective ![]()
![]()
Other from the main menu, as shown in Figure 5–7.
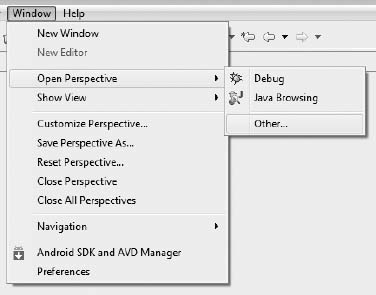
Figure 5–7. Perspective menu in Eclipse
Then, in the list of perspectives, shown in Figure 5–8, choose DDMS.
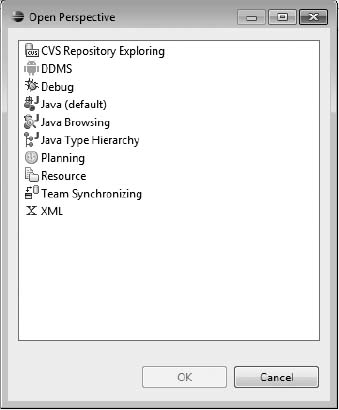
Figure 5–8. Perspective roster in Eclipse
This will add the DDMS perspective to your workspace and open it in your Eclipse IDE.
DDMS is covered in greater detail in a later chapter of this book.
How to Create an Emulator
By default, your Eclipse environment has no Android emulators set up. You will need one before you can run your project successfully.
To do this, first choose Window ![]()
![]()
Android SDK and AVD Manager from the main menu, as shown in Figure 5–9.
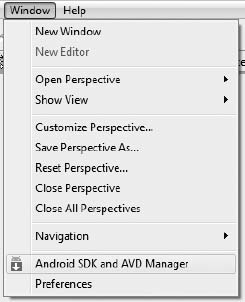
Figure 5–9. Android SDK and AVD Manager menu option in Eclipse
That brings up the same window as you get by running android from the command line.
You can now define an Android Virtual Device (AVD) by following the instructions given in Chapter 2, in the section “Step 5: Set Up the Emulator.”
How to Run a Project
Given that you have an AVD defined, or that you have a device set up for debugging and connected to your development machine, you can run your project in the emulator.
First, click the Run toolbar button, or choose Project ![]()
![]()
Run from the main menu. This brings up the Run As dialog box the first time you run the project, as shown in Figure 5–10.
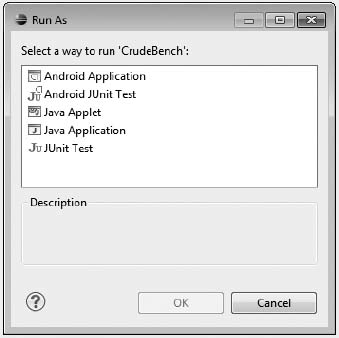
Figure 5–10. The Run As dialog box in Eclipse
Choose Android Application and click OK. If you have more than one AVD or device available, you will be presented with a window in which you choose the desired target environment. Then, the emulator will start up to run your application. Note that you will need to unlock the lock screen on the emulator (or device) if it is locked.
How Not to Run Your Project
When you go to run your project, be sure that an XML file is not the active tab in the editor. Attempting to “run” this will result in a .out file being created in whatever directory the XML file lives in (e.g., res/layout/main.xml.out). To recover, simply delete the offending .out file and try running again, this time with a Java file as the active tab.
Alternative IDEs
If you really like Eclipse and the ADT, you may want to consider MOTODEV Studio for Android. This is another set of add-ins for Eclipse, augmenting the ADT and offering a number of other Android-related development features, including the following (among many others):
- More wizards for helping you create Android classes
- Integrated SQLite browsing, so you can manipulate a SQLite database in your emulator right from your IDE
- More validators to check for common bugs, and a library of code snippets to have fewer bugs at the outset
- Assistance with translating your application to multiple languages
While MOTODEV Studio for Android is published by Motorola, you can use it to build applications for all Android devices, not only those manufactured by Motorola themselves. With Google's pending acquisition of Motorola, the future of MOTODEV will certainly be interesting.
Other IDEs are slowly getting their equivalents of the ADT, albeit with minimal assistance from Google. For example, IntelliJ's IDEA has a module for Android. It was originally commercial, but now it is part of the open source community edition of IDEA as of version 10.
And, of course, you do not need to use an IDE at all. While this may sound sacrilegious to some, IDEs are not the only way to build applications. Much of what is accomplished via the ADT can be accomplished through command-line equivalents, meaning a shell and an editor are all you truly need. For example, the authors of this book do not presently use an IDE and have no intentions of adopting Eclipse any time soon.
IDEs and This Book
You are welcome to use Eclipse as you work through this book. You are welcome to use another IDE if you wish. You are even welcome to skip the IDE outright and just use an editor.
This book is focused on demonstrating Android capabilities and the APIs for exploiting those capabilities. It is not aimed at teaching the use of any one IDE. As such, the sample code shown should work in any IDE, particularly if you follow the instructions in this chapter for importing non-Eclipse projects into Eclipse.