Because everything about the design and operation of Windows Phone 7 targets consumers, it is only natural that Microsoft has carefully thought through the ways to protect consumers from both intended and unintentional harm. Windows Phone 7 ships with a compelling set of built-in security features that go towards accomplishing that goal. The capabilities of the Windows Phone 7 platform allow the data to be protected both in transit and on the device. Because of the centralized application certification process, consumers gain confidence that no malicious applications are downloaded and installed on their devices (unlike some competing platforms, which are increasingly becoming infested with malware). And should the phone be lost or stolen, each device comes with a free web-based tool that allows you to remotely control the phone, including locking and wiping all data on that phone.
In this chapter, you will learn how the Windows Phone Marketplace certification process acts as a gatekeeper and allows only legitimate applications to be present on the device. Then you'll look at the ways you can ensure that your Windows Phone 7 application can receive, transmit, and store sensitive data in a secure manner. Finally, you'll take a look at the free support for remote lock and data wipe that Microsoft provides to protect lost or stolen Windows Phones.
We will lead you through an analysis of Windows Phone 7 security features along the following four domains: application security, network security, data security, and device security. You will also learn how to use the tools Windows Phone 7 platform has to address specific security concerns associated with each domain.
Ideally, all Windows Phone 7 applications would come from legitimate sources and behave like good citizens. However, experience shows that many applications break rules and that safeguards must be put in place to prevent malicious behavior. On the application security front, Windows Phone 7 platform includes the safeguards to verify the identity of the author of the application and sandboxes the execution of each mobile application. In the next few sections, you will explore these safeguards in detail.
For a moment, let's travel a couple of decades back in time. The early years of Windows XP were not happy ones at Microsoft. The whole world was upset with the company for allowing its operating system to be exploited by multiple malicious programs. Even though Windows XP shipped with safeguards that could prevent those exploits, the activation of those safeguards was left up to the user, and that activation rarely happened. What Microsoft quickly learned from that experience was that it must take a lot of responsibility to protect its user base from both known and potential harm.
Because mobile devices contain huge amounts of personal information and by their nature are frequently lost or misplaced, application monitoring is all the more necessary. For Microsoft to assume this responsibility for Windows Phone 7 applications, it must have as much control as possible over the applications built and deployed onto its platform, while still encouraging developer creativity as much as possible. To facilitate this dual goal of being autocratic and democratic at the same time, Microsoft has created a Windows Phone Marketplace. Windows Phone Marketplace is the single online distribution point for all Windows Phone 7 applications. The objectives of Windows Phone 7 Marketplace and the way it achieves those objectives are described in the following sections.
The first objective of Windows Phone Marketplace is to confirm the identity of an application's author. In the Internet era, attempts to claim false identity are extremely common—every day, millions of e-mails claim to come from an online bank or an African prince. In a similar fashion, without a centralized approval mechanism, any malicious Windows Phone 7 application could claim to be genuine and capture the user's personal information. In software security, the concept of non-repudiation refers to the guarantee that the application indeed came from the source it claims to have come from. On the Windows Phone 7 platform, the origin and safety of applications are confirmed during the application certification, a required step for all Windows Phone 7 applications. (Note that the application certification process is covered in Chapter 5, and a lot of the material on the following pages is repeating that same information as it relates to Windows Phone 7 security). During application certification, the developer submits her application to the Windows Phone Marketplace and pays a fee, at which point Microsoft runs a series of automated and manual tests to confirm application safety and, to some extent, reliability.
Currently, no application can be loaded onto the phone without going through Windows Phone Marketplace. While there is a possibility that this policy will be revisited in the future to allow enterprise customers to bypass Windows Phone Marketplace, at the time of this writing it is only a possibility. All Windows Phone 7 developers must sign up for the marketplace and must provide legitimate proof of their identity to the marketplace before any of the applications they create are available for installation on users' phones. Once their identity is verified, application developers receive a code-signing certificate. This digital certificate verifies that the application was created by the specified company or individual, fulfilling the concept of non-repudiation mentioned previously.
Software piracy is a huge problem affecting both giants of software development like Microsoft as well as small one-person shops trying to building mobile applications. To help safeguard from piracy, Microsoft requires that a valid application license issued by the Windows Phone Marketplace be present on the Windows Phone 7 device before it allows the execution of an application. This means that even if somebody figures out how to load an application onto the device without going through Windows Phone Marketplace, the application will not run since the license key for that application will not be available.
The Windows Phone Marketplace application approval process includes a suite of certification tests to prohibit risky applications from being loaded onto users' phones. Risky applications may contain malware or viruses themselves, or they may contain code constructs that could allow malicious code execution.
All applications submitted to Windows Phone Marketplace will be subject to malicious software screening, which will attempt to confirm that applications are free from viruses and malware. After successful completion of those tests, additional tests are performed to confirm that an application is written using only type-safe Microsoft Intermediate Language (MSIL) code. Writing applications in MSIL avoids public enemy #1, as software buffer overruns were called in Writing Secure Code by Michael Howard and David LeBlanc (Microsoft press, 2001). In addition, an application must not implement any security-critical code, since Windows Phone Application Platform does not allow an application to run security-critical code. You will revisit MSIL and briefly learn about security-critical code on mobile devices at the end of this chapter.
To get a better idea of how the Windows Phone Marketplace submission process helps improve the security of a user's device, let's walk through the steps involved in submitting an application to the marketplace.
In this example, you will prepare a package for your application to submit to Windows Phone Marketplace and learn the steps involved in successfully publishing an application to the marketplace, beginning with the creation of a XAP file. Let's get started.
The submission file that Windows Phone Marketplace requires is a XAP file that gets generated when the Windows Phone 7 application is built. An XAP file is a zip file containing all elements an application needs to run. To generate a XAP file, you must first build your application, as described in the following steps:
Open your Windows Phone 7 application project inside Visual Studio Express for Windows Phone.
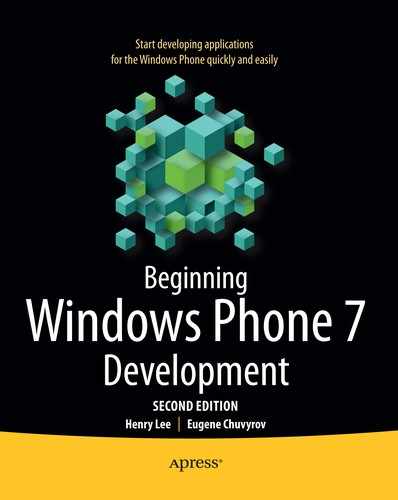
Set the Solution Configuration option to Release if it presently isn't, as shown in Figure 19-1.
In Solution Explorer, right-click the name of the solution and select Build. At this point, if the build succeeds, Visual Studio creates the
ProjectName.xapProjectNameLocate the
ProjectName.xapfile you created in Step 3. Open Windows Explorer and navigate to the project's directory and thebin/Release/folder. You should find there a file namedProjectName.xap. This is the file that you will upload to the marketplace.
The next step is to log in to Windows Phone Marketplace and submit the XAP file you just created.
Before uploading files to Windows Phone Marketplace, you must create Windows Phone Marketplace login credentials at http://create.msdn.com/. To do this, once you open the Marketplace web site, click the Register for the Marketplace link and follow the step-by-step wizard to create your username and password for the Marketplace. With login credentials created, follow the following step-by-step guide to submit your application to the marketplace.
Login to Windows Phone Marketplace (
http://create.msdn.com/) and create a new application submission.When prompted, locate the XAP file that you created in the previous section (remember, it's in the
bin/Release/folder of the project's directory) and follow instructions to upload it to the Marketplace.Enter a description for your application, select its category, and upload an icon for it.
Next, choose the countries that you would like your application to be available in and set the pricing.
While you are busy entering application details (description, category, pricing), Marketplace is at work validating the XAP file. This is the step that confirms that the XAP file is valid and can be passed on for further testing of its reliability and security.
If basic XAP file validation fails, you will get a failure notification and will have to start the process over.
If validation succeeds, you will be presented with a screen that lets you make your application available to customers right away once it passes certification or wait until you decide to publish.
The automated process within Windows Phone Marketplace opens up the submitted XAP file and updates the application manifest file (
WMAppManifest.xml) with a unique product identifier and which hub on the Windows Phone 7 device (for example, Media + Video hub) this application belongs to. In addition, the header file calledWMAppPRHeader.xmlis created; it will be used to protect digital rights to your application. Finally, an additional update to the application manifest file listing all of the security capabilities of an application is performed and the application is repackaged into a new XAP file. This new XAP file is then deployed to the actual Windows Phone 7 device at the Marketplace for certification testing.
Certification testing consists of both manual and automated verification that the application complies with the rules set by Microsoft regarding content, security, performance, and reliability of Windows Phone 7 applications. If an application violates any of these provisions, it is not published and you get a failure report with details of the problem-causing behavior.
If the application successfully passes certification tests, the XAP file is signed and becomes available for installation from the Windows Phone Marketplace according to the option you selected in Step 5.
Note
When you update your application, you will have to go through the same certification steps as the original application. Chapter 5 outlines the update process in detail.
Sandboxed execution refers to the concept that each application runs in its own environment, or sandbox, so that it has no access to applications running in different sandboxes on the same device. Windows Phone 7 platform implements this concept of sandboxed execution. Applications running on the same Windows Phone 7 device are isolated from each other and must communicate with services provided by the Windows Phone 7 platform by using a well-defined standard mechanism. System files and resources are shielded from user applications. To store and retrieve application and configuration data, applications must use isolated storage, which is designed to be protected from access by any application other than the currently running one. For in-depth information on working with isolated storage, please refer to Chapter 13.
To further ensure security and responsiveness of the Windows Phone 7 platform, Microsoft has built in separate provisions to make it even more secure. These provisions include the use of the Execution Manager, as well as granting only the rights an application absolutely requires to function.
The Execution Manager monitors application resource usage in accordance with certain defined conventions. For instance, the Execution Manager may terminate an application in the background if it deems that an application in the foreground is not very responsive. Similarly, the Execution Manager may dismiss an application if it makes an excessive number of requests for phone resources.
The Windows Phone Application Platform also tries to minimize the number of privileges granted to an application. For instance, if an application does not require the use of the location services library, Windows Phone will create a custom execution environment for the application that does not include the rights to that library. This way, the number of potential exploits (or "attack surface," as it is referred to in the computer security industry) against the application is minimized.
If your application accesses sensitive data over the network, it is critical that this data is encrypted during transit from the remote location to the Windows Phone 7 device. Similarly, if your application requires authentication, it is important to implement a secure authentication mechanism within your application. Windows Phone 7 platform allows you to accomplish both of these objectives. Any time you have to transmit sensitive data from a remote location, you should use Secure Sockets Layer (SSL) protocol, an industry standard for encrypting data. And if your environment requires secure authentication, it is possible to use digital certificates on a Windows Phone 7 device for that authentication, eliminating the need for user names and passwords.
In the next sections, you will walk through establishing SSL connections and configuring a certificate for secure authentication on a Windows Phone 7 device.
Secure Sockets Layer protocol is a sophisticated way of securing connections between the client (Windows Phone 7 device) and cloud service, and it utilizes the concepts of asymmetric cryptography and certification authority (CA) hierarchies. When a Windows Phone 7 device initiates a secure connection to the remote service, it requests that service's certificate. That certificate is checked and the certification authority that issued that certificate is determined. Once the CA of the certificate is known, Windows Phone 7 client then checks its own installed list of certification authorities. If it finds a certification authority in its list, that implies that a trust relationship between the Windows Phone 7 device and the CA has been previously established, and that a secure connection between the phone and the remote server can be created.
Windows Phone 7 devices come with several certification authorities pre-installed. This means that, most of the time, establishing an SSL connection will be a seamless experience. As long as the remote service obtained its certificate from a very well-known certification authority (such as VeriSign, for example), SSL connections can be created both from Internet Explorer on the phone and from application code. The following example demonstrates how to test if you can establish a secure connection to the remote server (PayPal) that has a certificate issued by a well-known CA (VeriSign).
In this brief example, you will test if you can establish a secure connection to a remote server (PayPal), and then you will write a small Windows Phone 7 application that programmatically loads secure content from the PayPal web site.
The quickest way to test whether a connection to a secure web site can be established is to open up Internet Explorer on Windows Phone 7 Emulator or a Windows Phone 7 device and type the URL of a secure remote server. Launch Windows Phone 7 Emulator by clicking Start

Tip
It may get quite tiresome having to click all of the keyboard buttons on the emulator. To enable the use of computer keyboard in the emulator window, you can press the PgUp key once the emulator loads up. To discontinue using the keyboard in the emulator, press the PgDn key.
Now, you will create a small Windows Phone 7 application that will access the PayPal site via a secure connection. You could access any secure remote service in a similar manner, but only if that service has a certificate issued by a CA that Windows Phone 7 device trusts. In the next section of this chapter, you will go through creating, exporting, and installing the self-signed certificates, which is a bit more complicated.
As usual, launch Visual Studio 2010 Express for Windows Phone and create a new Windows Phone 7 Application project. Name that project SSLConnection and click OK.
MainPage.xamlis presented in the Designer.From the toolbox, drag and drop the WebBrowser control onto the design surface. Make the width and height of that control to be the full width and height of available design surface on
MainPage.xaml.Switch to code view (right-click
MainPage.xamland select View Code) and add the following code to theMainPage()constructor. This code will create a WebClient object, register the callback function for that object (which you will write in the next section), and create a request to retrieve the contents ofwww.paypal.comsecurely.WebClient client = new WebClient(); client.OpenReadCompleted += new OpenReadCompletedEventHandler(HandleResponse); client.OpenReadAsync(new Uri("https://www.paypal.com"));Write the HandleResponse callback function for the request. This function will display the contents of whatever was returned as a result of the previous request to
https://www.paypal.com.void HandleResponse(object sender, OpenReadCompletedEventArgs e) { StreamReader reader = new StreamReader(e.Result); string res = reader.ReadToEnd(); webBrowser1.NavigateToString(res); }Press F5 to run the application. You should see the PayPal page displayed in the web browser window.
As you can see from the previous example, establishing a secure connection to the remote service is fairly straightforward if a remote service has a certificate issued by a major CA with whom Windows Phone 7 has an existing trust relationship. Just remember to use https protocol instead of http when accessing a remote web service securely. But certificates issued by a major certification authority can be expensive, and may not be necessary if all users of remote service trust that the service is legitimate. In addition, you may want to experiment or test your secure service without spending a lot of money on the certificates. Self-signed SSL certificates offer the same degree of data protection in transit (data is encrypted using SSL), without the expense of using the certification authority. There is a slight administrative overhead in issuing and installing those certificates, but you will easily tackle it in a few steps in the next example.
There are three steps to enabling the use of self-signed certificates on Windows Phone 7 device: first, you have to create a self-signed certificate; second, you have to export that certificate for installation on the mobile device; and third, you have to install that certificate on the Windows Phone 7 device. Creating and exporting the self-signed certificate steps occur on the server where the secure service resides. Installing the certificate, of course, happens on each device that will need to establish a secure connection to the service using a self-signed certificate.
Internet Information Services (IIS) is the web server software written by Microsoft. IIS has evolved significantly over the years, and the most current version in production as of this writing is IIS version 7.5. With IIS 7.5, creating self-signed certificates and enabling SSL using those certificates is much easier than with previous versions of IIS. IIS 7.5 comes with Windows 7 by default, and the following example assumes that you are using IIS7.5 installed on a Windows 7 machine. The example also assumes that both the server and the Windows Phone 7 client (the emulator) reside on the same machine.
Open IIS Manager by clicking Start
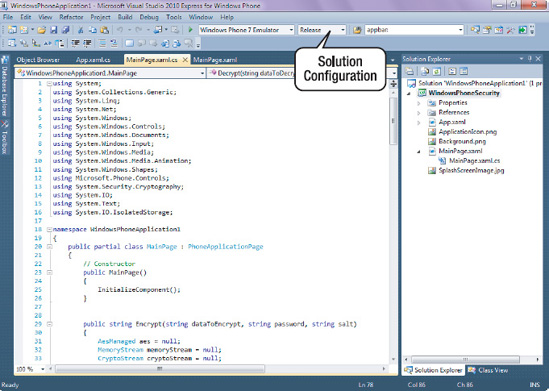
Create a new web site by right-clicking the Sites node on the left and choosing Add Web Site. Name the site WP7Server and fill in the rest of the web site properties as shown in Figure 19-2.
Note
The physical path setting for the new site on your computer may certainly be something else than what is shown in Figure 19-2, but be sure to make the Port setting something other than the default 80, otherwise IIS might complain that port 80 is already taken (note how it is set to 8888 in Figure 19-2).
Next, you will issue a self-signed certificate.
Click the root machine node on the left, and then click the Server Certificates node, as shown in Figure 19-3. This should bring up a dialog listing all of the certificates currently registered on the machine.
Click the Create Self-Signed Certificate link on the right-hand side of the dialog. Then, specify a name for that certificate when prompted—for example, wp7cert.
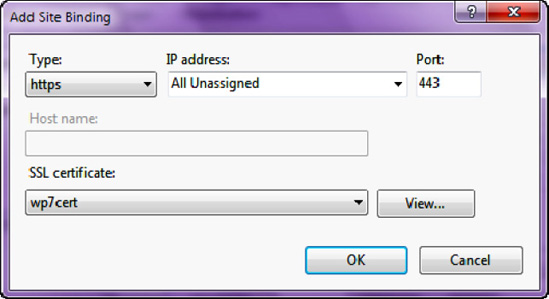
Next, you will enable SSL on the new web site that you created. To do this, you will need to create a binding of that web site to the https protocol.
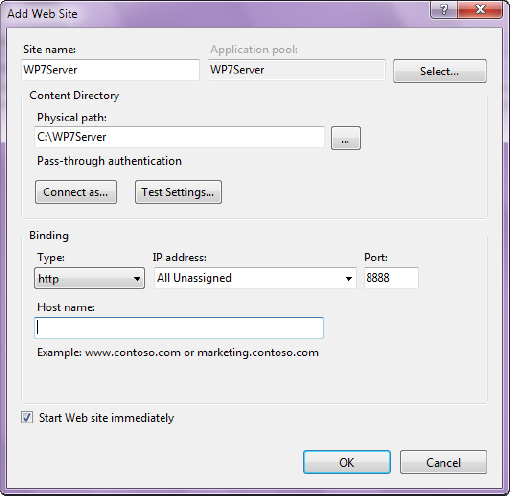
In the list of sites, click WP7Server and then click Bindings on the right-hand side, as illustrated in 19-4.
To create an https binding for the site, so that traffic to and from the site can be encrypted using SSL, click Add Binding. When the dialog shown in Figure 19-5 comes up, select https type binding and select the wp7cert certificate from the certificates list. This certificate will be used to encrypt traffic between the web site and your Windows Phone 7 client application.
Finally, you need to create some content to browse to on the secure web site. In the real world, this would most likely be the service returning some sort of sensitive data, such as financial or security information. However, for this example, you will simply create an HTML file and save it onto the server.
Open Notepad and paste the following HTML into it:
<html>
<h1>Hello, Windows Phone 7</h1>
</html>
Save the HTML file you created to the physical path for the web site that you specified in Step 2 (referenced in Figure 19-2) and name the file
index.html. For example, if you kept your Physical Path setting asC:WP7Serverin Step 2, then you will save the HTML file asC:WP7Serverindex.html.Note
Note You may be getting a "Permission Denied" error when you try to save the HTML file (we did). If so, make sure that the currently logged-in user has permissions to write to that folder and try again.
You are now ready to test out your self-signed certificate.
On your computer, open Internet Explorer and navigate to
https:/, where machinename is the name of your computer (for example,machinename/wp7server). You should see the "Hello, Windows Phone 7" message in the browser.Now let's test whether you can access secure data from your Windows Phone 7 application.
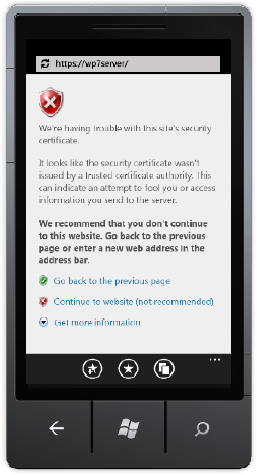
From your Windows Phone 7 emulator, open Internet Explorer and navigate to
https:/machinename/. The very first time you start up the emulator, you will see a screen like the one shown in Figure 19-6, the absence of trust relationship error message. If you click Continue, however, you will be able to establish SSL connections to the web server from both the browser on the Windows Phone 7 device and the applications.

It is possible to establish secure connections between mobile applications executing on the Windows Phone 7 and remote services, such as Microsoft Exchange, using self-signed certificates.
The first step in establishing a secure connection with the use of a self-signed certificate between the client and the server is to export the certificate from the server. The next example shows you how to do this; it assumes that you are using Internet Explorer 8 to export certificates and that you have created a self-signed certificate using the steps in the previous section.
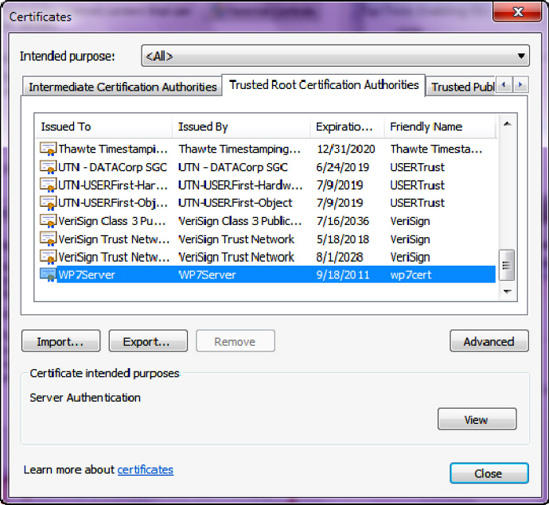
On the server, open Internet Explorer, and click Tools
In the window that comes up, click the Content tab, and then click the Certificates button. In the Certificates dialog that comes up, select the Trusted Root Certification Authorities tab. The self-signed certificate that you created should be listed in this tab—you can scan the Friendly Name column and look for wp7cert, as shown in Figure 19-7.
Click on the Export button, and then click the Next button. On the next screen, select "No, do not export the private key" (the default option) and click Next.
On the next screen, choose the DER Encoded binary X.509 format (default option) and click Next. Finally, select the folder to export certificate into, name the file wp7cert (make sure to put it somewhere you can find it later!), click Next, and then click Finish. You should get a message notifying you that the export was successful.
With the certificate exported, you are now ready to finalize the trust relationship between the Windows Phone 7 device and the server secured by a self-signed certificate. You will do that in the next section.
The easiest way to install a self-signed certificate on Windows Phone 7 device or emulator in the first release of Windows Phone 7 Framework is to simply e-mail it. Then, let the built-in Windows Phone 7 features recognize the certificate file and properly install it on the device. The next few steps will guide you through this process.
Open or navigate to your e-mail program; for instance, if you use Hotmail as your default e-mail, log in and create an e-mail message to yourself. In that e-mail, add an attachment—the exported self-signed certificate in the
wp7cert.cerfile you created in the previous example. Send e-mail to yourself.From the Windows Phone 7 device or emulator, access the e-mail message you just sent. Once you click the
wp7cert.cerattachment, the Windows Phone 7 should prompt you to open the certificate file. Go ahead and click (or tap) the screen to get the Install Certificate prompt shown in Figure 19-8. Then, click the Install Certificate button. After the installation, click the OK button.
You are now familiar with how to secure data in transit from a remote service to the Windows Phone 7 device. You have seen how to use SSL with both trusted third-party certificates from established certification authorities and self-signed certificates. In the next section, you will take a look at securely storing data on your Windows Phone 7 device by encrypting it.
In this section, you will learn how to secure data that gets stored on a Windows Phone 7 device. While the data in isolated storage is sandboxed for each application—i.e., an application cannot access the contents of isolated storage of another application—it is still important to encrypt sensitive data stored on the device. Encrypting data makes it impossible for anybody other than the data owner to read that data, something that is especially critical for enterprise users. Windows Phone 7 provides a powerful subset of .NET encryption classes, which make data encryption not only possible, but extremely easy on this device. The following data encryption algorithms are supported on Windows Phone 7:
AES
HMACSHA1
HMACSHA256
Rfc2898DeriveBytes
SHA1
SHA256
As you will see in the next example, many of these algorithms complement each other to provide a robust data encryption strategy for Windows Phone 7 devices. But first, let's briefly review the purpose of each of the supported encryption algorithms.
AES (stands for Advanced Encryption Standard) is a symmetric encryption algorithm, which means that it uses the same key (password) to encrypt and decrypt data. Since the key used to encrypt/decrypt data could be easy to guess by iterating through words in a dictionary in an automated manner, an additional secret key is added during the encryption process.

This additional key is called salt and is usually a random set of bits, such as an employee identification number, that is used to make the AES-encrypted message harder for intruders to decrypt.
HMACSHA1 and HMACSHA256 algorithms both generate a unique message authentication code (MAC) from the data and password supplied. Both algorithms use the same approach to generating MAC: they take data and hash it with the secret key using standard hash function SHA1 and SHA256 correspondingly. The difference between HMACSHA1 and HMACSHA256 lies in the strength of the message generated: HMACSHA1 output is 160 bits long while HMACSHA256 generates results that are 256 bits in length.
Finally, Rfc2898DeriveBytes is an algorithm that relies on the HMACSHA1 function to generate a strong key, using the password and salt values supplied, to be used to encrypt and decrypt data.
Note
Do not store password or salt values in application code. It is extremely easy to peek at compiled .NET code using tools such as Ildasm.exe, Red Gate Reflector or even a simple text editor and retrieve the value of the password/salt. At the end of this chapter, you will learn how to protect your application code from possible decompilation by obfuscating it; however, even with obfuscation, the password and salt values should never be stored inside application code.
In the first data security example, you will experiment with HMACSHA1 and HMACSHA256 algorithms to observe the keys that those algorithms generate from the input and password/salt values supplied. In the second example, you will encrypt and decrypt data on the device using the AES algorithm.
Both HMACSHA1 and HMACSHA256 functions are one-way: once the message authentication code is generated using either of those functions, it is impossible to recreate the original message from the generated MAC. This makes those functions ideal for storing values of security codes: the only way to produce a match of the MAC on those values is to supply a valid password and security code. The following example demonstrates how to generate HMACSHA1 and HMACSHA256 messages.
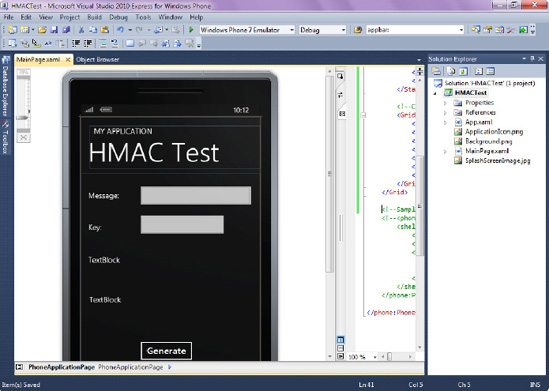
Your application interface will consist of textboxes to accept a message and a password to create a MAC from, and it will show the MAC generated using both HMACSHA1 and HMACSHA256 algorithms.
Open Visual Studio Express for Windows Phone and create a new project called HMACTest.
Make
MainPage.xamllook like Figure 19-9. For reference, the XAML of this page is pasted here (and don't forget that you can also download all code samples for this book):<!--LayoutRoot contains the root grid where all other page content is placed--> <Grid x:Name="LayoutRoot" Background="Transparent"> <Grid.RowDefinitions> <RowDefinition Height="Auto"/> <RowDefinition Height="*"/> </Grid.RowDefinitions> <!--TitlePanel contains the name of the application and page title--> <StackPanel x:Name="TitlePanel" Grid.Row="0" Margin="24,24,0,12"> <TextBlock x:Name="ApplicationTitle" Text="MY APPLICATION" Style="{StaticResource PhoneTextNormalStyle}"/> <TextBlock x:Name="PageTitle" Text="HMAC Test" Margin="-3,-8,0,0" Style="{StaticResource PhoneTextTitle1Style}"/> </StackPanel><!--ContentPanel - place additional content here--> <Grid x:Name="ContentGrid" Grid.Row="1"> <Button Content="Generate" Height="72" HorizontalAlignment="Left" Margin="149,437,0,0" Name="button1" VerticalAlignment="Top" Width="160" Click="button1_Click" /> <TextBox Height="72" HorizontalAlignment="Left" Margin="149,23,0,0" Name="txtMessage" Text="" VerticalAlignment="Top" Width="317" /> <TextBlock Height="99" HorizontalAlignment="Left" Margin="21,216,0,0" Name="textBlock1" Text="TextBlock" VerticalAlignment="Top" Width="445" TextWrapping="Wrap" /> <TextBlock Height="114" HorizontalAlignment="Left" Margin="24,321,0,0" Name="textBlock2" Text="TextBlock" VerticalAlignment="Top" Width="442" TextWrapping="Wrap" /> <TextBlock Height="30" HorizontalAlignment="Left" Margin="21,44,0,0" Name="textBlock3" Text="Message:" VerticalAlignment="Top" Width="122" /> <TextBlock Height="30" HorizontalAlignment="Left" Margin="21,129,0,0" Name="textBlock4" Text="Key:" VerticalAlignment="Top" /> <TextBox Height="72" HorizontalAlignment="Left" Margin="149,101,0,0" Name="txtKey" Text="" VerticalAlignment="Top" Width="246" /> </Grid> </Grid>
The next step is to add logic that takes advantage of the cryptography classes on Windows Phone 7 to show Message Authentication Codes.
Add the following using directive to the top of the page:
using System.Security.Cryptography;
Because you want all of the encryption logic to happen on the button click, add an event handler to the Click event of the Generate button. To do that, double-click the Generate button and paste the following code inside the handler. Note how after declaring the HMACSHA1 and HMACSHA256 classes, all of the magic happens in the ComputeHash function, which returns an array of bytes that you convert to the hexadecimal string.
string message = txtMessage.Text; string key = txtKey.Text; System.Text.UTF8Encoding encoding = new System.Text.UTF8Encoding(); byte[] keyByte = encoding.GetBytes(key); HMACSHA1 hmacsha1 = new HMACSHA1(keyByte); HMACSHA256 hmacsha256 = new HMACSHA256(keyByte); byte[] messageBytes = encoding.GetBytes(message); byte[] hashmessage = hmacsha1.ComputeHash(messageBytes); textBlock1.Text = ConvertToString(hashmessage); hashmessage = hmacsha256.ComputeHash(messageBytes); textBlock2.Text = ConvertToString(hashmessage);Finally, paste the contents of the
ConvertToStringhelper function that converts a byte array passed in to the hexadecimal string.public static string ConvertToString(byte[] buff) { string sbinary = ""; for (int i = 0; i < buff.Length; i++) { //hex-formatted sbinary += buff[i].ToString("X2"); } return (sbinary); }
Press F5 to run the application. Enter some message text (for example, "Hello, World") and key (for example, "test") and observe the MAC values generated using the HMACSHA1 algorithm (top TextBlock) and HMACSHA256 algorithm (bottom TextBlock). Notice that not only does the length of the MACs differ, but the MACs themselves are completely different from each other.
In the next example, you will encrypt and decrypt data using AES.
To encrypt data from prying eyes on a Windows Phone 7 device, you need a strong encryption mechanism that, in turn, relies on the strong key to make encryption withstand all of the known attempts to break it. The Rfc2898DeriveBytes algorithm, available on Windows Phone 7, creates a very strong key for use in AES encryption from the password and salt values passed in. This example demonstrates how to use both of these algorithms in combination on a Windows Phone 7 device.
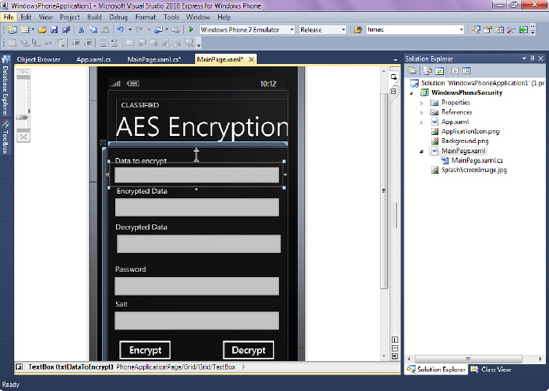
The interface will prompt the user for data to encrypt and for a password and salt to use for that encryption. The interface will also have two buttons—one for encryption and the other one for decryption of data.
Open Visual Studio Express for Windows Phone and create a new project called AESEncryption.
Make the
MainPage.xamlpage look like the one shown in Figure 19-10. For convenience, the XAML of this page is pasted here:<!--LayoutRoot contains the root grid where all other page content is placed--> <Grid x:Name="LayoutRoot" Background="Transparent"> <Grid.RowDefinitions> <RowDefinition Height="Auto"/> <RowDefinition Height="*"/> </Grid.RowDefinitions> <!--TitlePanel contains the name of the application and page title--> <StackPanel x:Name="TitlePanel" Grid.Row="0" Margin="24,24,0,12"> <TextBlock x:Name="ApplicationTitle" Text="CLASSIFIED" Style="{StaticResource PhoneTextNormalStyle}"/> <TextBlock x:Name="PageTitle" Text="AES Encryption" Margin="-3,-8,0,0" Style="{StaticResource PhoneTextTitle1Style}"/> </StackPanel> <!--ContentPanel - place additional content here--> <Grid x:Name="ContentGrid" Grid.Row="1"> <TextBox Height="65" HorizontalAlignment="Left" Margin="6,41,0,0" Name="txtDataToEncrypt" Text="" VerticalAlignment="Top" Width="462" /> <TextBlock Height="30" HorizontalAlignment="Left" Margin="20,21,0,0" Name="textBlock1" Text="Data to encrypt" VerticalAlignment="Top" Width="419" /> <TextBox Height="72" HorizontalAlignment="Left" Margin="6,334,0,0" Name="txtPassword" Text="" VerticalAlignment="Top" Width="462" /> <TextBlock Height="30" HorizontalAlignment="Left" Margin="20,310,0,0" Name="textBlock2" Text="Password" VerticalAlignment="Top" Width="346" /> <TextBox Height="72" HorizontalAlignment="Left" Margin="6,426,0,0" Name="txtSalt" Text="" VerticalAlignment="Top" Width="462" /> <TextBlock Height="36" HorizontalAlignment="Left" Margin="21,403,0,0" Name="textBlock3" Text="Salt" VerticalAlignment="Top" Width="304" /><Button Content="Encrypt" Height="72" HorizontalAlignment="Left" Margin="20,504,0,0" Name="button1" VerticalAlignment="Top" Width="160" Click="button1_Click" /> <Button Content="Decrypt" Height="72" HorizontalAlignment="Left" Margin="296,504,0,0" Name="button2" VerticalAlignment="Top" Width="160" Click="button2_Click" /> <TextBlock Height="30" HorizontalAlignment="Left" Margin="24,101,0,0" Name="textBlock4" Text="Encrypted Data" VerticalAlignment="Top" Width="432" /> <TextBox Height="72" HorizontalAlignment="Left" Margin="8,123,0,0" Name="txtEncryptedData" Text="" VerticalAlignment="Top" Width="460" /> <TextBlock Height="27" HorizontalAlignment="Left" Margin="21,197,0,0" Name="textBlock5" Text="Decrypted Data" VerticalAlignment="Top" Width="435" /> <TextBox Height="72" HorizontalAlignment="Left" Margin="13,221,0,0" Name="txtDecryptedData" Text="" VerticalAlignment="Top" Width="460" /> </Grid> </Grid>
AES encryption in the .NET Framework is implemented via a class called AesManaged. The following code uses this class, together with the Rfc2898DeriveBytes class to encrypt the data.
Add the following using directive to the top of the page:
using System.Security.Cryptography;
using System.IO;
using System.Text;
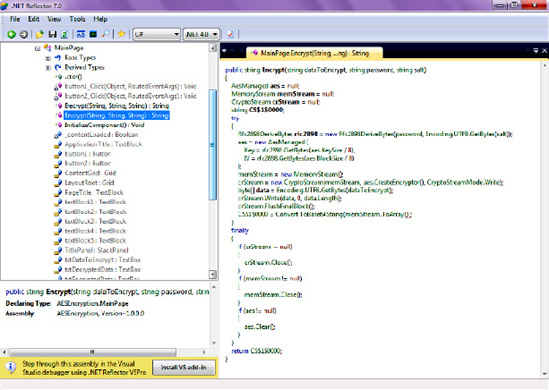
Code the Encrypt method. The
Encryptmethod takes data to encrypt, password and salt as parameters, and returns a string. Notice how theEncryptmethod creates the Rfc2898DerivedBytes class and uses that class to generate a strong key from the password and salt combination; that key is later used by the AesManaged class to encrypt data.public string Encrypt(string dataToEncrypt, string password, string salt) { AesManaged aes = null; MemoryStream memStream = null; CryptoStream crStream = null; try { //Generate a Key based on a Password and Salt Rfc2898DeriveBytes rfc2898 = new Rfc2898DeriveBytes(password, Encoding.UTF8.GetBytes(salt)); //Create AES algorithm with 256 bit key and 128-bit block size aes = new AesManaged(); aes.Key = rfc2898.GetBytes(aes.KeySize / 8); aes.IV = rfc2898.GetBytes(aes.BlockSize / 8); memStream = new MemoryStream(); crStream = new CryptoStream(memStream, aes.CreateEncryptor(), CryptoStreamMode.Write); byte[] data = Encoding.UTF8.GetBytes(dataToEncrypt); crStream.Write(data, 0, data.Length); crStream.FlushFinalBlock(); //Return Base 64 String return Convert.ToBase64String(memStream.ToArray()); } finally { //cleanup if (crStream != null) crStream.Close();if (memStream != null) memStream.Close(); if (aes != null) aes.Clear(); } }Code the Decrypt method. The Decrypt method is the inverse of Encrypt: it takes data to decrypt, password and salt as parameters, and returns an input string. Since AES is a symmetric algorithm, the same password and salt values must be used to decrypt data as were used to encrypt it. The Decrypt method initializes the Rfc2898Bytes key and uses it to create Decryptor for data.
public string Decrypt(string dataToDecrypt, string password, string salt)
        {
                AesManaged aes = null;
                MemoryStream memStream = null;
                CryptoStream crStream = null;

        try
        {
                Rfc2898DeriveBytes rfc2898 = new Rfc2898DeriveBytes(password,
                Encoding.UTF8.GetBytes(salt));
                aes = new AesManaged();
                aes.Key = rfc2898.GetBytes(aes.KeySize / 8);
                aes.IV = rfc2898.GetBytes(aes.BlockSize / 8);

                memStream = new MemoryStream();
                crStream = new CryptoStream(memStream, aes.CreateDecryptor(),
                CryptoStreamMode.Write);
                byte[] data = Convert.FromBase64String(dataToDecrypt);
                crStream.Write(data, 0, data.Length);
                crStream.FlushFinalBlock();

                byte[] decryptBytes = memStream.ToArray();
                return Encoding.UTF8.GetString(decryptBytes, 0, decryptBytes.Length);
        }
        finally
        {
                if (crStream != null)
                        crStream.Close();

                if (memStream != null)
                        memStream.Close();

                 if (aes != null)
                      aes.Clear();
                 }
         }
Add code to call the Encrypt method when the user clicks the Encrypt button. Double-click the Encrypt button in
MainPage.xamland add the following code to the click event handler:txtEncryptedData.Text = Encrypt(txtDataToEncrypt.Text, txtPassword.Text, txtSalt.Text);Finally, add code to call the Decrypt method when the user clicks the Decrypt button. Double-click the Decrypt button in MainPage.xaml and add the following code to the Click event handler:txtDecryptedData.Text = Decrypt(txtEncryptedData.Text, txtPassword.Text, txtSalt.Text);
Press F5 to run the application. Enter some data (for example, "Classified Information"), a password (for example, "test"), and salt (note that it must be at least 8 characters long, otherwise AES classes will throw an exception), and observe the values being encrypted in the Encrypted Data textbox. Press Decrypt and you should see the original text in the Decrypted Data field. Note that if you enter the password or salt values that are different between encryption and decryption, the application will raise an error.
Now that you understand the cryptography framework on the Windows Phone 7, it's time to take a look at the physical security of the device.
With Windows Phone 7, customers rarely have to worry about sensitive data ending up in malicious hands if the device is lost or stolen. This is because several standard features that come complimentary with the phone make it possible to feel confident about the security of the device at no extra charge. In this section, you will walk through the Windows Phone 7 physical security safeguards that Microsoft provides. All of these features are accessible at http://windowsphone.live.com. You will need to create a Microsoft Live ID if you don't have one already and properly associate it with your Windows Phone 7 device.
Map It: Using this feature, Windows Phone 7 users are able to see the location of their phones using Bing maps.
Ring It: Using this option, you can instruct the phone to ring for 60 seconds using a special ringtone, even if the ring tone has been turned off.
Lock It and Display a Message: You can also lock the phone from the web site and display a custom message to instruct people who may have found your phone on how to get in touch with you.
Erase It: Finally, if all is lost and there is no hope of recovering the phone, you can remotely wipe all of the data from that phone and reset it to factory settings.
As you can see, the Windows Phone 7 security story is very compelling, especially for the first generation of this device. You can expect this story to become better and more feature-rich in the very near future. Certainly, more and more features from the full .NET Framework will find their way onto the phone, which should further contribute to the security of the device.
Microsoft documentation on security in Windows Phone 7 lists explicit requirements regarding application code. In this chapter, you will gain an understanding of what types of application behavior are not tolerated by Microsoft.
Microsoft imposes a requirement on Windows Phone 7 application developers to use managed code to construct their applications. Strong typing, bounds checking, and memory management features of managed code help minimize the most common types of attacks (also referred to in the security community as attack vectors) on both the application and the Windows Phone 7 application platform.
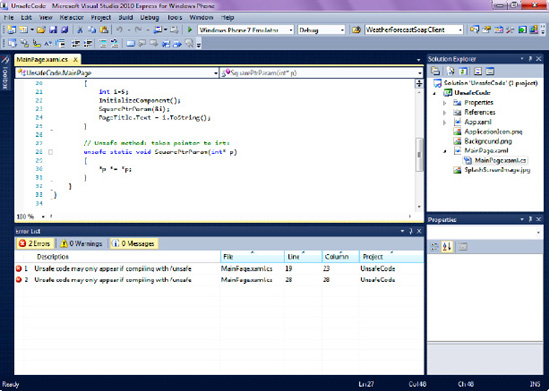
Generally, if you use C# language with its default settings, you will be in compliance with this restriction imposed by Windows Phone Marketplace. The problems will arise, however, if you venture into unsafe C# code territory, which can be enabled by using the unsafe keyword in a method signature. In addition to the unsafe keyword, applications with unsafe code must be compiled with a special switch, as shown in Figure 19-11. As an example of unsafe code, consider the following code, which uses a simple SquarePtrParam function to accept a pointer variable (non-MSIL code) and perform pointer arithmetic on it:
public partial class MainPage : PhoneApplicationPage
{
    unsafe public MainPage()
    {
        int i=5;
        InitializeComponent();
        SquarePtrParam(&i);
        PageTitle.Text = i.ToString();
    }

    // Unsafe method, using a pointer to square the number
    unsafe static void SquarePtrParam(int* p)
    {
        *p *= *p;
    }
}
The good news for Windows Phone 7 developers is that while the previous code is a perfectly valid .NET code, the Windows Phone 7 templates in Visual Studio disable the option to compile unsafe code. This option is generally found under Project
With .NET version 4.0, Microsoft has moved away from the complexities of its Code Access Security (CAS) model and towards a simpler model it calls the Transparent Security model. The first transparency rule set was initially introduced in .NET 2.0 and then expanded to Transparency Level 2 in .NET 4.0. With Transparency Level 2, code is segregated into three types: transparent code, security-safe-critical code, and security-critical code. These types are discussed in the following sections.
In the transparent category, there are applications that run in a sandbox, which are pretty much all of the Windows Phone 7 applications that you will ever write, and these applications have a limited permission set granted by the sandbox. That means that as a developer you don't have to be concerned about checking security policies when you write your applications, as long as you don't try to perform any operation deemed not accessible by the transparent code. For reference purposes, here is the list of tasks that transparent applications are not permitted to perform:
In the security-safe-critical category, there is code that is fully trusted but is still callable by transparent code. It exposes a limited surface area of full-trust code. Correctness and security verifications happen in security-safe-critical code.
Finally, there is a category of code that can't be called by transparent code. This is usually security-critical code that typically implements system-level functionality and has unlimited access to Windows Phone resources, making it a perfect place to embed malicious behavior. Therefore, Microsoft disallows this type of code; to successfully pass Windows Phone Marketplace certification criteria, applications must not implement any security-critical code. In addition, applications must not invoke native code via PInvoke or COM Interoperability.
You will most likely never have to worry about the ins and outs of the Transparent Security model when you program for Windows Phone 7. But in case you decide to try to implement unsafe or security-critical code in your application, remember that Marketplace certification tests will quickly uncover this type of behavior and deny entry to your application.
To protect users' privacy and enforce developer accountability, Windows Phone Marketplace fully discloses to the user whether an application is relying on any of the following services for proper operation:
Gamer Services
Location Services
Media Library
Microphone
Networking
Place Phone Calls
Push Notifications
Sensors
Web Browser
These capabilities are requested on a Windows Phone 7 device when an application developer submits her application for certification. Only the requested capabilities are granted, protecting device users from unexpected behavior of potentially privacy-intruding applications.
The clarity and speed of writing your application in managed .NET languages (C# or VB.NET) and avoiding unsafe code constructs are very appealing features of the Windows Phone 7 platform. Unfortunately, from a security and intellectual property perspective, managed languages have one significant drawback: they can easily be de-compiled or reverse-engineered using tools such as ildasm.exe or Red Gate Reflector, potentially exposing your application source code to anybody who has access to your application's .xap file. That means that the programming logic that you may have spent days or weeks tweaking could be easily copied by your competition or could be easily eavesdropped on for a possible attack on your application.
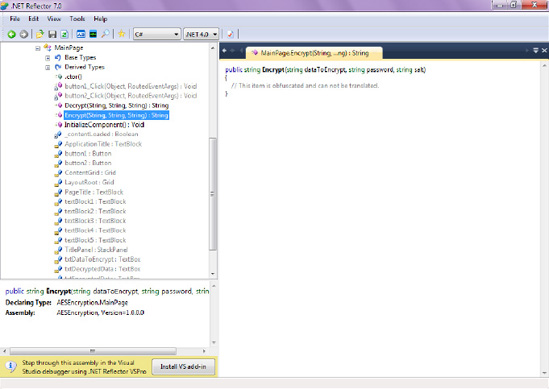
To illustrate how easy it is to peek inside your compiled application, let's use the Red Gate Reflector tool and open up one of the compiled assemblies that you have created earlier in this chapter.
Note
Reflector was a free tool for the longest time; however, it appears that Red Gate started charging for its use recently. You can still download a 14-day evaluation trial of this tool from http://reflector.red-gate.com/download.aspxM.
Launch Reflector (by double-clicking on Reflector.exe from the location you downloaded it to) and click on File
Obfuscation serves to protect intellectual property in your code from the prying eyes of Reflector and other such tools. There are several .NET obfuscation products on the market, including Dotfuscator, DeepSea, and Crypto. The one you will be taking a look in this chapter is Dotfuscator because full version of Dotfuscator for Windows Phone 7 will be freely available to you to try out first before making a decision to buy, but the basic principles of hiding code should be applicable to all of the products mentioned above.
Note
You can download a copy of Dotfuscator for Windows Phone 7 from PreEmptive Solutions website at www.preemptive.com/know-more/windows-phone-7.
Follow the steps in this example to obfuscate the code from the AESEncryption project.
Start by launching Dotfuscator from Start
When the Select Project Type dialog comes up, select Create New Project. On the Input Files menu bar, select the Add New Input (the folder icon) and navigate to the
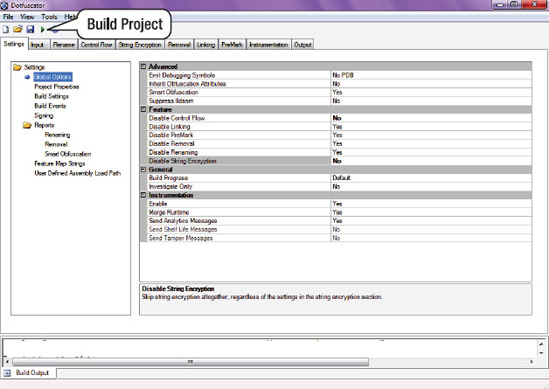
AESEncryption.xapfile. Note how Dotfuscator understands that Windows Phone 7 applications consist of .xapfiles, while we had to navigate to the .dllfile when we used Reflector, since Reflector is not currently customized to work with Windows Phone 7 applications. Make a mental note of it for now—you will come back to this minor difference in the way these two programs function shortly.By default, Dotfuscator is not set to obfuscate anything in the assembly. You must tell the application that you want the assembly obfuscated and variables hidden. To do so, go to the Settings tab. Set Disable Control Flow to No, and set Disable String Encryption to No, as shown in Figure 19-13
Still on the Settings tab, click on the Build Settings node and make sure to set Destination Directory to a folder that you can easily locate on your computer such as
C:ProjectsDotfuscated.You are now ready to create an obfuscated version of your .
xapfile. To do that, click on the Build button in Dotfuscator, as shown in Figure - Once the Build completes, you should have a new .xapfile generated in the Output Directory that you configured in Step 4.You are now ready to peek inside the obfuscated file to determine whether the code has indeed been made unreadable to Reflector. However, Reflector can only understand .
dllassemblies and not .xapfiles generated for Windows Phone 7 applications. Recall how a .xapfile is simply a renamed .zipfile containing several files, including application resource files and a .dllassembly within it. Rename the obfuscated .xapfile to have a .zipextension and peek inside that file.Extract the
AESEncryption.dllassembly from the obfuscated .xapfile generated in Step 5. From within Reflector, navigate to that assembly and open it.Expand AESEncryption
This example should give you the basic idea on obfuscating managed .NET code. You can tweak settings inside Dotfuscator to ensure that you application's intellectual property is properly secured. Note, however, that you should always deploy your obfuscated device to your (unlocked) Windows Phone 7 device for testing. Sometimes, the obfuscator tools get a bit ambitious and scramble the information that is expected by the Windows Phone 7 platform in a certain format, resulting in application failing to properly load and launch. Always test your .xap before submitting it to the Marketplace for certification!
In this last chapter of the book, you learned about the facilities that the Windows Phone 7 platform provides to secure data in transit and on devices, as well as how it imposes a set of rigorous tests to confirm the identity of the application developer and ensure that the applications in Windows Phone Marketplace don't contain malicious code. You have also looked at making your code unreadable, or obfuscated, to tools like ildasm and Reflector. The Windows Phone 7 device also provides security for the device itself, giving users the ability to remotely find, ring, or erase all data from the phone. Windows Phone 7 has already implemented a strong set of security features, and those features will only get more and more comprehensive.