An accelerometer has many practical uses for applications that depend on the movements of a Windows Phone in three-dimensional space. With data from an accelerometer, you can steer a simulated car in a driving game or fly a plane in a flight simulator. Capturing a motion such as a shake, a punch, a swing, or a slash and mixing this accelerometer data with a physics engine can be used to create Wii-like games. Just for fun, you can build novelty applications to amaze your friends, such as a light saber simulation that makes Star Wars-like sounds as you swing your phone in the air. An accelerometer can even be used for business applications, like a level to use when you hang a picture frame. Under the covers, the controllers for games that run on consoles like the Wii remotes are nothing more than accelerometers wrapped in buttons and plastic.
The accelerometer in a Windows Phone measures the device's movements in space, or more precisely its acceleration along three axes (x, y, and z)relative to the Earth's gravitational pull, which is perpendicular to the ground (9.8 m/sec2). Think of Newton's apple. When you drop an apple, it will fall toward the earth, and the force that pulls it can be calculated using that well-known high school science formula, force = mass x acceleration. In a Windows Phone, the accelerometer can tell you the orientation of the phone with respect to the earth's gravitational force.
In this chapter, you will learn how to use the Windows Phone accelerometer to write applications that respond to the phone's orientation and movement. In the first example, you will capture data from the accelerometer and interpret the x, y, and z values. In a second demo, you will use readings from the accelerometer to move a ball in a 2D space.
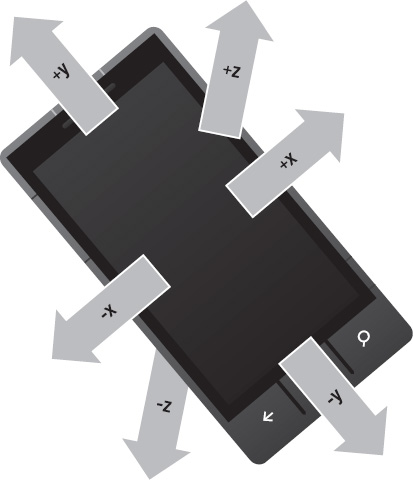
When you hold a Windows Phone in your hand with its display facing you, think of it as occupying the origin of a three-dimensional graph with its z axis pointing toward you (a positive direction), its y axis pointing down (a negative direction), and its x axis pointing toward the right (a positive direction). Figure 6-1 shows how these three axes are positioned relative to the device as you hold it facing toward you in your hand.
To illustrate the accelerometer reading of the (x, y, z) = (0, −1, 0) means standing the phone up on the table with the front of the phone facing toward you and the phone buttons facing downwards, as shown in Figure 6-2.
If you were to rotate the phone in Figure 6-2 to the right 90 degrees, so that the Windows Phone control buttons are to the right, as shown in Figure 6-3, the expected accelerometer readings would be (x, y, z) = (-1, 0, 0).
If you took the phone in Figure 6-2 and rotated it 180 degrees, (x, y, z) would be (0, 1, 0), as shown in Figure 6-4.
If you were to rotate the phone in Figure 6-4 to the left 90 degrees, as shown in Figure 6-5, (x, y, z) would be (1, 0, 0).
If you were to put the phone flat on the table with the phone facing up, as shown in Figure 6-6, (x, y, z) would be (0, 0, −1).
If you put the phone facing down on the table, as shown in Figure 6-7, (x, y, z) would be (0, 0, 1).


The Euclidean distance algorithm is a useful way to calculate a distance between two points in three-dimensional space. This equation allows you to detect sudden movements such as the shaking of the phone.
If (Ox, Oy, Oz) is a previous accelerometer value and (Nx, Ny, Nz) is a new one, you can calculate Euclidean distance as follows:
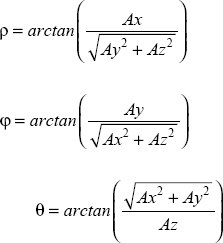
With obtained accelerometer readings you will have a pretty good understanding of the current orientation of the phone, but using the accelerometer data will tell you how far the phone is tilted on the x, y, and z axes. This information can be very useful if you are planning to create airplane simulation games or racing games that use the accelerometer to control the direction of moving objects. Think of it as using a phone like joystick by detecting the tilt motions known as pitch, roll and yaw.
When you hold the phone vertically, with the screen facing you, both the pitch and roll angles are 0 degrees, as shown in Figure 6-8.

Now if you tilt the phone slightly to the right, you will be able to calculate the pitch (ρ) and roll (φ) angles shown in Figure 6-9. There's another angle of interest, yaw, which is the angle respective to the z axis (not shown in Figure 6-9); think of yaw as phone being tilted towards you or away from you into the page.

In order to calculate pitch (ρ), roll (φ), and yaw (theta) angles you will need the following equations, where Ax, Ay, and Az are the accelerometer values for x, y, and z.
You'll use Euclidean distance and pitch, roll, and yaw calculations in the examples that follow.
In order to use the Windows Phone accelerometer, you'll need to reference the Microsoft.Devices.Sensors namespace, which contains the Accelerometer class. Among its members is the ReadingChanged event, which constantly updates the x, y, and z coordinates of the device as event arguments e.X, e.Y, and e.Z, with a Timestamp that can be used to calculate velocity, acceleration, and other values.
There are two things that you must remember about the accelerometer device. First is that heavy use of the accelerometer will use up the battery of the phone, and thus you must remember to turn it on only when it's needed and turn it off when done. Second, the accelerometer runs on a thread that is completely separate from the thread on which the current UI runs. This means that you must use Deployment.Current.Dispatcher.BeginInvoke to update the UI; otherwise you will receive an invalid cross thread exception.
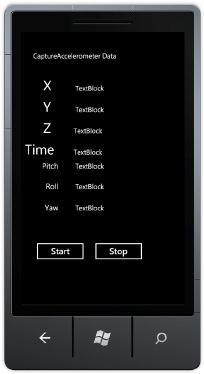
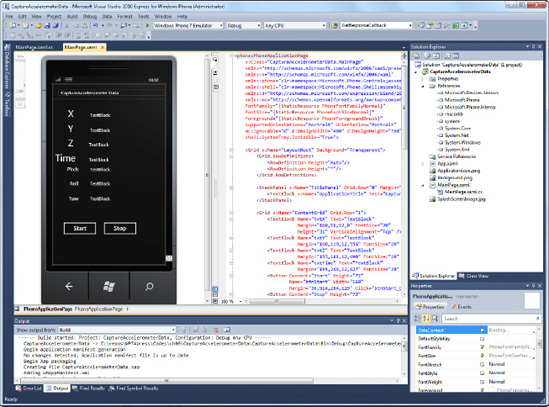
You will begin by building a simple application that captures the accelerometer data. The accelerometer data consist of acceleration data in x, y, and z directions plus the time in which the acceleration data was captured. Figure 6-10 displays the basic UI of the accelerometer data. In order for this demo to work, you must deploy the project to an actual Windows Phone device (please refer to Chapter 4 for deploying to the device). If you don't have a Windows Phone device, you might consider using Reactive Extension to simulate the accelerometer behavior. Reactive Extension will not be covered in this chapter, but you can refer to Chapter 18 for more detail on how to create simulation in order to work with the accelerometer in the emulator.
You will build the demo in three steps. First, you'll create a Visual Studio project. Next, you'll build the project's user interface, and then you'll finish up by adding the code the application needs to retrieve and display data from the accelerometer.
To set up the CaptureAccelerometerData project, follow the steps you've used for previous examples in this book.
Open Microsoft Visual Studio 2010 Express for Windows Phone on your workstation.
Create a new Windows Phone Application by selecting File

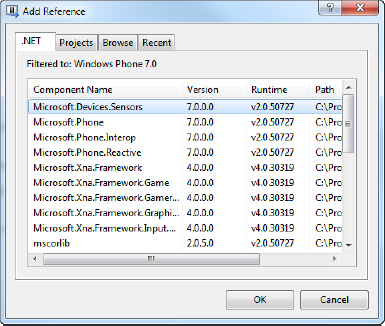
In order to use the accelerometer, add an assembly reference to
Microsoft.Devices.Sensorsby right-clicking theReferencesfolder in Solution Explorer and chooseMicrosoft.Devices.Sensorsfrom the Add Reference window, as shown in Figure 6-11.
You will be building the user interface using the XAML in the Visual Studio (for building simple controls, it's faster to work with the XAML code). Go to Solution Explorer, open MainPage.xaml, and replace the XAML you find there with the code in the following sections.
The namespaces you see in the following code snippet are typically declared by default when you first create a Windows Phone project. In particular, the namespace xmlns:phone="clr-namespace:Microsoft.Phone.Controls; assembly=Microsoft.Phone" allows you to add common Windows Phone controls to the application main page.
<phone:PhoneApplicationPage
    x:Class="CaptureAccelerometerData.MainPage"
    xmlns="http://schemas.microsoft.com/winfx/2006/xaml/presentation"
    xmlns:x="http://schemas.microsoft.com/winfx/2006/xaml"
    xmlns:phone="clr-namespace:Microsoft.Phone.Controls;assembly=Microsoft.Phone"
    xmlns:shell="clr-namespace:Microsoft.Phone.Shell;assembly=Microsoft.Phone"
    xmlns:d="http://schemas.microsoft.com/expression/blend/2008"
    xmlns:mc="http://schemas.openxmlformats.org/markup-compatibility/2006"
    FontFamily="{StaticResource PhoneFontFamilyNormal}"
    FontSize="{StaticResource PhoneFontSizeNormal}"
    Foreground="{StaticResource PhoneForegroundBrush}"
    SupportedOrientations="Portrait" Orientation="Portrait"
    mc:Ignorable="d" d:DesignWidth="480" d:DesignHeight="768"
shell:SystemTray.IsVisible="True">Now, create the components you need to display the x, y, and z values plus the time reading that your application captures from the accelerometer. You'll also want to add components to display the pitch, roll, and yaw values of the device, which you will calculate and use to understand how the phone is oriented. Finally, you also need buttons to start and stop the accelerometer, which are also specified
<Grid x:Name="LayoutRoot" Background="Transparent">
        <Grid.RowDefinitions>
            <RowDefinition Height="Auto"/>
            <RowDefinition Height="*"/>
        </Grid.RowDefinitions>

        <StackPanel x:Name="TitlePanel" Grid.Row="0" Margin="24,24,0,12">
            <TextBlock x:Name="ApplicationTitle" Text="CaptureAccelerometer Data"
Style="{StaticResource PhoneTextNormalStyle}"/>
        </StackPanel>

        <Grid x:Name="ContentGrid" Grid.Row="1">
            <TextBlock Name="txtX" Text="TextBlock"
                       Margin="160,56,12,0" FontSize="20"
                       Height="31" VerticalAlignment="Top" />
            <TextBlock Name="txtY" Text="TextBlock"
                       Margin="160,119,12,556" FontSize="20" />
            <TextBlock Name="txtZ" Text="TextBlock"
                       Margin="155,181,12,490" FontSize="20" />
            <TextBlock Name="txtTime" Text="TextBlock"
                       Margin="155,244,12,427" FontSize="20" />
<Button Content="Start" Height="72"
Name="btnStart" Width="160"
Margin="36,514,284,119" Click="btnStart_Click" />
<Button Content="Stop" Height="72"
Name="btnStop" Width="160"
Margin="207,514,113,119" Click="btnStop_Click" />
<TextBlock FontSize="40" Margin="66,34,331,614"
Name="lblX" Text="X" />
<TextBlock FontSize="40" Margin="66,97,331,552"
Name="lblY" Text="Y" />
<TextBlock FontSize="40" Margin="66,159,346,489"
Name="lblZ" Text="Z" />
<TextBlock FontSize="40" Margin="12,222,331,422"
Name="lblTime" Text="Time" />
<TextBlock FontSize="20" Margin="160,285,7,386"
Name="txtPitch" Text="TextBlock" />
<TextBlock FontSize="22" Margin="0,283,370,365"
Name="lblPitch" Text="Pitch" TextAlignment="Right" />
<TextBlock FontSize="20" Margin="160,345,7,326"
Name="txtRoll" Text="TextBlock" />
<TextBlock FontSize="22" Margin="0,343,370,305"
Name="lblRoll" Text="Roll" TextAlignment="Right" />
<TextBlock FontSize="20" Margin="160,408,7,263"
Name="txtYaw" Text="TextBlock" />
<TextBlock FontSize="22" Margin="0,406,370,242"
Name="lblYaw" Text="Yaw" TextAlignment="Right" />
</Grid>
</phone:PhoneApplicationPage>Once you have loaded the XAML code, you should see the layout shown in Figure 6-12. In the next section, you will be adding events to the updating of the UI with captured accelerometer data.
In Solution Explorer, open MainPage.xaml.cs and replace the code there with the following C# code blocks that will implement the UI updates using accelerometer data.
Begin by listing the namespaces the application will use. The inclusion of Microsoft.Devices.Sensors will allow you to start and stop Windows Phone's accelerometer.
using System;
using System.Windows;
using Microsoft.Phone.Controls;
using Microsoft.Devices.Sensors;
namespace CaptureAccelerometerData
{
    public partial class MainPage : PhoneApplicationPage
{The variable _ac, an Accelerometer object, will be used to start and stop the accelerometer and to retrieve x, y, z, and time. Also notice the inclusion of the ReadingChanged event, which you'll draw on to send captured accelerometer data to your UI.
Accelerometer _ac;

        public MainPage()
        {
            InitializeComponent();

            _ac = new Accelerometer();
            _ac.ReadingChanged += new
EventHandler<AccelerometerReadingEventArgs>(_ac_ReadingChanged);
}Note here that you can't directly change the UI elements upon receiving the accelerometer data because the accelerometer data comes from a different thread than the current UI thread. If you try to change the UI elements directly here, you'll get an invalid cross-thread access error, as shown in Figure 6-13. In order to overcome this problem, you must use the Dispatcher in the current UI thread, as shown in the following code.

private void ProcessAccelerometerReading(AccelerometerReadingEventArgs e)
        {
            txtTime.Text = e.Timestamp.ToString();
            txtX.Text = e.X.ToString();
            txtY.Text = e.Y.ToString();
txtZ.Text = e.Z.ToString();
txtPitch.Text = RadianToDegree((Math.Atan(e.X / Math.Sqrt(Math.Pow(e.Y, 2) +
Math.Pow(e.Z, 2))))).ToString();
txtRoll.Text = RadianToDegree((Math.Atan(e.Y / Math.Sqrt(Math.Pow(e.X, 2) +
Math.Pow(e.Z, 2))))).ToString();
txtYaw.Text = RadianToDegree((Math.Atan(Math.Sqrt(Math.Pow(e.X, 2) +
Math.Pow(e.Y, 2))/ e.Z))).ToString();
}Implement the button event for stopping and starting the accelerometer. Note here that you must anticipate the possible error that might occur when you are trying to start or stop the accelerometer.
private void btnStart_Click(object sender, RoutedEventArgs e)
        {
            try
            {
                _ac.Start();
            }
            catch (AccelerometerFailedException)
            {
                MessageBox.Show("Acceleromter failed to start.");
            }
        }

        private void btnStop_Click(object sender, RoutedEventArgs e)
        {
            try
            {
                _ac.Stop();
            }
            catch (AccelerometerFailedException)
            {
                MessageBox.Show("Acceleromter failed to stop.");
            }
        }
    }
}To test the finished application, press F5. The result should resemble the screenshot in Figure 6-10; you will see that the x, y, z, and time text blocks are constantly being updated each time you click the Start button. Remember that to run the application on a Windows Phone 7 device, you must choose the Windows Phone 7 Device option shown in Figure 6-14.

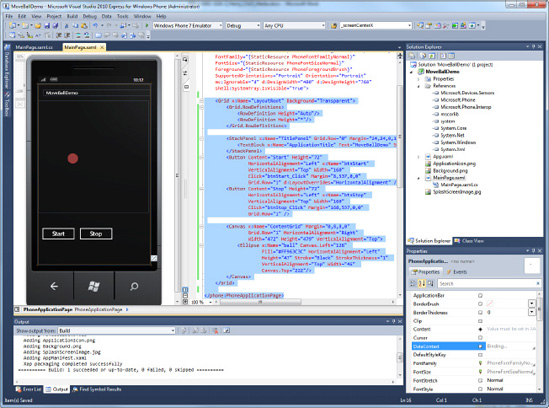
In this demo, you will use the captured accelerometer data to do something more useful: move the image of a ball as you tilt the phone left, right, forward, and back. This demo will help you understand how to translate the user input of the accelerometer data and apply it to UI elements. Figure 6-15 displays the basic UI of the MoveBallDemo.

To set up the CaptureAccelerometerData project, follow the steps you've used for previous examples in this book.
Open Microsoft Visual Studio 2010 Express for Windows Phone on your workstation.
Create a new Windows Phone Application by selecting File
In order to use the accelerometer, add an assembly reference to
Microsoft.Devices.Sensorsby right-clicking theReferencesfolder in Solution Explorer and chooseMicrosoft.Devices.Sensorsfrom the Add Reference window, as shown previously in Figure 6-11.
You will be building the user interface using the XAML in Visual Studio (for building simple controls, it's faster to work with the XAML code). Go to Solution Explorer, open MainPage.xaml, and replace the XAML you find there with the code in the following sections.
The namespaces you see here are typically declared by default when you first create the Windows Phone project, and the namespaces like xmlns:phone="clr-namespace:Microsoft.Phone.Controls;assembly=Microsoft.Phone" will allow you to add common Windows Phone controls.
<phone:PhoneApplicationPage
    x:Class="MoveBallDemo.MainPage"
    xmlns="http://schemas.microsoft.com/winfx/2006/xaml/presentation"
    xmlns:x="http://schemas.microsoft.com/winfx/2006/xaml"
    xmlns:phone="clr-namespace:Microsoft.Phone.Controls;assembly=Microsoft.Phone"
    xmlns:shell="clr-namespace:Microsoft.Phone.Shell;assembly=Microsoft.Phone"
    xmlns:d="http://schemas.microsoft.com/expression/blend/2008"
    xmlns:mc="http://schemas.openxmlformats.org/markup-compatibility/2006"
    FontFamily="{StaticResource PhoneFontFamilyNormal}"
    FontSize="{StaticResource PhoneFontSizeNormal}"
    Foreground="{StaticResource PhoneForegroundBrush}"
    SupportedOrientations="Portrait" Orientation="Portrait"
    mc:Ignorable="d" d:DesignWidth="480" d:DesignHeight="768"
shell:SystemTray.IsVisible="True">The UI consists of Start and Stop buttons for stopping and starting the accelerometer and a ball that moves as the Windows Phone is tilted left, right, forward, and backward.
<Grid x:Name="LayoutRoot" Background="Transparent">
        <Grid.RowDefinitions>
            <RowDefinition Height="Auto"/>
            <RowDefinition Height="*"/>
        </Grid.RowDefinitions>

        <StackPanel x:Name="TitlePanel" Grid.Row="0" Margin="24,24,0,12">
            <TextBlock x:Name="ApplicationTitle" Text="MoveBallDemo"
Style="{StaticResource PhoneTextNormalStyle}"/>
        </StackPanel>
        <Button Content="Start" Height="72"
                HorizontalAlignment="Left" x:Name="btnStart"
                VerticalAlignment="Top" Width="160"
                Click="btnStart_Click" Margin="8,537,0,0"
                Grid.Row="1" d:LayoutOverrides="HorizontalAlignment" />
        <Button Content="Stop" Height="72"
HorizontalAlignment="Left" x:Name="btnStop"
VerticalAlignment="Top" Width="160"
Click="btnStop_Click" Margin="168,537,0,0"
Grid.Row="1" />
<Canvas x:Name="ContentGrid" Margin="0,8,8,0"
Grid.Row="1" HorizontalAlignment="Right"
Width="472" Height="479" VerticalAlignment="Top">
<Ellipse x:Name="ball" Canvas.Left="126"
Fill="#FF963C3C" HorizontalAlignment="Left"
Height="47" Stroke="Black" StrokeThickness="1"
VerticalAlignment="Top" Width="46"
Canvas.Top="222"/>
</Canvas>
</Grid>
</phone:PhoneApplicationPage>Once you've loaded the XAML code, you should see the layout shown in Figure 6-16. Now it's time to animate the ball and add the sound effect by wiring up some events.
In Solution Explorer, open MainPage.xaml.cs and replace the code there with the following C# code blocks.
Begin by listing the namespaces the application will use. The inclusion of Microsoft.Devices.Sensors will allow you to start and stop Windows Phone's accelerometer.
using System;
using System.Windows;
using System.Windows.Controls;
using Microsoft.Phone.Controls;
using Microsoft.Devices.Sensors;

namespace MoveBallDemo
{
    public partial class MainPage : PhoneApplicationPage
{The variable _ac, an Accelerometer object, will be used to start and stop the sensor and retrieve the x, y, z, and time values. The ReadingChanged event sends the captured accelerometer data to be displayed in the UI. Finally, the starting position of the ball is set to the center of the canvas where the ball is placed.
private Accelerometer _ac;

        public MainPage()
        {
            InitializeComponent();

            SupportedOrientations = SupportedPageOrientation.Portrait;

            ball.SetValue(Canvas.LeftProperty, ContentGrid.Width / 2);
            ball.SetValue(Canvas.TopProperty, ContentGrid.Height / 2);

            _ac = new Accelerometer();
            _ac.ReadingChanged += new
EventHandler<AccelerometerReadingEventArgs>(ac_ReadingChanged);
}Here, as in the previous demo, you can't directly change the UI elements upon receiving the accelerometer data because the accelerometer data comes from a different thread than the current UI thread. If you try to change the UI elements directly here, you will get an invalid cross-thread access error, as shown previously in Figure 6-13. In order to overcome this problem, you must use the Dispatcher in the current UI thread, as shown in the following code:
private void ac_ReadingChanged(object sender, AccelerometerReadingEventArgs e)
{
    Deployment.Current.Dispatcher.BeginInvoke(() => MyReadingChanged(e));
}The following code achieves the behavior where if the phone is tilted vertically with the display facing toward you, based on the algorithm specified in the method, the ball will fall straight very fast. But if you tilt the phone slightly while the display is facing up, the ball will slowly slide to the direction in which the phone is tilted.
private void MyReadingChanged(AccelerometerReadingEventArgs e)
        {
            double distanceToTravel = 2;
            double accelerationFactor = Math.Abs(e.Z) == 0 ? 0.1 : Math.Abs(e.Z);
            double ballX = (double)ball.GetValue(Canvas.LeftProperty) +
distanceToTravel * e.X / accelerationFactor;
            double ballY = (double)ball.GetValue(Canvas.TopProperty) -
distanceToTravel * e.Y / accelerationFactor;

            if (ballX < 0)
            {
                ballX = 0;
            }
            else if (ballX > ContentGrid.Width)
            {
                ballX = ContentGrid.Width;
            }

            if (ballY < 0)
            {
                ballY = 0;
            }
            else if (ballY > ContentGrid.Height)
            {
                ballY = ContentGrid.Height;
            }

            ball.SetValue(Canvas.LeftProperty, ballX);
            ball.SetValue(Canvas.TopProperty, ballY);
}Implement the button event for stopping and starting the accelerometer.
private void btnStart_Click(object sender, RoutedEventArgs e)
        {
            if (_ac == null)
            {
                _ac = new Accelerometer();
            }
            _ac.Start();
        }

        private void btnStop_Click(object sender, RoutedEventArgs e)
        {
            if (_ac == null)
            {
                _ac = new Accelerometer();
            }
            _ac.Stop();
        }
    }
}To test the finished application, press F5 (remember to choose to run the application on a Windows Phone 7 device, as shown previously in Figure 6-15). Once the application runs on the Windows Phone, click the Start button. Tilt the phone and watch the ball move in the direction the phone is being tilted.
In this chapter, you learned about the fundamentals of the accelerometer. In the first demo, you captured the accelerometer data and displayed it by updating UI elements on the currently executing UI thread. In the second demo, you moved a ball on the phone screen by using captured accelerometer data to calculate its speed and position.
In Chapter 7, you will create an application bar to display shortcuts for the most commonly used tasks in the application and design it to be a compelling application.