As you develop Windows Phone applications, you must learn how to equip them to handle a number of exceptions that are unique to smartphones. Unlike a desktop computer, a Windows Phone is loaded with devices over which you have little direct control, including GPS, an accelerometer, Wi-Fi, isolated storage, and a radio. A user can decide to turn off an onboard device to save power at any time; isolated storage can run out of space; and a resource such as a cell tower, GPS satellite, or Wi-Fi router might not be available. To identify and fix unexpected exceptions in an application, you need to know how to use the powerful debugging facilities of Visual Studio. To assure yourself that you have dealt with all of the bugs your application is likely to encounter, you need to know how to test your applications on a real device.
In this chapter, you will learn to master critical debugging and troubleshooting skills using Visual Studio IDE, which you can also use to debug any application, including web applications (ASP.NET) and Windows applications.
The following sections are divided into three major topics. We'll walk you through a series of tutorials covering general exception handling in Windows Phone, Visual Studio debugger features, and testing using the emulator and the real device.
In this section, you will learn how to find and deal with two exceptions that are common to Windows Phone applications. The first is the navigation failed exception, which can be thrown when a main page is loaded; the second deals with the web service call that is consumed by the application.
The ErrorHandlingDemo application that you'll use contains two projects: a Windows Phone project and the Calculator web service project, which has an Add method that adds two numbers and returns the result to the caller. Being able to debug and handle web service call exceptions will be critical, especially if you are planning to work with external services like Microsoft Bing Maps services (which are covered in Chapter 14).
When you finally debug and fix all the issues in the application, you will see the result shown in Figure 4-1.

The ErrorHandlingDemo application contains bugs that will cause exceptions to be thrown when the application's main page is loaded. In this section, you will learn how to find and fix such problems in Visual Studio.
Whenever an application throws an exception, Visual Studio will stop execution at the line where it's thrown. To observe this behavior, let's run the application and take a closer look using the Visual Studio IDE.
Fire up Visual Studio, select File
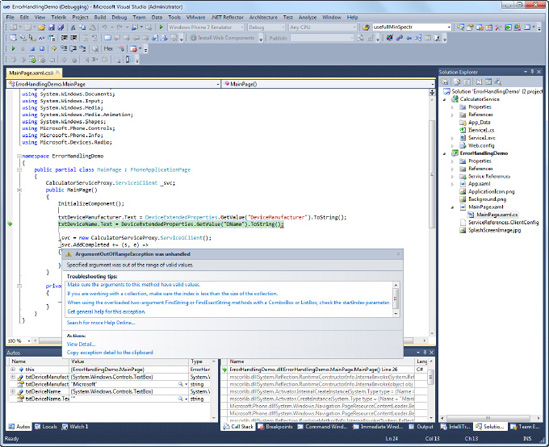
{unzippeddirectory}ch04ErrorHandlingDemoStartErrorHandlingDemo.sln.Once the solution file is loaded, press F5 to run it. Notice the raised exception message in Figure 4-2, which points to the code that has caused ArgumentOutOfRangeException to be thrown. From DeviceExtendedProperties you can obtain Windows Phone 7 system information, and only the following keys—DeviceManufacturer, DeviceName, DeviceUniqueId, DeviceTotalMemory, ApplicationCurrentMemoryUsage, and ApplicationPeakMemoryUsage—will be available. And when you try to query the system information DName that does not exist, the application throws ArgumentOutOfException.
Whenever an application running in Visual Studio pauses at a line where an exception has been thrown, you always have an opportunity to observe its variables in Visual Studio's Immediate Window.
Immediate Window is a most useful debugging feature because it allows you to evaluate any statement when the code execution pauses at the breakpoint. If you do not see the immediate window when the breakpoint is hit, you can go to Debug
With ErrorHandlingDemo still paused in the debugger, go to the Immediate Window, type in
DeviceExtendedProperties.GetValue("DeviceName")to query the object value, and press Enter. You will see the result printed in an Immediate Window, as shown in Figure 4-3.In next section, you will learn to handle exceptions specific to Windows Phone 7.

Unhandled exceptions in a Windows Phone application will be caught by one of two main methods: RootFrame_NavigationFailed and Application_UnhandledException. RootFrame_NavigationFailed catches unhandled exceptions thrown while a page is being loaded; Application_UnhandledException catches exceptions thrown in all other cases.
Press F5 to continue debugging from the breakpoint in the previous section.
The debugger will next break inside
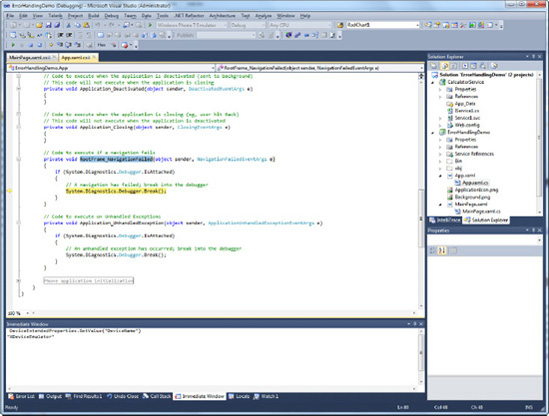
RootFrame_NavigationFailedinApp.xaml.cs, as shown in Figure 4-4. Notice that inApp.xaml.csyou will find various Windows Phone application-related events such asApplication_Launching, Application_Activated, Application_Deactivated, Application_Closing, RootFrame_NavigationFailed, andApplication_UnhandledException. As far as exceptions are concerned, only two events will be of interest.RootFrame_NavigationFailedcaptures unhandled exceptions when the Windows Phone page fails to load. In ErrorHandlingDemo, unhandled exceptions occur whenMainPagetries to load and throwsArgumentOutOfException.With your mouse, hover over NavigationFailedEventArgs
e; you will be able to drill into the object value and see thee.Urithat contains the page that caused the error during the load, as shown in Figure 4-5.Press F5 to continue debugging. You will notice that code execution next breaks in the
Application_UnhandledExceptionmethod. All exceptions that are not handled specifically by atry-catch-finallyblock will ultimately end up in this method.

When an exception is thrown in the MainPage of an application, the exception will be caught by the RootFrame_NavigationFailed method, and this is where you want to handle it in order to stop the exception from bubbling up to the Application_UnhandledException method.
In ErrorHandlingDemo, replace the RootFrame_NavigationFailed method with following code. Notice the use of MessageBox in the code to display the proper error with stack trace and set e.Handled to true, which will stop the breakpoint to move to the Application_UnhandledException method.
// Code to execute if a navigation fails
        private void RootFrame_NavigationFailed(object sender, NavigationFailedEventArgs e)
        {
            if (System.Diagnostics.Debugger.IsAttached)
            {
                // A navigation has failed; break into the debugger
                System.Diagnostics.Debugger.Break();
            }

            MessageBox.Show(
string.Format("Page {0} failed to load because of with error: {1}",
e.Uri.ToString(), e.Exception.StackTrace));
            e.Handled = true;
}In the previous section, you added a MessageBox display in case any other page fails to load. In the following steps, you will be fixing the actual cause of the exception in MainPage. But first, let's fix the error in MainPage.xaml.cs.
Fix the error in MainPage.xaml.cs by replacing
txtDeviceName.Text = DeviceExtendedProperties.GetValue("DName").ToString()with
txtDeviceName.Text = DeviceExtendedProperties.GetValue("DeviceName").ToString().ErrorHandlingDemo contains the CalculatorService web service project where the service will be hosted locally and consumed by the demo application. The code is written so that the application will throw the exceptions that you will be fixing.
You will be stepping through the breakpoints in order to understand the behavior of the thrown exception. Before you begin, make sure that both the Windows Phone project and the web service project start simultaneously when you Press F5.
Right-click the
ErrorHandlingDemosolution in Solution Explorer and choose the property. The solution property page window shown in Figure 4-6 will display.Select the Multiple startup projects option, and
CalculatorServiceandErrorHandlingDemoprojects' Actions are set to Start.Also, put two breakpoints in
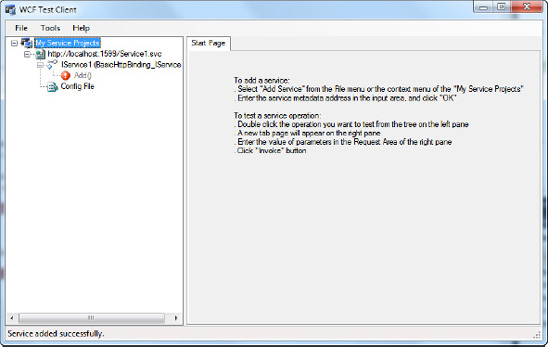
MainPage.xaml.csat the linetxtAnswer.Text = e.Result.ToString()and_svc.AddAsync(txtX.Text, txtY.Text), as shown in Figure 4-6.Press F5. You will see the application shown in Figure 4-1 in the emulator, and you will notice the WCF Test Client starts as well, as shown in Figure 4-7. The WCF Test Client will host the
CalculatorService, allowing you to step into the web service call.From the emulator, press the Call Calculator Service button.
Notice that the Visual Studio catches
InvalidCastExceptionthrown from theCalculatorServiceproject, as shown in Figure 4-8.When you hover over
xvalue you will notice that it containsTest, which can't be converted to integer, thus causingInvalidCastException.Press F5 to continue. Visual Studio breaks at
Reference.cs, which is the web service proxy class that was generated against WSDL from Visual Studio (see Chapter 3 for more detail on how to consume web services).Press F5 again. The execution will break on the line
txtAnswer.Text = e.Result.ToString()foundin MainPage.xaml.cs.In Immediate Window, type in
e.Error. You will notice that e.Error is not empty. When the web service returns any kind of error, e.Error will not be empty, and when you try to access e.Result that contains web service call, the result will throw an exception.Press F5 again. Note the exception thrown in the e.Result property, as shown in Figure 4-9.
Press F5. The exception will be finally caught in
Application_UnhandledException.


After stepping through the breakpoints, you now have enough information to fix the exception.
First, let's check the values received from the caller in CalculatorService. Replace Service1.svc.cs codes with the following snippet. The CheckValue method will make sure that the received value is not null and convert the value to the integer.
public int Add(object x, object y)
        {
            int xValue = CheckValue(x);
            int yValue = CheckValue(y);

            return xValue + yValue;
}
private int CheckValue(object value)
{
int convertedValue = −1;
if (value == null)
{
throw new ArgumentNullException("value");
}
else if (!int.TryParse(value.ToString(), out convertedValue))
{
throw new ArgumentException(
string.Format("The value '{0}' is not an integer.", value));
}
return convertedValue;
}In MainPage.xaml.cs, replace the AddCompleted event delegate with following code. You will be checking to make sure e.Error is empty before retrieving e.Result; if e.Error is not empty, you will be throwing the proper error message.
_svc.AddCompleted += (s, e) =>
            {
                if (e.Error == null)
                {
                    txtAnswer.Text = e.Result.ToString();
                }
                else
                {
                    MessageBox.Show(
string.Format("CalculatorService return an error {0}",
e.Error.Message));
                }
};You've finished debugging and fixing the application exceptions, and now you'll be able to properly run the application and handle exceptions.
Press F5 and you will see Figure 4-1; notice now that txtDeviceManufacturer and txtDeviceName are properly populated during the MainPage load. When you change txtX to an integer and click the Call Calculator Service button, txtAnswer will be populated with the result received from the web service.
Testing an application on a Windows Phone device is a lot more work than using the Windows Phone emulator because it involves registering your device, physically connecting it to your computer via a USB cable, and running Zune software in the background on your workstation. Here are the steps you need to follow to set up a phone as your debugging platform.
First, you must apply for a Windows Phone Marketplace account at the Windows Phone developer portal.
If you don't yet have a Windows Phone account, go to
http://create.msdn.com/and sign up.Microsoft will review your application and activate your account. If you have not yet installed Zune software, you can download the latest Zune software from
www.zune.net/en-us/products/software/download/default.htm.Once you're approved, click the Windows Start menu on your workstation and select All Programs

Note
The Windows Phone 7 device is based on the Zune, which is a Microsoft product and iPod competitor for playing video and audio. A Windows Phone uses Zune software to update a Windows Phone 7 system, and Zune must be running in order to deploy an application to a device. You can also use Zune software to back up your device.
Connect your Windows Phone device to your developer workstation using a USB cable.
To confirm that your device is properly connected and recognized by the Zune software, click the phone icon at the bottom left corner of the Zune Welcome screen, as indicated by the arrow in Figure 4-11.
When you click the phone icon, the Zune software will display detailed information about your device, as shown in Figure 4-12.
Now you are ready to actually register your device.
Go to the Windows Start menu, select All Programs
A Windows Phone developer registration form will display, as shown in Figure 4-14.
Enter the ID and password you used to register for a Windows Phone Marketplace account in step 1.


To confirm that your phone is properly registered, go to http://create.msdn.com/ and log in.
Once logged in, click My Dashboard

Then click on from the left menu My Account

In the following section, you will learn tips and tricks to make your life easier when you begin to debug and test using a real device.
TIPS AND TRICKS: DEBUGGING ON A DEVICE
Here are a few things that you should keep in mind to make your life easier and save you time when you're debugging an application on a live Windows Phone.
When debugging, it's best to disable screen time-out, especially if you are debugging through a complex program that takes a long time. On the Windows Phone device, go to Settings
When you try to debug in the Windows Phone 7 device, you will get the error message shown here. And when you click No, you will see an "Access Denied" message in your Error List window. This is because your device is locked due to time-out. To avoid this problem during the debugging, disable time-out on the device by following step 1. To resolve this issue, simply unlock your device and restart in debug mode in Visual Studio.


When the Zune application is not started, you will receive the error "Zune software is not launched. Retry after making sure that Zune software is launched" in the Visual Studio Error List Window.
In the following section, you will learn to capture device-specific exceptions. You will be using the accelerometer device as an example to properly handle unexpected exceptions by catching AccelerometerFailedException. AccelerometerFailedException can occur if the accelerometer device on the phone is broken. The exception can also occur if the device throws an unexpected error caused internally by Microsoft Window Phone framework. Figure 4-17 displays the basic UI of the CatchDeviceExceptionDemo project that you will be building.

To set up the CatchDeviceExceptionDemo project, follow the steps you've used for previous examples in this book.
Open Microsoft Visual Studio 2010 Express for Windows Phone on your workstation.
Create a new Windows Phone Application by selecting File
In order to use the accelerometer, add an assembly reference to
Microsoft.Devices.Sensorsby right-clicking theReferencesfolder in Solution Explorer, and choose Microsoft.Devices.Sensors from the Add Reference window, as shown in Figure 4-18.

You will be building the user interface using the XAML in the Visual Studio. For building simple controls, it's faster to work with the XAML code. Go to Solution Explorer, open MainPage.xaml, and replace the XAML you find there with the code in the next section.
The namespaces you see in the following code snippet are typically declared by default when you first create a Windows Phone project. In particular, namespaces xmlns:phone="clr-namespace:Microsoft.Phone.Controls; assembly=Microsoft.Phone" allow you to add common Windows Phone controls to the application main page.
<phone:PhoneApplicationPage
    x:Class="CatchingDeviceExceptionsDemo.MainPage"
    xmlns="http://schemas.microsoft.com/winfx/2006/xaml/presentation"
    xmlns:x="http://schemas.microsoft.com/winfx/2006/xaml"
    xmlns:phone="clr-namespace:Microsoft.Phone.Controls;assembly=Microsoft.Phone"
xmlns:shell="clr-namespace:Microsoft.Phone.Shell;assembly=Microsoft.Phone"
xmlns:d="http://schemas.microsoft.com/expression/blend/2008"
xmlns:mc="http://schemas.openxmlformats.org/markup-compatibility/2006"
mc:Ignorable="d" d:DesignWidth="480" d:DesignHeight="768"
FontFamily="{StaticResource PhoneFontFamilyNormal}"
FontSize="{StaticResource PhoneFontSizeNormal}"
Foreground="{StaticResource PhoneForegroundBrush}"
SupportedOrientations="Portrait" Orientation="Portrait"
shell:SystemTray.IsVisible="True">Create two buttons to start and stop the accelerometer.
<!--LayoutRoot is the root grid where all page content is placed-->
    <Grid x:Name="LayoutRoot" Background="Transparent">
        <Grid.RowDefinitions>
            <RowDefinition Height="Auto"/>
            <RowDefinition Height="*"/>
        </Grid.RowDefinitions>

        <!--TitlePanel contains the name of the application and page title-->
        <StackPanel x:Name="TitlePanel" Grid.Row="0" Margin="12,17,0,28">
            <TextBlock x:Name="ApplicationTitle" Text="CatchingDeviceExceptionsDemo"
Style="{StaticResource PhoneTextNormalStyle}"/>
        </StackPanel>

        <!--ContentPanel - place additional content here-->
        <Grid x:Name="ContentPanel" Grid.Row="1" Margin="12,0,12,0">
            <Button Content="Start Accelerometer" Height="72" HorizontalAlignment="Left"
Margin="84,45,0,0" Name="btnStartAcc" VerticalAlignment="Top"
Width="284" Click="btnStartAcc_Click" />
            <Button Content="Stop Accelerometer" Height="72" HorizontalAlignment="Left"
Margin="84,123,0,0" Name="btnStopAcc" VerticalAlignment="Top"
Width="284" Click="btnStopAcc_Click" />
        </Grid>
    </Grid>

</phone:PhoneApplicationPage>
Once you have loaded the XAML code, you should see the layout shown in Figure 4-19. In the next section, you will be coding the application.

In Solution Explorer, open MainPage.xaml.cs and replace the code there with the following C# code blocks.
Begin by listing the namespaces the application will use. Note that the inclusion of Microsoft.Devices.Sensors will allow you to start and stop Windows Phone's accelerometer.
using System.Windows;
using Microsoft.Phone.Controls;
using Microsoft.Devices.Sensors;
The variable _acc, Accelerometer object, will be used to start and stop.
Accelerometer _acc;

        public MainPage()
        {
            InitializeComponent();
            _acc = new Accelerometer();
}Implement a button event for stopping and starting the accelerometer. Note that you are catching AccelerometerFailedException, which can be raised during the start and stop of the accelerometer. In the exception property, you will find ErrorId and Message that contains specific error code and a description that could explain why the error was raised
private void btnStartAcc_Click(object sender, RoutedEventArgs e)
        {
            try
            {
                _acc.Start();

                _acc.ReadingChanged += (s1, e1) =>
                    {
                        // Do something with captured accelerometer data
                    };
            }
            catch (AccelerometerFailedException ex)
            {
                string errorMessage = string.Format(@"
                            Accelerometer threw an error with ErrorId {0}
    during the start operation
                            with error message {1}
                            ", ex.ErrorId, ex.Message);
                MessageBox.Show(errorMessage);
            }
        }

        private void btnStopAcc_Click(object sender, RoutedEventArgs e)
        {
            try
            {
                 _acc.Stop();
            }
            catch (AccelerometerFailedException ex)
            {
                string errorMessage = string.Format(@"
Accelerometer threw an error with ErrorId {0}
during the stop operation
with error message {1}
", ex.ErrorId, ex.Message);
MessageBox.Show(errorMessage);
}
}To test the finished application, press F5. The result should resemble the screenshot shown in Figure 4-16. The only thing you will not be able to test is being able to raise AccelerometerFailedException, which can be raised only if the accelerometer device fails. But the demo will give you a good idea of how you should be handling the device-related exception if it ever occurs.
In this chapter, you learned how catch and handle errors in an application and how to handle unexpected errors thrown by a Windows Phone. You also learned how to use Visual Studio's powerful debugging features to troubleshoot and fix defects, regardless of whether you're running an application in the emulator or on a real device.
In Chapter 5, you will learn to package, publish, and manage a Windows Phone application for distribution through the Windows Phone Marketplace.