Strong growth in mobile computing propelled by increasingly capable mobile devices is not just a North American phenomenon—people all over the world are increasingly relying on their phones both for business and leisure. This, of course, is wonderful news for Windows Phone 7 developers—the greater the customer base, the more potential revenue or exposure the application gets. There is just one small gotcha when taking mobile application development to the world: the vast majority of customers outside North America speak very little to no English.
So if your goal is to create an application that succeeds globally, you must ensure that it can "speak" many languages. Certainly, one way to make that happen is to create many versions of an application, one for each language market you target. Unfortunately, that approach quickly becomes a nightmare to maintain. Imagine making a small code change to an application, such as rearranging UI controls on its main page—that code change would have to be made to each language version of the application! Fortunately, .NET Framework and the .NET Compact Framework that powers Windows Phone 7 devices provide a set of culture-aware classes and a general approach to implementing multilingual applications. This approach involves creating and editing resource files, which can be developed and distributed independently of your application code
This chapter offers some simple steps that you can take to prepare an app for distribution in more than one language, ones that will save you time later. This topic deserves a book of its own, and indeed a few have been written already (see a list of them on Amazon's web site at www.amazon.com/s/ref=nb_sb_ss_i_0_17?url=search-alias%3Daps&field-keywords=.net+internationalization). We hope that our advice in this chapter will help you avoid extra work when you are ready to share your brilliant creation with non-English speaking population of the world. Let's begin with a closer look at the topic of internationalization and the support for it that the Windows Phone SDK provides.
Translating your application's interface or its documentation into other languages may be the most important task you'll face when you target your application for a global audience, but it's not the only one. Cultures differ in the ways they display dates, numbers, currencies, and even text. For instance, in the United States, the month is always the first part of the numeric representation of a date. In England, on the other hand, the month comes after the day. This could potentially create confusion—imagine payment due dates being missed because the date was not formatted according to a culture's standards. One way to avoid misinterpretation of numeric dates is to adopt an international standard, such as ISO 8601, that specifies that all dates are to be represented from the most significant to the least significant element: year, month, day, hour, and so on.
Similarly, disagreements over cultural representations of decimal separators have the power to almost stall the development of the programming language (http://en.wikipedia.org/wiki/Decimal_separator). To illustrate how such heated debates can originate, consider the following example: the number "one thousand one and one tenth" would be written in the United States as "1,001.1", with the comma symbol used as the separator for the thousands and the period symbol used for separating the decimals. The same number would be written in Europe as "1.001,1", with the dot used for separating thousands and the comma used to separate the decimals. The Windows Phone 7 operating system, fortunately, automatically makes these locale-aware changes for you. As a developer, however, you must help the framework out a little and ensure that you use appropriate data types and appropriate formatting options for the operations you perform in your applications. For example, you should never represent dates or numbers as strings and hardcode the formatting of those strings in your application if an application is intended for more than one national market.
In addition to these variations in the way different cultures handle numbers and dates, languages also differ in the number of words they require to express an idea, with some more verbose than others. For instance, it is estimated that an average sentence in the German language is 44 percent longer than the same sentence in English. That means that a Windows Phone 7 user interface written in English—its labels, textblocks, text boxes, and so on—may need to reserve additional available white space when designed in the English language and later translated (dynamically, as you'll see shortly) into German or other languages.
Also, if you are targeting international markets, the design of an application should be flexible enough to allow it to "speak" different languages without your having to make extensive changes to the source code. That means that all strings, images, and audio and video content must be placed in separate resource-only files—one for each target culture and language to make it easy to package the application for a new locale. By sticking with Unicode characters (with over 95,000 characters) to encode your strings content, you'll be able to display virtually any language in the world.
Another important consideration in deciding how to prepare to support your application in multiple languages is the amount of material that will need to be translated. Later in this chapter, we recommend you use resource-only files inside Visual Studio. This technique is perfectly acceptable for smaller applications, when there are only a handful of items to translate. However, if the translation requires the use of third-party translation services, you will be better served by looking at more specialized localization tools, such as Alchemy Catalyst, Globalizer.Net, Lingobit Localizer, or Radialix. While the use of such tools is beyond the scope of this chapter, if you ever find that editing resource files in Visual Studio becomes hard to manage, you can refer to the foregoing list to determine whether any of these products makes the task easier.
In MSDN documentation, there are usually two separate sections on internationalizing applications—globalization and localization. Roughly, globalization refers to ensuring that all commonly used application concepts, such as dates and currency, are properly represented and used in the system regardless of the locale of the user. Localization, on the other hand, refers to translating application resources, such as text of the user interface, into local representation. To muddy these concepts a little more, in the non-Microsoft world, the term internationalization is used to represent what Microsoft refers to as globalization. Since this is already confusing, for the purposes of this chapter, we won't make such a distinction; when we talk about "internationalizing" an application, we refer to ensuring that the application will work without problems in all countries and regions it was intended to work in—i.e., the Microsoft concepts of globalization and localization are blurred.
.NET and the Windows Phone 7 SDK include a number of tools to help you ready an app for international distribution. These tools include the CultureInfo class to properly determine the culture that an application is running in, as well as easy management of resource files that were custom developed for each culture. You will explore these tools next.
To see how you can go about preparing an application for the world, you'll build a simple application that announces a new product, in this case a Windows Phone. But first, you will learn how to use the CultureInfo class to ensure dates, numbers, and text appear in the right form regardless of the culture in which the announcement is made. Then you'll see how, by using resource (.resx) files, you can easily add translated content to your app to reach new markets. Figure 12-8 shows how the finished application will look.
Let's jump into code that will set the stage for the discussion of internationalization of Windows Phone 7 applications.
Let's start by creating a new project inside Visual Studio and naming it InternationalizationSample.
By default, the
MainPage.xamlfile is created in the application, with the designer and XAML windows open and ready to program.Double-click
MainPage.xamlto bring up the XAML designer window. For convenience and simplicity, you will alter the content of textblocks in the TitleGrid block. Make the XAML of the TitleGrid look identical to the XAML here:<StackPanel x:Name="TitlePanel" Grid.Row="0" Margin="24,24,0,12"> <TextBlock x:Name="ApplicationTitle" Text="Current Culture Setting" Style="{StaticResource PhoneTextNormalStyle}"/> <TextBlock x:Name="PageTitle" Text="culture" Margin="-3,-8,0,0" Style="{StaticResource PhoneTextTitle1Style}"/> </StackPanel>Your project should now look like Figure 12-1. So far you've simply changed the text of the default title textblock in the Windows Phone 7 application.
Now double-click
MainPage.xaml.csto bring up the code view. Alternately, you can right-click theMainPage.xamlfile and select View Code.Add the following statement to the top of the
MainPage.xaml.csfile:using System.Globalization;
Paste the following code in the
MainPage()constructor:PageTitle.Text = CultureInfo.CurrentCulture.ToString();
Press F5 to run the application. You should see a phone emulator screen that looks like the one in Figure 12-2.


Notice how the caption in Figure 12-2 reads "en-US." This caption represents two parts of the current Culture setting on Windows Phone 7. The first part—"en"—states that the English language is the current language on this Windows Phone 7 device (or device emulator in your case) and it is a part of an ISO standard to represent culture code associated with the language. The second part—"US"—states that the current locale is the United States, and indicates that dates, currency, and other region-specific items should be shown in the format that is native to people in the United States. That part is an ISO standard as well, to represent a subculture code associated with a country or region.
A concept of culture in .NET Framework refers to a set of user preferences specific to the user, such as dates, currency, and calendar format. Besides CurrentCulture, the CultureInfo class contains many properties that may be of interest to you as you internationalize your applications; you can find the full list at http://msdn.microsoft.com/en-us/library/system.globalization.cultureinfo_properties.aspx. For instance, you could have used the DisplayName property to show a friendlier description of the current culture (in your case, you would get "English (United States)." As mentioned, there is a lot of material to cover when it comes to internationalization—a good place to refer to for more information is the MSDN documentation of the System.Global namespace, located at http://msdn.microsoft.com/en-us/library/abeh092z.aspx.
You might think that the locale setting is of minor importance, yet it is extremely important to properly localize your application: in England, for instance, people speak English (certainly!), but, as mentioned, the numeric date format is "dd/mm/yyyy," where the "dd" is the numeric representation of the day, "mm" is the numeric representation of the month, and "yyyy" is the numeric representation of the year. Compare this to the United States, where people speak English as well, but for numerical date representations, the month comes first. In other words, it would be very time-consuming to keep track of all possible localization issues. In the end, you would very likely make mistakes. It's much easier to stand on the shoulders of giants who have thought through many internationalization issues and have made standard libraries and functions available for your use. Your main task is to make sure to use those libraries.
Suppose that you have built international support for only a portion of an application. What would happen when a user from a different country accesses features of an application that have not been internationalized? Will the application stop working, display a blank screen, etc.? The answer to this question lies in the concept of the .NET framework called culture hierarchy.
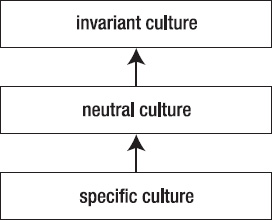
There are three types of cultures that you as a developer must be aware of: invariant, neutral, and specific. These cultures are arranged in a hierarchical manner, with invariant culture being at the top of the hierarchy, neutral in the middle, and specific culture at the bottom, as illustrated in Figure 12-3. When international users access Windows Phone 7 applications, the operating system starts at the bottom of this hierarchy and checks whether an application implements the specific culture of a given user. This check includes whether an application has the resources, such as text for menus and labels, which have been localized for the user's location. If such localized resources are not available, the system then moves up the culture hierarchy and checks whether there are provisions in the application for neutral cultures. Finally, if that check fails, the application defaults to the invariant culture, which is the same as English (US) culture.
For example, if a French-speaking user from Canada accesses Windows Phone 7 applications, the first thing the system checks is whether there are application resources implementing specific "fr-CA" culture. If that specific culture is not supported by an application, the system then performs a check of whether the neutral "fr" culture is supported. If the neutral culture is not supported, then the system defaults to the invariant culture, where none of the resources are localized. In this chapter, you will learn how to create resources for specific cultures, and let the .NET Framework do the heavy lifting of defaulting to neutral or invariant cultures when resources specific to users' culture are not available.
On Windows Phone 7, the System.Globalization.CultureInfo class contains all of the necessary information about the phone's current culture settings. In this section, you will write code to retrieve basic properties of the CultureInfo class, as well as code to change the current culture of the phone and to react to those changes. In real-world applications, you are not likely to adjust the current culture in code, since the culture setting should be fully controlled by the user.
In the following example, you will create a simple announcement of an upcoming event, and then, with a click of a button, adjust culture settings to properly display the date, time, and the cost of the event in a different region of the world—Spain. To accomplish that, you will instantiate a new CultureInfo class and set the current thread's CurrentCulture property to this new class. Later in this chapter, you will expand upon this example and make your event advertisement speak different languages without having to change the source code.
Note
You are probably wondering where and how the user would set Windows Phone 7 culture. On both the phone and the emulator, the culture is adjusted in Settings

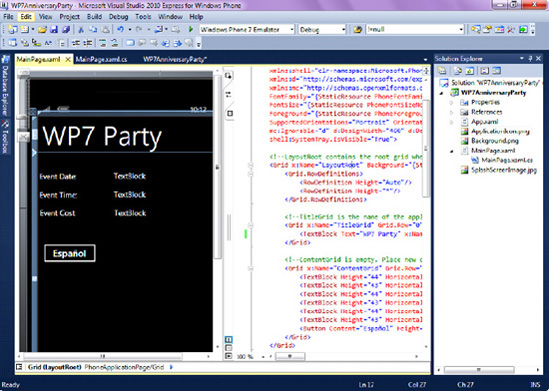
Start by creating a Visual Studio project and naming it WP7AnniversaryParty.
Double-click
MainPage.xamlin Solution Explorer to bring up the XAML designer window.For this first example, you will display the contents of just two fields on the screen: the name of the event as well as the event's date and time.
Remove one of two default textblocks automatically added to the design surface by Visual Studio. Highlight the textblock with MY APPLICATION text in it (either in XAML or on the design surface) and hit the Delete key.
Now let's add the additional six text box controls that you need. If the toolbox is not visible, either click the Toolbox button on the Visual Studio Application Bar or select View

Change the text of the three textblocks on the left to the following: Event Date, Event Time, and Event Cost, as shown in Figure 12-5.
Click on each textblock in the right column, press F4, and change the textblock names to txtEventDate, txtEventTime, and txtEventCost correspondingly.
Finally, add a button to the design surface and name it Español.
You should now end up with XAML code that matches the XAML shown in Listing 12-1 (you can simply copy and paste XAML code from the source code downloads for this chapter instead of adding elements to the design surface one-by-one, as you've done in the previous steps).
Example 12.1. WP7 Launch Party UI Code (XAML)
<Grid x:Name="LayoutRoot" Background="{StaticResource PhoneBackgroundBrush}">
        <Grid.RowDefinitions>
            <RowDefinition Height="Auto"/>
            <RowDefinition Height="*"/>
        </Grid.RowDefinitions>

        <!--TitleGrid is the name of the application and page title-->
        <Grid x:Name="TitleGrid" Grid.Row="0">
            <TextBlock Text="WP7 Party" x:Name="textBlockListTitle" Style="{StaticResource
PhoneTextTitle1Style}"/>
        </Grid>

        <!--ContentGrid is empty. Place new content here-->
        <Grid x:Name="ContentGrid" Grid.Row="1">
            <TextBlock Height="44" HorizontalAlignment="Left" Margin="204,48,0,0"
Name="txtEventDate" Text="TextBlock" VerticalAlignment="Top" Width="276" />
            <TextBlock Height="43" HorizontalAlignment="Left" Margin="5,49,0,0"
Name="textBlock1" Text="Event Date:" VerticalAlignment="Top" Width="193" />
            <TextBlock Height="44" HorizontalAlignment="Left" Margin="204,98,0,0"
Name="txtEventTime" Text="TextBlock" VerticalAlignment="Top" Width="276" />
            <TextBlock Height="43" HorizontalAlignment="Left" Margin="5,99,0,0"
Name="textBlock3" Text="Event Time:" VerticalAlignment="Top" Width="193" />
            <TextBlock Height="44" HorizontalAlignment="Left" Margin="205,146,0,0"
Name="txtEventCost" Text="TextBlock" VerticalAlignment="Top" Width="276" />
            <TextBlock Height="43" HorizontalAlignment="Left" Margin="6,147,0,0"
Name="textBlock4" Text="Event Cost:" VerticalAlignment="Top" Width="193" />
    <Button Content="Español" Height="70" HorizontalAlignment="Left" Margin="6,233,0,0"
Name="button1" VerticalAlignment="Top" Width="160" Click="button1_Click" />
        </Grid>
    </Grid>
Double-click
MainPage.xaml.csto bring up the code view. Alternately, you can right-click theMainPage.xamlfile and select View Code.Add the following statements to the very top of the page (right below the last using statement):
using System.Globalization;
using System.Threading;
Next, you will code the function that will populate event details and the function that toggles event locale. You will learn the internationalization concepts demonstrated in this function shortly, but for now add the code shown in Listing 12-2.
Example 12.2. ShowEventDetails and ToggleEventLocale functions (C#)
xsprivate void ShowEventDetails()
{
    textBlockListTitle.Text = "WP7 Party";
    //create the date of October 11, 2011 at 9:00 PM
    DateTime dtLaunchDate = new DateTime(2011, 10, 11, 21, 0, 0);
    //make the cost equal to $5
    decimal decEventCost = 5.0M;

    //ToString() can also return values in specified culture
    //txtEventDate.Text = dtLaunchDate.ToString("D");
    txtEventDate.Text = dtLaunchDate.ToString("D",
        Thread.CurrentThread.CurrentCulture);
    txtEventTime.Text = dtLaunchDate.ToString("T");

    txtEventCost.Text = decEventCost.ToString("C");
}

private void ToggleEventLocale()
{
    //default to English-US culture
    String cul = "en-US";

    if (button1.Content.ToString() == "Español")
    {
        //change the culture to Spanish
        cul = "es-ES";
    }
    else
    {
        cul = "en-US";
    }

    CultureInfo newCulture = new CultureInfo(cul);
    Thread.CurrentThread.CurrentCulture = newCulture;

    ShowEventDetails();
}
Now you will call a function to show event details right after the application loads.
Paste the call to the
ShowEventDetails()function in theMainPage()constructor to show event details in English when the application is launched:ShowEventDetails();
Finally, you need to add an event handler to handle the button click, which will toggle the current culture between English and Spanish. The best way to add it is to bring up
MainPage.xamlin design view and double-click the button.Add the following code:
private void button1_Click(object sender, RoutedEventArgs e)
{
    ToggleEventLocale();
}
Press F5 to run the application. Notice how the date, time, and cost are all shown in the familiar American format. If you press the Español button, you will see the date in Spanish, the time in the 24-hour format, and the cost in euros. The labels with Date, Time, and Cost did not change, however, since you have not made any localization provisions in your code for those. You will localize these resources in the next section of this chapter.
In the preceding example, there are a couple of interesting points worth discussing in more detail. The first one is how you switched from one culture to another in code. To accomplish that, you instantiated a new CultureInfo class and set the current thread's CurrentCulture property to this new class. During the instantiation of the CultureInfo class, you passed a string to its constructor representing a specific culture ("es-ES" for Spanish and "en-US" for American English). The second important point is the illustration of the use of standard formatting constructs in your code to make internationalizing your application easier. For example, let's put the following line of code at the end of the ShowEventDetails() function:
txtEventDate.Text = dtLaunchDate.ToString("MM/dd/yyyy");Now when you run the application, notice how the date will be displayed as "11/10/2011" for both Spanish and English versions of your event. This certainly is confusing for residents of Spain, who would think that the Windows Phone 7 anniversary date is actually on November 10, 2011. Remember to use standard formatting options for all UI elements—in the case of the date, the standard formatting you have used with the following line of code to show the "long date representation" is certainly more appropriate:
txtEventDate.Text = dtLaunchDate.ToString("D");The third and final important point in the previous example is the ease of switching specific cultures on Windows Phone 7. If you pass "es-MX" instead of "es-ES" into the CultureInfo() constructor in the ToggleEventLocale() function, you can still see the date translated into the Spanish language, but the currency and time are formatted according to the Mexican standard and not the standard of Spain.
Assume now that you have been diligently designing your application for international markets: you have allowed enough space on the user interface for more verbose languages, and you have used only standard formatting options for date, time, and currency values. You still have to perform translation of the application interface and resources to other languages. This could be, certainly, the most labor-intensive part of internationalizing your application.
As mentioned, the application should be flexible enough to function in different locales without the need for code change and recompilation. That means that all resources required for proper functioning of the application need to be located outside the source code of an application and loaded on demand in response to request for culture-specific elements. The location of those resources are the resource-only files, or *.resx files. In this section's example, you will enhance your WP7 Anniversary Party announcement application with the use of .resx files.
Note
Large resource files may take some time to load on the Windows Phone 7 device. However, according to the Windows Phone 7 Application Certification Requirements document, a Windows Phone 7 application must render its first screen within five seconds of launch. Make sure to always include a splash screen image within the root of your package submitted to the Marketplace (see Chapter 19 for more details about the Marketplace). This splash screen image can be any .jpg file of your choosing named SplashScreenImage.jpg. Even with the splash screen image, however, be aware that the Microsoft Certification Requirements document further states that an application must be responsive to user input within 20 seconds after its launch—make sure to use resource files diligently so they don't unnecessarily slow down your application.
One benefit of using .resx files is that Windows Phone 7 will automatically find and use the resource file appropriate for the user's locale based on the current user's culture settings. Another benefit of resource files comes from the concept of culture hierarchy mentioned previously—.NET Framework provides a default fallback mechanism (i.e., going one level up in the culture hierarchy) for those resources that have not been localized. Also, .resx files are easily parseable by external tools, since they are simply XML files. This allows easy editing of those files by third-parties (such as translation services).
Note
Throughout this book, you will see references to .NET Framework on Windows Phone 7. To be completely accurate, however, it is the compact version of .NET Framework (.NETCF) that powers Windows Phone 7. Compact .NET Framework is a portable version of the full .NET Framework, and it has a much smaller size and footprint to accommodate smaller devices. The first version of Windows Phone 7 runs .NETCF version 3.7. So whenever you encounter a reference to .NET Framework in this book, remember that the reference is really to the .NETCF 3.7 or later.
Unless it's already open, open the WP7AnniversaryParty solution.
Right-click the WP7LaunchParty project and select Add
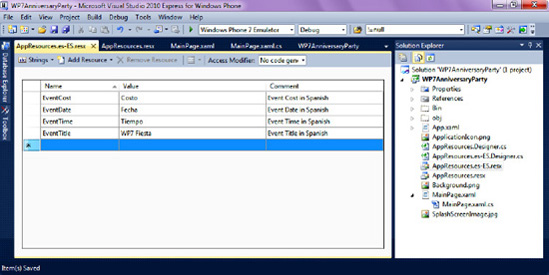
This resource file will contain the values for English-US culture. Name the resource file
AppResources.resxand click Add.Remember the discussion of culture hierarchies earlier in this chapter? The fact that your resource file does not contain any locale information in the file name (unlike the Spanish one that you will be creating shortly) makes this an invariant culture resource file—the file that will be shown if no locale-specific resource files are found on the device.
Double-click the
AppResources.resxfile to bring up an empty table. Next, add four entries to that table for Event Title, Event Date, Event Time, and Cost, all in English, as shown in Figure 12-6.Note that the contents of the first and second columns are extremely important: the first one contains the key that the code will use to reference the element, and it must be unique in this resource file. The second column contains the value, or the actual content that will be displayed on the UI at runtime. The third column is useful, but not essential: you can provide descriptive comments about each value in this column.
You will now add a resource file for Spanish translation of the user interface elements.
Right-click the WP7LaunchParty project and select Add
Name the resource file
AppResources.es-ES.resxand click Add.Note the "es-ES" portion of the file name—it is extremely important to name resource files in accordance with the specific cultures they represent. In your case, you will provide Spanish (spoken in Spain and not Latin America, for example) translation of the user interface, hence the "es-ES" in the resources file name. If you wanted to add German (spoken in Germany and not Austria, for example) translation as well, your resource file would have the name
AppResource.de-DE.resx.Add four entries for Event Title, Event Date, Event Time, and Cost in Spanish, as shown in Figure 12-7.
Note
The translations are approximate and are used for demonstrative purposes only—please forgive the authors if we are not 100 percent accurate.
You need to rename the textblocks used for captions in your application so that you can easily refer to them in code. Bring up
MainPage.xamland change textBlock1 to txtEventDateCaption, textBlock3 to txtEventTimeCaption, and textBlock4 to txtEventCostCaption. You should end up with XAML that matches the following markup:<Grid x:Name="ContentGrid" Grid.Row="1"> <TextBlock Height="44" HorizontalAlignment="Left" Margin="204,48,0,0" Name="txtEventDate" Text="TextBlock" VerticalAlignment="Top" Width="276" /> <TextBlock Height="43" HorizontalAlignment="Left" Margin="5,49,0,0" Name="txtEventDateCaption" Text="Date:" VerticalAlignment="Top" Width="193" /> <TextBlock Height="44" HorizontalAlignment="Left" Margin="204,98,0,0" Name="txtEventTime" Text="TextBlock" VerticalAlignment="Top" Width="276" /> <TextBlock Height="43" HorizontalAlignment="Left" Margin="5,99,0,0" Name="txtEventTimeCaption" Text="Time:" VerticalAlignment="Top" Width="193" /><TextBlock Height="44" HorizontalAlignment="Left" Margin="205,146,0,0" Name="txtEventCost" Text="TextBlock" VerticalAlignment="Top" Width="276" /> <TextBlock Height="43" HorizontalAlignment="Left" Margin="6,147,0,0" Name="txtEventCostCaption" Text="Cost:" VerticalAlignment="Top" Width="193" /> <Button Content="Español" Height="70" HorizontalAlignment="Left" Margin="6,233,0,0" Name="button1" VerticalAlignment="Top" Width="160" Click="button1_Click" /> </Grid>At the top of the page, add the following two statements:
using System.Resources;
using System.Reflection;
In
MainPage.xaml.cs, change theShowEventDetails()function to match the code chunk shown here (note the commented out setting of default (English) caption):private void ShowEventDetails() { //textBlockListTitle.Text = "WP7 Party"; ResourceManager rm = new ResourceManager("WP7AnniversaryParty.AppResources", Assembly.GetExecutingAssembly()); textBlockListTitle.Text = rm.GetString("EventTitle"); txtEventCostCaption.Text = rm.GetString("EventCost"); txtEventDateCaption.Text = rm.GetString("EventDate"); txtEventTimeCaption.Text = rm.GetString("EventTime"); //create the date of November 6, 2010 at 9:00 PM DateTime dtLaunchDate = new DateTime(2010, 11, 6, 21, 0, 0); //make the cost equal to $5 decimal decEventCost = 5.0M; txtEventDate.Text = dtLaunchDate.ToString("D"); txtEventTime.Text = dtLaunchDate.ToString("T"); txtEventCost.Text = decEventCost.ToString("C"); }Press F5 to compile and run the application. Click the button to toggle between Spanish and English. Do you see all captions and the event title being properly translated? Probably not, since you are missing one critical step: you have not indicated that your project must support different locales and which locales it must support. You will do that in the next step.
It's unfortunate that, at present time, you must edit a project file in the text editor (instead of Visual Studio) to indicate which locales your application supports. Open Windows Explorer and navigate to the folder where the
WP7LaunchParty.csprojfile is located. OpenWP7LaunchParty.csprojin any text editor (Notepad is good) and find the<SupportedCultures>node. More than likely, that node will not contain any elements. Edit that node to look like the two line of text below:<SupportedCultures>es-ES; </SupportedCultures>
Were you supporting more than one culture, you would include all of them in this node with each culture code separated by a semicolon. For example, if you were supporting German and Russian translations as well, you would put
es-ES;de-DE;ru-RU;in the<SuportedCultures>element.Save
WP7AnniversaryParty.csprojin the text editor. Visual Studio should detect an external change to this file and ask you if you would like to reload the project. Click Yes.Add the following line of code to the ToggleEventLocale method, right below the
Thread.CurrentThread.CurrentCulture = newCulture;statement:Thread.CurrentThread.CurrentUICulture = newCulture;
Press F5 to run the application.

Since you have provided a non-locale specific (invariant) file, AppResources.resx, with English (US) captions for the invitation text in it, you see a US English interface upon launching the application. Once you click the button to toggle the application into Spanish, you should see the event title and captions translated into the Spanish language, as shown in Figure 12-8. The cool part about this translation is that it's completely dynamic—the string values are loaded from the resource file instead of being hardcoded!

If you examine Figure 12-8 carefully, you will notice a couple of things. First, the date of the event almost ran off the screen in Spanish—a clear mistake on your part for not allowing an extra 40 percent of space (by perhaps allowing text wrapping) inside that date value for languages that are more verbose than English. Second, the caption for Cost did not translate into Spanish—it should be Costo in Spanish, not Cost. What's going on here?
The reason for this is that in AppResources.es-ES.resx, there is no entry named EventCost. There is an entry with the name Cost, but that is not the name you are referring to from code. This mistake is a good demonstration of the application's cultural fallback: there was no entry in the Spanish version for EventCost, so the application "fell back" to the default language (English-US) to represent a given caption—the raison d'être of the resource files!
Correct this typo by double-clicking the AppResources.es-ES.resx file and changing the name of the Cost entry to EventCost. Now re-run the application. You should see the proper caption, Costo, for the Spanish version of your announcement.
Note
The MSDN documentation for internationalizing Windows Phone 7 applications proposes an entirely different approach than the one we've advocated in this example. MSDN examples encourage you to add a separate class to return resources. In this example, however, we have simplified things a bit and used the ResourceManager class to locate resources within the resource files.
The main reason our example differs from the approach advocated by the MSDN documentation is that we are dynamically (i.e., in code) changing the culture of an application. We needed to do this for demonstration purposes, since changing local culture is a bit cumbersome if done in the emulator. Dynamic rebinding of elements (to toggle captions between English and Spanish) would be a bit more involved. The addition of a separate class and references to that class, as illustrated in the MSDN documentation, could have also taken away from the main points illustrated during the example. But we could certainly have used an approach other than using the ResourceManager class to accomplish the localization of the application.
In this chapter, you learned how to prepared an application to work in parts of the world other than the United States by using stored culture information and the ToString function to determine how to display data; ISO culture codes to reset an app's CulturalInfo object to the user's preferred language and country environment; and resource files to provide translated versions of field names, documentation, and even media. You learned what specific issues to consider when developing applications for international markets, such as dates, numbers, and currency translations between locales; you also learned how to translate application resources via Visual Studio resource files.
In the next chapter, you will take a look at how to persist files and settings on Windows Phone 7 via the use of local storage. You will save images and application settings and then load them on demand from a local store on Windows Phone 7.