
Lesson 32
Windows Phone Apps
This lesson explains how you can build Windows Phone applications. Note that you don't actually need to upload these applications to the Windows Store. You can build and run them locally on your phone if you like.
Building Apps
Windows Phone apps are similar to Windows Store apps in several ways. Both use XAML to define their user interfaces. Both can use C# code behind the user interface to do whatever it is that makes the app useful. Both also require that you define images of various sizes to represent the app. (More on that later.)
In addition to installing Visual Studio, you need to take a few other steps before you can start building phone apps. First download the Windows Software Development Kit (SDK) for your version of Windows. The Windows 8.1 version is available at msdn.microsoft.com/windows/desktop/bg162891.aspx. The Windows 10 version is at dev.windows.com/downloads/windows-10-sdk.
This SDK contains tools you can use to build phone and Windows Store apps. It's a big download, ranging in size from around 10MB to 1GB depending on your configuration, so be sure you have a high-speed Internet connection.
As is the case with Windows Store development, you'll need a Microsoft account (signup.live.com/signup.aspx) and a Windows Dev Center developer account (dev.windows.com/join).
After you install the SDK and sign up for Microsoft and Dev Center accounts, you can create new phone apps by opening Visual Studio's File menu, selecting New ![]() Project, and using the New Project dialog shown in Figure 32.1. Select the Windows Phone Apps category on the left to see the phone templates.
Project, and using the New Project dialog shown in Figure 32.1. Select the Windows Phone Apps category on the left to see the phone templates.

At this point you can build an app. At some point you'll want to test your app on your phone, so you may as well set up your phone so you can use it for testing now while you're preparing your development environment.
Normally you install apps from the Windows Store. An app in the store has been examined by Microsoft so it shouldn't contain viruses and other malware. To prevent people from easily installing viruses on other people's phones, you cannot simply download an app directly to a phone. First you need to unlock the phone for development.
To do that, connect your phone to your development computer with the USB cable that came with your phone. Turn the phone on and unlock its screen (if you have password protection on the phone).
Next use your computer's search tool to find the app called Windows Phone Developer Registration. (From the desktop, move the mouse to the lower-right corner, move the mouse up, and click the Search tool.)
In the dialog that appears, click the Register button. The dialog will ask you to log in to your Microsoft account and verify that it's associated with your developer account. When you're finished, you should be able to download apps to your phone. (For more details about registering your phone, including troubleshooting information, see msdn.microsoft.com/library/windows/apps/ff769508.)
At this point you can add XAML code and C# code behind it as usual. Writing a Windows Phone app is very similar to writing a Windows Store app, although a phone can do things that a computer can't so some differences exist. For example, phones may have cameras, orientation sensors, multi-touch capable screens, location services, near-field communication (NFC), Bluetooth, and more. Using those capabilities is a fairly advanced topic so I won't say any more about them in this book.
After you create your app, you have two options for testing it: running in an emulator and running on your phone. To select an option, open the Run dropdown in the Standard toolbar shown in Figure 32.2. Select one of the emulators or select Device to run on a phone.

To run in an emulator, select an emulator from the dropdown shown in Figure 32.2 and press F5 to run the program as usual. For the emulator to work, your computer needs to be running Hyper-V, a tool that allows your computer to run virtual machines.
Unfortunately Hyper-V requires you to have Windows Professional installed. If you don't have Windows Professional installed, you can still run your app on your phone. Select Device from the dropdown, use a USB cable to plug your phone into the computer, turn the phone on and unlock its screen, and press F5 to run the app. Visual Studio will download the app to your phone and run it.
When you're done testing, use the Debug menu's Stop Debugging command or click the Stop Debugging button on the Debug toolbar.
After you run an app on your phone, it will remain installed on the phone so you can use it later even if the phone is disconnected from the computer. You can find the app in the phone's list of installed apps. Press and hold the app to pin it to the Start screen or to uninstall it.
If you pin the app to the Start screen, you can press and hold its tile to change the tile size or unpin it.
Here's a summary of the steps you use to build and test an app:
- (Optional) Install Hyper-V if you are using Windows Professional or Enterprise edition and you want to run Windows Phone apps in the device emulator. For instructions, search the Internet or see
www.howtogeek.com/196158/how-to-create-and-run-virtual-machines-with-hyper-v/. - Install the Windows Software Development Kit (SDK) for Windows 8.1.
- Register for a Microsoft account.
- Register for a Dev Center account.
- Unlock your phone for development.
- Write the app.
- To test in an emulator, select an emulator from the dropdown and run the app.
- To test on a phone, connect the phone, turn the phone on, unlock the phone's screen, and run the app.
The following sections provide some more details about the kinds of apps you can build and the images you need to set to make them appear properly.
Navigation Style
Like Windows Store apps, Windows Phone apps cover the entire device. You can switch between different apps, but you can't resize and rearrange the apps to view more than one on the screen at the same time.
Because they display a single window at a time, phone apps typically use a simpler navigational model than desktop applications. Some apps allow you to use a back button to move to an earlier screen, but they don't allow you to easily jump from screen to screen.
Phone apps also typically don't provide buttons or menu items that let the user close them. Instead the user opens or navigates to another app and leaves yours sitting in the background. Later the device closes your app if it needs to free up memory.
Because these apps cover the entire device, you must arrange the controls to take best advantage of whatever space is available. You don't have control over how large the user's screen is, so you should use container controls such as Grid and StackPanel to get the most out of the space you have.
App Styles
Visual Studio includes templates for building several different styles of Windows Phone apps. The following list summarizes the most common kinds of templates:
- Blank—This kind of app displays a single window with no navigation to other windows. It's similar to a one-window desktop application without dialogs.
- Hub—This kind of app uses a
Hubcontrol. The mainHubcontrol displays a horizontally scrolling window divided into sections holding different kinds of information. You can tap a section heading to open a new page that provides details about that section. - Pivot—This kind of app displays a collection of list categories. When a category is selected, you see its list of items below it. You can scroll horizontally through the different categories. This template is useful for displaying different views of data. For example, my phone displays Outlook mail in a pivot view with categories All, Unread, and Urgent.
- WebView—This kind of app uses the
WebViewcontrol. That control lets an app display a piece of web content, although Microsoft makes it clear that this is not a full-featured web browser. For example, you can use aWebViewcontrol to display frequently updated information rather than make new builds to update the app's data.
If you use one of these templates to create a new project, the app comes pre-loaded with sample data so you can see what the finished app will look like. (In fact, you'll probably get a better sense of how the different templates work if you just create some sample projects and run them rather than staring at the previous descriptions.)
App Images
Like Windows Store apps, Windows Phone apps may be represented by images in many different sizes. For example, the phone's Start screen can display your app's tile in Small, Wide, and Large sizes.
The kinds of images are grouped into categories, each of which includes several versions at different sizes. If you include one image in a category and omit the others, then that image is scaled if necessary to provide the others.
As is the case with Windows Phone apps, automatic scaling is better than nothing, but sometimes it can produce poor results. For example, if you provide a relatively large image that contains text, when it's scaled down to a small size the text may turn into a fuzzy blur. To provide the best results, you should create separate images at several different scales.
The images you include in a project must match the required dimensions exactly. For example, you can't use a 100×100 pixel image in place of a 99×99 pixel image.
Table 32.1 lists the kinds of images you can include in a Windows Phone app. The bold entries in the Sizes column indicate required images.
| Category | Sizes |
| Square 44×44 Logo | 106 × 106 62 × 62 44 × 44 |
| Square 71×71 Logo | 170 × 170 99 × 99 71 × 71 |
| Square 150×150 Logo | 360 × 360 210 × 210 150 × 150 |
| Wide 310×150 Logo | 744 × 360 434 × 210 310 × 150 |
| Store Logo | 120 × 120 70 × 70 50 × 50 |
| Splash Screen | 1152 × 1920 672 × 1120 480 × 800 |
When you create your images, give them suggestive names such as MyApp106×106.png so you can tell what they are for.
After you've created the images, you need to attach them to the project. To do that, open Solution Explorer and double click Package.appxmanifest to open the Manifest Editor shown in Figure 32.3. This editor lets you select the orientations that your app allows. For example, if you only want your app to be available when the user is holding the phone in the portrait orientation, check the Portrait box.

To set the app's images, click the Visual Assets tab to see the display shown in Figure 32.4. In the category list on the left, you can click All Image Assets to see a list of everything, or you can click a category to see only the images in that category. For example, Figure 32.4 shows an app's Square 71×71 Logo category.
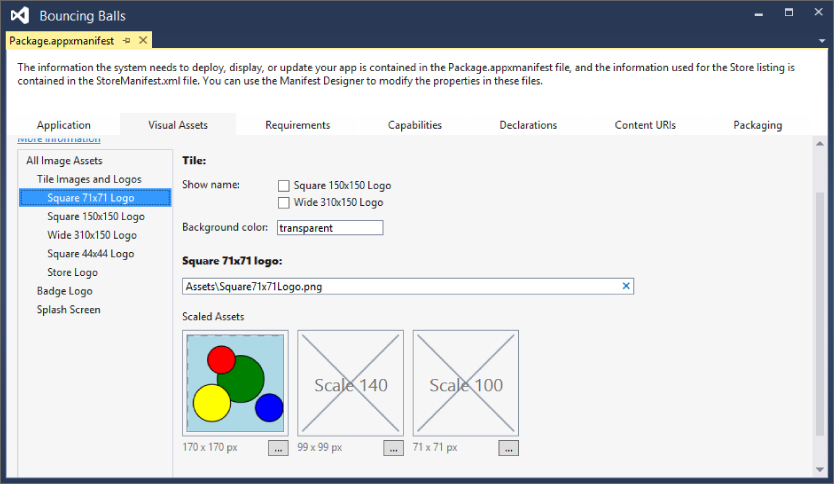
Use the ellipses below the image types to select an image for that type.
Options above the images let you decide whether the phone should display the app's name on top of the large or wide tile.
A third option lets you set the tile's background color. If you set this color to transparent and the image you use for the tile has a transparent background, then the phone's Start screen image will display behind the tile.
Try It
In this Try It, you build a Windows Phone interest calculator similar to the app you built for Exercise 31-3.
Lesson Requirements
In this lesson, you:
- Start a new blank Windows Phone app.
- Open the
Package.appxmanifestfile and allow the program to run only in the Landscape and Landscape-flipped orientations. - In the Window Designer, open the Design menu and select Device Window. In the Device Window tab, set the designer's orientation to Landscape.
- Copy the XAML and C# code you wrote for Exercise 31-3 into the new project and fix it up so it fits nicely in the designer. You will probably need to make the fonts smaller to make everything fit.
- Test the app in an emulator or on a phone.
Step-by-Step
- Start a new blank Windows Phone app.
- This is straightforward.
- Open the
Package.appxmanifestfile and allow the program to run only in the Landscape and Landscape-flipped orientations.- This is also straightforward.
- In the Window Designer, open the Design menu and select Device Window. In the Device Window tab, set the designer's orientation to Landscape.
- This is straightforward assuming you can find the Device Window tab. It normally appears as a tab with the Toolbox.
- Copy the XAML and C# code you wrote for Exercise 31-3 into the new project and fix it up so it fits nicely in the designer. You will probably need to make the fonts smaller to make everything fit.
- Copying the XAML and C# is straightforward.
- You should experiment with the font sizes and rearrange controls slightly if necessary to make everything fit on the designer. I set the
TextBlock,TextBox, andButton FontSizeproperties to 12. (This is a situation where XAMLStyleobjects come in handy.)
- Test the app in an emulator or on a phone.
- This is straightforward.
Exercises
- Apps that look good on a tablet or desktop system don't always look good on a phone. On my phone, the text displayed by the Try It is so small I can barely read it.
Copy the app you wrote for the Try It and modify it to make it easier to read. Move the
TextBlocks (used as labels) so they sit above their correspondingTextBoxes. Then make theTextBoxandListBoxfonts bigger so they are easier to read. (Hint: You can give the resultsStackPanelaResourcessection that defines aStyleto set theFontSizeproperty for the resultTextBlocks.) - [Hard] Copy the app you wrote for Exercise 1 and modify it so it displays its warning message in a separate
Gridcontrol as described in Exercise 31-4. - Copy the app you wrote for Exercise 2, add appropriate images to it, and make it display its name on its wide and large tiles.
- Make a bouncing ball app similar to the Windows Store app you built for the Try It in Lesson 31.
- Run the app you wrote for Exercise 4 and see what happens if you change the phone's orientation while it's running. The result is distracting and doesn't make the app more useful (not that it's particularly useful to begin with), so copy the project and modify it so it only allows the Portrait orientation.
- [Games] Copy the app you wrote for Exercise 5 and modify it so when the user taps a ball, that ball disappears with a popping sound. When the user taps the last ball, make the app close. Hints:
- Catch the main
Canvas'sTappedevent and usee.GetPositionto get the tap's position. Then loop through the balls and determine whether the user tapped one. - To make removing balls easy, store them in a
List<Ball>. - Check the balls in top-to-bottom order so the app removes the topmost ball that was clicked.
- Feel free to add other sounds if you like such as a “tap misses” sound and a “game over” sound.
- Catch the main
- [Hard] Make a tip calculator similar to the one shown in Figure 32.5. (This is a screen shot of the designer not the app running in the emulator because my system doesn't have Windows Professional installed and therefore can't run Hyper-V.)

When the user taps a button or adjusts the percentage
Slider, the app should display the corresponding tip amount in theTextBlockabove theSlider. (Normally I would place the outputTextBlockbelow all of the other controls, but during testing I found that my finger obscured the result when I adjusted the percentage so this layout worked much better.) Hints:- Only allow the Portrait orientation.
- Use a
TotalCostvariable to track the value entered by the user. - When the user taps a digit button, multiply
TotalCostby 10 and add the new digit's value divided by 100. Then displayTotalCostand the calculated tip amount. - When the user clicks the X button, reset
TotalCostto 0. - When the user adjusts the percentage
Slider, recalculate and display the new tip amount. - Protect the app from the user entering very large values such as $1 billion. (I don't think people tip when they buy soccer stadiums or nuclear submarines anyway.)
- Copy the app you built for Exercise 7, add appropriate images to it, and make it display its name on its wide and large tiles.
- Make a simple score-keeping application like the one shown in Figure 32.6. The user should be able to enter team names in the
TextBoxes at the top and use the arrow buttons to increase or decrease the scores. If the user taps the 0-0 button, reset both scores to 0. (Hint: Only allow the Landscape and Landscape-flipped orientations.)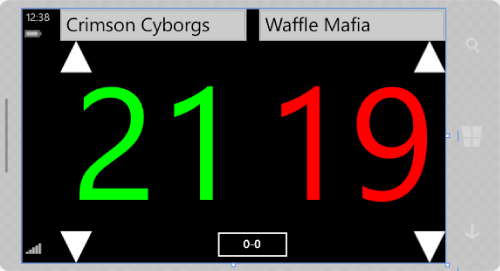
- Copy the app you built for Exercise 9, add appropriate images to it, and make it display its name on its wide and large tiles. Use images of volleyballs, flaming soccer balls, racing ducks, or whatever else is appropriate for your favorite sport.